Silvercrest SFE 450 D2 Operating Instructions Manual
- Kategorie
- Safthersteller
- Typ
- Operating Instructions Manual

JUICER SFE 450 D2
IAN 284970
JUICER
Operating instructions
SOKOVNIK
Navodilo za uporabo
ODŠŤAVOVAČ
Návod na obsluhu
GYÜMÖLCSCENTRIFUGA
Kezelési útmutató
ODŠŤAVŇOVAČ
Návod k obsluze
ENTSAFTER
Bedienungsanleitung
CPe284970 Entsafter_Cover_LB4.indd 2 12.12.16 09:16

English..................................................................................... 2
Magyar ................................................................................. 20
Slovenšêina ........................................................................... 38
éesky.................................................................................... 54
Slovenêina............................................................................. 70
Deutsch ................................................................................. 88
ID: SFE 450 D2_16_V1.6
__CPE284970_Fruchtentsafter_B4.book Seite 1 Donnerstag, 1. Dezember 2016 8:35 20

18
15
15
16
18
1515
5
7
A
1
2
3
4
8
5
10
14
13
15
16
18
7
12
17
11
9
6
19
1
12
2
18
5
4
6
B
C
E
D
I
F
G
H
K
2
3
10
11
20
8
1
12
2
19
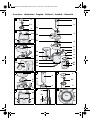
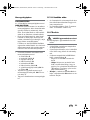
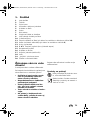
Overview / Áttekintés / Pregled / Pįehled / PrehĘad / Übersicht
__CPE284970_Fruchtentsafter_B4.book Seite 2 Donnerstag, 1. Dezember 2016 8:35 20

2
GB
Contents
1. Overview ........................................................................................ 3
2. Intended purpose ............................................................................ 4
3. Safety information ........................................................................... 4
4. Items supplied ................................................................................. 7
5. How to use ...................................................................................... 7
5.1 Disassembly......................................................................................... 8
5.2 Assembly............................................................................................. 8
6. Preparing food ................................................................................ 9
7. Operation ........................................................................................ 9
7.1 General............................................................................................... 9
7.2 Interruptions during juice extraction....................................................... 10
8. Cleaning and storing ..................................................................... 11
8.1 Disassembly....................................................................................... 12
8.2 Cleaning............................................................................................ 12
8.3 After cleaning..................................................................................... 13
8.4 Storage ............................................................................................. 13
9. Disposal ........................................................................................ 14
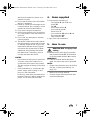
10.Troubleshooting ............................................................................. 14
11.Technical specifications .................................................................. 15
12.Recipes .......................................................................................... 15
13.Warranty of the HOYER Handel GmbH ........................................... 17
__CPE284970_Fruchtentsafter_B4.book Seite 2 Donnerstag, 1. Dezember 2016 8:35 20

3
GB
1. Overview
1 Lid of the food pusher
2 Food pusher
3 Food chute
4 Micro-mesh strainer with chopping unit
5 Juice collector pan
6 Drive unit
7 Motor block
8 Power cable with mains plug
9 Lid of the juice container
10 Foam separator
11 Juice container (stored inside pulp container|16 upon delivery)
12 Brush (for cleaning the micro-mesh strainer) (stored inside food pusher|2 upon deliv-
ery)
13 Suction feet
14 1 0 2 On/off switch (with two speed settings)
15 Safety catch
16 Pulp container
17 Chopping unit (small blades)
18 Lid
19 “Ridge” in food chute
20 Cable spool
Thank you for your trust!
Congratulations on your new juice extractor.
For a safe handling of the device and in or-
der to get to know the entire scope of fea-
tures:
• Thoroughly read these operat-
ing instructions prior to initial
commissioning.
• Above all, observe the safety in-
structions!
• The device should only be used
as described in these operating
instructions.
• Keep these operating instruc-
tions for reference.
• If you pass the device on to
someone else, please include
these operating instructions.
We hope you enjoy your new juice extrac-
tor!
Symbols on your appliance
Never reach into the food chute
while the micro-mesh strainer is ro-
tating.
The food-safe material of devices
with this symbol will not change the
taste or smell of food.
__CPE284970_Fruchtentsafter_B4.book Seite 3 Donnerstag, 1. Dezember 2016 8:35 20

4
GB
2. Intended purpose
The device is intended for extracting juice
from prepared fruit and vegetables.
The device is designed for use in private
households. The device must only be used in-
doors.
This device must not be used for commercial
purposes.
Foreseeable misuse
WARNING! Risk of material dam-
age!
~ The device must not be used for very
hard fruit and vegetables (e.g. sugar-
cane) or for very fibrous fruits/vegeta-
bles (e.g. rhubarb, bananas, papayas,
avocados, figs).
~ Thick or firm skins (e.g. of citrus fruits,
pineapples) and stones of stone fruits
(e.g. cherries, peaches, apricots) must
be removed before juice extraction.
3. Safety information
Warnings
If necessary, the following warnings will be
used in these operating instructions:
DANGER! High risk: failure to ob-
serve this warning may result in inju-
ry to life and limb.
WARNING! Moderate risk: failure to ob-
serve this warning may result in injury or se-
rious material damage.
CAUTION: low risk: failure to observe this
warning may result in minor injury or mate-
rial damage.
NOTE: circumstances and specifics that
must be observed when handling the de-
vice.
Instructions for safe operation
~ Children must be prevented from using this device.
~ This device with its power cable must be stored out of the reach
of children.
~ Cleaning and user maintenance must not be performed by chil-
dren.
~ Children must be supervised to ensure that they do not play with
the device.
~ This device can be used by people with restricted physical, sen-
sory or intellectual abilities or people without adequate experi-
ence and/or understanding if they are supervised or instructed
on how to use this device safely and if they are aware of the re-
sulting risks.
~ Never reach into the food chute while the micro-mesh strainer is
rotating. Never hold spoons or similar objects against the rotat-
ing micro-mesh strainer. Also keep long hair and loose clothing
well away from the rotating micro-mesh strainer.
__CPE284970_Fruchtentsafter_B4.book Seite 4 Donnerstag, 1. Dezember 2016 8:35 20

5
GB
~ The micro-mesh strainer keeps on turning for a while after the de-
vice has been switched off. Wait until it has stopped turning be-
fore opening the device.
~ The small blades at the bottom of the micro-mesh strainer are
sharp. Please be very careful when handling them. When clean-
ing by hand, best results are achieved by using the provided
cleaning brush.
~ The device must be disconnected from the mains if left unattend-
ed and prior to assembly, disassembly or cleaning.
~ If the rotating micro-mesh strainer is damaged, the device may
not be operated.
~ This device is not intended to be operated using an external timer
clock or a separate remote control system.
~ If the power cable of this device should become damaged, it
must be replaced by the manufacturer, the manufacturer's custom-
er service department or a similarly qualified specialist, in order
to avoid any hazards.
~ Prior to replacement of parts or attachments which move when in
operation, the device must be switched off and disconnected
from the mains.
~ Please take note of the chapter on cleaning (see “Cleaning and
storing” on page 11).
DANGER for children
~ Packing materials are not children's
toys. Children should not be allowed to
play with the plastic bags: there is a risk
of suffocation.
~ Please ensure that children are not able
to pull the device down from the work
surface with the power cable.
~ Keep the device out of the reach of chil-
dren.
DANGER to and from pets
and livestock
~ Electrical devices can represent a haz-
ard to pets and livestock. In addition,
animals can also cause damage to the
device. For this reason you should keep
animals away from electrical devices at
all times.
DANGER! Risk of electric
shock due to moisture
~ The motor block, the power cable and
the mains plug must not be immersed in
water or any other liquids.
~ Protect the device from moisture, water
drops and water spray.
~ If liquid gets into the motor block, re-
move the mains plug immediately. Have
the device checked before reusing.
~ The device should only be used in dry
indoor rooms, not outside and not near
water-filled vessels, e.g. sinks.
~ Never touch the device with wet hands.
__CPE284970_Fruchtentsafter_B4.book Seite 5 Donnerstag, 1. Dezember 2016 8:35 20

6
GB
~ If the device falls into water, disconnect
the mains plug immediately. Only then
is it safe to retrieve the device.
DANGER! Risk of electric
shock
~ Only plug the mains plug into the wall
socket after the device has been com-
pletely assembled.
~ Only connect the mains plug to a prop-
erly installed and easily accessible wall
socket whose voltage corresponds to
the specifications on the rating plate.
The wall socket must continue to be eas-
ily accessible after the device is
plugged in.
~ Ensure that the power cable cannot be
damaged by sharp edges or hot points.
Do not wrap the power cable around
the device.
~ The device is not fully disconnected from
the power supply, even after it is
switched off. In order to fully disconnect
it, pull out the mains plug.
~ When using the device, ensure that the
power cable cannot be trapped or
crushed.
~ When removing the mains plug, always
pull the plug and never the cable.
~ Disconnect the mains plug from the wall
socket…
… if there is a fault,
… when you are not using the device,
… when you leave the device unattend-
ed,
… before assembly and disassembly,
… before you clean the device and
… during thunderstorms.
~ To avoid any risk, do not make modifi-
cations to the device.
~ Do not use the device if there is visible
damage to the device or the power ca-
ble.
DANGER! Risk of injury
from cutting
~ Never reach into the food chute while
the micro-mesh strainer is rotating. Nev-
er hold spoons or similar objects
against the rotating micro-mesh strainer.
Also keep long hair and loose clothing
well away from the rotating micro-mesh
strainer.
~ The micro-mesh strainer keeps on turn-
ing for a while after the device has
been switched off. Wait until it has
stopped turning before opening the de-
vice.
~ The small blades at the bottom of the mi-
cro-mesh strainer are sharp. Please be
very careful when handling them.
When cleaning by hand, best results
are achieved by using the provided
cleaning brush.
FIRE HAZARD!
~ Never switch on the device at the same
time as there is another device with a
high power consumption attached to the
same multi-socket power strip.
~ When using an extension cable, this
must correspond to the applicable safe-
ty regulations.
WARNING! Risk of material
damage
~ The device is designed for a maximum
operating time of 30 minutes without in-
terruption. After this period of opera-
tion, the device must remain switched
off until the motor block has cooled
down completely.
~ In order to prevent damage to the de-
vice, please do not apply too much
pressure to the food pusher. Interrupt the
juice extraction process immediately if
the micro-mesh strainer stops turning or
is turning with difficulty. Unplug the
mains plug to check whether there is an
obstruction blocking the micro-mesh
__CPE284970_Fruchtentsafter_B4.book Seite 6 Donnerstag, 1. Dezember 2016 8:35 20

7
GB
strainer and whether the device is as-
sembled correctly.
~ Do not use the device if the micro-mesh
strainer is damaged.
~ Please be careful not to damage the mi-
cro-mesh strainer. Do not apply to much
pressure to the micro-mesh strainer.
~ Only use the original accessories.
~ Never place the device on hot surfaces
(e.g. hob plates) or near heat sources or
open fire.
~ Do not use any astringent or abrasive
cleaning agents.
~ The device is fitted with non-slip plastic
feet. As furniture is coated with a variety
of different varnishes and acrylics and
treated with different cleaning agents,
we cannot rule out that some of these
substances could damage and soften
the rubber feet. If necessary, place a
non-slip mat under the device.
NOTES:
• Do not store the fruit juice for more than
24 hours in the juice container or in
contact with other parts of the product.
This also applies to storage in the refrig-
erator.
• Some foodstuffs (e.g. carrots) stain the
plastic. Apply some cooking oil and
place it in the dishwasher.
In this way, most stains are removed ef-
fortlessly. Stains do neither damage the
plastic, nor do they affect the taste.
4. Items supplied
1 Juice extractor consisting of
- Food pusher|2 with lid|1 and
brush|12
-Lid|18
- Micro-mesh strainer|4
- Juice collector pan|5
- Motor block|7
- Juice container|11 with lid|9 and
foam separator|10
- Pulp container|16
1 copy of the user instructions
5. How to use
DANGER! Risk of injury from
cutting
~ Please keep in mind during operation,
that the small blades|17 at the bottom
of the micro-mesh strainer|4 are sharp.
WARNING!
~ If the micro-mesh strainer|4 is dam-
aged, the device may not be operated.
NOTE:
• Please clean the device prior to the first
use (see “Cleaning and storing” on
page 11).
• Remove all packing material.
• Check to ensure that all parts are pres-
ent and undamaged.
__CPE284970_Fruchtentsafter_B4.book Seite 7 Donnerstag, 1. Dezember 2016 8:35 20

8
GB
5.1 Disassembly
The device is delivered completely assem-
bled. For cleaning before the first use, the
device must be disassembled.
1. Pull the food pusher|2 off upwards from
the food chute|3.
2. Figure A: rotate the lid of the food
pusher|1, so that one of the arrows
points at the open lock symbol on the
food pusher|2. From inside the food
pusher|2, remove the brush|12.
3. Reattach the lid of the food pusher|1 to
the food pusher|2, so that one of the ar-
rows points at the open lock symbol| .
Turn the arrow to point at the closed
lock symbol .
4. Figure B: release the two safety catch-
es|15 at the lower end, and unhook
them from the lid|18 at the top.
5. Remove the lid|18 upwards.
6. Hold the pulp container|16 by the two
recessed grips and lift it away from the
motor block|7 at a slight angle.
7. Remove the juice container|11 from the
pulp container|16.
8. Remove the lid|9 from the juice contain-
er|11.
9. Pull the foam separator|10 upwards out
of the juice container|11.
10.Using both hands, pull out the juice col-
lector pan|5 with the micro-mesh strain-
er|4 upwards.
11.Remove the micro-mesh strainer|
4 from
the juice collector pan|5.
12.Disassembly is completed. Begin the
cleaning process (see “Cleaning and
storing” on page 11).
5.2 Assembly
1. Before operation, fully unwind the pow-
er cable|8 from around the cable
spool|20.
2. Place the device on a dry, level, non-slip
and heat-resistant surface.
3. Figure C: place the juice collector
pan|5 on the motor block|7.
4.
Figure D:
tilt the pulp container|
16
slightly and push it under the outlet of the
juice collector pan|
5
. Then slide it towards
the device at the bottom.
5. Figure E: place the micro-mesh strain-
er|4 onto the drive unit|6. Rotate the mi-
cro-mesh strainer|4 if necessary, until it
fits into the recesses and can be pressed
down completely. It must sit firmly on the
drive unit|6.
6. Figure E: replace the lid|18.
7. Figure F: close the safety catches|15
by placing them on top of the lid|18
and pushing them down until they click
into place.
NOTE:
• The device will only work if it has been
assembled correctly and the safety
catches|15 are firmly closed.
8. Figure G: fit the food pusher|2 into the
food chute|3 on the lid|18 in such a
manner, that the little ridge|19 on the
edge of the food chute|3 fits into the
groove on the food pusher|2.
9. Figure H: slide the foam separator|10
into the holder in the juice container|11
from above. An opening is left at the
bottom.
10.Place the lid|9 onto the juice contain-
er|11.
11.Slide the juice container|11 under the
outflow of the juice collector pan|5.
__CPE284970_Fruchtentsafter_B4.book Seite 8 Donnerstag, 1. Dezember 2016 8:35 20

9
GB
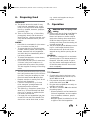
6. Preparing food
WARNING!
~ The device must not be used for very
hard fruit and vegetables (e.g. sugar-
cane) or for very fibrous fruits/vegeta-
bles (e.g. rhubarb, bananas, papayas,
avocados, figs).
~ Thick or firm skins (e.g. of citrus fruits,
pineapples), stems, and the stones of
stone fruits (e.g. cherries, peaches, apri-
cots) must be removed before juice ex-
traction.
NOTES:
• Dried fruit is not suitable for juice extrac-
tion. It contains too little juice.
• To ensure that the juice has the highest
possible vitamin content, use freshly har-
vested, seasonal fruit and vegetables
and drink the juice immediately after it
has been produced.
• To ensure that apples do not turn brown,
add a little lemon juice.
• Do not store the fruit juice for more than
24 hours in the juice container or in
contact with other parts of the product.
This also applies to storage in the refrig-
erator.
• The fruit used should be as ripe as possi-
ble. It will produce lots of juice. With un-
ripe fruit, it may be necessary to clean
the micro-mesh strainer|4 more often.
• Remove overripe or mouldy fruit. Wash
the fruit and vegetables.
• Coarse or hard peels (e.g. of citrus
fruits, mangoes, pomegranates and
pineapples) must be removed.
• Thin peels (e.g. of apples or pears), thin
stems (e.g. of blackcurrants) and small
pips (e.g. of apples or raspberries) do
not need to be removed.
• Cut large fruit and vegetables into piec-
es which fit into the food chute|3. The
device has a wide food chute, so that
e.g. carrots and apples can be pro-
cessed as a whole.
7. Operation
DANGER! Risk of injury from
cutting
~ Never reach into the food chute|3 while
the micro-mesh strainer|4 is rotating.
Never hold spoons or similar objects
against the rotating micro-mesh strain-
er|4. Also keep long hair and loose
clothing well away from the rotating mi-
cro-mesh strainer|4.
~ The micro-mesh strainer|4 keeps on turn-
ing for a while after the device has
been switched off. Wait until it has
stopped turning before opening the de-
vice.
CAUTION:
~ The device is designed for a maximum
operating time of 30 minutes without in-
terruption. After this period of opera-
tion, the device must remain switched
off until the motor block|7 has cooled
down completely.
7.1 General
1. Check that the device has been com-
pletely assembled and that the on/off
switch|14 is set to 0.
2. Fully unwind the power cable|8 from
around the cable spool|20.
3. Plug the mains plug|8 into an easily ac-
cessible wall socket.
4. Turn the on/off switch|14 to the desired
processing speed:
- I (lower speed) for soft and water-rich
fruit and vegetables, such as raspber-
ries, cucumbers, tomatoes, grapes,
watermelon.
- II (higher speed) is suitable for all oth-
er types of fruit and vegetables.
__CPE284970_Fruchtentsafter_B4.book Seite 9 Donnerstag, 1. Dezember 2016 8:35 20

10
GB
5. Remove the food pusher|2 from the
food chute|3, fill the prepared foodstuffs
into the chute|3 and close it as quickly
as possible with the food pusher|2.
6. Press the food pusher|2 down slowly
with only a little pressure. In this way
you achieve the greatest juice extraction
yield.
7. To pause the juice extraction process,
turn the on/off switch|14 to 0. Empty
the pulp container|16 if necessary:
- Open the safety catches|15.
- Remove the lid|18.
- Tilt the pulp container|16 slightly, re-
move it and empty it.
8. Empty the juice from the juice contain-
er|11 at the latest when the maximum
filling level of 1 litre has been reached.
NOTE:
• The foam separator|10 ensures that
most of the foam stays in the juice con-
tainer|11. Pour the juice out slowly.
9. To switch off the device, turn the on/off
switch|14 to 0. Unplug the mains
plug|8 and wait until the micro-mesh
strainer|4 has come to a standstill be-
fore you take off the lid|18. Clean the
device as soon as possible after use.
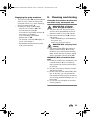
7.2 Interruptions during juice
extraction
Operating period
If the device has been in operation for 30
minutes without interruption, switch it off un-
til the motor block|7 has cooled down com-
pletely.
Emptying the micro-mesh
strainer / removing blockages
• The micro-mesh strainer|
4
must be emp-
tied when...
… the juice coming out becomes thicker,
… if juice is coming out between the
lid|18 and the juice collector pan|5
or
… when the motor becomes audibly
slower.
• Blockage: if a piece of fruit or vegeta-
ble is blocking the micro-mesh strain-
er|4, it must be removed immediately.
You can recognise a blockage...
… if no more juice is produced,
… if the fruit can no longer be pressed
down in the food chute,
… if there are unusual sounds, or
… when the motor becomes audibly
slower.
• Proceed as follows:
-Turn the on/off switch|14 to 0.
- Pull out the mains plug|8.
- Wait until the micro-mesh strainer|4
has come to a standstill.
- Open the safety catches|15.
- Remove the lid|18.
- Lift off the juice collector pan|5 with
the micro-mesh strainer|4 upwards.
- Remove the micro-mesh strainer|4
and empty it.
- Reassemble the parts and proceed
with juice extraction.
__CPE284970_Fruchtentsafter_B4.book Seite 10 Donnerstag, 1. Dezember 2016 8:35 20

11
GB
Emptying the pulp container
• The pulp container|16 must be emptied
when it is full. Check the filling level
from time to time, e.g. when emptying
the micro-mesh strainer|4.
• To empty the pulp container|16:
-Turn the on/off switch|14 to 0.
- Pull out the mains plug|8.
- Wait until the micro-mesh strainer|4
has come to a standstill.
- Open the safety catches|15.
- Remove the lid|18.
- Tilt the pulp container|16 slightly, re-
move it and empty it.
- Reassemble the parts and proceed
with juice extraction.
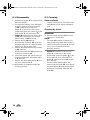
8. Cleaning and storing
Clean the device before the first use
and after every subsequent use!
DANGER! Risk of electric
shock through moisture !
~ The motor block|7, the power cable
and the mains plug|8 must not be im-
mersed in water or any other liquids.
~ Disconnect the mains plug|8 from the
wall socket, …
- before assembling or disassembling
the device and
- before you clean the device.
DANGER! Risk of injury from
cutting
~ The small blades|17 at the bottom of
the micro-mesh strainer|4 are sharp.
Please be very careful when handling
them. When cleaning by hand, please
use the provided cleaning brush|12.
WARNING! Risk of material dam-
age!
~ Please be careful not to damage the mi-
cro-mesh strainer|4. Do not apply to
much pressure to the micro-mesh strain-
er surfaces.
~ No part of the device may be cleaned
with boiling water.
~ Please clean all parts immediately after
use. In this way, you can prevent the
fruit residues from drying on the device
and causing possible blockage (e.g. of
the screen).
~ Do not use any astringent or abrasive
cleaning agents.
__CPE284970_Fruchtentsafter_B4.book Seite 11 Donnerstag, 1. Dezember 2016 8:35 20

12
GB
8.1 Disassembly
1. Pull the food pusher|2 off upwards from
the food chute|3.
2. For thorough cleaning in the dishwash-
er, and in order to remove the brush-
es|12: rotate the lid of the food
pusher|1, so that one of the arrows
points at the open lock symbol on the
food pusher|2, and remove the lid.
3. Figure B: release the two safety catch-
es|15 at the lower end, and unhook
them from the lid|18 at the top.
4. Remove the lid|18 upwards.
5. Hold the pulp container|16 by the two
recessed grips and lift it away from the
motor block|7 at a slight angle.
6. Remove the lid|9 from the juice contain-
er|11 upwards.
7. Pull the foam separator|10 upwards out
of the juice container|11.
8. Using both hands, pull out the juice col-
lector pan|5 with the micro-mesh strain-
er|4 upwards.
9. Remove the micro-mesh strainer|4 from
the juice collector pan|5.
10.Disassembly is completed. Begin the
cleaning process.
8.2 Cleaning
Outer surfaces
• Clean the motor block|7 and the power
cable|8 with a soft, slightly moistened
cloth.
Cleaning by hand
WARNING!
~ The micro-mesh strainer|4 must not be
cleaned in a dishwasher.
NOTE:
•The brush|12 included in delivery for
cleaning the micro-mesh strainer|4 is lo-
cated inside the food pusher|2 upon de-
livery. It can be stored there after
thorough cleaning.
• Figure A: rotate the lid of the food
pusher|1, so that one of the arrows
points at the open lock symbol on the
food pusher|2. From inside the food
pusher|2, remove the brush|12 includ-
ed in delivery.
• The micro-mesh strainer|4 can be
cleaned with the brush|12. Hold the mi-
cro-mesh strainer|4 under flowing water
and clean it from both sides with the
brush|12.
__CPE284970_Fruchtentsafter_B4.book Seite 12 Donnerstag, 1. Dezember 2016 8:35 20

13
GB
In the dishwasher
WARNING!
~ The micro-mesh strainer|4 must not be
cleaned in a dishwasher.
NOTES:
• If the dishwasher is not going to be
switched on immediately, all parts
should be rinsed off briefly after use. In
this way, you can prevent foods from
drying out and producing stains on the
appliance parts.
• Some foods (e.g. carrots) can stain the
plastic. Apply some cooking oil and
place it in the dishwasher.
In this way, most stains are removed ef-
fortlessly. Stains do neither damage the
plastic, nor do they affect the taste.
• The following parts can be cleaned in
the dishwasher:
- food pusher|2,
- the lid of the food pusher|1,
- the juice collector pan|5,
- the juice container|11,
- the foam separator|10,
- the lid of the juice container|9,
- the pulp container|16 and
-the lid|18
• Remove the pulp from the pulp contain-
er|16 and dispose of it promptly.
• Place the parts in the dishwasher.
8.3 After cleaning
• Before assembling, packing and storing
the device, allow the parts to dry com-
pletely.
• For assembly: (see “Assembly” on
page 8)
8.4 Storage
DANGER for children!
~ Please store the juice extractor out of the
reach of children.
• The device must be completely cleaned
and dried before being put into storage.
• Select a location where neither high
temperatures nor moisture can affect the
device.
• The fully dried brush|12 can be stored
in the food pusher|2:
-Place the brush|12 into the food push-
er|2.
- Figure I: place the lid of the food
pusher|1 onto the food pusher|2, so
that one of the arrows points at the
open lock symbol| . Turn the arrow
to point at the closed lock symbol .
• Figure K: the power cable|8 can be
wound around the cable spool|20 on
the underside of the motor block|7 for
storage.
__CPE284970_Fruchtentsafter_B4.book Seite 13 Donnerstag, 1. Dezember 2016 8:35 20

14
GB
9. Disposal
This product is subject to the
provisions of European Direc-
tive 2012/19/EC. The sym-
bol showing a wheelie bin
crossed through indicates
that the product requires sep-
arate refuse collection in the European Un-
ion. This applies to the product and all
accessories marked with this symbol. Prod-
ucts identified with this symbol may not be
discarded with normal household waste, but
must be taken to a collection point for recy-
cling electric and electronic appliances. Re-
cycling helps to reduce the consumption of
raw materials and protect the environment.
Packaging
When disposing of the packaging, make
sure you comply with the environmental reg-
ulations applicable in your country.
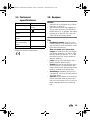
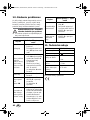
10. Troubleshooting
If your device fails to function as required,
please try this checklist first. Perhaps there is
only a minor problem, and you can solve it
yourself.
DANGER! Risk of electric
shock!
~ Do not attempt to repair the device your-
self under any circumstances.
Fault
Possible causes/
Action
No function
• Has the device been
connected to the pow-
er supply?
• Are the safety catch-
es|15 closed correct-
ly?
The device
smells strange,
is making an
unusual noise
or is heating up
excessively.
• Switch the on/off
switch|14 to 0 and
unplug the mains
plug|8. Allow the de-
vice to cool down.
• Was the device in op-
eration continuously
for longer than 30
minutes?
• Is the micro-mesh
strainer|4 blocked?
The motor
comes to a
standstill.
• Is the micro-mesh
strainer|4 blocked?
Juice is leaking
from under the
lid|18.
• Place less pressure on
the food pusher|2 and
work more slowly.
• Is the micro-mesh
strainer|4 blocked?
The micro-mesh
strainer|4 is vi-
brating strong-
ly or is making
grinding nois-
es.
• Switch the on/off
switch|14 to 0, un-
plug the mains plug|8
and wait for the micro-
mesh strainer to come
to a|4 standstill.
Check whether the mi-
cro-mesh strainer|4 is
correctly installed and
stable.
The micro-mesh
strainer|4 gets
blocked.
• Foreign matter in the
micro-mesh strainer|4?
• Foodstuffs too hard?
• Place less pressure on
the food pusher|2 and
work more slowly.
Very moist fruit
residue - very
little juice.
• Place less pressure on
the food pusher
|
2 and
work more slowly.
Fault
Possible causes/
Action
__CPE284970_Fruchtentsafter_B4.book Seite 14 Donnerstag, 1. Dezember 2016 8:35 20

15
GB
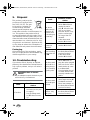
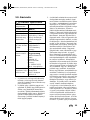
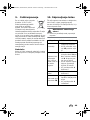
11. Technical
specifications
Subject to technical modification.
12. Recipes
NOTES:
• Prepare fruit as described (see “Prepar-
ing food” on page 9).
• The following recipes are suggestions.
Try you own variations. The following
recipes are for 2 - 4 glasses. The quanti-
ty depends on the size of the fruit, the
yield and the processing speed.
Tips
• Freshness counts: drink your juice
freshly pressed. Only press as much as
you are likely to drink right away, as the
juice does not last long.
• How to make your juices last
longer: to make your juice last longer,
you should pasteurise i.e. heat it. Heat
the juice quickly to approx. 72 °C. Do
not let the juice boil, as this would de-
stroy the vitamins.
• Jelly: boil the juice with sugar and a
gelling agent to produce jelly.
• Sorbet: mix the juice with sugar syrup
and let it freeze. For the sorbet to be-
come creamy and to prevent lumps from
forming, it needs to be stirred often.
• Seasoning: vegetable juices can be
"pepped up" very well with salt, pepper
and other spices.
• Carrots: the provitamin A from carrots
will be absorbed better by the body if
you add a few drops of oil or if you con-
sume it together with food containing
fats.
Model: SFE 450 D2
Mains voltage: 220 - 240 V~,
50 Hz
Protection class: II
Volume of juice con-
tainer:
1litre
Volume of pulp con-
tainer:
2.5 litres
KB
(short operating
time):
up to 30 min.
Power rating: Max. 450 W
__CPE284970_Fruchtentsafter_B4.book Seite 15 Donnerstag, 1. Dezember 2016 8:35 20

16
GB
Early starter
3 carrots
2 apples
1 orange
1. Extract the juice from the carrots, apples
and oranges one after another.
2. Stir well and, if desired, serve with ice
cubes.
Fire devil
3 beetroots
1-3 squirts of tabasco
1. Extract the juice from the beetroots.
2. Add tabasco to taste and stir well.
Red and yellow
1 beetroot
3 oranges
1. Extract the juice from the beetroots and
oranges.
2. Stir well.
Pineapple-mango-apple-orange
1/2 pineapple
1 mango
1 apple
1 orange
1. First of all, extract the juice from the ap-
ple and orange.
2. Extract the juice from the mango.
3. Extract the juice from the halved pineap-
ple.
4. Stir well and enjoy right away.
Pineapple-mango
1/2 pineapple
1 mango
1. Extract the juice from the mango.
2. Extract the juice from the halved pineap-
ple.
3. Stir well and enjoy right away.
Green hell
2 green apples
3 kiwis
1/2 cucumber
1. Extract the juice from the apples, kiwis
and the halved cucumber.
2. Stir well and enjoy right away.
Kiwi-grapes-lemon
3 kiwis
500 g grapes
1 lime (or lemon)
1. Extract the juice from the kiwis, grapes
and the lime.
2. Stir well and enjoy right away.
Pomegranate and co.
1 pomegranate
1/4 pineapple
1 orange
1. Scoop out the pips from the pomegran-
ate and extract the juice.
2. Extract the juice from the quartered
pineapple and orange.
3. Stir well and enjoy right away.
Fruity bell peppers
2 red bell peppers
3 oranges
2 apples
2 pears
1. Juice oranges, apples, pears and bell
peppers consecutively.
2. Stir well and enjoy right away.
Orange-apple-lemon-pineapple
1 orange
1 apple
1 lemon
1/4 pineapple
1. Extract the juice from the fruits.
2. Stir well and enjoy right away.
__CPE284970_Fruchtentsafter_B4.book Seite 16 Donnerstag, 1. Dezember 2016 8:35 20

17
GB
13. Warranty of the
HOYER Handel GmbH
Dear Customer,
your device is provided with a 3 year war-
ranty starting with the purchase date. In the
event of product defects, you are entitled to
statutory rights against the vendor. These
statutory rights are not restricted by our war-
ranty presented in the following.
Warranty conditions
The warranty period starts with the purchase
date. Please keep the original purchase re-
ceipt in a safe place. This document is re-
quired to verify the purchase.
If within three years from the purchase date
of this product a material or factory defect
occurs, the product will be repaired or re-
placed by us – at our discretion – free of
charge to you. This warranty implies that
within the period of three years the defective
device and the purchase receipt are present-
ed, including a brief written description of
the defect and the time it occurred.
If the defect is covered by our warranty, the
repaired or a new product will be returned
to you. No new warranty period starts with
a repair or replacement of the product.
Warranty period and statutory
claims for defects
The warranty period is not extended when
the warranty has been claimed. This also ap-
plies to replaced and repaired parts. Any
damages and defects already existing at the
time of purchase must be reported immedi-
ately upon unpacking. Repairs arising after
the expiration of the warranty period are
subject to a charge.
Warranty coverage
The device was produced carefully according
to strict quality guidelines and tested diligent-
ly prior to delivery.
The warranty applies to material or factory
defects.
Excluded from the warranty are
wear parts subject to normal wear
and damages to fragile parts, e.g.
switches, batteries, lamps or other
parts manufactured from glass.
This warranty expires if the product is dam-
aged, not used as intended or not serviced.
For the proper operation of the product, all in-
structions listed in the operating instructions
must be observed carefully. Any form of use
and handling that is advised against in the
operating instructions or warned against
must always be avoided.
The product is only intended for private and
not for commercial use. In the case of incor-
rect and improper treatment, use of force and
interventions not performed by our author-
ised Service Centre, the warranty shall cease.
Handling in case of a warranty
claim
In order to ensure prompt processing of your
matter, please observe the following notes:
• Please keep the article number
IAN: 284970
and the purchase receipt
as a purchase verification for all inquiries.
• The article number can be found on the
rating plate, an engraving, the title
page of your instructions (in the bottom
left), or as a label on the rear or under-
side of the device.
• If faulty operation or other defects occur,
first contact the Service Centre listed in
the following by telephone or email.
• Then, you are able to send a product re-
ported as defective free of charge to the
service address specified to you, includ-
ing the purchase receipt and the infor-
mation on the defect and when it
occurred.
Please visit www.lidl-service.com to
download this and many other
manuals, product videos and soft-
ware.
__CPE284970_Fruchtentsafter_B4.book Seite 17 Donnerstag, 1. Dezember 2016 8:35 20

18
GB
Service Centre
Service Great Britain
Tel.: 0871 5000 720 (£ 0.10/Min.)
E-Mail: hoyer@lidl.co.uk
Service Ireland
Tel.: 1890 930 034
(0,08 EUR/Min., (peak))
(0,06 EUR/Min., (off peak))
E-Mail: [email protected]
IAN: 284970
Supplier
Please note that the following address is no
service address. First contact the afore-
mentioned Service Centre.
HOYER Handel GmbH
Tasköprüstraße 3
22761 Hamburg
Germany
GB
IE
__CPE284970_Fruchtentsafter_B4.book Seite 18 Donnerstag, 1. Dezember 2016 8:35 20
Seite wird geladen ...
Seite wird geladen ...
Seite wird geladen ...
Seite wird geladen ...
Seite wird geladen ...
Seite wird geladen ...
Seite wird geladen ...
Seite wird geladen ...
Seite wird geladen ...
Seite wird geladen ...
Seite wird geladen ...
Seite wird geladen ...
Seite wird geladen ...
Seite wird geladen ...
Seite wird geladen ...
Seite wird geladen ...
Seite wird geladen ...
Seite wird geladen ...
Seite wird geladen ...
Seite wird geladen ...
Seite wird geladen ...
Seite wird geladen ...
Seite wird geladen ...
Seite wird geladen ...
Seite wird geladen ...
Seite wird geladen ...
Seite wird geladen ...
Seite wird geladen ...
Seite wird geladen ...
Seite wird geladen ...
Seite wird geladen ...
Seite wird geladen ...
Seite wird geladen ...
Seite wird geladen ...
Seite wird geladen ...
Seite wird geladen ...
Seite wird geladen ...
Seite wird geladen ...
Seite wird geladen ...
Seite wird geladen ...
Seite wird geladen ...
Seite wird geladen ...
Seite wird geladen ...
Seite wird geladen ...
Seite wird geladen ...
Seite wird geladen ...
Seite wird geladen ...
Seite wird geladen ...
Seite wird geladen ...
Seite wird geladen ...
Seite wird geladen ...
Seite wird geladen ...
Seite wird geladen ...
Seite wird geladen ...
Seite wird geladen ...
Seite wird geladen ...
Seite wird geladen ...
Seite wird geladen ...
Seite wird geladen ...
Seite wird geladen ...
Seite wird geladen ...
Seite wird geladen ...
Seite wird geladen ...
Seite wird geladen ...
Seite wird geladen ...
Seite wird geladen ...
Seite wird geladen ...
Seite wird geladen ...
Seite wird geladen ...
Seite wird geladen ...
Seite wird geladen ...
Seite wird geladen ...
Seite wird geladen ...
Seite wird geladen ...
Seite wird geladen ...
Seite wird geladen ...
Seite wird geladen ...
Seite wird geladen ...
Seite wird geladen ...
Seite wird geladen ...
Seite wird geladen ...
Seite wird geladen ...
Seite wird geladen ...
Seite wird geladen ...
Seite wird geladen ...
Seite wird geladen ...
Seite wird geladen ...
Seite wird geladen ...
Seite wird geladen ...
Seite wird geladen ...
-
 1
1
-
 2
2
-
 3
3
-
 4
4
-
 5
5
-
 6
6
-
 7
7
-
 8
8
-
 9
9
-
 10
10
-
 11
11
-
 12
12
-
 13
13
-
 14
14
-
 15
15
-
 16
16
-
 17
17
-
 18
18
-
 19
19
-
 20
20
-
 21
21
-
 22
22
-
 23
23
-
 24
24
-
 25
25
-
 26
26
-
 27
27
-
 28
28
-
 29
29
-
 30
30
-
 31
31
-
 32
32
-
 33
33
-
 34
34
-
 35
35
-
 36
36
-
 37
37
-
 38
38
-
 39
39
-
 40
40
-
 41
41
-
 42
42
-
 43
43
-
 44
44
-
 45
45
-
 46
46
-
 47
47
-
 48
48
-
 49
49
-
 50
50
-
 51
51
-
 52
52
-
 53
53
-
 54
54
-
 55
55
-
 56
56
-
 57
57
-
 58
58
-
 59
59
-
 60
60
-
 61
61
-
 62
62
-
 63
63
-
 64
64
-
 65
65
-
 66
66
-
 67
67
-
 68
68
-
 69
69
-
 70
70
-
 71
71
-
 72
72
-
 73
73
-
 74
74
-
 75
75
-
 76
76
-
 77
77
-
 78
78
-
 79
79
-
 80
80
-
 81
81
-
 82
82
-
 83
83
-
 84
84
-
 85
85
-
 86
86
-
 87
87
-
 88
88
-
 89
89
-
 90
90
-
 91
91
-
 92
92
-
 93
93
-
 94
94
-
 95
95
-
 96
96
-
 97
97
-
 98
98
-
 99
99
-
 100
100
-
 101
101
-
 102
102
-
 103
103
-
 104
104
-
 105
105
-
 106
106
-
 107
107
-
 108
108
-
 109
109
-
 110
110


Silvercrest SFE 450 D2 Operating Instructions Manual
- Kategorie
- Safthersteller
- Typ
- Operating Instructions Manual
in anderen Sprachen
- slovenčina: Silvercrest SFE 450 D2
Verwandte Artikel
Andere Dokumente
-
Rommelsbacher ES 850/E WIENEU Benutzerhandbuch
-
Gastroback 40145 Bedienungsanleitung
-
-
-
-
Caso SJW 500 Bedienungsanleitung
-
-
MIA SP 2003N Bedienungsanleitung
-
Philips HR1881/10 Bedienungsanleitung
-
Braun MP 75 Benutzerhandbuch