
MapSend
®
DirectRoute
™
Quick Start Guide
Manuel de l’utilisateur
Benutzerhandbuch
Manuale dell’utente

© 2003 Thales Navigation, Inc. All rights reserved.
Magellan, MapSend, and DirectRoute are trademarks of Thales Navigation.

Magellan MapSend DirectRoute
Quick Start Guide


3
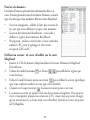
All global positioning system (GPS) receiver products are navigation aids, and
are not intended to replace other methods of navigation. Purchaser is advised
to use good judgment in the use of this product.
READ THE USER GUIDE CAREFULLY BEFORE USING
THE PRODUCT.
The MapSend DirectRoute software is a navigation aid designed to assist you in
arriving at your selected destinations. When using the MapSend DirectRoute
software with your Magellan GPS receiver, these safety rules must be followed to
prevent accidents that can result in injury or death to yourself or others:
• The Magellan GPS receiver must not be used while engaged in any
activity requiring the user's full attention to the environment. For
instance, the Magellan GPS receiver should be operated only by vehicle
passengers when the vehicle is moving, or by the driver when the vehicle
has come to a complete stop. A driver must not attempt to view the
display while driving. A climber must not attempt to view the display
while negotiating treacherous terrain.
•It is your responsibility to ensure compliance to all traffic laws, including
pedestrian observance of crosswalks, and to use good judgment while
operating a Magellan GPS receiver. Disregard any unsafe, hazardous or
illegal route suggestions.
WARNING

4
• The MapSend DirectRoute database does not include, analyze, process,
consider or reflect any of the following: legal restrictions (such as weight,
height, width, load and speed restrictions); road slope or grade; bridge
height, width, weight or other limits; population density; neighborhood
quality or safety; availability or proximity of law enforcement, emergency
rescue, medical or other assistance; construction work zones or hazards;
road, sidewalk or waterway closures or conditions; weather conditions;
pavement characteristics or conditions; special events; traffic congestion;
time of day.
•While every attempt is made to ensure that the MapSend DirectRoute
database is accurate at the time of delivery; roadways, points of interest
and business/service locations may change over time.

5
Magellan
®
MapSend
®
DirectRoute
™
Quick Start Guide
Overview
MapSend DirectRoute Europe provides detailed Navtech® street maps and
points of interest for France, Germany, Austria, and Switzerland. MapSend
DirectRoute also includes basic, automated street routing and guidance
functions. When you use DirectRoute with a street route activated, you get
visual and auditory turn-by-turn guidance prompts that take the guesswork out
of finding your way in a new place. You can view the map on the PC and mark
and upload sections of the map to your qualifying Magellan GPS receiver or
Secure Digital (SD) memory card. Depending upon the available memory in
your handheld or the SD card, you may be able to store and access a city, state
or a larger map area.
Note: Maps you define with MapSend DirectRoute are for use with one GPS
receiver.
Overview ........................................................................................................5
System Requirements ......................................................................................7
Installation ......................................................................................................8
Using MapSend DirectRoute on the PC .........................................................9
Using DirectRoute on the GPS Receiver .......................................................17
Tr oubleshooting ............................................................................................25
Contacting Magellan ....................................................................................25

6
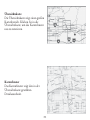
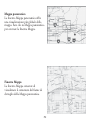
Basemaps vs. Detailed Maps
Basemap
A basemap contains major map features like highways, railroads, cities, etc.
Magellan mapping GPS receivers have a built-in basemap. Basemaps have
sufficient detail for orienting oneself to a broad geographic area. The basemap
is displayed at higher zoom levels or when you view a geographic area for
which there is no detailed map.
Detailed Map
Detailed maps contain more map features and more specialized information
than basemaps. Detailed maps are useful when you want to work with smaller
regions, close-up. There are a wide variety of optional MapSend detailed
products available, including street maps, topographic maps, and marine
charts. Depending on locale, there are a variety of MapSend detailed map
products available. MapSend DirectRoute Europe provides detailed streets,
highways, and points of interest for France, Germany, Austria, and Switzerland.
Detailed maps and basemaps work together to provide a useful map view at
any zoom level. Uploading a detail map does not erase the built-in basemap in
the GPS receiver.
You can define and save many detailed map regions in MapSend on the PC. If
you have a SporTrak receiver, you can connect it to the PC and upload any saved
map to the receiver’s memory. If you have a Meridian with an SD card inserted,
you can connect it to the PC and upload to the card in the unit, or you can use
an SD card reader/writer to upload the map directly to the SD card.

7
The unit switches automatically to a detailed map when a detailed map covers
the majority of the displayed area,- and the zoom scale is 0.40 (700 meters)
miles or closer. The detail map can be set to start appearing at higher or lower
zoom levels on the unit by pressing the Menu key, choosing Map Setup, and
choosing a different Detail setting.
System Requirements
• Microsoft® Windows® 95, 98, 2000, XP, ME, NT 4.0 or higher
• Pentium 300 MHz or better
• 64 MB RAM or more
• 300 MB hard disk space or more
• VGA video card
Additionally Required
• Magellan Secure Digital (SD) card (if GPS takes SD card)
Supported Magellan GPS Receivers
MapSend DirectRoute will only work with this current line of Magellan GPS
Receivers: SporTrak Color, Pro, and Pro Marine; Meridian Color, Platinum,
Gold, and Marine. Meridian series GPS receivers require an SD card.

8
Installation
1. With your computer on and all applications closed, insert the Installation
CD-ROM into your CD-ROM drive.
2. The installation application should begin automatically. Just follow the
on-screen instructions to complete the installation. If installation does not
start automatically, open Windows® Explorer, browse to your CD-ROM
Drive, click on the “Setup” file, and proceed.
3. After the installation is complete, you can start MapSend by clicking on
the Windows Start button, click Programs, Magellan, MapSend
DirectRoute, or if Windows is set to Auto run CD applications, just insert
the MapSend Data CD-ROM.
4. When MapSend DirectRoute begins, it will ask that you check the
software version you are using in your GPS receiver. Onscreen instructions
are provided to help you find the software version. Early versions of
Magellan software may not be compatible with MapSend DirectRoute.
The firmware update CD-ROM included with MapSend DirectRoute is
provided in case the version of software you presently have installed is not
compatible. Instructions for updating your receiver’s software can be
found on the firmware update CD-ROM.
NOTE: YOU MUST HAVE THE MAPSEND MAP DATA CD IN THE
CD DRIVE IN ORDER TO USE MAPSEND.
NOTE: PLEASE EXIT FROM ANY HOT SYNC PROGRAMS YOU MAY
HAVE FOR YOUR PDA, CELLPHONE, ETC., WHENEVER YOU
WANT TO CONNECT MAPSEND TO THE GPS.

9
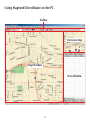
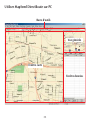
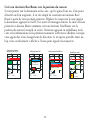
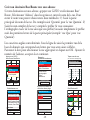
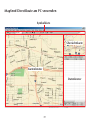
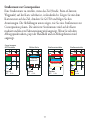
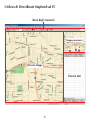
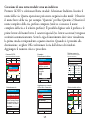
Using MapSend DirectRoute on the PC
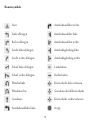
Toolbar
Map Window
Data Window
Overview Map

10
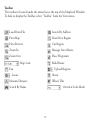
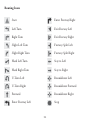
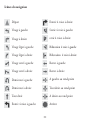
Toolbar
The toolbar is located under the menu bar at the top of the MapSend Window.
To hide or display the Toolbar, select “Toolbar” from the View menu.
Search By Address
Draw New Region
Cut Region
Manage Street Route
Place Waypoints
Build Route
Upload Regions
About
What’s This
Overview Scale Mode
Load From File
Print Map
Print Preview
Zoom In
Zoom Out
Map Scale
Pan
Locate
Measure Distance
Search By Name

11
Overview Map
The Overview Map window gives a
more global view of the map. Clicking
in the Overview Map re-centers the
Map Window.
Map Window
The Map Window displays the
contents of the Overview Map’s detail
frame.

12
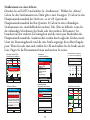
Data Window
The data window presents information related to the
map. There are several data window views, depen-
dent on what you are trying to do in MapSend.
•Saved Regions - lists regions of the map that you
define and name.
•Street Route Management – helps you define
and manage street routes
•Navigation – this window is used if you want to
use the PC to do Guidance and have your GPS
receiver attached to the PC.
Defining a Detailed Map Area in MapSend on the PC
1. Insert the MapSend Data CD in the drive. Start MapSend DirectRoute.
2. Use the Pan and Zoom tools to view the area of the map to be used.
3. Use the Draw New Region tool to outline the specific area you want
to use as a detail map.
4. Click the Cut Region tool . Type a name for the region.
5. The new region is added to the Saved Regions List. You can create and
save many map region definitions on the PC. You can only upload one
map at a time to your Magellan GPS receiver.

13
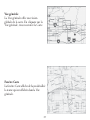
Panning Mode
From the Tools menu choose Pan, or click the Pan tool on the toolbar.
Click and drag the map to the desired location.
Zooming Mode
To enlarge an area on the map, select the Zoom In tool on the toolbar. You
can simply click on the location in the map you want to enlarge, or you can
click and drag a rectangle over an area and that area will show in the Map
Window. The Zoom Out tool works similarly.
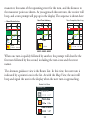
Uploading a Detailed Map to the GPS Receiver
Saved regions in MapSend can be converted to map images and uploaded for
use on the GPS receiver.
If your receiver uses SD cards, you can either upload to the card installed in the
unit, or use an SD card reader/writer. An SD card reader/writer can upload
large files much faster than uploading through the unit. If you use an SD card,
please give it plenty of time to finish writing the file.
Magellan SporTrak models don’t use SD cards, so in that case you must attach
the receiver, and the detail map is uploaded to the receiver’s internal memory.
If you upload a map directly to the internal memory of a SporTrak or to a card
in the Meridian, it will overwrite the map previously stored directly to the
receiver.

14
MapSend DirectRoute is licensed for use with one GPS receiver. When you
upload a map you must assign the receiver’s serial number. There are two ways
to do this-
1. Connect the GPS receiver to the PC. MapSend will automatically read the
serial number from your GPS receiver. You can use this method whether
or not you are using an SD card reader/writer.
2. You can type in the serial number manually. To find the serial number,
power on the receiver. Press the ENTER key to accept the conditions.
Press the MENU key. Select About from the list and press ENTER. The
serial number is displayed just below the software version number. Note:
The serial number requested by MapSend is internal to the GPS receiver
and is not the same as the serial number printed in the battery compart-
ment.
For convenience, you may note the serial number here: _________________
If you are uploading to a SD card in a GPS receiver or directly to a GPS
receiver’s memory, use fresh batteries in the receiver or use external power.
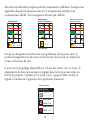
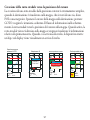
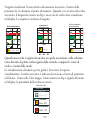
1. Click the checkbox for the map you wish to upload in the Saved Regions
List (see picture).
You may choose not to upload POI information by clicking on the “P.”

15
2. Click the Upload Regions button on the toolbar.
3. Choose where you want to send the map. Note: Sending the map to the
hard drive is useful if you wish to frequently switch maps on the unit.
This option processes the map image and stores it, so next time you
upload it you can skip the processing wait.
4. The first time you upload a map, MapSend asks you to connect your GPS
receiver to the computer’s serial port, so it can auto-detect the port and
determine the baud rate. If MapSend has problems detecting the port, use
the GPS receiver MENU options to turn off NMEA and Set Baud Rate to
4800. Make sure any hot sync programs (e.g. PDA, cell phone, etc.) on
your PC are turned off.
5. Next step is to either auto-detect or manually input the unit serial
number.
6. MapSend will help you make sure the map will fit on the storage device.
This may involve a couple of steps to reach an acceptable map size. Once
you have an acceptable map, Click Finish to proceed.
7. The map data is then converted and loaded to the target receiver or
storage device.
Using Street Routing and Guidance in MapSend
DirectRoute routing and guidance is primarily designed for use on the
handheld, but it is possible to create street routes in DirectRoute on the PC.

16
The next two subsections describe routing and guidance on the PC. You may
want to first read the next major section, Using MapSend DirectRoute on the
GPS Receiver, before reading the following.
Defining a Street Route on the PC
Start by selecting Route Management from the Menu Bar, or Press F7 on the
keyboard, or click on the Street Route Management tool on the Toolbar.
The Street Route Management window will be displayed on the right side of
the DirectRoute Window. The cursor will turn into a green flag. Click on the
start of the route. The cursor will turn into a red flag. Click on the route
destination. You may need to use the keyboard arrow keys to pan the map view
to the destination. With the destination marked, choose whether you want to
make a Street Route or Point-to-Point route. If you select Street Route, the
route will be highlighted on the map and it will become active. In MapSend on
the PC, you will have to connect your unit if you want to use the PC for
guidance. When it’s connected, press the Navigate key in the Street Routes
Sidebar.
Guidance on the PC
Guidance on the PC proceeds much as it does on the handheld. If you press the
Navigate key while a street route is active, you can choose whether to proceed
with the street route or change it to a Point-to-Point route. You can exit street
routing by exiting the Street Routing window. As on the handheld, only one
street route can be active at a time, and once routing is stopped, the street route
disappears. On the PC you can use the Convert Route key to convert a Street
Route to a multi-leg waypoint route and save it that way in the routes list.

17
Using DirectRoute on the GPS Receiver
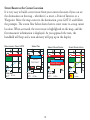
Viewing the Detailed Map
There are two ways to quickly view a DirectRoute map on the handheld.
1. Press the NAV or ESC key until you reach the Map screen. Use the cursor
key and the Zoom keys to find the general area of the detailed map. You
will see a rectangle indicating the area of the detailed map. Zoom in to at
least a scale of 0.40 mi. (700 m) to view the detailed map.
2. Press the Menu key and select “Database”. Select the detailed map, by its
name, from the list of options. Now you can search POIs in the detailed
map. Find a POI you want to see, press VIEW, and the POI in the
detailed map will appear.
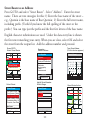
About Street Routing and Guidance
DirectRoute is the first MapSend product with the ability to automatically
calculate a street route and use it for turn-by-turn guidance. DirectRoute
calculates shortest time street routes. Shortest time street route calculation
considers the speed limits and length of possible street paths between you and
your destination. The shortest time route is not necessarily the fastest or
simplest route. DirectRoute is tuned to provide reasonable street routes, but it
doesn’t know about traffic, road construction, etc.
DirectRoute also maintains the ability to manually set up simple, straight-line point-
to-point routes and multi-leg Waypoint Routes, similar to other Magellan MapSend
products. This Quick Start guide focuses on street routing. There is more informa-
tion about straight-line routing in the User Manual for your GPS receiver.

18
Each time you create a street route on the GPS receiver it becomes activated
and ready to start guidance as soon as it is calculated. Only one street route can
be active. A street route stays active until you deactivate it or you reach your
destination– even if you power off and power up the unit. If you get off-
course, you can easily re-route to the current destination from your current
location by pressing the GOTO key and pressing it again at the Street Route
window. DirectRoute also keeps a list of the last 10 POI and address
destinations used, so if you stop routing but later want to route to that
destination again, it’s easy.
Street routes cannot be saved as such. However, you can make a street route
from a saved point-to-point route, if the start and end points are within the
active detail map. If you want to do this, DirectRoute uses only the start and
end points of the waypoint route, and it calculates and activates the shortest-
time street route. You can also convert previous destination points to user
waypoints, and route to them whenever you wish.
Routing with the GOTO Key
The GOTO key on the handheld is the focal point of street routing. Use it to
create a street route between your current location and a destination you
specify. There are three ways to define a destination :
• Move the map cursor to the destination
• Type in an address for the destination
• Select a point of interest category or a saved waypoint
• Pick from the last ten previous destinations
Seite wird geladen ...
Seite wird geladen ...
Seite wird geladen ...
Seite wird geladen ...
Seite wird geladen ...
Seite wird geladen ...
Seite wird geladen ...
Seite wird geladen ...
Seite wird geladen ...
Seite wird geladen ...
Seite wird geladen ...
Seite wird geladen ...
Seite wird geladen ...
Seite wird geladen ...
Seite wird geladen ...
Seite wird geladen ...
Seite wird geladen ...
Seite wird geladen ...
Seite wird geladen ...
Seite wird geladen ...
Seite wird geladen ...
Seite wird geladen ...
Seite wird geladen ...
Seite wird geladen ...
Seite wird geladen ...
Seite wird geladen ...
Seite wird geladen ...
Seite wird geladen ...
Seite wird geladen ...
Seite wird geladen ...
Seite wird geladen ...
Seite wird geladen ...
Seite wird geladen ...
Seite wird geladen ...
Seite wird geladen ...
Seite wird geladen ...
Seite wird geladen ...
Seite wird geladen ...
Seite wird geladen ...
Seite wird geladen ...
Seite wird geladen ...
Seite wird geladen ...
Seite wird geladen ...
Seite wird geladen ...
Seite wird geladen ...
Seite wird geladen ...
Seite wird geladen ...
Seite wird geladen ...
Seite wird geladen ...
Seite wird geladen ...
Seite wird geladen ...
Seite wird geladen ...
Seite wird geladen ...
Seite wird geladen ...
Seite wird geladen ...
Seite wird geladen ...
Seite wird geladen ...
Seite wird geladen ...
Seite wird geladen ...
Seite wird geladen ...
Seite wird geladen ...
Seite wird geladen ...
Seite wird geladen ...
Seite wird geladen ...
Seite wird geladen ...
Seite wird geladen ...
Seite wird geladen ...
Seite wird geladen ...
Seite wird geladen ...
Seite wird geladen ...
Seite wird geladen ...
Seite wird geladen ...
Seite wird geladen ...
Seite wird geladen ...
Seite wird geladen ...
Seite wird geladen ...
Seite wird geladen ...
Seite wird geladen ...
Seite wird geladen ...
Seite wird geladen ...
Seite wird geladen ...
Seite wird geladen ...
Seite wird geladen ...
Seite wird geladen ...
Seite wird geladen ...
Seite wird geladen ...
Seite wird geladen ...
Seite wird geladen ...
-
 1
1
-
 2
2
-
 3
3
-
 4
4
-
 5
5
-
 6
6
-
 7
7
-
 8
8
-
 9
9
-
 10
10
-
 11
11
-
 12
12
-
 13
13
-
 14
14
-
 15
15
-
 16
16
-
 17
17
-
 18
18
-
 19
19
-
 20
20
-
 21
21
-
 22
22
-
 23
23
-
 24
24
-
 25
25
-
 26
26
-
 27
27
-
 28
28
-
 29
29
-
 30
30
-
 31
31
-
 32
32
-
 33
33
-
 34
34
-
 35
35
-
 36
36
-
 37
37
-
 38
38
-
 39
39
-
 40
40
-
 41
41
-
 42
42
-
 43
43
-
 44
44
-
 45
45
-
 46
46
-
 47
47
-
 48
48
-
 49
49
-
 50
50
-
 51
51
-
 52
52
-
 53
53
-
 54
54
-
 55
55
-
 56
56
-
 57
57
-
 58
58
-
 59
59
-
 60
60
-
 61
61
-
 62
62
-
 63
63
-
 64
64
-
 65
65
-
 66
66
-
 67
67
-
 68
68
-
 69
69
-
 70
70
-
 71
71
-
 72
72
-
 73
73
-
 74
74
-
 75
75
-
 76
76
-
 77
77
-
 78
78
-
 79
79
-
 80
80
-
 81
81
-
 82
82
-
 83
83
-
 84
84
-
 85
85
-
 86
86
-
 87
87
-
 88
88
-
 89
89
-
 90
90
-
 91
91
-
 92
92
-
 93
93
-
 94
94
-
 95
95
-
 96
96
-
 97
97
-
 98
98
-
 99
99
-
 100
100
-
 101
101
-
 102
102
-
 103
103
-
 104
104
-
 105
105
-
 106
106
-
 107
107
-
 108
108


Magellan MAPSEND DIRECTROUTE Bedienungsanleitung
- Typ
- Bedienungsanleitung
- Dieses Handbuch eignet sich auch für
in anderen Sprachen
Verwandte Artikel
-
Magellan SporTrak SporTrak Color User Manual Addendum
-
Magellan eXplorist 710 Schnellstartanleitung
-
-
-
-
-
Magellan Triton 300 Benutzerhandbuch
-
-
-
Magellan RoadMate 9620 LM Benutzerhandbuch
