Bresser Junior 8855001 Bedienungsanleitung
- Kategorie
- Spielzeuge
- Typ
- Bedienungsanleitung

DE
Bedienungsanleitung
EN
Operating Instructions
FR
Mode d’emploi
NL
Handleiding
IT
Istruzioni per l’uso
ES
Instrucciones de uso
PT
Manual de utilização
Mikroskop
Microscope
Art. No. 8855001
40x-1024x

DE
Bedienungsanleitung ............................................................. 4
EN
Operating Instructions ......................................................... 10
FR
Mode d’emploi .................................................................... 16
NL
Handleiding ....................................................................... 22
IT
Istruzioni per l’uso .............................................................. 28
ES
Instrucciones de uso ........................................................... 34
PT
Manual de utilização ........................................................... 40
www.bresser.de/warranty_terms
SERVICE AND WARRANTY:
www.bresser.de/guide
MICROSCOPE GUIDE:
i
www.bresser.de/faq
MICROSCOPE FAQ:
www.bresser.de/P8855001
MANUAL DOWNLOAD:
www.bresser.de/download/CamLabLite_Junior
SOFTWARE DOWNLOAD:
www.bresser.de/downloads
EXPERIMENTS:

B/C
D
F
G
H
1%
I
E
J
1)
1!
1@
1#
1*
1(
B C
D
1^
1&
B
3x AA
1$
2!
2)

4
DE
Bedienungsanleitung
ACHTUNG! Nicht für Kinder unter 3
Jahren geeignet. Kleine Teile, Ersti-
ckungsgefahr. Beinhaltet funktiona-
le scharfkantige Kanten und Spitzen!
ACHTUNG: Ausschließlich für Kinder von min-
destens 8 Jahren geeignet. Anweisungen für
Eltern oder andere verantwortliche Personen
sind beigefügt und müssen beachtet werden.
Verpackung aufbewahren, da sie wichtige Infor-
mationen enthält.
Allgemeine Warnhinweise
• ERSTICKUNGSGEFAHR! Dieses Produkt
beinhaltet Kleinteile, die von Kindern
verschluckt werden können! Es besteht
ERSTICKUNGSGEFAHR!
• GEFAHR eines STROMSCHLAGS! Dieses
Gerät beinhaltet Elektronikteile, die über eine
Stromquelle (Batterien) betrieben werden.
Lassen Sie Kinder beim Umgang mit dem
Gerät nie unbeaufsichtigt! Die Nutzung
darf nur, wie in der Anleitung beschrieben,
erfolgen, andernfalls besteht GEFAHR eines
STROMSCHLAGS!
• BRAND-/EXPLOSIONSGEFAHR! Setzen Sie
das Gerät keinen hohen Temperaturen aus.
Benutzen Sie nur die empfohlenen Batterien.
Gerät und Batterien nicht kurzschließen oder
ins Feuer werfen! Durch übermäßige Hitze
und unsachgemäße Handhabung können
Kurzschlüsse, Brände und sogar Explosionen
ausgelöst werden!
• VERÄTZUNGSGEFAHR! Batterien gehören
nicht in Kinderhände! Achten Sie beim
Einlegen der Batterie auf die richtige
Polung. Ausgelaufene oder beschädigte
Batterien verursachen Verätzungen, wenn
Sie mit der Haut in Berührung kommen.
Benutzen Sie gegebenenfalls geeignete
Schutzhandschuhe.
• Ausgelaufene Batteriesäure kann zu
Verätzungen führen! Vermeiden Sie den
Kontakt von Batteriesäure mit Haut, Augen
und Schleimhäuten. Spülen Sie bei Kontakt
mit der Säure die betroffenen Stellen sofort
mit reichlich klarem Wasser und suchen Sie
einen Arzt auf.
• Benutzen Sie nur die empfohlenen Batterien.
Ersetzen Sie schwache oder verbrauchte
Batterien immer durch einen komplett neuen
Satz Batterien mit voller Kapazität. Verwenden
Sie keine Batterien unterschiedlicher Marken,
Typen oder unterschiedlich hoher Kapazität.
Entfernen Sie Batterien aus dem Gerät, wenn
es längere Zeit nicht benutzt wird, oder die
Batterien leer sind!
• Keinesfallsnormale,nichtwiederauadbare
Batterienauaden!SiekönneninFolgedes
Ladens explodieren.
•Auadbare Batterien dürfen nur unter
Aufsicht von Erwachsenen geladen werden.
• AuadbareBatteriensindausdemSpielzeug
herauszunehmen, bevor sie geladen werden.
• Die Anschlussklemmen dürfen nicht kurzge-
schlossen werden.
• Bauen Sie das Gerät nicht auseinander!
Wenden Sie sich im Falle eines Defekts an
Ihren Fachhändler. Er nimmt mit dem Service-
Center Kontakt auf und kann das Gerät ggf.
zwecks Reparatur einschicken.
• Für die Arbeit mit diesem Gerät werden
häug scharfkantige und spitze Hilfsmittel
eingesetzt. Bewahren Sie deshalb dieses
Gerät sowie alle Zubehörteile und Hilfsmittel
an einem für Kinder unzugänglichen Ort auf.
Es besteht VERLETZUNGSGEFAHR!
• Anleitung und Verpackung aufbewahren, da
Sie wichtige Informationen enthalten.
• Die mitgelieferten Chemikalien und Flüssig-
keiten gehören nicht in Kinderhände! Chemi-
kalien nicht trinken! Hände nach Gebrauch
unterießendemWassergründlichsäubern.
Bei versehentlichem Kontakt mit Augen oder
Mund mit Wasser ausspülen. Bei Beschwer-
den unverzüglich einen Arzt aufsuchen und
die Substanzen vorlegen.

5
DE
HINWEISE zur Reinigung
Trennen Sie das Gerät vor der Reini-
gung von der Stromquelle (Batterien
entfernen)!
Reinigen Sie das Gerät nur äußerlich mit einem
trockenen Tuch. Benutzen Sie keine Reini-
gungsüssigkeit,umSchädenanderElektronik
zu vermeiden.
Spielzeug, das mit Flüssigkeit zu reinigen ist, ist
vor der Reinigung vom Stromnetz zu trennen.
Reinigen Sie die Linsen (Okulare und/oder Ob-
jektive) nur mit dem beiliegeden Linsenputz-
tuch oder mit einem anderen weichen und fus-
selfreien Tuch (z.B. Microfaser) ab. Das Tuch
nicht zu stark aufdrücken, um ein Verkratzen
der Linsen zu vermeiden.
Zur Entfernung stärkerer Schmutzreste be-
feuchten Sie das Putztuch mit einer Brillen-
Reinigungsüssigkeit und wischen Sie damit
die Linsen mit wenig Druck ab.
Schützen Sie das Gerät vor Staub und Feuchtig-
keit! Bewahren Sie es in der mitgelieferten Ta-
sche oder Transportverpackung auf. Batterien
sollten aus dem Gerät entfernt werden, wenn es
längere Zeit nicht benutzt wird.
ENTSORGUNG
Entsorgen Sie die Verpackungsmateriali-
en sortenrein. Informationen zur ord-
nungsgemäßen Entsorgung erhalten Sie beim
kommunalen Entsorgungsdienstleister oder
Umweltamt.
Werfen Sie Elektrogeräte nicht in den
Hausmüll!
Gemäß der Europäischen Richtlinie
2002/96/EG über Elektro- und Elektronik-Altge-
räte und deren Umsetzung in nationales Recht
müssen verbrauchte Elektrogeräte getrennt
gesammelt und einer umweltgerechten Wieder-
verwertung zugeführt werden.
Entladene Altbatterien und Akkus müssen
vom Verbraucher in Batteriesammelgefäßen
entsorgt werden. Informationen zur Entsor-
gung alter Geräte oder Batterien, die nach dem
01.06.2006 produziert wurden, erfahren Sie
beim kommunalen Entsorgungsdienstleister
oder Umweltamt.
DE
EG-Konformitätserklärung
Eine „Konformitätserklärung“ in Über-
einstimmung mit den anwendbaren
Richtlinien und entsprechenden Nor-
men ist von der Bresser GmbH erstellt worden.
Der vollständige Text der EG-Konformitätserklä-
rung ist unter der folgenden Internetadresse
verfügbar:
www.bresser.de/download/8855001/CE/
8855001_CE.pdf
Garantie & Service
Die reguläre Garantiezeit beträgt 5 Jahre
und beginnt am Tag des Kaufs. Die voll-
ständigen Garantiebedingungen sowie In-
formationen zu Garantiezeitverlängerung
und Serviceleistungen können Sie unter
www.bresser.de/garantiebedingungen einse-
hen.

6
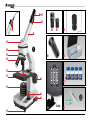
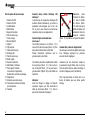
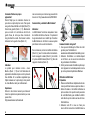
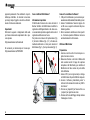
Aus diesen Teilen besteht dein Mikroskop
1 16x WF Okular
2 10x WF Okular
3 Barlowlinse
4 MikrOkular (USB Okular)
5 Okularstutzen
6 Mikroskopkopf
7 Feststellschraube
8 Objektivrevolver
9 Objektiv
10 Halteklammer
11 Mikroskoptisch
12 LED-Beleuchtung (Durchlicht)
13 Mikroskopfuß
14 Batteriefach
15 Scharfeinstellungsrad
16 MicroOkular / Software
17 Objektträger, Deckgläser und
Dauerpräparate in Kunststoffbox
18 Präparate
19 Präparierbesteck
20 Ein-/Ausschalter für Durchlicht
21 Dimmer
Wo mikroskopiere ich?
Bevor Du das Mikroskop aufbaust, achte dar-
auf, dass der Tisch, Schrank oder worauf Du es
stellen möchtest, stabil ist und fest steht, ohne
zu wackeln.
Elektrische LED-Beleuchtung
Das Mikroskop ist mit einer modernen LED-
Beleuchtung (Leuchtdiode) ausgestattet, die
von unten das Präparat beleuchtet. (Das, was
Du unter dem Mikroskop betrachten willst, heißt
übrigens Objekt oder Präparat.)
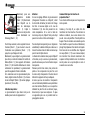
Wie stelle ich mein Mikroskop richtig ein?
Löse zuerst die Schraube (Abb. 1, 7) und drehe
den Mikroskopkopf (Abb. 1, 6) in eine bequeme
Beobachtungsposition.
Jede Beobachtung wird mit der niedrigsten Ver-
größerung begonnen.
Fahre den Mikroskoptisch (Abb. 1, 11) zunächst
ganz hinunter. Dann drehe den Objektivrevolver
(Abb. 1, 8) so weit, bis er auf der niedrigsten
Vergrößerung (Objektiv 4x) einrastet.
Hinweis:
Bevor Du die Objektiveinstellung wechselst,
fahre den Mikroskoptisch (Abb. 1, 11) immer
erst ganz herunter. Dadurch kannst Du eventu-
elle Beschädigungen vermeiden!
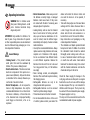
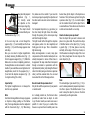
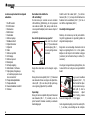
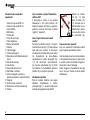
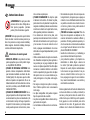
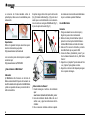
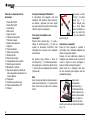
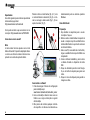
Nun setze das Okular
10x (Abb. 1, 1) in die
Barlowlinse (Abb. 1,
3) ein. Achte darauf,
dass die Barlowlinse
ganz im Okularstutzen
(Abb. 1, 5) steckt und
nicht herausgezogen
ist (Abb. 2).
Wie beobachte ich das Präparat?
Nachdem Du das Mikroskop mit der passenden
Beleuchtung aufgebaut und eingestellt hast,
gelten folgende Grundsätze:
Beginne mit einer einfachen Beobachtung bei
niedrigster Vergrößerung. So ist es leichter, das
Objekt in die Mitte zu bekommen (Zentrierung)
und das Bild scharf zu stellen (Fokussierung).
Je höher die Vergrößerung ist, desto mehr Licht
brauchst Du für eine gute Bildqualität.
Abb. 2
D
f
B/C

7
DE
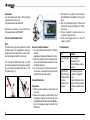
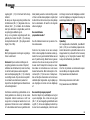
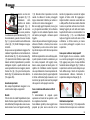
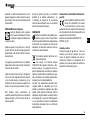
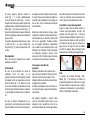
Nun lege ein Dauer-
präparat (Abb. 1, 19)
direkt unter dem Objek-
tiv auf den Mikroskop-
tisch (Abb. 3). Das zu
beobachtende Objekt
soll hierbei genau über
der Beleuchtung (Abb. 1, 12) liegen.
Im nächsten Schritt schaust Du durch das Oku-
lar (Abb. 1, 1) und drehst vorsichtig am Scharf-
einstellungsrad (Abb. 1, 15) bis das Bild scharf
zu sehen ist.
Jetzt kannst Du eine höhere Vergrößerung
einstellen, indem Du langsam die Barlowlin-
se (Abb. 1, 3) aus dem Okularstutzen (Abb.
1, 5) herausziehst. Wenn die Barlowlinse fast
vollständig herausgezogen wird, kann die Ver-
größerung auf nahezu das Doppelte gesteigert
werden.
Wenn Du noch höhere Vergrößerungen möch-
test, setze das Okular 16x (Abb. 1, 1) ein und
drehe den Objektivrevolver (Abb. 1, 8) auf höhe-
re Einstellungen (10x oder 40x).
Wichtiger Hinweis:
Nicht bei jedem Präparat ist die höchste Ver-
größerung auch gleichzeitig die Beste!
Beachte:
Bei veränderter Vergrößerungseinstellung (Oku-
lar- oder Objektivwechsel, Herausziehen der
Barlowlinse) muss die Bildschärfe am Scharf-
einstellungsrad (Abb. 1, 15) neu eingestellt
werden. Gehe hierbei sehr vorsichtig vor. Wenn
Du den Mikroskoptisch zu schnell herauffährst,
können sich Objektiv und Objektträger berühren
und beschädigt werden!
Viele Kleinlebewesen des Wassers, Panzen-
teile und feinste tierische Bestandteile sind
bereits von Natur aus transparent. Andere müs-
sen erst noch entsprechend vorbereitet (prä-
pariert) werden. Sei es, dass wir sie mit einer
Vorbehandlung oder Durchdringung mit geeig-
neten Stoffen (Medien) durchsichtig machen
oder dadurch, dass wir feinste Scheibchen von
ihnen abschneiden (Handschnitt, Dünnschnitt)
und diese dann untersuchen. Mehr dazu kannst
Du in den folgenden Abschnitten lesen.
Wie stelle ich dünne Präparatschnitte her?
Bitte nur unter Aufsicht Deiner Eltern oder ande-
rer Erwachsener durchführen.
Wie ich schon sagte, werden von einem Objekt
möglichst dünne Schnitte gemacht. Um zu bes-
ten Ergebnissen zu kommen, benötigen wir et-
wasWachsoderParafn.NimmDirambesten
eine Kerze. Das Wachs gibst Du in einen Topf
um es über einer Flamme kurz zu erwärmen.
Nun tauchst Du das Objekt mehrere Male in das
üssigeWachs.DanachlassedasWachshart
werden. Mit der Dünnschnittapparatur (Abb. 1,
19) oder einem Messer/Skalpell werden jetzt
feinste Schnitte von dem mit Wachs umhüllten
Objekt abgeschnitten. Diese Schnitte werden
auf einen Glasobjektträger gelegt und mit ei-
nem Deckglas abgedeckt.
Wie stelle ich mein eigenes Präparat her?
Nimm das Objekt, das Du beobachten möchtest
und lege es auf einen Glasobjektträger. Dann
gebe mit einer Pipette (Abb. 1, 19) einen Trop-
fen destilliertes Wasser auf das Objekt (Abb.
7). Nun setzte ein Deckglas senkrecht am Rand
des Wassertropfens an, so dass das Wasser
entlang der Deckglaskante verläuft. Danach
senke das Deckglas langsam über dem Was-
sertropfen ab (Abb. 8).
Hinweis:
Das mitgelieferte Einschlussmittel „Gum-Me-
dia“ (Abb. 1, 18) dient zur Herstellung von Dau-
erpräparaten. Gib dieses anstelle von destil-
liertem Wasser hinzu. Wenn Du also möchtest,
dass das Objekt dauerhaft auf dem Objektträ-
I
Abb. 3
Abb. 7 Abb. 8

8
ger verbleibt, so nehme das aushärtende „Gum
Media“.
Experimente
ImInternetndestduunterfolgendemLinkBro-
schüren mit interessanten Experimenten, die du
ausprobieren kannst.
http://www.bresser.de/downloads
Mikroskop-Zubehörndestduz.B.hier:
http://www.bresser.de/P8859480
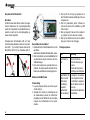
Wie setze ich das MikrOkular ein?
Hinweis:
Das MikrOkular funktioniert nur ohne die mitge-
lieferte Barlowlinse! Die Vergrößerungseinstel-
lung wird durch den Einsatz des MikrOkulars
verändert und muss mit dem Scharfeinstel-
lungsrad neu eingestellt werden.
Zuerst entfernst du die Barlowlinse (Abb. 4, 3)
mit dem momentan verwendeten Okular aus
dem Okularstutzen (Abb. 4) und setzt statt des-
sen das MikrOkular (Abb. 5, 4) in den Okular-
stutzen ein (Abb. 5).
Wie installiere ich die Software?
1. Die Setup Datei zur installation kannst du
hier herunterladen:
www.bresser.de/download/CamLabLite_Junior
2. Mit einem Doppelklick auf die .exe-Datei die
Installation starten und den Anweisungen
des Installationsmanagers folgen.
3. Es ist nicht notwendig, einen speziellen Trei-
ber zu installieren. Die Kamera wird von den
entsprechenden Windows-Betriebssystemen
automatisch erkannt.
Arbeiten mit dem MikrOkular
Vorbereitung
1. Lege ein Präparat unter dein Mikroskop und
stelle es scharf.
2. Entferne das Okular und die Barlowlinse aus
dem Okularstutzen, sowie die Staubschutz-
kappe vom MikrOkular und stecke dieses
anstelle der Barlowlinse in den Okularstuzen.
3. Starte den PC und schließe das MikrOkular
an den USB-Port deines Computers an.
4. Starte die „CamLabLite_Junior“ Software
und aktiviere die Kamera durch klicken auf
„USB Video Device“.
5. Klicke auf „Schnappschuss“ um ein Bild zu
machen oder auf „Aufnahme“ um ein Video
aufzunehmen.
6. Klicke auf das Disketten Symbol um das Bild
oder die Aufnahme zu speichern.
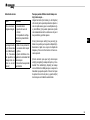
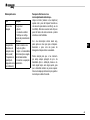
Fehlerbehebung
Fehler Lösung
kein Bild
erkennbar
• Licht einschalten
• Schärfe neu einstellen
• Windows Einstellun-
gen für Datenschutz
überprüfen
Bildimmert
(bei Beobachtung
mit MikrOkular) =
Bildwiederholfre-
quenz des Moni-
tors nicht ausrei-
chend
•ggf.AuösungderGra-
kkarteherabsetzen
• Helligkeit am Dimmer
des Mikroskops einstellen
• Automatische Belich-
tung deaktivieren
Abb. 4
D
f
Abb. 5
E
F

9
DE
Wie pege ich mein Mikroskop und wie gehe
ich damit um?
Dein Mikroskop ist ein hochwertiges optisches
Gerät. Deshalb solltest Du es vermeiden, dass
Staub oder Feuchtigkeit mit Deinem Mikroskop
in Berührung kommt. Vermeide auch Fingerab-
drücke auf allen optischen Flächen (z. B. Oku-
lar).
Sollte dennoch Schmutz oder Staub auf dein
Mikroskop oder das Zubehör geraten sein, ent-
fernst Du diesen zuerst mit einem weichen Pin-
sel. Danach reinigst Du die verschmutzte Stelle
mit einem weichen, fusselfreien Tuch. Finger-
abdrücke auf den optischen Flächen entfernst
Du am besten mit einem fusselfreien, weichen
Tuch, auf das Du vorher etwas Alkohol gegeben
hast.
Nach der Benutzung solltest Du das Mikroskop
und das Zubehör wieder in den dazugehörigen
Behältnissen verstauen.
Bedenke:
EingutgepegtesMikroskopbehältaufJahre
hinaus seine optische Qualität und so seinen
Wert.

1010
EN
Operating Instructions
WARNING! Not for children under
three years. Choking hazard – small
parts. Contains functional sharp
edges and points!
ATTENTION: Only suitable for children of at
least 8 years of age. Instructions for parents
or other responsible persons are enclosed and
must be followed. Keep packaging as it con-
tains important information.
General Warnings
• Choking hazard — This product contains
small parts that could be swallowed by
children. This poses a choking hazard.
• Risk of electric shock — This device contains
electronic components that operate via a
power source (batteries). Only use the device
as described in the manual, otherwise you
run the risk of an electric shock.
• Risk of re/explosion — Do not expose the
device to high temperatures. Use only the
recommended batteries. Do not short-circuit
the device or batteries, or throw them into
a re. Excessiveheat or improper handling
could trigger a short-circuit, a re or an
explosion.
• Risk of chemical burn — Make sure you insert
the batteries correctly. Empty or damaged
batteries could cause burns if they come
into contact with the skin. If necessary, wear
adequate gloves for protection.
• Leaking battery acid can lead to chemical
burns. Avoid contact of battery acid with
skin, eyes and mucous membranes. In the
event of contact, rinse the affected region
immediately with a plenty of water and seek
medical attention.
• Use only the recommended batteries. Always
replace weak or empty batteries with a new,
complete set of batteries at full capacity.
Do not use batteries from different brands
or with different capacities. Remove the
batteries from the unit if itis not to be used
for a long period of time, or if the batteries
are empty!
• Never recharge normal, non-rechargeable
batteries. This could lead to explosion during
the charging process.
• Rechargeable batteries are only to be
charged under adult supervision.
• Rechargeable batteries are to be removed
from the toy before being charged
• The terminals must not be short-circuited.
• Do not disassemble the device. In the event
of a defect, please contact your dealer. The
dealer will contact the Service Centre and
can send the device in to be repaired, if
necessary.
• Tools with sharp edges are often used when
working with this device. Because there is
a risk of injury from such tools, store this
device and all tools and accessories in a
location that is out of the reach of children.
• Keep instructions and packaging as they
contain important information.
• The chemicals and liquids provided should
be kept out of reach of children. Do not drink
the chemicals! Hands should be washed
thoroughly under running water after use.
In case of accidental contact with the eyes
or mouth rinse with water. Seek medical
treatment for ailments arising from contact
with the chemical substances and take the
chemicals with you to the doctor.
Check the Power supply for damage to the
cord, plug, enclosure or other parts on a regular
basis before use. Do not use until the damage
has been repaired. The toy is not intended for
children under three years. The toy must only
be used with the recommended power supply.
The power supply is not a toy.
The toy is not to be connected to more than the
recommended number of power supplies.

11
GBEN
11
TIPS on cleaning
Remove the device from it’s energy
source before cleaning (remove plug
from socket / remove batteries).
Clean the exterior of device with a dry cloth. Do
notusecleaninguidssoastoavoidcausing
damage to electronic components.
Toys liable to be cleaned with liquid are to be
disconnected from the power supply before
cleaning
Clean the lens (objective and eyepiece) only
with the cloth supplied or some other soft lint-
freecloth(e.g.micro-bre).Donotuseexcessi-
ve pressure - this may scratch the lens.
DISPOSAL
Dispose of the packaging material/s as
legally required. Consult the local authori-
ty on the matter if necessary.
Do not dispose of electrical equipment
in your ordinary refuse. The European
guideline 2002/96/EU on Electronic and
Electrical Equipment Waste and relevant laws
applying to it require such used equipment to
be separately collected and recycled in an envi-
ronment-friendly manner.
Empty batteries and accumulators must be dis-
posed of separately. Information on disposing
of all such equipment made after 01 June 2006
can be obtained from your local authority.
EC Declaration of Conformity
Bresser GmbH has issued a „Declara-
tion of Conformity“ in accordance
with applicable guidelines and corre-
sponding standards. The full text of the EU dec-
laration of conformity is available at the follow-
ing internet address:
www.bresser.de/download/8855001/CE/
8855001_CE.pdf
Warranty & Service
The regular guarantee period is 5 years and be-
gins on the day of purchase. You can consult
the full guarantee terms as well as information
on extending the guarantee period and details
of our services at:
www.bresser.de/warranty_terms.

12
Here are the parts of your microscope
1 16x WF Eyepiece
2 10x WF Eyepiece
3 Barlow Lens
4 MicrOcular (USB Ocular)
5 Eyepiece supports
6 Microscope Head
7 Set Screw
8 Objective Nosepiece
9 Objective
10 Clips
11 Microscope Stage
12 LED Illumination (transmitted light)
13 Microscope Base
14 Battery compartment
15 Focus knob
16 MicroOkular / Software
17 Slides, Cover Sips and Prepared
Specimens plastic box
18 Specimens
19 Microscope utensils
20 Transmitted light switch on/off
21 Dimmer
How do I use my microscope?
Before you assemble your microscope, make
sure that the table, desk or whatever surface
that you want to place it on is stable, and does
not wobble.
Electric LED illumination?
The microscope is equipped with modern LED
lighting (a light-emitting diode) that illuminates
the specimen from below. (By the way, the thing
you want to observe with the microscope is
known as the object or specimen.)
How do I adjust my microscope correctly?
First, loosen the screw (Fig. 1, 7) and turn the
microscope head (Fig. 1, 6) into a comfortable
viewing position.
Each observation starts with the lowest
magnication.
Adjust the microscope stage (Fig. 1, 11) so
that it goes all the way down to the lowest
position. Then, turn the objective nosepiece
(Fig. 1, 8) until it clicks into place at the lowest
magnication(objective4x).
Note:
Before you change the objective setting,
always move the microscope stage (Fig. 1, 11)
to its lowest position. This way, you can avoid
causing any damage!
Now, insert the 10x
eyepiece (Fig. 1, 1)
into the Barlow lens
(Fig. 1, 3). Make sure
that the Barlow lens is
placed all the way into
the eyepiece supports
(Fig. 1, 5) and is not
pulled out (Fig. 2).
How do I observe the specimen?
After you have assembled the microscope
with the adequate illumination and adjusted
it correctly, the following basic rules are to be
observed:
Start with a simple observation at the lowest
magnication.Thisway,itiseasiertoposition
the object in the middle (centering) and make
the image sharp (focusing).
Thehigherthemagnication,themorelightyou
will require for a good image quality.
Abb. 2
D
f
B/C

GB
13
Now place the prepared
specimen (Fig. 1,
19) directly under
the objective on the
microscope stage (Fig.
3). The object should
be located directly over
the illumination (Fig. 1, 12).
In the next step, take a look through the
eyepiece (Fig. 1, 1) and carefully turn the focus
knob (Fig. 1, 16) until the image appears clear
and sharp.
Now you can select a higher magnication
by slowly removing the Barlow lens (Fig. 1, 3)
from the eyepiece support (Fig. 1, 5). When the
Barlow lens is almost completely pulled out,
themagnicationcanbeincreasedto–almost
double. If you would like an even higher level of
magnication,insertthe16xeyepiece(Fig.1,
2) and turn the objective nosepiece (Fig. 1, 8)
to a higher setting (10x or 40x).
Important tip:
The highest magnication is not always the
best for every specimen!
Note:
Eachtimethemagnicationchanges(eyepiece
or objective change, pulling out the Barlow
lens), the image sharpness must be readjusted
with the focus knob (Fig. 1, 16). When doing
this, make sure to be careful. If you move the
microscope stage too quickly, the objective and
the slide could come into contact and become
damaged!
For transparent objections (e.g. protozoa), on
the other hand, the light shines from below,
through the opening in the microscope stage
and then through the object.
The light travels further through the objective
and eyepiece,where itisalso magnied, and
nally goes into the eye. This is transmitted-
light microscopy.
Many microorganisms in water, many plan
components and the smallest animal parts are
already transparent in nature. Others have to
be prepared. We may make them transparent
through a treatment or penetration with the
right materials (media), or by taking the thinnest
slices from them (using our hand or a specimen
slicer), and then examine them. You can read
more about this in the following sections.
How do I make thin specimen slices?
Only do this with the supervision of your parents
or another adult.
As I already pointed out, the thinnest slices
possible are taken from an object. In order
to get the best results, we need some wax or
parafn. It is best if you get a candle. Place
the wax in a pot and heat it carefully over a low
burner. Now, dip the object in the liquid wax a
few times. Then, let the wax get hard. Using the
specimen slicer (Fig. 1,19) or a knife/scalpel,
cut the smallest slices from the object that is
covered with wax. These slices are to be laid on
a slide and covered with a cover slip.
How do I make my own specimens?
Take the object that you want to observe and
place it on a glass slide. Then, add a few drops
of distilled water on the object (Fig. 7) using
a pipette (Fig. 1, 19). Now, place a cover slip
vertically at the edge of the drop of water, so
that the water runs along the edge of the cover
slip. Then, slowly lower the cover slip over the
water drops (Fig. 8).
Note:
The included glue “gum media” (Fig. 1, 18) is
used to make permanent prepared specimens.
Use this in place of the distilled water. If you
want to keep the object in place on the slide
permanently, use the gum media.
I
Abb. 3
Abb. 7 Abb. 8

14
Experiments
Use the following web link to nd interesting
experiments you can try out.
http://www.bresser.de/downloads
Microscope accessories can be found here:
http://www.bresser.de/P8859480
How do I install the MicrOcular?
Note:
The MicrOcular only works without the includ-
ed Barlow lens! The magnication setting is
changed when the MicrOcular is used, and it
must be readjusted with the focus knob.
First, remove the Barlow lens (Fig. 4, 3) with
the current eyepiece from the eyepiece support
(Fig. 4) and place the MicrOcular (Fig. 5, 4) in
the eyepiece (Fig. 5).
Fig. 4
D
f
Fig. 5
E
F
How do I install the software?
1.Youcandownloadthesetupleforinstalla-
tion here:
www.bresser.de/download/CamLabLite_Junior
2. Start the installation with a double click on
the.exeleandfollowtheinstructionsofthe
installation manager.
3. It is not necessary to install a special driver.
The camera is automatically recognized by
your Windows operating system.
Using the MicrOcular
Preparation
1. Slide a specimen under your microscope and
focus on it.
2. Remove the eyepiece and Barlow lens from
the eyepiece support and the dust cap from
your MikrOkular and then install the MikrOku-
lar into the eyepiece support instead of the
Barlow lens.
3. Start your PC if you haven‘t yet and connect
your MikrOkular to the USB port of your com-
puter.
4. Start the „CamLabLite_Junior“ software and
activate the camera by clicking on „USB Vi-
deo Device.
5. Click on „Snapshot“ to take a picture or on
„Capture“ to record a video.
6.Click on the oppy disk icon to save the
image or capture.
Troubleshooting
Error Solution
No recognizable
image
• Turn on light
• Readjust focus
• Check Windows privacy
settings
Imageickers
(while observing
with MicrOcular)
= Monitor
refresh rate not
adequate
• If necessary, increase
resolution of graphics
card
• Adjust brightness at the
dimmer of the microscope
• Disable automatic expo-
sure

EN
15
Make sure your microscope has a long service
life.
Clean the lens (objective and eyepiece) only
with the cloth supplied or some other soft lint-
freecloth(e.g.microbre).Donotpresshardas
this might scratch the lens.
Ask your parents to help if your microscope is
really very dirty. The cleaning cloth should be
moistenedwithcleaninguidandthelenswi-
ped clean using little pressure.
Make sure your microscope is always protec-
ted against dust and dirt. After use leave it in
a warm room to dry off. Then install the dust
caps and keep it in the case provided.

16
FR
Mode d’emploi
AVERTISSEMENT ! Ne convient pas
pour les enfants de moins de 3 ans.
Risque d‘étouffement - Petites pi-
èces. Contient des pointes et arêtes
coupantes fonctionnelles !
ATTENTION : Convient exclusivement pour les
enfants âgés d’au moins 8 ans. Des instruc-
tions pour les parents et les autres personnes
responsables sont incluses et doivent être res-
pectées. Conservez l’emballage car il contient
d’importantes informations.
Consignes générales de sécurité
• RISQUE D’ETOUFFEMENT! Ce produit contient
des petites pièces, qui pourraient être avalées
par des enfants. Il y a un RISQUE D’ETOUFFE-
MENT.
•
RISQUE D’ELECTROCUTION ! Cet appareil
contient des pièces électroniques raccordées à
une source d’alimentation électrique (batteries).
L’utilisation de l’appareil doit se faire exclusive
-
ment comme décrit dans ce manuel, faute de
quoi un RISQUE d’ELECTROCUTION peut exister !
• RISQUE D’EXPLOSION / D’INCENDIE ! Ne pas
exposer l’appareil à des températures trop éle-
vées. N’utilisez que les batteries conseillées.
L’appareil et les batteries ne doivent pas être
court-circuitées ou jeter dans le feu ! Toute
surchauffe ou manipulation inappropriée peut
déclencher courts-circuits, incendies voire
conduire à des explosions!
• RISQUE DE BLESSURE ! En équipant l’appareil
des batteries, il convient de veiller à ce que la
polarité des batteries soit correcte. Les batte-
ries endommagées ou ayant coulées causent
des brûlures par acide, lorsque les acides
qu’elles contiennent entrent en contact direct
avec la peau. Le cas échéant, il convient d’uti-
liser des gants de protection adaptés.
• L’écoulement de l‘électrolyte d’une batterie
peut entraîner des blessures par brûlure due
à l’acidité du produit ! Evitez tout contact
de l’électrolyte avec la peau, les yeux et les
muqueuses. En cas de contact avec l‘acide,
rincez abondamment et immédiatement les
parties du corps concernées en utilisant de
l’eau claire et consultez un médecin dans les
meilleurs délais.
• N‘utilisez que les batteries conseillées. Rem-
placez toujours les batteries trop faibles ou
usées par un jeu complet de nouvelles batte-
ries disposant de toute sa capacité. N’utilisez
pas de batteries de marques, de types ou de
capacités différentes. Les batteries doivent
être enlevées de l’appareil lorsque celui-ci est
destiné à ne pas être utiliser pendant un cer-
tain temps ou si les piles sont vides !
• Ne jamais recharger de piles normales non
rechargeables ! Les piles à usage unique
peuvent exploser lorsqu’elles sont rechar-
gées.
• Les piles rechargeables ne doivent être char-
gées que sous la surveillance d’un adulte.
• Les piles rechargeables doivent être retirées
du jouet avant le chargement.
• Les bornes ne doivent pas être court-circui-
tées.
• Ne pas démonter l’appareil ! En cas de défaut,
veuillez vous adresser à votre revendeur
spécialisé. Celui-ci prendra contact avec le
service client pour, éventuellement, envoyer
l’appareil en réparation.
• L’utilisation de cet appareil exige souvent l’uti-
lisation d’accessoires tranchants et/ou poin-
tus. Ainsi, il convient de conserver l’appareil
et ses accessoires et produits à un endroit
se trouvant hors de la portée des enfants.
RISQUES DE BLESSURES !
• Conservez les instructions et l’emballage car
ils contiennent des informations importantes.
• Les produits chimiques et les liquides inclus
à la livraison doivent être tenus hors de la
portéedesenfants!Nepasboirelesproduits
chimiques!Bienselaverlesmainssousl’eau
courante après utilisation. En cas de contact
involontaire avec les yeux ou la bouche,
bien rincer à l’eau claire. En cas de troubles,
consultez sans tarder un médecin et montrez-
lui les substances.

17
FR
Inspectez régulièrement avant utilisation le
cordond’alimentation,lache,leboîtieretles
autres pièces pour vérier qu’ils ne sont pas
endommagés. Ne pas utiliser tant que la dété-
rioration n’a pas été réparée. Le jouet n’est pas
conçu pour les enfants de moins de 3 ans. Le
jouet ne doit être utilisé qu’avec l’alimentation
électrique recommandée. L’alimentation élec-
trique n’est pas un jouet. Le jouet ne doit pas
être branché dans plus d’alimentations élec-
triques que le nombre recommandé.
REMARQUES concernant le nettoyage
Avant de procéder au nettoyage de
l’appareil, séparez-le de la source de
courant (retirez le bloc secteur de la
priseouretirezlespiles)!
Ne nettoyez que l’extérieur de l’appareil et à
l’aide d’un chiffon propre. N’utilisez pas de li-
quidedenettoyageand’évitertoutdommage
au système électronique.
Les jouets pouvant être nettoyés avec du li-
quide doivent d’abord être débranchés de
l’alimentation électrique.
Pour nettoyer les lentilles (oculaires et /ou ob-
jectifs), utilisez uniquement le chiffon à lentil-
les ci-joint ou bien un chiffon doux et non pelu-
cheux(parexempleenmicrobre).N’appuyez
pas trop fortement le chiffon sur les lentilles
pour ne pas les rayer.
Pour retirer des traces de saleté plus résistantes,
humidiezlégèrementlechiffonavecunliquide
prévu pour le nettoyage des lunettes et passez
sur les lentilles en exerçant une légère pression.
Tenez l’appareil à l’abri de la poussière et de
l’humidité ! Conservez-le dans la sacoche in-
cluse à la livraison ou bien dans l’emballage de
transport. Retirez les piles de l‘appareil si vous
nen’utilisezpaspendantuncertaintemps!
ÉLIMINATION
Éliminez les matériaux d’emballage selon
le type de produit. Pour plus
d’informations concernant l’élimination
conforme, contactez le prestataire communal
d’élimination des déchets ou bien l’ofce de
l’environnement.
Ne jetez pas d’appareils électriques dans
lesorduresménagères!
Selon la directive européenne 2002/96/EG
relative aux déchets d‘équipements électriques et
électroniques et à sa mise en œuvre au niveau
du droit national, les équipements électriques
doivent être triés et déposés à un endroit où ils
seront recyclés de façon écologique. Les piles et
les accumulateurs usagés doivent être déposés
dans des conteneurs de collectes de piles prévus
à cet effet. Pour plus d’informations concernant
l’élimination conforme d’appareils usagés et de
piles usagées produites après le 01.06.2006, con-
tactez le prestataire d’élimination communal ou
bienl’ofcedel’environnement.
Déclaration de conformité CE
Bresser GmbH a émis une « déclarati-
on de conformité » conformément
aux lignes directrices applicables et
aux normes correspondantes. Le texte complet
de la déclaration UE de conformité est disponi-
ble a l’adresse internet suivante:
www.bresser.de/download/8855001/CE/
8855001_CE.pdf
Garantie et Service
La durée normale de la garantie est de 5 ans
à compter du jour de l’achat. Vous pouvez
consulter l’intégralité des conditions de garan-
tie ainsi que les informations concernant la pro-
longation de la garantie et les prestations de
service sur www.bresser.de/warranty_terms.

18
Voici les pièces de ton microscope
1 Oculaire 16x WF
2 Oculaire 10x WF
3 Lentille Barlow
4 MicrOculaire
5 Supports d’oculaire
6 Tête de microscope
7 Vis de serrage
8 Nez de l’objectif
9 Objectif
10 Clip maintien
11 Table du microscope
12 Eclairage LED
13 Pied de microscope
14 Boîtier à piles
15 Roue de focalisation
16 MicroOkular / Software
17 Porte-objectif, Lamelle
couvre-objets et préparation
durable dans une boîte en plastique
18 Préparations:
19 Ustensiles pour microscope
20 Commutateur sélecteur éclairage
par transmission
21 Variateur
Comment dois-je utiliser l’éclairage LED
électrique?
Le microscope est équipé d’un éclairage LED
moderne (diodes lumineuses), qui éclaire ta
préparation microscopique par le bas. (Au
fait, ce que tu veux observer au microscope
s’appelle un objet ou une préparation.)
Comment régler correctement mon
microscope?
Tout d’abord, desserre la vis (Illustr. 1,7) et
tourne la tête du microscope (Illustr. 1,6) dans
une position d’observation confortable.
Chaque observation commence avec le
grossissement le plus faible.
Tout d’abord, descends complètement la table
du microscope (Illustr. 1,11). Puis tourne le
nez de l’objectif (Illustr. 1, 8) au point que le
grossissement (Objectif 4x) le plus faible soit
enclenché.
Indication:
Avant de changer le réglage de l’objectif,
commence toujours par bien descendre la
table du microscope (Illustr. 1,11). Ainsi tu
peuxéviterd’éventuelsdommages!
Maintenant, place
l’oculaire 10x (Illustr.
1,1) dans la lentille
de Barlow (Illustr.
1,3). Veille à ce que la
lentille de Barlow soit
entièrement dans les
supports oculaires
(Illustr. 1,5) et qu’elle ne soit pas retirée (Illustr.
2).
Comment dois-je observer la préparation?
Une fois que tu as monté et réglé le microscope
avec l’éclairage approprié, les principes
suivants doivent s’appliquer:
Commence par une observation simple au
grossissement le plus faible. Ainsi, il est plus
facile de mettre l’objet au milieu (Centrage) et
de mettre l’image au point (Focalisation).
Plus le grossissement est élevé, plus tu as
besoin de lumière pour une bonne qualité
d’image.
Illustr. 2
D
f
B/C

19
FR
Maintenant, pose une
préparation durable
(Illustr. 1, 19) directement
sous l’objectif sur la
table du microscope
(Illustr. 3). L’objet à
observer ne doit pas être
placé directement sur
l’éclairage (Illustr. 1, 12).
Pour l’étape suivante, tu dois regarder à travers
l’oculaire (Illustr. 1, 1) puis tourner la roue de
focalisation avec précaution (illustr. 1, 16)
jusqu’à ce que l’image soit nette.
Maintenant, tu peux régler à un grossissement
plus élevé, en retirant lentement la lentille de
Barlow (Illustr. 1, 3) des supports de l’oculaire
(Illustr. 1, 5). Si la lentille de Barlow est retirée
entièrement et rapidement, le grossissement
peut être augmenté d’environ le double.
Si tu souhaites avoir des grossissements plus
élevés, règle l’oculaire 16x (Illustr. 1,2) et tourne
le nez de l’objectif (Illustr. 1,8) sur des réglages
plus élevés (10x ou 40x).
Indication importante:
Le grossissement le plus élevé n’est pas le
meilleurpourtouteslespréparations!
Attention:
En cas de réglage différent du grossissement
(changement d’oculaire ou d’objectif, retrait
de la lentille de Barlow) la netteté de l’image
doit être à nouveau réglée sur la roue de
focalisation 1,16). Sois très prudent lors de
cette manipulation. Si tu sors la table de
microscope trop vite, l’objectif et le porte-objet
peuventsetoucheretêtreendommagés!
Pour les objets transparents (par ex. Organisme
unicellulaire) la lumière brille par en dessous à
travers l’ouverture dans la table du microscope
puis à travers l’objet observé.
Le chemin de la lumière mène jusqu’à l’objectif
et l’oculaire, ou il y a encore un grossissement,
puis elle arrive aux yeux. Ceci est la microscopie
transparente.
Plusieurs petits êtres marins, des parties de
plante et les composants les plus ns sont
de nature déjà transparents. D’autres doivent
d’abord être préparés de façon adéquate.
A moins que nous les rendions transparents
avec un traitement préalable ou une pénétration
avecdesmatières(uides)ouencoupantles
élémentslesplusnsdecesderniers(coupe,
lame mince) et que nous analysons. Tu peux
en apprendre plus sur ce procédé dans les
paragraphes suivants.
Comment fabriquer des tranches de
préparation nes?
Tu ne dois les effectuer que sous la supervision
de tes parents.
Comme je l’ai déjà dit, un objet doit être
transforméennestranches.Pourobtenirde
meilleurs résultats, nous avons besoin d’un
peudecireoudeparafne.Prendsplutôtune
bougie. Place la cire dans une casserole pour la
faire chauffer un peu à feux doux. Maintenant,
plonge l’objet plusieurs fois dans la cire liquide.
Puislaisselaciresesolidier.Avecl’appareil
de coupe (Illustr. 1, 19) ou un couteau/scalpel,
des tranches nes doivent maintenant être
coupées de l’objet enduit de cire. Ces tranches
seront posées sur un porte-objet en verre et
couvertes avec un cache.
I
2)
Illustr. 3

20
Comment effectuer ma propre
préparation?
Prends l’objet que tu souhaites observer et
pose le sur un porte-objet en verre. Puis ajoute
une goutte d’eau distillée sur l’objet (Illustr.7) à
l’aide d’une pipette (Illustr. 1, 19). Maintenant
pose un cache à la verticale au bord de la
goutte d’eau, de sorte que l’eau s’écoule le
long du rebord du cache. Puis baisse le cache
lentement sur la goutte d’eau (Illustr. 8).
Indication:
Le produit pour inclusion inclus « Gum-
Media»(Illustr.1,18)sertàlafabricationde
préparations durables. Ajoute ceci à la place de
l’eau distillée. Si tu souhaites également que
l’objet demeure sur le porte-objet, alors prends
le«Gum-Media»durciparvieillissement.
Expériences
Utilisez le lien Internet suivant pour découvrir
toutes les expériences passionnantes que vous
pouvez faire.
http://www.bresser.de/downloads
Les accessoires pour microscope peuvent être
trouvés ici : http://www.bresser.de/P8859480
Comment dois-je installer le MicrOculaire?
Indication:
Le MicrOculaire fonctionne uniquement sans
leslentillesde Barlow fournies!L’ajustement
du grossissement seramodié par l’insertion
du MicrOculaire et doit être à nouveau ajustée
par le biais de la roue de focalisation.
Pour commencer, retire les lentilles de Barlow
(Illustr. 4,3) avec l’oculaire utilisé momentané-
ment du support oculaire (Illustr. 4,) et installe
à la place le MicrOculaire (Illustr. 5,4) dans les
supports d’oculaire (Illustr. 5).
Fig. 4
D
f
Fig. 5
E
F
Comment installer le logiciel ?
1.Vouspouveztéléchargerlechierdecon-
guration pour l‘installation ici :
www.bresser.de/download/CamLabLite_Junior
2. Démarrez l‘installation en double-cliquant
surlechier.exeetsuivezles instructions
du gestionnaire d‘installation.
3. Il n‘est pas nécessaire d‘installer un pilote spé-
cial. L‘appareil est automatiquement reconnu
par votre système d‘exploitation Windows.
Utilisation du MicrOcular
Préparation
1. Placez un échantillon sur la platine de votre mi-
croscope et faites la mise au point sur celui-ci.
2. Retirez l’oculaire et la lentille de Barlow du
porte oculaire et le capuchon anti-poussière
de votre MicrOcular, puis installez le MicrO-
cular dans le porte oculaire au lieu de la len-
tille de Barlow.
3. Démarrez votre PC si vous ne l’avez pas
encore fait et connectez votre MicrOcular au
Illustr. 7 Illustr. 8
2^
Seite laden ...
Seite laden ...
Seite laden ...
Seite laden ...
Seite laden ...
Seite laden ...
Seite laden ...
Seite laden ...
Seite laden ...
Seite laden ...
Seite laden ...
Seite laden ...
Seite laden ...
Seite laden ...
Seite laden ...
Seite laden ...
Seite laden ...
Seite laden ...
Seite laden ...
Seite laden ...
Seite laden ...
Seite laden ...
Seite laden ...
Seite laden ...
Seite laden ...
Seite laden ...
Seite laden ...
Seite laden ...
-
 1
1
-
 2
2
-
 3
3
-
 4
4
-
 5
5
-
 6
6
-
 7
7
-
 8
8
-
 9
9
-
 10
10
-
 11
11
-
 12
12
-
 13
13
-
 14
14
-
 15
15
-
 16
16
-
 17
17
-
 18
18
-
 19
19
-
 20
20
-
 21
21
-
 22
22
-
 23
23
-
 24
24
-
 25
25
-
 26
26
-
 27
27
-
 28
28
-
 29
29
-
 30
30
-
 31
31
-
 32
32
-
 33
33
-
 34
34
-
 35
35
-
 36
36
-
 37
37
-
 38
38
-
 39
39
-
 40
40
-
 41
41
-
 42
42
-
 43
43
-
 44
44
-
 45
45
-
 46
46
-
 47
47
-
 48
48


Bresser Junior 8855001 Bedienungsanleitung
- Kategorie
- Spielzeuge
- Typ
- Bedienungsanleitung
in anderen Sprachen
- English: Bresser Junior 8855001 Owner's manual
- français: Bresser Junior 8855001 Le manuel du propriétaire
- español: Bresser Junior 8855001 El manual del propietario
- italiano: Bresser Junior 8855001 Manuale del proprietario
- Nederlands: Bresser Junior 8855001 de handleiding
- português: Bresser Junior 8855001 Manual do proprietário
Verwandte Papiere
-
Bresser Junior 8855000 Bedienungsanleitung
-
-
-
-
Bresser Junior Biolux CA 40x-1024x Microscope incl. Smartphone Holder Bedienungsanleitung
-
Bresser Junior MicroSet 40x-1024x Bedienungsanleitung
-
Bresser 20x Stereo Microscope Bedienungsanleitung
-
-
Sonstige Unterlagen
-
Bresser 5116200 Bedienungsanleitung
-
-
-
National Geographic Reflected Light Microscope 20x magnification Bedienungsanleitung
-
-
-
-
-
-