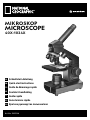
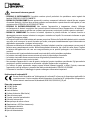
National Geographic 9039100 Bedienungsanleitung
- Kategorie
- Mikroskope
- Typ
- Bedienungsanleitung

Art.No. 9039100
Schnellstart-Anleitung
Quick-start instructions
Guide de démarrage rapide
Snelstart-handleiding
Guida rapida
Guía de inicio rápido
Краткое руководство пользователя
DE
EN
FR
NL
IT
ES
RU
MIKROSKOP
MICROSCOPE
40X-1024X

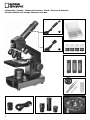
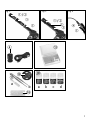
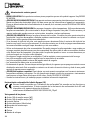
Lieferumfang · Contents · Contenu de la livraison · Inhoud · Accessori in dotazione
Artículos incluidos en la entrega · Комплект поставки
2
B
A

3
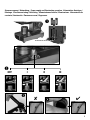
Stromversorgung / Beleuchtung · Power supply and illumination operation · Alimentation électrique /
Eclairage · Stroomvoorziening / Belichting · Alimentazione elettrica / Illuminazione · Alimentación de
corriente / Iluminación · Питание от сети / Подсветка
C
OFF I II III
D
E
B

Zubehör anbringen · Accessory installation · Fixation des accessoires · Accessoires aansluiten ·
Montaggio degli accessori · Instalación de accesorios · Установка дополнительного оборудования
B C
D
C
E
B

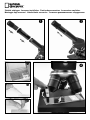
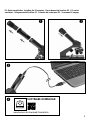
PC-Okular anschließen · Installing the PC eyepiece · Raccordement de l’oculaire PC · PC-oculair
aansluiten · Collegamento dell’oculare PC · Conexión del ocular para PC · Установка PC окуляр
5
5
D
E
B C
www.bresser.de/download/CamLabLite
SOFTWARE DOWNLOAD:

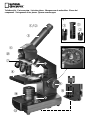
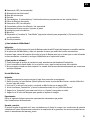
Teileübersicht · Parts overview · Liste des pièces · Weergave van de onderdelen · Elenco dei
componenti · Vista general de las piezas · Детали и аксессуары
B/C
F
G
2!
h
1%
J
1)
1@
1!
1^
1$
1$
D
C
B
Fig. 1
I

7
a
b
1&
1(
1*
a b c d
2)
1#
B/C
D
F
B/C
D
F
Fig. 3Fig. 2
E
F
Fig. 4
E

8
DE
Zu dieser Anleitung
Diese Schnellstart-Anleitung soll Ihnen helfen das Gerät in Betrieb zu nehmen, ersetzt aber nicht die
ausführliche Bedienungsanleitung!
Lesen Sie vor Benutzung des Geräts aufmerksam die Sicherheitshinweise und die ausführliche Bedie-
nungsanleitung. Diese Schnellstart-Anleitung vermittelt die wichtigsten Schritte zur Inbetriebnahme
Ihres neuen Geräts. Eine ausführliche Bedienungsanleitung mit weiteren Informationen und Hinwei-
sen zur Fehlerbehebung nden Sie auf unserer Internetseite:
www.bresser.de (Download: http://www.bresser.de/9039100)
EN
About this manual
This quick-start guide will help you put the device into operation quickly, but it is not intended to
replace the more detailed user manual.
Please read the safety instructions and the user manual carefully before using the device. This quick-
start manual contains the most important steps to start using your new device. Comprehensive oper-
ating instructions and further information, including troubleshooting advice, is available on our web-
site: www.bresser.de (Download: http://www.bresser.de/9039100)
FR
A propos de ce manuel
Ce guide de démarrage rapide vous aidera à mettre rapidement en service votre appareil, mais n’a pas
pour but de remplacer le manuel d’utilisation détaillé.
Lisez attentivement les instructions concernant la sécurité reprises dans le manuel avant toute utilisation
de l’appareil. Ce guide de démarrage rapide vous indique les principales étapes vous permettant de
mettre en service votre nouvel appareil. Des instructions d’utilisation plus détaillées et d’autres informa-
tions comme les diagnostics de pannes peuvent être trouvées sur notre site web:
www.bresser.de (Download: http://www.bresser.de/9039100)
NL
Over deze handleiding
Deze snelstart gids helpt u om het apparaat aan de slag te nemen, maar vervangt niet de gedetail-
leerde instructies!
Lees voor gebruik van het apparaat aandachtig de veiligheidsvoorschriften en de volledige bedie-
ningshandleiding. Deze snelstart-handleiding geeft de belangrijkste stappen aan om uw nieuwe ap-
paraat in gebruik te nemen. De uitgebreide handleiding met meer informatie en troubleshooting vindt
u op onze internet pagina:
www.bresser.de (Download: http://www.bresser.de/9039100)
Download: http://www.bresser.de/9039100
Eine ausführliche Anleitung steht für Sie auf unserer Internetseite zu Ihrer Verfügung.
A more detailed manual is available on our website. • Un guide détaillé est disponible sur
notre site. • Een uitgebreide handleiding is beschikbaar op onze website. • Un manuale di
istruzioni dettagliato è disponibile sul nostro sito Web su internet. • Un manual de
Instrucciones detallado se encuentra disponible en nuestra página Web en internet.
Подробное руководство можно найти на веб-сайте.

9
IT
Informazioni sul presente manuale
Questa Guida Rapida vi aiuterà a mettere il dispositivo in funzione, ma non sostituisce le istruzioni
dettagliate!
Prima di utilizzare l’apparecchio, leggere attentamente le indicazioni di sicurezza e il manuale d’istru-
zioni completo. La presente guida rapida illustra le principali operazioni da eseguire per mettere in
funzione lo strumento. Un manuale di istruzioni dettagliate con informazioni aggiuntive e le istruzioni
per la risoluzione dei problemi, è disponibile sul nostro sito web:
www.bresser.de (Download: http://www.bresser.de/9039100)
ES
Sobre este manual
Esta Guía de inicio rápido le ayudará a poner en funcionamiento el dispositivo, pero no sustituye al
manual de Instrucciones detalladas!
Por favor leer las instrucciones de seguridad y el manual de usuario atentamente antes de utilizar el
producto. Esta guía de inicio rápido proporciona los pasos más importantes para la puesta en servicio
de su nuevo aparato. Un manual de instrucciones detallado con información adicional e instrucciones
para la solución de problemas, se encuentra disponible en nuestro sitio web:
www.bresser.de (Download: http://www.bresser.de/9039100)
RU
Краткое руководство пользователя
Краткое описание поможет вам быстро начать работу с устройством, но не заменит подроб-
ную инструкцию.
Перед использованием устройства внимательно прочтите инструкции по безопасности и ру-
ководство пользователя. Краткое руководство пользователя содержит описание наиболее
важных шагов по вводу в эксплуатацию вашего нового устройства. Подробное руководство
по эксплуатации с дополнительной информацией и инструкциями по устранению неисправ-
ностей находится на нашей веб-странице:
www.bresser.de (Download: http://www.bresser.de/9039100)

10
Allgemeine Warnhinweise
• ERSTICKUNGSGEFAHR! Dieses Produkt beinhaltet Kleinteile, die von Kindern verschluckt werden können! Es
besteht ERSTICKUNGSGEFAHR!
• GEFAHR eines STROMSCHLAGS! Dieses Gerät beinhaltet Elektronikteile, die über eine Stromquelle (Batterien)
betrieben werden. Lassen Sie Kinder beim Umgang mit dem Gerät nie unbeaufsichtigt! Die Nutzung darf nur,
wie in der Anleitung beschrieben, erfolgen, andernfalls besteht GEFAHR eines STROMSCHLAGS!
• BRAND-/EXPLOSIONSGEFAHR! Setzen Sie das Gerät keinen hohen Temperaturen aus. Benutzen Sie nur die
empfohlenen Batterien. Gerät und Batterien nicht kurzschließen oder ins Feuer werfen! Durch übermäßige Hitze
und unsachgemäße Handhabung können Kurzschlüsse, Brände und sogar Explosionen ausgelöst werden!
• VERÄTZUNGSGEFAHR! Batterien gehören nicht in Kinderhände! Achten Sie beim Einlegen der Batterie auf die
richtige Polung. Ausgelaufene oder beschädigte Batterien verursachen Verätzungen, wenn Sie mit der Haut in
Berührung kommen. Benutzen Sie gegebenenfalls geeignete Schutzhandschuhe.
• Ausgelaufene Batteriesäure kann zu Verätzungen führen! Vermeiden Sie den Kontakt von Batteriesäure mit
Haut, Augen und Schleimhäuten. Spülen Sie bei Kontakt mit der Säure die betroffenen Stellen sofort mit
reichlich klarem Wasser und suchen Sie einen Arzt auf.
• Benutzen Sie nur die empfohlenen Batterien. Ersetzen Sie schwache oder verbrauchte Batterien immer durch
einen komplett neuen Satz Batterien mit voller Kapazität. Verwenden Sie keine Batterien unterschiedlicher
Marken, Typen oder unterschiedlich hoher Kapazität. Entfernen Sie Batterien aus dem Gerät, wenn es längere
Zeit nicht benutzt wird, oder die Batterien leer sind!
• Keinesfalls normale, nicht wieder auadbare Batterien auaden! Sie können in Folge des Ladens explodieren.
• Auadbare Batterien dürfen nur unter Aufsicht von Erwachsenen geladen werden.
• Auadbare Batterien sind aus dem Spielzeug herauszunehmen, bevor sie geladen werden.
• Die Anschlussklemmen dürfen nicht kurzgeschlossen werden.
• Bauen Sie das Gerät nicht auseinander! Wenden Sie sich im Falle eines Defekts an Ihren Fachhändler. Er nimmt
mit dem Service-Center Kontakt auf und kann das Gerät ggf. zwecks Reparatur einschicken.
• Für die Arbeit mit diesem Gerät werden häug scharfkantige und spitze Hilfsmittel eingesetzt. Bewahren Sie
deshalb dieses Gerät sowie alle Zubehörteile und Hilfsmittel an einem für Kinder unzugänglichen Ort auf. Es
besteht VERLETZUNGSGEFAHR!
• Anleitung und Verpackung aufbewahren, da Sie wichtige Informationen enthalten.
EG-Konformitätserklärung
Eine „Konformitätserklärung“ in Übereinstimmung mit den anwendbaren Richtlinien und entsprechen-
den Normen ist von der Bresser GmbH erstellt worden. Der vollständige Text der EG-Konformitätser-
klärung ist unter der folgenden Internetadresse verfügbar:
www.bresser.de/download/9039100/CE/9039100_CE.pdf
Teileübersicht:
B 10X WF Okular
C 16X WF Okular
D Barlowlinse
E Elektronisches Okular (MikrOkular)
F Okularstutzen
G Mikroskopkopf
H Objektivrevolver
I Mikroskoptisch
J Scharfeinstellungsrad
1) LED-Beleuchtung (Durchlicht)

11
DE
1! Batteriefach
1@ Mikroskopfuß
1# je 5 Objektträger, 10 Deckgläser und 5 Dauerpräparate in Kunststoffbox
1$ Farblterscheibe
1% LED-Beleuchtung (Auicht)
1^ Wahlschalter Auf-/Durchlicht
1& Mikroskopierbesteck: a) Pipette; b) Pinzette
1* Brutanlage
1( MicroCut
2) Präparate: a) Hefe, b) „Gum-Media“ c) Meersalz, d) Krebseier
2! Feststellschraube
Wie setze ich das MikrOkular ein?
Hinweis:
Das MikrOkular funktioniert nur ohne die mitgelieferte Barlowlinse! Die Vergrößerungseinstellung wird durch den
Einsatz des MikrOkulars verändert und muss mit dem Scharfeinstellungsrad neu eingestellt werden.
Zuerst entfernst du die Barlowlinse mit dem momentan verwendeten Okular aus dem Okularstutzen und setzt
statt dessen das MikrOkular in den Okularstutzen ein.
Wie installiere ich die Software?
1. Die Setup Datei zur installation kannst du hier herunterladen:
www.bresser.de/download/CamLabLite
2. Mit einem Doppelklick auf die .exe-Datei die Installation starten und den Anweisungen des Installationsmana-
gers folgen.
3. Es ist nicht notwendig, einen speziellen Treiber zu installieren. Die Kamera wird von den entsprechenden Win-
dows-Betriebssystemen automatisch erkannt.
Arbeiten mit dem MikrOkular
Vorbereitung
1. Lege ein Präparat unter dein Mikroskop und stelle es scharf.
2. Entferne das Okular und die Barlowlinse aus dem Okularstutzen, sowie die Staubschutzkappe vom MikrOkular
und stecke dieses anstelle der Barlowlinse in den Okularstuzen.
3. Starte den PC und schließe das MikrOkular an den USB-Port deines Computers an.
4. Starte die „CamLabLite“ Software und aktiviere die Kamera durch klicken auf „USB Video Device“.
5. Klicke auf „Schnappschuss“ um ein Bild zu machen oder auf „Aufnahme“ um ein Video aufzunehmen.
6. Klicke auf das Disketten Symbol um das Bild oder die Aufnahme zu speichern.
Experimente
Im Internet ndest du unter folgendem Link Broschüren mit interessanten Experimenten, die du ausprobieren
kannst. http://www.bresser.de/downloads
Garantie & Service
Die reguläre Garantiezeit beträgt 5 Jahre und beginnt am Tag des Kaufs. Die vollständigen Garantiebedingungen
sowie Informationen zu Garantiezeitverlängerung und Serviceleistungen können Sie unter www.bresser.de/garan-
tiebedingungen einsehen.

12
General Warnings
• Choking hazard — This product contains small parts that could be swallowed by children. This poses a choking
hazard.
• Risk of electric shock — This device contains electronic components that operate via a power source
(batteries). Only use the device as described in the manual, otherwise you run the risk of an electric shock.
• Risk of re/explosion — Do not expose the device to high temperatures. Use only the recommended batteries.
Do not short-circuit the device or batteries, or throw them into a re. Excessive heat or improper handling could
trigger a short-circuit, a re or an explosion.
• Risk of chemical burn — Make sure you insert the batteries correctly. Empty or damaged batteries could cause
burns if they come into contact with the skin. If necessary, wear adequate gloves for protection.
• Leaking battery acid can lead to chemical burns. Avoid contact of battery acid with skin, eyes and mucous
membranes. In the event of contact, rinse the affected region immediately with a plenty of water and seek
medical attention.
• Use only the recommended batteries. Always replace weak or empty batteries with a new, complete set of
batteries at full capacity. Do not use batteries from different brands, types or with different capacities. Remove
the batteries from the unit if itis not to be used for a long period of time, or if the batteries are empty!
• Never recharge normal, non-rechargeable batteries. This could lead to explosion during the charging process.
• Rechargeable batteries are only to be charged under adult supervision.
• Rechargeable batteries are to be removed from the toy before being charged
• The terminals must not be short-circuited.
• Do not disassemble the device. In the event of a defect, please contact your dealer. The dealer will contact the
Service Centre and can send the device in to be repaired, if necessary.
• Tools with sharp edges are often used when working with this device. Because there is a risk of injury from
such tools, store this device and all tools and accessories in a location that is out of the reach of children.
• Keep instructions and packaging as they contain important information.
EC Declaration of Conformity
Bresser GmbH has issued a „Declaration of Conformity“ in accordance with applicable guidelines and
corresponding standards. The full text of the EU declaration of conformity is available at the following
internet address:
www.bresser.de/download/9039100/CE/9039100_CE.pdf
Parts overview:
B 10X WF eyepiece
C 16X WF eyepiece
D Barlow lens
E Electronic eyepiece (MicrOcular)
F Microscope head
G Objective revolver
H Microscope stage
I Focus wheel
J LED lighting (transmitted light)
1) Electricity supply
1! Microscope base
1@ Main plug
1# 5 slides, 10 covering glasses and 5 preparations in a plastic box
1$ Colour lter disc

13
EN
1% LED lighting (reected light)
1^ Direct light/transmitted light switch
1& Microscope tools: a) pipette; b) tweezers
1* Hatchery
1( MicroCut
2) Specimens: a) yeast; b) gum media (specimen inclusion medium); c) sea salt; d) brine shrimp eggs
2! Locking screw
How do I install the MicrOcular?
Note:
The MicrOcular only works without the included Barlow lens! The magnication setting is changed when the
MicrOcular is used, and it must be readjusted with the focus knob.
First, remove the Barlow lens with the current eyepiece from the eyepiece support and place the MicrOcular in
the eyepiece.
How do I install the software?
1. You can download the setup le for installation here:
www.bresser.de/download/CamLabLite
2. Start the installation with a double click on the .exe le and follow the instructions of the installation manager.
3. It is not necessary to install a special driver. The camera is automatically recognized by your Windows opera-
ting system.
Using the MicrOcular
Preparation
1. Slide a specimen under your microscope and focus on it.
2. Remove the eyepiece and Barlow lens from the eyepiece support and the dust cap from your MikrOkular and
then install the MikrOkular into the eyepiece support instead of the Barlow lens.
3. Start your PC if you haven‘t yet and connect your MikrOkular to the USB port of your computer.
4. Start the „CamLabLite“ software and activate the camera by clicking on „USB Video Device.
5. Click on „Snapshot“ to take a picture or on „Capture“ to record a video.
6. Click on the oppy disk icon to save the image or capture.
Experiments
Use the following web link to nd interesting experiments you can try out.
http://www.bresser.de/downloads
Warranty & Service
The regular guarantee period is 5 years and begins on the day of purchase. You can consult the full guarantee
terms as well as information on extending the guarantee period and details of our services at www.bresser.de/
warranty_terms.

14
Consignes générales de sécurité
• RISQUE D’ETOUFFEMENT! Ce produit contient des petites pièces, qui pourraient être avalées par des enfants. Il y
a un RISQUE D’ETOUFFEMENT.
•
RISQUE D’ELECTROCUTION ! Cet appareil contient des pièces électroniques raccordées à une source d’alimentation
électrique (batteries). L’utilisation de l’appareil doit se faire exclusivement comme décrit dans ce manuel, faute de quoi
un RISQUE d’ELECTROCUTION peut exister !
• RISQUE D’EXPLOSION / D’INCENDIE ! Ne pas exposer l’appareil à des températures trop élevées. N’utilisez que
les batteries conseillées. L’appareil et les batteries ne doivent pas être court-circuitées ou jeter dans le feu ! Toute
surchauffe ou manipulation inappropriée peut déclencher courts-circuits, incendies voire conduire à des explosions!
• RISQUE DE BLESSURE ! En équipant l’appareil des batteries, il convient de veiller à ce que la polarité des
batteries soit correcte. Les batteries endommagées ou ayant coulées causent des brûlures par acide, lorsque
les acides qu’elles contiennent entrent en contact direct avec la peau. Le cas échéant, il convient d’utiliser des
gants de protection adaptés.
• L’écoulement de l‘électrolyte d’une batterie peut entraîner des blessures par brûlure due à l’acidité du produit
! Evitez tout contact de l’électrolyte avec la peau, les yeux et les muqueuses. En cas de contact avec l‘acide,
rincez abondamment et immédiatement les parties du corps concernées en utilisant de l’eau claire et consultez
un médecin dans les meilleurs délais.
• N‘utilisez que les batteries conseillées. Remplacez toujours les batteries trop faibles ou usées par un jeu
complet de nouvelles batteries disposant de toute sa capacité. N’utilisez pas de batteries de marques, de types
ou de capacités différentes. Les batteries doivent être enlevées de l’appareil lorsque celui-ci est destiné à ne
pas être utiliser pendant un certain temps ou si les piles sont vides !
• Ne jamais recharger de piles normales non rechargeables ! Les piles à usage unique peuvent exploser
lorsqu’elles sont rechargées.
• Les piles rechargeables ne doivent être chargées que sous la surveillance d’un adulte.
• Les piles rechargeables doivent être retirées du jouet avant le chargement.
• Les bornes ne doivent pas être court-circuitées.
• Ne pas démonter l’appareil ! En cas de défaut, veuillez vous adresser à votre revendeur spécialisé. Celui-ci prendra
contact avec le service client pour, éventuellement, envoyer l’appareil en réparation.
• L’utilisation de cet appareil exige souvent l’utilisation d’accessoires tranchants et/ou pointus. Ainsi, il convient de
conserver l’appareil et ses accessoires et produits à un endroit se trouvant hors de la portée des enfants. RISQUES
DE BLESSURES !
• Conservez les instructions et l’emballage car ils contiennent des informations importantes.
Déclaration de conformité CE
Bresser GmbH a émis une « déclaration de conformité » conformément aux lignes directrices appli-
cables et aux normes correspondantes. Le texte complet de la déclaration UE de conformité est dis-
ponible a l’adresse internet suivante: www.bresser.de/download/9039100/CE/9039100_CE.pdf
Liste des pièces:
B Oculaire 10X WF
C Oculaire 16X WF
D Lentille Barlow
E Oculaire électronique (MicrOcular)
F Tête de microscope
G Tourelle d‘objectifs
H Plateau du microscope
I Vis d‘ajustement micrométrique
J Eclairage DEL (éclairage par transmission)

15
FR
1) Raccordement électrique
1! Pied de microscope
1@ Fiche de secteur
1# Porte-objets, lamelles couvre-objet et préparations à recette xée dans coffret en matière plastique, 5 de chaque
1$ Verre ltrant coloré
1% Eclairage DEL (éclairage par lumière incidente)
1^ Commutateur sélecteur lumière incidente/éclairage par transmission
1& Accessoires de microscope : a) pipette; b) pincette
1* Installation d‘accouvage
1( MicroCut
2) Préparations: a) levure, b) «olution de résine» (solution d‘inclusion pour préparations); c) sel marin; d) oeufs
de crustacés
2! Vis de blocage
Comment dois-je installer le MicrOculaire?
Indication:
Le MicrOculaire fonctionne uniquement sans les lentilles de Barlow fournies! L’ajustement du grossissement
sera modié par l’insertion du MicrOculaire et doit être à nouveau ajustée par le biais de la roue de focalisation.
Pour commencer, retire les lentilles de Barlow avec l’oculaire utilisé momentanément du support oculaire et ins-
talle à la place le MicrOculaire dans les supports d’oculaire.
Comment installer le logiciel ?
1. Vous pouvez télécharger le chier de conguration pour l‘installation ici :
www.bresser.de/download/CamLabLite
2. Démarrez l‘installation en double-cliquant sur le chier .exe et suivez les instructions du gestionnaire
d‘installation.
3. Il n‘est pas nécessaire d‘installer un pilote spécial. L‘appareil est automatiquement reconnu par votre système
d‘exploitation Windows.
Utilisation du MicrOcular
Préparation
1. Placez un échantillon sur la platine de votre microscope et faites la mise au point sur celui-ci.
2. Retirez l’oculaire et la lentille de Barlow du porte oculaire et le capuchon anti-poussière de votre MicrOcular,
puis installez le MicrOcular dans le porte oculaire au lieu de la lentille de Barlow.
3. Démarrez votre PC si vous ne l’avez pas encore fait et connectez votre MicrOcular au port USB de votre ordinateur.
4. Démarrez le logiciel „CamLabLite“ et activez la caméra en cliquant sur „USB Video Device“.
5. Cliquez sur „Snapshot“ pour prendre une photo ou sur „Capture“ pour enregistrer une vidéo.
6. Cliquez sur l‘icône de la disquette pour enregistrer l‘image ou la capture.
Expériences
Utilisez le lien Internet suivant pour découvrir toutes les expériences passionnantes que vous pouvez faire.
http://www.bresser.de/downloads
Garantie et Service
La durée normale de la garantie est de 5 ans à compter du jour de l’achat. Vous pouvez consulter l’intégralité des
conditions de garantie ainsi que les informations concernant la prolongation de la garantie et les prestations de
service sur www.bresser.de/warranty_terms.

16
Algemene waarschuwingen
• VERSTIKKINGSGEVAAR! Dit product bevat kleine onderdelen die door kinderen kunnen worden ingeslikt! Er
bestaat VERSTIKKINGSGEVAAR!
• GEVAAR VOOR ELEKTRISCHE SCHOK! Dit toestel bevat elektronische onderdelen die door een elektriciteitsbron
(batterijen) worden gevoed. Het toestel mag alleen gebruikt worden zoals in de handleiding wordt beschreven,
anders bestaat er GEVAAR op een STROOMSTOOT!
• BRAND-/EXPLOSIEGEVAAR! Stel het apparaat niet bloot aan hoge temperaturen. Gebruik uitsluitend de
aanbevolen batterijen. Sluit het apparaat en de batterijen niet kort en gooi deze niet in het vuur! Te hoge
temperaturen en ondeskundig gebruik kunnen leiden tot kortsluitingen, branden en zelfs explosies!
• GEVAAR VOOR INBRANDEND ZUUR! Let bij het plaatsen van de batterijen op de juiste richting van de polen.
Lekkende of beschadigde batterijen veroorzaken irritaties wanneer deze met de huid in aanraking komen.
Gebruik in dat geval alleen hiervoor goedgekeurde beschermingshandschoenen.
• Uitgelopen batterijzuur kan tot corrosieve brandwonden leiden! Vermijd contact van het batterijzuur met de
huid, ogen en slijmvliezen. Spoel de getroffen lichaamsdelen bij contact met het zuur onmiddellijk met ruim
helder water af en raadpleeg een arts.
• Gebruik alleen de aanbevolen batterijen. Vervang zwakke of lege batterijen alleen door een set nieuwe batterijen
met volledige capaciteit. Gebruik geen batterijen van verschillende merken, types of capaciteiten samen. Verwijder
de batterijen uit het toestel wanneer deze langere tijd niet gebruikt wordt of als de batterijen leeg zijn!!
• Laad in geen geval normale, niet weer oplaadbare batterijen op! Deze kunnen bij het opladen exploderen.
• Oplaadbare batterijen mogen alleen onder toezicht van een volwassene worden opgeladen.
• Oplaadbare batterijen moeten uit het speelgoed worden verwijderd voordat ze worden opgeladen.
• De klemmen mogen niet kortgesloten worden.
• Neem het toestel niet uit elkaar! Neem bij defecten a.u.b. contact op met de verkoper. Deze zal contact
opnemen met een servicecenter en kan het toestel indien nodig voor reparatie terugsturen.
• Tijdens het gebruik van dit toestel worden regelmatig scherpe hulpmiddelen gebruikt. Bewaar dit toestel en
alle toebehoren en hulpmiddelen dus op een voor kinderen ontoegankelijke plaats. Er bestaat GEVAAR VOOR
VERWONDINGEN!
• Bewaar de instructies en de verpakking omdat deze belangrijke informatie bevatten.
EG-conformiteitsverklaring
Een “conformiteitsverklaring” in overeenstemming met de van toepassing zijnde richtlijnen en overe-
enkomstige normen is door Bresser GmbH afgegeven. Il testo completo della dichiarazione di con-
formita UE e disponibile al seguente indirizzo Internet:
www.bresser.de/download/9039100/CE/9039100_CE.pdf
Weergave van de onderdelen:
B 10X WF oculair
C 16X WF oculair
D Barlow lens
E Elektronisch oculair (MicrOcular)
F Microscoop-hoofd
G Object - revolver
H Microscoop platform
I Instellingswieltje
J LED-verlichting (doorlicht)
1) Elektriciteitssnoer
1! Microscoop voetstuk
1@ Netstekker

17
NL
1# 5 objectdragers, 10 dekglaasjes, 5 preparaten voor meermalig gebruik in een kunstoffen box
1$ Kleurenlterschijf
1% LED-verlichting (oplicht)
1^ Keuzeschakelaar op-/doorlicht
1& Microscoopbestek: a) Pipet; b) Pincet
1* Broedinstallatie
1( MicroCut
2) Preparaten: a) gist; b) “Gum-Media” (insluitmiddel voor preparaten); c) zeezout; d) Pekelkreeftjes eieren
2! Blokkeerschroef
Hoe plaats ik het MicrOculair?
Nota bene:
De MicrOculair werkt alleen zonder de meegeleverde Barlow-lens! De vergrotingsinstelling wordt door het gebruik
van de MicrOculair veranderd en moet met de scherpteregeling opnieuw worden ingesteld.
Verwijder eerst de Barlowlens met het momenteel gebruikte oculair uit de oculairbuis en schuif in plaats daarvan
het MicrOculair in de oculairbuis.
Hoe installeer ik de software?
1. Download hier het installatiebestand voor de installatie:
www.bresser.de/download/CamLabLite
2. Start de installatie met een dubbelklik op het .exe bestand en volg de instructies van de installatiemanager.
3. Het is niet nodig om een speciale driver te installeren. De camera wordt automatisch herkend door uw Windows
besturingssysteem.
Werken met het MicrOcular
Voorbereiding
1. Leg een preparaat onder uw microscoop en stel het scherp.
2. Verwijder het oculair en de Barlow-lens uit de oculairsteunen, alsook de stofbeschermingskap van het MicrO-
cular en steek deze in plaats van de Barlow-lens in de oculairsteunen.
3. Start uw PC als dit nog niet gebeurd is en sluit het MicrOcular aan de USB-poort van uw computer aan.
4. Start de „CamLabLite“ software en activeer de camera door te klikken op „USB Video Device“.
5. Klik op „Snapshot“ om een foto te maken of op „Capture“ om een video op te nemen.
6. Klik op het diskette-icoontje om de afbeelding op te slaan of vast te leggen.
Experimenten
Voor het uit proberen van interessante experimenten klik op de volgende web link.
http://www.bresser.de/downloads
Garantie & Service
De reguliere garantieperiode bedraagt 5 jaar en begint op de dag van aankoop. De volledige garantievoorwaarden
en informatie over de verlenging van de garantieperiode en servicediensten kunt u bekijken op www.bresser.de/
warranty_terms.

18
Avvertenze di sicurezza generali
• PERICOLO DI SOFFOCAMENTO! Il prodotto contiene piccoli particolari che potrebbero venire ingoiati dai
bambini! PERICOLO DI SOFFOCAMENTO!
• RISCHIO DI FOLGORAZIONE! Questo apparecchio contiene componenti elettronici azionati da una sorgente
di corrente (batterie). L’utilizzo deve avvenire soltanto conformemente a quanto descritto nella guida, in caso
contrario esiste il PERICOLO di SCOSSA ELETTRICA!
• PERICOLO DI INCENDIO/ESPLOSIONE! Non esporre l’apparecchio a temperature elevate. Utilizzare
esclusivamente le batterie consigliate. Non cortocircuitare o buttare nel fuoco l‘apparecchio e le batterie! Un
surriscaldamento oppure un utilizzo non conforme può provocare cortocircuiti, incendi e persino esplosioni!
• RISCHIO DI CORROSIONE! Per inserire le batterie rispettare la polarità indicata. Le batterie scariche o
danneggiate possono causare irritazioni se vengono a contatto con la pelle. Se necessario indossare un paio
di guanti di protezione adatto.
• La fuoriuscita dell’acido della batteria può causare corrosione! Evitare che l’acido della batteria entri in contatto
con pelle, occhi e mucose. In caso di contatto con l’acido, sciacquare immediatamente le parti interessate con
abbondante acqua pulita e rivolgersi ad un medico.
• Utilizzare esclusivamente le batterie consigliate. Sostituire le batterie scariche o usate sempre con una serie di
batterie nuove completamente cariche. Non utilizzare batterie di marche, tipi o livelli di carica diversi. Togliere
le batterie dall’apparecchio nel caso non venga utilizzato per un periodo prolungato o se le batterie sono
scariche!
• Non tentare mai di ricaricare batterie normali non ricaricabili, poiché potrebbero esplodere.
• Le batterie ricaricabili devono essere caricate solo sotto la supervisione di un adulto.
• Le batterie ricaricabili devono essere rimosse dal giocattolo prima della ricarica.
• I terminali non devono essere cortocircuitati.
•
Non smontare l’apparecchio! In caso di guasto, rivolgersi al proprio rivenditore specializzato. Egli provvederà a
contattare il centro di assistenza e se necessario a spedire l’apparecchio in riparazione.
•
Per l’utilizzo di questo apparecchio vengono spesso utilizzati strumenti appuntiti e aflati. Pertanto, conservare
l’apparecchio e tutti gli accessori e strumenti fuori dalla portata dei bambini. PERICOLO DI LESIONE!
• Conservare le istruzioni e l’imballaggio in quanto contengono informazioni importanti.
Dichiarazione di conformità CE
Bresser GmbH ha redatto una “dichiarazione di conformità” in linea con le disposizioni applicabili e le
rispettive norme. Il testo completo della dichiarazione di conformita UE e disponibile al seguente in-
dirizzo Internet: www.bresser.de/download/9039100/CE/9039100_CE.pdf
Elenco dei componenti:
B 10X WF Okular
C 16X WF Okular
D Lente di Barlow
E Oculare elettronico (MicrOcular)
F Tubo del microscopio
G Torretta a revolver portaobiettivi
H Ottica del microscopio
I Manopola per la messa a fuoco
J Illuminazione a LED (luce trasmessa)
1) Collegamento elettrico
1! Stativo del microscopio
1@ Spina di alimentazione

19
IT
1# 5 pz. cad. vetrini, coprivetrini e Preparati permanenti contenuti in una scatola di materiale plastico
1$ Filtri a disco colorati
1% Illuminazione a LED (luce riessa)
1^ Selettore luce riessa / trasmessa
1& Set attrezzi per microscopio: a) Pipetta; b) Pinzetta
1* Schiuditoio
1( MicroCut
2) Preparati: a) lievito; b) mezzo di inclusione per preparati; c) sale marino; d) crostaceo
2! Vite di ssaggio
Come si utilizza il MicrOculare?
Informazione importante:
Il MicrOculare funziona solo senza la lente di Barlow! L’utilizzo del MicrOculare modica la regolazione dell’in-
grandimento che deve essere nuovamente impostata agendo sulla ruota di regolazione della messa a fuoco.
Per prima cosa rimuovi dal portaoculare la lente di Barlow e l‘oculare attualmente utilizzato e al loro posto inse-
risci il MicrOculare nel portaoculare.
Come si fa a installare il software?
1. Il le per l’installazione si può scaricare qui: www.bresser.de/download/CamLabLite
2. Avviare l’installazione facendo doppio clic sul le .exe e seguire le istruzioni del procedimento guidato.
3. Non è necessario installare un driver specico. Il sistema operativo Windows riconosce automaticamente la
fotocamera.
Utilizzare il MicrOcular
Preparazione
1. Inserire un vetrino sotto il microscopio e regolare la messa a fuoco.
2. Rimuovere l’oculare e la lente di Barlow dal tubo oculare nonché il tappo di copertura antipolvere dal MicrOcu-
lar, poi installare il MicrOcular nel tubo oculare al posto della lente di Barlow.
3. Avviare il PC (se non è già acceso) e collegare il MicrOcular alla porta USB del computer.
4. Avviare il software „CamLabLite“ e attivare la fotocamera cliccando su „USB Video Device“.
5. Cliccare su „Snapshot“ per fare una foto o su „Capture“ per registrare un video.
6. Cliccare sull’icona del oppy disk per salvare l’immagine o il video.
Esperimenti
Utilizzare il seguente collegamento della web per trovare interessanti esperimenti che si possono provare.
http://www.bresser.de/downloads
Garanzia e assistenza
La durata regolare della garanzia è di 5 anni e decorre dalla data dell‘acquisto. Le condizioni complete di garanzia e
le informazioni sull‘estensione di garanzia e i servizi di assistenza sono visibili al sito: www.bresser.de/warran-
ty_terms.

20
Advertencias de carácter general
• RIESGO DE AXFISIA Este producto contiene piezas pequeñas que un niño podría tragarse. Hay RIESGO
DE AXFISIA.
• ¡PELIGRO DE DESCARGA ELÉCTRICA! Este aparato contiene componentes electrónicos que funcionan me-
diante una fuente de electricidad (pilas). No deje nunca que los niños utilicen el aparato sin supervisión.
El uso se deberá realizar de la forma descrita en el manual; de lo contrario, existe PELIGRO de DESCARGA
ELÉCTRICA.
•
¡PELIGRO DE INCENDIO/EXPLOSIÓN! No exponga el aparato a altas temperaturas. Utilice exclusivamente
las pilas recomendadas. ¡No cortocircuitar ni arrojar al fuego el aparato o las pilas! El calor excesivo y el
manejo inadecuado pueden provocar cortocircuitos, incendios e incluso explosiones.
• ¡PELIGRO DE ABRASIÓN! No dejar las pilas al alcance de los niños. Al colocar las pilas, preste atención a
la polaridad. Las pilas descargadas o dañadas producen causticaciones al entrar en contacto con la piel.
Dado el caso, utilice guantes protectores adecuados.
• Si se derrama el ácido de las pilas, este puede provocar abrasiones Evite el contacto del ácido de las
baterías con la piel, los ojos y las mucosas. En caso de contacto con el ácido, enjuague inmediatamente
las zonas afectadas con agua limpia abundante y visite a un médico.
• Utilice exclusivamente las pilas recomendadas. Recambie siempre las pilas agotadas o muy usadas por
un juego completo de pilas nuevas con plena capacidad. No utilice pilas de marcas o modelos distintos
ni de distinto nivel de capacidad. ¡Hay que retirar las pilas del aparato si no se va a usar durante un pe-
riodo prolongado o si las pilas están agotadas!
• No cargar en ningún caso pilas no recargables. Podrían explotar como consecuencia de la carga.
• Las pilas recargables sólo pueden cargarse bajo la supervisión de un adulto.
• Las pilas recargables deben retirarse del juguete antes de cargarlo.
• Los terminales no deben estar en cortocircuito.
•
No desmonte el aparato. En caso de que exista algún defecto, le rogamos que se ponga en contacto con su
distribuidor autorizado. Este se pondrá en contacto con el centro de servicio técnico y, dado el caso, podrá
enviarle el aparato para su reparación.
• ¡PELIGRO de lesiones corporales! Para trabajar con este aparato se emplean con frecuencia instrumen-
tos auxiliares alados y punzantes. Por ello, guarde este aparato y todos los accesorios e instrumentos
auxiliares en un lugar fuera del alcance de los niños. ¡Existe PELIGRO DE LESIONES!
• Guarde las instrucciones y el embalaje ya que contienen información importante.
Declaración de conformidad de la Unión Europea (CE)
Bresser GmbH ha emitido una “Declaración de conformidad” de acuerdo con las directrices y
normas correspondientes. El texto completo de la declaración de conformidad de la UE está
disponible en la siguiente dirección de Internet:
www.bresser.de/download/9039100/CE/9039100_CE.pdf
Vista general de las piezas:
B Ocular 10X de amplio campo (WF)
C Ocular 16X de amplio campo (WF)
D Lente de Barlow
E Oculare elettronico (MicrOcular)
F Monocular del microscopio
G Revólver
H Platina
I Mando de enfoque
Seite wird geladen ...
Seite wird geladen ...
Seite wird geladen ...
Seite wird geladen ...
-
 1
1
-
 2
2
-
 3
3
-
 4
4
-
 5
5
-
 6
6
-
 7
7
-
 8
8
-
 9
9
-
 10
10
-
 11
11
-
 12
12
-
 13
13
-
 14
14
-
 15
15
-
 16
16
-
 17
17
-
 18
18
-
 19
19
-
 20
20
-
 21
21
-
 22
22
-
 23
23
-
 24
24


National Geographic 9039100 Bedienungsanleitung
- Kategorie
- Mikroskope
- Typ
- Bedienungsanleitung
in anderen Sprachen
- English: National Geographic 9039100 Owner's manual
- français: National Geographic 9039100 Le manuel du propriétaire
- español: National Geographic 9039100 El manual del propietario
- italiano: National Geographic 9039100 Manuale del proprietario
- русский: National Geographic 9039100 Инструкция по применению
- Nederlands: National Geographic 9039100 de handleiding
Verwandte Artikel
Andere Dokumente
-
Bresser Junior 8855001 Bedienungsanleitung
-
-
-
Bresser 5803810 Bedienungsanleitung
-
-
Bresser 5116200 Bedienungsanleitung
-
-
-
-
Bresser Junior MicroSet 40x-1024x Bedienungsanleitung