VEVOR 451P Handheld Digital Endoscope Benutzerhandbuch
- Typ
- Benutzerhandbuch

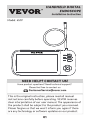
HANDHELD DIGITAL ENDOSCOPE
USER MANUAL

HANDHELD DIGITAL
ENDOSCOPE
Installation Instruction
Model: 451P
Have product questions? Need technical suppo?
Please feel free to contact us:
CustomerSe[email protected]
NEED HELP? CONTACT US!
This is the original instruction, please read all manual
instructions carefully before operating. VEVOR resees
clear interpretation of our user manual. The appearance of
the product shall be subject to the product you received.
Please forgive us that we won't inform you again if there
are any technology or software updates on our product.
0101

SAFETY WARNING
Please read the following instructions carefully and save
this manual.
Failure to follow the instructions listed in this manual may
result in electric shock, re, or serious personal inju.
WELCOME
Thank you for choosing our product. Please read the
instructions carefully before use.
This product is a new type of practical device that can view
videos in real-time video, record, and takes pictures. Mainly
used in areas where the line of sight cannot be obseed,
such as: car repair, sewer inspection/maintenance, air
conditioning inspection, etc.
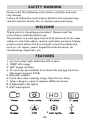
FEATURES
1. 4.5-inch color high-denition IPS screen
2. 1080P HD image
3. 360° image rotation
4. TF card can be installed to achieve le storage function.
Maximum suppo 32GB.
5. 8mm HD camera
6. Front lens clear viewing range from 3cm to 10cm
7. Type-c plug-in, easy to replace dierent lenses
8. 8 adjustable LED lights
9. IP67 waterproof
8
02

APPLICATION
It is widely used in aviation, automobiles, ships, electrical,
chemical, electric power, natural gas, atomic energy,
civil engineering and construction. Industrial endoscopes can
also monitor, record, store and analyze targets.
ACCESSORIES LIST
1. Digital endoscope
2. Manual
3. USB data cable
4. Accessories - Hook, magnet, protective cap
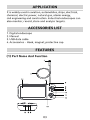
FEATURES
(1) Pa Name And Function
03

04
Camera
Cable
Settings button
Light adjustment
Reset button hole
Micro TF card slot
Charging indicator Unlock switch
4.5 inch IPS screen
Back button
Down
OK
Up and rotate
Take pictures
DC 5V/1A charging po
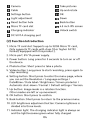
(2) Function Introduction
1. Micro TF card slot: Suppos up to 32GB Micro TF card,
Only suppos TF cards with class 10 or higher FAT32
format( equipped with this product ).
2. Micro po: 5V/1A power supply.
3. Power button: Long press for 3 seconds to turn on or o
the device.
4. Photo button: Sho press to take a photo.
5. Video button: Long press to sta recording, press again to
stop recording.
6. Setting button: Sho press to enter the menu page, where
you can set the Resolution / Language settings /
Date&time / Date label / Brightness / Screen protector /
Automatic shut-down / Format / Default settings / Version.
7. Up button: Image mode is a rotation function.
Other modes are left or up movement.
8. OK button: Sho press to conrm.
9. Back button: Sho press to return to the previous menu.
10. LED brightness adjustment button: Camera rightness is
divided into three levels.
11. Indicator light: The charging indicator light is always on
and the light becomes green when fully charged

05
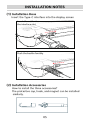
INSTALLATION NOTES
(1) Installation Hose
(2) Installation Accessories
Inse the Type-C inteace into the display screen
How to install the three accessories?
The protective cap, hook, and magnet can be installed
similarly.
Push the buckle forcibly
Inse the cable into
the inteace slot

06
Magnet Hook Protective
cap
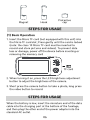
STEPS FOR USAGE
(1) Basic Operation
1. Inse the Micro TF card (not equipped with this unit) into
the Micro TF card slot; Press gently until the card is locked
(note: the class 10 Micro TF card must be inseed to
record and store pictures and videos). To prevent data
loss or damage, power o the device before inseing or
removing the memo card
2. When turning it on, press the LED brightness adjustment
button to adjust the brightness of the camera.
TF card
3. Sho press the camera button to take a photo, long press
the video button to record.
STEPS FOR USAGE
When the batte is low, inse the miniature end of the data
cable into the charging po at the bottom of the fuselage,
and then plug the other end of the power adapter into the
standard AC outlet.

07
The charging indicator light is always red when charging, and
it lights up green when fully charged. The charging time is
4 to 5 hours.
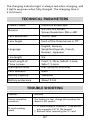
TECHNICAL PARAMETERS
Product name
Monitor
Lens Angle
Language
Line length
Focal Length of
Three Lenses
Waterproof level
Lens diameter
Batte capacity
Batte endurance
Industrial endoscope
4.5-lnch IPS screen,
Screen Resolution: 854 x 480
Each of the three lenses is 70°
Lens Resolution 1920 x 1080
English, German,
Simplied Spanish, French,
Russian, Japanese
5m
Front: 3-10cm, Side B: 2-6cm,
Side C: 2-6cm
IP67 (only for lens/line)
8mm
2860mAh
About 3.5 H
TROUBLE SHOOTING
Device cannot be
turned on.
Problem
TF card reading
failed.
Solution
The batte is low, charge ttie machine for
about 4-5H, resta.
1. TF card format is incorrect? (This device
only suppos FAT32 le format).
2. Reinse after removing the TF card.

08
After ttie device is
connected to the PC,
the TF card cannot
be read.
1. Reconnect the device and PC.
2. Conrm whether to enter the Mass
storage mode.
Problem Solution
Device crash.
First, inse the USB data cable to charge
the product. It will automatically shut down.
Then, press the power button to reset.
It can be reset by lightly pressing the reset
hole with a ne needle.
Smudges or smears
are present on the
screen.
Wipe the screen and lens gently with a
clean cloth dipped in alcohol.
Cannot charge or
the charging indicator
does not light up.
Please replace ihe charging cable.
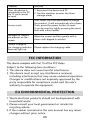
FCC INFORMATION
This device complies with Pa 15 of the FCC Rules.
Subject to the following two conditions
1. This device does not cause harmful inteerence.
2. This device must accept any inteerence received,
including inteerence that may cause undesired operation.
Changes or modications not expressly approved by the
pay responsible for compliance could void the user's
authority to operate the equipment.
EU ENVIRONMENTAL PROTECTION
1. Waste electrical products should not be disposed of with
household waste.
2. Please consult your local government or retailer for
recycling advice.
3. lf the number contained in the user manual has any minor
changes without prior notice.

09
Waste electrical products should not be disposed
of with household waste.
Please consult your local government or retailer
for recycling advice.
* There are any minor changes to the numbers included in the user
manual without prior notice.
EU Impoer: WAITCHX
Address: 250 bis boulevard Saint-Germain 75007 Paris
UK Impoer: FREE MOOD LTD
Address: 2 Holywell Lane, London, England, EC2A 3ET
Add: 1301#Block 3,Tian'an Yun Gu Industrial Park,
Bantian Longgang District,Shenzhen City,China
EU ENVIRONMENTAL PROTECTION
UK REP
EUREP GmbH
Unterlettenweg 1a, 85051 Ingolstadt,
Germany
EC REP
EUREP UK LTD
UNIT 2264, 100 OCK STREET, ABINGDON
OXFORDSHIRE ENGLAND OX14 5DH

10
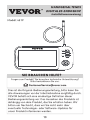
Modell: 451P
Fragen zum Produkt? Sie brauchen technische Unterstützung?
Bitte kontaktieren Sie uns:
CustomerSe[email protected]
SIE BRAUCHEN HILFE?
Dies ist die Original-Bedienungsanleitung, bitte lesen Sie
alle Anweisungen vor der Inbetriebnahme sorgfältig durch.
VEVOR behält sich eine eindeutige Denition dieser
Bedienungsanleitung vor. Das Aussehen des Produkts ist
abhängig von dem Produkt, das Sie erhalten haben. Wir
bitten um Nachsicht, dass wir Sie nicht mehr über
eventuelle Technologie- oder Software-Updates für
unser Produkt informieren werden.
HANDGEHALTENES
DIGITALES ENDOSKOP
Installationsanweisung

11
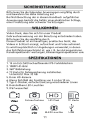
SICHERHEITSHINWEISE
Bitte lesen Sie die folgenden Anweisungen sorgfältig durch
und bewahren Sie diese Anleitung auf.
Bei Nichtbeachtung der in diesem Handbuch aufgefühen
Anweisungen besteht die Gefahr eines elektrischen Schlags,
einer Freisetzung oder schwerer Verletzungen.
WILLKOMMEN
Vielen Dank, dass Sie sich für unser Produkt
Gebrauchsanweisung vor der Benutzung entschieden haben.
Bitte lesen Sie die sorgfältig durch.
Dieses Produkt ist ein neuaiges, praktisches Gerät, das
Videos in Echtzeit anzeigt, aufzeichnet und Fotos aufnimmt.
Es wird hauptsächlich in Umgebungen verwendet, in denen
das Sichtfeld eingeschränkt ist, wie z. B. bei Autoreparaturen,
Kanalinspektionen/-waungen, Klimaanlageninspektionen usw.
SPEZIFIKATIONEN
1. 15 cm (4,5 Zoll) hochauösender IPS-Farbbildschirm
2. 1080P HD-Bild
3. 360° Bilddrehung
4. TF Kae für Dateispeicherung installierbar.
Unterstützt Max. 32 GB.
5. 8 mm HD-Kamera
6. Klares Sichtfeld der Frontlinse von 3 cm bis 10 cm
7. Typ-C-Stecker, einfache Ersetzung verschiedener Linsen
8. 8 einstellbare LED-Leuchten
9. IP67 wasseest
8LED LeuchteDrehung
Fotoaufnahme HD Pixel TF Kae
USB

12
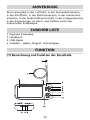
ANWENDUNG
Breit verwendet in der Luftfah, in der Automobilindustrie,
in der Schifah, in der Elektroindustrie, in der chemischen
Industrie, in der Elektrizitätswischaft, in der Erdgasindustrie,
in der Atomenergie, im Hoch- und Tieau und in der
industriellen Endoskopie.
ZUBEHÖR LISTE
1. Digitales Endoskop
2. Handbuch
3. USB-Kabel
4. Zubehör - Haken, Magnet, Schutzkappe
FUNKTION
(1) Bezeichnung und Funktion der Einzelteile

13
Kamera
Kabel
Einstellungstasten
Lichteinstellung
Reset-Taste
Micro TF Kaensteckplatz
Ladeanzeige Entsperr-Schalter
4,5 Zoll IPS-Bildschirm
Zurück-Taste
Abwäs
OK-Taste
Aufwäs & Drehen
Foto Aufnahme
DC 5V/1A Ladeanschluss
(2) Funktionsbeschreibung
1. Micro TF-Kaensteckplatz: Unterstützt bis Setzen Sie das
Type-C-Schnittstelle in den zu 32GB Micro TF-Kae,
unterstützt nur TF-Kaen mit Klasse 10 oder höher im
FAT32-Format ( Im Lieferumfang enthalten ).
2. Mikro-Anschluss: 5V/1A Stromversorgung.
3. Einschalttaste: 3 Sekunden lang drücken, zum Ein- und
Ausschalten des Geräts.
4. Foto-Taste: Kurz drücken für Fotoaufnahme.
5. Videotaste: Zum Staen der Aufnahme lang drücken; zum
Beenden der Aufnahme erneut drücken.
6. Einstellungstaste: Zum Aufrufen der Menüseite kurz drücken.
Folgenden Einstellungen können Sie hier vornehmen:
Auösung / Spracheinstellungen / Datum&Zeit / Datums
-anzeige / Helligkeit / Bildschirmschutz / Automatische
Abschaltung / Format / Standard Einstellungen / Version.
7. Aufwäs-Taste: Bildmodus mit rotierenden Funktion.
Andere Modi sind Bewegungen nach links oder oben.
8. OK-Taste: Zum Bestätigen kurz drücken.
9. Zurück-Taste: Zum Zurückschalten in das vorherige Menü
kurz drücken.

14
10. LED-Helligkeit Taste: Die Helligkeit der Kamera lässt sich
in drei Stufen einstellen.
11. Anzeigelampe: Die Ladeanzeige ist immer eingeschaltet
und leuchtet grün wenn sie vollständig geladen ist.
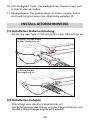
INSTALLATIONSHINWEISE
(1) Installation Kabelverbindung
(2) Installation Zubehör
Setzen Sie das Type-C-Schnittstelle in den Bild-schirm ein
Stecken Sie das Kabel
in den Steckplatz ein
Drücken Sie die
Verriegelung zu
Wie bringt man die drei Zubehöeile an?
Die Schutzkappe, der Haken und der Magnet können auf
ähnliche Weise kappe angebracht werden.

15
Magnet Hook Protective
cap
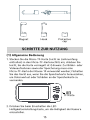
SCHRITTE ZUR NUTZUNG
(1) Allgemeine Bedienung
1. Stecken Sie die Micro-TF-Kae (nicht im Lieferumfang
enthalten) in den Micro-TF-Kaenschlitz ein; drücken Sie
leicht, bis die Kae verriegelt ist (Hinweis: Zur Bilder- oder
Videoaufnahmen sowie der Speicherung muss eine
Micro-TF-Kae der Klasse 10 verwendet werden.) Schalten
Sie das Gerät aus, wenn Sie die Speicherkae herausziehen,
um Datenverlust oder Schäden an der Speicherkae zu
vermeiden.
2. Drücken Sie beim Einschalten die LED
Helligkeitseinstellungstaste, um die Helligkeit der Kamera
einzustellen.
TF Kae

16
Die Ladekontrollleuchte leuchtet während des Ladevorgangs
immer rot und leuchtet grün, wenn der Akku vollständig
geladen ist. Die Ladezeit beträgt 4 bis 5 Stunden.
3. Zur Aufnahme eines Fotos drücken Sie kurz die
Kamerataste; zur Aufnahme eines Videos drücken Sie lang
auf die Videotaste.
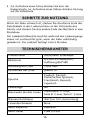
SCHRITTE ZUR NUTZUNG
Wenn der Akku schwach ist, stecken Sie das dünne Ende des
Datenkabels in den Ladeanschluss an der Unterseite des
Geräts, und stecken Sie das andere Ende des Netzteils in eine
Steckdose.
TECHNISCHEPARAMETER
Produktname
Bildschirm
Auösung der Linse 1920x1080
Sichtwinkel der Linse
Sprache
Zeilenlänge
Brennweite der drei Linsen
Wasserschutzklasse
Linsendurchmesser
Akku-Kapazität
Akku-Dauer
Industrieller Endoskope
4,5-Zoll-IPS-Bildschirm,
Auösung 854*480
jeweils 70°
Englisch, Deutsch,
Vereinfachtes Spanisch,
Französisch, Russisch,
Japanisch
5m
Vorderseite: 3-10cm,
Seite B: 2-6cm, Seite C: 2-6cm
IP67 (nur für Linse/Leitung)
8mm
2860mAh
Etwa 3,5 Std.

17
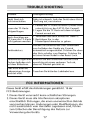
TROUBLE SHOOTING
Gerät lässt sich
nicht einschalten.
Akku ist schwach, lade das Gerät etwa 4 bis 5
Std. lang auf, neu staen.
Problem Lösungsvorschlag
Geräteabsturz.
Stecken Sie zunächst das USB-Datenkabel
zum Auaden des Geräts ein. Es wird
automatisch ausgeschaltet. Drücken Sie dann
den Netz-schalter zum Reseten. Drücken Sie
mit einer feinen Nadel in das Reset-Loch.
Verschmutzungen oder
Flecken benden sich
auf dem Bildschirm.
Wischen Sie den Bildschirm und die Linse
vorsichtig mit einem sauberen Tuch ab,
dass mit Alkohol getränkt ist.
Lädt nicht oder die
Ladeanzeige Anzeige
leuchtet nicht.
Tauschen Sie bitte das Ladekabel aus.
Lesen der TF-Kae
fehlgeschlagen.
Nach Anschluss am
PC, kann die TF-Kae
nicht gelesen werden.
1. Verbinden das Gerät erneut mit dem PC.
2. Bestätigen Sie, in den
Massenspeichermodus zu gehen.
1. Format der TF-Kae ist falsch. (Dieses Gerät
unterstützt nur das FAT32-Flat-Format).
2. Legen Sie die TF-Kae mit dem richtigen
Format erneut ein.
FCC INFORMATIONEN
Dieses Gerät eüllt die Anforderungen gemäß A. 15 der
FCC-Bestimmungen.
1. Dieses Gerät verursacht keine schädlichen Störungen.
2. Dieses Gerät muss alle Inteerenzen akzeptieren
einschließlich Störungen, die einen unerwünschten Betrieb
verursachen können. Änderungen oder Modikationen, die
nicht ausdrücklich vom Hersteller zugelassen sind, führen
zum Erlöschen der Berechtigung des Nutzers zur
Verwendung des Geräts.

18
Elektroaltgeräte sollten nicht über den Hausmüll
entsorgt werden.
Bitte wenden Sie sich an Ihre Gemeinde-
verwaltung oder Ihren Händler, um Ratschläge
zum Recycling zu erhalten.
* Geringfügige Änderungen an den im Benutzerhandbuch enthaltenen
Zahlen sind ohne vorherige Ankündigung möglich.
EU Impoeur: WAITCHX
Address: 250 bis boulevard Saint-Germain 75007 Paris
UK Impoeur: FREE MOOD LTD
Adresse: 2 Holywell Lane, London, England, EC2A 3ET
Adresse: 1301#Block 3,Tian'an Yun Gu Industrial Park,
Bantian Longgang District, Shenzhen City, China
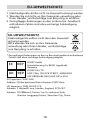
EU-UMWELTSCHUTZ
EUREP UK LTD
UNIT 2264, 100 OCK STREET, ABINGDON
OXFORDSHIRE ENGLAND OX14 5DH
UK REP
EUREP GmbH
Unterlettenweg 1a, 85051 Ingolstadt,
Germany
EC REP
EU-UMWELTSCHUTZ
1. Elektroaltgeräte düen nicht im Hausmüll entsorgt werden.
2. Wenden Sie sich bitte an Ihre Gemeinde-verwaltung oder
Ihren Händler, um Ratschläge zum Recycling zu erhalten.
3. Geringfügige Änderungen an den im Benutzer-handbuch
enthaltenen Zahlen sind ohne vorherige Ankündigung
möglich.

E-mail: CustomerSeice@vevor.com
-
 1
1
-
 2
2
-
 3
3
-
 4
4
-
 5
5
-
 6
6
-
 7
7
-
 8
8
-
 9
9
-
 10
10
-
 11
11
-
 12
12
-
 13
13
-
 14
14
-
 15
15
-
 16
16
-
 17
17
-
 18
18
-
 19
19
-
 20
20


VEVOR 451P Handheld Digital Endoscope Benutzerhandbuch
- Typ
- Benutzerhandbuch
in anderen Sprachen
Andere Dokumente
-
VOLTCRAFT 4016138910780 Operating Instructions Manual
-
 DEPSTECH DS600 Industrial Endoscope Benutzerhandbuch
-
 DEPSTECH DS300 Industrial Endoscope Benutzerhandbuch
-
DEPSTECH DS300 Benutzerhandbuch
-
DEPSTECH DS350 Benutzerhandbuch
-
-
-
VOLTCRAFT BS-1000T Operating Instructions Manual
-
-

