
IAN 365152_2101
LASER-PROJEKTOR / CHRISTMAS LASER LIGHT
PROJECTOR / PROJECTEUR LASER
LASER-PRO JEKTOR
Bedienungs- und Sicherheitshinweise
CHRISTMAS LASER LIGHT PROJECTOR
Operation and safety notes
PRO JECTEUR LASER
Instructions d‘utilisation et consignes de sécurité
LASERPROJECTOR
Bedienings- en veiligheidsinstructies
LASEROVÝ PRO JEKTOR
Pokyny pro obsluhu a bezpečnostní pokyny
PRO JEKTOR LASEROWY
Wskazówki dotyczące obsługi i bezpieczeństwa
LASEROVÝ PROJEKTOR
Pokyny pre obsluhu a bezpečnostné pokyny
PRO YECTOR LÁSER
Instrucciones de utilización y de seguridad
LASER PRO JEKTOR
Brugs- og sikkerhedsanvisninger

DE / AT / CH Bedienungs- und Sicherheitshinweise Seite 5
GB / IE Operation and safety notes Page 11
FR / BE Instructions d‘utilisation et consignes de sécurité Page 17
NL / BE Bedienings- en veiligheidsinstructies Pagina 24
PL Wskazówki dotyczące obsługi i bezpieczeństwa Strona 30
CZ Pokyny pro obsluhu a bezpečnostní pokyny Strana 36
SK Pokyny pre obsluhu a bezpečnostné pokyny Strana 42
ES Instrucciones de utilización y de seguridad Página 48
DK Brugs- og sikkerhedsanvisninger Side 54

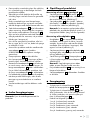
A
B
5
64
2
1
3
6
7
8
C
1
2
3
9
D
1
1
2
35
4

Ø 3mm
20mm
E

5 DE/AT/CH
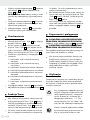
Legende der verwendeten Piktogramme ........................................................Seite 6
Einleitung ......................................................................................................................................Seite 6
Bestimmungsgemäße Verwendung .................................................................................................Seite 6
Teilebeschreibung ............................................................................................................................ Seite 6
Technische Daten ............................................................................................................................. Seite 6
Lieferumfang .....................................................................................................................................Seite 7
Sicherheitshinweise .............................................................................................................Seite 7
Vor der Inbetriebnahme .................................................................................................Seite 8
Produkt aufstellen ................................................................................................................ Seite 8
Inbetriebnahme ......................................................................................................................Seite 9
Timer-Funktion ......................................................................................................................... Seite 9
Reinigung und Pflege .........................................................................................................Seite 9
Entsorgung .................................................................................................................................. Seite 9
Garantie ........................................................................................................................................ Seite 10
Abwicklung im Garantiefall .............................................................................................................Seite 10
Service ..............................................................................................................................................Seite 10
V4.0

6 DE/AT/CH
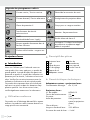
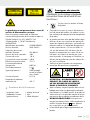
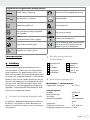
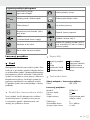
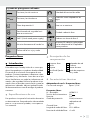
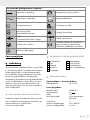
Legende der verwendeten Piktogramme
Gleichstrom / -spannung Polarität des Ausgangsanschlusses
Wechselstrom / -spannung Spritzwassergeschützt
Schutzklasse II Für den Außenbereich
Kurzschlussfester
Sicherheitstransformator Vorsicht: Laserstrahlung
SMPS
(Switched Mode Power Supply) Produkt der Laserklasse 2
Nicht in den Lichtstrahl sehen. Das CE-Zeichen bestätigt die
Konformität mit den für das Produkt
zutreffenden EU Richtlinien.
Lichtfarben: Rot und Grün
Laser-Projektor
Einleitung
Wir beglückwünschen Sie zum Kauf Ihres neuen
Produkts. Sie haben sich damit für ein hochwertiges
Produkt entschieden. Die Bedienungsanleitung ist
Teil dieses Produkts. Sie enthält wichtige Hinweise
für Sicherheit, Gebrauch und Entsorgung. Machen
Sie sich vor der Benutzung des Produkts mit allen
Bedien- und Sicherheitshinweisen vertraut. Benutzen
Sie das Produkt nur wie beschrieben und für die
angegebenen Einsatzbereiche. Händigen Sie alle
Unterlagen bei Weitergabe des Produkts an Dritte
mit aus.
Bestimmungsgemäße
Verwendung
Dieses Produkt dient zur dekorativen Beleuchtung
im Außenbereich. Das Produkt ist nur für den Ein-
satz in privaten Haushalten und nicht für den ge-
werblichen Einsatz bestimmt.
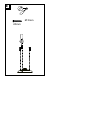
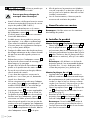
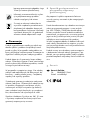
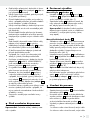
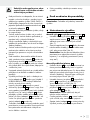
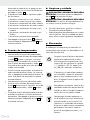
Teilebeschreibung
1 Laser-Projektor
2 Stab
3 Erdspieß
4 Feststellschraube
5 Bodenplatte
6 Netzadapter
7 Anschlussstecker
8 Überwurfmutter
9 Timer- & Modus-Taste
Technische Daten
Netzadapter + Laser-Projektor:
Leistungsaufnahme: ca. 3,2 W
Laser-Projektor:
Modell-Nr.: HG08315
Betriebsspannung: 5 V
Leistung: 2 W
Schutzgrad: IP44 (spritzwasser-
geschützt)
Laserklasse: 2
Wellenlänge des Lasers: 532–650 nm
Ausgangsleistung des Lasers: <1 mW

7 DE/AT/CH
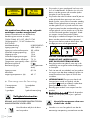
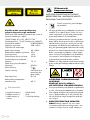
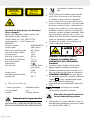
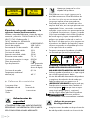
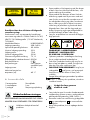
LASERSTRAHLUNG
NICHT IN DEN STRAHL BLICKEN
LASER KLASSE 2
P max.: <1 mW
: 532 - 650 nm
EN 60825-1:2014
Das Produkt kann nur an folgendes
Netzteil angeschlossen werden:
Name oder Handelsmarke des Herstellers,
Handelsregisternummer und Anschrift:
OWIM GmbH & Co. KG, HRA721742
Stiftsbergstraße 1, 74167 Neckarsulm,
DEUTSCHLAND
Modellkennung: HS0501000VO
Eingangsspannung: 200–240 V~
Eingangswechselstromfrequenz: 50 – 60 Hz
Nennausgangsspannung: 5,0 V
Ausgangsstrom: 1,0 A
Nennausgangsleistung: 5,0 W
Durchschnittliche aktive Effizienz: 75,1 %
Leistungsaufnahme bei Nulllast: 0,09 W
Schutzklasse: II /
Schutzart: IP44 (spritzwas-
sergeschützt)
Eingangsstrom: 0,15 A
Maximale Umgebungs-
temperatur (ta): 40 °C
Lieferumfang
1 Laser-Projektor
1 Netzadapter
1 Erdspieß
1 Bodenplatte
1 Stab
1 Bedienungsanleitung
Sicherheitshinweise
BEWAHREN SIE ALLE SICHERHEITS HINWEISE
UND ANWEISUNGEN FÜR DIE ZUKUNFT AUF!
Halten Sie Kinder stets vom
Produkt fern.
Dieses Produkt ist kein Spielzeug, es gehört
nicht in Kinderhände. Kinder können die Ge-
fahren, die im Umgang mit dem Produkt ent-
stehen, nicht erkennen.
Dieses Produkt kann von Kindern ab 8 Jahren
und darüber sowie von Personen mit verringer-
ten physischen, sensorischen oder mentalen
Fähigkeiten oder Mangel an Erfahrung und
Wissen benutzt werden, wenn sie beaufsichtigt
oder bezüglich des sicheren Gebrauchs des
Produktes unterwiesen wurden und die daraus
resultierenden Gefahren verstehen. Kinder d
ürfen
nicht mit dem Produkt spielen. Reinigung und
Benutzerwartung dürfen nicht von Kindern ohne
Beaufsichtigung durchgeführt werden.
Achten Sie darauf, dass das Produkt nur von
fachkundigen Personen montiert wird.
VORSICHT: LASERSTRAHLUNG
PRODUKT DER LASERKLASSE 2
NICHT IN DEN LICHTSTRAHL SEHEN
Bewahren Sie das Produkt nach Gebrauch
wieder in der Verpackung auf, um ungewollte
Beschädigungen zu vermeiden.
Ziehen Sie nicht an der Netzleitung des Produkts
und stellen Sie sicher, dass sie so verlegt ist, dass
niemand darüber laufen oder stolpern kann.
VERLETZUNGSGEFAHR! Stellen Sie sicher,
dass, wenn der Laser-Projektor entfernt wird,
auch der Erdspieß 3 mit entfernt wird, damit
dieser keine Gefahr darstellt (z. B. Stolpern).
Befestigen Sie keine zusätzlichen Gegenstände
am Produkt.
Benutzen Sie dieses Produkt
nur, wenn es ordnungsgemäß installiert ist.
Vermeiden Sie Lebensgefahr
durch elektrischen Schlag!
Vergewissern Sie sich vor der Benutzung,
dass die vorhandene Netzspannung mit der
benötigten Betriebsspannung des Produktes
übereinstimmt (200–240 V∼).

8 DE/AT/CH
Überprüfen Sie vor jedem Netzanschluss den
Erdspieß 3 und den Netzadapter 6 auf et-
waige Beschädigungen.
Benutzen Sie das Produkt niemals, wenn Sie
irgendwelche Beschädigungen feststellen.
Die Netzleitung dieses Produkts kann nicht
ausgetauscht werden; falls die Netzleitung be-
schädigt ist, muss das ganze Produkt entsorgt
werden.
Öffnen Sie niemals eines der elektrischen
Betriebsmittel oder stecken irgendwelche
Gegenstände in dieselben.
Schützen Sie die Netzleitung vor scharfen
Kanten, mechanischen Belastungen und
heißen Oberflächen.
Nicht mit scharfen Klammern oder Nägeln
befestigen.
Ziehen Sie immer den Netzadapter 6 vor der
Montage, Demontage oder Reinigung aus der
Steckdose.
Berühren Sie weder den Anschlussstecker 7
des Produkts noch das Produkt selbst mit nassen
Händen.
Bei längerer Nichtnutzung trennen Sie das
Produkt vom Stromnetz.
Wenn Sie Fragen zum Produkt haben oder sich
nicht sicher sind, fragen Sie einen Elektrofach-
betrieb um Rat.
Verwenden Sie das Produkt nur mit dem mitge-
lieferten Netzadapter 6 des Typs (Modell-Nr.
HS0501000VO); ansonsten erlöschen jegliche
Gewährleistungsansprüche.
Der Laser-Projektor 1 ist nicht austauschbar.
Sollte der Laser-Projektor 1 am Ende seiner
Lebensdauer ausfallen, muss das gesamte
Produkt ersetzt werden.
Beachten Sie, dass der Netzadapter 6 auch
ohne Betrieb des Produkts noch eine geringe
Leistung aufnimmt, solange sich der Netz-
adapter 6 in der Steckdose befindet. Um
das Produkt vollständig auszuschalten, entfer-
nen Sie den Netzadapter 6 aus der Steck-
dose.
Um den Spritzschutz des Produkts zu erhalten,
darf dieses Produkt nicht verwendet werden, ohne
dass alle Dichtungen und die Motivschablonen
ordnungsgemäß installiert sind.
Blockieren Sie während des Betriebs nicht die
Lüftungsöffnungen des Produkts.
Vor der Inbetriebnahme
Hinweis: Entfernen Sie sämtliches Verpackungs-
material vom Produkt.
Produkt aufstellen
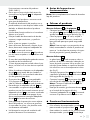
Stab 2 und Erdspieß 3 montieren:
Setzen Sie den Laser-Projektor 1 auf den
Stab 2 mit Erdspieß 3 und befestigen Sie
diesen, indem Sie ihn gegen den Uhrzeigersinn
drehen (Abb. C).
Stecken Sie den Erdspieß 3 tief ins Erdreich,
in den Rasen oder das Beet (im Innen- oder
Außenbereich), damit dieser fest sitzt (Abb. D).
Hinweis: Um eine gute Projektionsleistung zu
erzielen wird empfohlen, das Produkt minde
stens
1 m von der Projektionsfläche entfernt zu plat-
zieren (Wand, Decke etc.).
Bodenplatte 5 montieren:
Die Bodenplatte 5 kann auf verschiedenen
Oberflächenmaterialien montiert werden, die
für Garten- / Terrassenstandorte typisch sind.
Verwenden Sie bei Holz oder weichen Ober-
flächen Schrauben (nicht im Lieferumfang ent-
halten). Nicht an geneigten Mauerwerks -
oberflächen verwenden (Abb. E).
Setzen Sie den Laser-Projektor 1 auf die
Bodenplatte 5 und befestigen Sie diese,
indem Sie sie gegen den Uhrzeigersinn drehen
(Abb. D).
Stecken Sie den Anschlussstecker 7 des
Laser-Projektors 1 in die Anschlussbuchse
des Netzadapters 6 (Abb. B).
Hinweis: Verlegen Sie das Kabel stolpersicher.
Drehen Sie die Überwurfmutter 8 im Uhrzei-
gersinn, um die Verbindung zu fixieren.
Stecken Sie den Netzadapter 6 in die Steck-
dose. Das Produkt ist betriebsbereit.

9 DE/AT/CH
Inbetriebnahme
Drücken Sie die Timer- & Modus-Taste 9, um
den Laser-Projekt 1 einzuschalten.
Drücken Sie zum Wechsel der Leuchtmodi die
Timer- & Modus-Taste 9. Wenn Sie Leucht-
modus 6 erreicht haben, schalten Sie das
Produkt aus, indem Sie ein weiteres Mal die
Timer- & Modus-Taste 9 drücken.
Das Produkt verfügt über folgende Leuchtmodi:
1 x drücken: Leuchtmodus rot, rotierend
2 x drücken: Leuchtmodus rot, stehend
3 x drücken: Kombination grün, rotierend
4 x drücken: Kombination grün, stehend
5 x drücken: Kombination grün und rot, rotierend
6 x drücken: Kombination grün und rot, stehend
7 x drücken: Laser-Projektor aus
Ziehen Sie den Netzadapter 6 aus der
Netzsteckdose, um den Laser-Projektor 1
vollständig auszuschalten.
Timer-Funktion
Zum Einschalten der Timer-Funktion halten Sie
die Timer- & Modus-Taste 9 für etwa 2 Sekun-
den gedrückt, nachdem Sie das Produkt an die
Stromversorgung angeschlossen haben. Die
Timer- & Modus-Taste 9 leuchtet grün auf,
wenn die Timer-Funktion aktiviert ist.
In der Timer-Funktion ist das Produkt für 6 Stunden
eingeschaltet und wird anschließend automa-
tisch für 18 Stunden ausgeschaltet. Dieses
Schaltmuster wird automatisch wiederholt.
Um die Timer-Funktion zu deaktivieren, halten
Sie die Timer- & Modus-Taste 9 erneut für
etwa 2 Sekunden gedrückt. Das Licht der
Timer- & Modus-Taste 9 erlischt.
Wenn die Timer-Funktion ausgeschaltet ist,
leuchtet das Produkt kontinuierlich. Um das
Produkt vollständig auszuschalten, ziehen Sie
den Netzadapter 6 aus der Steckdose.
Reinigung und Pflege
VORSICHT! STROMSCHLAGGEFAHR!
Ziehen Sie zuerst den Netzadapter 6 aus der
Steckdose.
VORSICHT! STROMSCHLAGGEFAHR!
Aus Gründen der elektrischen Sicherheit darf das
Produkt niemals in Wasser getaucht werden.
Benutzen Sie keine Lösungsmittel, Benzin o. Ä.
Das Produkt würde hierbei Schaden nehmen.
Reinigen Sie das Produkt regelmäßig mit einem
trockenen, fusselfreien Tuch. Verwenden Sie
bei stärkeren Verschmutzungen ein leicht an-
gefeuchtetes Tuch.
Entsorgung
Die Verpackung besteht aus umweltfreundlichen
Ma-
terialien, die Sie über die örtlichen Recyclingstellen
entsorgen können.
b
a
Beachten Sie die Kennzeichnung der
Verpackungsmaterialien bei der Abfall-
trennung, diese sind gekennzeichnet mit
Abkürzungen (a) und Nummern (b) mit
folgender Bedeutung: 1–7: Kunststoffe /
20–22: Papier und Pappe / 80–98:
Verbundstoffe.
Das Produkt und die Verpackungsmate-
rialien sind recycelbar, entsorgen Sie
diese getrennt für eine bessere Abfall-
behandlung. Das Triman-Logo gilt nur
für Frankreich.
Möglichkeiten zur Entsorgung des aus-
gedienten Produkts erfahren Sie bei Ihrer
Gemeinde- oder Stadtverwaltung.
Werfen Sie Ihr Produkt, wenn es ausge-
dient hat, im Interesse des Umweltschutz
es
n
icht in den Hausmüll, sondern führen S
ie
es einer fachgerechten Entsorgung zu.
Über Sammelstellen und deren Öffn
ungs-
zeiten können Sie sich bei Ihrer zustän-
digen Verwaltung informieren.

10 DE/AT/CH
Garantie
Das Produkt wurde nach strengen Qualitätsrichtlinien
sorgfältig produziert und vor Anlieferung gewissen-
haft geprüft. Im Falle von Mängeln dieses Produkts
stehen Ihnen gegen den Verkäufer des Produkts
gesetzliche Rechte zu. Diese gesetzlichen Rechte
werden durch unsere im Folgenden dargestellte
Garantie nicht eingeschränkt.
Sie erhalten auf dieses Produkt 3 Jahre Garantie
ab Kaufdatum. Die Garantiefrist beginnt mit dem
Kaufdatum. Bitte bewahren Sie den Original-Kassen-
bon gut auf. Diese Unterlage wird als Nachweis
für den Kauf benötigt.
Tritt innerhalb von 3 Jahren ab dem Kaufdatum
dieses Produkts ein Material- oder Fabrikationsfeh-
ler auf, wird das Produkt von uns – nach unserer
Wahl – für Sie kostenlos repariert oder ersetzt. Dies
e
Garantie verfällt, wenn das Produkt beschädigt,
nicht sachgemäß benutzt oder gewartet wurde.
Die Garantieleistung gilt für Material- oder Fabri-
kationsfehler. Diese Garantie erstreckt sich nicht
auf Produktteile, die normaler Abnutzung ausgesetzt
sind (z. B. Batterien) und daher als Verschleißteile
angesehen werden können oder Beschädigungen
an zerbrechlichen Teilen, z. B. Schalter, Akkus oder
die aus Glas gefertigt sind.
Abwicklung im Garantiefall
Um eine schnelle Bearbeitung Ihres Anliegens zu ge-
währleisten, folgen Sie bitte den folgenden Hinweisen:
Bitte halten Sie für alle Anfragen den Kassenbon
und die Artikelnummer (z. B. IAN 123456_7890)
als Nachweis für den Kauf bereit.
Die Artikelnummer entnehmen Sie bitte dem Typen-
schild, einer Gravur, auf dem Titelblatt Ihrer Bedie-
nungsanleitung (unten links) oder als Aufkleber auf
der Rück- oder Unterseite des Produkts.
Sollten Funktionsfehler oder sonstige Mängel auftre-
ten, kontaktieren Sie zunächst die nachfolgend be-
nannte Serviceabteilung telefonisch oder per E-Mail.
Ein als defekt erfasstes Produkt können Sie dann
unter Beifügung des Kaufbelegs (Kassenbon) und
der Angabe, worin der Mangel besteht und wann
er aufgetreten ist, für Sie portofrei an die Ihnen
mitgeteilte Service-Anschrift übersenden.
Service
Service Deutschland
Tel.: 0800 5435 111
E-Mail: [email protected]
Service Österreich
Tel.: 0800 292726
E-Mail: [email protected]
Service Schweiz
Tel.: 0800562153
E-Mail: [email protected]

11 GB/IE
List of pictograms used .....................................................................................................Page 12
Introduction ................................................................................................................................Page 12
Proper use .........................................................................................................................................Page 12
Description of parts ..........................................................................................................................Page 12
Technical data ..................................................................................................................................Page 12
Included items ..................................................................................................................................Page 13
Safety information ............................................................................................................... Page 13
Before use ....................................................................................................................................Page 14
Setting up the product .......................................................................................................Page 14
Use ..................................................................................................................................................... Page 14
Timer function ...........................................................................................................................Page 15
Cleaning and care .................................................................................................................Page 15
Disposal ......................................................................................................................................... Page 15
Warranty ......................................................................................................................................Page 15
Warranty claim procedure ..............................................................................................................Page 16
Service ..............................................................................................................................................Page 16

12 GB/IE
List of pictograms used
Direct current / voltage Polarity of output terminal
Alternating current / voltage Splashproof
Safety class II For outdoor use
Short-circuit-proof safety
isolating transformer Caution: Laser radiation
SMPS
(Switched Mode Power Supply) Class 2 laser product
Do not stare into beam. CE mark indicates conformity with
relevant EU directives applicable
for this product.
Light colours: red and green
Christmas laser light projector
Introduction
We congratulate you on the purchase of your new
product. You have chosen a high quality product.
The instructions for use are part of the product. They
contain important information concerning safety,
use and disposal. Before using the product, please
familiarise yourself with all of the safety information
and instructions for use. Only use the product as
described and for the specified applications. If you
pass the product on to anyone else, please ensure
that you also pass on all the documentation with it.
Proper use
This product is suitable for decorating use in outdoors.
This product is intended for use in private, domestic
environment only and not for commercial purposes.
Description of parts
1 Projector
2 Pole
3 Spike
4 Locking screw
5 Round base
6 Mains adapter
7 Connection plug
8 Union nut
9 Timer & Mode button
Technical data
Mains adapter + Christmas laser light
projector:
Total power consumption: approx. 3.2 W
Christmas laser light projector:
Model No.: HG08315
Operating voltage: 5 V
Power: 2 W
Degree of protection: IP44 (Splashproof)
Laser class: 2
Laser wavelength: 532–650 nm
Laser output power: <1 mW

13 GB/IE
LASERSTRAHLUNG
NICHT IN DEN STRAHL BLICKEN
P max.: <1 mW
: 532 - 650 nm
P max.: <1 mW
: 532 - 650 nm
EN 60825-1:2014
LASER RADIATION
DO NOT STARE INTO BEAM
CLASS 2 LASER PRODUCT
The product can only be connected to the
following power adapter:
Manufacturer’s name or trade mark, commercial
registration number and address:
OWIM GmbH & Co. KG, HRA721742,
Stiftsbergstraße 1, 74167 Neckarsulm,
GERMANY
Model identifier: HS0501000VO
Input voltage: 200–240 V~
Input AC frequency: 50 – 60 Hz
Output voltage: 5.0 V
Output current: 1.0 A
Output power: 5.0 W
Average active efficiency: 75.1 %
No-load power consumption: 0.09 W
Protection class: II /
Protection type: IP44 (Splashproof)
Input current: 0.15 A
Rated maximum ambient
temperature (ta): 40 °C
Included items
1 Christmas laser light
projector
1 Mains adapter
1 Ground spike
1 Round base
1 Pole
1 Operating instructions
Safety information
YOU SHOULD STORE ALL SAFETY INFORMA-
TION AND INSTRUCTIONS IN A SAFE PLACE IN
CASE YOU NEED TO REFER TO THEM AGAIN
IN THE FUTURE!
Always keep children away from
the product.
This product is not a toy and should not be
played by children. Children are not able to
understand the dangers that can occur when
handling this product.
This product can be used by children aged from
8 years and above and persons with reduced
physical, sensory or mental capabilities or lack
of experience and knowledge if they have been
given supervision or instruction concerning use
of the product in a safe way and understand
the hazards involved. Children shall not play
with the product. Cleaning and user mainte-
nance shall not be made by children without
supervision.
Ensure that the product is installed by suitably
experienced or qualified persons only.
CAUTION: LASER RADIATION
CLASS 2 LASER PRODUCT
DO NOT STARE INTO BEAM
After use, keep the product in the packaging
to prevent unwanted damage.
Do not pull the mains cable and make sure it
is laid down properly so that no one walks or
trips over it.
DANGER OF INJURY! Make sure that w
hen
the laser projector is removed, the ground
spike 3 is also removed so that it is not a
hazard (eg tripping).
Do not attach any other objects to the product.
This product must not be used
without properly installed.
Avoid the danger of
death from electric shock!
Before use, ensure that the mains voltage
available is the same as the required operat-
ing voltage for the product (200–240 V∼).
Before connecting the product to the mains
you should always check the spike 3 and the
mains adapter 6 for any damage.
Never use the product if you discover that it is
damaged in any way.

14 GB/IE
This mains cable of the product is nonreplace-
able. Hence if it becomes damaged you must
dispose of the entire product.
Never open any of the electrical parts or
insert any kind of object into them.
Protect the mains cable from sharp edges,
mechanical loads and hot surfaces.
Do not install with sharp fasteners or nails.
Always unplug the mains adapter 6 from the
socket before installation, dismantling or cleaning.
Never touch the connection plug 7 of the
product or the product itself with wet hands.
If the product is not in use for any length of
time (e.g. holidays), disconnect it from the
power supply.
If you have any questions about the product
or are unsure about any of its aspects, please
seek the advice of an electrical equipment
specialist.
Only use the product with the supplied
mains adapter 6 for the type (Model No.:
HS0501000VO); all warranty claims will oth-
erwise expire.
The laser projector 1 is not replaceable.
If the laser projector 1 fails at the end of its
lifes, the entire product must be replaced.
Please note that the mains adapter 6 conti-
nues to draw a small amount of power even if
the product is turned off as long as the mains
adapter 6 is plugged into a power outlet. To
switch the product off completely, unplug the
mains adapter 6 from the socket.
To maintain splash protection of the product, this
product must not be used without all gaskets
and slide being properly installed.
Ventilation openings are not to be obstructed
during operation of the product.
Before use
Note: Remove all packaging materials from the
product.
Setting up the product
Connect the pole 2 and the spike 3:
Put the laser projector 1 onto the pole 2
and the spike 3 and connect it by turning it
counterclockwise (fig. C).
Insert the spike 3 deep into the ground, lawn
or flower bed (indoor or outdoor) for it to be
stable (fig. D).
Note: For better projection performance, sug-
gest to place the product at least 1 meter away
from the projection surface (wall, ceiling, etc.).
Connect the round base 5:
Round base 5 mounted on different surface
materials typical for garden / patio locations.
And use the screw (not include) to the wood
or soft surface. Will not use to the tilt masonry
surface (fig. E).
Put the laser projector
1
onto the round base
5
and connect it by turning it counterclockwise
(fig. D).
Insert the connection plug 7 of the laser
projector 1
into the socket of the mains
adapter 6 (fig. B).
Note: Lay the cable so that tripping is avoided.
Turn the union nut 8 in clockwise direction to
fix the connection (fig. B).
Insert the mains adapter 6 into the mains
socket. The product is ready to use.
Use
Press the Timer & Mode button 9 to switch
on the laser projector 1.
Press the Timer & Mode button 9 to switch to
the next laser ray mode. When you reach
lighting mode 6, the next press of the Timer &
Mode button 9 switches the product off.
The laser ray mode list as below;
Press 1 x: light mode red, rotating
Press 2 x: light mode red, standing
Press 3 x: combination green, rotating
Press 4 x: combination green, standing
Press 5 x: combination of green and red,
rotating

15 GB/IE
Press 6 x: combination of green and red,
standing
Press 7 x: laser projector off
Pull the mains adapter 6 out of the mains
socket to completely switch off the projector 1.
Q Timer function
To switch on the timer function, press and hold
2 second the Timer & Mode button 9 after
the product is connected to the socket of power
supply. The indicate light at Timer & Mode
button 9 will light up when the timer function
is activated.
The product lights glow permanently for 6 hours
and will be followed by a subsequent pause of
18 hours. Afterwards, the product will light up
again at its designated turn on time for 6 hours
followed by a subsequent pause of 18 hours.
To switch off the timer function, press and hold
the Timer & Mode button 9 for 2 seconds
and the indicate light will be turned off.
When the timer function is switched off, the
product glows continuously. To switch off the
product completely, the mains adapter 6 has
to be unplugged from the socket.
Q Cleaning and care
CAUTION! DANGER OF ELECTRIC SHOCK!
First pull the mains adapter
6
out of the mains socket.
CAUTION! DANGER OF ELECTRIC SHOCK!
For reasons of electrical safety the product must
never be immersed in water.
Do not use any solvents, petrol or similar items.
This would damage the product.
Clean the product regularly with a dry, lint-free
cloth. Use a slightly dampened cloth to remove
more stubborn dirt.
Q Disposal
The packaging is made entirely of recyclable
materials, which you may dispose of at local r
ecycling facilities.
b
a
Observe the marking of the packaging
materials for waste separation, which
are marked with abbreviations (a) and
numbers (b) with following meaning:
1–7: plastics / 20–22: paper and fibre-
board / 80–98: composite materials.
The product and packaging materials
are recyclable, dispose of it separately
for better waste treatment. The Triman
logo is valid in France only.
Contact your local refuse disposal author-
ity for more details of how to dispose of
your worn-out product.
To help protect the environment, please
dispose of the product properly when it
has reached the end of its useful life and
not in the household waste. Information
on collection points and their opening
hours can be obtained from your local
authority.
Warranty
The product has been manufactured to strict quality
guidelines and meticulously examined before deliv-
ery. In the event of product defects you have legal
rights against the retailer of this product. Your legal
rights are not limited in any way by our warranty
detailed below.
The warranty for this product is 3 years from the
date of purchase. The warranty period begins on
the date of purchase. Please keep the original
sales receipt in a safe location. This document is
required as your proof of purchase.

16 GB/IE
Should this product show any fault in materials or
manufacture within 3 years from the date of pur-
chase, we will repair or replace it – at our choice
– free of charge to you. This warranty becomes
void if the product has been damaged, or used or
maintained improperly.
The warranty applies to defects in material or man
u-
facture. This warranty does not cover product parts
subject to normal wear, thus possibly considered
consumables (e.g. batteries) or for damage to frag-
ile parts, e.g. switches, rechargeable batteries or
glass parts.
Warranty claim procedure
To ensure quick processing of your case, please
observe the following instructions:
Please have the till receipt and the item number
(e.g. IAN 123456_7890) available as proof of
purchase.
You will find the item number on the rating plate,
an engraving on the front page of the instructions
for use (bottom left), or as a sticker on the rear or
bottom of the product.
If functional or other defects occur, please contact
the service department listed either by telephone
or by e-mail.
You can return a defective product to us free of
charge to the service address that will be provided
to you. Ensure that you enclose the proof of pur-
chase (till receipt) and information about what the
defect is and when it occurred.
Service
Service Great Britain
Tel.: 08000569216
E-Mail: [email protected]
Service Ireland
Tel.: 1800 200736
E-Mail: [email protected]

17 FR/BE
Légende des pictogrammes utilisés .......................................................................Page 18
Introduction ................................................................................................................................Page 18
Utilisation conforme .........................................................................................................................Page 18
Descriptif des pièces ........................................................................................................................ Page 18
Caractéristiques techniques .............................................................................................................Page 18
Contenu de la livraison ....................................................................................................................Page 19
Consignes de sécurité ........................................................................................................Page 19
Avant la mise en service ..................................................................................................Page 20
Installer le produit ................................................................................................................ Page 20
Mise en service ........................................................................................................................ Page 21
Fonction de minuterie ........................................................................................................ Page 21
Nettoyage et entretien .....................................................................................................Page 21
Mise au rebut ............................................................................................................................Page 21
Garantie ........................................................................................................................................ Page 22
Faire valoir sa garantie ....................................................................................................................Page 23
Service après-vente .......................................................................................................................... Page 23

18 FR/BE
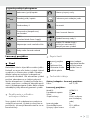
Légende des pictogrammes utilisés
Courant continu / Tension continue Polarité de la connexion de sortie
Courant alternatif / Tension alternative Protégé contre les projections d'eau
Classe de protection II Conçu pour un usage en extérieur
Transformateur de sécurité
anti-court-circuit Attention : Rayonnement laser
SMPS
(Switched Mode Power Supply) Produit à laser de classe 2
Ne pas regarder directement dans le
faisceau lumineux.
La marque CE indique la conformité
aux directives européennes appli-
cables à ce produit.
Couleurs de la lumière : rouge et vert
Projecteur laser
Introduction
Nous vous félicitons pour l‘achat de votre nou-
veau produit. Vous avez opté pour un produit de
grande qualité. Le mode d‘emploi fait partie inté-
grante de ce produit. Il contient des indications im-
portantes pour la sécurité, l’utilisation et la mise au
rebut. Veuillez lire consciencieusement toutes les
indications d‘utilisation et de sécurité du produit.
Ce produit doit uniquement être utilisé conformé-
ment aux instructions et dans les domaines d‘ap-
plication spécifiés. Lors d‘une cession à tiers,
veuillez également remettre tous les documents.
Utilisation conforme
Ce produit sert à l’éclairage décoratif d’un espace
extérieur. Le produit est exclusivement destiné à un
usage privé et non commercial.
Descriptif des pièces
1 Projecteur laser
2 Tige
3 Piquet de terre
4 Vis de réglage
5 Plaque de sol
6 Adaptateur secteur
7 Fiche de
raccordement
8 Écrou-raccord
9 Touche Timer &
Mode
Caractéristiques techniques
Adaptateur secteur + projecteur laser :
Consommation d’énergie: env. 3,2W
Projecteur laser :
N° de modèle : HG08315
Tension de fonctionnement : 5 V
Puissance : 2 W
Indice de protection : IP44 (protection
contre les projections
d’eau)
Classe de laser: 2
Longueur d’onde du laser: 532–650 nm
Puissance de sortie du laser : <1 mW

19 FR/BE
LASERSTRAHLUNG
NICHT IN DEN STRAHL BLICKEN
P max.: <1 mW
: 532 - 650 nm
P max.: <1 mW
: 532 - 650 nm
EN 60825-1:2014
RAYONNEMENT LASER
NE PAS REGARDER DANS LE FAISCEAU
APPAREIL A LASER DE CLASSE2
Le produit peut uniquement être raccordé
au bloc d’alimentation suivant :
Nom ou marque commerciale du fabricant,
numéro d’enregistrement de la société et adresse :
OWIM GmbH & Co. KG, HRA721742
Stiftsbergstraße 1, 74167 Neckarsulm,
ALLEMAGNE
Identification de modèle : HS0501000VO
Tension d’entrée : 200–240 V~
Fréquence du courant
alternatif d’entrée: 50–60Hz
Tension de sortie nominale : 5,0 V
Courant de sortie: 1,0A
Puissance de sortie nominale : 5,0 W
Efficience moyenne active : 75,1 %
Puissance absorbée à
charge nulle: 0,09W
Classe de protection : II /
Type de protection : IP44 (protégé
contre les projec-
tions d’eau)
Courant d’entrée: 0,15 A
Température ambiante
maximale (ta): 40 °C
Contenu de la livraison
1 projecteur laser
1 adaptateur secteur
1 piquet de terre
1 plaque de fond
1 tige
1 mode d’emploi
Consignes de sécurité
CONSERVEZ POUR L’AVENIR L’ENSEMBLE
DES INSTRUCTIONS DE SÉCURITÉ ET INS-
TRUCTIONS !
Toujours tenir les enfants à l’écart
du produit.
Ce produit n’est pas un jouet, il doit être tenu
hors de portée des enfants. Les enfants ne sont
pas conscients des dangers liés à la manipulation
du produit.
Le produit peut être utilisé par des enfants âgés
de 8 ans et plus ainsi que par des personnes
ayant des capacités physiques, sensorielles ou
mentales réduites ou manquant d’expérience
ou de connaissances, s’ils sont surveillés ou
s’ils ont été informés de l’utilisation sûre du
produit et comprennent les risques liés à son
utilisation. Les enfants ne doivent pas jouer
avec le produit. Le nettoyage et l’entretien ne
doivent pas être effectués par des enfants lais-
sés sans surveillance.
Veillez à ce que le produit soit uniquement
monté par des personnes compétentes.
ATTENTION : RAYONNEMENT LASER
PRODUIT DE CLASSE DE LASER 2
NE PAS REGARDER DIRECTEMENT
DANS LE FAISCEAU LUMINEUX
Après utilisation, rangez le produit dans son em-
ballage pour éviter tout dommage involontaire.
Ne tirez pas sur le câble secteur du produit et
veillez à ce qu’il soit posé de manière à ce que
personne ne puisse marcher ou trébucher dessus.
RISQUE DE BLESSURES! Lorsque vous
rangez le projecteur laser, veillez également à
enlever le piquet de terre 3 pour prévenir
tout risque (par ex. de trébuchement).
N’accrochez pas d’objet supplémentaire au
produit.

20 FR/BE
Utilisez ce produit que
lorsqu’il est correctement installé.
Prenez garde au danger de
mort par choc électrique!
Avant l’utilisation, vérifiez que la tension secteur
existante corresponde à la tension de service
requise du produit (200–240 V∼).
Avant chaque branchement sur le secteur,
contrôlez le bon état du piquet de terre 3 et
de l’adaptateur secteur 6.
N’utilisez jamais le produit si vous constatez
la moindre détérioration.
Le câble secteur de ce produit ne peut pas
être remplacé; si ce câble est endommagé,
il faut mettre la totalité du produit au rebut.
N’ouvrez jamais les équipements électriques
et n’y insérez jamais d’objets.
Protégez le câble secteur des bords tranchants,
des charges mécaniques et des surfaces chaudes.
Ne pas fixer avec des agrafes pointues ou
des clous.
Débranchez toujours l’adaptateur secteur 6
de la prise de courant avant le montage, le
démontage ou le nettoyage.
Ne pas saisir la fiche de raccordement 7 du
produit ou le produit avec des mains mouillées.
En cas de non utilisation prolongée, débran-
chez le produit du secteur.
Si vous avez des questions concernant le
produit ou si vous n’êtes pas sûr, demandez
conseil à un électricien.
Utilisez uniquement le produit avec l’adapta-
teur secteur fourni 6 de type adéquat (n° de
modèle HS0501000VO) ; tout droit de ga-
rantie est annulé dans le cas contraire.
Le projecteur laser 1 n’est pas remplaçable.
Si le projecteur laser 1 arrive en fin de vie,
l’ensemble du produit doit alors être remplacé.
Veuillez noter que l’adaptateur secteur 6
consomme une faible quantité d’électricité,
même lorsque le produit n’est pas en état de
marche, et ce aussi longtemps que l’adaptateur
secteur 6 est branché dans la prise électrique.
Pour éteindre complètement le produit, débran-
chez l’adaptateur secteur 6 de la prise.
Afin de préserver la protection anti éclabous-
sures de ce produit, il ne doit être utilisé que si
tous les joints et les pochoirs de motifs ont été
installées correctement.
Lors du fonctionnement, n‘obstruez pas les
ouvertures de ventilation du produit.
Avant la mise en service
Remarque: Veuillez retirer tous les matériaux
d’emballage du produit.
Installer le produit
Monter la tige 2 et le piquet de terre 3 :
Placez le projecteur laser 1 sur la tige 2
avec le piquet de terre 3 et fixez ce dernier
en le tournant dans le sens anti-horaire (Fig. C).
Enfoncez profondément le piquet dans la terre
3, dans l’herbe ou dans le parterre de fleurs
(en intérieur ou extérieur), afin qu’il soit stable
(Fig. D).
Remarque : Afin d’obtenir un résultat de
projection optimal, il est recommandé de placer
le produit à un 1 m min. de distance de la
surface de projection (mur, plafond, etc).
Monter la plaque de sol 5 :
La plaque de fond 5 peut être montée sur
différents matériaux de surface caractéristiques
des emplacements de jardins et terrasses. Utili-
sez des vis dans le bois ou d‘autres surfaces
souples (non fournies). Ne pas utiliser sur des
surface de maçonnerie inclinées (Fig. E).
Placez le projecteur laser 1 sur la plaque de
sol 5 et fixez-la en la tournant dans le sens
anti-horaire (Fig. D).
Branchez la fiche de raccordement 7 du
projecteur laser 1 dans la prise de raccorde-
ment de l’adaptateur secteur 6 (Fig. B).
Remarque : Posez le câble de manière à
ce que personne ne puisse trébucher dessus.
Tournez l’écrou-raccord 8 dans le sens horaire
pour fixer la connexion.
Seite laden ...
Seite laden ...
Seite laden ...
Seite laden ...
Seite laden ...
Seite laden ...
Seite laden ...
Seite laden ...
Seite laden ...
Seite laden ...
Seite laden ...
Seite laden ...
Seite laden ...
Seite laden ...
Seite laden ...
Seite laden ...
Seite laden ...
Seite laden ...
Seite laden ...
Seite laden ...
Seite laden ...
Seite laden ...
Seite laden ...
Seite laden ...
Seite laden ...
Seite laden ...
Seite laden ...
Seite laden ...
Seite laden ...
Seite laden ...
Seite laden ...
Seite laden ...
Seite laden ...
Seite laden ...
Seite laden ...
Seite laden ...
Seite laden ...
Seite laden ...
Seite laden ...
Seite laden ...
-
 1
1
-
 2
2
-
 3
3
-
 4
4
-
 5
5
-
 6
6
-
 7
7
-
 8
8
-
 9
9
-
 10
10
-
 11
11
-
 12
12
-
 13
13
-
 14
14
-
 15
15
-
 16
16
-
 17
17
-
 18
18
-
 19
19
-
 20
20
-
 21
21
-
 22
22
-
 23
23
-
 24
24
-
 25
25
-
 26
26
-
 27
27
-
 28
28
-
 29
29
-
 30
30
-
 31
31
-
 32
32
-
 33
33
-
 34
34
-
 35
35
-
 36
36
-
 37
37
-
 38
38
-
 39
39
-
 40
40
-
 41
41
-
 42
42
-
 43
43
-
 44
44
-
 45
45
-
 46
46
-
 47
47
-
 48
48
-
 49
49
-
 50
50
-
 51
51
-
 52
52
-
 53
53
-
 54
54
-
 55
55
-
 56
56
-
 57
57
-
 58
58
-
 59
59
-
 60
60


in anderen Sprachen
- français: LIVARNO 365152 Le manuel du propriétaire
- español: LIVARNO 365152 El manual del propietario
- Nederlands: LIVARNO 365152 de handleiding
- slovenčina: LIVARNO 365152 Návod na obsluhu
- dansk: LIVARNO 365152 Brugervejledning
- polski: LIVARNO 365152 Instrukcja obsługi
Verwandte Papiere
Sonstige Unterlagen
-
 neuhaus 994341 Benutzerhandbuch
-
 BOXLIGHT MP-650i Benutzerhandbuch
-
 Ibiza Light & Sound LZR-RGOUTDOOR Bedienungsanleitung
-
NEC NC1700L Installationsanleitung
-
Hitachi CPX960WA Benutzerhandbuch
-
Proxima ASA DP6850 Benutzerhandbuch
-
-
NEC NP-PH3501QL Installationsanleitung
-
Hitachi CPX958 Benutzerhandbuch
-
NEC NC2402ML-IMS Installationsanleitung


