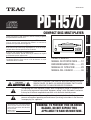
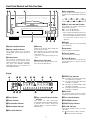
TEAC PD-H570 Bedienungsanleitung
- Kategorie
- CD-Spieler
- Typ
- Bedienungsanleitung

pd-h570
`
COMPACT DISC MULTI PLAYER
9A06736700
This appliance has a serial number located
on the rear panel. Please record the model
number and serial number and retain them
for your records.
Model number
Serial number
WARNING: TO PREVENT FIRE OR SHOCK
HAZARD, DO NOT EXPOSE THIS
APPLIANCE TO RAIN OR MOISTURE.
The exclamation point within an equilateral triangle is intended to alert the user to the
presence of important operating and maintenance (servicing) instructions in the literature
accompanying the appliance.
The lightning flash with arrowhead symbol, within an equilateral triangle, is intended to alert
the user to the presence of uninsulated “dangerous voltage” within the product’s enclosure
that may be of sufficient magnitude to constitute a risk of electric shock to persons.
CAUTION: TO REDUCE THE RISK OF ELECTRIC SHOCK, DO NOT
REMOVE COVER (OR BACK). NO USER-SERVICEABLE PARTS INSIDE.
REFER SERVICING TO QUALIFIED SERVICE PERSONNEL.
Ü
ÿ
Ÿ
Thanks for buying a TEAC. Read this manual carefully to get the
best performance from this unit.
Nous vous remercions pour l’achat d’un appareil TEAC.
Lire ce manuel avec attention pour obtenir les meilleures
performances possibles de cet appareil.
Vielen Dank für den Kauf dieses TEAC-Geräts.
Bitte lesen Sie diese Anleitung sorgfältig durch, um die Leistungs-
fähigkeit dieses Geräts optimal nutzen zu können.
Grazie per aver acquistato un prodotto TEAC.
Leggere attentamente questo manuale per ottenere le migliori
prestazioni da questo apparecchio.
Enhorabuena por la adquisición de un TEAC.
Lea detenidamente este manual a fin de obtener el mejor
rendimiento de esta unidad.
OWNER’S MANUAL ...................... 4
MANUEL DU PROPRIETAIRE .......12
BEDIENUNGSANLEITUNG............20
MANUALE DI ISTRUZIONI ...........28
MANUAL DEL USUARIO ..............36
ENGLISHFRANÇAISDEUTSCH
ITALIANO
ESPAÑOL
D

Important Safety Instructions
_
2
_
CAUTION:
••
Read all of these Instructions.
••
Save these Instructions for later use.
••
Follow all Warnings and Instructions marked on the audio
equipment.
1) Read Instructions
— All the safety and operating instructions
should be read before the product is operated.
2) Retain Instructions — The safety and operating instructions
should be retained for future reference.
3) Heed Warnings — All warnings on the product and in the
operating instructions should be adhered to.
4) Follow Instructions — All operating and use instructions should
be followed.
5) Cleaning — Unplug this product from the wall outlet before
cleaning. Do not use liquid cleaners or aerosol cleaners. Use a
damp cloth for cleaning.
6) Attachments — Do not use attachments not recommended by
the product manufacturer as they may cause hazards.
7) Water and Moisture — Do not use this product near water
_
for
example, near a bath tub, wash bowl, kitchen sink, or laundry tub; in
a wet basement; or near a swimming pool; and the like.
8) Accessories — Do not place this product on an unstable cart,
stand, tripod, bracket, or table.The product may fall, causing serious
injury to a child or adult, and serious damage to the product. Use
only with a cart, stand, tripod, bracket, or table recommended by the
manufacturer, or sold with the product. Any mounting of the product
should follow the manufacturer’s instructions, and should use a
mounting accessory recommended by the manufacturer.
9) A product and cart combination should be moved with care.
Quick stops, excessive force, and uneven surfaces may cause the
product and cart combination to overturn.
10) Ventilation — Slots and openings in the cabinet are provided
for ventilation and to ensure reliable operation of the product and to
protect it from overheating, and these openings must not be
blocked or covered. The openings should never be blocked by
placing the product on a bed, sofa, rug, or other similar surface.
This product should not be placed in a built-in installation such as a
bookcase or rack unless proper ventilation is provided or the
manufacturer’s instructions have been adhered to.
11) Power Sources — This product should be operated only from
the type of power source indicated on the marking label. If you are
not sure of the type of power supply to your home, consult your
product dealer or local power company. For products intended to
operate from battery power, or other sources, refer to the operating
instructions.
12) Grounding or Polarization — This product may be equipped
with a polarized alternating-current line plug (a plug having one
blade wider than the other). This plug will fit into the power outlet
only one way. This is a safety feature. If you are unable to insert the
plug fully into the outlet, try reversing the plug. If the plug should still
fail to fit, contact your electrician to replace your obsolete outlet. Do
not defeat the safety purpose of the polarized plug.
13) Power-Cord Protection — Power-supply cords should be
routed so that they are not likely to be walked on or pinched by
items placed upon or against them, paying particular attention to
cords at plugs, convenience receptacles, and the point where they
exit from the product.
14) Outdoor Antenna Grounding — If an outside antenna or
cable system is connected to the product, be sure the antenna or
cable system is grounded so as to provide some protection against
voltage surges and built-up static charges. Article 810 of the
National Electrical Code, ANSI/NFPA 70, provides information with
regard to proper grounding of the mast and supporting structure,
grounding of the lead-in wire to an antenna discharge unit, size of
grounding conductors, location of antenna-discharge unit,
connection to grounding electrodes, and requirements for the
grounding electrode.
"Note to CATV system installer:
This reminder is provided to call the CATV system installer’s
attention to Section 820-40 of the NEC which provides guidelines
for proper grounding and, in particular, specifies that the cable
ground shall be connected to the grounding system of the building,
as close to the point of cable entry as practical.
ANTENNA
LEAD IN
WIRE
ANTENNA
DISCHARGE UNIT
(NEC SECTION 810-20)
GROUNDING CONDUCTORS
(NEC SECTION 810-21)
GROUND CLAMPS
POWER SERVICE GROUNDING
ELECTRODE SYSTEM
(NEC ART 250. PART H)
NEC - NATIONAL ELECTRICAL CODE
ELECTRIC
SERVICE
EQUIPMENT
Example of Antenna Grounding as per
National Electrical Code, ANSI/NFPA 70
GROUND
CLAMP
15) Lightning — For added protection for this product during a
lightning storm, or when it is left unattended and unused for long
periods of time, unplug it from the wall outlet and disconnect the
antenna or cable system. This will prevent damage to the product
due to lightning and power-line surges.
16) Power Lines — An outside antenna system should not be
located in the vicinity of overhead power lines or other electric light
or power circuits, or where it can fall into such power lines or
circuits. When installing an outside antenna system, extreme care
should be taken to keep from touching such power lines or circuits
as contact with them might be fatal.
17) Overloading — Do not overload wall outlets, extension cords,
or integral convenience receptacles as this can result in risk of fire
or electric shock.
18) Object and Liquid Entry — Never push objects of any kind into
this product through openings as they may touch dangerous voltage
points or short-out parts that could result in a fire or electric shock.
Never spill liquid of any kind on the product.
19) Servicing — Do not attempt to service this product yourself as
opening or removing covers may expose you to dangerous voltage
or other hazards. Refer all servicing to qualified service personnel.
20) Damage Requiring Service — Unplug this product from the
wall outlet and refer servicing to qualified service personnel under
the following conditions:
a) when the power-supply cord or plug is damaged.
b) if liquid has been spilled, or objects have fallen into the product.
c) if the product has been exposed to rain or water.
d) if the product does not operate normally by following the
operating instructions. Adjust only those controls that are covered
by the operating instructions as an improper adjustment of other
controls may result in damage and will often require extensive work
by a qualified technician to restore the product to its normal
operation.
e) if the product has been dropped or damaged in any way.
f ) when the product exhibits a distinct change in performance
_
this indicates a need for service.
21) Replacement Parts — When replacement parts are required,
be sure the service technician has used replacement parts
specified by the manufacturer or have the same characteristics as
the original part. Unauthorized substitutions may result in fire,
electric shock, or other hazards.
22) Safety Check — Upon completion of any service or repairs to
this product, ask the service technician to perform safety checks to
determine that the product is in proper operating condition.
23) Wall or Ceiling Mounting — The product should be mounted
to a wall or ceiling only as recommended by the manufacturer.
24) Heat — The product should be situated away from heat sources
such as radiators, heat registers, stoves, or other products
(including amplifiers) that produce heat.

_
3
_
OCAUTION OACHTUNG OOBSERVERA OADVARSEL
1
2
CLASS 1 LASER PRODUCT
LUOKAN 1 LASERLAITE
KLASS 1 LASERAPPARAT
CAUTION - INVISIBLE LASER RADIATION WHEN OPEN AND
INTERLOCKS DEFEATED. AVOID EXPOSURE TO BEAM.
VORSICHT! UNSICHTBARE LASERSTRAHLUNG TRITT AUS.
WENN DECKEL GEÖFFNET UND WENN
SICHERHEITSVERRIEGELUNG ÜBERBRÜCKT IST.
NICHT DEM STRAHL AUSSETZEN !
VARNING - OSYNLIG LASERSTRÅLNING NÄR DENNA DEL
ÄR ÖPPNAD OCH SPÄRR ÄR URKOPPLAD.
STRÅLEN ÄR FARLIG.
ADVARSEL - USYNLIG LASERSTRÅLING VED ÅBNING, NÅR
SIKKERHEDSAFBRYDERE ER UDE AF FUNKTION.
UNDGÅ UDSÆTTELSE FOR STRÅLING.
VAROITUS! SUOJAKOTELOA EI SAA AVATA. LAITE SISÄLTÄÄ
LASERDIODIN, JOKA LÄHETTÄÄ (NÄKYMÄTÖNTÄ)
SILMILLE VAARALLISTA LASERSÄTEILYÄ.
ADVARSEL - USYNLIG LASERBESTRÅLING NÅR DENNE DELEN ER
ÅPEN OG SIKKERHETSSPERREN ER UTKOBLET.
UNNGÅ UTSETTELSE FOR STRÅLING.
SAFETY INFORMATION
This product has been designed and manufactured according to FDA regulations "title 21, CFR, chapter 1, subchapter J, based on the Radiation
Control for Health and Safety Act of 1968", and is classified as a class 1 laser product. There is no hazardous invisible laser radiation during
operation because invisible laser radiation emitted inside of this product is completely confined in the protective housings.
The label required in this reguration is shown
1.
… CAUTION
- DO NOT REMOVE THE PROTECTIVE HOUSING USING A SCREWDRIVER.
- USE OF CONTROLS OR ADJUSTMENTS OR PERFORMANCE OF PROCEDURES OTHER THAN THOSE SPECIFIED HEREIN MAY
RESULT IN HAZARDOUS RADIATION EXPOSURE.
- IF THIS PRODUCT DEVELOPS TROUBLE, MAKE A CONTACT WITH OUR SERVICEMAN, AND DO NOT USE THE PRODUCT IN A
TROUBLED STATE.
Optical pickup: Type : SF-91PQ
Manufacturer : SANYO Electric Co., Ltd.
Laser output : Less than 0.5 mW on the objective lens
Wavelength : 765–815 nm
1 THIS LABEL IS ATTACHED TO THE PLACE AS ILLUSTRATED TO INFORM THAT
THE APPARATUS CONTAINS A LASER COMPONENT.
1 DIESE AUFKLEBEMARKE IST AN DEM IN DER ABBILDUNG GEZEIGTEN ORT
ANGEBRACHT UM DARAUF HINZUWEISEN, DASS IM INNERN DES GERÄTS
EINE LASER-KOMPONENTE BEFINDET.
1 PÅSKRIFTEN SITTER PÅ APPARATEN SOM VISAS SOM UPPMANING OM ATT
APPARATEN OMFATTAR EN INBYGGD LASERKOMPONENT.
1 DETTE MÆRKAT ER ANBRAGT SOM VIST I ILLUSTRATIONEN FOR AT ADVARE
BRUGEREN OM AT APPARATET INDEHOLDER EN LASERKOMPONENT.
2 DETTE MÆRKAT ER SOM VIST PÅ ILLUSTRATIONEN ANBRAGT PÅ INDERSIDEN AF
TOPDÆKSLET FOR AT ADVARE BRUGEREN OM AT YDERLIGERE FREMTRÆNGEN
VIL VÆRE FORBUNDET MED FARE FOR AT UDSÆTTE SIG FOR LASERSTRÅLING.
ADVARSEL — BETJENING AF ANDRE KONTROLLER OG REGULATORER ELLER
BENYTTELES AF ANDRE FREMGANGSMÅDER END BESKREVET HERI ER FOR-
BUNDET MED FARE FOR UDSÆTTELSE FOR LASERSTRÅLING.
VARING: APPARATEN INNEHÅLLER LASER KOMPONENT MED
STRÅLNING ÖVERSTIGANDE KLASS 1.
"ADVARSEL: USYNLIG LASERSTRÅLING VED ÅBNING NAR
SIKKERHEDSAFBRYDERE ER UDE AF FUNKTION. UNDGÅ
UDSAETTELSE FOR STRÅLING"
"VAROITUS! SUOJAKOTELOA EI SAA AVATA. LAITE SISÄLTÄÄ
LASERDIODIN. JOKA LÄHETTÄ (NÄKYMÄTÖNTÄ) SILMILLE
VAARALLISTA LASERSÄTEILYÄ".
ADVARSEL: USYNLIG LASERBESTRÅLING NÅR DENNE
DELEN ER ÅPEN OG SIKKERHETSSPERREN ER UTKOBLET
UNNGÅ UTSETTELSE FOR STRÅLING.
CERTIFICATION
THIS PRODUCT COMPLES WITH DHHS
RULES 21 CFR SUBCHAPTER J APPLI-
CABLE AT DATE OF MANUFACTURE
TEAC CORPORATION
3-7-3 NAKA-CHO, MUSASHINO-SHI, TOKYO, JAPAN
MANUFACTURED TIF
1
For U.S.A.

This unit has been designed specifically for
reproduction of compact discs bearing the
D mark. No other discs can be
reproduced.
• Always place the compact disc in the
disc tray with the label facing upward.
(Compact discs can be played only on
one side.)
• To remove a disc from its storage case,
press down on the center of the case
and lift the disc out, holding it carefully
by the edges.
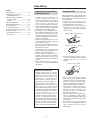
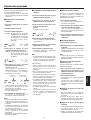
How to remove the disc
How to hold the disc
• Fingermarks and dust should be
carefully wiped off the disc's recorded
surface with a soft cloth.
Wipe radially
• Never use such chemicals as record
sprays, antistatic sprays or fluid, benzine
or thinner to clean compact discs. Such
chemicals will do irreparable damage to
the disc's plastic surface.
• Discs should be returned to their cases
after use to avoid serious scratches that
could cause the laser pickup to "skip."
• Do not expose discs to direct sunlight or
high humidity and temperature for
extended periods.
Long exposure to high temperatures can
warp the disc.
• Do not stick paper or write anything with
a ballpoint pen on the surface of the
label side.
• Choose the installation location of your
unit carefully. Avoid placing it in direct
sunlight or close to a source of heat.
Also avoid locations subject to
vibrations and excessive dust, heat, cold
or moisture. Keep away from such
sources of hum as transformers or
motors.
• Do not open the cabinet as this might
result in damage to the circuitry or
electrical shock. If a foreign object
should get into the unit, contact your
dealer.
• Be sure not to handle discs with dirty
fingers. Never insert a disc which has a
crack on the surface.
• When removing the power plug from the
wall outlet, always pull directly on the
plug, never yank the cord.
• To keep the laser-pickup clean, do not
touch it, and do not forget to close the
disc tray.
• Do not attempt to clean the unit with
chemical solvents as this might damage
the finish. Use a clean, dry cloth.
• Keep this manual in a safe place for
future reference.
Table of Contents
Before Use..................................................... 4
Connections and Rear Panel Overview .... 5
Front Panel Controls and Their
Functions..................................................... 6
Display......................................................... 6
Remote Control.............................................. 7
Basic Operation ............................................ 8
Repeat Play.................................................... 8
Program Play................................................. 9
Shuffle Play.................................................. 10
Time Display................................................. 10
Specifications.............................................. 10
Troubleshooting .......................................... 11
Before Use
_
4
_
Read This Before Operating Handling the Discs
Beware of condensation
When the player (or a compact disc) is
moved from a cold to a warm place or
used after sudden temperature
change, there is the danger of
condensation. Water vapor in the air
could condense on the mechanism or
the laser pickup. If droplets of water
form on these parts, correct playback
will be impossible because the laser
will not read the information from the
disc correctly.
To prevent this, if you are going to use
the player in a condition where
condensation could occur, you should
leave the player for 1 or 2 hours after
plugging it into an AC outlet depending
on the amount of condensation. If this
is done, the player will stabilize at the
temperature of its surroundings.
IMPORTANT (for U.K. Customers)
DO NOT cut off the mains plug from this
equipment.
If the plug fitted is not
suitable for the power points in your
home or the cable is too short to reach
a power point, then obtain an
appropriate safety approved extension
lead or consult your dealer.
If nonetheless the mains plug is cut off,
remove the fuse and dispose of the plug
immediately, to avoid a possible shock
hazard by inadvertent connection to the
mains supply.
If this product is not provided with a
mains plug, or one has to be fitted,
then
follow the instructions given below:
IMPORTANT. DO NOT make any
connection to the larger terminal which
is marked with the letter E or by the
safety earth symbol
ç or coloured
GREEN or GREEN-and-YELLOW.
The wires in the mains lead on this
product are coloured in accordance
with the following code:
BLUE: NEUTRAL
BROWN: LIVE
As these colours may not correspond
with the coloured markings identifying
the terminals in your plug proceed as
follows:
The wire which is coloured BLUE must
be connected to the terminal which is
marked with the letter N or coloured
BLACK.
The wire which is coloured BROWN
must be connected to the terminal
which is marked with the letter L or
coloured RED.
When replacing the fuse only a
correctly rated approved type should
be used and be sure to re-fit the fuse
cover.
IF IN DOUBT — CONSULT A
COMPETENT ELECTRICIAN.

ENGLISH
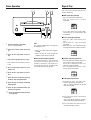
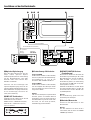
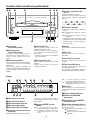
Connections and Rear Panel Overview
_
5
_
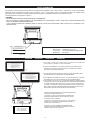
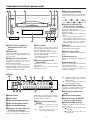
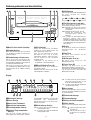
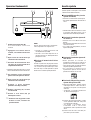
1DIGITAL OUT(PUT) OPTICAL
terminals
These terminals are used for connecting to
the DIGITAL INPUT OPTICAL terminals on
the MD player and the D/A converter by
using the digital optical cable (not
provided).
When connecting the digital optical
cable, remove the cap on the terminal.
Leave the cap in place when it is not in
use.
2LINE OUT jacks
Connect these jacks to the CD input jacks
on the amplifier:
White pin-plug
T White jack (left)
Red pin-plug
T Red jack (right)
Audio connection cords
RCA pin cord
To
DIGITAL IN
OPTICAL
Digital optical
cable
Remote control cord
3REMOTE CONTROL SELECTOR
switch
SYSTEM position:
Set the switch to this position when you
operate the system connected with remote
control jacks A and B on the TEAC A-H500
amplifier.
SINGLE position:
Set to this position when you operate this
unit alone with the optional remote control
unit (not provided).
Note:
If set to the SINGLE position, this unit
cannot be operated even if the amplifier is
operated manually or using the remote
control pointed toward it to operate this
unit.
4REMOTE CONTROL jacks
These jacks are used for the connection of
the TEAC Mini Component system (T-H500,
R-H500, A-H500) for the purpose of
operating it using the Remote Control unit
(RC-613 provided with the A-H500
amplifier) or system control signals.
Connect the jack A (or B) to the jack A (or
B) on other unit either on or beneath this
unit.
Note:
The remote control transmitter is not
provided with this unit.
5AC power cord
Plug this AC power cord into an AC wall
socket or AC OUTLETS on the amplifier.
Note:
When you pull the plug out, make sure that
the unit has been tuned to POWER
STANDBY.
12
3
4
A-H500
MD Deck
(MD-H500)
PD-H570
LL
RR
White White
White
Red
Red
Red
5

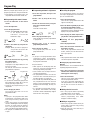
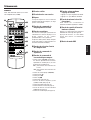
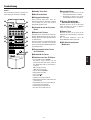
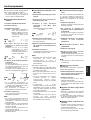
Front Panel Controls and Their Functions
_
6
_
1power standby/on button
2power standby indicator
This indicator lights up in the power
standby mode; goes out when this unit is
turned on.
3remote sensor
This sensor is used when this unit is
operated alone by the optional remote
control transmitter. The sensor operates
only when the REMOTE CONTROL
SELECTOR switch on the rear panel is set
to the SINGLE position.
6 Time counter/Program number
indicator
This shows the time information
corresponding to the time mode indicator,
in minutes and seconds. During the
program mode, a program number is
indicated here.
4Disc tray
Load a disc on this tray with its label side
up while the tray is open.
When playing an 8 cm (3-inch) CD single
disc, make sure that the disc is set at the
center of the tray.
*8 cm discs can only be played in Tray
No. 1.
5open/close (∫) button
Press this button to open the disc tray.
Press it again to close the tray.
7 REPEAT play indicator
ONE : This lights up when the repeat play
of a single track is engaged.
ö : This lights up when the repeat play
of one disc is engaged.
A-B : This lights up when the A-B section
repeat play is engaged.
TTL : This lights up when the repeat play
of all discs is engaged.
8 Over mark
This indicator lights up when the total
number of tracks on the disc is 16 or more.
9 Track calendar display
0 PROGRAM indicator
q SHUFFLE play indicator
w Disc NO. indicator
This indicates whether a disc is in a disc
tray or not.
ex.) means there is a disc in Tray No.1
means Tray No.1 is selected.
Display
6disc skip button
Use this to select a disc. When you press
the button, each number will be selected in
order.
7Music skip (Ú/Æ) buttons
These buttons are used for selecting the
desired track on the disc.
Æ : Press to skip forward.
Ú : Press to skip backward.
• You can skip to the beginning of the track
being played by pressing the button
once. If you hold the button pressed, you
can skip to the previous tracks in
sequence.
8Display
This display shows the current operating
states of this unit.
9stop button
Press this button to stop playing.
0Play (∏) button
Press this button to start playing.
qPause (ƒ) button
Press this button to pause playing. To
restart playing, press it again or the play
(
∏) button.
1 Play indicator
2 Pause indicator
3 Track number indicator
4 Index number indicator
5 Time mode indicator
8
1
2
3
45
q0 9
w
7
8
6
5
21
6
74
3
890q

ENGLISH
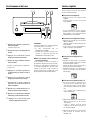
Remote Control
_
7
_
1power [standby] button
2[power on] button
3Indicator
This indicator blinks in green in the CD
operating mode; blinks in red in other
mode.
4Cassette deck operation buttons
5Numeric buttons
These numeric buttons are used for
selecting track numbers on the CD, or for
preset channels on the tuner.
They can be used for the CD after the CD
button or the CD play (
∏) button is
pressed.
6Input selector buttons of the
amplifier
7Tuner operating buttons
8CD player operation buttons
• search (/Ò) buttons
These buttons are used for searching for
the desired position quickly during play
or in the pause mode.
Ò: for forward search
: for backward search
• music skip (Ú/Æ) buttons
• play (∏) button
• pause (ƒ) button
• stop (∑) button
• time button (see page 10)
• repeat (1/ALL, A-B) play buttons
(see page 8)
• program button (see page 9)
• clear button (see page 9)
• shuffle button (see page 10)
• disc skip button (see page 6)
9[volume up/down] buttons
• + : press to increase the volume.
• – : press to decrease the volume.
0[sleep] timer button
This button is used for engaging the sleep
timer in the tuner T-H500.
q[dimmer] button
Press this button when you want to darken
the displays on the system. Press it again
to resume the original brightness.
wRDS (Radio Data System) mode
button
1
2
0
q
w
3
4
5
6
7
8
9
Note:
This remote control unit (RC-613) is
provided with the amplifier A-H500.

(You can use this function only with the
remote control unit.)
∑ ONE-repeat play function
• Press the 1/ALL repeat button once.
– Only the current track is played
repeatedly.
* If you select other tracks during ONE-
repeat play, the track selected last will
be repeated.
∑ 1 Disc-repeat play function
• Press the 1/ALL repeat button once
more.
– All the tracks on a disc are played
repeatedly.
* When the tracks are programmed, only
the programmed tracks will be repeated.
∑ All-Disc repeat play function
• Press the 1/ALL repeat button once more
in the status of 1 Disc repeat mode.
– All the discs loaded in the disc tray
continue to play repeatedly.
• Press the button once more to cancel
the TTL repeat play function.
∑ A-B repeat play function
(1) During play, press the A-B repeat
button at the desired start point (A).
– Then "A-" will be displayed and "B" will
blink on the display.
(2) Press the button again at the desired
end point (B).
– Then "A-B" will be displayed and only
A-B section will be played repeatedly.
(3) Press the button once more to cancel
the A-B repeat play function.
Repeat Play
_
8
_
Basic Operation
1 Press the open/close (∫) button.
The disc tray will slide out.
2 Load a disc with its label side facing
up.
3 Press the disc skip button to select a
tray.
4 Load a disc only when the tray is open.
• Load another disc by repeating steps 3
and 4.
5 Press the open/close button to close
the disc tray.
6 Press the disc skip button to select a
disc.
7 Select the track you want by pressing
the music skip (
Ú/Æ) button.
8 Press the play (∏) button, and the CD
will be played.
9 Press the pause (ƒ) button when you
want to pause playing.
10 Press the stop button when you want
to stop playing.
Note
This unit will automatically start playing in
the following cases:
• When you select CD on the amplifier
(A-H500).
• When you turn the system on with the
amplifier's input selector set to CD.
∑ Last position memory function
If the program button is pressed during
normal play, the player will revert to a
position at which the stop button was
previously pressed. Then, the playing will
restart from that particular position.
2 ,4
8
79
1 ,53,6

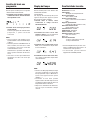
With this program play function, you can
program up to 32 tracks in any desired order.
• Programming can be done only in the
stop mode with the remote control unit.
∑ Programming with numeric buttons
1. Press the CD button on the remote
control.
2. Press the stop button.
3. Press the program button.
Example: The PROGRAM indicator lights
in the display. Disc NO.
indicators 1, 2 and 5 of the
loaded discs light.
4. Select a disc number by using the disc
skip button.
Example: When you want to program a
song in Disc No. 5, Disc NO.
indicator 5 will blink.
5. Select the desired tracks by pressing
the numeric buttons.
Example: 02T06T12
To program a one-digit number, be sure
to insert a zero first.
The 2nd, 6th, and 12th tracks have been
programmed in sequence.
• If you want to continuously program the
4th and 5th tracks of Disc No. 2, you can
do it by repeating steps
4 and 5.
• To release the program mode, press the
stop button.
6. Press the play (∏) button.
The program play will start in the
programmed order.
Notes:
• If you press the program button while
programming, programming will cease
and change into the program recall
mode.
• If you stop playing, the programmed
contents will disappear from the display,
but they are not lost from the memory.
Press the program button when you
want to recall the programmed contents.
• The program is enabled even if the tray
is open.
∑ Programming with music skip button
1. Press the stop button, then press the
program button.
2. Select a disc by using the disc skip
button.
3. Select the desired track by using the
music skip (
Ú/Æ) button.
Example:
Track No. 5 on Disc No. 5.
4. Press the program button again.
Then, the 5th track has been programmed
as program No. 1.
5. Repeat steps 2 to 4 to continue
programming other tracks.
6. Press the play (
∏) button.
The program play will start in the
programmed order.
Note:
• If you press the program button twice
continuously while programming,
programming will cease and change into
the program recall mode.
For your reference:
• "FULL" appears on the display when the
33rd track has been programmed (no
further programming is possible).
• Track numbers not actually on the disc
cannot be programmed.
• The programmed contents are not lost
even if the unit is turned off, but they are
lost when the disc tray is opened.
• The unit will stop automatically when all
the programmed tracks have finished
playing, and the programmed contents
disappear from the display, but they are
not lost.
• It is possible to program with the disc
tray opened. Track numbers not actually
on the disc will be automatically skipped
when the disc starts playing.
∑ Recalling the program
As the programmed contents are not lost
even if you stop playing or turn off the unit,
you can recall them later.
1. Press the program button.
Then the first programmed track will
appear on the display.
2. Press the button repeatedly if you want
to check the programmed contents.
Each time the button is pressed, the next
programmed contents will appear on the
display in the programmed order.
3. Press the play (∏) button if you want to
play the disc in the programmed order.
∑ Erasing all the programmed
contents
1. Press the program button.
2. Press the clear button and hold it for
longer than 2 seconds.
Then, all the programmed contents will
be lost, and they are also lost when the
disc tray is opened.
Note:
• The program button and the clear button
can work only in the stop mode.
∑
Changing the programmed contents
Deleting:
Undesired tracks can be deleted from the
originally programmed contents.
1. Press the program button repeatedly
until the track number that you want to
delete appears on the display.
2. Press the clear button.
Then that track number will be deleted
from the programmed contents.
If you press the button repeatedly, the
next programmed tracks will be deleted
one by one each time the button is
pressed.
∑ Adding after the last track:
1. Press the program button repeatedly
until "END" appears on the display.
2. Enter new tracks in the same way as
normal programming after "END"
disappears from the display
∑ Adding to any position:
1. Select the program number which you
want to add a new track to by pressing
the program button.
2. Enter the new track in the same way as
normal programming.
Program Play
_
9
_
ENGLISH
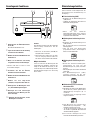
Track No.
Program No.

_
10
_
Laser System : 3-beam laser
Digital Filter : 8-times oversampling
Frequency Response : 20-20,000 Hz (±2 dB)
Error Correction Method :
Cross Interleave Reed-Solomon
code
S/N Ratio :
More than 96 dB (IHF "A" filter
used)
THD : Less than 0.015% (1 kHz)
Output Voltage : 2 V rms
Power Source : 230 VAC, 50 Hz
Power Consumption : 10 W
Dimensions (WxHxD) : 285 x 131 x 327 mm
Weight: : 5 kg
Accessories:
Signal input/output cord
Remote control cord
• Improvements may result in specifi-
cation or feature changes without
notice.
• Illustrations may differ slightly from
production models.
Specifications
You can use this function only with the
remote control unit.
1. Press the shuffle button to select a disc
and then a track of the disc will be
played at random.
2. Press the button again to cancel the
shuffle play function.
When this function is canceled, play will
continue from the subsequent track in
normal order.
Notes
• This function operates even in the stop
mode or during play.
• If you press the Æ button during
shuffle play, you can select tracks at
random irrespective of the current track
number. And if you press the
Ú
button, play will start from the beginning
of the current track.
• A once selected or played disc, track
will not be played any more.
You can use this function only with the the
remote control unit.
States of the display
This unit can display four types of time
mode on the time counter in the display.
1. The elapsed time of the current track is
displayed when playback begins.
2. Press the time button once during play.
Then, the remaining time of the current
track will be displayed.
3. Press the time button again.
Then, the total elapsed time of the disc
will be displayed.
4. Press the time button once more.
Then, the total remaining time of the disc
will be displayed.
Notes
• Time will not be displayed during the
programmed play if the programmed
contents exceed 100 minutes. At this
time, "--.--" will be shown instead.
• If you press the time button in the stop
mode, the total track number and the
total playing time on a disc will be
displayed.
• When track 33 or more is played, the
remaining time will not be displayed.
Shuffle Play
Time Display

ENGLISH
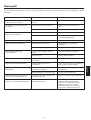
Troubleshooting
_
11
_
Problem Probable cause(s) Suggested remedy
No power when power button is pressed. Power plug not inserted securely. Plug in securely.
No playback when disc is loaded. Disc loaded with label side down. Load with label side up.
Disc dirty. Clean disc surface.
No audio output (or too low level output). Connection to stereo system is incorrect. Check connections.
Misoperation of amplifier. Check amplifier's control/switch setting.
A single track can only be played. 1/ALL button engaged. Press button to disengage it.
No program playback. Program button not pressed. Press button to display "PROGRAM".
Play button not pressed. Press button.
Mistracking (sound jumping). Player receiving vibration or shock. Change the installation position of player.
Disc dirty. Clean disc surface.
Hum. Pin-cord plug not connected securely. Re-connect plug securely.
Noise in tuner. Player too near tuner. Keep a reasonable distance between
them or switch off player's power.
Remote control unit operation is impossible. REMOTE CONTROL SELECTOR switch is Set switch to correct position.
not set correctly. Refer to page 5.
Batteries not inserted in remote control unit. Insert batteries.
No programming is possible. Numeric The remote control is set to a mode other Select CD on the remote control.
button entry is not accepted. than CD.
"Err" indication appears on the display Inserted 8 cm disc into disc tray 2-7. 8 cm discs can be used only in Tray No. 1.
and the disc tray is opened. Load a 12 cm disc in the disc tray and
press the open/close button to close.
Before calling for service, check through the chart below for probable causes of the problems you experience while using this unit.

_
12
_
Cet appareil a été conçu spécialement
pour la reproduction des disques audio-
numériques portant la marque "
˛".
Les autres disques ne peuvent pas être
reproduits.
• Toujours placer le disque audio-
numérique dans le tiroir, l'étiquette
dirigée vers le haut. (Les disques
audionumériques ne peuvent être lus
que sur une face.)
• Pour retirer un disque de son boîtier,
presser le centre du boîtier et sortir le
disque en le tenant soigneusement par
les bords.
Comment retirer le disque
Comment tenir le disque
• Les empreintes digitales et la poussière
sur la surface du disque doivent être
essuyées avec soin avec un chiffon
doux.
Essuyer du centre vers l'extérieur
• Ne jamais utiliser de produits chimiques
comme des aérosols pour disques,
aérosols ou liquide antistatiques, de la
benzine ni de diluants pour nettoyer les
disques audionumériques. De tels
produits chimiques endommageront de
façon définitive la surface de plastique
du disque.
• Les disques doivent toujours être remis
dans leurs boîtiers après l'usage pour
éviter des rayures sérieuses qui
pourraient provoquer des "sauts" du
capteur laser.
• Ne pas exposer les disques directement
au soleil ni à l'humidité ou à des
températures élevées pendant
longtemps. Une longue exposition à de
hautes températures peut voiler le
disque.
• Ne pas coller de papier ni écrire quoi
que ce soit avec un crayon-bille sur la
surface de la face comportant
l'étiquette.
• Choisir avec soin l'endroit où vous
placerez votre appareil. Eviter de le
placer directement au soleil ou près
d'une source de chaleur. Eviter aussi les
endroits sujets à des vibrations, à de la
poussière excessive, à la chaleur, au
froid ou à l'humidité. Toujours le garder
éloigné de sources de bourdonnements
telles que des transformateurs ou
moteurs.
• Ne pas ouvrir le coffret car ceci
risquerait de provoquer des dommages
aux circuits ou des chocs électriques. Si
un objet rentre dans l'appareil, contacter
votre revendeur.
• Ne pas manipuler les disques avec des
mains sales. Ne jamais insérer un disque
dont la surface est craquelée.
• Lors du débranchement du cordon
d'alimentation de la prise murale,
toujours tirer sur la fiche et non sur le
cordon.
• Pour garder le capteur laser propre, ne
pas y toucher et ne pas oublier de
fermer le tiroir du disque.
• Ne pas essayer de nettoyer l'appareil
avec des solvants chimiques car ceci
pourrait endommager le fini de
l'appareil. Utiliser un chiffon propre et
sec.
• Garder soigneusement ce manuel
d'instructions pour une référence
ultérieure.
Table des matières
Avant utilisation .......................................... 12
Raccordements et présentation
du panneau arrière.................................. 13
Commandes et fonctions du
panneau avant.......................................... 14
Afficheur.................................................... 14
Télécommande............................................ 15
Fonctionnement de base........................... 16
Lecture répétée........................................... 16
Lecture programmée.................................. 17
Lecture en ordre aléatoire (SHUFFLE)..... 18
Affichage des temps de lecture............... 18
Caractéristiques techniques..................... 18
Dépannage................................................... 19
Avant utilisation
Lire ceci avant de faire
fonctionner l'appareil
Manipulation des disques
Attention à la condensation
Quand le lecteur (ou un disque
audionumérique) est déplacé d'un
endroit froid à un endroit chaud ou
utilisé après un changement rapide de
la température, il y a danger de
condensation. La vapeur d'eau que
comporte l'air risque de se condenser
sur le mécanisme ou sur le capteur
laser. Si des gouttelettes d'eau se
forment sur ces pièces, une lecture
correcte sera impossible car le laser
ne pourra pas lire correctement les
informations du disque. Pour éviter
ceci, si vous devez utiliser le lecteur
sous des conditions qui peuvent
provoquer une condensation, vous
devez le laisser tel quel pendant 1 ou 2
heures, selon le degré de
condensation, après l'avoir branché
sur une prise CA. Le lecteur se
stabilisera alors à la température de
l'environnement.

_
13
_
FRANÇAIS
Raccordements et présentation du panneau arrière
1Prises DIGITAL OUTPUT
OPTICAL (sortie numérique
optique)
Ces prises permettent de raccorder
l'appareil aux prises DIGITAL INPUT
OPTICAL (entrée numérique optique) du
lecteur MD et du convertisseur N/A à
l'aide du câble optique numérique (non
fourni avec le lecteur).
Pour brancher le câble optique numérique,
retirez le bouchon de protection placé sur
la prise. Laissez ce bouchon en place si
vous n'utilisez pas cette prise.
2Prises LINE OUT (sortie
analogique)
Connectez ces fiches aux prises d'entrée
du lecteur de disque compact situées sur
l'Amplificateur:
Fiche blanche
T prise femelle blanche (L)
Fiche rouge
T prise femelle rouge (R)
Cordons de raccordement audio
3Interrupteur SELECTOR /
REMOTE CONTROL (Sélecteur
de télécommande)
position SYSTEM:
Mettre l'interrupteur sur SYSTEM lorsque
l'appareil est raccordé par l'intermédiaire
des prises A et B de la Télécommande à
l'amplificateur TEAC A-H500.
position SINGLE (SEUL):
Mettre l'interrupteur sur la position SINGLE
si vous utilisez cet appareil seul avec la
télécommande (non fournie avec le
lecteur).
Nota:
Quand l'interrupteur est sur la position
SINGLE l'appareil ne peut pas fonctionner
même si on actionne l'amplificateur
manuellement ou en utilisant la
télécommande.
4Prises REMOTE CONTROL
(Télécommande)
Ces prises permettent de brancher des
éléments de la mini- chaîne TEAC (T-H500,
R-H500, A-H500), de façon à pouvoir la
commander à l'aide de la télécommande
(RC-613 fournie avec l'amplificateur A-
H500) ou des signaux de commande de la
chaîne.
Connectez la fiche A (ou B) à la prise
correspondante, A (ou B), situé sur l'autre
élément placé au-dessus ou en dessous de
celui-ci.
Nota:
L'émetteur de télécommande n'est pas
fourni avec cet appareil.
5Cordon d'alimentation (CA)
Branchez ce cordon d'alimentation CA sur
une prise de courant CA murale ou sur les
connecteurs de sortie CA « AC OUTLETS »
de l'Amplificateur.
Remarque:
Lorsque vous tirez sur la fiche, bien
s'assurer que l'appareil a été mis en mode
veille (POWER STANDBY).
Cordon à broches RCA
Vers ENTREE
NUMERIQUE
OPTIQUE
Câble numérique
optique
Cordon de télécommande
Platine MD
(MD-H500)
A-H500
PD-H570
LL
RR
Blanc Blanc
Blanc
Rouge
Rouge
Rouge
12
3
4
5

_
14
_
Commandes et fonctions du panneau avant
4Tiroir à disque
Pour charger un disque, faites sortir le
tiroir à disque puis chargez le disque sur le
plateau, étiquette vers le haut.
Pour lire un disque compact 80 mm (3
pouces), veiller à bien placer le disque au
centre du plateau du tiroir.
* Les disques de 8 cm ne peuvent être lus
que dans le tiroir No. 1.
5Touche « open/close » (∫)
(ouvert/fermé)
Appuyez sur cette touche pour ouvrir le
tiroir à disque.
Appuyez à nouveau sur cette touche pour
fermer le tiroir à disque.
Mode Temps, en minutes et en secondes.
En cas de lecture programmée, le numéro
des programmes est affiché ici.
7 Indicateur de Lecture Répétée
(REPEAT)
ONE : Ce voyant s'allume en cas de
lecture répétée d'une seule
plage.
ö : Ce voyant s'allume en cas de
lecture répétée d'un disque.
A-B : Ce voyant s'allume en cas de lecture
répétée des plages situées entre les
repères A et B.
TTL : Ce voyant s'allume en cas de lecture
répétée de tous les disques.
8 Voyant Over (Dépassement)
Ce voyant s'allume quand le disque
comporte un total de 16 plages ou plus.
9 Affichage du Calendrier des
plages
0 Indicateur de Programme
q Voyant de lecture en SHUFFLE
(lecture en ordre aléatoire)
w Indicateur de No. de disque
Il indique si un disque est dans un tiroir à
disque ou non.
ex.) signifie qu'il y a un disque dans le
tiroir No. 1.
signifie que le tiroir No. 1 est
sélectionné.
Afficheur
6Touche de saut de disque
L'utiliser pour sélectionner un disque.
Lorsque vous appuyez sur la touche,
chaque numéro sera sélectionné dans
l'ordre.
7Touches de Saut rapide de
plages musicales (Ú/Æ)
Ces touches permettent de sélectionner le
morceau désiré sur le disque.
Appuyez sur
Æ pour faire avancer le
disque vers l'avant.
Appuyez sur
Ú pour une recherche vers
l'arrière.
• Pour revenir au début du morceau en
cours de lecture appuyer une fois sur la
touche. Maintenir cette touche enfoncée
pour revenir sur les morceaux
précédents déplacement vers l'arrière.
8Afficheur
Cet afficheur présente les différents états
de fonctionnement de l'appareil.
9Touche « stop » (arrêt)
Appuyez sur cette touche pour arrêter la
lecture.
0Touche Lecture (∏)
Appuyez sur cette touche pour démarrer la
lecture.
qTouche Pause (ƒ)
Appuyez sur cette touche pour interrompre
provisoirement la lecture.
Pour reprendre la lecture, appuyez à
nouveau sur cette touche ou appuyez sur
la touche Lecture (
∏).
1Touche « power standby/on »
(Marche/arrêt -veille / sous
tension)
2Voyant veille
Ce voyant s'allume quand l'appareil est en
mode « veille »; il s'éteint quand l'appareil
est sous tension.
3Capteur de la télécommande
Ce capteur ne fonctionne que lorsque
l'appareil est employé seul avec sa
télécommande optionnelle.
Il n'est actif que lorsque l'interrupteur
REMOTE CONTROL SELECTOR (Sélection
Télécommande) situé sur le panneau
arrière est positionné sur SINGLE.
1 Voyant Lecture
2 Voyant Pause
3 Indicateur de numéro de Plage
4 Indicateur de numéro d'Indice
5 Indicateur de Mode Temps
6 Compteur de temps/Indicateur
de numéro de Programme
Ce voyant affiche les informations de
temps correspondant à l'indicateur de
5
21
890q
6
74
3
1
2
3
45 6 7
q0 9
w
8
8

_
15
_
FRANÇAIS
Télécommande
1Touche « veille»
2Touche de mise sous tension
3Voyant
Ce voyant clignote en vert en mode de
fonctionnement disque compact, en rouge
pour les autres modes.
4Touches de commande du
magnétophone à cassette
5Touches numériques
Les touches numériques permettent de
sélectionner les numéros de plage sur un
disque compact ou les stations
présélectionnées sur le syntoniseur.
On peut les utiliser pour le disque compact
après avoir appuyé sur la touche CD ou sur
la touche de Lecture de CD (
∏).
6Touches de sélection d'entrée
de l'Amplificateur
7Touches de commande du
Syntoniseur
8Touches de commande du
Lecteur de disque compact:
• touche search (/Ò) (recherche)
Ces touches permettent de rechercher
rapidement un endroit précis, en cours
de lecture ou en mode Pause.
Ò: pour effectuer une recherche vers
l'avant
: pour effectuer une recherche vers
l'arrière
• touches de saut de plages (Ú/Æ)
• touche lecture (∏)
• touche pause (ƒ)
• touche stop (∑)
• touche temps (voir page 18)
• touches de lecture répétée (1/ ALL
(1/TOUT) ou A-B) (voir page 16)
• touche programme (voir page 17)
• touche de remise à zéro (voir page 17)
• touche de lecture en ordre aléatoire
(SHUFFLE) (voir page 18)
• touche de saut de disque (voir page 14)
9Touches volume up/down
(réglage du volume)
• appuyez sur + pour augmenter le volume
• appuyez sur – pour diminuer le volume
0Touche de minuterie de veille
(sleep timer)
Cette touche sert à enclencher la
minuterie de veille du Syntoniseur T-H500.
qTouche de contrôle d'intensité
lumineuse (dimmer)
Appuyez sur cette touche pour atténuer la
luminosité des affichages de l'appareil.
Appuyez de nouveau sur cette même
touche pour revenir à la luminosité
d'origine.
wTouche de mode RDS
REMARQUE:
Cette Télécommande (RC-613) est livrée
avec l'Amplificateur (A-H500).
1
2
0
q
w
3
4
5
6
7
8
9

(Cette fonction ne peut être utilisée
qu'avec la télécommande)
∑ Fonction Lecture Répétée
• Appuyez une fois sur la touche 1/ALL
(1/TOUT)
– Seule la plage en cours sera lue de
façon répétée.
* Si on sélectionne d'autres plages
pendant qu'on est en Lecture Répétée
Plage Unique, c'est la dernière plage
sélectionnée qui sera répétée.
∑ Fonction Lecture Répétée 1 Disque
• Appuyez une seconde fois sur la touche
1/ALL (1/TOUTES)
– Toutes les plages du disque sont lues de
façon répétée.
* Si des plages ont été programmées,
seules ces plages seront répétées.
∑ Fonction Lecture Répétée Tous
Disques
• Appuyez une fois de plus sur la touche
de lecture répétée 1/ALL dans le mode
de lecture répétée 1 disque.
– Tous les disques chargés dans le tiroir à
disque sont lus de façon répétée.
• Appuyez de nouveau sur la touche pour
annuler la fonction Lecture Répétée
Tous Disques.
∑ Fonction Lecture Répétée de A à B
(1) En cours de lecture, appuyez sur la
touche de lecture répétée A-B pour
sélectionner le point à partir duquel
vous souhaitez commencer la lecture
(A).
–« A- » s'affiche, « B » clignote dans la
fenêtre d'affichage.
(2) Appuyez de nouveau sur la touche pour
définir le point de fin de lecture
souhaité (B).
–« A-B » s'affiche, seule la partie
comprise entre les points A et B sera
lue de façon répétée.
(3) Appuyez de nouveau sur cette touche
pour annuler la fonction Lecture
Répétée A-B.
_
16
_
Lecture répétée
Fonctionnement de base
1 Appuyez sur la touche « open/close »
(
∫) (ouvert/fermé);
Le tiroir à disque sort.
2 Chargez le disque, côté étiquette vers
le haut.
3 Appuyez sur la touche de saut de
disque pour sélectionner un tiroir.
4 Chargez un disque seulement quand le
tiroir est ouvert.
• Chargez un autre disque en répétant les
étapes 3 et 4.
5 Appuyez sur la touche "open/close"
(ouvert/fermé) pour fermer le tiroir à
disque.
6 Appuyez sur la touche de saut de
disque pour sélectionner un disque.
7 Sélectionnez la plage voulue en
appuyant sur la touche de Saut de
plages (
Ú/Æ).
8 Appuyez sur la touche Lecture (∏), la
lecture du disque compact démarre.
9 Appuyez sur la touche Pause (ƒ) pour
interrompre provisoirement la lecture.
10 Appuyez sur la touche stop pour
arrêter complètement la lecture.
ATTENTION
L'appareil commencera automatiquement
la lecture dans les cas suivants:
• Si vous sélectionnez CD sur
l'Amplificateur (A-H500).
• Lorsque vous mettez l'appareil sous
tension, le sélecteur d'entrée de
l'Amplificateur étant réglé sur CD.
∑ Fonction mémoire de la dernière
position précédente
Si on actionne la touche « program »
(programme) pendant la lecture normale,
le lecteur se repositionne à l'endroit où il
se trouvait la dernière fois que vous avez
appuyé sur la touche « stop » (arrêt). La
lecture reprend alors au début de cette
plage comportant cette position définie.
8
79
2 ,4
8
79
1 ,53,6

_
17
_
FRANÇAIS
La fonction Lecture Programmée permet
de programmer jusqu'à 32 plages dans
n'importe quel ordre souhaité.
• La programmation ne peut être
effectuée que dans le mode d'arrêt avec
la télécommande.
∑ Programmation à l'aide des touches
numériques
1. Appuyez sur la touche CD sur la
télécommande.
2. Appuyez sur la touche d'arrêt (stop).
3. Appuyez sur la touche "program".
Exemple: L'indicateur PROGRAM
s'allume dans l'affichage. Les
indicateurs de numéro de
disque 1, 2 et 5 des disques
chargés s'allument.
4. Sélectionner un numéro de disque en
utilisant la touche de saut de disque.
Exemple: si vous voulez programmer un
morceau dans le disque No. 5,
l'indicateur de numéro de
disque 5 clignotera.
5. Sélectionner les plages désirées en
appuyant sur les touches numériques
correspondantes.
Exemple: 02T06T12
Pour programmer un nombre à un
chiffre, bien s'assurer d'introduire
d'abord un zéro.
Les plages 2, 6 et 12 ont été
programmées dans cet ordre.
• Si vous voulez programmer à la suite les
4ème et 5ème plages du disque No. 2,
vous pouvez le faire en répétant les
étapes 4 et 5.
• Pour sortir du mode de programmation,
appuyer sur la touche stop.
6. Appuyez sur la touche Lecture (∏).
La lecture du programme sélectionné
commence dans l'ordre choisi.
REMARQUES:
• Si vous appuyez sur la touche
Programme en cours de programmation,
celle-ci est interrompue et l'appareil
passe en fonction Rappel de
Programme.
• Si vous arrêtez la lecture, le contenu du
programme disparaît de l'affichage mais
le programme n'est pas effacé. Appuyez
sur la touche Programme pour rappeler
la sélection programmée.
• La programmation est possible même si
le tiroir est ouvert.
∑ Programmation à l'aide de la
touche de saut de plage musicale
1. Appuyez sur la touche stop, puis sur la
touche program.
2. Sélectionner un disque en utilisant la
touche de saut de disque.
3. Sélectionnez la plage souhaitée à l'aide
de la touche de saut de plage
(
Ú/Æ).
Exemple: Plage No. 5 sur Disque No. 5.
4. Appuyez de nouveau sur la touche
Programme.
La plage n° 5 a été programmée comme
1er morceau du programme.
5. Répéter les étapes 2 à 4 pour continuer
la programmation d'autres plages.
6. Appuyez sur la touche Lecture (
∏).
La lecture du programme sélectionné
commence dans l'ordre défini.
REMARQUE:
• Si vous appuyez deux fois de suite sur la
touche Programme pendant que vous
êtes en train de définir un programme, la
programmation est interrompue et
l'appareil passe en mode Rappel du
Programme.
Pour votre information:
• L'indication « FULL » (PLEIN) apparaît
sur l'afficheur, après la programmation
du trente-troisième morceau. (Il n'est
pas possible de programmer au-delà.)
• Les plages dont le numéro ne se trouve
pas sur le disque ne peuvent pas être
programmées.
• Le contenu du programme n'est pas
effacé même si on met l'appareil hors
tension, mais il est effacé si l'on ouvre le
tiroir à disque.
• L'appareil s'arrête automatiquement une
fois la lecture de toutes les plages
programmées terminée; le contenu du
programme disparaît de la Fenêtre
d'affichage, mais n'est pas effacé.
• Il est possible de sélectionner un
programme alors que le tiroir à disque
est ouvert.
Les numéros des plages qui ne sont pas
sur le disque seront automatiquement
effacés quand la lecture commencera.
∑ Rappel d'un Programme
Le contenu du programme n'étant pas
effacé même si l'on arrête la lecture ou si
l'on éteint l'appareil, il est possible de le
rappeler ultérieurement.
1. Pour cela, appuyez sur la touche
Programme.
La première plage programmée s'affiche
sur l'afficheur.
2. Appuyez plusieurs fois sur cette touche
pour vérifier le contenu du programme.
Chaque fois que l'on appuie sur cette
touche, la plage programmée suivante
s'affiche.
3. Appuyez sur la touche Lecture (∏) pour
lire le disque dans l'ordre programmé.
∑ Effacement complet du programme
1. Appuyez sur la touche Programme.
2. Appuyer sur la touche CLEAR (Remise à
zéro) et la maintenir enfoncée pendant
au moins deux secondes.
L'ensemble des programmes est effacé;
de même tous les programmes seront
effacés si l'on ouvre le tiroir à disque.
REMARQUE:
• Les touches Programme et Remise à
zéro ne peuvent être activés qu'en mode
stop (arrêt).
∑
Modification du contenu d'un
programme
Suppression de plages:
Il est possible de supprimer certains
morceaux programmés préalablement.
1. Pour cela, appuyez plusieurs fois sur la
touche Programme jusqu'à ce que le
numéro de la plage que l'on veut
supprimer apparaisse sur l'afficheur.
2. Appuyez sur la touche CLEAR (remise à
zéro).
La plage portant le numéro affiché est
supprimée du programme.
Si vous appuyez sur cette touche de
façon répétée, les plages programmées
suivantes seront supprimées l'une après
l'autre.
∑ Ajout d'une plage à la suite de la
dernière plage programmée:
1. Appuyez plusieurs fois sur la touche
Programme jusqu'à ce que la mention
END (fin) apparaisse sur l'afficheur.
2. Entrez les nouvelles plages de la même
manière que pour une programmation
normale, dès que la mention END a
disparu de la fenêtre d'affichage.
∑ Ajout d'une plage en un point
quelconque du programme:
1. Sélectionnez le numéro du programme
désiré, puis appuyer sur la touche
Programme pour ajouter le morceau
désiré.
2. Entrez le morceau désiré de la même
façon que pour une programmation
normale.
Lecture programmée
Program No.
(n° de programme)
Track No.
(n° de plage)

Cette fonction ne peut être utilisée qu'avec
la télécommande.
1. Appuyez sur la touche "shuttle" pour
sélectionner un disque, puis une plage
du disque sera lue de façon aléatoire.
2. Appuyez de nouveau sur cette touche
pour annuler la fonction Lecture
Aléatoire.
Après avoir annulé cette fonction, la
lecture du disque se poursuivra dans
l'ordre normal à partir de la plage
suivante.
REMARQUES:
• Cette fonction est disponible même
lorsque l'appareil est à l'arrêt, ou
pendant la lecture.
• Si vous appuyez sur la touche Æ
pendant la Lecture Aléatoire, vous
pouvez sélectionner une plage au
hasard quelle que soit la plage en cours
de lecture. Si vous appuyez sur la
touche
Ú, la lecture commencera au
début de la plage en cours de lecture.
• Un disque sélectionné ou lu une fois ne
sera plus lu par la suite.
_
18
_
Détecteur laser : laser triple faisceau
Filtre numérique :
suréchantillonnage octuple
Réponse en fréquence :
20 à 20 000 Hz (± 2 dB)
Système de correction d'erreur :
code CIRC
(Cross Interleave Reed-Solomon)
Rapport signal/bruit :
supérieur à 96 dB (pondéré « A »)
DHT : inférieure à 0,015% (1 kHz)
Tension de sortie : 2 V efficace
Alimentation : 230 V, 50 Hz
Consommation électrique : 10 W
Dimensions (L x H x P) : 285 x 131 x 327 mm
Poids : 5 kg
Accessoires
Cordon de signal audio : 1
Cordon de télécommande : 1
• Des améliorations peuvent apporter des
changements dans les caractéristiques
techniques et générales sans avis
préalable.
• Les illustrations peuvent légèrement
différer du produit fini.
Caractéristiques
techniques
Cette fonction ne peut être utilisée qu'avec
la télécommande.
Etats de l'affichage
Cet appareil permet d'afficher quatre types
de mode temps sur le compteur de temps
de l'Afficheur.
1. Le temps écoulé depuis le début de la
plage en cours s'affiche dès le début de
la lecture.
2. Appuyez sur la touche Time une fois
pendant la lecture.
Le temps de lecture restant pour la plage
en cours s'affiche.
3. Appuyez de nouveau sur la touche
d'affichage du temps.
La durée totale écoulée depuis le début du
disque s'affiche.
4. Appuyez encore une fois sur cette
touche, le temps de lecture total restant
jusqu'à la fin du disque s'affiche.
AVERTISSEMENTS:
• La durée de lecture ne sera pas affichée
en cas de lecture programmée si la
durée du programme est supérieure à
100 minutes. l'afficheur indiquera alors
« --.-- ».
• Si on appuie sur la touche temps en
mode « stop », le nombre total de plages
et la durée totale de lecture du disque
apparaissent sur l'afficheur.
• En cas de lecture de la plage 33 ou plus,
le temps restant jusqu'à la fin du disque
ne s'affiche pas.
Lecture en ordre aléatoire
(SHUFFLE)
Affichage des temps de
lecture

_
19
_
FRANÇAIS
Dépannage
Problème Cause(s) probable(s) Solution
L'appareil ne s'allume pas quand on appuie La prise est mal enfoncée dans la prise Bien enfoncer la prise dans la prise murale.
sur la touche Marche/arrêt. murale.
Pas de lecture après chargement du disque. Le disque est chargé étiquette vers le bas. Remettre le disque en place étiquette vers
le haut.
Disque sale. Nettoyer la surface du disque.
Pas de son ou (ou son très faible). Les branchements à la chaîne stéréo Vérifier les branchements.
sont mal faits.
Mauvais fonctionnement de l'amplificateur. Vérifier le réglage de la commande et de
l'interrupteur sur l'amplificateur.
L'appareil ne lit qu'un seul morceau. La touche 1/ALL (1/TOUT) est enfoncée. Appuyez sur la touche pour la débloquer.
Pas de lecture du programme. La touche program n'est pas enfoncée. Appuyez sur cette touche pour que
l'indication PROGRAM s'affiche.
La touche play (Lecture) n'est pas Appuyez sur cette touche.
enfoncée.
Mauvais positionnement sur la plage Le lecteur est soumis à des vibrations Changez le lecteur de place.
(le son saute). ou à des chocs.
Le disque est sale. Nettoyez la surface du disque.
Bourdonnement Le cordon de raccordement est mal Vérifier le contact au niveau de la prise.
enfoncé.
Bruit au syntoniseur. Le lecteur est placé trop près du Placez ces appareils à une certaine distance
syntoniseur. l'un de l'autre ou éteignez le lecteur.
La télécommande ne fonctionne pas. L'interrupteur SELECTOR / REMOTE Mettre l'interrupteur sur la bonne position.
CONTROL (télécommande) n'est pas Voir page 13.
sur la bonne position.
Il n'y a pas de piles dans la télécommande. Mettre des piles.
Impossible de programmer. Entrée par Télécommande réglée sur un mode Sélectionnez CD sur la télécommande.
la touche numérique non acceptée. autre que CD.
L'indication "Err" apparaît sur l'affichage Un disque de 8 cm est introduit dans le Les disques de 8 cm ne peuvent être utilisés
et le tiroir à disque est ouvert. tiroir à disque 2 à 7. que dans le tiroir No. 1. Chargez un disque
12 cm dans le tiroir à disque et appuyez sur
la touche "open/close" pour fermer.
Avant de vous adresser à un technicien, vérifier à l'aide du tableau ci-dessous que le problème rencontré n'est pas dû à l'une des causes
suivantes.

_
20
_
Dieses Gerät ist ausschließlich zum
Abspielen von Compact Discs vorgesehen,
die mit dem "
˛" Symbol gekennzeichnet
sind.
• CDs stets mit nach oben weisendem
Etikett in den CD-Halter einlegen. (CDs
sind nur einseitig bespielt.)
• Zur Entnahme einer CD aus ihrer
Schutzhülle die Haltenabe in der Mitte
drücken. Die CD vorsichtig an ihrer
Kante halten und entnehmen.
Entnehmen der CD
Die CD am Rand halten
• Fingerabdrücke und Staub auf der
bespielten Seite mit einem sauberen
trockenen Tuch entfernen.
Gerade nach außen wischen
• Unter keinen Umständen zur Reinigung
von CDs herkömmliche Plattenreini-
gungsmittel wie Plattenspray oder
-flüssigkeit, Benzin, Farbverdünner oder
ähnliche Chemikalien verwenden. Die
Kunststoffoberfläche der CD kann hier-
durch irreparablen Schaden nehmen!
• CDs nach Gebrauch stets wieder in ihre
Schutzhülle einlegen. Hierdurch sind
diese vor Staub, Kratzern etc. geschützt,
die zu Abtastaussetzern des Lasers
führen können.
• CDs niemals über einen längeren
Zeitraum direkter Sonneneinstrahlung,
hoher Feuchtigkeit und Temperatur
aussetzen.
Bei längerer Einwirkung von hohen
Temperaturen kann es zu Ver-werfungen
der CD kommen.
• Keine Aufkleber an der Etikettseite
anbringen, und niemals mit einem
Kugelschreiber die Etikettseite
beschriften.
• Wählen Sie einen geeigneten Standort
für den Spieler. Nicht geeignet sind
Standorte, die direkter Sonnenein-
strahlung, Heizquellen, Vibrationen,
Staubeinwirkung, starken Temperatur-
schwankungen oder Feuchtigkeit
ausgesetzt sind. Von Brummstörungen
verursachenden Geräten wie Transfor-
matoren etc. fernhalten.
• Niemals das Gehäuse öffnen, da
hierdurch Schäden an der Elektronik
und/oder elektrische Schläge verursacht
werden können. Falls ein Fremdkörper in
das Geräteinnere gelangen sollte,
wenden Sie sich bitte an Ihren
Fachhändler.
• CDs niemals mit verschmutzten Fingern
handhaben. Niemals eine verkratzte CD
einlegen.
• Bei Abziehen des Netzkabels darauf
achten, das Kabel am Stecker zu halten.
Niemals am Kabel ziehen.
• Um den Laser-Tonabnehmer sauber-
zuhalten, diesen nicht berühren und den
CD-Halter stets einfahren.
• Zur Gehäusereinigung keine Lösungs-
mittel verwenden, da hierdurch die
Gehäuseoberfläche beschädigt werden
kann. Ein sauberes trockenes Tuch
verwenden.
• Bewahren Sie diese Bedienungs-
anleitung auf, um bei eventuell später
auftauchenden Fragen darin nach-
schlagen zu können.
INHALTSVERZEICHNIS
Vor Inbetriebnahme.................................... 20
Anschlüsse auf der Geräterückseite....... 21
Bedienungselemente und deren
Funktion..................................................... 22
Display....................................................... 22
Fernbedienung ............................................ 23
Grundlegende Funktionen......................... 24
Wiederholungsfunktion ............................. 24
Titelprogrammierung.................................. 25
Zufallsfunktion............................................. 26
Zeitanzeige................................................... 26
Technische Daten....................................... 26
Hilfe bei der Fehlersuche .......................... 27
Vor Inbetriebnahme
Bitte vor Inbetriebnahme lesen Handhaben der CD's
Auf Kondensationsniederschlag
achten!
Wenn das Gerät oder CDs von kalter in
eine warme Umgebung gebracht
werden, bzw. einer starken Tempera-
turschwankung ausgesetzt sind,
besteht die Gefahr von Kondensa-
tionsniederschlag am Laser-
Tonabnehmer. Durch eine solche
Beeinträchtigung wird die Abtast-
funktion des Lasers schwerwiegend
gestört, so daß keine Toninformation
von der CD erhältlich ist. Sollte die
Möglichkeit von Kondensations-
niederschlag gegeben sein, emp-
fehlen wir, nach Netzanschluß ein bis
zwei Stunden bis zur Inbetriebnahme
zu warten. Nach Ablauf dieser
Zeitspanne sollte ein Temperatur-
ausgleich des Geräts gegeben sein.
Seite wird geladen ...
Seite wird geladen ...
Seite wird geladen ...
Seite wird geladen ...
Seite wird geladen ...
Seite wird geladen ...
Seite wird geladen ...
Seite wird geladen ...
Seite wird geladen ...
Seite wird geladen ...
Seite wird geladen ...
Seite wird geladen ...
Seite wird geladen ...
Seite wird geladen ...
Seite wird geladen ...
Seite wird geladen ...
Seite wird geladen ...
Seite wird geladen ...
Seite wird geladen ...
Seite wird geladen ...
Seite wird geladen ...
Seite wird geladen ...
Seite wird geladen ...
Seite wird geladen ...
-
 1
1
-
 2
2
-
 3
3
-
 4
4
-
 5
5
-
 6
6
-
 7
7
-
 8
8
-
 9
9
-
 10
10
-
 11
11
-
 12
12
-
 13
13
-
 14
14
-
 15
15
-
 16
16
-
 17
17
-
 18
18
-
 19
19
-
 20
20
-
 21
21
-
 22
22
-
 23
23
-
 24
24
-
 25
25
-
 26
26
-
 27
27
-
 28
28
-
 29
29
-
 30
30
-
 31
31
-
 32
32
-
 33
33
-
 34
34
-
 35
35
-
 36
36
-
 37
37
-
 38
38
-
 39
39
-
 40
40
-
 41
41
-
 42
42
-
 43
43
-
 44
44


TEAC PD-H570 Bedienungsanleitung
- Kategorie
- CD-Spieler
- Typ
- Bedienungsanleitung
in anderen Sprachen
- English: TEAC PD-H570 Owner's manual
- français: TEAC PD-H570 Le manuel du propriétaire
- español: TEAC PD-H570 El manual del propietario
- italiano: TEAC PD-H570 Manuale del proprietario
Verwandte Artikel
-
TEAC PD-H500 Bedienungsanleitung
-
-
-
-
-
-
-
-
TEAC AD-500 Benutzerhandbuch
-
Esoteric Esoteric X-01 Limited Benutzerhandbuch