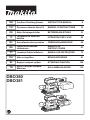
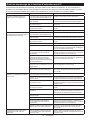
Makita DBO381 Benutzerhandbuch
- Kategorie
- Power Sanders
- Typ
- Benutzerhandbuch

DBO380
DBO381
EN Cordless Finishing Sander INSTRUCTION MANUAL 8
FR Ponceuse vibrante Sans Fil MANUEL D’INSTRUCTIONS 19
DE Akku-Schwingschleifer BETRIEBSANLEITUNG 31
IT
batteria ISTRUZIONI PER L’USO 43
NL Accuafwerkschuurmachine GEBRUIKSAANWIJZING 55
ES Lijadora de Acabado
Inalámbrica
MANUAL DE
INSTRUCCIONES 67
PT Lixadeira Orbital a Bateria MANUAL DE INSTRUÇÕES 79
DA Akku svingsliber BRUGSANVISNING 91
EL 102
TR
KULLANMA KILAVUZU 114

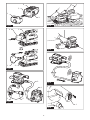
1
2
3
Fig.1
1
2
Fig.2
1
2
3
Fig.3
1
Fig.4
12
3
5
4
1
4
52
3
Fig.5
1
2
3
Fig.6
2

1
2
3
4
5
1
2 3
4
5
Fig.7
1
2
Fig.8
1
2
3
4
5
1
2 3
4
5
Fig.9
1
2
3
3
5
4
5
4
Fig.10
1
1
2
3
Fig.11
3

1
2
3
Fig.12
1
23
Fig.13
12
3
Fig.14
12
3
Fig.15
1
2
3
3
Fig.16
15
2
3
4
Fig.17
15
2
3
4
Fig.18
4

1
2
3
3
Fig.19
12
34
Fig.20
12
3
4
Fig.21
Fig.22
Fig.23
Fig.24
1
Fig.25
5

1
2
3
4
Fig.26
1
2
3
Fig.27
1
Fig.28
12
1
2
Fig.29
Fig.30
1
Fig.31
6

1
2
Fig.32
1
Fig.33
1
Fig.34
12
1
2
Fig.35
7

8ENGLISH
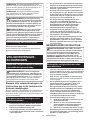
ENGLISH (Original instructions)
SPECIFICATIONS
Model: DBO380 DBO381
Pad size 92 mm x 185 mm
Abrasive paper size 93 mm x 228 mm
Orbits per minute High 12,000 min-1
Medium 8,000 min-1
Low 4,000 min-1
Overall length (with front grip) 336 mm
Rated voltage D.C. 18 V
Net weight 1.9 - 2.2 kg
without notice.
-
est combinations, according to EPTA-Procedure 01/2014, are shown in the table.
BL1815N / BL1820B / BL1830B / BL1840B / BL1850B / BL1860B
Charger DC18RC / DC18RD / DC18RE / DC18SD / DC18SE / DC18SF /
DC18SH
residence.
WARNING:
Intended use
The tool is intended for the sanding of large surface of
wood, plastic and metal materials as well as painted
surfaces.
Noise
-
ing to EN62841-2-4:
Model DBO380
Sound pressure level (LpA) : 72 dB(A)
Model DBO381
Sound pressure level (LpA) : 72 dB(A)
NOTE: The declared noise emission value(s) has
been measured in accordance with a standard test
another.
NOTE: The declared noise emission value(s)
exposure.
WARNING:
WARNING: The noise emission during actual
WARNING: -
trigger time).
Vibration
The vibration total value (tri-axial vector sum) deter-
mined according to EN62841-2-4:
Model DBO380
Work mode: sanding metal plate
Vibration emission (ah) : 3.6 m/s2
2
Model DBO381
Work mode: sanding metal plate
Vibration emission (ah) : 3.6 m/s2
2

9ENGLISH
NOTE: The declared vibration total value(s) has been
measured in accordance with a standard test method
NOTE:
WARNING: The vibration emission during
WARNING: -
trigger time).
For European countries only
to this instruction manual.
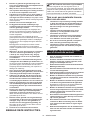
SAFETY WARNINGS
WARNING: -
Failure to follow all instructions
Save all warnings and instruc-
tions for future reference.
(cordless) power tool.
1.
2.
3.
4.
5.
6.
-
7.
-
8. Be sure that there are no cracks or breakage
9.
with the tool. Make sure there is no one below
when working in high locations.
SAVE THESE INSTRUCTIONS.
WARNING:
1.
-
2.
cartridge.
or explosion.
3.
4.
with clear water and seek medical attention right
5.
(1) -
ductive material.
(2) -
tainer with other metal objects such as
(3)
or rain.
breakdown.
6. -
reach or exceed 50 °C (122 °F).
7.
8.
9.
10.
The contained lithium-ion batteries are subject to
forwarding agents, special requirement on pack-
aging and labeling must be observed.
For preparation of the item being shipped, consulting an
expert for hazardous material is required. Please also
around in the packaging.

10 ENGLISH
11.
12.
Installing the batteries to
-
13.
14.
take on heat which can cause burns or low
-
15. Do not touch the terminal of the tool imme-
cause burns.
16.
cartridge.
17.
-
18.
SAVE THESE INSTRUCTIONS.
CAUTION:
Use of non-genuine Makita batteries, or batteries that
charger.
1.
2.
3.
-
ture at 10 °C - 40 °C (50 °F - 104 °F). Let a hot
4.
it from the tool or the charger.
5.
wireless unit
1. -
less unit.
2. -
3.
4.
conditions.
5.
6.
7.
If operated, auto-
8.
-
9.
10. The wireless unit is an accurate instrument. Be
11. Avoid touching the terminal of the wireless
unit with bare hands or metallic materials.
12.
when installing the wireless unit into it.
13.
14.
direction.
15.
16.
17. Do not remove the wireless unit from the slot
unit.
18. Do not remove the sticker on the wireless unit.
19.
20.
generated.
21. -
sun.
22.
could be generated.
23.
the wireless unit. Do not use the wireless unit
24.
-
25.
26.
wireless unit into the slot on the tool.
27. Do not use the tool with the lid of the slot dam-
aged.
cause malfunction.
28.
from the tool.
29.
damaged.
SAVE THESE INSTRUCTIONS.

11 ENGLISH
FUNCTIONAL
DESCRIPTION
CAUTION:
before adjusting or checking function on the tool.
cartridge
CAUTION:
CAUTION: -
cartridge.
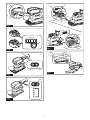
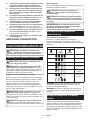
Fig.1: 1. Red indicator 2. Button 3.
while sliding the button on the front of the cartridge.
CAUTION:
If not,
CAUTION:
-
CAUTION: -
tridge from the tool before installing and unin-
CAUTION: -
another or when holding the tool while not in use.
NOTICE:
BL1840B / BL1850B / BL1860B.
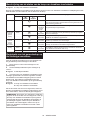
Only for battery cartridges with the indicator
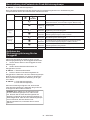
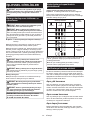
Fig.2: 1. Indicator lamps 2. Check button
-
light up for a few seconds.
Remaining
Lighted Blinking
75% to 100%
50% to 75%
25% to 50%
0% to 25%
Charge the
malfunctioned.
NOTE: Depending on the conditions of use and the
NOTE:
-
-
placed under one of the following conditions:
-
caused the tool to become overloaded. Then turn the
tool on to restart.
before turning the tool on again.

12 ENGLISH
Switch action
CAUTION: Avoid turning the tool on while it
Press the power/speed select button on the top of the main handle
to start the tool. The tool starts to run at its highest orbital speed.
Press the stop button to pause or cease operation.
Fig.3: 1. Power/speed select button 2. Stop button
3. Main handle
The orbital speed can be changed in three modes, that is, high,
medium and low depending on the application and workload.
Press the power/speed select button to switch speed mode.
Fig.4: 1. Power/speed select button
3 (High) 12,000 min-1 (/min)
2 (Medium) 8,000 min-1 (/min)
1 (Low) 4,000 min-1 (/min)
NOTICE:
NOTICE:
Sanding at high orbital
contact.
Electronic function
The tool is equipped with the electronic function for
This function serves a constant orbital speed to obtain
ASSEMBLY
CAUTION:
Installing and removing abrasive
CAUTION:
sanding operation.
1.
Push and hold down the clamp lever on either front
so the clamp is released from its fastened position.
2.
Pull the clamp lever outwards as far as possible to cre-
ate a space between the clamp and side wall of the sanding
base in which one end of abrasive paper can be inserted.
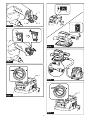
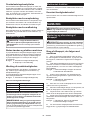
Fig.5: 1. Clamp lever 2. Stopper 3. Clamp
4. Sanding base 5. Pad
3.
Place a sheet of abrasive paper over the pad, aligning
the dust-suction holes in the paper with those in the pad.
Fig.6: 1. Abrasive paper 2. Pad 3. Dust-suction hole
4. Slip one end of the abrasive paper into the space
between the clamp and sanding base.
5. Set the clamp lever back in a locked position so
6. Release the clamp on the other end, and have the
7. Maintain a proper tension on abrasive paper, and
then set the clamp lever on the other end in a locked
position.
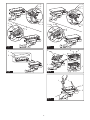
Fig.7: 1. Abrasive paper 2. Clamp 3. Sanding base
4. Clamp lever 5. Stopper
8. To remove the abrasive paper, release the clamps
market
1. Cut a sheet of abrasive paper down to an appro-
priate size.
Fig.8: 1. Abrasive paper 2. Pad
2.
Push and hold down the clamp lever on either front
so the clamp is released from its fastened position.
3. Pull the clamp lever outwards as far as possible to
create a space between the clamp and side wall of the
sanding base in which one end of abrasive paper can
be inserted.
4. Slip one end of the abrasive paper into the space
between the clamp and sanding base.
5. -
laid on the pad surface.
6. Set the clamp lever back in a locked position to
7. Release the clamp on the other end, and have the
8. Maintain a proper tension on abrasive paper, and
then set the clamp lever on the other end in a locked
position.
Fig.9: 1. Abrasive paper 2. Clamp 3. Sanding base
4. Clamp lever 5. Stopper
9. Cover the abrasive paper with the punch plate
base.
Fig.10: 1. Abrasive paper 2. Punch plate
3. Positioning stoppers 4. Pad 5. Sanding
base

13 ENGLISH
10. Push the punch plate over the abrasive paper to
make dust-suction holes.
11. To remove the abrasive paper, release the clamps
Optional accessory
CAUTION: Make sure to install a hook-and-
A loose attach-
ment will run out of balance and cause an excessive
vibration resulting in loss of control.
CAUTION:
attached.
CAUTION:
1. Loosen and remove the four screws securing the
pad to the sanding base.
2. Replace the standard-equipped pad with an
optional hook-and-loop pad.
3.
and-loop pad.
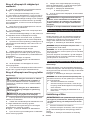
Fig.11: 1. Screws 2. Sanding base 3. Pad
4. Remove all dirt and foreign matter from the hook-
and-loop pad.
5. Attach a sheet of optional hook-and-loop abrasive
paper to the pad, aligning the dust-suction holes in the
paper with those in the pad.
Fig.12: 1. Abrasive paper 2. Pad 3. Dust-suction
holes
6.
edge.
CAUTION:
ring back in the circular grooves around the cen-
Fig.13: 1. O ring 2. Sanding base 3. Circular
grooves
Installing and removing dust bag
Optional accessory
Attach the dust bag over the tapered dust spout at the
back end of the motor housing. Put the dust inlet of the
bag onto the dust spout as far as it will go to avoid it
Fig.14: 1. Dust spout 2. Dust inlet 3. Dust bag
NOTE: Make sure to attach the dust bag with its
zipper slider facing downwards.
NOTE:
Remove the dust bag from the tool and pull the fas-
Installing and removing dust box
Optional accessory
Attach the dust box over the tapered dust spout at the
back end of the motor housing. Put the dust nozzle onto
the dust spout as far as it will go to avoid it from coming
Fig.15: 1. Dust spout 2. Dust nozzle 3. Dust box
NOTE:
1. Remove the dust box from the tool.
2. Detach the dust nozzle from the box while
pressing and holding the locking latches on both
sides of the box.
NOTICE: Be aware to align the logos on all the
1. Remove the dust box from the tool.
2. Detach the dust nozzle from the box while press-
ing and holding the locking latches on both sides of the
box.
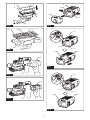
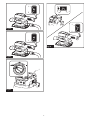
Fig.16: 1. Dust nozzle 2. Dust box 3. Locking latch
3. Hold the inner top edge of the cardboard opening,
edge of the cardboard opening from the upper hooking
tab on the lip of the dust box.
4.
outer bottom edge of the cardboard opening free from
the lower hooking tab.
Fig.17: 1. Filter 2. Cardboard opening 3. Upper
hooking tab 4. Lower hooking tab 5. Dust
box
5.
the cardboard opening in the lower hooking tab and
push the top edge inwards until it clips into the upper
hooking tab .
Fig.18: 1. Filter 2. Cardboard opening 3. Upper
hooking tab 4. Lower hooking tab 5. Dust
box
6. Snap the dust nozzle into place while pressing
and holding the locking latches on both sides of the dust
box.
Fig.19: 1. Dust nozzle 2. Dust box 3. Locking latch
CAUTION:
NOTICE:
cause damage to the tool.

14 ENGLISH
-
Uninstallation
housing and rotate it 90 degrees to either the left or
right. Then pull it apart from the tool.
Installation
Insert the end of the front grip into the slot on the motor hous-
ing, aligning the outlines of the grip end with those of the slot.
rotate it 90 degrees with its gripping surface facing upwards.
Fig.20: 1. Front grip 2. Slot 3. Motor housing
4. Gripping surface
Connecting with vacuum cleaner
Optional accessory
either an optional horse 28 mm or a combination of front
a connection.
Fig.21: 1. Dust spout 2. 3. Hose
4. Vacuum cleaner
OPERATION
CAUTION: Never run the tool without the
CAUTION: Never force the tool. Excessive
-
age the abrasive paper and/or shorten tool life.
1.
hand on the handle and the other on the front grip.
2. Turn the tool on and wait until it attains full speed.
3.
4. -
Fig.22
1. Detach the front grip from the tool.
2. Hold the handle with one hand.
3. Turn the tool on and wait until it attains full speed.
4.
5. -
6. Move the tool along curves, wall faces and in other
Fig.23
WIRELESS ACTIVATION
FUNCTION
For model DBO381 only
NOTICE:
when the supported vacuum cleaner is being
installed.
activation function
The wireless activation function enables clean and com-
Fig.24
To use the wireless activation function, prepare follow-
ing items:
•A vacuum cleaner which supports the wireless
activation function
The overview of the wireless activation function
setting is as follows. Refer to each section for detail
procedures.
1. Installing the wireless unit
2. Tool registration for the vacuum cleaner
3. Starting the wireless activation function
Installing the wireless unit
Optional accessory
CAUTION:
surface when installing the wireless unit.
NOTICE: Clean the dust and dirt on the tool
before installing the wireless unit. Dust or dirt
wireless unit.
NOTICE:
wireless unit.
NOTICE:
closed.
1.
Fig.25: 1. Lid
2. Insert the wireless unit to the slot and then close
the lid.
with the recessed portions on the slot.
Fig.26: 1. Wireless unit 2. 3. Lid
4. Recessed portion

15 ENGLISH
The hooks on the back of the lid will lift the wireless unit
Fig.27: 1. Wireless unit 2. Hook 3. Lid
After removing the wireless unit, keep it in the supplied
case or a static-free container.
NOTICE:
the lid when removing the wireless unit. If the
hooks do not catch the wireless unit, close the lid
Tool registration for the vacuum
cleaner
NOTE: A Makita vacuum cleaner supporting the
wireless activation function is required for the tool
registration.
NOTE: Finish installing the wireless unit to the tool
before starting the tool registration.
NOTE: During the tool registration, do not pull the
switch trigger or turn on the power switch on the
vacuum cleaner.
NOTE: Refer to the instruction manual of the vacuum
cleaner, too.
-
tion beforehand.
1. Install the batteries to the vacuum cleaner and the
tool.
2.
"AUTO".
Fig.28: 1.
3. Press the wireless activation button on the vac-
uum cleaner for 3 seconds until the wireless activation
lamp blinks in green. And then press the wireless acti-
Fig.29: 1. Wireless activation button 2. Wireless
activation lamp
If the vacuum cleaner and the tool are linked success-
for 2 seconds and start blinking in blue.
NOTE:
in green after 20 seconds elapsed. Press the wireless
activation button on the tool while the wireless acti-
vation lamp on the cleaner is blinking. If the wireless
activation lamp does not blink in green, push the wire-
NOTE: When performing two or more tool registra-
-
Starting the wireless activation
function
NOTE: Finish the tool registration for the vacuum
cleaner prior to the wireless activation.
NOTE: Refer to the instruction manual of the vacuum
cleaner, too.
After registering a tool to the vacuum cleaner, the
switch operation of the tool.
1. Install the wireless unit to the tool.
2. Connect the hose of the vacuum cleaner with the
tool.
Fig.30
3.
"AUTO".
Fig.31: 1.
4. Push the wireless activation button on the tool
Fig.32: 1. Wireless activation button 2. Wireless
activation lamp
5. Pull the switch trigger of the tool. Check if the
vacuum cleaner runs while the switch trigger is being
pulled.
To stop the wireless activation of the vacuum cleaner,
push the wireless activation button on the tool.
NOTE: The wireless activation lamp on the tool will
stop blinking in blue when there is no operation for
vacuum cleaner to "AUTO" and push the wireless
activation button on the tool again.
NOTE:
There is a time lag when the vacuum cleaner detects
a switch operation of the tool.
NOTE: The transmission distance of the wireless unit
circumstances.
NOTE: When two or more tools are registered to one
-
another user is using the wireless activation function.

16 ENGLISH
Fig.33: 1. Wireless activation lamp
The wireless activation lamp shows the status of the wireless activation function. Refer to the table below for the
meaning of the lamp status.
Status
Color
On Blinking
Duration
Blue 2 hours The wireless activation of the vacuum cleaner is available. The
for 2 hours.
When
the tool is
running.
The wireless activation of the vacuum cleaner is available and the
tool is running.
Tool
registration
Green 20 seconds
vacuum cleaner.
2 seconds
lamp will start blinking in blue.
Cancelling
tool
registration
Red 20 seconds
2 seconds
wireless activation lamp will start blinking in blue.
Others Red 3 seconds The power is supplied to the wireless unit and the wireless activa-
tion function is starting up.
- - The wireless activation of the vacuum cleaner is stopped.
Cancelling tool registration for the
vacuum cleaner
Perform the following procedure when cancelling the
tool registration for the vacuum cleaner.
1. Install the batteries to the vacuum cleaner and the
tool.
2.
"AUTO".
Fig.34: 1.
3. Press the wireless activation button on the vac-
uum cleaner for 6 seconds. The wireless activation
lamp blinks in green and then become red. After that,
press the wireless activation button on the tool in the
Fig.35: 1. Wireless activation button 2. Wireless
activation lamp
-
less activation lamps will light up in red for 2 seconds
and start blinking in blue.
NOTE:
red after 20 seconds elapsed. Press the wireless acti-
vation button on the tool while the wireless activation
lamp on the cleaner is blinking. If the wireless acti-
vation lamp does not blink in red, push the wireless

17 ENGLISH
Troubleshooting for wireless activation function
-
ment parts for repairs.
Probable cause (malfunction)
The wireless activation lamp does
not light/blink.
The wireless unit is not installed into the tool.
into the tool.
The terminal of the wireless unit and/or
wireless unit and clean the slot.
The wireless activation button on the
tool has not been pushed.
Push the wireless activation button on the tool
cleaner is not set to "AUTO".
"AUTO".
-
The wireless unit is not installed into the tool.
into the tool.
The terminal of the wireless unit and/or
wireless unit and clean the slot.
cleaner is not set to "AUTO".
"AUTO".
Incorrect operation
the tool registration/cancellation procedures again.
from each other (out of the transmission
range).
Get the tool and vacuum cleaner closer to each other. The
- the power button on the vacuum
cleaner is turned on.
perform the tool registration/cancellation procedures
again.
The tool registration procedures for the
Perform the tool registration procedures for both the
tool and the vacuum cleaner at the same timing.
waves.
appliances such as Wi-Fi devices and microwave
ovens.
The vacuum cleaner does not run
along with the switch operation of
the tool.
The wireless unit is not installed into the tool.
into the tool.
The terminal of the wireless unit and/or
wireless unit and clean the slot.
The wireless activation button on the
tool has not been pushed.
sure that the wireless activation lamp is blinking in blue.
cleaner is not set to "AUTO".
"AUTO".
More than 10 tools are registered to the
vacuum cleaner.
Perform the tool registration again.
If more than 10 tools are registered to the vacuum
cleaner, the tool registered earliest will be cancelled
The vacuum cleaner erased all tool
registrations.
Perform the tool registration again.
from each other (out of the transmission
range).
Get the tool and vacuum cleaner closer each other. The
waves.
appliances such as Wi-Fi devices and microwave
ovens.
The vacuum cleaner runs while the
tool's switch trigger is not pulled.
Other users are using the wireless
activation of the vacuum cleaner with
their tools.
tools or cancel the tool registration of the other
tools.

18 ENGLISH
MAINTENANCE
CAUTION:
maintenance.
NOTICE:
To maintain product SAFETY and RELIABILITY,
After use
-
OPTIONAL
ACCESSORIES
CAUTION: These accessories or attachments
accessories or attachments might present a risk of
for its stated purpose.
-
Center.
•Abrasive paper (with pre-punched holes)
•Punch plate
abrasive paper)
abrasive paper)
•Dust bag
•Dust box
•Filter
•Hose
•Wireless unit (for model DBO381)
NOTE:

19 FRANÇAIS
FRANÇAIS (Instructions originales)
SPÉCIFICATIONS
Modèle :DBO380 DBO381
Dimensions du plateau 92 mm x 185 mm
Dimensions du papier abrasif 93 mm x 228 mm
Nombre d’oscillations par
minute
Élevé 12 000 min-1
8 000 min-1
Faible 4 000 min-1
Longueur totale (avec manche avant) 336 mm
Tension nominale 18 VCC
Poids net 1,9 - 2,2 kg
Batterie BL1815N / BL1820B / BL1830B / BL1840B / BL1850B / BL1860B
Chargeur DC18RC / DC18RD / DC18RE / DC18SD / DC18SE / DC18SF /
DC18SH
résidez.
AVERTISSEMENT : L’utilisation
d’autres batteries et chargeurs peut provoquer des blessures et/ou un incendie.
Utilisations
L’outil est conçu pour le ponçage des grandes surfaces
de bois, de plastique et de métal, ainsi que des sur-
faces peintes.
Bruit
EN62841-2-4 :
Modèle DBO380
Niveau de pression sonore (LpA): 72 dB (A)
Modèle DBO381
Niveau de pression sonore (LpA): 72 dB (A)
Le niveau de bruit en fonctionnement peut dépasser 80 dB (A).
NOTE : La ou les valeurs d’émission de bruit décla-
-
parer les outils entre eux.
NOTE : La ou les valeurs d’émission de bruit décla-
préliminaire de l’exposition.
AVERTISSEMENT : Portez un serre-tête
antibruit.
AVERTISSEMENT :
AVERTISSEMENT :
Vibrations
Valeur totale de vibrations (somme de vecteur triaxial)
déterminée selon EN62841-2-4 :
Modèle DBO380
Mode de travail : ponçage de la tôle
Émission de vibrations (ah): 3,6 m/s2
2
Modèle DBO381
Mode de travail : ponçage de la tôle
Émission de vibrations (ah): 3,6 m/s2
2

20 FRANÇAIS
NOTE : La ou les valeurs de vibration totales décla-
-
parer les outils entre eux.
NOTE : La ou les valeurs de vibration totales décla-
préliminaire de l’exposition.
AVERTISSEMENT :
AVERTISSEMENT :
Pour les pays européens uniquement
La déclaration de conformité CE est fournie en Annexe
CONSIGNES DE SÉCURITÉ
AVERTISSEMENT : Veuillez lire les
Le non-respect de toutes les instructions
indiquées ci-dessous peut entraîner une électrocu-
tion, un incendie et/ou de graves blessures.
Conservez toutes les mises en
-
Le terme « outil électrique » dans les avertissements
-
tionnant sur batterie (sans cordon d’alimentation).
1.
ou de soleil NE sont PAS des lunettes de
2. Tenez l’outil fermement.
3. -
vous le tenez en main.
4.
sur la surface de travail.
5. -
6.
7.
-
8.
-
9.
-
CONSERVEZ CES
INSTRUCTIONS.
AVERTISSEMENT : NE vous laissez PAS
-
de graves blessures.
1.
2.
batterie. Cela pourrait entraîner un incendie, une
chaleur excessive ou une explosion.
3.
de fonctionnement devient excessivement
4.
5.
(1) -
riau conducteur.
(2) Évitez de ranger la batterie dans un
-
(3)
-
Seite wird geladen ...
Seite wird geladen ...
Seite wird geladen ...
Seite wird geladen ...
Seite wird geladen ...
Seite wird geladen ...
Seite wird geladen ...
Seite wird geladen ...
Seite wird geladen ...
Seite wird geladen ...
Seite wird geladen ...
Seite wird geladen ...
Seite wird geladen ...
Seite wird geladen ...
Seite wird geladen ...
Seite wird geladen ...
Seite wird geladen ...
Seite wird geladen ...
Seite wird geladen ...
Seite wird geladen ...
Seite wird geladen ...
Seite wird geladen ...
Seite wird geladen ...
Seite wird geladen ...
Seite wird geladen ...
Seite wird geladen ...
Seite wird geladen ...
Seite wird geladen ...
Seite wird geladen ...
Seite wird geladen ...
Seite wird geladen ...
Seite wird geladen ...
Seite wird geladen ...
Seite wird geladen ...
Seite wird geladen ...
Seite wird geladen ...
Seite wird geladen ...
Seite wird geladen ...
Seite wird geladen ...
Seite wird geladen ...
Seite wird geladen ...
Seite wird geladen ...
Seite wird geladen ...
Seite wird geladen ...
Seite wird geladen ...
Seite wird geladen ...
Seite wird geladen ...
Seite wird geladen ...
Seite wird geladen ...
Seite wird geladen ...
Seite wird geladen ...
Seite wird geladen ...
Seite wird geladen ...
Seite wird geladen ...
Seite wird geladen ...
Seite wird geladen ...
Seite wird geladen ...
Seite wird geladen ...
Seite wird geladen ...
Seite wird geladen ...
Seite wird geladen ...
Seite wird geladen ...
Seite wird geladen ...
Seite wird geladen ...
Seite wird geladen ...
Seite wird geladen ...
Seite wird geladen ...
Seite wird geladen ...
Seite wird geladen ...
Seite wird geladen ...
Seite wird geladen ...
Seite wird geladen ...
Seite wird geladen ...
Seite wird geladen ...
Seite wird geladen ...
Seite wird geladen ...
Seite wird geladen ...
Seite wird geladen ...
Seite wird geladen ...
Seite wird geladen ...
Seite wird geladen ...
Seite wird geladen ...
Seite wird geladen ...
Seite wird geladen ...
Seite wird geladen ...
Seite wird geladen ...
Seite wird geladen ...
Seite wird geladen ...
Seite wird geladen ...
Seite wird geladen ...
Seite wird geladen ...
Seite wird geladen ...
Seite wird geladen ...
Seite wird geladen ...
Seite wird geladen ...
Seite wird geladen ...
Seite wird geladen ...
Seite wird geladen ...
Seite wird geladen ...
Seite wird geladen ...
Seite wird geladen ...
Seite wird geladen ...
Seite wird geladen ...
Seite wird geladen ...
Seite wird geladen ...
Seite wird geladen ...
-
 1
1
-
 2
2
-
 3
3
-
 4
4
-
 5
5
-
 6
6
-
 7
7
-
 8
8
-
 9
9
-
 10
10
-
 11
11
-
 12
12
-
 13
13
-
 14
14
-
 15
15
-
 16
16
-
 17
17
-
 18
18
-
 19
19
-
 20
20
-
 21
21
-
 22
22
-
 23
23
-
 24
24
-
 25
25
-
 26
26
-
 27
27
-
 28
28
-
 29
29
-
 30
30
-
 31
31
-
 32
32
-
 33
33
-
 34
34
-
 35
35
-
 36
36
-
 37
37
-
 38
38
-
 39
39
-
 40
40
-
 41
41
-
 42
42
-
 43
43
-
 44
44
-
 45
45
-
 46
46
-
 47
47
-
 48
48
-
 49
49
-
 50
50
-
 51
51
-
 52
52
-
 53
53
-
 54
54
-
 55
55
-
 56
56
-
 57
57
-
 58
58
-
 59
59
-
 60
60
-
 61
61
-
 62
62
-
 63
63
-
 64
64
-
 65
65
-
 66
66
-
 67
67
-
 68
68
-
 69
69
-
 70
70
-
 71
71
-
 72
72
-
 73
73
-
 74
74
-
 75
75
-
 76
76
-
 77
77
-
 78
78
-
 79
79
-
 80
80
-
 81
81
-
 82
82
-
 83
83
-
 84
84
-
 85
85
-
 86
86
-
 87
87
-
 88
88
-
 89
89
-
 90
90
-
 91
91
-
 92
92
-
 93
93
-
 94
94
-
 95
95
-
 96
96
-
 97
97
-
 98
98
-
 99
99
-
 100
100
-
 101
101
-
 102
102
-
 103
103
-
 104
104
-
 105
105
-
 106
106
-
 107
107
-
 108
108
-
 109
109
-
 110
110
-
 111
111
-
 112
112
-
 113
113
-
 114
114
-
 115
115
-
 116
116
-
 117
117
-
 118
118
-
 119
119
-
 120
120
-
 121
121
-
 122
122
-
 123
123
-
 124
124
-
 125
125
-
 126
126


Makita DBO381 Benutzerhandbuch
- Kategorie
- Power Sanders
- Typ
- Benutzerhandbuch
in anderen Sprachen
- français: Makita DBO381 Manuel utilisateur
- español: Makita DBO381 Manual de usuario
- italiano: Makita DBO381 Manuale utente
- Nederlands: Makita DBO381 Handleiding
- português: Makita DBO381 Manual do usuário
- dansk: Makita DBO381 Brugermanual
- Türkçe: Makita DBO381 Kullanım kılavuzu
Verwandte Artikel
-
Makita DBO480 Benutzerhandbuch
-
Makita DBO140 Benutzerhandbuch
-
Makita DCL285F Benutzerhandbuch
-
-
-
-
-
Makita 9565HZ1 Bedienungsanleitung
-
Makita PV001G Benutzerhandbuch
-
Makita BO5040 Bedienungsanleitung