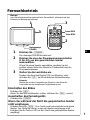
Sony XTL-6100 Bedienungsanleitung
- Kategorie
- LCD-Fernseher
- Typ
- Bedienungsanleitung

XTL-6100
EN
D
1998 by Sony Corporation
Mobile Color TV
For installation and connections, see the supplied installation/connections
manual.
Zur Installation und zum Anschluß siehe die mitgelieferte Installations-/
Anschlußanleitung.
Operating Instructions
Bedienungsanleitung

2
EN
Thank you for purchasing the Sony Mobile Colour TV.
• This unit can receive the TV broadcasts in the United Kingdom and
other CCIR B/G system areas such as Germany.
• You can connect both PAL and NTSC video playback units.
• The low reflection liquid crystal panel reduces the glare from outside
lighting sources.
• You can manually adjust the brightness of the display according to the
prevailing light conditions of the surrounding environs.
• The visual off function turns the picture off so that you can listen to the
TV or video sound only.
• The automatic memory function can store up to 12 stations.
• This unit has several input/output terminals so you can connect a video
player and rear monitor.
Welcome!

3
EN
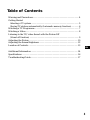
Table of Contents
Warning and Precautions..................................................................................... 4
Getting Started
Selecting a TV system ........................................................................................ 5
Storing TV stations automatically (Automatic memory function) ............. 6
Watching a TV Programme ................................................................................. 7
Watching a Video .................................................................................................. 8
Listening to the TV/video Sound with the Picture Off
(Visual off function) ........................................................................................... 9
Adjusting the Picture .......................................................................................... 10
Adjusting the Screen Brightness ....................................................................... 12
Location of Controls............................................................................................ 13
Additional Information ...................................................................................... 14
Specifications........................................................................................................ 16
Troubleshooting Guide....................................................................................... 17

4
EN
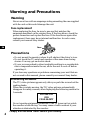
Warning and Precautions
Warning
Never use a fuse with an amperage rating exceeding the one supplied
with the unit as this could damage the unit.
Fuse replacement
When replacing the fuse, be sure to use one that matches the
amperage described on the original fuse. If the fuse blows, check the
power connection and replace the fuse. If the fuse blows again after
replacement, there may be an internal malfunction. In such a case,
consult your nearest Sony dealer.
Precautions
• Do not mount the monitor where it will obstruct the driver’s view.
• Do not touch the TV aerial and monitor at the same time during
storms. You may get an electric shock.
• If your car was parked in direct sunlight resulting in a considerable
rise in temperature inside the car, allow the unit to cool off before
operating it.
If you have any questions or problems concerning your unit that are
not covered in this manual, please consult your nearest Sony dealer.
Preventing accidents
The TV/video pictures appear only after you park the car and set the
parking brake.
When the car starts moving, the TV/video pictures automatically
disappear for safety reasons,
after displaying the following caution for
5 seconds.
Do not operate equipment connected to the TV tuner unit or watch
the monitor while driving. You may cause a traffic accident if your
attention is distracted by the monitor.
Fuse
PICTURE OFF
FOR
YOUR SAFETY
Comply with the Road Traffic Laws in your country.

5
EN
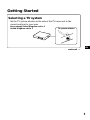
Getting Started
Selecting a TV system
Set the TV system selector on the side of the TV tuner unit to the
correct position for your area.
Areas except United Kingdom: set to 1
United Kingdom: set to 2
TV system selector
continued n
TV
SYSTEM
1
2

6
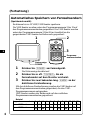
EN
TV/VIDEO
SEL
A MEMV OFF DSPL
2SEC
789
123
456
10 11 12
SEEKVOL
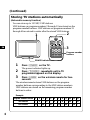
Storing TV stations automatically
(Automatic memory function)
You can store up to 12 VHF/UHF stations.
VHF stations on program numbers 2 through 12 are stored on the
program number buttons. UHF stations on program numbers 21
through 69 are stored in order after the stored VHF stations.
1 Press (POWER) on the TV.
The power indicator lights up.
2 Press (TV/VIDEO) repeatedly until a TV
programme appears on the display.
3 Press (AMEM) on the wireless remote for two
seconds.
The wireless remote stores VHF stations on the program
number buttons corresponding to the VHF station numbers.
UHF stations are stored on the remaining program number
buttons in order.
(Continued)
1
POWER indicator
2
3
Program number
buttons
Program number button
VHF station
UHF station
1
-
21
3
-
24
2
2
-
4
4
-
5
-
27
6
6
-
7
-
32
8
8
-
9
-
34
10
10
-
11
-
48
12
12
-
Example

7
EN
TV/VIDEO
SEL
A MEMV OFF DSPL
2SEC
789
123
456
10 11 12
SEEKVOL
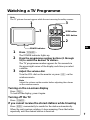
Note
The TV picture does not appear while the car is moving for safety reasons.
1 Press (POWER).
The POWER indicator lights up.
2 Press the programme number buttons (1 through
12) to select the desired TV station.
The TV programme number appears for five seconds in
the upper right corner of the display each time you select
a station.
3 Adjust the volume dial.
Turn the VOL dial on the monitor or press (VOL) on the
wireless remote.
Note
Adjust the volume on the monitor before adjusting the volume
on the wireless remote.
Turning on the on-screen display
Press (DSPL).
To turn off the display, press it again.
Turning off the TV
Press (POWER).
If you cannot receive the stored stations while traveling
Press (SEEK) momentarily to search for the station automatically.
When the unit receives a station, it stops scanning. Press the button
repeatedly until the desired station is received.
Watching a TV Programme
1
3
3
SEEK button
DSPL button
2
POWER indicator

8
EN
TV/VIDEO
SEL
A MEMV OFF DSPL
2SEC
789
123
456
10 11 12
SEEKVOL
Watching a Video
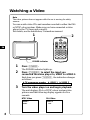
Note
The video picture does not appear while the car is moving for safety
reasons.
You can watch video CDs and cassettes recorded in either the PAL
or NTSC colour system. Make sure you have connected a video
player to the TV tuner unit correctly.
For details, see the Installation/Connections manual.
1 Press (POWER).
The POWER indicator lights up.
2 Press (TV/VIDEO) to select the input you
connected the
video player to
,
VIDEO 1 or VIDEO 2.
Each time you press (TV/VIDEO), the indication changes
as follows.
z TV programme number z VIDEO 1 z VIDEO 2
3 Turn the video player on and begin playback.
The unit displays PAL or NTSC colour system video
pictures and the following display appears for five
seconds.
1
POWER indicator
2
PAL Video
VIDEO 2
PAL
NTSC Video
VIDEO 1
NTSC

9
EN
TV/VIDEO
SEL
A MEMV OFF DSPL
2SEC
789
123
456
10 11 12
SEEKVOL
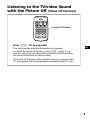
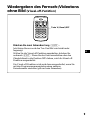
Press (VOFF) for two seconds.
You only hear the sound of the selected programme.
To cancel the visual off function, press (VOFF) again. If you
turn the unit off or turn the ignition switch to the OFF position,
the visual off function will be cancelled.
The visual off function is also canceled when you select another
TV programme with the programme number buttons (TV only).
Listening to the TV/video Sound
with the Picture Off
(Visual off function)
V (visual) OFF button

10
EN
TV/VIDEO
SEL
A MEMV OFF DSPL
2SEC
789
123
456
10 11 12
SEEKVOL
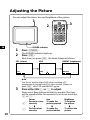
Adjusting the Picture
POWER indicator
1
3
2
You can adjust the colour, hue and brightness of the picture.
1 Press (POWER).
The POWER indicator lights up.
2 Press (SEL).
Each time you press (SEL), the items change as follows.
Note
You do not need to adjust HUE when watching a TV
programme or playing back PAL video sources. When you
press (SEL), only COL and BRIGHT appear.
3 Press either SEL(+) or (–) to adjust.
Press one of these buttons within five seconds. The item
will be cancelled after five seconds if you do not touch the
(+) or (–).
BRIGHTCOL HUE
RG
COL (colour)
HUE
(+)
(–)
Colour
For more colour
intensity
<
For less colour
intensity
Brightness
To brighten
the picture
<
To darken the
picture
Hue
To make the
picture greenish
<
To make the
picture reddish
BRIGHT (brightness)

11
EN
Tips
• To restore the factory settings, press (SEL) for more than two seconds,
VISUAL STD (standard) appears.
• When the picture is too dark or too bright from the viewing position,
press (SEL) to select BRIGHT and press (+) or (–).

12
EN
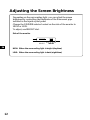
LOWHIGH
DIMMERBRIGHT
Adjusting the Screen Brightness
Depending on the surrounding light, you can adjust the screen
brightness by controlling the brightness of the fluorescent pipe
installed in the liquid crystal panel.
Change the DIMMER selector located on the side of the monitor to
HIGH or LOW.
To adjust, use BRIGHT dial.
Side of the monitor
HIGH: When the surrounding light is bright (daytime).
LOW: When the surrounding light is dark (nighttime).

13
EN
TV/VIDEO
SEL
A MEMV OFF DSPL
2SEC
789
123
456
10 11 12
SEEKVOL
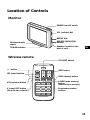
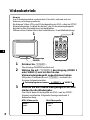
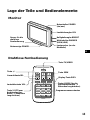
Location of Controls
Monitor
POWER (on/off) switch
VOL (volume) dial
POWER indicator
Wireless remote
TV/VIDEO button
SEEK button
DSPL (display) button
+/– button
BRIGHT dial
Speaker (located on the
back of unit)
A MEM (auto memory)
button
(Press for two seconds.)
SEL (select) button
VOL (volume) button
V (visual) OFF button
(Press for two seconds.)
Programme number
buttons
Wireless remote
sensor
DIMMER (HIGH/LOW)
selector

14
EN
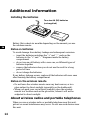
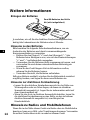
Installing the batteries
Battery life is about six months depending on the amount you use
the wireless remote.
Notes on batteries
To avoid damage from battery leakage and subsequent corrosion:
— insert the batteries matching the “+” and “–” ends on the
batteries to the “+” and “–” diagrams inside the battery
compartment
— do not use an old battery with a new one, or different types of
batteries together
— remove the batteries when you do not use the unit for a long
period of time
— do not charge the batteries.
If any battery leakage occurs, replace all the batteries with new ones
after cleaning the battery compartment.
Notes on the wireless remote
• Do not leave the wireless remote near any heat sources, or in a
place subject to direct sunlight (especially on the dashboard).
• When you park your car in direct sunlight, place the wireless
remote in a location such as the glove-box, where it will not be
subjected to direct sunlight.
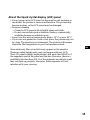
About wireless radios and portable telephones
When you use a wireless radio or portable telephone near this unit,
picture or sound interference may occur. Do not use such devices near
this unit.
Additional Information
Two size AA (R6) batteries
(not supplied)

15
EN
About the liquid crystal display (LCD) panel
• Do not press on the LCD panel on the monitor unit as doing so
can distort the picture or cause a malfunction. The picture may
become unclear, or the LCD panel may be damaged.
• Notes on cleaning
—Clean the LCD panel with a slightly damp soft cloth.
—Do not use solvents such as benzine, thinner, commercially
available cleaners or antistatic spray.
• Do not use this unit in temperatures under -10° C or over 60° C.
• If your car was parked in a cold or hot place, the picture may not
be clear. The monitor is not damaged. The picture will become
clear after the temperature in your car becomes normal.
Some stationary blue or red dots may appear on the monitor.
These are called bright spots, and can happen with any LCD.
The LCD panel is highly sophisticated, and more than 99.99 % of
the segments used in the panel are flawless. However, there is a
possibility that less than 0.01 % of the segments are defective and
may not light up properly. However, these segments will not
interfere with your viewing.

16
EN
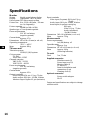
Specifications
Monitor
System Liquid crystal colour display
Display Transparent TN LCD panel
Drive systemTFT active matrix system
Picture size 6 in.; 121.9 × 89.2 mm, 151 mm
(w × h, diagonally)
Picture segment
224,640 (w 960 × h 234 )
Speaker type ø 5 cm dynamic speaker
Power requirements
12 V DC car battery
(negative ground)
Current drain
Approx. 0.7 A
Dimensions 162 × 129 × 31 mm (w × h × d)
Operating temperature
-10° C ~ +60° C
Mass Approx. 430 g
TV tuner unit
Television system
CCIR B,G,I,D,K system
Colour system
TV: PAL
Video: PAL, NTSC
Channel converge
VHF: 2 CH ~ 12 CH
UHF: 21 CH ~ 69 CH
Power requirements
12 V DC car battery
(negative ground)
Current drain
Approx. 0.5 A
Output terminals
Video output: RCA pin 1 Vp-p, 75 ohm
Audio output: RCA pin -10 dBs, 10 kohm
Monitor output: Square 16 -pin (exclusive)
Input terminals
Video input (2 system): RCA pin 1 Vp-p,
75 ohm
Audio input: RCA pin -10 dBs, 10 kohm
Aerial input (4 system): mini plug
RCA pin:
Video 1 Vp-p, 75 ohm
Audio (monaural)
-10 dBs, 10 kohm
Dimensions 202 × 30 × 140 mm (w × h × d)
Mass Approx. 750 g
Wireless remote
Power requirements
AA (R6) battery × 2
Operable range
Approx. 3 m
Dimensions 62 × 25 × 115 mm (w × h × d)
Mass Approx. 100 g
(including batteries)
TV aerial
Cord 5 m, 75 ohm
Supplied accessories
Wireless remote (1)
Power input cord (1)
Monitor cable (1)
TV aerial (1)
Parts for installation and
connections (1 set)
Cleaning cloth (1)
Optional accessories
Power switch adaptor
XA-15
Design and specifications are subject to change
without notice.

17
EN
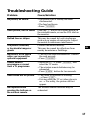
Troubleshooting Guide
Problem
No picture, no sound
Good picture, but no sound
Dotted lines or stripes
The picture is blurred,
or has double images or
ghosts
No picture, or no sound
when you connect the
optional equipment
Cannot select a
programme or cannot
view a TV programme
Good sound but no picture
No response when
pressing the buttons on
the wireless remote
Cause/Solution
•The power cord or battery has been
disconnected.
•The fuse has blown.
•Press (TV/VIDEO).
Press the (+) side of the volume button on
the wireless remote, or use the VOL dial on
the monitor.
This may be caused by local interference
such as a car engine or motorcycle. Adjust
the aerials for minimum interference.
Connect the aerials securely.
This may be caused by reflections from
nearby mountains or buildings.
• The cord has been disconnected. Connect
the cord securely.
• Press (TV/VIDEO).
• Select the TV. n Press (TV/VIDEO) and
select the TV mode.
• The wireless remote batteries may be
exhausted.
• Press (AMEM) button for two seconds.
• The visual off function is working.
n Press (VOFF).
• Driving while the TV or video player is
on. n For safety, the picture will not
appear.
The wireless remote batteries may be
exhausted.

2
D
Danke, daß Sie sich für das mobile Farbfernsehgerät von Sony entschieden
haben.
• Mit diesem Gerät können Sie in Gebieten, in denen das CCIR-B/G-
System verwendet wird, zum Beispiel in Deutschland und
Großbritannien, Fernsehsendungen empfangen.
• An das Gerät können Sie PAL- und NTSC-Videowiedergabegeräte
anschließen.
• Der LCD-Bildschirm zeichnet sich durch einen besonders geringen
Reflexionsgrad aus, so daß das Bild auch bei hellem Umgebungslicht
fast blendfrei zu sehen ist.
• Die Bildhelligkeit können Sie von Hand auf das Umgebungslicht
einstellen.
• Das Gerät verfügt über eine Funktion zum Ausblenden des Bildes
(Visual-off-Funktion), so daß Sie die Möglichkeit haben, allein den Ton
einer Fernsehsendung oder eines Videos wiederzugeben.
• Mit Hilfe der Speicherautomatik können Sie bis zu 12 Sender speichern.
• Das Gerät verfügt über mehrere Ein- und Ausgänge, an die Sie ein
Videowiedergabegerät oder einen weiteren Monitor anschließen
können.
Willkommen!

3
D
Inhalt
Warnung und Sicherheitsmaßnahmen .............................................................. 4
Vorbereitungen
Auswählen einer Farbfernsehnorm................................................................. 5
Automatisches Speichern von Fernsehsendern (Speicherautomatik) ......... 6
Fernsehbetrieb........................................................................................................ 7
Videobetrieb ........................................................................................................... 8
Wiedergeben des Fernseh-/Videotons ohne Bild (Visual-off-Funktion) ......... 9
Einstellen der Bildqualität.................................................................................. 10
Einstellen der Bildhelligkeit............................................................................... 12
Lage der Teile und Bedienelemente ................................................................. 13
Weitere Informationen........................................................................................ 14
Technische Daten................................................................................................. 16
Störungsbehebung .............................................................................................. 17

4
D
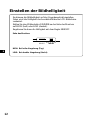
Warnung und
Sicherheitsmaßnahmen
Achtung
Verwenden Sie unter keinen Umständen eine Sicherung mit einem
höheren Ampere-Wert als dem der Sicherung, die ursprünglich mit
dem Gerät geliefert wurde. Andernfalls kann es zu Schäden am Gerät
kommen.
Austauschen der Sicherung
Wenn Sie eine Sicherung austauschen, achten Sie darauf, eine
Ersatzsicherung mit dem gleichen Ampere-Wert wie die
Originalsicherung zu verwenden. Dieser ist auf der Originalsicherung
angegeben. Wenn die Sicherung durchbrennt, überprüfen Sie den
Stromanschluß und tauschen Sie die Sicherung aus. Brennt die neue
Sicherung ebenfalls durch, kann eine interne Fehlfunktion vorliegen.
Wenden Sie sich in einem solchen Fall an Ihren Sony-Händler.
Sicherheitsmaßnahmen
• Montieren Sie den Monitor nicht an einer Stelle, an der er die Sicht
des Fahrers behindert.
• Berühren Sie während eines Unwetters nicht gleichzeitig die
Fernsehantenne und den Monitor. Andernfalls besteht die Gefahr
eines elektrischen Schlags.
• Wenn Sie das Fahrzeug längere Zeit in direktem Sonnenlicht
parken, kann die Temperatur im Wageninneren erheblich ansteigen.
Lassen Sie das Gerät in diesem Fall etwas abkühlen, bevor Sie es
einschalten.
Sollten an Ihrem Gerät Probleme auftreten oder sollten Sie Fragen
haben, auf die in dieser Anleitung nicht eingegangen wird, wenden
Sie sich bitte an Ihren Sony-Händler.
Sicherung
Seite laden ...
Seite laden ...
Seite laden ...
Seite laden ...
Seite laden ...
Seite laden ...
Seite laden ...
Seite laden ...
Seite laden ...
Seite laden ...
Seite laden ...
Seite laden ...
Seite laden ...
Seite laden ...
Seite laden ...
Seite laden ...
-
 1
1
-
 2
2
-
 3
3
-
 4
4
-
 5
5
-
 6
6
-
 7
7
-
 8
8
-
 9
9
-
 10
10
-
 11
11
-
 12
12
-
 13
13
-
 14
14
-
 15
15
-
 16
16
-
 17
17
-
 18
18
-
 19
19
-
 20
20
-
 21
21
-
 22
22
-
 23
23
-
 24
24
-
 25
25
-
 26
26
-
 27
27
-
 28
28
-
 29
29
-
 30
30
-
 31
31
-
 32
32
-
 33
33
-
 34
34
-
 35
35
-
 36
36


Sony XTL-6100 Bedienungsanleitung
- Kategorie
- LCD-Fernseher
- Typ
- Bedienungsanleitung
in anderen Sprachen
- English: Sony XTL-6100 Operating instructions