ZyXEL Communications 5 Benutzerhandbuch
- Kategorie
- Router
- Typ
- Benutzerhandbuch
Dieses Handbuch eignet sich auch für


ENGLISH
2
Overview
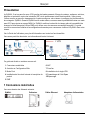
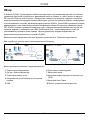
The ZyWALL 5 is a firewall with VPN, bandwidth management, content filtering, anti-spam, anti-virus, IDP
(Intrusion Detection and Protection) and many other features. You can use it as a transparent firewall and not
reconfigure your network nor configure the ZyWALL’s routing features. When the ZyWALL is in router mode,
you can also insert a 3G wireless card to add a second WAN. The ZyWALL increases network security by
adding the option to change port roles from LAN to DMZ for use with publicly accessible servers. This guide
covers the initial connections and configuration needed to start using the ZyWALL in your network.
See the User’s Guide for more information on all features.
You may need your Internet access information.
This guide is divided into the following sections.
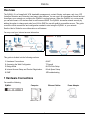
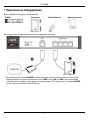
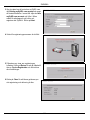
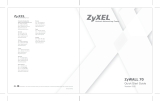
1 Hardware Connections
You need the following.
1 Hardware Connections
2 Accessing the Web Configurator
3 Bridge Mode
4 Internet Access Setup and Product Registration
5 DMZ
6 NAT
7 Firewall
8 VPN Rule Setup
9 Anti-Spam Setup
10Troubleshooting
ZyWALL Computer Ethernet Cables
Power Adaptor
ENGLISH

ENGLISH
3
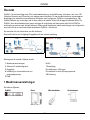
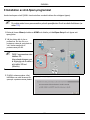
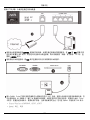
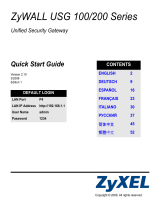
Do the following to make hardware connections for initial setup.
1 Use an Ethernet cable to connect the LAN/DMZ port to a computer. If you configure these ports as DMZ
ports in the LAN or DMZ screen through the web configurator, you can also use Ethernet cables to connect
public servers (web, e-mail, FTP, etc.) to the LAN/DMZ ports.
2 Use another Ethernet cable to connect the WAN port to an Ethernet jack with Internet access.
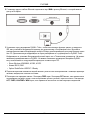
3 Insert the ZyWALL Turbo extension card to use the anti-virus and IDP features or insert a wireless LAN
card to use the wireless LAN feature. You can optionally insert a 3G wireless card to access the Internet
wirelessly via a 3G network. See the ZyWALL Turbo Card guide for more information about the extension
card. See the user’s guide about installing a wireless LAN card. At the time of writing, you can use the
following 3G wireless cards in the ZyWALL.
• Sierra Wireless AC850/860, AC595, AC875

ENGLISH
4
• Huawei E612, E620
• Option GlobeTrotter HSDPA 7.2 Ready
4 Use the included power adaptor to connect the power socket (on the rear panel) to a power outlet.
5 Look at the front panel. The PWR LED turns on. The SYS LED blinks while performing system testing and
then stays on if the testing is successful. The ACT, CARD, LAN/DMZ and WAN LEDs turn on and stay on
if the corresponding connections are properly made.
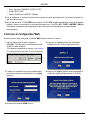
2 Accessing the Web Configurator
Use this section to configure the WAN 1 interface for Internet access.
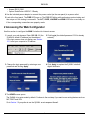
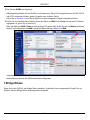
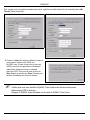
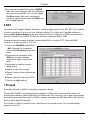
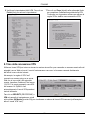
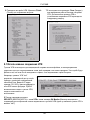
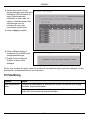
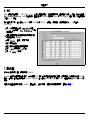
5 The HOME screen opens.
The ZyWALL is in router mode by default. Continue to the next step if you want to use routing features such as
NAT, DHCP and VPN.
Go to Section 3 if you prefer to use the ZyWALL as a transparent firewall.
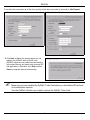
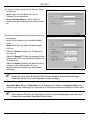
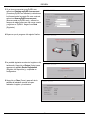
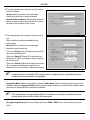
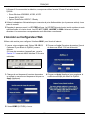
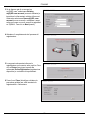
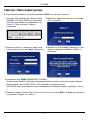
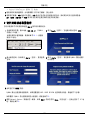
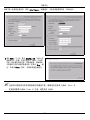
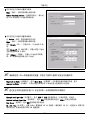
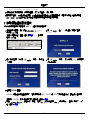
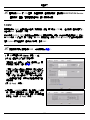
1 Launch your web browser. Enter 192.168.1.1 (the
ZyWALL’s default IP address) as the address.
If the login screen does not display, see Section
10.1 to set your computer’s IP address.
2 Click Login (the default password 1234 is already
entered).
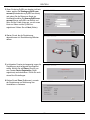
3 Change the login password by entering a new
password and clicking Apply.
4 Click Apply to replace the ZyWALL’s default
digital certificate.

ENGLISH
5
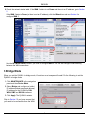
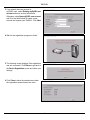
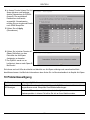
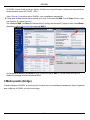
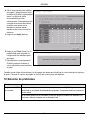
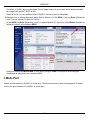
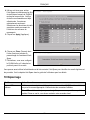
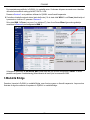
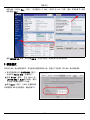
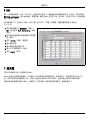
6 Check the network status table. If the WAN 1 status is not Down and there is an IP address, go to Section
5.
If the WAN 1 status is Down (or there is not an IP address), click the Wizard icon and use Section 4 to
configure WAN 1.
Use the NETWORK WAN screens if you need to configure WAN 2. You can also configure load balancing
between the WAN connections.
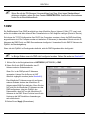
3 Bridge Mode
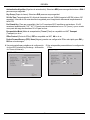
When you set the ZyWALL to bridge mode, it functions as a transparent firewall. Do the following to set the
ZyWALL to bridge mode.
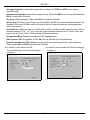
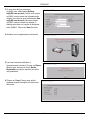
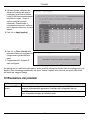
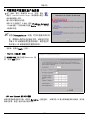
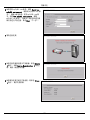
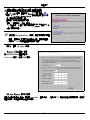
1 Click MAINTENANCE in the navigation
panel and then Device Mode.
2 Select Bridge and configure a (static)
IP address subnet mask and gateway
IP address for the ZyWALL’s LAN,
WAN, DMZ and WLAN interfaces.
3 Click Apply. The ZyWALL restarts.
Skip to Section 5 if you have servers that
you need to be accessible from the WAN.

ENGLISH
6
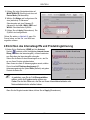
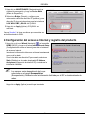
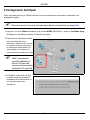
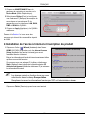
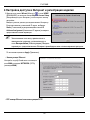
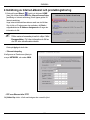
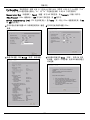
4 Internet Access Setup and Product Registration
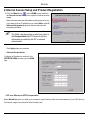
1 Click the Wizard icon ( ) in the HOME screen and then
the Internet Access Setup link to open the Internet access
wizard.
Enter the Internet access information exactly as given to you.
If you were given an IP address to use, select Static in the IP
Address Assignment drop-down list box and enter the
information provided.
" The fields vary depending on what you select in
the Encapsulation field. Fill them in with the
information provided by the ISP or network
administrator.
Click Apply when you are done.
• PPP over Ethernet or PPTP Encapsulation
Select Nailed-Up when you want your connection up all the time (this could be expensive if your ISP bills you
for Internet usage time instead of a flat monthly fee).
• Ethernet Encapsulation
Configure a Roadrunner service in the
NETWORK WAN screens (use the WAN
tab).

ENGLISH
7
To not have the connection up all the time, specify an idle time-out period (in seconds) in Idle Timeout.
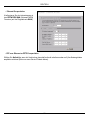
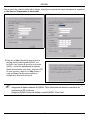
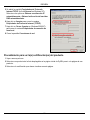
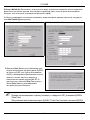
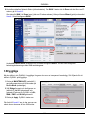
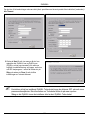
2 Click Next to display the screen where you can
register your ZyWALL with myZyXEL.com
(ZyXEL’s online services center) and activate the
free content filtering, anti-spam, anti-virus and IDP
trial applications. Otherwise, click Skip and then
Close to complete Internet access setup.
" Make sure you have installed the ZyWALL Turbo Card before you activate the IDP and anti-
virus subscription services.
Turn the ZyWALL off before you install or remove the ZyWALL Turbo Card.

ENGLISH
8
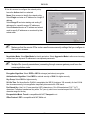
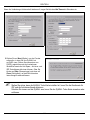
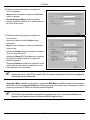
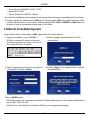
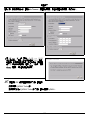
3 If you already have an account at
myZyXEL.com, select Existing myZyXEL.com
account and enter account information.
Otherwise, select New myZyXEL.com account
and fill in the fields below to create a new
account and register your ZyWALL. Click Next.
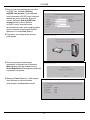
4 Wait for the registration progress to finish.
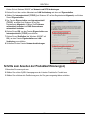
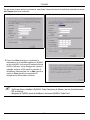
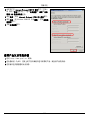
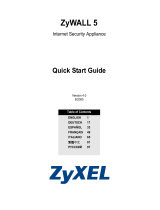
5 The following screen displays if the registration
was not successful. Click Return to go back to
the Device Registration screen and check your
settings.
6 Click Close to leave the wizard screen when
the registration and activation are done.

ENGLISH
9
" If you want to activate a standard service with your iCard’s PIN number (license key), use the
REGISTRATION Service screen. See the user’s guide for details.
5 DMZ
The DeMilitarized Zone (DMZ) allows public servers (web, e-mail, FTP, etc.) to be visible to the outside world
and still have firewall protection from DoS (Denial of Service) attacks.
You can assign TCP/IP configuration via DHCP to computers connected to the DMZ ports. Otherwise,
configure the computers with static IP addresses (in the same subnet as the DMZ port's IP address) and DNS
server addresses. Use the ZyWALL's DMZ IP address as the default gateway.
Do the following to configure the DMZ if the ZyWALL is in routing mode.
" You do not need to configure DMZ with bridge mode, skip to Section 7.
1 Click NETWORK > DMZ in the navigation panel.
2 Specify an IP address and subnet mask for the
DMZ interface.
If you use private IP addresses on the DMZ, use
NAT to make the servers publicly accessible (see
Section 6).
A public IP address must be on a separate subnet
from the WAN port’s public IP address. If you do
not configure NAT for the public IP addresses on
the DMZ, the ZyWALL routes traffic to the public IP
addresses on the DMZ without performing NAT.
This may be useful for hosting servers for NAT
unfriendly applications.
3 Click Apply.
4 By default, LAN/DMZ ports 1 to 4 are all LAN ports.
To configure a port as a DMZ port, click the Port
Roles tab, select its radio button next to DMZ and
click Apply.

ENGLISH
10
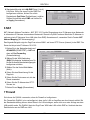
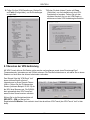
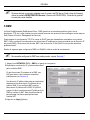
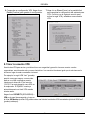
6 NAT
NAT (Network Address Translation - NAT, RFC 1631) means the translation of an IP address in one network
to a different IP address in another. You can use the NAT Address Mapping screens to have the ZyWALL
translate multiple public IP addresses to multiple private IP addresses on your LAN (or DMZ).
The following example allows access from the WAN1 to an HTTP (web) server on the DMZ. The server has a
private IP address of 10.0.0.20.
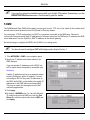
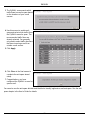
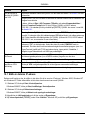
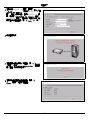
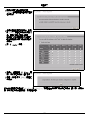
1 Click ADVANCED > NAT in the
navigation panel and then Port
Forwarding.
2 Select the WAN connection (WAN1) for
which you want to configure port
forwarding rules.
3 Select the Active check box.
4 Type a name for the rule.
5 Type the port number that the service
uses.
6 Type the HTTP server’s IP address.
7 Click Apply.
7 Firewall
You can use the ZyWALL without configuring the firewall.
The ZyWALL’s firewall is pre-configured to protect your LAN from attacks from the Internet. By default, no
traffic can enter your LAN unless a request was generated on the LAN first. The ZyWALL allows access to the
DMZ from the WAN or LAN, but blocks traffic from the DMZ to the LAN.
If you are using the ZyWALL in router mode, continue with the next section. For bridge mode, skip to Section
10.

ENGLISH
11
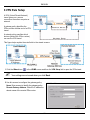
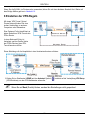
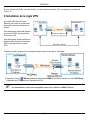
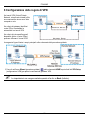
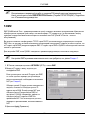
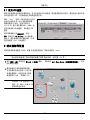
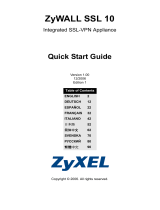
8 VPN Rule Setup
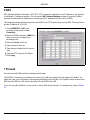
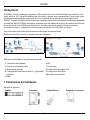
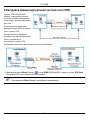
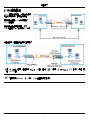
A VPN (Virtual Private Network)
tunnel gives you a secure
connection to another computer or
network.
A gateway policy identifies the
IPSec routers at either end of a VPN
tunnel.
A network policy specifies which
devices (behind the IPSec routers)
can use the VPN tunnel.
This figure helps explain the main fields in the wizard screens.
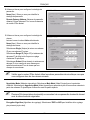
1 Click the Wizard icon ( ) in the HOME screen and then the VPN Setup link to open the VPN wizard.
" Your settings are not saved when you click Back.
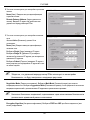
2 Use this screen to configure the gateway policy.
Name: Enter a name to identify the gateway policy.
Remote Gateway Address: Enter the IP address or
domain name of the remote IPSec router.

ENGLISH
12
3 Use this screen to configure the network policy.
Leave the Active check box selected.
Name: Enter a name to identify the network policy.
Select Single and enter an IP address for a single IP
address.
Select Range IP and enter starting and ending IP
addresses for a specific range of IP addresses.
Select Subnet and enter an IP address and subnet
mask to specify IP addresses on a network by their
subnet mask.
" Make sure that the remote IPSec router uses the same security settings that you configure in
the next two screens.
Negotiation Mode: Select Main Mode for identity protection. Select Aggressive Mode to allow more incoming
connections from dynamic IP addresses to use separate passwords.
" Multiple SAs (security associations) connecting through a secure gateway must have the
same negotiation mode.
Encryption Algorithm: Select 3DES or AES for stronger (and slower) encryption.
Authentication Algorithm: Select MD5 for minimal security or SHA-1 for higher security.
Key Group: Select DH2 for higher security.
SA Life Time: Set how often the ZyWALL renegotiates the IKE SA (minimum 180 seconds). A short SA life
time increases security, but renegotiation temporarily disconnects the VPN tunnel.
Pre-Shared Key: Use 8 to 31 case-sensitive ASCII characters or 16 to 62 hexadecimal ("0-9", "A-F")
characters. Precede a hexadecimal key with a "0x” (zero x), which is not counted as part of the 16 to 62
character range for the key.
Encapsulation Mode: Tunnel is compatible with NAT, Transport is not.
IPSec Protocol: ESP is compatible with NAT, AH is not.

ENGLISH
13
Perfect Forward Secrecy (PFS): None allows faster IPSec setup, but DH1 and DH2 are more secure.
8.1 Using the VPN Connection
Use VPN tunnels to securely send and retrieve files, and allow remote access to corporate networks, web
servers and e-mail. Services work as if you were at the office instead of connected through the Internet.
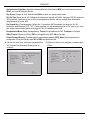
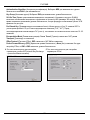
4 Use this screen to configure IKE (Internet Key
Exchange) tunnel settings.
5 Use this screen to configure IPSec settings.
6 Check your VPN settings. Click Finish to save the
settings.
7 Click Close in the final screen to complete the
VPN wizard setup. Continue with the next section
to activate the VPN rule and establish a VPN
connection.

ENGLISH
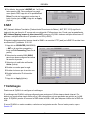
14
For example, the “test” VPN rule allows
secure access to an web server on a
remote corporate LAN. Enter the server’s
IP address (10.0.0.23 in this example) as
your browser’s URL. The ZyWALL
automatically builds the VPN tunnel when
you attempt to use it.
Click SECURITY > VPN in the navigation
panel and then the SA Monitor tab to
display a list of connected VPN tunnels
(the “test” VPN tunnel is up here).
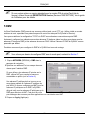
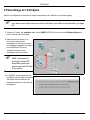
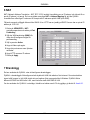
9 Anti-Spam Setup
Use anti-spam to have the ZyWALL check for unsolicited commercial or junk e-mail (spam).
" You must have already subscribed to the anti-spam service to use the feature (see page 6).
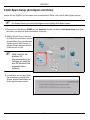
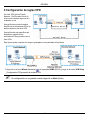
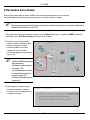
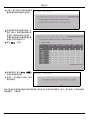
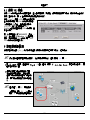
1 Click the Wizard icon in the HOME screen and then Anti-Spam Setup to open the anti-spam wizard.
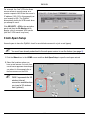
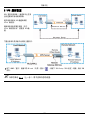
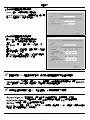
2 Select the locations where you
have e-mail servers. An icon of an
e-mail server appears at each spot
you select. In this example the e-
mail servers are on the LAN.
" WAN 2 represents the 3G
wireless Internet
connection available when
you insert a 3G wireless
card (optional).

ENGLISH
15
You can also use the anti-spam whitelist and blacklist to identify legitimate e-mail and spam. See the anti-
spam chapter in the User’s Guide for details.
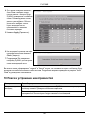
3 The ZyWALL recommends which
traffic flows to scan for spam based
on the locations of your e-mail
servers.
4 Use this screen to enable anti-
spam and select which traffic flows
the ZyWALL scans for spam. The
recommended traffic flows are
already selected. You generally
only need to select traffic directions
that have incoming e-mail from
outside e-mail servers.
5 Click Apply.
6 Click Close in the final screen to
complete the anti-spam wizard
setup.
7 Congratulations, you have
configured the ZyWALL to scan for
spam e-mail.

ENGLISH
16
10 Troubleshooting
10.1 Set Up Your Computer’s IP Address
This section shows you how to set up your computer to receive an IP address in Windows 2000, Windows NT
and Windows XP. This is ensures that your computer can communicate with your ZyWALL.
1 In Windows XP, click Start, Control Panel.
In Windows 2000/NT, click Start, Settings, Control Panel.
2 In Windows XP, click Network Connections.
In Windows 2000/NT, click Network and Dial-up Connections.
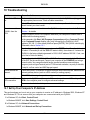
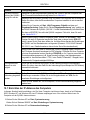
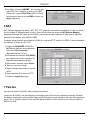
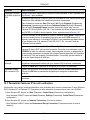
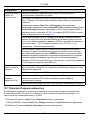
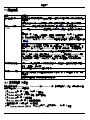
Problem Corrective Action
None of the LEDs turn
on.
Make sure that you have the power adaptor connected to the ZyWALL and plugged in to
an appropriate power source. Check all cable connections.
If the LEDs still do not turn on, you may have a hardware problem. In this case, you
should contact your local vendor.
Cannot access the
ZyWALL from the
LAN.
Check the cable connection between the ZyWALL and your computer or hub. Refer to
Section 1 for details.
Ping the ZyWALL from a LAN computer. Make sure your computer’s Ethernet card is
installed and functioning properly.
In the computer, click Start, (All) Programs, Accessories and then Command Prompt.
In the Command Prompt window, type "ping" followed by the ZyWALL’s LAN IP
address (192.168.1.1 is the default) and then press [ENTER]. The ZyWALL should reply.
Otherwise, refer to Section 10.1.
If you’ve forgotten the ZyWALL’s password, use the RESET button. Press the button in
for about 10 seconds (or until the SYS LED starts to blink), then release it. It returns the
ZyWALL to the factory defaults (password is 1234, LAN IP address 192.168.1.1 etc.; see
your User’s Guide for details).
If you’ve forgotten the ZyWALL’s LAN or WAN IP address, you can check the IP address
in the SMT via the console port. Connect your computer to the CONSOLE port using a
console cable. Your computer should have a terminal emulation communications
program (such as HyperTerminal) set to VT100 terminal emulation, no parity, 8 data bits,
1 stop bit, no flow control and 9600 bps port speed.
Cannot access the
Internet.
Check the ZyWALL’s connection to the Ethernet jack with Internet access. Make sure the
Internet gateway device (such as a DSL modem) is working properly.
Click WAN in the navigation panel to verify your settings.
Cannot establish a
VPN connection
Make sure the ZyWALL and the remote IPSec router use the same VPN settings. Click
VPN in the navigation panel to configure advanced settings.
Access a web site to check that you have a successful Internet connection.

ENGLISH
17
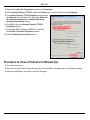
3 Right-click Local Area Connection and then click Properties.
4 Select Internet Protocol (TCP/IP) (under the General tab in Windows XP) and click Properties.
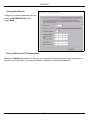
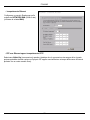
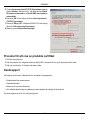
5 The Internet Protocol TCP/IP Properties screen opens
(the General tab in Windows XP). Select the Obtain an
IP address automatically and Obtain DNS server
address automatically options.
6 Click OK to close the Internet Protocol (TCP/IP)
Properties window.
7 Click Close (OK in Windows 2000/NT) to close the
Local Area Connection Properties window.
8 Close the Network Connections screen.
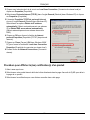
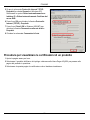
Procedure to View a Product’s Certification(s)
1 Go to www.zyxel.com.
2 Select your product from the drop-down list box on the ZyXEL home page to go to that product's page.
3 Select the certification you wish to view from this page.

DEUTSCH
18
Übersicht
Die ZyWALL 5 ist eine Firewall mit VPN, Bandbreitenmanagement, Content Filtering, Anti-Spam, Anti-Virus,
IDP (Intrusion Detection and Protection) und vielen anderen Funktionen. Sie können sie als transparente
Firewall verwenden, ohne das Netzwerk neu zu konfigurieren und die Routingfunktionen des Geräts zu
konfigurieren. Wenn sich der ZyWALL im Router-Modus befindet, können Sie auch eine 3G-Wireless-Card
einsetzen, um ein zweites WAN hinzuzufügen. Die ZyWALL bietet die Möglichkeit, bei der Benutzung öffentlich
zugänglicher Server die Portfunktionen zu wechseln (LAN zu DMZ) und erhöht damit die Netzwerksicherheit.
In dieser Anleitung finden Sie eine Beschreibung der Anschlüsse und der Konfiguration, die notwendig ist,
damit Sie die ZyWALL in Ihrem Netzwerk verwenden können.
Eine ausführliche Beschreibung aller Funktionen finden Sie im Benutzerhandbuch.
Bitte halten Sie die Daten für Ihren Internetzugang bereit.
Diese Anleitung ist in die folgenden Abschnitte aufgeteilt.
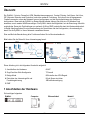
1 Anschließen der Hardware
Sie benötigen folgendes:
1 Anschließen der Hardware
2 Zugriff auf den Web-Konfigurator
3 Bridge Mode
4 Einrichten des Internetzugriffs und
Produktregistrierung
5 DMZ
6 NAT
7 Firewall
8 Einstellen der VPN-Regeln
9 Anti-Spam einrichten
10Problembeseitigung
ZyWALL Computer Ethernetkabel
Netzteil
DEUTSCH

DEUTSCH
19
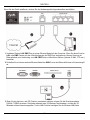
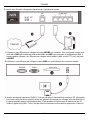
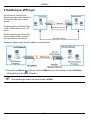
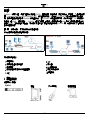
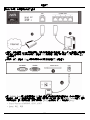
Wenn Sie das Gerät installieren, müssen Sie die Hardwaregeräte folgendermaßen anschließen.
1 Verbinden Sie den LAN-/DMZ-Port mit einem Ethernet-Kabel mit dem Computer. Wenn Sie diese Ports im
LAN- oder DMZ-Fenster mit dem Web-Konfigurator als DMZ-Ports konfigurieren, können Sie auch mit
Ethernetkabeln eine Verbindung von LAN-/DMZ-Ports zu öffentlichen Servern (Internet, E-Mail, FTP usw.)
herstellen.
2 Schließen Sie mit einem anderen Ethernet-Kabel den WAN-Port an die Ethernet-Buchse mit Internetzugriff
an.
3 Wenn Sie die Antiviren- und IDP-Funktion verwenden möchten, müssen Sie die Erweiterungskarte
ZyWALL TURBO einsetzen. Sie können alternativ eine 3G-Wireless-Card einsetzen, um über ein 3G-
Netzwerk auf das Internet zuzugreifen. Fur die LAN-Funktion benötigen Sie die Wireless LAN-Karte.

DEUTSCH
20
Weitere Informationen zu den Erweiterungskarten erhalten Sie in der Bedienungsanleitung der ZyWALL
Turbo Karte. Eine Installationsanleitung fur eine Wireless LAN-Karte finden Sie im Benutzerhandbuch.
Zum Zeitpunkt der Drucklegung können Sie ZyWALL die folgenden 3G-Wireless-Cards verwenden.
• Sierra Wireless AC850/860, AC595, AC875
• Huawei E612, E620
• Option GlobeTrotter HSDPA 7.2 Ready
4 Schließen Sie das mitgelieferte Netzteil an der Rückseite der ZyWALL an.
5 Kontrollieren Sie den Systemstart mittels der LEDs an der Frontseite. Die PWR-LED beginnt zu leuchten.
Während des Systemtests blinkt die SYS-LED. Wurde der Test erfolgreich abgeschlossen, bleibt diese
Anzeige an. Die LEDs ACT, CARD, LAN/DMZ und WAN beginnen zu leuchten und bleiben an, wenn die
entsprechenden Verbindungen richtig hergestellt wurden.
2 Zugriff auf den Web-Konfigurator
In diesem Abschnitt wird beschrieben, wie die WAN 1-Schnittstelle für den Internetzugriff konfiguriert wird.
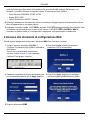
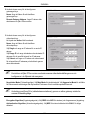
1 Starten Sie Ihren Internetbrowser. Geben Sie als
Adresse 192.168.1.1 (die Standard IP-Adresse der
ZyWALL) ein.
Wenn das Loginfenster nicht angezeigt wird, lesen
Sie in Abschnitt 10.1 nach, wie Sie die IP-Adresse
Ihres Computers einstellen können.
2 Klicken Sie auf Login (Einloggen) (das
Standardpasswort 1234 ist bereits vorgegeben).
3 Ändern Sie das Passwort, indem Sie ein neues
Passwort eingeben und auf Apply (Übernehmen)
klicken.
4 Klicken Sie auf Apply (Übernehmen), um das
Standarddigitalzertifikat der ZyWALL zu ersetzen.
Seite wird geladen ...
Seite wird geladen ...
Seite wird geladen ...
Seite wird geladen ...
Seite wird geladen ...
Seite wird geladen ...
Seite wird geladen ...
Seite wird geladen ...
Seite wird geladen ...
Seite wird geladen ...
Seite wird geladen ...
Seite wird geladen ...
Seite wird geladen ...
Seite wird geladen ...
Seite wird geladen ...
Seite wird geladen ...
Seite wird geladen ...
Seite wird geladen ...
Seite wird geladen ...
Seite wird geladen ...
Seite wird geladen ...
Seite wird geladen ...
Seite wird geladen ...
Seite wird geladen ...
Seite wird geladen ...
Seite wird geladen ...
Seite wird geladen ...
Seite wird geladen ...
Seite wird geladen ...
Seite wird geladen ...
Seite wird geladen ...
Seite wird geladen ...
Seite wird geladen ...
Seite wird geladen ...
Seite wird geladen ...
Seite wird geladen ...
Seite wird geladen ...
Seite wird geladen ...
Seite wird geladen ...
Seite wird geladen ...
Seite wird geladen ...
Seite wird geladen ...
Seite wird geladen ...
Seite wird geladen ...
Seite wird geladen ...
Seite wird geladen ...
Seite wird geladen ...
Seite wird geladen ...
Seite wird geladen ...
Seite wird geladen ...
Seite wird geladen ...
Seite wird geladen ...
Seite wird geladen ...
Seite wird geladen ...
Seite wird geladen ...
Seite wird geladen ...
Seite wird geladen ...
Seite wird geladen ...
Seite wird geladen ...
Seite wird geladen ...
Seite wird geladen ...
Seite wird geladen ...
Seite wird geladen ...
Seite wird geladen ...
Seite wird geladen ...
Seite wird geladen ...
Seite wird geladen ...
Seite wird geladen ...
Seite wird geladen ...
Seite wird geladen ...
Seite wird geladen ...
Seite wird geladen ...
Seite wird geladen ...
Seite wird geladen ...
Seite wird geladen ...
Seite wird geladen ...
Seite wird geladen ...
Seite wird geladen ...
Seite wird geladen ...
Seite wird geladen ...
Seite wird geladen ...
Seite wird geladen ...
Seite wird geladen ...
Seite wird geladen ...
Seite wird geladen ...
Seite wird geladen ...
Seite wird geladen ...
Seite wird geladen ...
Seite wird geladen ...
Seite wird geladen ...
Seite wird geladen ...
Seite wird geladen ...
Seite wird geladen ...
Seite wird geladen ...
Seite wird geladen ...
Seite wird geladen ...
Seite wird geladen ...
Seite wird geladen ...
Seite wird geladen ...
Seite wird geladen ...
Seite wird geladen ...
Seite wird geladen ...
Seite wird geladen ...
Seite wird geladen ...
Seite wird geladen ...
Seite wird geladen ...
Seite wird geladen ...
Seite wird geladen ...
Seite wird geladen ...
Seite wird geladen ...
Seite wird geladen ...
Seite wird geladen ...
Seite wird geladen ...
Seite wird geladen ...
Seite wird geladen ...
Seite wird geladen ...
Seite wird geladen ...
Seite wird geladen ...
Seite wird geladen ...
Seite wird geladen ...
Seite wird geladen ...
Seite wird geladen ...
Seite wird geladen ...
Seite wird geladen ...
Seite wird geladen ...
Seite wird geladen ...
Seite wird geladen ...
Seite wird geladen ...
Seite wird geladen ...
Seite wird geladen ...
Seite wird geladen ...
Seite wird geladen ...
Seite wird geladen ...
Seite wird geladen ...
Seite wird geladen ...
Seite wird geladen ...
Seite wird geladen ...
-
 1
1
-
 2
2
-
 3
3
-
 4
4
-
 5
5
-
 6
6
-
 7
7
-
 8
8
-
 9
9
-
 10
10
-
 11
11
-
 12
12
-
 13
13
-
 14
14
-
 15
15
-
 16
16
-
 17
17
-
 18
18
-
 19
19
-
 20
20
-
 21
21
-
 22
22
-
 23
23
-
 24
24
-
 25
25
-
 26
26
-
 27
27
-
 28
28
-
 29
29
-
 30
30
-
 31
31
-
 32
32
-
 33
33
-
 34
34
-
 35
35
-
 36
36
-
 37
37
-
 38
38
-
 39
39
-
 40
40
-
 41
41
-
 42
42
-
 43
43
-
 44
44
-
 45
45
-
 46
46
-
 47
47
-
 48
48
-
 49
49
-
 50
50
-
 51
51
-
 52
52
-
 53
53
-
 54
54
-
 55
55
-
 56
56
-
 57
57
-
 58
58
-
 59
59
-
 60
60
-
 61
61
-
 62
62
-
 63
63
-
 64
64
-
 65
65
-
 66
66
-
 67
67
-
 68
68
-
 69
69
-
 70
70
-
 71
71
-
 72
72
-
 73
73
-
 74
74
-
 75
75
-
 76
76
-
 77
77
-
 78
78
-
 79
79
-
 80
80
-
 81
81
-
 82
82
-
 83
83
-
 84
84
-
 85
85
-
 86
86
-
 87
87
-
 88
88
-
 89
89
-
 90
90
-
 91
91
-
 92
92
-
 93
93
-
 94
94
-
 95
95
-
 96
96
-
 97
97
-
 98
98
-
 99
99
-
 100
100
-
 101
101
-
 102
102
-
 103
103
-
 104
104
-
 105
105
-
 106
106
-
 107
107
-
 108
108
-
 109
109
-
 110
110
-
 111
111
-
 112
112
-
 113
113
-
 114
114
-
 115
115
-
 116
116
-
 117
117
-
 118
118
-
 119
119
-
 120
120
-
 121
121
-
 122
122
-
 123
123
-
 124
124
-
 125
125
-
 126
126
-
 127
127
-
 128
128
-
 129
129
-
 130
130
-
 131
131
-
 132
132
-
 133
133
-
 134
134
-
 135
135
-
 136
136
-
 137
137
-
 138
138
-
 139
139
-
 140
140
-
 141
141
-
 142
142
-
 143
143
-
 144
144
-
 145
145
-
 146
146
-
 147
147
-
 148
148
-
 149
149
-
 150
150
-
 151
151
-
 152
152
-
 153
153
-
 154
154
-
 155
155
-
 156
156
-
 157
157


ZyXEL Communications 5 Benutzerhandbuch
- Kategorie
- Router
- Typ
- Benutzerhandbuch
- Dieses Handbuch eignet sich auch für
in anderen Sprachen
- français: ZyXEL Communications 5 Manuel utilisateur
- español: ZyXEL Communications 5 Manual de usuario
- italiano: ZyXEL Communications 5 Manuale utente
Verwandte Artikel
-
 ZyXEL Communications ZyWALL 2 Plus Schnellstartanleitung
-
 ZyXEL Communications ZYWALL 70 UTM Bedienungsanleitung
-
 ZyXEL Communications 70 Benutzerhandbuch
-
 ZyXEL Communications P1 Benutzerhandbuch
-
 ZyXEL Communications Network Card 70 Benutzerhandbuch
-
 ZyXEL Communications ZYWALL USG 200 Bedienungsanleitung
-
 ZyXEL Communications SSL 10 Benutzerhandbuch
-
 ZyXEL Communications ZyWALL USG-1000 Benutzerhandbuch
-
ZyXEL Communications ZyWALL 1050 Benutzerhandbuch
-
 ZyXEL Communications ZYWALL USG 300 Bedienungsanleitung


