Easypix MovieCam SD-III Benutzerhandbuch

Kategorie
Camcorder
Typ
Benutzerhandbuch

Dieses Handbuch ist auch geeignet für

Preparing Your Camera
Getting Started
Digital Video Mode
Digital Camera Mode
Voice Recording Mode
Playback Mode
MP3 Mode
Camera Settings
TV Output
Copying Files to PC
Using PC Camera
Users Manual
MovieCam SD III
English
Safety Notice
1. Do not drop, puncture or disassemble the camera; otherwise the warranty will be voided.
2. Avoid all contact with water and dry hands before using.
3. Do not expose the camera to high temperature or leave it in direct sunlight. Doing so may
damage the camera.
4. Use the camera with care. Avoid pressing hard on the camera body.
5. For your own safety, avoid using the camera when there is a storm or lightning.
6. Avoid using batteries of different brands or types at the same time. There is potential of
explosion by doing that.
7. Remove batteries during long periods between usage, as deteriorated batteries may affect
the functionality of the camera.
8. Remove batteries if they show signs of leaking or distortion.
9. Use only the accessories supplied by the manufacturer.
10. Keep the camera out of the reach of children.
~ 1 ~
Welcome
Dear user, thanks for purchasing this product.
Much investment in time and effort has gone into its development,
and it is our hope that it will give you many years of trouble-free service.
~ 2 ~
Users guide
Camera
Driver CD
USB cable
AV cable
AA Alkaline
batteries x 4
Tripod
Bag
Wrist Strap
Earphone
Package Contents
Microphone
Back LED
Shutter/Record Button
Direction Buttons
OK Button
Menu Button
Wrist Strap Hook
SD/MMC Card Slot
Video-out Connector
USB Connector
Earphone Connector
Speaker
LCD Panel
LCD On/Off Detector
Flash Strobe
Lens
Lens Cover
Front LED
Battery Cover
Focus Switch
Power On/Off Button
Mode Switch
Tripod Socket
~ 3 ~
Camera Parts
Loading the batteries
Your camera runs on four AA alkaline batteries. High
performance batteries are recommended for this camera
for maximum battery life.
Preparing Your Camera
1. Slide the battery compartment
cover open in the direction as
indicated.
2. Place the batteries into the compartment. Note that
the positive and negative ends cannot be reversed.
3. After the batteries are properly
installed, replace the battery
compartment cover.
Preparing Your Camera
~ 4 ~
~ 5 ~
Inserting the SD/MMC card (optional)
The SD card comes with a write-protect switch. When the
write-protect switch is set to the Lock position, the card
will become non-writable. To ensure that the camera can
operate normally, you should set the write-protect switch
to the Unlock position before inserting the SD card.
In addition to 16MB (128Mbits) built-in flash memory, your
camera can store data on a Secure Digital (SD) card or a
MultiMedia card (MMC). The supported memory size
ranges from 8MB to 256MB.
To insert a SD/MMC card, gently push the card as
indicated until the card reaches the end of the slot. Note
that once a SD/MMC card is inserted, the camera will use
the card as the main storage media. Files stored in the
camera's built-in memory will become inaccessible until
the SD/MMC card is removed.
To remove the SD/MMC card, gently push the card. After the
card pops up, pull the card out of the slot.
Do not remove the SD/MMC card while the camera is
processing data (when the LED is flashing).
If you insert a write-protected card, the media icon on the
LCD display will become red.
Unlock
Lock
Preparing Your Camera
Attaching the wrist strap
Please unfasten and separate the strap into two parts. To
attach the wrist strap to the camera, thread the strap
through the hook on the side of the camera, and then the
one on the bottom part. After threading the strap, fasten
the strap and then use the leather wrap to hold the strap.
~ 6 ~
How to hold your camera
Please put your hand through the wrist strap and firmly
hold the camera as illustrated. While taking stills or
recording AVI movies, avoid blocking the lens to retain
the best result.
Preparing Your Camera
Avoid blocking the lens.
Using the bag
The accessory bag comes handy if you are planning to
carry the camera with you while you are travelling around.
Simply put the camera into the bag as indicated, and you
are ready to carry the camera with you.
~ 7 ~
Using the tripod
Use a tripod to minimize camera movement and ensure
optimal image quality, especially while shooting self-
portraits or video conferencing.
Preparing Your Camera
Avoid severe impact to the camera body even it is placed in
the bag.
Tight
Loose
Turning on your camera
Getting Started
Press and hold down the power button for 2 ~ 3 seconds
to turn on the camera.
If the camera is not turned on after pressing the power
button, please check:
1. There are four AA batteries installed in the camera.
2. The batteries have enough power left.
You can turn on the camera without opening the LCD panel.
Please open the lens cover if you are going to use the digital
video or camera function.
Turning off your camera
Press and hold down the power button for 2 ~ 3 seconds
to turn off the camera.
Getting Started
The LED will light up.
The LED will go out.
~ 8 ~
Setting the date and time
When you power on the camera for the first time, you
need to set up the date and time:
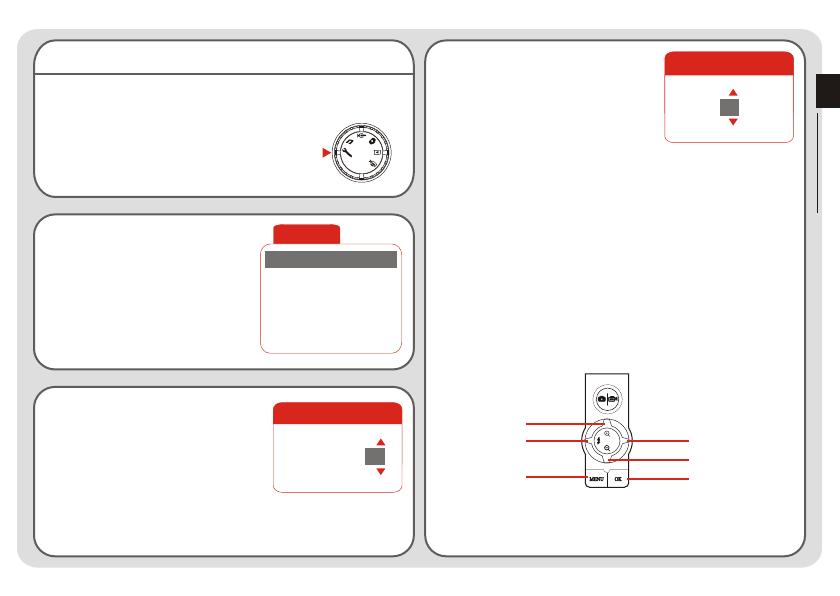
1. Set the Mode Switch to Setting mode.
2. Press the Up or Down button
to highlight Date, and then
press the OK button or the
Right button to enter the
sub-menu.
Date
2003 / 01 / 01
3. Press the Left or Right button
to move the cursor. Press the
Up or Down button to change
the value. After the correct date
has been set up, press the OK
button to confirm the setting.
Time
12 : 00 : 00
4. Repeat step 2 and enter the
Time sub-menu. Use the same
method described in step 3 to
set time. Note that the second
digits are not adjustable. After
the correct time has been set up,
press the OK button to confirm
the setting.
Getting Started
Setting
Beep
ON
ON
Boot-up
Auto Off
10m
Date
03/01/01
Tim e
12:00
While operating the camera, pressing the Menu button can
bring up a sub-menu under most circumstances. The menu
items vary according to the mode you select. When a sub-
menu is being shown on the screen, you can use the
illustrated function buttons to make your selection.
Cancel
Move Cursor Up
Move Cursor Down
Cancel/Exit
Confirm
Confirm
~ 9 ~
Tips for best shooting
Keep the focus set to except for close-ups.
Make sure your subject is well lit from the front.
Keep the camera level and steady when releasing the
shutter.
Make sure you have adequate light when taking stills
or recording AVI movies.
For stable and
smooth image
quality, move the
camera slowly
during filming.
The LCD display varies according to the operation mode.
However, you can easily check the media type and power
status on the LCD display.
Checking the media and power status
Getting Started
Storage media indicator:
: The camera is using the built-in memory for file
storage.
: The camera is using a SD card for file storage.
: The camera is using a MMC card for file storage.
Power status indicator:
: Full battery life.
: Adequate battery life.
: Low battery life.
: Empty battery life. Please replace the batteries
immediately when the icon is flashing red.
When the camera is using a SD/MMC card as main storage
media, files stored in the camera's built-in memory will
become inaccessible until the card is removed.
For details under different modes, please refer to the
respective chapters.
Make sure you have adequate light
~ 10 ~
The following chart is estimated based on a 64MB SD card. Actual capacity
may vary (up to +5%) depending on the environment and color condition.
Storage capacity chart
Getting Started
~ 11 ~
LCD display
Digital Video (DV) Mode
Digital Video Mode
Fine
1. 00 06:20
00:00
QVGA
DV mode indicator
Recording indicator
Recording time lapse
Image resolution
Image quality
Battery life indicator
Storage media type
Remaining capacity (mm:ss)
Zoom ratio
~ 12 ~
Recording an AVI movie
Digital Video Mode
1. Set the Mode Switch to Digital Video
mode.
2. Press the Shutter/Record button to start recording.
Shutter/Record button
4. Press the Shutter/Record button again to stop
recording.
3. While recording, you can press the Up or Down
button to zoom in/out the screen.
Second
Minute
Fine
1. 00 260
00:00
QVGA
Recording
indicator
To review the recorded AVI movies, switch the camera to
Playback mode and play the AVI clips. Please refer to
Chapter 6 for more information.
~ 13 ~
Digital Video Mode
DV menu
While in Digital Video mode,
press the Menu button to bring
up the DV menu.
The following table illustrates all items and their functions.
DV
Video
VGA
Display
ON
Start/Stop Recording
Zoom In
Zoom Out
DV Menu
Function buttons
The following function buttons are available while the
camera is in Digital Video mode:
~ 14 ~
LCD display
Digital Camera Mode
Digital Camera Mode
Fine
2601. 00
EV+1
1280
Digital Camera mode indicator
Self-timer indicator
Flash indicator
White balance indicator
Image resolution
Image quality
Battery life indicator
Storage media type
Remaining capacity (pic.)
Exposure compensation value
Zoom ratio
~ 15 ~
Taking a still
1. Set the Mode Switch to Digital
Camera mode.
4. Press the Shutter/Record button to take a still.
3. Before shooting, you can press the Up or Down
button to adjust the zoom ratio.
2. Use the Focus Switch to set focus as appropriate.
12"~16" (30cm~40cm)
16"~ (40cm~ )
Shutter/Record button
~ 16 ~
Digital Camera Mode
Using the flash strobe
When the lighting is not sufficient for your shooting
environment, the flash can provide the extra light you
need.
Using the hot button
While in Digital Camera mode, pressing the Left button
allows you to switch the flash mode without entering the
options menu.
Pressing the hot button can cycle through three flash
modes - Auto, Force, Off.
Auto mode ( ): When the flash is set to Auto mode,
the camera will automatically measure the lighting
condition, and the flash will be activated if needed.
A
Force mode ( ): When the flash is set to Force
mode, the flash always fires no matter how the lighting
condition is.
Off (no icon): The flash will not function when it is set
to Off.
When the battery power is low (with only one gauge left), the
flash strobe cannot be activated due to insufficient power for
recharge.
While the flash is being recharged, you cannot press the
shutter button to take pictures.
~ 17 ~
Digital Camera Mode
Setting white balance
Under certain conditions, you may need to manually
select the white balance setting to take pictures with the
correct color balance.
Using the hot button
While in Digital Camera mode, pressing the Right button
allows you to change the white balance setting without
entering the options menu.
Pressing the hot button can cycle through five settings -
Auto, Sunny, Cloudy, Fluorescent, and Tungsten.
Auto (no icon): The camera will measure the color
temperature and make adjustments automatically.
Sunny ( ): Suitable for shooting outdoors in good
weather.
Cloudy ( ): Suitable for shooting under shades or
cloudy weather.
Fluorescent ( ): Suitable for shooting environment
with fluorescent light.
Tungsten ( ): Suitable for shooting environment
with incandescent light.
White balance:
When the human eye sees an object, it adapts to the object
so that a white object always looks white. However, a digital
camera sees an object as white by adjusting the color
balance of the lighting condition. This process is called
matching the white balance.
~ 18 ~
Digital Camera Mode
Using the self-timer
1. While in Digital Camera mode, press the Menu button
to bring up the Camera menu.
2. Highlight the SelfTimer item,
and then select ON in the
sub-menu. Then press the
Menu button to exit.
2. Highlight the Exposure item,
and then select a desired EV
value in the sub-menu. The
larger the number is, the
brighter the stills will be.
3. When the Shutter/Record button is pressed, the
camera will have ten seconds delay before taking a
picture. After the shutter fires, the SelfTimer will be
automatically disabled.
10
Setting exposure compensation
Setting the EV value enables you to manually control the
brightness of the taken stills.
Camera
Strobe
AUTO
2M
ImageSize
SelfTimer
ON
DateSt amp
OFF
Display
OFF
1. Press the Menu button to bring up the Camera menu.
Highlight the Camera tab, and press the Right button
to select the Advanced tab.
Quality
Fine
0
Exposure
Advanced
WB
AUTO
Setting the value too high may cause the pictures to appear
over-exposed.
~ 19 ~
Digital Camera Mode
  • Page 1 1
  • Page 2 2
  • Page 3 3
  • Page 4 4
  • Page 5 5
  • Page 6 6
  • Page 7 7
  • Page 8 8
  • Page 9 9
  • Page 10 10
  • Page 11 11
  • Page 12 12
  • Page 13 13
  • Page 14 14
  • Page 15 15
  • Page 16 16
  • Page 17 17
  • Page 18 18
  • Page 19 19
  • Page 20 20
  • Page 21 21
  • Page 22 22
  • Page 23 23
  • Page 24 24
  • Page 25 25
  • Page 26 26
  • Page 27 27
  • Page 28 28
  • Page 29 29
  • Page 30 30
  • Page 31 31
  • Page 32 32
  • Page 33 33
  • Page 34 34
  • Page 35 35
  • Page 36 36
  • Page 37 37
  • Page 38 38
  • Page 39 39
  • Page 40 40
  • Page 41 41
  • Page 42 42
  • Page 43 43
  • Page 44 44
  • Page 45 45
  • Page 46 46
  • Page 47 47
  • Page 48 48
  • Page 49 49
  • Page 50 50
  • Page 51 51
  • Page 52 52
  • Page 53 53
  • Page 54 54
  • Page 55 55
  • Page 56 56
  • Page 57 57
  • Page 58 58
  • Page 59 59
  • Page 60 60
  • Page 61 61
  • Page 62 62
  • Page 63 63
  • Page 64 64
  • Page 65 65
  • Page 66 66
  • Page 67 67
  • Page 68 68
  • Page 69 69
  • Page 70 70
  • Page 71 71
  • Page 72 72
  • Page 73 73
  • Page 74 74
  • Page 75 75
  • Page 76 76
  • Page 77 77
  • Page 78 78
  • Page 79 79
  • Page 80 80
  • Page 81 81
  • Page 82 82
  • Page 83 83
  • Page 84 84
  • Page 85 85
  • Page 86 86
  • Page 87 87
  • Page 88 88
  • Page 89 89
  • Page 90 90
  • Page 91 91
  • Page 92 92
  • Page 93 93
  • Page 94 94
  • Page 95 95
  • Page 96 96
  • Page 97 97
  • Page 98 98
  • Page 99 99
  • Page 100 100
  • Page 101 101
  • Page 102 102
  • Page 103 103
  • Page 104 104
  • Page 105 105
  • Page 106 106
  • Page 107 107
  • Page 108 108
  • Page 109 109
  • Page 110 110
  • Page 111 111
  • Page 112 112
  • Page 113 113
  • Page 114 114
  • Page 115 115
  • Page 116 116
  • Page 117 117
  • Page 118 118
  • Page 119 119
  • Page 120 120
  • Page 121 121
  • Page 122 122
  • Page 123 123
  • Page 124 124
  • Page 125 125
  • Page 126 126
  • Page 127 127
  • Page 128 128
  • Page 129 129
  • Page 130 130
  • Page 131 131
  • Page 132 132
  • Page 133 133
  • Page 134 134
  • Page 135 135
  • Page 136 136
  • Page 137 137
  • Page 138 138
  • Page 139 139
  • Page 140 140
  • Page 141 141
  • Page 142 142
  • Page 143 143
  • Page 144 144
  • Page 145 145
  • Page 146 146
  • Page 147 147
  • Page 148 148
  • Page 149 149
  • Page 150 150
  • Page 151 151
  • Page 152 152
  • Page 153 153
  • Page 154 154
  • Page 155 155
  • Page 156 156
  • Page 157 157
  • Page 158 158
  • Page 159 159
  • Page 160 160
  • Page 161 161
  • Page 162 162
  • Page 163 163
  • Page 164 164
  • Page 165 165
  • Page 166 166
  • Page 167 167
  • Page 168 168
  • Page 169 169
  • Page 170 170
  • Page 171 171
  • Page 172 172
  • Page 173 173
  • Page 174 174
  • Page 175 175
  • Page 176 176
  • Page 177 177
  • Page 178 178
  • Page 179 179
  • Page 180 180
  • Page 181 181
  • Page 182 182
  • Page 183 183
  • Page 184 184
  • Page 185 185
  • Page 186 186
  • Page 187 187
  • Page 188 188
  • Page 189 189
  • Page 190 190
  • Page 191 191
  • Page 192 192
  • Page 193 193
  • Page 194 194
  • Page 195 195
  • Page 196 196
  • Page 197 197
  • Page 198 198
  • Page 199 199
  • Page 200 200
  • Page 201 201
  • Page 202 202
  • Page 203 203
  • Page 204 204
  • Page 205 205
  • Page 206 206
  • Page 207 207
  • Page 208 208
  • Page 209 209
  • Page 210 210
  • Page 211 211
  • Page 212 212
  • Page 213 213
  • Page 214 214
  • Page 215 215
  • Page 216 216
  • Page 217 217
  • Page 218 218
  • Page 219 219
  • Page 220 220
  • Page 221 221
  • Page 222 222
  • Page 223 223
  • Page 224 224
  • Page 225 225
  • Page 226 226
  • Page 227 227
  • Page 228 228
  • Page 229 229
  • Page 230 230
  • Page 231 231
  • Page 232 232
  • Page 233 233
  • Page 234 234
  • Page 235 235
  • Page 236 236
  • Page 237 237
  • Page 238 238
  • Page 239 239
  • Page 240 240
  • Page 241 241
  • Page 242 242
  • Page 243 243
  • Page 244 244
  • Page 245 245
  • Page 246 246
  • Page 247 247
  • Page 248 248
  • Page 249 249
  • Page 250 250
  • Page 251 251
  • Page 252 252
  • Page 253 253
  • Page 254 254
  • Page 255 255
  • Page 256 256
  • Page 257 257
  • Page 258 258
  • Page 259 259
  • Page 260 260
  • Page 261 261
  • Page 262 262
  • Page 263 263
  • Page 264 264
  • Page 265 265
  • Page 266 266
  • Page 267 267
  • Page 268 268
  • Page 269 269
  • Page 270 270
  • Page 271 271
  • Page 272 272
  • Page 273 273
  • Page 274 274
  • Page 275 275
  • Page 276 276
  • Page 277 277
  • Page 278 278
  • Page 279 279
  • Page 280 280
  • Page 281 281
  • Page 282 282
  • Page 283 283
  • Page 284 284
  • Page 285 285
  • Page 286 286
  • Page 287 287
  • Page 288 288
  • Page 289 289
  • Page 290 290
  • Page 291 291
  • Page 292 292
  • Page 293 293
  • Page 294 294
  • Page 295 295
  • Page 296 296
  • Page 297 297
  • Page 298 298
  • Page 299 299
  • Page 300 300
  • Page 301 301
  • Page 302 302
  • Page 303 303
  • Page 304 304
  • Page 305 305
  • Page 306 306
  • Page 307 307
  • Page 308 308
  • Page 309 309
  • Page 310 310
  • Page 311 311
  • Page 312 312
  • Page 313 313
  • Page 314 314
  • Page 315 315
  • Page 316 316
  • Page 317 317
  • Page 318 318
  • Page 319 319
  • Page 320 320
  • Page 321 321
  • Page 322 322
  • Page 323 323
  • Page 324 324
  • Page 325 325
  • Page 326 326
  • Page 327 327
  • Page 328 328
  • Page 329 329
  • Page 330 330
  • Page 331 331
  • Page 332 332
  • Page 333 333
  • Page 334 334
  • Page 335 335
  • Page 336 336
  • Page 337 337
  • Page 338 338
  • Page 339 339
  • Page 340 340
  • Page 341 341
  • Page 342 342
  • Page 343 343
  • Page 344 344
  • Page 345 345
  • Page 346 346
  • Page 347 347
  • Page 348 348
  • Page 349 349
  • Page 350 350
  • Page 351 351
  • Page 352 352
  • Page 353 353
  • Page 354 354
  • Page 355 355
  • Page 356 356
  • Page 357 357
  • Page 358 358
  • Page 359 359
  • Page 360 360
  • Page 361 361
  • Page 362 362
  • Page 363 363
  • Page 364 364
  • Page 365 365
  • Page 366 366
  • Page 367 367
  • Page 368 368
  • Page 369 369
  • Page 370 370
  • Page 371 371
  • Page 372 372

Easypix MovieCam SD-III Benutzerhandbuch

Kategorie
Camcorder
Typ
Benutzerhandbuch
Dieses Handbuch ist auch geeignet für