
GGM.L001 Ed. 09.12
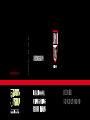
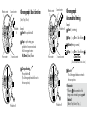
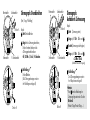
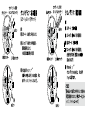
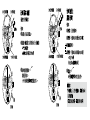
CHRONOGRAPH
www.luminox.com
USE FOR SERIES
1140, 9120, 9270, 9280, 9380

30
10
20
12
3
9
6
10
1
2
3
7
8
9
15
60
30
45
21
C
A
B
F
K
L
R
G
H
I
*
S
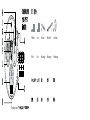
KEY
Push button
Drücker
Crown
Krone
Hour hand
Stundenzeiger
Minute hand
Minutenzeiger
Second hand
Sekundenzeiger
*Depending on model

Chrono:
seconds
Chrono:
Sekunden
Chrono:
1/10 sec.
Chrono:
1/10 Sekunden
Chrono:
minutes and
hours
Chrono:
Minuten und
Stunden
Date
Datum
Weekday
Wochentag
*

30
10
20
12
3
9
6
10
1
2
3
7
8
9
15
60
3
0
45
21
III
30
10
20
12
3
9
6
10
1
2
3
7
8
9
15
60
30
45
IIIIII
21
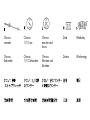
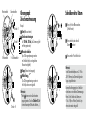
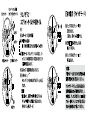
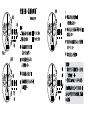
Push-button B
Push-button A
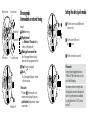
Adjusting the chronograph
hands to zero position
Example:
One or several chronograph hands are not
in their correct zero positions and have to be
adjusted (e.g. following a battery change).
Pull out the crown to position III
(all 4 chronograph hands are in their
correct or incorrect zero position).
Keep push-buttons A and B depressed
simultaneously for at least 2 seconds
(the centre stop-second rotates by
360°
corrective mode is activated).
Centre stop-second
1
⁄10 second counter
Minute counter
Hour counter
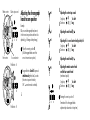
Adjusting the centre stop second
Single step
A
1 x short
Continuous
A
long
Adjusting the next hand
B
Adjusting the
1
⁄10 second counter hand (position 6h)
Single step
A
1 x short
Continuous
A
long
Adjusting the next hand
B
Adjusting the minute counter hand
and the hour counter hand
(mechanical coupled)
Single step
A
1 x short
Continuous
A
long
A
B
A
III
III
Returning the crown to position I
Termination of the chronograph hands
adjustment (can be carried out at any time).
B
A

30
10
2
0
12
3
9
6
10
1
2
3
7
8
9
15
60
30
4
5
21
30
1
0
2
0
12
3
9
6
10
1
2
3
7
8
9
15
60
30
45
21
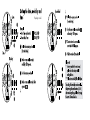
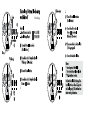
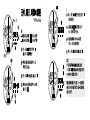
Chronograph: Basic function
(Start / Stop / Reset )
Example:
Start: Press push-button A.
Stop: to stop the timing, press
push-button A once more and read
the 4 chronograph counters:
4h / 20 min / 5 sec /
7
⁄10 sec
Zero positioning:
Press push-button B.
(The 4 chronograph hands will be reset to
their zero positions).
Second counter
Push-button B
1
⁄10 second counter
Minute counter
Hour counter
Push-button
A
30
10
2
0
12
3
9
6
10
1
2
3
7
8
9
15
60
30
4
5
21
30
10
20
12
3
9
6
10
1
2
3
7
8
9
15
60
30
45
21
Chronograph:
Accumulated timing
Example:
Start: (start timing)
Stop: (e.g. 15 min 5 sec following )
Restart: (timing is resumed)
* Stop: (e.g. 10 min 5 sec following )
= 25 min 10 sec
(The accumulated measured time is shown)
Reset:
The 4 chronograph hands are returned to
their zero positions.
Push-button B
Please note:
* Following
, the accumulation of the
timing can be continued by pressing push-
button A
(Restart / Stop, Restart / Stop, …)
Second counter
1
⁄10 second counter
Minute counter
Hour counter
Push-button A

30
10
2
0
12
3
9
6
10
1
2
3
7
8
9
15
60
30
4
5
21
30
10
20
12
3
9
6
10
1
2
3
7
8
9
15
60
30
45
21
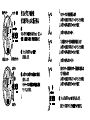
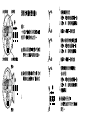
Push-button B
Push-button B
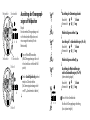
Chronograph:
Intermediate or interval timing
Example:
Start: (start timing)
Display interval:
e.g. 10 minutes 10 seconds (timing
continues in the background)
Making up the measured time:
(the 4 chronograph hands are quickly
advanced to the ongoing measured time)
Stop: (Final time is displayed)
Reset:
The 4 chronograph displays are returned
to their zero position.
Please note:
* Following
, further intervals or inter-
mediates can be displayed by pressing
push-button B (display interval / make up
measured time, ...)
*
Second counter
1
⁄10 second counter
Minute counter
Hour counter
Push-button A
III
30
10
20
12
3
9
6
10
1
2
3
7
8
9
15
60
30
4
5
01
III
30
10
20
1
2
3
9
6
10
1
2
3
7
8
9
15
60
3
0
45
31
Setting the date (quick mode)
Pull out the crown to position II (the watch
continues to run).
Tu rn the crown until the correct
date
1
appears.
Push the crown back into position I.
Please note:
During the date changing phase between
9 PM and 12 PM; the date must be set to the
date of the following day.
An extreme acceleration in setting the date
with quick mode can induce a false date indi-
cation. The synchronization is re-established
by setting the date from 01 till 31 (crown in
position II).

*Depending on model
*
*

30
10
20
12
3
9
6
10
1
2
3
7
8
9
15
60
30
45
III III
21
30
10
20
12
3
9
6
10
1
2
3
7
8
9
15
60
3
0
45
21
III
Drücker B
Drücker A
Ausrichtung der Chronograph-
zeiger auf Nullposition
Beispiel:
Einer oder mehrere Chronographzeiger sind
nicht in ihren korrekten Nullpositionen und
müssen ausgerichtet werden (z.B. nach
Batteriewechsel)
Krone in Position III herausziehen.
(Alle 4 Chronographenzeiger stellen sich
in ihre korrekte bz w. nicht korrekte Null-
position)
Drücker A und B gleichzeitig während
mindestens 2 Sekunden drücken.
(Der Zentrumstoppsekundenzeiger dreht
um 360°
Korrekturmodus ist aktiviert)
Sekundenzähler
1
⁄10 Sekundenzähler
Minutenzähler
Stundenzähler
Ausrichtung der Zentrumstoppsekunde
Einzelschritt:
A
1 x kurz
Kontinuierlich:
A
lang
Nächsten Zeiger ausrichten
B
Ausrichtung des
1
⁄10 Sekundenzählerzeigers (Pos. 6h)
Einzelschritt:
A
1 x kurz
Kontinuierlich:
A
lang
Nächsten Zeiger ausrichten
B
Ausrichtung des Minutenzählerzeiger
und des Stundenzählerzeigers (Pos. 9h)
(sind mechanisch gekoppelt)
Einzelschritt:
A
1 x kurz
Kontinuierlich:
A
lang
A
B
A
III
III
Krone in Position I zurückdrücken
Abschluss der Chronographzeiger -Ausrichtung.
(dies ist jederzeit möglich)
B
A

30
1
0
2
0
12
3
9
6
10
1
2
3
7
8
9
15
60
30
45
21
30
10
2
0
12
3
9
6
10
1
2
3
7
8
9
15
60
30
4
5
21
Chronograph: Grundfunktion
(Start / Stopp / Nullstellung)
Beispiel :
Start: Drücker A drücken
Stopp: Um die Zeitmessung abzubrechen,
Drücker A nochmals drücken und die
4 Chronographenzähler ablesen:
4h / 20 Min. / 5 Sek. /
7
⁄10 Sekunden
Nullstellung:
Drücker B drücken.
(Die 4 Chronographenzeiger werden in
ihre Nullstellungen zurückgestellt).
Sekundenzähler
Drücker B
1
⁄10 Sekundenzähler
Minutenzähler
Stundenzähler
Drücker A
30
10
20
12
3
9
6
10
1
2
3
7
8
9
15
60
30
45
21
30
10
2
0
12
3
9
6
10
1
2
3
7
8
9
15
60
30
4
5
21
Chronograph:
Aufaddierte Zeitmessung
Beispiel :
Start: (Zeitmessung starten)
Stopp: (z.B. 15 Min. 5 Sek. nach )
Restart: (Zeitmessung wieder freigeben)
* Stopp: (z.B. 10 Min. 5 Sek. nach )
= 25 Min. 10 Sek.
(Aufaddierte Messzeit wird angezeigt)
Nullstellung:
Die 4 Chronographanzeigen werden in
ihre Nullpositionen zurückgestellt.
Drücker B
Hinweise
* Nach
kann die Aufaddierung der
Zeitmessung fortgesetzt werden. Dies über
Drücker A
(Restart / Stopp, Restart / Stopp, …)
Sekundenzähler
1
⁄10 Sekundenzähler
Minutenzähler
Stundenzähler
Drücker A

30
10
20
12
3
9
6
10
1
2
3
7
8
9
15
60
30
45
21
30
10
2
0
12
3
9
6
10
1
2
3
7
8
9
15
60
30
4
5
21
Drücker B
Drücker B
Chronograph:
Zwischenzeitmessung
Beispiel :
Start: (Messzeit starten)
Zwischenzeit anzeigen:
z.B. 10 Min. 10 Sek. (die Zeitmessung läuft
im Hintergrund weiter)
Messzeit aufholen:
(die 4 Chronographanzeigen werden
im Schnelllauf auf die weitergelaufene
Messzeit nachgeführt.)
Stopp: (Endzeit wird angezeigt)
Nullstellung:
Die 4 Chronographanzeigen werden in
ihre Nullpositionen zurückgestellt.
Hinweise
* Nach
können weitere Zwischenzeiten
angezeigt werden. Dies über Drücker B
(Zwi-
schenzeit anzeigen / Messzeit aufholen, ...)
*
Sekundenzähler
1
⁄10 Sekundenzähler
Minutenzähler
Stundenzähler
Drücker A
III
30
10
20
1
2
3
9
6
10
1
2
3
7
8
9
15
60
3
0
45
31
III
30
10
20
12
3
9
6
10
1
2
3
7
8
9
15
60
30
4
5
01
Schnellkorrektur Datum
Krone in Position II herausziehen.
(Uhr läuft weiter)
Krone drehen bis das aktuelle
Datum
1
erscheint
Krone zurück in Position I drücken
Hinweis
In der Kalenderschaltphase von 21:00 bis
24:00 Uhr muss das Datum des folgenden
Ta ges eingestellt werden.
Extreme Beschleunigung in der Schnellkor-
rektur kann zu einer falschen Datumsanzeige
führen. Durch Schalten des Datums von
01 bis 31 (Krone Position II) wird die Syn-
chronisation wieder hergestellt.

*Modellabhängig
*
*


*
*


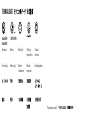
Ronda 5050.B
Ronda 5050.C
Movement
Uhrwerk-Typ
395/SR 927 SW
Battery
Batterie-Typ
Battery life
Batterie-
Lebensdauer
Working
temperatures
Betriebs-
temperatur
Stainless
steel case
Edelstahl gehäuse
TECHNICAL DATA
*
month
48
*Depending on model
*
*
Seite laden ...
-
 1
1
-
 2
2
-
 3
3
-
 4
4
-
 5
5
-
 6
6
-
 7
7
-
 8
8
-
 9
9
-
 10
10
-
 11
11
-
 12
12
-
 13
13
-
 14
14
-
 15
15
-
 16
16
-
 17
17
-
 18
18
-
 19
19
-
 20
20
-
 21
21


in anderen Sprachen
- English: Luminox XA.9388 Owner's manual
Verwandte Papiere
Sonstige Unterlagen
-
 ROAMER RONDA Z60 Benutzerhandbuch
-
eta 251.262 Technical Manual
-
Victorinox Alliance Chronograph Schnellstartanleitung
-
Victorinox Ronda 5030D Schnellstartanleitung
-
-
Swatch ETA 251.292 Technical Communication
-
-
Hamilton KHAKI CHRONO WORLDTIMER Benutzerhandbuch
