
GGM.L003 Ed. 07.14
INSTRUCTION MANUAL – BEDIENUNGSANLEITUNG
MANUAL DE USO – –
CHRONOGRAPH ALARM
www.luminox.com
7 6 1
1 3
8 2 2 6 3
3
6 0

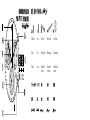
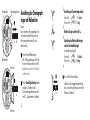
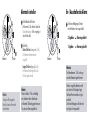
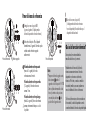
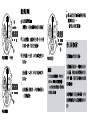
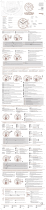
Push button
Drücker
Pulsador
Crown
Krone
Corona
Hour hand
Stundenzeiger
Manecilla de
las horas
Minute hand
Minutenzeiger
Manecilla de
los minutos
Second hand
Sekundenzeiger
Manecilla de los
segundos
min
31
12
60
s
ec
30
6
min
31
12
60
s
ec
30
6

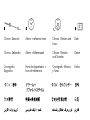
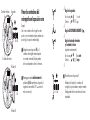
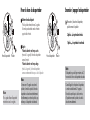
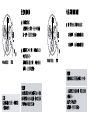
Chrono: Seconds
Chrono: Sekunden
Cronógrafo:
Segundos
Alarm + reference time
Alarm + Referenzzeit
Hora de despertador +
hora de referencia
Chrono: Minutes and
hours
Chrono: Minuten
und Stunden
Cronógrafo: Minutos
y horas
Date
Datum
Fecha
min
31
12
60
s
ec
30
6
min
31
12
60
s
ec
30
6

III III
30
10
20
12
3
6
9
12
2
4
6
8
10
1
11
3
5
7
9
15
60
30
45
21
21
III
30
10
20
12
3
6
9
12
2
4
6
8
10
1
11
3
5
7
9
15
60
30
45
21
21
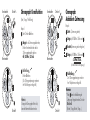
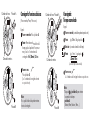
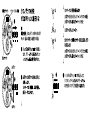
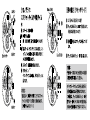
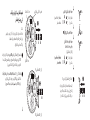
Adjusting the chronograph
hands to zero position
Example:
One or several chronograph hands are not
in their correct zero positions and have to be
adjusted (e.g. following a battery change).
Pull out the crown to position III (all 3
chronograph hands are in their correct
or incorrect zero position. The display
changes from alarm time to reference
time. )
Keep push-buttons A and B depressed
simultaneously for at least 2 seconds (the
center stop-second rotates by
360° corrective mode is activated).
Center stop-second
Push-button B
Minute counter
Hour counter
Push-button A
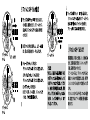
Adjusting the center stop-second
Single step
A
1 x short
Continuous
A
long
Adjusting the next hand
B
Adjusting the minute counter hand
and the hour counter hand
(mechanical coupled)
Single step
A
1 x short
Continuous
A
long
A
B
A
III
III
Returning the crown to position I
Termination of the chronograph hands
adjustment (can be carried out at any time. The
display changes from reference to alarm time.)

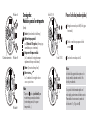
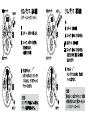
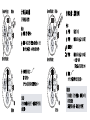
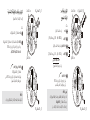
Chronograph: Basic function
(Start / Stop / Reset)
Example:
Start: Press push-button A.
Stop: to stop the timing, press
pushbutton A once more and read
the 3 chronograph counters:
4h / 20 min / 38 sec
Zero positioning:
Press push-button B.
(The 3 chronograph hands will be reset to
their zero positions).
30
10
20
12
3
6
9
12
2
4
6
8
10
1
11
3
5
7
9
15
60
30
45
21
21
30
10
20
12
3
6
9
12
2
4
6
8
10
1
11
3
5
7
9
15
60
30
45
21
21
Note
The alarm cannot be used as long as the
chronograph is in operation.
Push-button A
Push-button B
Minute counter
Hour counter
30
10
20
12
3
6
9
12
2
4
6
8
10
1
11
3
5
7
9
15
60
30
45
21
21
30
10
20
12
3
6
9
12
2
4
6
8
1
0
1
11
3
5
7
9
15
60
30
45
21
21
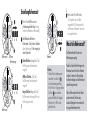
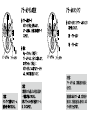
Chronograph:
Accumulated timing
Example:
Start: (start timing)
Stop: (e.g. 15 min 5 sec following )
Restart: (timing is resumed)
* Stop: (e.g. 10 min 5 sec following )
= 25 min 10 sec
(The accumulated measured time is shown)
Reset:
The three chronograph hands are returned
to their zero positions.
Push-button A
Push-button B
Minute counter
Hour counter
Please note:
* Following
, the accumulation of the
timing can be continued by pressing
push-button A
(Restart / Stop, Restart / Stop, …)

30
10
20
12
3
6
9
12
2
4
6
8
10
1
11
3
5
7
9
15
60
30
45
21
21
30
10
20
12
3
6
9
12
2
4
6
8
10
1
11
3
5
7
9
15
60
30
45
21
21
Push-button B
Minute counter
Push-button A
Push-button B
Chronograph:
Intermediate or interval timing
Example:
Start: (start timing)
Display interval:
e.g. 10 minutes 10 seconds (timing
continues in the background)
Making up the measured time:
(the 3 chronograph hands are quickly
advanced to the ongoing measured time).
Stop: (Final time is displayed)
Reset:
The 3 chronograph hands are returned to
their zero position
Please note:
* Following
, further intervals or inter-
mediates can be displayed by pressing
push-button B (display interval / make up
measured time, ...)
*
III
30
10
20
12
3
6
9
12
2
4
6
8
10
1
11
3
5
7
9
15
60
30
45
01
01
III
30
10
20
12
3
6
9
12
2
4
6
8
10
1
11
3
5
7
9
15
60
30
45
31
31
Date 5130.B
Date 5130.D
Setting the date (quick mode)
Pull out the crown to position II (the watch
continues to run).
Turn the crown until the correct
date
01
appears.
Push the crown back into position I.
Please note:
The date of the following day must be set in
the calendar changing phase between 9 PM
and midnight.
Setting the date too quickly in quick mode
can result in the incorrect date being
displayed. Switching the date between
01 and 31 (position II) restores the syn-
chronisation.

III
III
30
10
20
12
3
6
9
12
2
4
6
8
10
1
11
3
5
7
9
15
60
30
45
04
04
III
III
30
10
20
12
3
6
9
12
2
4
6
8
10
1
11
3
5
7
9
15
60
30
45
04
04
Small
minute hand
Reference time
Reference time
Setting the reference time
*
Pull out the crown to position III
(second hand stops. The display changes
from alarm time to reference time.)
Activating the setting mode
Press the push-button for at least
2 seconds. As soon as the small minute
hand jumps forwards one minute, this
mode is active.
Short pressing (less than 1 second):
the reference time is moved forwards by
the minute.
Medium pressing: (1–2 seconds):
the reference time is moved forwards by
the hour.
Long pressing (longer than 2 seconds):
the reference time is moved forwards until
the push-button is released.
Please note:
* In order to set the time to the
exact second,
must be pulled
out when the second hand is in
position «60» (III ).
Once the hour and minute hands
have been set, must be pushed
back into position I at the exact
second.
III
III
30
10
20
12
3
6
9
12
2
4
6
8
10
1
11
3
5
7
9
15
60
30
45
04
04
What is the reference time?
The current time is displayed by means of
the hour and minute hand.
Parallel to the current time, the reference
time runs in the background: the alarm time
refers itself to this reference time. Thus,
resetting the time also requires the identical
correction of the reference time.
If the reference time is not synchronised
with the current time, this results in the alarm
signal being emitted at a different
time to the set alarm time.
Alarm time
* Push the crown back into position I
(the display changes from reference time
to alarm time).
A signal indicates that the alarm is
switched off.

I
30
10
20
12
3
6
9
12
2
4
6
8
10
1
11
3
5
7
9
15
60
30
45
31
31
Alarm time Push-button
Note
The alarm cannot be used as long as
the chronograph is in operation.
Setting the alarm time
Activate the setting mode
Press the push-button for at least
2 seconds. As soon as the small minute
hand jumps forward one minute, this
mode is active.
Setting
Short pressing (less than 1 second):
the alarm time is moved forward by the
minute.
Long pressing (longer than 2 seconds):
the alarm time is moved forward until the
push-button is released.
Please note:
If the push-button is not activated for
10 seconds, the setting mode of the alarm
time deactivates itself. At the same time,
two beeps are emitted to indicate that the
alarm is switched on.
I
30
10
20
12
3
6
9
12
2
4
6
8
10
1
11
3
5
7
9
15
60
30
45
31
31
Alarm time
Push-button
Switching the alarm on / off
The alarm is switched on / off by briefly
pressing the push-button:
2 beeps
alarm switched on
1 beep alarm switched off
Please note:
The alarm can be set maximum 12 hours
before the desired alarm time.
Once the set alarm time has been reached,
a signal is emitted for 20 seconds.
This signal is repeated after two minutes.
Following brief pressing of the push-button,
the signal is immediately switched off.

Deutsch
III III
30
10
20
12
3
6
9
12
2
4
6
8
10
1
11
3
5
7
9
15
60
30
45
21
21
III
30
10
20
12
3
6
9
12
2
4
6
8
10
1
11
3
5
7
9
15
60
30
45
21
21
Zentrumstoppsekunde
Drücker B
Minutenzähler
Stundenzähler
Drücker A
Ausrichtung der Chronograph-
zeiger auf Nullposition
Beispiel:
Einer oder mehrere Chronographzeiger sind
nicht in ihren korrekten Nullpositionen und
müssen ausgerichtet werden (z.B. nach
Batteriewechsel)
Krone in Position III herausziehen.
(Alle 3 Chronographenzeiger stellen sich
in ihre korrekte bzw. nicht korrekte Null-
position. Anzeige wechselt von Alarmzeit
zur Referenzzeit.)
Drücker A und B gleichzeitig während
mindestens 2 Sekunden drücken.
(Der Zentrumstoppsekundenzeiger dreht
um 360°
Korrekturmodus ist aktiviert)
Ausrichtung der Zentrumstoppsekunde
Einzelschritt:
A
1 x kurz
Kontinuierlich:
A
lang
Nächsten Zeiger ausrichten
B
Ausrichtung des Minutenzählerzeigers
und des Stundenzählerzeigers
(sind mechanisch gekoppelt)
Einzelschritt:
A
1 x kurz
Kontinuierlich:
A
lang
A
B
A
III
III
Krone in Position I zurückdrücken
Abschluss der Chronographzeiger-Ausrichtung.
(dies ist jederzeit möglich. Anzeige wechselt von
Referenz- zur Alarmzeit.)

30
10
20
12
3
6
9
12
2
4
6
8
10
1
11
3
5
7
9
15
60
30
45
21
21
30
10
20
12
3
6
9
12
2
4
6
8
10
1
11
3
5
7
9
15
60
30
45
21
21
Chronograph: Grundfunktion
(Start / Stopp / Nullstellung)
Beispiel:
Start: Drücker A drücken
Stopp: Um die Zeitmessung abzubrechen,
Drücker A nochmals drücken und die
3 Chronographenzähler ablesen:
4h / 20 Min. / 38 Sek.
Nullstellung:
Drücker B drücken.
(Die 3 Chronographenzeiger werden in
ihre Nullstellungen zurückgestellt).
Drücker A
Drücker B
Minutenzähler
Stundenzähler
Hinweis
Solange der Chronograph in Betrieb ist,
kann der Alarm nicht bedient werden.
30
10
20
12
3
6
9
12
2
4
6
8
10
1
11
3
5
7
9
15
60
30
45
21
21
30
10
20
12
3
6
9
12
2
4
6
8
10
1
11
3
5
7
9
15
60
30
45
21
21
Chronograph:
Aufaddierte Zeitmessung
Beispiel:
Start: (Zeitmessung starten)
Stopp: (z.B. 15 Min. 5 Sek. nach )
Restart: (Zeitmessung wieder freigeben)
* Stopp: (z.B. 10 Min. 5 Sek nach )
= 25 Min. 10 Sek.
(Aufaddierte Messzeit wird angezeigt)
Nullstellung:
Die 3 Chronographenzeiger werden in
ihre Nullpositionen zurückgestellt.
Drücker A
Drücker B
Minutenzähler
Stundenzähler
Hinweise
* Nach
kann die Aufaddierung der
Zeitmessung fortgesetzt werden. Dies über
Drücker A
(Restart / Stopp, Restart / Stopp, …)

30
10
20
12
3
6
9
12
2
4
6
8
10
1
11
3
5
7
9
15
60
30
45
21
21
30
10
20
12
3
6
9
12
2
4
6
8
10
1
11
3
5
7
9
15
60
30
45
21
21
Drücker B
Minutenzähler
Drücker A
Drücker B
Chronograph:
Zwischenzeitmessung
Beispiel:
Start: (Messzeit starten)
Zwischenzeit anzeigen:
z.B. 10 Min. 10 Sek. (die Zeitmessung läuft
im Hintergrund weiter)
Messzeit aufholen:
(die 3 Chronographenzeiger werden
im Schnelllauf auf die weitergelaufene
Messzeit nachgeführt.)
Stopp: (Endzeit wird angezeigt)
Nullstellung:
Die 3 Chronographenzeiger werden in
ihre Nullpositionen zurückgestellt.
Hinweise
* Nach
können weitere Zwischenzeiten
angezeigt werden. Dies über Drücker B
(Zwi-
schenzeit anzeigen / Messzeit aufholen, ...)
*
III
30
10
20
12
3
6
9
12
2
4
6
8
10
1
11
3
5
7
9
15
60
30
45
01
01
Schnellkorrektur Datum
Krone in Position II herausziehen.
(Uhr läuft weiter)
Krone drehen bis das aktuelle
Datum (Beispiel ) erscheint.
01
Krone zurück in Position I drücken.
III
30
10
20
12
3
6
9
12
2
4
6
8
10
1
11
3
5
7
9
15
60
30
45
31
31
Hinweise
In der Kalenderschaltphase von 21:00 bis
24:00 Uhr muss das Datum des folgenden
Tages eingestellt werden.
Extreme Beschleunigung in der Schnellkor-
rektur kann zu einer falschen Datumsanzeige
führen. Durch Schalten des Datums von 01
bis 31 (Krone Position II) wird die Synchroni-
sation wieder hergestellt.
Datum 5130.B
Datum 5130.D

III
III
30
10
20
12
3
6
9
12
2
4
6
8
10
1
11
3
5
7
9
15
60
30
45
04
04
III
III
30
10
20
12
3
6
9
12
2
4
6
8
10
1
11
3
5
7
9
15
60
30
45
04
04
Einstellung Referenzzeit
*
Krone in Position III herausziehen.
(Sekundenzeiger bleibt stehen. Anzeige
wechselt von Alarmzeit zur Referenzzeit.)
Einstellmodus aktivieren
Drücker mind. 2 Sek. drücken. Sobald der
kleine Minutenzeiger 1 Min. vorspringt, ist
dieser Modus aktiv.
Kurzes Drücken: (weniger als 1 Sek.)
Die Referenzzeit wird minutenweise
vorgestellt.
Mittleres Drücken: (1–2 Sek.)
Die Referenzzeit wird stundenweise
vorgestellt.
Langes Drücken (länger als 2 Sek.)
Die Referenzzeit wird vorgestellt, bis der
Drücker losgelassen wird.
Kleiner
Minutenzeiger
Referenzzeit
Referenzzeit
Hinweis
* Um die Uhrzeit «sekundengenau»
einzustellen, muss die Krone
bei der Sekundenzeigerstellung
«60» in Position III gezogen werden.
Die Krone muss «sekunden-
genau» (als Richtlinie: Radiosignal,
Funkuhren etc.) in Pos. I zurück-
gedrückt werden.
III
III
30
10
20
12
3
6
9
12
2
4
6
8
10
1
11
3
5
7
9
15
60
30
45
04
04
* Krone zurück in Position I drücken.
1 Ton signalisiert, dass der Alarm
ausgeschaltet ist. Die Anzeige wechselt
von Referenz- zur Alarmzeit – diese muss
neu eingestellt werden.
Was ist die Referenzzeit?
Die Uhrzeit wird mittels Stunden- und
Minutenzeiger angezeigt.
Parallel zur Uhrzeit läuft im Hintergrund die
Referenzzeit, an welcher sich die Alarmzeit
orientiert. Somit muss bei Neueinstellung
der Uhrzeit unbedingt auch die Referenzzeit
identisch korrigiert werden.
Falls die Referenzzeit nicht mit der Uhrzeit
synchronisiert wird, führt dies dazu,
dass das Alarmsignal zu einer anderen als
der eingestellten Alarmzeit ertönt.
Alarmzeit

I
30
10
20
12
3
6
9
12
2
4
6
8
10
1
11
3
5
7
9
15
60
30
45
31
31
Alarmzeit einstellen
Einstellmodus aktivieren
Drücker mind. 2 Sek. drücken. Sobald der
kleine Minutenzeiger 1 Min. vorspringt, ist
dieser Modus aktiv.
Einstellen
Kurzes Drücken: (weniger als 1 Sek.)
Die Alarmzeit wird minutenweise
vorgestellt.
Langes Drücken (länger als 2 Sek.)
Die Alarmzeit wird vorgestellt, bis der
Drücker losgelassen wird.
Hinweis
Wenn der Drücker 10 Sek. nicht betätigt
wird, deaktiviert sich der Einstellmodus
der Alarmzeit. Gleichzeitig signalisieren zwei
Töne, dass der Alarm eingeschaltet ist.
Alarmzeit
Drücker
Hinweis
Solange der Chronograph in
Betrieb ist, kann der Alarm nicht
bedient werden.
Ein- / Ausschalten des Alarms
Durch kurze Betätigung des Drückers
wird der Alarm ein- oder ausgeschaltet:
2 Signaltöne Alarm eingeschaltet
1 Signalton Alarm ausgeschaltet
Hinweise
Der Alarm kann max. 12 Std. vor der ge-
wünschten Alarmzeit eingestellt werden.
Wenn die eingestellte Alarmzeit erreicht
wird, ertönt ein 20-sekündiges Signal.
Nach zwei Minuten wird dieses Signal
wiederholt.
Durch kurze Betätigung des Drückers wird
das Signal sofort ausgeschaltet.
I
30
10
20
12
3
6
9
12
2
4
6
8
10
1
11
3
5
7
9
15
60
30
45
31
31
Alarmzeit Drücker
I
12
12
8
4
93
01
A
L
A
R
M
I
12
12
8
4
93
01
A
L
A
R
M

III III
30
10
20
12
3
6
9
12
2
4
6
8
10
1
11
3
5
7
9
15
60
30
45
21
21
III
30
10
20
12
3
6
9
12
2
4
6
8
10
1
11
3
5
7
9
15
60
30
45
21
21
Poner los contadores del
crónografo en la posición cero
Ejemplo:
Uno o varios contadores del crónografo no están
puestos a cero correctamente y deben cambiarse des
posición (p.ej. después de cambiar lapila).
Extraiga la corona a la posición III (los 3
contadores del cronógrafo están en la posición
cero correcta o incorerecta. El display cambia
de hora de despertador a hora de referencia.
Mantenga presionados simultáneamente los
pulsadores A y B durante al menos 2 segundos (el
segundero da una vuelta de 360° se activa el
modo de corrección).
Segundero
Pulsador B
Contador de minutos
Contador de horas
Pulsador A
Regular el segundero
Un solo paso
A
1 x corto
Continuo
A
largo
Regular EL CONTADOR SIGUIENTE
B
Regular el contador de minutos
y el contador de horas
(acoplados mecánicamente)
Un solos paso
A
1 x corto
Continuo
A
largo
A
B
A
III
III
Devuelva la corona a la posicion I
Finalización del ajuste de los contadores del
cronógrafo (se puede realizar en cualquier momento.
El display cambia de hora de referencia a hora de
despertador).
Spanisch

Cronógrafo: Funciones básicas
(Poner en marcha/ Parar / Poner a cero)
Ejemplo:
Poner en marcha: Pulse el pulsador A.
Parar:
Para detener la medición del
tiempo,pulse el pulsador A una vez
mas y lea los 3 contadores del
cronógrafo:
4h / 20 min / 38 sec
Poner a cero:
Pulse el pulsador B.
(Los 3 contadores del cron
ó
grafo volverán
a su posici
ó
n cero).
30
10
20
12
3
6
9
12
2
4
6
8
10
1
11
3
5
7
9
15
60
30
45
21
21
30
10
20
12
3
6
9
12
2
4
6
8
10
1
11
3
5
7
9
15
60
30
45
21
21
Nota
No es posible utilizar el despertador mientras
funcione el cron
ó
grafo.
Pulsador A
Pulsador B
Contador de minutos
Contador de horas
30
10
20
12
3
6
9
12
2
4
6
8
10
1
11
3
5
7
9
15
60
30
45
21
21
30
10
20
12
3
6
9
12
2
4
6
8
10
1
11
3
5
7
9
15
60
30
45
21
21
Cronógrafo:
Tiempo acumulado
Ejemplo:
Poner en marcha: (se mide el tiempo durante un periodo corto)
Parar: (p.ej. 15 min 5 seg después de )
Reiniciar: (se reanuda la medición del tiempo)
* Parar: (p.ej. 10 min 5 seg después )
= 25 min 10 sec
(Se muestra el tiempo medido acumulado)
Poner a cero:
Los 3 contadores del cronógrafo vuelven a su posición cero.
Pulsador A
Pulsador B
Contador de minutos
Contador de horas
Nota:
* Despues de
, el pulsador A para continuar
la acumulación de tiempo
pulsador A
(Reiniciar/ Parar, Reiniciar / Parar, …)

30
10
20
12
3
6
9
12
2
4
6
8
10
1
11
3
5
7
9
15
60
30
45
21
21
30
10
20
12
3
6
9
12
2
4
6
8
10
1
11
3
5
7
9
15
60
30
45
21
21
PulsadorB
Contador de minutos
Pulsador A
Pulsador B
Cronógrafo:
Medición parcial o ratrapante
Ejemplo:
Iniciar: (iniciar la medición del tiempo)
Mostrar tiempo parcial:
p.ej. 10 minutos 10 segundos (el tiempo sigue
acumulándose pero sin mostrarse)
Recuperar el tiempo medido:
(los 3 contadores del cronógrafo avanzan
rápidamente al tiempo medido actual).
Parar: (Se muestra el tiempo final)
Poner a cero:
Los 3 contadores del cronógrafo vuelven
a su a su posición cero.
Nota:
* Después de
, pulse el pulsador B para
mostrar tiempos paraciales adicionales
(mostrar tiempo parcial / recuperar
tiempo medido, ...)
*
III
30
10
20
12
3
6
9
12
2
4
6
8
10
1
11
3
5
7
9
15
60
30
45
01
01
III
30
10
20
12
3
6
9
12
2
4
6
8
10
1
11
3
5
7
9
15
60
30
45
31
31
Fecha 5130.B
Fecha 5130.D
Poner la fecha (modo rápido)
Extraiga la corona a la posición II (el reloj sigue
funcionando).
Gire la corona hasta que aparezca la fech
correcta
01
.
Devuelva la corona a la posición I.
Nota:
la fecha del día siguiente debe ajustrase en la
fase de cambio de calendario entre las 9 de
la noche y medianoche.
Si se pone de la fech demasiado rápido en el
modo rápido, puede mostrarse la fecha incoreccta.
Para restablecer la sincronización, cambie la
la fecha entre 01 y 31 (posición II).

III
III
30
10
20
12
3
6
9
12
2
4
6
8
10
1
11
3
5
7
9
15
60
30
45
04
04
III
III
30
10
20
12
3
6
9
12
2
4
6
8
10
1
11
3
5
7
9
15
60
30
45
04
04
Minutero pequeño
Hora de referencia
Hora de referencia
Poner la hora de referencia
*
Extraiga la corona a la posición III
(se para el segundero. El display cambia
de hora de despertador a hora de referencia.)
Active el modo de ajuste. Pulse el pulsador
durante al menos 2 segundos. Este modo queda
activado cuando el minutero pequeño
salta un minuto.
Pulsando durante un tiempo corto
(menos de 1 segundo): la hora de
referencia avanza 1 minuto.
Pulsando durante un tiempo medio
(1-2 segundos): la hora de referencia
avanza 1 hora.
Pulsando durante un tiempo largo
(más de 2 segundos): la hora de referencia
avanza continuamente hasta que se suelte
el pulsador.
Nota:
* Para poner la hora al segundo exacto,
debe extraerse cuando el
segundero está en la posición “60” III.
Una vez fijadas las manecillas de las
horas y los minutos a las posiciones
correctas, debe devolverse a la
posición I en el segundo exacto.
III
III
30
10
20
12
3
6
9
12
2
4
6
8
10
1
11
3
5
7
9
15
60
30
45
04
04
Qué es la hora de referencia?
La hora actual se muestra mediante las
manecillas de las horas y los minutos.
Paralelamente a la hora actual, la hora de
referencia avanza sin mostrarse: la hora de
despertador se referencia a esta hora de
referencia. Por lo tanto, cuando se cambia la
hora actual, también es necesario realizar una
corrección idéntica de la hora de referencia.
Si la hora de referencia no está sincronizada con
la hora actual, la señal de despertador se emite
a una hora distinta de la hora de despertador fijada.
Hora de despertador
* Devuelva la corona a la posición I
(el display cambia de hora de referencia a
hora de despertador). Una señal indica que el
despertador está desactivado.

I
30
10
20
12
3
6
9
12
2
4
6
8
10
1
11
3
5
7
9
15
60
30
45
31
31
Hora de despertador Pulsador
Nota:
No se puede utilizar el despertador
mientras funcione el cronógrafo.
Poner la hora de despertador
Activar el modo de ajuste
Pulse el pulsador durante al menos 2 segundos.
Este modo queda activado cuando el minutero
pequeño salta 1 minuto.
Ajuste
Pulsando durante un tiempo corto
(menos de 1 segundo): la hora de despertador
avanza 1 minuto.
Pulsando durante un tiempo largo
(más de 2 segundos): la hora de despertador
avanza continuamente hasta que se suelte el pulsador.
Nota:
Si transcurren 10 segundos sin activar el
pulsador, el modo de ajuste de la hora de
despertador se desactiva automáticamente.
Simultáneamente, se emiten dos pitidos que
indican que el despertador está activado.
I
30
10
20
12
3
6
9
12
2
4
6
8
10
1
11
3
5
7
9
15
60
30
45
31
31
Hora de despertador
Pulsador
Encender / apagar la despertador
Para activar / desactivar el despertador,
pulse brevemente el pulsador:
2 pitidos despertador activado
1 pitido despertador desactivado
Nota:
El despertador se puede fijar un máximo de 12
horas antes de la hora de despertador deseada.
Cuando llega la hora fijada en el despertador,
se emite una señal durante 20 segundos.
Esta señal se repite después de dos minutos.
Al pulsar brevemente el pulsador, la señal se
desactiva inmediatamente.


Seite laden ...
Seite laden ...
Seite laden ...
Seite laden ...
Seite laden ...
Seite laden ...
Seite laden ...
Seite laden ...
Seite laden ...
Seite laden ...
Seite laden ...
Seite laden ...
Seite laden ...
Seite laden ...
-
 1
1
-
 2
2
-
 3
3
-
 4
4
-
 5
5
-
 6
6
-
 7
7
-
 8
8
-
 9
9
-
 10
10
-
 11
11
-
 12
12
-
 13
13
-
 14
14
-
 15
15
-
 16
16
-
 17
17
-
 18
18
-
 19
19
-
 20
20
-
 21
21
-
 22
22
-
 23
23
-
 24
24
-
 25
25
-
 26
26
-
 27
27
-
 28
28
-
 29
29
-
 30
30
-
 31
31
-
 32
32
-
 33
33
-
 34
34


Verwandte Papiere
Sonstige Unterlagen
-
 ROAMER RONDA Z60 Benutzerhandbuch
-
CONCORD Quartz Benutzerhandbuch
-
Victorinox Alliance Chronograph Schnellstartanleitung
-
Breitling Chronospace Evo B60 Benutzerhandbuch
-
Victorinox Ronda 5030D Schnellstartanleitung
-
 Patek Philippe CH 29-535 PS Benutzerhandbuch
-
-
-

