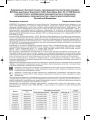
Bosch BGB45331 Bedienungsanleitung
- Kategorie
- Staubsauger
- Typ
- Bedienungsanleitung
Dieses Handbuch eignet sich auch für

Umschlag 9000 955 842 11.08.2014 7:28 Uhr Seite 1
Seite wird geladen ...

2
Reinigung und Benutzer-Wartung dürfen
nicht durch Kinder ohne Beaufsichtigung
durchgeführt werden.
Plastiktüten und Folien sind außer
Reichweite von Kleinkindern aufzube-
wahren und zu entsorgen.
=> Es besteht Erstickungsgefahr!
Sachgemäßer Gebrauch
Staubsauger nur gemäß Typenschild anschließen und
in Betrieb nehmen.
Niemals ohne Staubbeutel bzw. Staubbehälter,
Motorschutz - und Ausblasfilter saugen.
=> Gerät kann beschädigt werden!
Niemals mit Düse und Rohr in Kopfnähe saugen.
=> Es besteht Verletzungsgefahr!
Beim Saugen auf Treppen muss das Gerät immer
unterhalb des Benutzers stehen.
Das Netzanschlusskabel und den Schlauch nicht zum
Tragen / Transportieren des Staubsaugers benutzen.
Wenn die Netzanschlussleitung dieses Gerätes
beschädigt ist, muss sie durch den Hersteller oder
seinen Kundendienst oder eine ähnlich qualifizierte
Person ersetzt werden, um Gefährdungen zu vermei-
den.
Bei einer Betriebsdauer von mehr als 30 Minuten
Netzanschlusskabel vollständig ausziehen.
Nicht am Anschlusskabel, sondern am Stecker zie-
hen, um das Gerät vom Netz zu trennen.
Achten Sie darauf, dass der Netzstecker beim auto-
matischen Kabeleinzug nicht gegen Personen,
Körperteile, Tiere oder Gegenstände geschleudert
wird. => Netzanschlusskabel mit Hilfe des Netz-
steckers führen.
Das Netzanschlusskabel nicht über scharfe Kanten
ziehen und nicht einquetschen.
Vor allen Arbeiten am Staubsauger Netzstecker zie-
hen.
Beschädigten Staubsauger nicht in Betrieb nehmen.
Beim Vorliegen einer Störung Netzstecker ziehen.
Um Gefährdungen zu vermeiden, dürfen Reparaturen
und Ersatzteileaustausch am Staubsauger nur vom
autorisierten Kundendienst durchgeführt werden.
Staubsauger vor Witterungseinflüssen, Feuchtigkeit
und Hitzequellen schützen.
Keine brennbaren oder alkoholhaltigen Stoffe auf die
Filter (Staubbeutel, Motorschutzfilter, Ausblasfilter
etc.) geben.
Staubsauger ist für den Baustellenbetrieb nicht
geeignet.
=> Einsaugen von Bauschutt kann zur Beschädigung
des Gerätes führen.
Gerät ausschalten und Netzstecker ziehen, wenn
nicht gesaugt wird.
Ausgediente Geräte sofort unbrauchbar machen,
danach das Gerät einer ordnungsgemäßen
Entsorgung zuführen.
de
Die Gebrauchsanweisung bitte aufbewahren.
Bei Weitergabe des Staubsaugers an Dritte bitte
Gebrauchsanweisung mitgeben.
Bestimmungsgemäße Verwendung
Dieser Staubsauger ist für den Gebrauch im Haushalt
und nicht für gewerbliche Zwecke bestimmt. Den
Staubsauger ausschließlich gemäß den Angaben in die-
ser Gebrauchsanweisung verwenden. Der Hersteller
haftet nicht für eventuelle Schäden, die durch nicht
bestimmungsgemäßen Gebrauch oder falsche
Bedienung verursacht werden.
Deshalb beachten Sie bitte unbedingt die nachfolgen-
den Hinweise!
Der Staubsauger darf nur bedient werden mit:
Original-Ersatzteilen, -Zubehör oder -Sonderzubehör.
Um die Garantieleistung nicht zu gefährden, empfeh-
len wir das Betreiben ihres Gerätes nur mit Original-
Staubbeuteln.
Um Verletzungen und Schäden zu vermeiden, darf
der Staubsauger nicht benutzt werden für:
das Absaugen von Menschen oder Tieren.
das Aufsaugen von:
- Kleinlebewesen (z. B. Fliegen, Spinnen, ...).
- gesundheitsschädlichen, scharfkantigen, heißen
oder glühenden Substanzen.
- feuchten oder flüssigen Substanzen.
- leicht entflammbaren oder explosiven Stoffen und
Gasen.
- Asche, Ruß aus Kachelöfen und Zentral-
Heizungsanlagen.
- Tonerstaub aus Druckern und Kopierern.
Sicherheitshinweise
Dieser Staubsauger entspricht den aner-
kannten Regeln der Technik und den ein-
schlägigen Sicherheitsbestimmungen.
Das Gerät kann von Kindern ab 8 Jahren
und darüber und von Personen mit
verringerten physischen, sensorischen
oder mentalen Fähigkeiten oder Mangel
an Erfahrung und / oder Wissen benutzt
werden, wenn sie beaufsichtigt werden
oder bezüglich des sicheren Gebrauchs
des Gerätes unterwiesen wurden und
die daraus resultierenden Gefahren ver-
standen haben.
Kinder dürfen nicht mit dem Gerät
spielen.
Innenteil 9000 955 842 A 10.07.2014 7:02 Uhr Seite 2

3
Please keep this instruction manual. When passing the
vacuum cleaner on to a third party, please also pass on
this instruction manual.
Intended use
This vacuum cleaner is intended for domestic use and
not for commercial use. Only use this vacuum cleaner
in accordance with the instructions in this instruction
manual. The manufacturer will not accept any respon-
sibility for damage caused by improper use or incor-
rect operation.
Therefore, please note the following points.
The vacuum cleaner must only be operated with:
Original replacement parts, accessories or special
accessories.
In order to avoid invalidating the warranty, we recom-
mend that you operate your appliance using only origi-
nal dust bags.
In order to prevent injuries and damage, the vacuum
cleaner must not be used for:
Vacuum-cleaning persons or animals
Vacuuming up:
- insects or spiders.
- hazardous, sharp-edged, hot or glowing sub-
stances.
- damp or liquid substances.
- highly flammable or explosive substances and
gases.
- ash, soot from tiled stoves and central heating
systems.
- toner dust from printers and copiers.
Safety information
This vacuum cleaner complies with the
recognised rules of technology and the
relevant safety regulations.
The appliance may be used by children
over the age of 8 years and by persons
with reduced physical, sensory or
mental capacity or by persons with a
lack of experience or knowledge if they
are supervised or have been instructed
on the safe use of the appliance and the
have understood the potential dangers
of using the appliance.
Children must never play with the
appliance.
Cleaning and user maintenance must
never be carried out by children without
supervision.
en
! Bitte beachten
Die Netzsteckdose muss über eine Sicherung von
mindestens 16A abgesichert sein.
Sollte die Sicherung beim Einschalten des Gerätes
einmal ausgelöst werden, so kann dies daran liegen,
dass gleichzeitig andere Elektrogeräte mit hohem
Anschlusswert am gleichen Stromkreis angeschlos-
sen sind.
Das Auslösen der Sicherung ist vermeidbar, indem
Sie vor dem Einschalten des Gerätes die niedrigste
Leistungsstufe einstellen und erst danach eine höhe-
re Leistungsstufe wählen.
Hinweise zur Entsorgung
Verpackung
Die Verpackung schützt den Staubsauger vor
Beschädigung auf dem Transport. Sie besteht aus
umweltfreundlichen Materialien und ist deshalb
recycelbar. Entsorgen Sie nicht mehr benötigte
Verpackungsmaterialien an den Sammelstellen für
das Verwertungssystem »Grüner Punkt«.
Altgerät
Altgeräte enthalten vielfach noch wertvolle
Materialien. Geben Sie deshalb Ihr ausgedientes
Gerät bei Ihrem Händler bzw. einem Recyclingcenter
zur Wiederverwertung ab. Aktuelle Entsorgungswege
erfragen Sie bitte bei Ihrem Händler oder Ihrer
Gemeindeverwaltung.
Entsorgung Filter und Staubbeutel
Filter und Staubbeutel sind aus umweltverträglichen
Materialien hergestellt. Sofern sie keine Substanzen
enthalten, die für den Hausmüll verboten sind, kön-
nen sie über den normalen Hausmüll entsorgt wer-
den.
Allgemeine Hinweise
Zubehör
Das Aussehen Ihres Zubehörs (Düse, Saugrohr, etc.)
kann bei gleicher Funktionsweise von den Abbildungen
in dieser Gebrauchsanweisung abweichen.
Hinweise zum Energielabel
Bei diesem Staubsauger handelt es sich um einen
Universalstaubsauger.
Für das Erreichen der deklarierten Energieeffizienz und
Reinigungsklasse auf Teppich verwenden Sie bitte die
umschaltbare Universaldüse.
Für das Erreichen der deklarierten Energieeffizienz und
Reinigungsklasse auf Hartboden mit Fugen und Ritzen
verwenden Sie bitte die beigefügte Hartbodendüse
Die angegebenen Werte zum Energielabel wurden
nach den vorgeschriebenen Messverfahren (gemäß
EN60312-1) ermittelt.
Innenteil 9000 955 842 A 10.07.2014 7:02 Uhr Seite 3

4
! Please note
The mains socket must be protected by at least a 16
amp circuit breaker.
If a circuit breaker is tripped when you switch on
the vacuum cleaner, this may be because other elec-
trical appliances which have a high current draw are
connected to the same power circuit.
To prevent the circuit breaker from tripping, select
the lowest power setting before switching the appli-
ance on, and increase the power only once it is run-
ning.
Disposal information
Packaging
The packaging is designed to protect the vacuum
cleaner from being damaged during transportation.
It is made of environmentally friendly materials and
can therefore be recycled. Dispose of packaging that
is no longer required at an appropriate recycling
point.
Old appliance
Old appliances still contain many valuable materials.
Therefore, please take appliances that have reached
the end of their service life to your retailer or recyc-
ling centre so that they can be recycled. For current
disposal methods, please enquire at a retailer or
your local council.
Disposal of filters and dust bags
Filters and dust bags are manufactured from envi-
ronmentally friendly materials. Provided they do not
contain substances that are not permitted in house-
hold waste, you can dispose of them with your nor-
mal household waste.
General information
Accessories
Your accessories (nozzle, suction pipe, etc.) may look
different from but work in the same way as those
depicted in the illustrations in this instruction manual.
Notes on the energy label
This vacuum cleaner is a general purpose vacuum
cleaner.
To achieve the declared energy efficiency and cleaning
performance class on carpet, please use the interchan-
geable universal nozzle.
To achieve the declared energy efficiency and cleaning
performance class on hard floor with nooks and
crannies, please use the hard floor nozzle provided
The values provided on the energy label have been
determined according to the prescribed measuring
process (in accordance with EN60312-1).
Plastic bags and films must be kept out
of the reach of children before disposal.
=> Risk of suffocation.
Proper use
Only connect and use the vacuum cleaner in accor-
dance with the specifications on the rating plate.
Never vacuum without the dust bag or dust contai-
ner, motor protection or exhaust filter.
=> This may damage the vacuum cleaner.
Always keep the vacuum cleaner away from your
head when using nozzles and tubes.
=> This could cause injury!
When vacuuming stairs, the appliance must always
be positioned below the user.
Do not use the power cord or the hose to carry or
transport the vacuum cleaner.
For safety reasons, if this appliance's mains power
cable becomes damaged, it must be replaced by the
manufacturer, their after-sales service department or
a similarlyqualified person.
If using the appliance for longer than 30 minutes,
pull out the power cord completely.
When disconnecting the appliance from the mains,
pull on the plug itself to remove it; do not pull on
the power cord.
When the cable is being automatically rewound,
ensure that the mains plug is not thrown towards
persons, body parts, animals or objects. => Use the
mains plug to guide the power cord.
Do not pull the power cord over sharp edges or
allow it to be-come trapped.
Pull out the mains plug before carrying out any work
on the vacuum cleaner.
Do not operate the vacuum cleaner if it is damaged.
Unplug the appliance from the mains if a fault is
detected.
For safety reasons, only authorised after-sales
service personnel are permitted to carry out repairs
and fit replacement parts to the vacuum cleaner.
Protect the vacuum cleaner from the weather,
moisture and sources of heat.
Do not pour flammable substances or substances
containing alcohol onto the filters (dust bag, motor
protection filter, exhaust filter, etc.).
The vacuum cleaner is not suitable for use on
construction sites.
=> Vacuuming up building rubble could damage the
appliance.
When not in use, switch off the appliance and pull
out the mains plug.
At the end of its life, the appliance should immedia-
tely be rendered unusable, then disposed of in an
appropriate manner.
Innenteil 9000 955 842 A 10.07.2014 7:02 Uhr Seite 4
Seite wird geladen ...

6
it
Conservare le istruzioni per l'uso. In caso di cessione
dell'aspirapolvere a terzi, si raccomanda di consegnare
anche le istruzioni per l'uso.
Utilizzo conforme
Questo aspirapolvere è destinato esclusivamente all'u-
tilizzo in ambito domestico e non è adatto all'uso indu-
striale. Utilizzare l'aspirapolvere soltanto così come
indicato dalle presenti istruzioni per l'uso. Il costrutto-
re non si assume alcuna responsabilità per gli eventuali
danni causati da un utilizzo non conforme o errato.
Si raccomanda pertanto di osservare scrupolosamente
le seguenti avvertenze.
L'aspirapolvere può essere utilizzato esclusivamente
con:
parti di ricambio, accessori o accessori speciali ori-
ginali.
Per non pregiudicare il diritto alla garanzia, consiglia-
mo di usare l'apparecchio solo con sacchetti originali.
Al fine di evitare lesioni e/o danni, l'aspirapolvere
non può essere utilizzato:
su persone e/o animali.
Non può altresì essere utilizzato per aspirare:
- insetti (come mosche, ragni, ecc.)
- sostanze nocive, oggetti affilati, materiali caldi o
incandescenti
- sostanze umide o liquide
- sostanze e gas infiammabili o esplosivi
- cenere, fuliggine delle stufe di maiolica e degli
impianti di
riscaldamento centrali
- polvere del toner di stampanti e fotocopiatrici.
Norme di sicurezza
Questo aspirapolvere è conforme alle dis-
posizioni tecniche riconosciute e alle
norme di sicurezza in vigore.
L'apparecchio può essere utilizzato da
bambini di età pari o superiore a 8 anni
e da persone con ridotte facoltà fisiche,
sensoriali o mentali nonché da persone
prive di sufficiente esperienza e/o
conoscenza dello stesso se sorvegliate o
istruite in merito all'utilizzo sicuro
dell'apparecchio e consapevoli degli
eventuali rischi derivanti da un utilizzo
improprio.
I bambini non devono giocare con
l'apparecchio.
Rendre immédiatement inutilisables les appareils
hors d'usage, ensuite mettre l'appareil au rebut de
façon réglementaire.
! Important
La prise de secteur doit être protégée par un fusible
d'au moins 16 A.
Si le disjoncteur se déclenche lors de la mise en
marche de l'appareil, ceci peut être dû au fait que
d'autres appareils électriques d'une puissance
connectée élevée sont branchés en même temps sur
le même circuit électrique.
Le déclenchement du disjoncteur peut être évité en
réglant l'appareil sur la plus faible puissance avant
de le mettre en marche et en le réglant ensuite sur
une puissance supérieure.
Consignes pour la mise au rebut
Emballage
L'emballage protège l'aspirateur pendant le trans-
port. Il est constitué de matériaux écologiques et est
donc recyclable. Les matériaux d'emballage qui ne
sont plus utilisés doivent être mis au rebut aux
points collecteurs du système de recyclage « Point
vert ».
Appareil usagé
Les appareils usagés contiennent souvent des
matériaux précieux. Il faut donc apporter l'appareil
usagé au revendeur ou à un centre de recyclage pour
la revalorisation. Pour connaître les possibilités d'éli-
mination actuelles, renseignez-vous auprès du reven-
deur ou de la mairie.
Elimination des filtres et des sacs
Les filtres et les sacs ont été fabriqués avec des
matériaux compatibles avec l'environnement. Ils peu-
vent être éliminés avec les ordures ménagères ordi-
naires, à condition qu'ils ne contiennent aucune sub-
stance prohibée.
Indications générales
Accessoires
L'apparence de vos accessoires (brosse, tube d'aspira-
tion, etc.) peut être différentes des illustrations dans
cette notice d'utilisation, le fonctionnement étant tou-
tefois le même.
Indications concernant le label énergétique
Cet aspirateur est à usage général.
Pour atteindre l’efficacité énergétique et la classe de
performance de nettoyage déclarées sur des tapis,
veuillez utiliser la brosse universelle adaptable au type
de sol.
Pour atteindre l’efficacité énergétique et la classe de
performance de nettoyage déclarées sur des sols durs
avec des joints et fissures, veuillez utiliser la brosse
pour sols durs livrée avec l'appareil
Les valeurs indiquées relatives au label énergétique
ont été déterminées en utilisant les méthodes de
mesure prescrites (selon EN60312-1).
Innenteil 9000 955 842 A 10.07.2014 7:02 Uhr Seite 6
Seite wird geladen ...
Seite wird geladen ...
Seite wird geladen ...
Seite wird geladen ...
Seite wird geladen ...
Seite wird geladen ...
Seite wird geladen ...
Seite wird geladen ...
Seite wird geladen ...
Seite wird geladen ...
Seite wird geladen ...
Seite wird geladen ...
Seite wird geladen ...

20
tr
Kullanma kılavuzunu lütfen itinayla saklayınız. Elektrikli
süpürgeyi başka birisine verecek olursanız, lütfen kull-
anma kılavuzunu da veriniz.
Amaca uygun kullanűm
Bu elektrikli süpürge evde kullanım için üretilmiştir,
sanayi ortamında kullanıma uygun değildir. Bu elektrikli
süpürge sadece bu kullanma kılavuzunda verilen bilgile-
re göre kullanılmalıdır. Amaca uygun olmayan veya
hatalı kullanımdan kaynaklanan muhtemel hasarlardan
üretici sorumlu değildir ve sorumlu tutulamaz.
Bu nedenle, lütfen aşağıdaki uyarılara kesinlikle dikkat
ediniz!
Elektrikli süpürge sadece aşağıdaki parçalar ile
kullanılmalıdır:
Orijinal yedek parçalar, -aksesuarlar veya özel akse-
suarlar.
Garantinin geçerliliğini bozmamak için cihazınızı
yalnızca orijinal toz torbalarıyla kullanmanızı öneririz.
Yaralanmaları ve hasarları önlemek için elektrikli
süpürge şunlar için kullanılmamalıdır:
İnsanların veya hayvanların temizlenmesi.
Aşağıdaki cisim, madde veya pisliklerin emilerek
temizlenmesi:
- Küçük canlılar (örn. sinekler, örümcekler, ...).
- Sağlığa zararlı, keskin kenarlı, sıcak veya
kızdırılmış maddeler.
- Nemli veya ıslak maddeler.
- Kolay tutuşabilen veya patlayıcı maddeler ve gaz-
lar.
- Çinili sobalardaki kül, is ve merkezi ısıtma sistem-
leri.
- Yazıcılardan veya fotokopi makinelerinden çıkan
toner tozu.
Güvenlik bilgileri
Bu elektrikli süpürge, geçerli teknik
kurallara ve bilinen güvenlik yönetmelikle-
rine uygundur.
Bu cihaz 8 yaşın altındaki çocuklar ve
fiziksel, algısal veya mental
yeteneklerinde eksiklikler olan veya
tecrübe ve/veya bilgi eksikliği bulunan
kişiler tarafından ancak, gözetim altında
olmaları veya cihazın güvenli kullanımı
hakkında bilgi
sahibi olmaları veya olası tehlikeleri
bilmeleri durumunda kullanılabilir.
Çocukların cihaz ile oynamalarına izin
verilmemelidir.
Γενικές υποδείξεις
Εξαρτήµατα
Η εµφάνιση των εξαρτηµάτων σας (στόµια αναρρόφη-
σης, σωλήνας αναρρόφησης, κλπ.) σε περίπτωση ίδιου
τρόπου λειτουργίας µπορεί να αποκλίνει από τις εικόνες
σε αυτές τις οδηγίες χρήσης.
Υποδείξεις για την ενεργειακή ετικέτα
Αυτή η ηλεκτρική σκούπα πρόκειται για µια ηλεκτρική
σκούπα γενικής χρήσης.
Για την επίτευξη της δηλωµένης τάξης ενεργειακής από-
δοσης και τάξης επίδοσης καθαρισµού σε χαλί χρησιµο-
ποιήστε το πέλµα γενικής χρήσης µε δυνατότητα εναλλα-
γής.
Για την επίτευξη της δηλωµένης τάξης ενεργειακής από-
δοσης και τάξης επίδοσης καθαρισµού σε σκληρό δάπε-
δο µε αρµούς και σχισµές χρησιµοποιήστε το συµπαρα-
διδόµενο πέλµα σκληρού δαπέδου
Οι αναφερόµενες τιµές στην ενεργειακή ετικέτα
έχουν εξακριβωθεί σύµφωνα µε την προκαθορισµένη
µέθοδο µέτρησης (κατά το πρότυπο EN60312-1).
Innenteil 9000 955 842 A 10.07.2014 7:02 Uhr Seite 20
Seite wird geladen ...
Seite wird geladen ...
Seite wird geladen ...
Seite wird geladen ...
Seite wird geladen ...
Seite wird geladen ...
Seite wird geladen ...

использованию прибора и осознания
данными лицами опасностей,
связанных с его эксплуатацией.
Детям запрещено играть с прибором.
Чистка и уход не должны
производиться детьми без присмотра.
Пластиковые мешки и полимерную
плёнку храните и утилизируйте в
недоступном для детей месте.
=> Опасность удушья!
Правильное использование
Подключение к электросети и включение пылесоса
должно производиться только с учётом данных
типовой таблички.
Никогда не используйте пылесос без сменного
пылесборника либо контейнера для сбора пыли,
моторного и выпускного фильтров.
=> Пылесос может быть повреждён!
Не подносите всасывающую насадку и трубку к
голове.
=> Это может привести к травме!
При уборке лестницы пылесос всегда должен
находиться ниже пользователя.
Не используйте сетевой кабель и шланг для
переноски /транспортировки пылесоса.
Во избежание опасности замена поврежденного
сетевого кабеля данного прибора может быть
выполнена только производителем или
авторизованной им сервисной службой либо
лицом, имеющим аналогичную квалификацию.
При продолжительности эксплуатации более
30 минут сетевой кабель необходимо полностью
вытянуть.
При отсоединении прибора от электросети всегда
беритесь рукой за вилку, а не за сетевой кабель.
Перед автоматическим сматыванием сетевого
кабеля убедитесь в том, что его штекер не
цепляется за людей, части тела, животных или
другие объекты. => Отсоедините сетевой кабель от
электросети, потянув за штекер.
Следите за тем, чтобы сетевой кабель не был зажат
и не попадал на острые края предметов.
Перед выполнением любых операций по ремонту и
техни-ческому обслуживанию пылесоса
отсоединяйте его от электросети.
Не пользуйтесь неисправным пылесосом. При
возникновении неисправности вынимайте вилку
из розетки.
Во избежание опасности все работы по ремонту и
замене деталей пылесоса следует выполнять только
в авторизованной сервисной службе.
Защищайте пылесос от воздействия
неблагоприятных метеорологических условий,
влажности и источников тепла.
Не подвергайте фильтры (сменный пылесборник,
моторный фильтр, выпускной фильтр и т. д.)
воздействию воспламеняющихся или
спиртосодержащих веществ.
28
ru
Сохраните инструкцию по эксплуатации. При
передаче пылесоса новому владельцу не забудьте
передать также инструкцию по эксплуатации.
Указания по использованию
Данный пылесос предназначен для уборки бытовых
помещений, он не подходит для промышленного
использования. Используйте пылесос только согласно
приведенным в инструкции по эксплуатации
указаниям. Изготовитель не несёт ответственности за
повреждения, полученные в результате
использования пылесоса не по назначению или
неправильного обращения с ним.
Поэтому обязательно соблюдайте указания,
приведенные ниже!
Для пылесоса необходимо использовать только:
Оригинальные запасные части, принадлежности
или специальные принадлежности.
Для того чтобы не нарушить условия гарантийного
обслуживания, мы рекомендуем использовать
устройство только с оригинальными мешками для
пыли.
Во избежание травм и повреждений пылесос
нельзя использовать для :
чистки людей и животных;
всасывания:
- насекомых (например, мух, пауков, ...);
- вредных для здоровья веществ, острых, горячих
или раскалённых предметов;
- мокрых предметов и жидкостей;
- легковоспламеняющихся или взрывчатых
веществ и газов;
- пепла, сажи из кафельных печей и систем
центрального отопления;
- тонера из принтеров или копировальных
аппаратов.
Правила техники безопасности
Данный пылесос соответствует
общепризнанным техническим
требованиям и специальным правилам
техники безопасности.
Использование пылесоса детьми
старше 8 лет и лицами с
ограниченными физическими или
умственными способностями, а также
лицами, не имеющими опыта
обращения с подобным
оборудованием, допускается только
под присмотром или после
инструктажа по безопасному
Innenteil 9000 955 842 A 10.07.2014 7:02 Uhr Seite 28
Seite wird geladen ...
Seite wird geladen ...
Seite wird geladen ...
Seite wird geladen ...
Seite wird geladen ...
Seite wird geladen ...

35
Innenteil 9000 955 842 A 10.07.2014 7:02 Uhr Seite 35

36
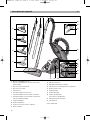
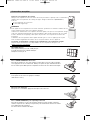
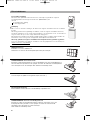
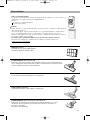
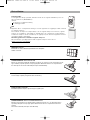
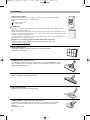
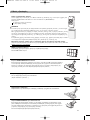
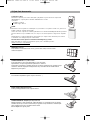
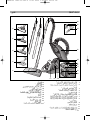
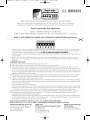
Gerätebeschreibung de
1 Umschaltbare Bodendüse*
2 Umschaltbare Bodendüse mit Entriegelungshülse*
3 Tierhaardüse*
4 Hartbodendüse*
5 Turbobürste*
6 Teleskoprohr mit Schiebetaste*
7 Teleskoprohr mit Schiebemanschette*
8 Teleskoprohr mit Schiebemanschette
und Entriegelungshülse*
9 Schlauchhandgriff
10 Saugschlauch
11 Zubehörträger für Kombidüse*
12 Kombidüse*
13 Deckel
14 Ausblasfilter*
15 Elektronischer Schieberegler
16 Filterwechselanzeige
17 Ein- / Austaste
18 Parkhilfe
19 Netzanschlusskabel
20 Abstellhilfe (an der Geräteunterseite)
21 Motorschutzfilter*
22 Staubbeutel
*je nach Ausstattung
98*
21*
22
20
13
10
19
16
1*
3*
4*
5*
2*
18
17
15
7*6*
14*
11*
12*
Innenteil 9000 955 842 A 10.07.2014 7:02 Uhr Seite 36

37
Es freut uns, dass Sie sich für einen Bosch Staubsauger
der Baureihe BGL45 entschieden haben.
In dieser Gebrauchsanweisung werden verschiedene
BGL45 – Modelle dargestellt. Es ist deshalb möglich,
dass nicht alle beschriebenen Ausstattungsmerkmale
und Funktionen auf Ihr Modell zutreffen.
Sie sollten nur das Original Zubehör von Bosch
verwenden, das speziell für Ihren Staubsauger
entwickelt wurde, um das bestmögliche Saugergebnis
zu erzielen.
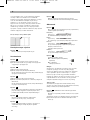
Bitte Bildseiten ausklappen!
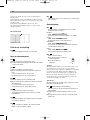
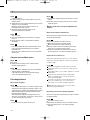
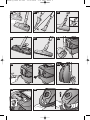
Vor dem ersten Gebrauch
Bild
Handgriff auf Saugschlauch stecken und verrasten.
Inbetriebnahme
Bild
a)Saugschlauchstutzen in die Saugöffnung einrasten.
b)Zum Entfernen des Saugschlauches Entriegelungs-
tasten drücken und Schlauch herausziehen.
Bild
a)Handgriff und Teleskoprohr zusammenstecken.
b)Handgriff bis zum Einrasten in das Teleskoprohr
schieben.
Zum Lösen der Verbindung Entriegelungshülse
drücken und Teleskoprohr herausziehen.
Bild
a)Bodendüse und Teleskoprohr zusammenstecken.
b)Teleskoprohr bis zum Einrasten bündig in den
Stutzen der Bodendüse schieben.
Zum Lösen der Verbindung Entriegelungshülse
drücken und Teleskoprohr herausziehen
Bild
Durch Verstellen der Schiebemannschette /
Schiebetaste in Pfeilrichtung Teleskoprohr entriegeln
und gewünschte Länge einstellen.
Bild
Zubehörträger auf Kombidüse schieben und auf
Saug-/ Teleskoprohr clipsen.
6*
5*
4*
3*
2
1*
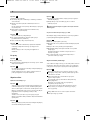
Bild
Netzanschlusskabel am Stecker greifen, auf die
gewünschte Länge herausziehen und Netzstecker in
Steckdose stecken.
Bild
Staubsauger durch Betätigen der Ein- / Austaste in
Pfeilrichtung einschalten.
Saugen
Bild
Durch Verstellen des Schiebereglers kann die
gewünschte Saugkraft stufenlos eingestellt werden.
Niedrigster
Leistungsbereich:
Für das Absaugen empfindlicher Stoffe,
z. B. Gardinen.
Niedriger
Leistungsbereich:
Für die tägliche Reinigung bei geringer
Verschmutzung.
Mittlerer
Leistungsbereich:
Zur Reinigung robuster Bodenbeläge, Hartböden und
bei starker Verschmutzung.
Hoher
Leistungsbereich:
Zum Reinigen von hartnäckigen und sehr starken
Verschmutzungen.
Bild
Bodendüse einstellen:
a)Zum Saugen von Teppichen
und Teppichböden =>
b)Zum Saugen von
Hartböden =>
Achtung!
Bodendüsen unterliegen, abhängig von der Beschaffen-
heit ihres Hartbodens (z.B. raue, rustikale Fließen)
einem gewissen Verschleiß. Deshalb sollten Sie in
regelmäßigen Abständen die Laufsohle der Düse über-
prüfen. Verschlissene, scharfkantige Düsensohlen
können Schäden auf empfindlichen Hartböden wie
Parkett oder Linoleum verursachen. Der Hersteller
haftet nicht für eventuelle Schäden, die durch eine
verschlissene Bodendüse verursacht werden.
Turbo-Bürste
Ist Ihr Gerät mit einer Turbo-Bürste ausgestattet,
entnehmen Sie bitte die Hinweise über Anwendung und
Wartung der beiliegenden Gebrauchsanweisung.
10
9
8
7
de
Innenteil 9000 955 842 A 10.07.2014 7:02 Uhr Seite 37

38
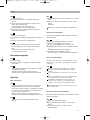
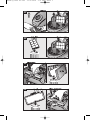
Bild Saugen mit Zusatzzubehör
Düsen je nach Bedarf auf Saugrohr oder Handgriff
stecken:
a)Fugendüse zum Absaugen von Fugen und Ecken, etc.
b)Polsterdüse zum Absaugen von Polstermöbeln,
Vorhängen, etc.
Bild
Tierhaardüse
Bodendüse zum leichten und gründlichen Entfernen
von Tierhaaren.
Teleskoprohr bis zum Einrasten in den Stutzen der
Tierhaardüse schieben.
Zum Lösen der Verbindung Entriegelungshülse
drücken und Teleskoprohr herausziehen.
Zur Reinigung die Düse einfach mit dem Saugrohr /
Teleskoprohr absaugen.
Bild
Hartbodendüse
Zum Reinigen von harten Bodenbelägen
(Fliesen, Parkett usw.)
Hartbodendüse und Teleskoprohr zusammenstecken.
Bild
Bei kurzen Saugpausen können Sie nach Ausschalten
des Gerätes die Parkhilfe an der Geräterückseite
benutzen.
Dazu den Haken an der Bodendüse in die Aussparung
an der Geräterückseite schieben.
Nach der Arbeit
Bild
Netzstecker ziehen.
Kurz am Netzanschlusskabel ziehen und loslassen.
Kabel rollt sich automatisch auf.
Bild
Zum Abstellen/Transportieren des Gerätes können Sie
die Abstellhilfe an der Geräteunterseite benutzen.
Gerät aufrecht hinstellen. Haken an der Bodendüse in
die Aussparung an der Geräteunterseite schieben.
Filterwechsel
Staubbeutel austauschen
Bild
Leuchtet bei vom Teppich abgehobener Düse und
höchster Saugleistungseinstellung die Filterwechsel-
anzeige intensiv und gleichmäßig auf, muss der
Staubbeutel gewechselt werden, auch wenn er noch
nicht voll sein sollte. In diesem Fall macht die Art des
Füllgutes den Wechsel erforderlich.
Düse, Saugrohr und Saugschlauch dürfen dabei nicht
verstopft sein, da dies auch zum Auslösen der
Filterwechselanzeige führt.
17
16
15
14
13*
12*
11*
Bild
Deckel durch Betätigung des Verschlusshebels in
Pfeilrichtung öffnen.
Bild
a)Staubbeutel durch Ziehen an der Verschlusslasche
verschließen und herausnehmen.
b)Neuen Staubbeutel in die Halterung einlegen und
Staubraumdeckel schließen.
!
Achtung: Deckel schließt nur mit eingelegtem
Staubbeutel.
Motorschutzfilter reinigen
Der Motorschutzfilter sollte in regelmäßigen Abständen
durch Ausklopfen bzw. Auswaschen gereinigt werden!
Bild
Staubraumdeckel öffnen (siehe Bild 18).
Motorschutzfilter in Pfeilrichtung herausziehen.
Motorschutzfilter durch Ausklopfen reinigen.
Bei starker Verschmutzung sollte der
Motorschutzfilter ausgewaschen werden.
Den Filter anschließend mindestens 24 Stunden
trocknen lassen.
Nach der Reinigung, Motorschutzfilter in das Gerät
einschieben und Staubraumdeckel schließen.
Filterschaum reinigen
Ist ihr Gerät mit einem Filterrahmen mit Filterschaum
ausgestattet, sollte der Filterschaum in regelmäßigen
Abständen durch Ausklopfen bzw. Auswaschen
gereinigt werden!
Bild
Staubraumdeckel öffnen (siehe Bild 18).
Filterrahmen mit Filterschaum in Pfeilrichtung
herausziehen.
Filterschaum aus dem Filterrahmen entnehmen und
durch Ausklopfen reinigen.
Bei starker Verschmutzung sollte der Filterschaum
ausgewaschen werden.
Den Filterschaum anschließend mindestens
24 Stunden trocknen lassen.
Nach der Reinigung Filterschaum in den Filter-
rahmen einsetzen, den Filterrahmen mit Filterschaum
in das Gerät einschieben und Staubraumdeckel
schließen.
!
Achtung: Staubsauger darf nicht ohne
Motorschutzfilter betrieben werden!
21*
20*
19
18
de
Innenteil 9000 955 842 A 10.07.2014 7:02 Uhr Seite 38

39
Hepa-Filter (Motorschutzfilter) austauschen
Ist Ihr Gerät mit einem Hepa-Filter ausgestattet, muss
dieser jährlich ausgewechselt werden.
Bild
Staubraumdeckel öffnen.
Hepa-Filter in Pfeilrichtung herausziehen und aus
dem Gerät nehmen.
Neuen Hepa-Filter einsetzen und Staubraumdeckel
schließen
Ausblasfilter wechseln
Der Ausblasfilter Ihres Gerätes muss einmal im Jahr
ausgetauscht werden.
Micro-Hygienefilter austauschen
Bild
Staubraumdeckel öffnen (siehe Bild 18).
Durch Drücken der Verschlusslasche in Pfeilrichtung
Filterhalter entriegeln
Filterschaum und Micro-Hygienefilter entnehmen.
Neuen Micro-Hygienefilter und den Filterschaum in
Filterhalter einlegen.
Filterhalter in Gerät einsetzen und verrasten.
Hepa-Filter austauschen
Sie können den neuen Filter über unseren
Kundendienst mit folgender Ersatzteilnummer
bestellen: 574 020
Bild
Staubraumdeckel öffnen (siehe Bild 18).
Durch Drücken der Verschlusslasche in Pfeilrichtung
Hepa-Filter entriegeln und aus dem Gerät nehmen
(siehe Bild 23).
Neuen Hepa-Filter einsetzen und verrasten.
Nach dem Aufsaugen feiner Staubpartikel
(wie z. B. Gips, Zement, usw.), Motorschutzfilter
durch Ausklopfen reinigen, evtl. Motorschutzfilter
und Ausblasfilter austauschen.
24*
23*
22*
*
je nach Ausstattung
Pflege
Vor jeder Reinigung des Staubsaugers muss dieser
ausgeschaltet und der Netzstecker gezogen werden.
Staubsauger und Zubehörteile aus Kunststoff können mit
einem handelsüblichen Kunststoffreiniger gepflegt
werden.
!
Keine Scheuermittel, Glas- oder Allzweckreiniger
verwenden. Staubsauger niemals in Wasser tauchen.
Der Staubraum kann bei Bedarf mit einem zweiten Staub-
sauger ausgesaugt oder einfach mit einem trockenen
Staubtuch / Staubpinsel gereinigt werden.
Technische Änderungen vorbehalten.
de
Innenteil 9000 955 842 A 10.07.2014 7:02 Uhr Seite 39

40
Austauschfilterpackung
Damit Ihr Gerät auf seinem optimalen Leistungsniveau arbeitet, empfehlen wir den Einsatz
von Original-Ersatzbeuteln vom Typ PowerProtect (BBZ41FGALL).
Inhalt:
4 Staubbeutel mit Verschluss
1 Micro-Hygienefilter
HINWEIS
Bei ihrem Gerät handelt es sich um einen hocheffizienten Staubsauger, der nur mit Original-
Staubbeuteln seine besten Reinigungs-Ergebnisse erzielt.
Nur bei der Verwendung von hochwertigen Staubbeuteln, wie den Original-Staubbeuteln von
Bosch werden die im EU Energie-Label angegebene Werte zur Energieeffizienzklasse,
Staubaufnahme und Staubrückhaltevermögen erreicht.
Bei der Verwendung von Staubbeuteln minderer Qualität (z.B. Papierbeutel) kann zudem die
Lebensdauer und Leistung Ihres Gerätes signifikant beeinflusst werden.
Ein Garantieanspruch besteht nur bei Verwendung von Original-Staubbeuteln.
Mehr Informationen und Bestellmöglichkeit von Original-Staubbeuteln unter
www
.bosch-home.com/dust-bag
HEPA-Filter BBZ8SF1
Zusatzlicher Filter für reinere Ausblasluft.
Empfohlen für Allergiker. Jährlich auswechseln.
TURBO-UNIVERSAL
®
-Bürste BBZ102TBB
Bürsten und Saugen in einem Arbeitsgang von kurzflorigen Teppichen und Teppichböden bzw.
für alle Beläge. Besonders geeignet zum Aufsaugen von Tierhaaren. Antrieb der Bürstenwalze
erfolgt über Saugstrom des Staubsaugers. Kein Elektroanschluss erforderlich.
Hartboden-Düse BBZ123HD
Zum Saugen glatter Böden (Parkett, Fliesen, Terracotta,...)
Bodendüse BBZ082BD
Umschaltbare Bodendüse, geeignet für Teppiche und glatte Böden.
Ersatzteile und Sonderzubehör
TURBO-UNIVERSAL
®
-Bürste für Polster BBZ42TB
Bürsten und Saugen von Polstermöbeln, Matratzen, Autositzen, usw in einem Arbeitsgang.
Besonders geeignet zum Aufsaugen von Tierhaaren. Antrieb der Bürstenwalze erfolgt über
Saugstrom des Staubsaugers.
Kein Elektroanschluss erforderlich.
!
Innenteil 9000 955 842 A 10.07.2014 7:02 Uhr Seite 40

41
en
Your vacuum cleaner en
1 Adjustable floor tool*
2 Adjustable floor tool with locking collar*
3 Pet hair tool*
4 Hard-floor brush*
5 Turbo brush*
6 Telescopic tube with sliding switch*
7 Telescopic tube with adjusting sleeve
8 Telescopic tube with adjusting sleeve and locking
collar*
9 Handle
10 Flexible hose
11 Accessories holder for multi-purpose nozzle*
12 Multi-purpose nozzle*
13 Cover
14 Exhaust filter*
15 Electronic slide control
16 Dust bag change indicator
17 ON/OFF button
18 Parking aid
19 Power cord
20 Storage aid (on underside of unit)
21 Motor protection filter*
22 dust bag
*Dependent on model
98*
21*
22
20
13
10
19
16
1*
3*
4*
5*
2*
18
17
15
7*6*
14*
11*
12*
Innenteil 9000 955 842 A 10.07.2014 7:02 Uhr Seite 41

42
en
Congratulations on your purchase of a Bosch BGL45
vacuum cleaner.
This instruction manual describes various BGL45 models,
which means that some of the equipment features and
functions described may not be available on your model.
You should only use original Bosch accessories, which
have been specially developed for your vacuum cleaner to
achieve the best possible vacuuming results.
Fold out picture pages.
Before using for the first time
Figure
Push the handle onto the flexible hose until it engages.
Setting up
Figure
a) Push the flexible hose adapter into the opening on the
vacuum cleaner until it engages.
b To remove the flexible hose, press the release button and
pull the hose out.
Figure
a) Connect the handle and the telescopic tube together.
b) Push the handle into the telescopic tube until it engages.
To release the connection, squeeze the locking collar and
pull the telescopic tube out.
Figure
a) Connect the floor tool and the telescopic tube together.
b) Push the telescopic tube straight into the
connecting piece of the floor tool until it
engages.
To release the connection, squeeze the locking collar
and pull the telescopic tube out.
Figure
To adjust the length of the telescopic tube, adjust the
adjusting sleeve/sliding switch in the direction of the
arrow and adjust the tube to the required length.
Figure
Attach the accessories holder to the multi-purpose
nozzle and clip it onto the suction pipe/telescopic tube.
6*
5*
4*
3*
2
1*
Figure
Take the mains plug, pull the mains cable to the required
length and insert the plug into a socket.
Figure
Press the ON/OFF button in the direction of the arrow to
switch your vacuum cleaner on.
Vacuuming
Figure
The required suction power can be selected infinitely
variably by adjusting the slide control.
Lowest
suction range:
For vacuuming delicate fabrics,
e.g. curtains.
Low
suction range:
For daily vacuuming of lightly soiled floors.
Medium
suction range:
For vacuuming durable floor coverings, hard floors and
for heavily soiled surfaces.
High
suction range:
For vacuuming stubborn dirt and very heavily soiled
surfaces.
Figure
Adjusting the floor tool:
a) For vacuuming rugs
and carpets =>
b For vacuuming
hard floors =>
Caution!
Floor tools are subject to a certain amount of wear,
depending on the type of hard floors you have
(e.g. rough, rustic tiles). Therefore, you must check
the underside of the floor tool at regular intervals.
Worn undersides of floor tools may have sharp edges
that can damage sensitive hard floors, such as parquet
or linoleum. The manufacturer does not accept any
responsibility for damage caused by worn floor tools.
Turbo brush
If your vacuum cleaner is equipped with a turbo brush,
please consult the accompanying instruction manual for
notes on its use and maintenance.
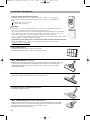
Figure Vacuuming with accessories
Attach the nozzles to the tube or handle as required:
a) Crevice nozzle for vacuuming crevices and corners, etc.
b) Upholstery nozzle for vacuuming upholstered furniture,
curtains, etc.
11*
10
9
8
7
Innenteil 9000 955 842 A 10.07.2014 7:02 Uhr Seite 42

43
en
Figure
Pet hair tool
Floor tool for easy and thorough vacuuming of pet hair.
Push the telescopic tube into the connecting piece of the
pet hair tool until it engages.
Press on the locking collar and pull out the telescopic
tube to disconnect.
To clean, simply vacuum the tool using the suction
pipe/telescopic tube.
Figure
Hard-floor brush
For cleaning hard floor coverings
(tiles, parquet flooring, etc.)
Connect the floor tool and the telescopic tube together.
Figure
Once you have switched off the vacuum cleaner, you can
use the parking aid on the back of the vacuum cleaner if
you wish to stop vacuuming for a short time.
To do this, slide the catch on the floor tool into the
groove on the back of the vacuum cleaner.
When the work is done
Figure
Unplug the vacuum cleaner.
Briefly pull the power cord and release. The cord rewinds
automatically.
Figure
To store or transport the vacuum cleaner, use the storage
aid on the underside of the vacuum cleaner.
Stand the vacuum cleaner up on its end. Slide the catch
on the floor tool into the groove on the underside of the
vacuum cleaner.
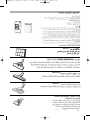
Changing the dust bag and filters
Replacing the dust bag
Figure
If the dust bag change indicator lights up brightly and
evenly when the floor tool is lifted from the carpet and
the highest suction power is selected, the dust bag must
be changed, even though it may not yet be full. In this
case it is essential to change the dust bag due to the
type of material it contains.
First check that the nozzle, suction pipe and flexible hose
are not blocked, as this would also lead to the dust bag
change indicator being triggered.
Figure
Open the lid by moving the locking lever in the direction
of the arrow.
18
17
16
15
14
13*
12*
Figure
a) Seal the dust bag by pulling the sealing strip and then
remove it.
b) Insert a new dust bag into the holder and close the dust
bag compartment lid.
!
Caution: the lid will only close when the dust bag is
inserted.
Cleaning the motor protection filter
The motor protection filter should be cleaned regularly by
knocking out the dirt and rinsing.
Figure
Open the dust bag compartment lid (see Figure 18).
Pull out the motor protection filter in the direction of the
arrow.
Clean the motor protection filter by tapping it.
If it is very dirty, the motor protection filter should be
rinsed.
The filter must then be left to dry for at least 24 hours.
After cleaning, slide the motor protection filter into the
vacuum cleaner and close the dust bag compartment lid.
Cleaning the foam filter
If your appliance is fitted with a filter frame and foam
filter, the foam filter should be cleaned at regular
intervals by tapping out the dust or rinsing the filter.
Figure
Open the dust bag compartment lid (see Fig. 18).
Pull out the filter frame and foam filter in the
direction of the arrow.
Remove the foam filter from the filter frame and
clean it by tapping out the dust.
If the foam filter is very dirty, it should be rinsed.
After rinsing it, allow the foam filter to dry for at
least 24 hours.
After cleaning, place the foam filter back in the filter
frame, insert the filter frame with foam filter in the
appliance and close the dust bag compartment lid.
!
Caution: The vacuum cleaner must not be operated
without the motor protection filter.
21*
20*
19
Innenteil 9000 955 842 A 10.07.2014 7:02 Uhr Seite 43
Seite wird geladen ...

45
Optional accessories
Replacement filter pack
To get the most out of your appliance, we recommend using PowerProtect genuine
replacement bags (BBZ41FGALL).
Contents:
4 dust bags with fasteners
1 micro-hygiene filter
PLEASE NOTE
Your appliance is a highly efficient vacuum cleaner that can only achieve its best cleaning
results using genuine dust bags.
Only if high-quality dust bags are used, such as genuine Bosch dust bags, can the figures
specified on the EU energy label pertaining to energy efficiency class, suction and dust
retention capacity be achieved.
Additionally, using inferior quality dust bags (e.g. paper bags) can have a significant impact
on the service life and performance of your appliance.
Warranty claims can only be made if genuine Bosch dust bags are used.
For more information and to order genuine Bosch dust bags, go to
www
.bosch-home.com/dust-bag
HEPA Filter BBZ8SF1
additional filter for pure exhaust air. Recommended for those with allergies.
Replace every year.
TURBO UNIVERSAL
®
brush BBZ102TBB
All in one brushing and vacuuming of short-pile pile rugs and carpets and all hard floor cover-
ings. Especially suitable for picking up pet hair. The brush roller is driven by the air flow
through the vacuum cleaner. No separate electrical connection is needed.
Hard-floor brush BBZ123HD
For vacuuming hard floors (parquet flooring, tiles, laminate, etc.)
Floor nozzle BBZ082BD
Adjustable floor nozzle, suitable for carpets and hard floors.
TURBO-UNIVERSAL
®
brush for upholstery BBZ42TB
All-in-one brushing and vacuuming of upholstered furniture, mattresses, car seats, etc.
Especially suitable for picking up pet hair. The brush roller is driven by the air flow through
the vacuum cleaner.
No separate electrical connection is needed.
!
Innenteil 9000 955 842 A 10.07.2014 7:02 Uhr Seite 45

46
fr
Description de l'appareil fr
1 Brosse commutable pour sols*
2 Brosse commutable pour sols avec manchon de
déverrouillage*
3 Brosse pour poils d'animaux*
4 Brosse pour sols durs*
5 Turbo Brosse*
6 Tube télescopique avec poussoir*
7 Tube télescopique avec manchette coulissante*
8 Tube télescopique avec manchette coulissante et
manchon de déverrouillage*
9 Poignée de flexible
10 Flexible d'aspiration
11 Porte-accessoires pour buse combinée*
12 Buse combinée*
13 Couvercle
14 Filtre de sortie d'air*
15 Régulateur électronique coulissant
16 Indicateur pour le changement du sac aspirateur
17 Bouton marche / arrêt
18 Position parking
19 Cordon électrique
20 Position de rangement
(sur le dessous de l'appareil)
21 Filtre de protection du moteur*
22 Sac aspirateur
*selon l'équipement
98*
21*
22
20
13
10
19
16
1*
3*
4*
5*
2*
18
17
15
7*6*
14*
11*
12*
Innenteil 9000 955 842 A 10.07.2014 7:02 Uhr Seite 46
Seite wird geladen ...

48
fr
Fig. Aspiration avec les accessoires supplémentaires
Emmancher les suceurs sur le tube d'aspiration ou sur la
poignée, selon les besoins:
a) Suceur de joints, pour aspirer dans les joints et les coins
etc.
b) Tête pour coussins pour aspirer sur des meubles
capitonnés, rideaux, etc.
Fig.
Brosse pour poils d'animaux
Brosse pour sols pour éliminer des poils d'animaux
facilement et à fond.
Pousser le tube télescopique dans le manchon de la
brosse pour poils d'animaux jusqu'à ce qu'il s'enclenche.
Pour le désassemblage, presser le manchon de
déverrouillage et retirer le tube télescopique
Pour le nettoyage, aspirer la buse simplement avec le
tube d'aspiration / tube télescopique.
Fig.
Brosse pour sols durs
Pour nettoyer des revêtements de sol durs (carrelages,
parquet, etc.)
Assembler la brosse pour sols et le tube télescopique.
Fig.
En cas de pauses d'aspiration, vous pouvez utiliser la
position parking à l'arrière de l'appareil après avoir éteint
l'appareil.
A cet effet, glisser le crochet situé sur la brosse pour sols
dans l'évidement à l'arrière de l'appareil.
Après le travail
Fig.
Retirer le connecteur de la prise.
Tirer brièvement sur le cordon électrique et le relâcher. Le
cordon s'enroule automatiquement.
Fig.
Pour ranger/transporter l'appareil vous pouvez utiliser la
position de rangement sur la face inférieure de
l'aspirateur
Placer l'appareil debout. Glisser le crochet situé sur la
brosse pour sols dans l'évidement à la face inférieure de
l'appareil.
16
15
14
13*
12*
11*
Changement de filtre
Remplacement du sac aspirateur
Fig.
Si l'indicateur pour le changement du sac aspirateur est
allumé intensivement et uniformément lorsque la brosse est
décollée du tapis et la puissance d'aspiration est réglée au
maximum, il faut changer le sac aspirateur même s'il n'est
pas encore plein. Dans ce cas, la nature de la matière
contenue dans le sac rend le changement nécessaire.
La brosse, le tube d'aspiration et le flexible d'aspiration
ne doivent alors pas être bouchés, car ceci peut
également déclencher l'indication pour le changement du
sac aspirateur.
Fig.
Ouvrir le couvercle en actionnant le levier de fermeture
dans le sens de la flèche.
Fig.
a) Fermer le sac aspirateur en tirant sur l'attache de
fermeture et enlever le sac.
b) Mettre en place un sac aspirateur neuf dans le support et
fermer le couvercle du compartiment de poussière.
!
Attention: Le couvercle ferme uniquement si un sac
aspirateur en est place.
Nettoyer le filtre de protection du moteur
Le filtre de protection du moteur doit être nettoyé
régulièrement en le frappant ou en le rinçant!
Fig.
Ouvrir le couvercle du compartiment de poussière
(voir fig. 18).
Retirer le filtre de protection du moteur dans le sens de la
flèche.
Nettoyer le filtre de protection du moteur en le frappant.
Si le filtre de protection du moteur est très encrassé, il
est recommandé de le rincer.
Laisser ensuite sécher le filtre au moins 24 heures.
Après le nettoyage, glisser le filtre de protection du
moteur dans l'appareil et fermer le couvercle du
compartiment de poussière.
20*
19
18
17
Innenteil 9000 955 842 A 10.07.2014 7:02 Uhr Seite 48
Seite wird geladen ...

50
Accessoires en option
Paquet de sacs aspirateur de rechange
Afin que votre aspirateur fonctionne à son niveau de performance optimal, nous recommandons
d'utiliser des sacs aspirateur de rechange d'origine du type PowerProtect (BBZ41FGALL).
Contenu :
4 sacs aspirateur avec fermeture
1 micro-filtre hygiénique
REMARQUE
Votre appareil est un aspirateur à très haute efficacité qui atteint ses meilleurs résultats de net-
toyage uniquement avec des sacs aspirateur d'origine.
Seulement en utilisant des sacs aspirateur de haute qualité, tels que les sacs aspirateur d'origi-
ne Bosch, garantissent d'atteindre les valeurs indiquées dans le label d'énergie UE concernant
la classe d'efficacité énergétique, l'absorption de poussière et la capacité de rétention des
poussières.
L'utilisation de sacs aspirateur d'une qualité moindre (par ex. sacs en papier) peut en plus
avoir un impact significatif sur la durée de vie et la performance de votre appareil.
La garantie est uniquement concédée lors de l'utilisation de sacs aspirateurs d'origine.
De plus amples informations et la disponibilité des sacs aspirateurs d'origine sous
www
.bosch-home.com/dust-bag
Filtre HEPA BBZ8SF1
Filtre supplémentaire pour un air soufflé plus pur.
Conseillé aux personnes souffrant d'allergies.
Remplacer une fois par an.
Brosse TURBO-UNIVERSAL
®
BBZ102TBB
Brossage et aspiration en une seule opération sur des tapis à voile ras et des moquettes,
voire appropriée à tous les revêtements. Idéale pour aspirer des poils. Entraînement de la
brosse rotative par le débit aspiré de l'aspirateur. Pas besoin de raccordement électrique.
Brosse pour sols durs BBZ123HD
Pour aspirer sur des sols lisses (parquet, carrelages,
dalles de terre cuite,...)
Buse pour sols BBZ082BD
Buse pour sols commutable, appropriée aux tapis et aux sols lisses.
Brosse TURBO-UNIVERSAL
®
pour capitonnages BBZ42TB
Brossage et aspiration, en une seule opération de travail, sur des meubles capitonnés,
matelas, sièges auto etc. Idéale pour aspirer des poils. Entraînement de la brosse rotative
par le débit aspiré de l'aspirateur.
Pas besoin de raccordement électrique.
!
Innenteil 9000 955 842 A 10.07.2014 7:02 Uhr Seite 50
Seite wird geladen ...
Seite wird geladen ...
Seite wird geladen ...
Seite wird geladen ...
Seite wird geladen ...
Seite wird geladen ...
Seite wird geladen ...
Seite wird geladen ...
Seite wird geladen ...
Seite wird geladen ...
Seite wird geladen ...
Seite wird geladen ...
Seite wird geladen ...
Seite wird geladen ...
Seite wird geladen ...
Seite wird geladen ...
Seite wird geladen ...
Seite wird geladen ...
Seite wird geladen ...
Seite wird geladen ...
Seite wird geladen ...
Seite wird geladen ...
Seite wird geladen ...
Seite wird geladen ...
Seite wird geladen ...
Seite wird geladen ...
Seite wird geladen ...
Seite wird geladen ...
Seite wird geladen ...
Seite wird geladen ...
Seite wird geladen ...
Seite wird geladen ...
Seite wird geladen ...
Seite wird geladen ...
Seite wird geladen ...
Seite wird geladen ...
Seite wird geladen ...
Seite wird geladen ...
Seite wird geladen ...
Seite wird geladen ...
Seite wird geladen ...
Seite wird geladen ...
Seite wird geladen ...
Seite wird geladen ...
Seite wird geladen ...
Seite wird geladen ...
Seite wird geladen ...
Seite wird geladen ...
Seite wird geladen ...
Seite wird geladen ...
Seite wird geladen ...
Seite wird geladen ...
Seite wird geladen ...
Seite wird geladen ...
Seite wird geladen ...
Seite wird geladen ...
Seite wird geladen ...
Seite wird geladen ...
Seite wird geladen ...
Seite wird geladen ...
Seite wird geladen ...
Seite wird geladen ...
Seite wird geladen ...
Seite wird geladen ...
Seite wird geladen ...
Seite wird geladen ...
Seite wird geladen ...
Seite wird geladen ...
Seite wird geladen ...
Seite wird geladen ...
Seite wird geladen ...
Seite wird geladen ...
Seite wird geladen ...
Seite wird geladen ...
Seite wird geladen ...
Seite wird geladen ...
Seite wird geladen ...
Seite wird geladen ...
Seite wird geladen ...
Seite wird geladen ...
Seite wird geladen ...
Seite wird geladen ...
Seite wird geladen ...
Seite wird geladen ...
Seite wird geladen ...
Seite wird geladen ...
Seite wird geladen ...
Seite wird geladen ...
Seite wird geladen ...
Seite wird geladen ...
Seite wird geladen ...
Seite wird geladen ...
Seite wird geladen ...
Seite wird geladen ...
Seite wird geladen ...
Seite wird geladen ...
Seite wird geladen ...
Seite wird geladen ...
Seite wird geladen ...
Seite wird geladen ...
Seite wird geladen ...
Seite wird geladen ...
Seite wird geladen ...
Seite wird geladen ...
-
 1
1
-
 2
2
-
 3
3
-
 4
4
-
 5
5
-
 6
6
-
 7
7
-
 8
8
-
 9
9
-
 10
10
-
 11
11
-
 12
12
-
 13
13
-
 14
14
-
 15
15
-
 16
16
-
 17
17
-
 18
18
-
 19
19
-
 20
20
-
 21
21
-
 22
22
-
 23
23
-
 24
24
-
 25
25
-
 26
26
-
 27
27
-
 28
28
-
 29
29
-
 30
30
-
 31
31
-
 32
32
-
 33
33
-
 34
34
-
 35
35
-
 36
36
-
 37
37
-
 38
38
-
 39
39
-
 40
40
-
 41
41
-
 42
42
-
 43
43
-
 44
44
-
 45
45
-
 46
46
-
 47
47
-
 48
48
-
 49
49
-
 50
50
-
 51
51
-
 52
52
-
 53
53
-
 54
54
-
 55
55
-
 56
56
-
 57
57
-
 58
58
-
 59
59
-
 60
60
-
 61
61
-
 62
62
-
 63
63
-
 64
64
-
 65
65
-
 66
66
-
 67
67
-
 68
68
-
 69
69
-
 70
70
-
 71
71
-
 72
72
-
 73
73
-
 74
74
-
 75
75
-
 76
76
-
 77
77
-
 78
78
-
 79
79
-
 80
80
-
 81
81
-
 82
82
-
 83
83
-
 84
84
-
 85
85
-
 86
86
-
 87
87
-
 88
88
-
 89
89
-
 90
90
-
 91
91
-
 92
92
-
 93
93
-
 94
94
-
 95
95
-
 96
96
-
 97
97
-
 98
98
-
 99
99
-
 100
100
-
 101
101
-
 102
102
-
 103
103
-
 104
104
-
 105
105
-
 106
106
-
 107
107
-
 108
108
-
 109
109
-
 110
110
-
 111
111
-
 112
112
-
 113
113
-
 114
114
-
 115
115
-
 116
116
-
 117
117
-
 118
118
-
 119
119
-
 120
120
-
 121
121
-
 122
122
-
 123
123
-
 124
124
-
 125
125
-
 126
126
-
 127
127
-
 128
128
-
 129
129
-
 130
130
-
 131
131
-
 132
132
-
 133
133
-
 134
134
-
 135
135
-
 136
136
-
 137
137
-
 138
138
-
 139
139
-
 140
140
-
 141
141
-
 142
142
-
 143
143
-
 144
144
-
 145
145
-
 146
146
-
 147
147
-
 148
148
-
 149
149
-
 150
150
-
 151
151
-
 152
152
-
 153
153
-
 154
154
-
 155
155


Bosch BGB45331 Bedienungsanleitung
- Kategorie
- Staubsauger
- Typ
- Bedienungsanleitung
- Dieses Handbuch eignet sich auch für
in anderen Sprachen
- English: Bosch BGB45331 Owner's manual
- français: Bosch BGB45331 Le manuel du propriétaire
- español: Bosch BGB45331 El manual del propietario
- italiano: Bosch BGB45331 Manuale del proprietario
- русский: Bosch BGB45331 Инструкция по применению
- Nederlands: Bosch BGB45331 de handleiding
- português: Bosch BGB45331 Manual do proprietário
- dansk: Bosch BGB45331 Brugervejledning
- polski: Bosch BGB45331 Instrukcja obsługi
- svenska: Bosch BGB45331 Bruksanvisning
- Türkçe: Bosch BGB45331 El kitabı
- suomi: Bosch BGB45331 Omistajan opas
- română: Bosch BGB45331 Manualul proprietarului
Verwandte Artikel
-
Bosch BSB2884 Benutzerhandbuch
-
Bosch BSGL52255 Bedienungsanleitung
-
-
Bosch BGL32211/01 Bedienungsanleitung
-
-
-
-
-
-
Bosch BGL8ZOOAU/05 Bedienungsanleitung
Andere Dokumente
-
Siemens VS08G750 Benutzerhandbuch
-
Siemens VS05G2510/03 Benutzerhandbuch
-
Siemens VS06G2511/03 Benutzerhandbuch
-
-
Miele SWING H1 ECOLINE Bedienungsanleitung
-
-
-
Siemens VSZ4GPXCH/02 Bedienungsanleitung