Silvercrest SAS 7.4 LI A2 Operating Instructions Manual
- Kategorie
- Tragbare Staubsauger
- Typ
- Operating Instructions Manual

IAN 89291
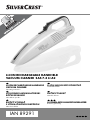
LI-ION RECHARGEABLE HANDHELD
VACUUM CLEANER SAS 7.4 LI A2
LI-ION RECHARGEABLE HANDHELD
VACUUM CLEANER
Operating instructions
LITIJ-IONSKI AKUMULATORSKI
ROČNI SESALNIK
Navodila za uporabo
LI-ION AKKUS KÉZI PORSZÍVÓ
Használati utasítás
RUČNÝ VYSÁVAČ
S LÍTIUM-IÓNOVOU BATÉRIOU
Návod na obsluhu
RUČNÍ VYSAVAČ
Návod k obsluze
LI-IONEN-AKKU-HANDSTAUBSAUGER
Bedienungsanleitung

GB Operating instructions Page 1
HU Használati utasítás Oldal 9
SI Navodila za uporabo Stran 17
CZ Návod k obsluze Strana 25
SK Návod na obsluhu Strana 33
DE / AT / CH Bedienungsanleitung Seite 41
Before reading, unfold the page containing the illustrations and familiarise yourself with all functions of
the device.
Olvasás előtt kattintson az ábrát tartalmazó oldalra és végezetül ismerje meg a készülék mindegyik
funkcióját.
Pred branjem odprite stran s slikami in se nato seznanite z vsemi funkcijami naprave.
Před čtením si otevřete stranu s obrázky a potom se seznamte se všemi funkcemi přístroje.
Pred čítaním si odklopte stranu s obrázkami a potom sa oboznámte so všetkými funkciami prístroja.
Klappen Sie vor dem Lesen die Seite mit den Abbildungen aus und machen Sie sich anschließend mit allen
Funktionen des Gerätes vertraut.

4
1
2
q
0
8
7
6
3
5
9

- 1 -
Content Page
Intended Usage 2
Important safety instructions 2
Items supplied 3
Appliance description 3
Technical data 4
Before taking into use 4
Information about the batteries 4
Installation of the wall holder 4
Charging 5
Operation 5
Cleaning 6
Disposal 6
Warranty and Service 7
Importer 7
IB_89291_SAS7.4LIA1_LB4 01.10.2013 13:11 Uhr Seite 1

- 2 -
Li-Ion Rechargeable
Handheld Vacuum
Cleaner
Congratulations on the purchase of your new
appliance.
You have clearly decided in favour of a quality pro-
duct. These operating instructions are a part of this
product. They contain important information in regard
to safety, use and disposal. Before using the product,
familiarise yourself with all of these operating and
safety instructions. Use the product only as described
and only for the specified areas of application. In ad-
dition, pass these documents on, together with the
product, to any future owner.
Intended Usage
This cordless hand-held vacuum cleaner may only
be used to vacuum dry or wet surfaces resp. dry or
wet materials and fluids. People or animals may not
be vacuumed with this appliance. Any other usage
of, or modification to, the appliance is deemed to be
improper usage and carries the risk of serious per-
sonal injury. The manufacturer accepts no liability
for damages that result from improper use of the ap-
pliance or are caused by the incorrect operation of
it. The appliance is not intended for commercial use.
Important safety instructions
To avoid potentially fatal electric
shocks:
• Do not charge or use the appliance outdoors.
• Never use the hand vacuum cleaner if the cable,
plug or casing are damaged.
• To avoid risks, arrange for damaged power cables
and/or plugs to be replaced as soon as possible
by a qualified specialist or by our Customer
Services.
• Arrange for repairs to be carried out only by
specialist workshops. Under no circumstances
should you open the appliance yourself. Inter-
ferences that are not carried out by a specialist
workshop could lead to physical injuries.
• Before switching the hand vacuum cleaner on,
ensure that the mains voltage corresponds to
the voltage indicated in the technical data for
the appliance.
• Never touch the power supply or the appliance
with wet or damp hands.
• Do not use the power adapter with an extension
cable; connect the power adapter directly to
a power socket.
To avoid the risk of injury:
• Do not change any accessories while the ap-
pliance is switched on.
• Do not use the hand vacuum for vacuuming
up sharp objects or glass shards.
• Never vacuum up burning matches, glowing
ashes or cigarette butts.
• Do not use the hand vacuum for vacuuming up
chemical products, stone dust, gypsum, cement
or similar particles.
• This appliance is not suitable for use with inflam-
mable and explosive substances or chemical
and aggressive liquids.
• Always store the appliance indoors. To prevent
accidents, keep the appliance in a dry location
when not in use.
• Under extreme conditions, leaks in the battery cells
may occur. In the event that battery fluid comes
into contact with skin or eyes, the affected area
must be rinsed off with water immediately.
Contact a physician.
IB_89291_SAS7.4LIA1_LB4 01.10.2013 13:11 Uhr Seite 2

- 3 -
Tips for safety:
• This appliance is not intended for use by individuals
(including children) with restricted physical, physio-
logical or intellectual abilities or deficiences in
experience and/or knowledge unless they are
supervised by a person responsible for their safety
or receive from this person instruction in how the
appliance is to be used. Children should be super-
vised to ensure that they do not play with the
appliance.
• Use only accessory parts recommended by the
manufacturer.
• The power adapter may not be used for other
purposes. Never carry the wall holder or the
power adapter by the cable. Do not pull on the
cable when you want to move the appliance.
• Always grip the power plug to disconnect the
appliance from the power supply.
• Always be sure to keep the hand vacuum away
from heating elements, ovens or other heated
appliances and surfaces.
• Always make certain that the ventilation slits are
open. A blocked ventilation circuit can result in
overheating and damage to the appliance.
• This product contains rechargeable batteries.
Do not thow the batteries into a fire and do
not subject them to high temperatures.
There is the risk of an explosion!
• Take special care when using the hand vacuum
on stairs.
• Do not use the hand vacuum without the dust
filter inserted.
• Do not use the power adapter for a different pro-
duct and do not attempt to charge this appliance
with a different charging station. Use only the
charging station supplied with this appliance.
• Never try to recharge non-rechargeable batteries.
Items supplied
Li-Ion Rechargeable Handheld Vacuum Cleaner
Crevice nozzle
Wet suction nozzle
Wall holder
Assembly material
Power transformer
Operating instructions
Check the items supplied directly after unpacking
for completeness.
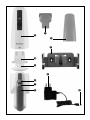
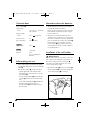
Appliance description
1 Wet suction nozzle
2 Crevice nozzle
3 Wall holder
4 Power adapter
5 Barrel plug
6 On/Off switch
7 Charge indicator lamp
8 Unlocking button
9 Dust filter bag
0 Dust filter
q Dirt container
Note:
This appliance is supplied with non-charged batteries.
The batteries must be charged for 24 hours before
the first use.
IB_89291_SAS7.4LIA1_LB4 01.10.2013 13:11 Uhr Seite 3

- 4 -
Technical data
Power adapter 4
Input voltage /
- current: 100 - 240 V
~
, 50/60 Hz
max. 300 mA
Output voltage/
- current: 9,6 V / 300 mA
Protection class: II /
Type designation: SAS 7.4 LI A2-1
AApppplliiaannccee
Input voltage 7,4 V
BBaatttteerriieess
Capacity: 1300 mAh
Batteries: 7,4 V
(2 x 3.7 V Lithium-Ion
Batteries)
Before taking into use
• Remove all packaging materials from the applian-
ce, particularly the protective cap over the On/Off
switch 6.
• Place the dirt container q onto the motor block:
• Slide the plastic tab on the underside of the
handheld vacuum cleaner into the recess in the
dirt container q.
• Press the unlocking button 8 and slide the dirt
container q onto the motor block at the same
time.
• Let go of the unlocking button 8 so that the lok-
king mechanism engages in the recess.
The dirt container q is now sitting securely on
the motor block.
Information about the batteries
1. This hand-held vacuum cleaner is powered by
rechargeable lithium-ion batteries.
Before using the cableless hand vacuum cleaner
for the first time, the batteries must be charged
for at least 24 hours.
2. The batteries reach their full capacity after a
charging period of 24 hours. For care of the bat-
teries we recommend the following: after the bat-
teries are charged, remove the power adapter 4
from the mains power socket. Reconnect the
power adapter 4 again with the mains power
socket when the suction power of the appliance
is noticeably weaker.
Installation of the wall holder
Mortal danger!
Ensure that there are no power cables or other con-
duits or pipes in the wall at the location where you
intend to bore the holes for the wall holder 3.
It would be a potentially fatal risk to bore into a
current carrying electric cable!
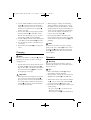
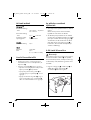
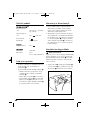
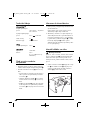
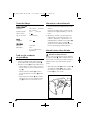
1. Place the barrel plug 5 of the power adapter 4
into the wall holder 3 as shown in the diagramme.
Secure the barrel plug 5 by turning it.
IB_89291_SAS7.4LIA1_LB4 01.10.2013 13:11 Uhr Seite 4

- 5 -
2. Select a suitable installation location for the wall
holder 3: It should present no problem with
taking the hand vacuum cleaner out of it and a
mains power socket for the power adapter 4
must be accessible.
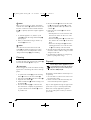
3. Bore two holes with a spacing of approx. 68 mm.
Use the wall holder 3 to mark the boreholes:
this will ensure the spacing is correct. The bore-
holes must be suitable for 5 mm wallplugs.
4. Insert the wallplugs into the boreholes and, using the
screws, firmly screw the wall holder 3 to the wall.
5. You can place the nozzles on the lateral acces-
sories holder.
6. Connect the power adapter 4 to a mains power
socket.
Charging
Note:
Check to ensure that the on/off switch 6 has been
slid back (to the position "0") before starting the
charging process.
• Place the hand vacuum cleaner from above into
the wall holder 3, so that the barrel plug 5
slips into the socket on the hand vacuum cleaner.
The charge indicator lamp 7 flashes red and
the charging process begins.
Important:
• When the hand vacuum again has enough ener-
gy to vacuum, the charge indicator lamp 7
glows green. This does not mean that the batte-
ries are fully charged. When the charge indica-
tor lamp 7 glows green, it means the batteries
are charged to about 80%.
• When charging is complete, which with fully
discharged batteries can take approx. 5 hours,
the appliance automatically switches to a trickle
charge (maintenance function). Nevertheless, in
order to avoid possible damage to the batteries,
do not leave the appliance permanently con-
nected to the power adapter 4.
• First recharge the batteries when the suction
power of the hand vacuum cleaner is noticeably
weaker and the charge indicator lamp 7 green
is blinking.
Note:
The hand vacuum cleaner can also be charged
directly via the power adapter 4. For this, remove
the barrel plug 5 with a slight twist from the wall
holder 3 and insert it into the socket on the hand
vacuum cleaner.
Operation
Warning!
The suction opening must always be open and
unblocked. Blockages lead to overheating and da-
mage to the motor.
Tips:
• Make certain that the dust filter 0 is always
inserted before using the appliance.
• As the maximum, suck up only as much liquid as
will fill the dirt container q to the MAX mark.
1. Take the hand vacuum cleaner from the wall hol-
der 3 or, if you do not use the wall holder 3,
remove the barrel plug 5 from the socket.
2. If required, place the appropriate nozzle into the
suction opening:
• the crevice nozzle 2, to clean narrow and
difficult to reach locations.
• the wet suction nozzle 1 to vacuum liquids up.
IB_89291_SAS7.4LIA1_LB4 01.10.2013 13:11 Uhr Seite 5

- 6 -
Note:
After you have vacuumed up liquids, immediately
clean the dirt container q. Otherwise bacteria and
microbes could form in it! Ensure that the dust filter
bag 9 is completely dry before using the appliance
again.
3. To switch the appliance on, slide the on/off
switch 6 forwards. The charge indicator lamp 7
lights up green.
4. When you have finished using it, slide the on/
off switch 6 to the rear.
Note:
Place the hand vaccum cleaner into the wall
holder 3 and start the charging process when
the suction power is noticeably weaker and the
charge indicator lamps 7 green is blinking.
Cleaning
To achieve the best results, empty the dirt container q
and clean the dust filter 0 after every use.
Important:
Do not use aggressive, chemical or abrasive cleaning
agents. These could damage the surfaces of the ap-
pliance.
1. To open the dirt container q, press the unlocking
button 8 and remove the dirt container q.
2. Remove the dust filter 0 from the dirt container q.
3. Empty the dirt container q.
4. Pull the dust filter bag 9 with its mounting out of
the dust filter 0.
5. Rinse the dust filter bag 9 in cold water and
then wait until it is completely dry again before
you place it back into the dust filter 0. Do not
dry it with hot air.
6. Place the dust filter 0 back into the dirt contai-
ner q. Ensure that the dust filter 0 is seated
squarely and that the rubber lip seals the dirt
container q.
7. Replace the dirt container q back onto the
motor block:
• Push the plastic nose on the underside of the
hand vacuum cleaner into the recess on the
dirt container q.
• Press the unlocking button 8 and, at the same
time, slide the dirt container q onto the motor
block.
• Release the unlocking button 8 so that the
restraint grips into the recess. The dirt contai-
ner q now sits firmly on the motor block.
8. Clean the housing and both nozzles with a lightly
moistened cloth. For stubborn soiling use a mild
detergent on the cloth.
9. Dry all parts thoroughly before reusing the ap-
pliance or putting it into storage.
Disposal
Do not dispose of this appliance in your
normal domestic waste. This product is
subject to the provisions of European
Directive 2002/96/EC.
The appliance and the batteries must be disposed
of separately.
1. Unscrew all the cross-head screws on the motor
block and take it apart.
2. Cut the connection cable from the battery and
remove the battery from the appliance.
Dispose of the appliance through an approved dis-
posal centre or at your community waste facility.
Observe the currently applicable regulations.
In a case of doubt, please contact your waste di-
sposal centre.
IB_89291_SAS7.4LIA1_LB4 01.10.2013 13:11 Uhr Seite 6

- 7 -
Disposal of batteries/cells
Used batteries/cells may not be disposed
of in house-hold waste. Every consumer is
statutorily obliged to dispose of batteries
at a collection site of his community/city
district or at a retail store.
The purpose of this obligation is to ensure that batteries
are disposed of in a non-polluting manner. Only dis-
pose of batteries/cells when they are fully discharged.
Dispose of all packaging materials in an
environmentally friendly manner.
Warranty and Service
The warranty for this appliance is for 3 years from
the date of purchase. The appliance has been ma-
nufactured with care and meticulously examined be-
fore delivery.
Please retain your receipt as proof of purchase. In
the event of a warranty claim, please make contact
by telephone with our Service Department. Only in
this way can a post-free despatch for your goods be
assured.
The warranty covers only claims for material and mau-
facturing defects, but not for transport damage, for
wearing parts or for damage to fragile components,
e.g. buttons or batteries. This product is for private
use only and is not intended for commercial use.
The warranty is void in the case of abusive and impro-
per handling, use of force and internal tampering not
carried out by our authorized service branch. Your
statutory rights are not restricted in any way by this
warranty.
The warranty period will not be extended by repairs
made under warranty. This applies also to replaced
and repaired parts. Any damage and defects extant
on purchase must be reported immediately after un-
packing the appliance, at the latest, two days after
the purchase date. Repairs made after the expira-
tion of the warranty period are subject to payment.
Service Great Britain
Tel.: 0871 5000 720 (£ 0.10/Min.)
E-Mail: [email protected]
Hotline availability:
Monday to Friday 08:00 - 20:00 (CET)
Importer
KOMPERNASS GMBH
BURGSTRASSE 21
44867 BOCHUM, GERMANY
www.kompernass.com
IAN 89291
IB_89291_SAS7.4LIA1_LB4 01.10.2013 13:11 Uhr Seite 7

- 8 -
IB_89291_SAS7.4LIA1_LB4 01.10.2013 13:11 Uhr Seite 8

- 9 -
Tartalomjegyzék Oldalszám
Rendeltetésszerű használat 10
Fontos biztonsági utasítások 10
Tartozékok 11
A készülék leírása 11
Műszaki adatok 12
Az első használat előtt 12
Az akkukra vonatkozó tájékoztató 12
A fali tartó felszerelése 12
Feltöltés 13
Működtetés 13
Tisztítás 14
Ártalmatlanítás 14
Garancia és szerviz 15
Gyártja 15
IB_89291_SAS7.4LIA1_LB4 01.10.2013 13:11 Uhr Seite 9

- 10 -
Li-ion akkus
kézi porszívó
Gratulálunk!
Vásárlásával kiváló minőségű termék mellett dön-
tött. Az összeszerelés és az üzembevétel előtt ismer-
kedjen meg a termékkel. Ehhez figyelmesen olvassa
el az alábbi összeszerelési leírást és a biztonsági
tudnivalókat. Csak a leírtak szerint és a megadott célo-
kra használja a terméket. Őrizze meg ezt a leírást. A
készülék harmadik személynek történő továbbadása-
kor adja a termékhez valamennyi leírást is.
Rendeltetésszerű használat
A morzsaporszívót csak száraz vagy nedves felületek
ill. száraz vagy nedves dolgok vagy folyadékok fel-
szívására szabad használni. Nem szabad emberre
vagy állatra irányítani. A készülék minden más fel-
használása vagy átalakítása nem rendeltetésszerűnek
minősül és balesetveszélyes. A gyártó nem vállal
felelősséget olyan károkért, amelyek a nem rendel-
tetésszerű használat vagy a helytelen kezelés miatt
keletkeztek.
A készülék nem alkalmas iparszerű használatra.
Fontos biztonsági utasítások
Életveszélyes áramütés
elkerülése érdekében:
• Ne töltse ill. használja a készüléket a szabadban.
• A kézi porszívót soha ne használjuk, ha a vezeték,
dugó vagy a külső burkolat meg van sérülve.
• A sérült hálózati kábelt vagy csatlakozót a veszély
elkerülése érdekében azonnal cseréltesse ki sza-
kemberrel.
• Csak szakemberrel végeztessen javítást. Semmi
esetre se szerelje szét egymaga a készüléket.
Az olyan beavatkozások, melyet nem szakértő
cég végez, sérülést okozhatnak.
• A készülék bekapcsolása előtt győződjön meg
arról, hogy a készülék műszaki adatain megjelölt
feszültség megfelel-e a hálózati feszültségnek.
• Ne fogja meg a hálózati részt vagy a készüléket
vizes vagy nedves kézzel.
• Ne használja a hálózati részt hosszabbítóval,
hanem közvetlenül csatlakoztassa a konnektorba.
A sérülésveszély elkerülése
érdekében:
• Ne cseréljen tartozékot a készüléken működés
közben.
• Ne szippantson fel a morzsaporszívóval hegyes
tárgyakat vagy üvegszilánkokat.
• Soha ne szippantson fel égő gyufát, parazsat
vagy cigarettacsikket.
• Ne használja a morzsaporszívóval vegyi anyag,
kőpor, gipsz, cement vagy más részecskeszerű
anyag felporszívózására.
• A készülék nem alkalmas gyúlékony és robbané-
kony anyagok vagy vegyi és agresszív folyadék
felporszívózására.
• A készüléket mindig zárt helyen tárolja. A bale-
setek elkerülése végett a készüléket használat
után száraz helyen tárolja.
• Extrém körülmények között az elemek szivárog-
hatnak. Ha a folyadék érintkezésbe kerül a bőrrel
vagy a szembe jutna, az érintett testrészt azonnal
öblítsük ki vagy öblítsük le tiszta vízzel. Forduljon
orvoshoz.
IB_89291_SAS7.4LIA1_LB4 01.10.2013 13:11 Uhr Seite 10

- 11 -
Így cselekszik helyesen:
• A készülék nem alkalmas arra, hogy olyan sze-
mélyek (ideértve a gyermekeket is) használják,
akiket testi, érzékszervi vagy elmebeli képességeik
vagy tapasztalatuk és ismeretük hiánya mega-
kadályoznának abban, hogy biztonságosan
használják a készüléket, kivéve, ha a biztonsá-
gukról gondoskodó felügyelettel vannak, vagy
ha előtte felvilágosították őket a készülék hasz-
nálatáról. Vigyázni kell a gyermekekre, hogy
ne játsszanak a készülékkel.
• Csak olyan tartozékokat használjon, amelyet
a gyártó ajánl.
• A tápegységet nem szabad más célokra felhasz-
nálni. A fali tartót vagy a tápegységet soha ne
a vezetéknél hordozza. Ne a kábelnél húzza
meg a készüléket, ha arrébb szeretné tenni.
• Mindig a hálózati csatlakozónál fogva húzza
ki a konnektorból a készüléket.
• Mindenképpen ügyeljen arra, hogy a morzsapors-
zívóval ne legyen fűtőtest, sütő vagy más forró
készülék vagy felület közelében.
• Mindig ügyeljen rá, hogy a szellőzőnyílások
szabadon legyenek. A levegőmozgás akadá-
lyoztatása a készülék felhevüléséhez és sérülésé-
hez vezethet.
• A termék újratölthető NiMH-akkumulátorokat
tartalmaz. Ne dobja az akkukat tűzba és ne
tegye ki őket magas hőmérsékletnek.
Robbanásveszély áll fenn!
• A kézi porszívó lépcsőn való használatakor
legyen különösen körültekintő.
• Ne használja a morzsaporszívóval behelyezett
porszűrő nélkül.
• A hálózati részt ne használja más készülékhez és
ne próbálja meg ezt a készüléket másik töltőállo-
mással feltölteni. Csak a csomagban található
tápegységet használja!.
• Ne próbáljon fel nem újratölthető elemet feltölteni.
Tartozékok
Li-ion akkus kézi porszívó
réstisztító fúvóka
nedves szívófej
fali tartó
szerelőanyag
tápegység
Használati utasítás
Közvetlenül kicsomagolás után ellenőrizze a szállí-
tás terjedelmét, hogy hiánytalan-e.
A készülék leírása
1 nedves szívófej
2 réstisztító szívófej
3 fali tartó
4 tápegység
5 csatlakozó
6 kapcsoló
7 töltést jelző ellenőrző lámpa
8 kireteszelő gomb
9 porszűrő tasak
0 porszűrő
q szennyeződéstároló
Tudnivaló:
A készülék akkuja kiszállításkor nincsen feltöltve.
A készülék első használata előtt 24 órán át fel kell
tölteni őket.
IB_89291_SAS7.4LIA1_LB4 01.10.2013 13:11 Uhr Seite 11

- 12 -
Műszaki adatok
TTááppeeggyysséégg
4
Bemeneti feszültség/
- áram: 100 - 240 V
~
, 50/60 Hz
max. 300 mA
Kimeneti feszültség/
- áram: 9,6 V / 300 mA
Védettségi osztály : II/
Típusmegjelölés: SAS 7.4 LI A2-1
KKéésszzüülléékk
Bemeneti feszültség 7,4 V
AAkkkkuukk
Kapacitás: 1300 mAh
Elem: 7,4 V
(2 x 3,7 V lítium ion akku)
Az első használat előtt
• Távolítsa el az összes csomagolóanyagot a
készülékről, különösen a védősapkát a be-/ki-
kapcsolóról 6.
• Helyezze a portartályt q a motor egységre:
• Tolja bele a műanyag bütyköt a kézi porszívó
alján a portartály q mélyedésébe.
• Nyomja meg a kireteszelő gombot 8 és
egyidejűleg tolja rá a portartályt q a motor
egységre.
• Engedje el a kireteszelő gombot 8, hogy a
retesz a mélyedésbe érjen. A portartály q
ekkor szorosan illeszkedik a motor egységre.
Az akkukra vonatkozó
tájékoztató
1. A morzsaporszívó újratölthető lítium ion akkuval
üzemel.
Mielőtt a kézi porszívót először használná,
legalább 24 órán át töltse az akkukat.
2. Az akkuk teljes kapacitásukat 24 órás feltöltési
idő után érik el. Az akkuk ápolásához az alábbit
javasoljuk: csak akkor húzza ki a tápegységet 4
a konnektorból, ha fel vannak töltve az akkuk.
Csak akkor dugja vissza a tápegységet 4 a
konnektorba, ha a készülék szívóteljesítménye
érezhetően alábbhagy.
A fali tartó felszerelése
Életveszély!
Győződjön meg arról, hogy a falon azon a helyen,
ahova ki szeretné fúrni a tartóhoz 3 való lyukakat,
nem húzódik villanyvezeték, másfajta vezeték vagy
cső. Életveszélyes lehet, ha belefúr egy áramot vezető
vezetékbe!
1. Dugja be a tápegység 4 csatlakozóját 5 az
alábbi ábra alapján a fali tartóba 3.
A csatlakozót 5 elfordítva rögzítse.
IB_89291_SAS7.4LIA1_LB4 01.10.2013 13:11 Uhr Seite 12

- 13 -
2. Keressen a fali tartónak 3 egy megfelelő helyet:
a morzsaporszívót minden további nélkül ki kell
tudni húzni belőle és a tápegységhez 4 legyen
egy konnektor a közelben.
3. Fúrjon két lyukat egymástól kb. 68 mm távolságra.
Használja a fali tartót 3 a lyukak bejelölésére:
így pontosan mérheti le a távolságot. A furatokat
5 mm-es dübelekhez fúrjuk ki.
4. Dugja a dübeleket a lyukakba és a csavarok
segítségével csavarozza fel a fali tartót 3.
5. A szívófejeket az oldalsó tartozéktartóra lehet
feldugni.
6. Dugja be a tápegységet 4 a konnektorba.
Feltöltés
Tudnivaló:
Bizonyosodjon meg róla, hogy a Be-/Kikapcsoló
gomb 6 „0” helyzetben van-e, mielőtt megkezdené
a töltést.
• A morzsaporszívót fentről tegye be a fali tartó-
ba 3, hogy a csatlakozót 5 a morzsaporszí-
vón lévő aljzatba csússzon.
A töltésellenőrző lámpa 7 pirosan villog és a
töltés megkezdődik.
Fontos:
• Ha a kézi porszívóban elég energia van szívni,
a töltésjelző lámpa 7 zölden világít. Ez nem jel-
enti azt, hogy az elemek teljesen fel vannak tölt-
ve. Ha a töltésjelző lámpa 7 zölden világít, az
elemek kb. 80%-ban fel vannak töltve.
• Ha a töltés befejeződött, mely teljesen üres akku
esetén 5,5 - 6,5 óráig is eltarthat, a készülék
magától fenntartó töltésre kapcsol át (ápolási
funkció). Ennek ellenére ne hagyja a tápegysé-
get 4 mindig csatlakoztatva, mert így elromol-
hatnak az akkuk.
• Csak akkor töltse fel az akkut, ha a morzsapor-
szívó érezhetően gyengébben szív és a töltésel-
lenőrző lámpa 7 zölden villog.
Tudnivaló:
A morzsaporszívót közvetlenül a tápegységen 4
is lehet tölteni. Ehhez vegye ki a csatlakozót 5
elcsavarva a fali tartóból 3 és dugja a morzsa-
porszívón lévő aljzatba.
Működtetés
Figyelem!
A szívónyílás mindig legyen szabadon és ne legyen
eldugulva. A dugulás túlhevüléshez és a motor sérü-
léséhez vezethet.
Tudnivalók:
• Ügyeljen arra, hogy a porszűrő 0 mindig
be legyen helyezve, mielőtt használná a gépet.
• Legfeljebb csak annyi folyadékot szívjon fel,
amíg a szennytartály q a MAX jelölésig nem
töltődik fel.
1. Vegye le a morzsaporszívót a fali tartóról 3
vagy ha nem használja a fali tartót 3, húzza
ki a csatlakozót 5 az aljzatból.
2. Ha szeretné, tegye a megfelelő szívófejet a
szívónyílásra:
• a réstisztító szívófejet 2, ha szűk, vagy nagyon
nehezen elérhető helyet tisztít.
• a nedves szívófejet 1, ha folyadékot szeretne
felszívni.
IB_89291_SAS7.4LIA1_LB4 01.10.2013 13:11 Uhr Seite 13

- 14 -
Tudnivaló:
A folyadék felszívása után azonnal tisztítsa ki a
portartályt q. Különben baktériumok és bacilusok
keletkezhetnek! Ügyeljen arra, hogy a porszűrő ta-
sak 9 mindig teljesen száraz legyen, mielőtt újra
használná a készüléket.
3. A készülék bekapcsolásához nyomja előre a
be-/kikapcsoló gombot 6. A töltésellenőrző
lámpa 7 zölden villan fel.
4. Használat után tolja hátra a be-/kikapcsoló
gombot 6.
Tudnivaló:
Helyezze a morzsaporszívót a fali tartóba 3
és akkor kezdje a töltést, ha a morzsaporszívó
érezhetően gyengébben szív és a töltésellenőrző
lámpa 7 zölden villog.
Tisztítás
A legjobb eredmény elérése érdekében ürítse ki
a portartályt q és tisztítsa meg a porszűrőt 0
minden használat után.
Fontos:
Ne használjon súroló, maró vagy vegyi tisztítószereket,
mert az kárt tehet a készülék felületében.
1. Ha ki szeretné nyitni a portartályt q, nyomja
meg a kireteszelő gombot 8 és vegye ki a
portartályt q.
2. Vegye ki a porszűrőt 0 a portartályból q.
3. Ürítsa ki a portartályt q.
4. A porszűrő zsákot 9 a tartóval együtt húzza ki
a porszűrőből 0.
5. Hideg vízzel öblítse ki a porszűrő zsákot 9 és
várja meg, amíg teljesen megszárad, mielőtt újra
betenné a porszűrőbe 0. Ne szárítsa forró leve-
gőn.
6. Helyezze vissza a porszűrőt 0 a portartályba q.
Ügyeljen arra, hogy a porszűrő 0 egyenesen
legyen és a portartály q gumiszegély záródjon.
7. Helyezze vissza a portartályt q a motor egységre:
• Tolja a morzsporszívó alján lévő műanyag
fület a portartályon q lévő mélyedésbe.
• Nyomja meg a kireteszelő gombot 8 és egy-
szerre tolja a portartályt q a motor egységre.
• Engedje el a kireteszelő gombot 8, hogy a
retesz a mélyedésbe érjen. A portartályt q
ekkor szorosan illeszkedik a motor egységre.
8. A készülékházat és a két szívófejet kissé meg-
nedvesített ronggyal tisztítsa. Makacs szennyező-
dések esetén tegyen enyhe tisztítószert a meg-
nedvesített kendőre.
9. Alaposan szárítson meg valamennyi alkatrészt,
mielőtt újra használná vagy eltenné a helyére.
Ártalmatlanítás
Semmi esetre se dobja a készüléket a
háztartási hulladékba. Ez a termék a
2002/96/EC európai irányelv hatálya
alá tartozik.
A készüléket és az akkut egymástól külön ártalmat-
lanítsa.
1. Ehhez oldja ki a motorblokkon lévő valamennyi
csavart és szedje szét.
2. Vágja le az akku csatlakozókábelét és vegye
ki az akkut a készülékből.
A készüléket engedélyeztetett hulladékgyűjtő he-
lyen vagy a helyi hulladékeltávolító üzemnél tudja
kidobni.
Vegye figyelembe az érvényben lévő idevonatkozó
előírásokat.
Ha kérdése merülne fel, vegye fel a kapcsolatot a
hulladékfeldolgozó vállalattal.
IB_89291_SAS7.4LIA1_LB4 01.10.2013 13:11 Uhr Seite 14

- 15 -
Az elemek/akkuk ártalmatlanítása
Az elemeket/akkukat nem szabad a háztar-
tási hulladékba dobni. Valamennyi felhasz-
náló törvényes kötelessége az elemeket és
akkukat városa ill. városrésze gyűjtőhelyén
vagy a kereskedelemben leadni.
Ez a kötelezettség azt a célt szolgálja, hogy az ele-
mek/akkuk környezetkímélő ártalmatlanításra kerül-
hessenek. Az elemeket és akkukat csak lemerült ál-
lapotban adják le.
Valamennyi csomagolóanyagot juttasson el
a környezetbarát hulladékhasznosítóhoz.
Garancia és szerviz
A készülékre 3 év garanciát adunk a vásárlás dát-
umától számítva. A készüléket gondosan gyártottuk,
és szállítás előtt lelkiismeretesen ellenőriztük.
Kérjük, a vásárlás igazolására őrizze meg a pénz-
tári blokkot. Kérjük, garanciaigény esetén vegye fel
a kapcsolatot telefonon az Ön közelében lévő szer-
vizzel. Csak ebben az esetben garantálhatjuk, hogy
ingyen tudja beküldeni az árut.
A garancia csak anyag- és gyártási hibára vonatko-
zik, nem pedig szállítási kárra, kopásra vagy töréke-
ny részek (pl. kapcsoló vagy elem) sérülésére. A ter-
mék kizárólag magánhasználatra, nem üzleti
használatra készült.
A garancia érvényét veszti visszaélésszerű vagy
szakavatatlan kezelés, erőszak alkalmazása vagy
olyan beavatkozások esetén, amelyeket nem enge-
délyeztetett szervizelő üzleteink hajtottak végre. Az
ön törvényes jogait ez a garancia nem korlátozza.
A garanciaidő nem hosszabbodik a jótállással. Ez
a kicserélt vagy javított alkatrészekre is érvényes.
Az esetlegesen már a megvételkor meglévő károkat
és hiányosságokat azonnal kicsomagolás után, leg-
később két nappal a vétel dátumától számítva jelez-
ni kell. A garanciális idő lejárta után esedékes javí-
tások térítéskötelesek.,
Szerviz Magyarország
Tel.: 0640 102785
E-Mail: [email protected]
Az ügyfélszolgálati forródrót elérhetősége:
hétfőtől péntekig 8.00 és 20.00 óra között
(közép-európai idő szerint)
Gyártja
KOMPERNASS GMBH
BURGSTRASSE 21
44867 BOCHUM, GERMANY
www.kompernass.com
IAN 89291
IB_89291_SAS7.4LIA1_LB4 01.10.2013 13:11 Uhr Seite 15

- 16 -
IB_89291_SAS7.4LIA1_LB4 01.10.2013 13:11 Uhr Seite 16

- 17 -
Kazalo vsebine Stran
Predvidena uporaba 18
Pomembni varnostni napotki 18
Vsebina kompleta 19
Opis naprave 19
Tehnični podatki 20
Pred prvo uporabo 20
Informacije o akumulatorjih 20
Montaža stenskega držala 20
Polnjenje 21
Uporaba 21
Čiščenje 22
Odstranitev 22
Proizvajalec 23
Servis 23
Garancijski list 23
IB_89291_SAS7.4LIA1_LB4 01.10.2013 13:11 Uhr Seite 17
Seite wird geladen ...
Seite wird geladen ...
Seite wird geladen ...
Seite wird geladen ...
Seite wird geladen ...
Seite wird geladen ...
Seite wird geladen ...
Seite wird geladen ...
Seite wird geladen ...
Seite wird geladen ...
Seite wird geladen ...
Seite wird geladen ...
Seite wird geladen ...
Seite wird geladen ...
Seite wird geladen ...
Seite wird geladen ...
Seite wird geladen ...
Seite wird geladen ...
Seite wird geladen ...
Seite wird geladen ...
Seite wird geladen ...
Seite wird geladen ...
Seite wird geladen ...
Seite wird geladen ...
Seite wird geladen ...
Seite wird geladen ...
Seite wird geladen ...
Seite wird geladen ...
Seite wird geladen ...
Seite wird geladen ...
Seite wird geladen ...
-
 1
1
-
 2
2
-
 3
3
-
 4
4
-
 5
5
-
 6
6
-
 7
7
-
 8
8
-
 9
9
-
 10
10
-
 11
11
-
 12
12
-
 13
13
-
 14
14
-
 15
15
-
 16
16
-
 17
17
-
 18
18
-
 19
19
-
 20
20
-
 21
21
-
 22
22
-
 23
23
-
 24
24
-
 25
25
-
 26
26
-
 27
27
-
 28
28
-
 29
29
-
 30
30
-
 31
31
-
 32
32
-
 33
33
-
 34
34
-
 35
35
-
 36
36
-
 37
37
-
 38
38
-
 39
39
-
 40
40
-
 41
41
-
 42
42
-
 43
43
-
 44
44
-
 45
45
-
 46
46
-
 47
47
-
 48
48
-
 49
49
-
 50
50
-
 51
51


Silvercrest SAS 7.4 LI A2 Operating Instructions Manual
- Kategorie
- Tragbare Staubsauger
- Typ
- Operating Instructions Manual
in anderen Sprachen
- slovenčina: Silvercrest SAS 7.4 LI A2
Verwandte Artikel
-
Silvercrest SAS 7.4 LI B3 Benutzerhandbuch
-
Silvercrest SAS 7.4 LI A1 Operating Instructions Manual
-
-
Silvercrest 42774 Operating Instructions Manual
-
Silvercrest SAS 7.4 LI C1 Operating Instructions Manual
-
-
-
-
-