Midland Alan 42 DS Benutzerhandbuch
- Kategorie
- Uhren
- Typ
- Benutzerhandbuch

> RICETRASMETTITORE CB PORTATILE
> HANDHELD CB TRANSCEIVER
> CB HANDFUNKGERÄT
> TRANSCEPTOR CB PORTATIL
> EMETTEUR-RÉCEPTEUR
CB PORTATIF
> RADIO CB
> STATIE RADIO CB
Alan 42 DS
THE BEST CB AUDIO
NOISE
BLANKER
SYSTEM
DIGITAL
SQUELCH
ANL
FILTER


Manuale d’uso Alan 42 DS | 1
Contenuto
›1 ricetrasmettitore CB portatile
›caricatore da muro per pacco batterie da 8 stili
›pacco vuoto per batterie alcaline da 6 stili tipo AA
›pacco batterie vuoto da 8 stili tipo AA per batterie ricaricabili con presa di ricarica
›adattatore per uso in auto con presa per antenna esterna
›custodia antigrao
›antenna
›attacco a cintura
›cinghia da polso

2 | Manuale d’uso Alan 42 DS
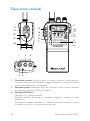
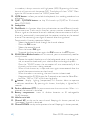
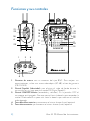
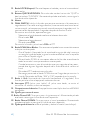
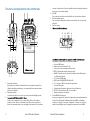
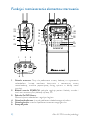
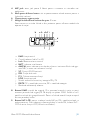
Descrizione comandi
1. Connettore antenna: A questa presa va inserita l’antenna in dotazione con
l’innesto a baionetta. Per estendere il raggio di copertura, si possono utilizzare
antenne esterne veicolari o più ecienti.
2. Manopola squelch: permette di eliminare i fastidiosi rumori in fase di ricezione
e di operare in modalità DS (Digital Squelch).
3. Manopola O-Volume
Posizione OFF: Apparato spento
Posizione Volume: Ruotando la manopola, regolare il volume al livello
desiderato.
Ruotando la manopola verso destra, il volume viene alzato, ruotando la stessa
manopola verso sinistra, il volume viene abbassato.
ALAN 42 DS
1 2 3
4 5
7
20
10
12
13
11
14
13
9
8
17
16
15
6
22
18
23
21
MIC SPK
OFF/VOLDS/SQ
ALAN 42 DS
1 2 3
4 5
7
20
10
12
13
11
14
13
9
8
17
16
15
6
22
18
23
21
MIC SPK
OFF/VOLDS/SQ

Manuale d’uso Alan 42 DS | 3
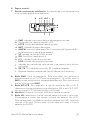
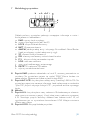
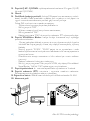
4. Presa microfono esterno: Collegare inserendo nell’ apposito spinotto il
microfono altoparlante (o vox) accessorio.
5. Presa altoparlante esterno: Collegare inserendo all’apposito spinotto il
microfono altoparlante (o vox) accessorio.
6. Attacco cintura
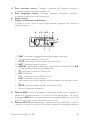
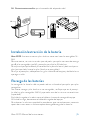
7. Display retroilluminato multifunzione
Il display a cristalli liquidi è stato espressamente progettato per indicare la
modalità operativa.
a. EMG: indicatore lampeggiante canale d’emergenza attivato
b. Numero canali selezionati (da 1 a 40)
c. LOCK: indicatore funzione blocco tastiera attivata
d. BATT: indicatore batterie scariche
e. AM/FM: indicatore del modo di emissione e dell’attivazione del filtro N.B.
(in questo caso l’indicatore è lampeggiante)
f. SC: indicatore funzione SCAN attivata
g. DW: Dual Watch
h. P. S.: indicatore funzione SAVE attivata
i. LOW: indicatore di bassa potenza
j. Indicatore di intensità del segnale ricevuto e di potenza di segnale trasmes-
so.
k. RX/TX: indicatore ricezione (RX) e trasmissione (TX)
l. Banda di frequenza selezionata
8. Pulsante EMG: canale d’emergenza. Premendo questo tasto l’apparato si
posizionerà automaticamente sul canale 9 canale d’emergenza. Sul display
lampeggerà EMG e non sarà possibile cambiare accidentalmente il canale. Per
disinserire questa funzione, premere di nuovo il tasto.
9. Pulsante A/F-LCR:per selezionare il modo di emissione (AM/FM). La relativa
scelta sarà visualizzata sul display. Se inoltre si seleziona una banda di frequenza
ab e k h f i g
d
c
jl

4 | Manuale d’uso Alan 42 DS
che opera solamente la modalità FM, il tasto “A/F-LCR” attiva la funzione LCR
(richiamo ultimo canale utilizzato).
10. Microfono: durante la trasmissione, parlare con un tono di voce normale verso
il microfono
11. Pulsante H/L: Selezione livello di potenza in trasmissione. All’accensione
l’apparato trasmette sempre con il livello più alto (“HIGH”) di potenza.
Premendo questo tasto l’apparato trasmetterà con potenza ridotta,
visualizzando nel contempo sul display la scritta “LOW”. Premere nuovamente
questo tasto per tornare in alta potenza. In alta potenza l’apparato eroga 4W, in
bassa potenza 1W
12. Pulsante LOCK: tramite questo tasto è possibile bloccare la tastiera evitando
accidentali pressioni dei tasti.
13. Pulsanti QUICK UP/DOWN: per spostarsi di dieci canali verso l’alto (UP) o
verso il basso (DOWN).
14. Altoparlante
15. Dual Watch: con questo tasto si ha la possibilità di rimanere sintonizzati
contemporaneamente su due canali a scelta dell’utente.
Con tale funzione si monitorizzerà ciclicamente un secondo canale. In presenza
di un segnale sul secondo canale, la conversazione sul canale prescelto si
interromperà e il ricevitore commuterà automaticamente sul secondo canale. Il
monitoraggio riprenderà dopo 4 secondi dal cessare del segnale.
Per attivare questa funzione, operare come segue:
- Selezionare il canale desiderato mediante il selettore canali
- Premere il tasto DW
- Selezionare il secondo canale
- Ripremere il tasto DW
- Per annullare la funzione premere il tasto DW o il PTT.
16. Pulsante SCAN e Noise Blanker
Tramite questo comando si potrà ricercare automaticamente un canale sul
quale ci sono comunicazioni (occupato). Operare come segue:
- Ruotare lo squelch in senso orario fino a quando non sparisce il rumore di
fondo in un canale libero; oppure ruotare totalmente la manopola in senso
antiorario per utilizzare il Digital Squelch.
- Premere il pulsante SCAN. Il ricetrasmettitore scansionerà automatica-
mente e ripetutamente tutti i canali fino a quando non troverà un canale in
uso.
- Quando trova il canale in uso si ferma e riparte alcuni secondi dopo la fine
della comunicazione sul canale.
- Mandando in trasmissione la radio, la funzione SCAN si disattiva.
- Tenendo premuto il tasto SCAN per 2 secondi si attiva la funzione N.B.; In
questo caso le icone AM /FM lampeggiano sul display.

Manuale d’uso Alan 42 DS | 5
17. Pulsante : Tasto illuminazione display (temporizzata) che consente di poter
operare anche in condizioni di oscurità. Questo tasto permette l’illuminazione
del display per 5 secondi.
18. Interruttore PTT: tasto di commutazione RX/TX. Premendolo si attiva il
trasmettitore, rilasciandolo viene attivato il ricevitore.
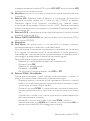
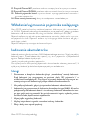
19. Vano batterie: l’apparato funziona con 6 batterie alcaline o 8 batterie Ni-Mh
ricaricabili.
20. Foro per cinghia da polso
21. Pulsante Channel UP: Permette di sintonizzarsi al canale successivo.
Mantenendo premuto questo tasto si ottiene la funzione di autorepeat.
22. Pulsante Channel DOWN: Permette di sintonizzarsi al canale precedente.
Mantenendo premuto questo tasto, si ha la funzione di autorepeat.
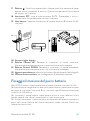
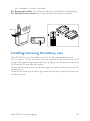
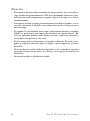
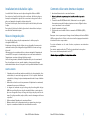
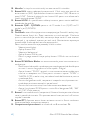
23. Aggancio pacco batterie: sollevare il pulsante e sfilare le batterie (vedi disegno).
24. Contatto antenna ausiliare: per il collegamento all’adattatore veicolare.
Fissaggio/rimozione del pacco batteria
Alan 42 DS funziona sia con batterie alcaline che con batterie ricaricabili NI-Mh.
Per questo motivo vengono forniti due tipi di pacco batterie: pacco batterie vuoto
con presa di ricarica per la carica di 8 stili ricaricabili tipo AA e pacco batterie per
l’uso di 6 stili AA alcaline.
Per rimuovere il pacco batteria vuoto occorre prima di tutto sollevare la leva
laterale; dopo di che sfilate il pacco batteria. Inserire le batterie.
Per fissare nuovamente il pacco batterie posizionatelo nell’apposita scanalatura
posta nella parte inferiore del ricetrasmettitore e fatelo scorrere finché non
udirete scattare un click.
19
24
ALAN 42 DS

6 | Manuale d’uso Alan 42 DS
Ricarica delle batterie
La ricarica delle batterie può avvenire solo utilizzando il pacco batterie per stili
ricaricabili.
Non cercate di ricaricare batterie alcaline o non ricaricabili; accertatevi che
nel pacco batterie dell’apparecchio, con il caricabatterie collegato, vi siano
esclusivamente batterie ricaricabili del tipo consigliato.
Inserite la spina del cavo di ricarica in una presa di alimentazione di rete CA e l’altra
estremità nella presa della radio.
Al termine della carica, scollegate la spina del cavo di ricarica dalla presa da
alimentazione di rete CA.
Per ottenere la capacità massima ricordiamo che normalmente è necessario, al
primo utilizzo della radio, ripetere due/tre volte il ciclo completo di scarica/carica
delle batterie.
Attenzione:
! L’adattatore da muro in dotazione utilizza il metodo di ricarica standard. La corren-
te di ricarica utilizzata è quindi circa il 10% della capacità. Quando le batterie sono
completamente cariche, il processo di carica non si blocca automaticamente.
! E’ consigliato non tenere l’apparecchio perennemente connesso al caricatore; se
non necessario, staccare il ricetrasmettitore dal caricabatteria non appena é tra-
scorso il tempo necessario di ricarica.
! Il caricatore è stato progettato per caricare esclusivamente batterie ricaricabili
NiMh e non può essere utilizzato per caricare batterie Alcaline o altre batterie non
ricaricabili. Batterie non idonee potrebbero perdere liquido, esplodere, bruciare e
causare danni o lesioni personali!
! Per la ricarica, utilizzate il caricatore in dotazione. L’utilizzo di un caricabatterie
non originale può causare danni al vostro apparecchio o causare esplosioni e lesioni
personali.
! Smaltite le batterie esclusivamente seguendo le normative locali.
! La presa di rete deve rimanere prontamente utilizzabile.

Manuale d’uso Alan 42 DS | 7
Uso dell’apparato
1. Collegare l’antenna al ricetrasmettitore
2. Inserire le batterie nell’apposito vano, facendo attenzione alla giusta polarità.
3. Ruotare la manopola di accensione in senso orario, quindi regolare il volume per
un livello normale di ascolto.
4. Regolare lo squelch come descritto al punto 2.
5. Selezionare il canale desiderato mediante i tasti UP/DOWN (oppure QUICK
UP /QUICK DOWN)
Nota: se il canale non cambia, controllare che non sia stato premuto il tasto EMG o
LOCK. In tal caso premere di nuovo il tasto EMG o LOCK per disattivare la funzione
d’emergenza.
Per le altre funzioni fare riferimento alle istruzioni precedentemente descritte.
Per trasmettere: premere e mantenere premuto il tasto PTT situato sul lato sinistro
dell’apparato. Parlare verso il microfono con normale tono di voce .
Per ricevere: rilasciare semplicemente il tasto PTT.
ATTENZIONE: NON ESPORRE IL DISPLAY A TEMPERATURE TROPPO ALTE O
TROPPO BASSE.

8 | Manuale d’uso Alan 42 DS
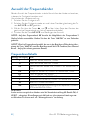
Selezione bande di frequenza
La scelta delle bande di frequenza deve essere eseguita a seconda del paese nel
quale si intende operare.
Procedimento:
1. Spegnere la radio.
2. Accendere l’apparecchio premendo contemporaneamente i tasti A/F-LCR e
SC.
3. Tramite i tasti ▲ e ▼ posizionati sul lato sinistro della radio, selezionare la banda
di frequenza desiderata (vedi tabella bande).
4. Premere il tasto A/F-LCR per terminare la selezione.
NOTA1: Se si seleziona una banda di frequenza che opera solamente in modalità FM,
il tasto A/F-LCR attiva la funzione LCR (richiamo ultimo canale selezionato).
NOTA2: nella banda di frequenza UK è possibile selezionare direttamente la banda I
(Italia) premendo il tasto “AM/FM” per 2 secondi circa.
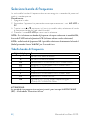
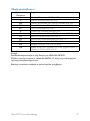
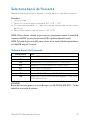
Tabella bande di frequenza
Sigla sul display Paese
IItalia 40 CH AM/FM 4Watt
I2 Italia 34 CH AM/FM 4Watt
D4 Germania 80 CH FM 4Watt / 40 CH AM 4 Watt
EU Europa 40 CH FM 4Watt / 40 CH AM 1 Watt
EC CEPT 40 CH FM 4Watt
ESpagna 40 CH AM/FM 4Watt
FFrancia 40 CH FM 4Watt / 40 CH AM 1 Watt
PL Polonia 40 CH AM/FM 4W
UK Inghilterra 40 CH FM 4Watt frequenze inglesi +
I (Italia) 40 CH AM/FM 4Watt
ATTENZIONE:
Lo standard sicuramente riconosciuto in tutti i paesi europei è 40CH FM 4W
(EC) - Vedi tabella “Restrizioni all’uso”

Manuale d’uso Alan 42 DS | 9
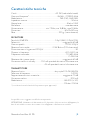
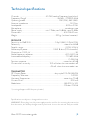
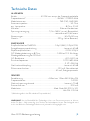
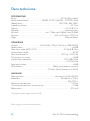
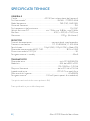
Caratteristiche tecniche
Canali...................................................................................40 FM (vedi tabella bande)
Gamma di frequenza* ............................................................ 26.565 - 27.99125 MHz
Modulazione ............................................................................... F3E (FM), A3E (AM)
Impedenza antenna .............................................................................................50 ohm
Altoparlante .................................................................................................8 ohm 0.5W
Microfono ................................................................................................a condensatore
Alimentazione ................................................ min 7.2Vcc;max 13,8Vcc; nom 12,6Vcc
Dimensioni .............................................................................................30x70x140 mm
Peso ........................................................................................... 220 gr. (senza batterie)
RICEVITORE
Sensibilità 10dB S/N.........................................................0.5µV (AM), 0.25µV (FM)
Selettività ........................................................................................... maggiore di 60 dB
Gamma squelch ......................................................................................0.25V-500µV
Potenza d’uscita audio ................................................ 0.5W 8 ohm (10% distorsione)
Distorsione con un’ingresso di 1000µV....................................................................3%
Risposta in frequenza ............................................................................ 400-2400 Hz
Frequenze intermedie ............................................................................I° 10.695 MHz
........................................................................................................................ II° 455 KHz
Reiezione alle risposte spurie ........................................................... maggiore di 60 dB
Corrente assorbita in standby ............100 mA quando é disinserita la funzione save
...................................................................... 45 mA quando é inserita la funzione save
TRASMETTITORE
Potenza d’uscita ..............................................................duty cycle 10% 4W AM/FM
Tolleranza di frequenza ...................................................................................... 0.005%
Soppressione emissioni armoniche ................................................. maggiore di 70 dB
Corrente assorbita .............................................................................................900 mA
Modulazione .........................................................................................AM 90% (± 5%)
................................................................................................................ FM dev. 2.0KHz
* (considerando tutte le bande di frequenza europee approvate)
Le specifiche sono soggette a modifiche senza preavviso.
ATTENZIONE: L’adattatore di alimentazione è il dispositivo di disconnessione dell’apparato; la
base di carica della corrente deve restare vicino all’apparato e facilmente accessibile.

10 | Manuale d’uso Alan 42 DS

Alan 42 DS instruction guide | 1
Content
›1 portable CB transceiver
›wall charger for 8 penlight battery pack
›empty pack for 6 penlight AA type alkaline batteries
›empty pack for 8 penlight AA type rechargeable batteries with charge jack
›car adapter with SO 239 external antenna jack
›scratch proof case
›antenna
›belt clip
›wrist band

2 | Alan 42 DS instruction guide
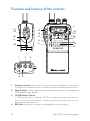
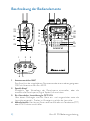
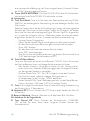
Function and location of the controls
1. Antenna connector: insert into this plug the antenna supplied with the radio. It
is possible to use external vehicular antennas to obtain a better performance.
2. Squelch knob : it allows to eliminate the background noises in rx and to operate
in DS mode (Digital Squelch).
3. On/O Volume Control.
In ‘’o’’ position your transceiver is o. Turn this control clockwise to switch on
the unit. Turn the knob clockwise a little more to set the audio level, until you
get a comfortable reception.
4. MIC jack: connect by inserting the loudspeaker mike to the plug.
ALAN 42 DS
1 2 3
4 5
7
20
10
12
13
11
14
13
9
8
17
16
15
6
22
18
23
21
MIC SPK
OFF/VOLDS/SQ
ALAN 42 DS
1 2 3
4 5
7
20
10
12
13
11
14
13
9
8
17
16
15
6
22
18
23
21
MIC SPK
OFF/VOLDS/SQ

Alan 42 DS instruction guide | 3
5. External loudspeaker jack: connect by inserting the loudspeaker mike to the
plug.
6. Belt clip
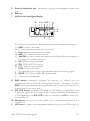
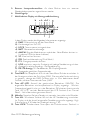
7 Multifunction backlighted display.
This liquid crystal display has been projected to show the operative modality:
a. EMG function activated
b. Channel selected number( from 1 up to 40)
c. Lock: keyboard lock function activated
d. BATT: Run-down batteries indicator
e. AM/FM: it shows the emission mode and the Noise Blanker activation (in
this case, the indication will blink)
f. SC: SCAN function activated
g. DW: DUAL WATCH function
h. P. S.: Save function activated
i. LOW function activated
j. The received signal strength and the power of the transmitting signal
k. RX/TX: TX=transmit mode; RX=receive mode
l. Frequency band selected
8. EMG button: emergency channel. By pressing this button, the unit
automatically skips to Channel 9 (emergency channel). The display will shows
EMG. It will not be possibile to change accidentally the channel. To cancel this
function, press the button again.
9. A/F–LCR button: to select AM mode or FM mode; the modulation you
choose will appear on the display. If you select a frequency band operating
in FM mode only, the A/F–LCR button will activate the LCR function (Last
Channel Recall).
10. Microphone: during transmission, speak with a normal tone of voice to the
microphone.
11. H/L button: it selects the output power level during trasmission.When the unit
ab e k h f i g
d
c
jl

4 | Alan 42 DS instruction guide
is turned on, it always transmits with high power (4W). By pressing this button,
the unit will transmit with low power (1W). The display will show “LOW”. Press
again the H/L button to return to “HIGH” power level.
12. LOCK button: it allows you to lock the keyboard, thus avoiding accidental use
of the keys.
13. Q.UP - Q.DOWN buttons: to skip 10 channels up (Q.UP) or 10 channels
down (Q.DOWN).
14. Loudspeaker
15. Dual Watch: this function allows the synthonization on two dierent channels
at the same time. Thanks to this function, you can monitor a second channel.
When a signal on the second channel is received, the conversation on the first
channel is automatically interrupted and the receiver switches on the second
channel. The monitoring starts again 4 seconds after the signal end.
To activate this function, operate as follows:
- Select the desired channel through the channel selector
- Press the DW button
- Select the second channel
- Press the button DW again
- To cancel the function press again the DW button or the PTT button.
16. SCAN /Noise Blanker button: with this control, you can automatically seek for
a busy channel.
- Rotate the squelch clockwise until the background noise is no longer he-
ard; or rotate the knob totally anti-clockwise to use the digital squelch.-
Press the ‘’SCAN’’ button: the transceiver will scan automatically all the
channels until a carrier is being received.
- When it finds the carrier, it stops and starts again some seconds after the
end of the communication on the channel.
- When the radio is transmitting, the scan function is deactivated.
- Keep pressed the SCAN button for 2 seconds to activate the Noise Blan-
ker filter; “AM” or “FM” will blink on the display.
17. button: display lighting (temporized).This function allows to operate
in darkness conditions. By pressing this button, the display is lighted for 5
seconds.
18. Push to talk button (PTT): Its pressure activates the transmission. When it is
released, the receiver is activated.
19. Battery compartment: insert 6 alkaline batteries or 8 rechargeable
Ni-Mh batteries.
20. Hole for wrist belt
21. Channel UP: to skip to the next channel. Keeping this button pressed, the
“autorepeat” function is obtained.
22. Channel DOWN: to skip to the previous channel. Keeping this button pressed,

Alan 42 DS instruction guide | 5
the “autorepeat” function is obtained.
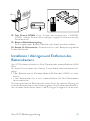
23. Battery pack contact: lift the button and take the batteries out (see drawing).
24. Auxiliary antenna contact: for the connection to the vehicular adaptor.
Installing/removing the battery case
Alan 42 DS works with both Alkaline and with Ni-Mh rechargeable batteries.
For this reason, 2 kinds of battery case are supplied: empty battery case for 8
penlight AA type rechargeable batteries with charge jack and an empty battery case
for 6 penlight AA type alkaline batteries.
To remove the battery case, lift the side trigger and slide the battery case o. Put
the batteries in.
To replace the battery case, slide it again onto the dual track system of the back side
of the transceiver.
19
24
ALAN 42 DS

6 | Alan 42 DS instruction guide
Recharge of the batteries
The battery recharge can be possible only by using the NiMH rechargeable battery
case.
Do not try to charge alkaline batteries or non rechargeable batteries. Make sure that
when you charge the radio, only rechargeable NI-MH batteries should be contained
in the battery compartment!
Use a socket ready accessible for ac/dc adaptor; Connect the socket of the wall
adaptor to a mains power socket and insert the jack of the wall adaptor into the
charge jack of the battery case.
When charging is complete detach the socket of the wall adaptor from the mains.
To obtain the maximum performance and capacity, at the first use of the radio, it is
highly recommended to completely discharge/recharge the batteries 2 or 3 times.
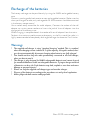
Warnings
! The supplied wall charger is using “standard charging” method. This is a method,
where the charging current is about 10 % of the capacity. Using this method, char-
gers do not automatically disconnect charging when batteries are fully charged.
! You should avoid to keep the radio permanently connected to the wall charger,
when you do not need it.
! The charger is only designed for NiMH rechargeable batteries and cannot be used
for standard Alkaline or other not chargeable batteries. Trying to charge such kind
of batteries can be a risk. Such batteries may leak, explode or even burn and cause
damage or personal injuries!
! Please use only the supplied wall charger type and no other charger.
! Dispose of the batteries according to the procedures set out by local regulations.
! Mains plug used shall remain readily operable.

Alan 42 DS instruction guide | 7
How to operate with your Alan 42 DS
1. Insert the antenna in the antenna connector.
2. Insert the batteries into the battery compartment, noting polarity.
3. Rotate the ON/OFF volume control clockwise to turn the unit on. Adjust the
volume for a normal listening level.
4. Adjust the SQUELCH control
5. Select the desired channel by the UP/DOWN or QUICK UP/QUICK/DOWN
buttons
Note: if the channel does not change,control that the EMG or LOCK button has not
been pressed. In this case, press the EMG or LOCK button to deactivate this function.
As far as the other functions are concerned, refer to previous instructions.
To transmit: press and hold the PTT button, then talk to the microphone.
To receive: simply release the PTT button.
CAUTION: DON’T EXPOSE THE DISPLAY TO EXTREME TEMPERATURES.
Frequency band selection
The frequency bands must be chosen according to the country where you are ope-
rating.
Procedure:
1. Switch o the unit.
2. Turn it on while pushing the “A/F-LCR” and “SC” buttons.
3. By pushing the ▲ and ▼ buttons at the left hand side of the radio, select the
desired frequency band (see the chart).
4. To fix your selection, press the “A/F-LCR” button.
NOTE1: If you select a frequency band which operates in FM mode only, the “A/F-
LCR” control activates the LCR function (Last Channel Recall).
NOTE2: In the UK frequency band, you can select directly the I (Italy) band by pushing
the “AM/FM” button for 2 seconds.

8 | Alan 42 DS instruction guide
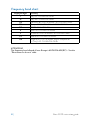
Frequency band chart
Displayed digits Country
IItaly 40 CH AM/FM 4Watt
I2 Italy 34 CH AM/FM 4Watt
D4 Germany 80 CH FM 4Watt / 40 CH AM 4 Watt
EU Europe 40 CH FM 4Watt / 40 CH AM 1 Watt
EC CEPT 40 CH FM 4Watt
ESpain 40 CH AM/FM 4Watt
FFrance 40 CH FM 4Watt / 40 CH AM 1 Watt
PL Poland 40 CH AM/FM 4Watt
UK England 40 CH FM 4Watt English frequencies
+ I (Italy) 40 CH AM/FM 4Watt
ATTENTION!
The frequency band allowed all over Europe is 40CH FM 4W (EC) – See the
“Restrictions on the use” table.
Seite wird geladen ...
Seite wird geladen ...
Seite wird geladen ...
Seite wird geladen ...
Seite wird geladen ...
Seite wird geladen ...
Seite wird geladen ...
Seite wird geladen ...
Seite wird geladen ...
Seite wird geladen ...
Seite wird geladen ...
Seite wird geladen ...
Seite wird geladen ...
Seite wird geladen ...
Seite wird geladen ...
Seite wird geladen ...
Seite wird geladen ...
Seite wird geladen ...
Seite wird geladen ...
Seite wird geladen ...
Seite wird geladen ...
Seite wird geladen ...
Seite wird geladen ...
Seite wird geladen ...
Seite wird geladen ...
Seite wird geladen ...
Seite wird geladen ...
Seite wird geladen ...
Seite wird geladen ...
Seite wird geladen ...
Seite wird geladen ...
Seite wird geladen ...
Seite wird geladen ...
Seite wird geladen ...
Seite wird geladen ...
Seite wird geladen ...
Seite wird geladen ...
Seite wird geladen ...
Seite wird geladen ...
Seite wird geladen ...
Seite wird geladen ...
Seite wird geladen ...
Seite wird geladen ...
Seite wird geladen ...
Seite wird geladen ...
Seite wird geladen ...
Seite wird geladen ...
-
 1
1
-
 2
2
-
 3
3
-
 4
4
-
 5
5
-
 6
6
-
 7
7
-
 8
8
-
 9
9
-
 10
10
-
 11
11
-
 12
12
-
 13
13
-
 14
14
-
 15
15
-
 16
16
-
 17
17
-
 18
18
-
 19
19
-
 20
20
-
 21
21
-
 22
22
-
 23
23
-
 24
24
-
 25
25
-
 26
26
-
 27
27
-
 28
28
-
 29
29
-
 30
30
-
 31
31
-
 32
32
-
 33
33
-
 34
34
-
 35
35
-
 36
36
-
 37
37
-
 38
38
-
 39
39
-
 40
40
-
 41
41
-
 42
42
-
 43
43
-
 44
44
-
 45
45
-
 46
46
-
 47
47
-
 48
48
-
 49
49
-
 50
50
-
 51
51
-
 52
52
-
 53
53
-
 54
54
-
 55
55
-
 56
56
-
 57
57
-
 58
58
-
 59
59
-
 60
60
-
 61
61
-
 62
62
-
 63
63
-
 64
64
-
 65
65
-
 66
66
-
 67
67


Midland Alan 42 DS Benutzerhandbuch
- Kategorie
- Uhren
- Typ
- Benutzerhandbuch
in anderen Sprachen
- français: Midland Alan 42 DS Manuel utilisateur
- español: Midland Alan 42 DS Manual de usuario
- italiano: Midland Alan 42 DS Manuale utente
- română: Midland Alan 42 DS Manual de utilizare
