Seite wird geladen ...

1
Betriebsanleitung
Erweiterungs-Modul
MODBUS für A2..-Geräte
Mode d’emploi
Module d’extension
MODBUS pour instruments A2..
Operating Instructions
MODBUS extension module
for A2.. instruments
EMMOD 201 V 2.0 EMMOD201 Bd-f-e 152 637-01 11.05
Camille Bauer AG
Aargauerstrasse 7
CH-5610 Wohlen/Switzerland
Telefon +41 56 618 21 11
Telefax +41 56 618 35 35
e-mail: info@camillebauer.com
http://www.camillebauer.com
Sicherheitshinweise Safety notes
Die Installation und Inbe-
triebnahme darf nur durch
geschultes Personal erfol-
gen.
Überprüfen Sie vor der Inbetriebnah-
me, dass:
– die maximalen Werte aller Anschlüs-
se nicht überschritten werden,
siehe Kapitel «Technische Daten»,
– die Anschlussleitungen nicht be-
schädigt und bei der Verdrahtung
spannungsfrei sind.
Das Gerät muss ausser Betrieb ge-
setzt werden, wenn ein gefahrloser
Betrieb (z.B. sichtbare Beschädigun-
gen) nicht mehr möglich ist. Dabei
sind alle Anschlüsse abzuschalten.
Das Gerät ist an unser Werk bzw. an
eine durch uns autorisierte Service-
stelle zu schicken.
Leiterplatte und Kontakte
nicht berühren! Elektro-
statische Aufladung kann
elektronische Bauteile zer-
stören.
Bei einem Eingriff in das Gerät erlischt
der Garantieanspruch.
The installation and com-
missioning should only be
carried out by trained per-
sonnel.
Check the following points before
commissioning:
– that the maximum values for all the
connections are not exceeded, see
the “Technical data” section,
– that the connection wires are not
damaged, and that they are not live
during wiring.
The instrument must be taken out of
service if safe operation is no longer
possible (e.g. visible damage). In this
case, all the connections must be
switched off. The instrument must be
returned to the factory or to an autho-
rized service dealer.
Do not touch the printed
circuit or contacts! Electro-
static charge can damage
electronic components.
Unauthorized repair or alteration of the
unit invalidates the warranty.
Consignes de sécurité
L’installation et la mise en
service doivent impérative-
ment être faites par du per-
sonnel spécialement formé.
Avant la mise en service vérifier les
points suivants:
– ne pas dépasser les valeurs maxi-
males de tous les raccordements,
voir chapitre «Caractéristiques tech-
niques»,
– s’assurer que les lignes raccordées
ne soient ni abimées ni sous ten-
sion.
L’appareil doit être mis hors service si
un fonctionnement sans danger n’est
plus possible (p.ex. suite à un dom-
mage visible). Tous les raccordements
doivent être déconnectés. L’appareil
doit être retourné en usine ou à un
atelier autorisé pour faire des travaux
de service.
Ne pas toucher les circuits
imprimés et les contacts!
Des charges électrostati-
ques pourraient endom-
mager les composants élec-
troniques.
Toute intervention dans l’appareil
entraîne l’extinction de la clause de
garantie.
Inhaltsverzeichnis
1. Kurzbeschreibung ......................2
2. Lieferumfang ..............................2
3. Technische Daten .......................2
4. Montage/Demontage .................4
5. Programmierung ........................5
6. Elektrische Anschlüsse ..............7
7. Anschliessen des EMMOD 201 .7
8. Schnittstelle umschalten ............9
9. Zubehör ......................................9
10. Konformitätserklärung .............10
Sommaire
1. Description brève .......................2
2. Etendue de la livraison ...............2
3. Caractéristiques techniques ......2
4. Montage et démontage ..............4
5. Programmation ..........................5
6. Raccordements électriques .......7
7. Raccordement d’EMMOD 201 ...7
8. Commutation d’interface ...........9
9. Accessoires ................................9
10. Certificat de conformité ...........10
Contents
1. Brief description .........................2
2. Scope of supply .........................2
3. Technical data ............................2
4. Mounting/releasing the module .4
5. Programming .............................5
6. Electrical connections ................7
7. Connecting the EMMOD 201 .....7
8. Select interface ..........................9
9. Accessories ................................9
10. Declaration of conformity .........10
Geräte dürfen nur fachge-
recht entsorgt werden!
Les appareils ne peuvent
être éliminés que de façon
appropriée!
The instruments must only
be disposed of in the
correct way!

2
1. Kurzbeschreibung
Das Erweiterungs-Modul EMMOD 201
ergänzt die Funktionalität sowie Flexi-
bilität eines Grundgerätes A2.. und
realisiert die Programmierung bzw.
Kommunikation via RS 232/485 (um-
schaltbar) Schnittstelle. Es ermöglicht
einen Datenaustausch mit einem
Leitsystem mittels MODBUS RTU und
ist ohne Eingriff in das Grundgerät
nachrüstbar. Datenspeicher und Digi-
taleingang ermöglichen Mittelwert- und
Lastprofil-Logger mit Zeit- oder Takt-
Synchronisation. Mit dieser Funktion
ermitteln sie z.B. Ihre Werte für die
Lastprofile. Der Digitaleingang kann
alternativ für die Hoch- und Niedertarif-
umschaltung verwendet werden.
Zum Programmieren des Grundgerä-
tes A2.. mit PC und EMMOD 201 und
zum Lesen und Auswählen der Werte
des Datenspeichers ist die Software
A200plus erforderlich (siehe 9. Zube-
hör).
2. Lieferumfang
1 Erweiterungs-Modul
EMMOD 201
4 Kunststoff-Spreiznieten
1 Betriebsanleitung deutsch/franzö-
sisch/englisch
Je 1 Zusatzschild Eingang und Aus-
gang/Hilfsenergie
3. Technische Daten
Hilfsenergie
Das EMMOD 201 wird vom Grundgerät
A2.. versorgt.
Die Leistungsaufnahme des Grund-
gerätes steigt um < 1 VA bei aufge-
stecktem EMMOD 201.
Umgebungsbedingungen
Betriebs-
temperatur: – 10 bis + 55 °C
Lager-
temperatur: – 25 bis + 70 °C
Relative
Feuchtigkeit im
Jahresmittel: ≤ 75%
Betriebshöhe: 2000 m max.
Nur in Innenräumen zu verwenden
Kommunikation
Schnittstelle: RS 232/RS 485
umschaltbar
Protokoll: MODBUS RTU für
SCADA
1. Brief description
The EMMOD 201 extension module
extends both the functionality and
flexibility of the basic A2.. instru-
ments and supports programming
and communication via the RS 232 /
485 interface (selectable). It supports
data communication with a control
system with the MODBUS RTU. It can
be added without modifying the basic
instrument. Data memory and a digital
input enable the logging of average
values and the load profile with time
or interval based synchronization. This
function determines e.g. the values
for the load profile. Alternatively, the
digital input can be used for switching
between high and low tariff.
The A200plus software is required to
program the basic A2.. instrument with
a PC and the EMMOD 201, and to read
and select the values in memory (see
9. Accessories).
2. Scope of supply
1 EMMOD 201 extension module
4 plastic fixing clips
1 Operating Instructions German/
French/English
1 additional label each for input and
output/power supply
3. Technical data
Power supply
The EMMOD 201 is supplied from the
A2.. basic instrument.
The EMMOD 201 increases the power
consumption of the basic instrument
by < 1 VA.
Environmental conditions
Operating
temperature: – 10 to + 55 °C
Storage
temperature: – 25 to + 70 °C
Relative
humidity of
annual mean: ≤ 75%
Altitude: 2000 m max.
Indoor use statement
Communication
Interface: RS 232/RS 485
switchable
Protocol: MODBUS RTU for
SCADA
1. Description brève
Le module d’extension EMMOD 201
élargit les fonctions et la flexibilité d’un
appareil de base A2.. et réalise la pro-
grammation et la communication par
l’interface commutable RS 232/485. Il
permet l’échange de donnés à l’aide
de MODBUS RTU avec un système de
conduite et peut être incorporé sans
modification dans l’instrument de base.
La mémoire de données et l’entrée
numérique permettent l’acquisition de
valeurs moyennes et de profils de char-
ge avec synchronisation temporelle
ou séquentielle. Cette fonction vous
permet p. ex. de déterminer le profil
des puissances. L’entrée numérique
peut alternativement être utilisée pour
la commutation haut-bas tarif.
Pour la programmation de l’instrument
de base A2.. avec un PC et EMMOD
201 et pour lire et sélectionner les
valeurs mémorisées, il faut disposer
du logiciel A200plus (voir 9. Acces-
soires).
2. Etendue de la livraison
1 module d’extension EMMOD 201
4 rivets spéciaux en matière plas-
tique
1 mode d’emploi en allemand/français/
anglais
1 étiquette additionnelle pour chaque
entrée de mesure et sortie de me-
sure/alimentation auxiliaire
3. Caractéristiques
techniques
Alimentation auxiliaire
L’alimentation de EMMOD 201 est as-
surée par l’instrument de base A2.. .
Par l’enfichage d’EMMOD 201, la con-
sommation de l’instrument des base
augmente de < 1 VA.
Ambiance extérieure
Température
de fonctionne-
ment: – 10 à + 55 °C
Température
de stockage: – 25 à + 70 °C
Humidité rela-
tive en moyenne
annuelle: ≤ 75%
Altitude: 2000 m max.
Utiliser seulement dans les intérieurs
Communication
Interface: RS 232/RS 485 com-
mutable
Protocole: MODBUS RTU pour
automate

3
Digitaleingang
Synchron-
eingang: Synchrontakt für Mittel-
wert- und Lastprofil-
Logger
bzw.
Tarif-
umschalter: Hoch-/Niedertarifum-
schaltung für Ener-
giezähler und Pulsaus-
gänge
Adresse der
Bus-
Schnittstelle: 1 bis 247
Baud-Rate: 1200, 2400, 4800, 9600,
19,2 k
Parity-Check: no, even, odd, space
Datenspeicher für Mittelwert- und
Lastprofil-Logger
Speicherbare
Werte A230: Pint: Wirkleistungsmittel-
wert Bez./Abg.,
Qint: Blindleistungsmit-
telwert Bez./Abg. bzw.
ind./kap.,
Sint: Scheinleistungsmit-
telwert
sowie 9 weitere frei pro-
grammierbare Mittelwer-
te (max. 14 Grössen)
Speicherbare
Werte A210: Pint: Wirkleistungsmit-
telwert mit Vorzeichen
(Bezug+/Abgabe-),
Qint: Blindleistungsmit-
telwert ohne Vorzeichen
(induktiv+/kapazitiv+)
Speichertiefe: 1 Grösse = 166 Tage
2 Grössen = 83 Tage
·
·
14 Grössen = 12 Tage
bei 15min Intervall
Lesen und
Auswahl
der Werte: Über Software A200plus
möglich
Werkeinstellungen
Synchron-
eingang: 15 Min / Dig-Input off
Adresse der
Busschnitt-
stelle: 247
Baudrate: 9600
Parity-Check: no parity
Daten-
speicher: Pint und Qint
Entrée numérique:
Entrée de syn-
chronisation: Contact de synchroni-
sation pour acquisition
de valeurs moyennes et
de profils de charge
Commutateur
de tarif: Commutation haut-bas
tarif pour compteurs
d’énergie et sorties d’im-
pulsions
Adresse de
l’interface
bus: 1 à 247
Débit en
Baud: 1200, 2400, 4800, 9600,
19,2 k
Contrôle de
parité: aucun, paire, impaire,
espace
Mémoire de données pour l’acquisi-
tion de valeurs moyennes et de pro-
fils de charge
Valeurs mémo-
risable A230: Pint: val. moyenne de
puissance active reçu/
fourni,
Qint: val. moyenne de
puiss. réactive reçu/
fourni resp. ind./cap.,
Sint: val. moyenne de
puiss. apparente
en plus 9 valeurs moy-
ennes librement pro-
grammables (au max. 14
grandeurs)
Valeurs mémo-
risable A210: Pint: val. moyenne de
puiss. active avec signe
(reçu+/fourni-),
Qint: val. moyenne de
puiss. réactive sans si-
gne (inductive+ capa-
citive+)
Capacité de
mémorisation:1 valeur = 166 jours
2 valeurs = 83 jours
·
·
14 valeurs = 12 jours
à 15min intervalle
Lire et sélectionner
les valeurs: Possible par logiciel
A200plus
Réglage en usine
Entrée
synchr.: 15 min / dig. input off
Adresse de
l’interface bus:247
Débit en Baud:9600
Contrôle de
parité: no parity
Mémoire de
données: Pint et Qint
Digital input:
Synchronizing
input: Synchronizing interval
for average value and
load profile logger
resp.
tariff
switchover: Switching between high/
low tariff for the energy
counters and pulse out-
puts
Bus interface
address: 1 to 247
Baudrate: 1200, 2400, 4800, 9600,
19.2 k
Parity check: no, even, odd, space
Data memory for average value and
last profile logger
Values that can
be recorded
A230: Pint: average active po-
wer values inc./outg.,
Qint: average reactive
power values inc./outg.
resp. ind./cap.,
Sint: average apparent
power values
and 9 further freely
programmable average
values (max. 14 values)
Values that can
be recorded
A210: Pint: average active
power values with sign
(inc.+/outg.-),
Qint: average reactive
power values without
sign (ind.+ cap.+)
Amount of
data: 1 value = 166 days
2 values = 83 days
·
·
14 values = 12 days
at 15min interval
Reading and
selection
of the values: Possible with the
A200plus software
Factory default
Synchronizing
input: 15 min. / digital input
off.
Bus interface
address: 247
Baudrate: 9600
Parity-check: no parity
Recording: Pint and Qint

4
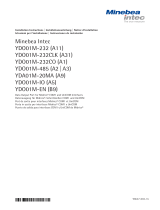
Erweiterungs-Modul (1) einfach auf
der Rückseite des Grundgeräts auf-
stecken (Bild 1). Dabei beachten, dass
Steckerleiste (2) und Steckbuchse (3),
aufeinander passen.
Achtung! Leiterplatte und
Kontakte nicht berühren.
Elektrostatische Aufladung
kann elektronische Bauteile
beschädigen.
Zur mechanischen Sicherung die vier
mitgelieferten Kunststoff-Spreiznieten
(5) in die dafür vorgesehenen Löcher
(4) eindrücken (Bild 2).
Die Zusatzschilder Eingang und Aus-
gang/Hilfsenergie nach Bild 3 aufkle-
ben.
Simply plug-in the extension module
(1) at the back of the basic instrument
(fig. 1). Please ensure that the plug (2)
and socket (3) are aligned correctly.
Note! Do not touch the
printed circuit or contacts!
Electrostatic charge can dam-
age electronic components.
To fix the module mechanically, insert
the four plastic clips supplied (5) in the
fixing holes (4) (fig.2).
Affix the additional label; inputs and
outputs / power supply as in fig. 3.
Embrocher simplement le module com-
plémentaire (1) à l’arrière de l’instru-
ment de base (Fig. 1) tout en veillant
à faire correspondre la fiche (2) et la
prise (3).
Attention! Ne pas toucher le
circuit imprimé ni les con-
tacts.
Des charges électrostatiques
pourraient endommager les
composants électroniques.
Pour assurer mécaniquement le mon-
tage, enficher les 4 rivets spéciaux en
matière plastique (5) dans les trous
correspondants (4), (Fig. 2).
Coller suivant Fig. 3 les plaquettes indi-
catrices avec désignation des entrées,
sorties et alim. auxiliaire.
(1)
(2)
(4)
(3)
Bild 1 / Fig. 1 Bild 2 / Fig. 2
(5)(4)
Zum Demontieren den gerändelten
Kopf (6) der Kunststoff-Spreiznieten
mit den Fingern herausziehen (Bild 4).
Das Erweiterungs-Modul (1) lässt sich
jetzt abnehmen.
To release the module, pull out the
plastic clips by the knurled knob (6)
with the fingers (fig 4). The extension
module (1) can now be removed.
Pour le démontage, retirer les rivets
spéciaux en les tenant par leur tête
moletée (6) (Fig. 4). Le module com-
plémentaire (1) peut maintenant être
débroché.
Bild 3 / Fig. 3
(6)
(1)
Bild 4 / Fig. 4
4. Montage / Demontage
Das zu erweiternde Grundgerät A2..
muss die Firmware Version 1.04 oder
höher enthalten.
Grundgerät A2.. abschalten.
4. Mounting / Releasing the
module
The A2.. basic instrument to be ex-
tended must have at least firmware
version 1.04.
Switch off the basic instru-
ment.
4. Montage et démontage
L’instrument de base A2.. à complé-
ter doit comporter le programme de
base (Firmware) version 1.04 ou plus
haut.
Déclencher l’instrument de
base A2.. .

5
P
P
Digital-Eingang
Entrée numérique
Digital input
COM
1
2
3
4
P
5. Programmierung
Eine ausführliche Programmieranlei-
tung finden Sie in der Bedienungsan-
leitung des Basisgerätes A2.. .
Kurzanleitung
P
- Taste > 2 sec drücken.
P
- Taste drücken, bis das gewün-
schte Menu «Digitaleingang» bzw.
«Com» erscheint. Mit der Taste
gelangt man in die Parameterebene.
P
- Taste drücken und blinkenden
Parameter mit den Tasten
ändern.
P
- Taste > 2 sec. drücken. Das
Basisgerät ist wieder im Anzeige-
modus.
Das Modul muss hierzu aufgesteckt
sein.
5. Programmation
Vous trouvez une instruction de pro-
grammation détaillée dans l’instruction
de service de l’appareil de base A2.. .
Instruction abrégée
Appuyer la touche
P
> 2 sec.
Enfoncer la touche
P
jusqu’à appa-
rition du menu désiré «Entrée numé-
rique» resp. «Com». Avec la touche
on atteint le niveau de paramé-
trage, enfoncer la touche
P
et modi-
fier le paramètre qui clignote avec les
touches .
Appuyer la touche
P
> 2 sec. Re-
mettre l’appareil de base en mode
affichage.
Le module doit être embroché pour ces
opérations.
5. Programming
There are detailed programming in-
structions in the operating instructions
for the basic instrument A2.. .
Brief instructions
Press
P
> 2 sec.
Press the
P
button, until the menu
required, «Digital input» or «Com» ap-
pears. Enter the parameter level with
the button. Press the
P
button
and change the flashing parameter with
the buttons.
Press
P
> 2 sec. The basic instrument
is now in display mode again.
The module must be plugged in for
programming.

6
Übersicht der Parameter Aperçu des paramètres Parameters overview
Anzeige oben
Anzeige mitte
Affichage en haut
Affichage au centre
Topmost display
Middle display
Nr.
No.
Anzeige unten
(Auswahl,
* = Default)
Affichage en bas
(Sélection,
* = défaut)
Undermost display
(Selection,
* = default)
Bedeutung
Signification
Meaning
Hinweis
Information
Hints
Der Eingang bewirkt Hochtarif/Niedertarif-
Umschaltung bei Energiezählern
L’entrée produit la commutation bas/haut tarif
des compteurs d’énergie
Input used for high/low tariff switching of meters
Der Eingang wird zur Synchronisation der Intervall-
Leistungen benutzt
L’entrée sert à la synchronisation des intervalles
de la mesure de puissance
Input used for power interval synchronization
4
no parity
Parity-Bit für die Bus-Kommunikation
auf Erweiterungsmodul
Bit de parité pour la communication
par l’interface bus
Parity checking mode, for bus communi-
cation on optional interface module only
*
2
Adresse der Bus-Schnittstelle
Adresse de l’interface bus
Device address, for bus interface only
3
Baud-Rate für die Bus-Kommunikation auf
Erweiterungsmodul
Fréquence Baud pour la communication par
l’interface bus
Baudrate selection, for bus communication only
*
even parity
odd parity
space
*
Das Zeitintervall im Menu
«Synctime» wird ignoriert
L’intervalle de temps au menu
«Synctime» est ignoré
The time interval in the «Synctime»
menu is ignored
*
1200, 2400,
4800, 9600,
19,2 k
Eingang inaktiv
Entrée inactive
Input inactive
1
Betriebsart des digitalen Eingangs auf
Erweiterungsmodul
Mode de fonctionnement de l’entrée numérique
du module d’interface
Operating mode of the digital input on the
interface module
(input mode)

7
7. Anschliessen des
EMMOD 201
7. Connecting the
EMMOD 201
EMMOD201
MASTER
EMMOD201
+ 3.3/+5V
Rs
Rs
Rt
Rt
30
31
32
1 2 3
1)
Rb
+6V
30
31
32
33
34 Vz
EMMOD201
31
Rb
+6V
30
31
32
33
34
Vz
RS485 Bus
Rx/Tx-,B
Rx/Tx+,A
GND
EMMOD201
30
31
32
Dig. Inp.
Dig.Inp.
++
+–-–
+
–
HT/LT,
Sync.
+
+-
-
1) Erdanschluss nur an einer Stelle.
Eventuell schon im Master (PC)
vorhanden.
Rt Abschlusswiderstände: je 120 Ω bei
langen Leitungen ( > ca. 10m )
Rs Speisewiderstände Bus: je
500...1000 Ω
Rb Speisewiderstand Kontakt-
Eingang 4,5 kΩ
Vz Zenerdiode als Schutz 6,2 V
1) One ground connection only. This is
possibly already made at the master
(PC).
Rt Termination resistors: 120 Ω each
for long cables (> approx. 10m)
Rs Bus supply resistors: 500…1000 Ω
each
Rb Contact input supply resistors
4.5 kΩ
Vz 6.2 V Zener diode for protection
Bild 6 / Fig. 6
7. Raccordement
d’EMMOD 201
1) Mise à terre à un point seulement.
Eventuellement déjà réalisée dans
le Master (PC).
Rt Résistances de bouclage: 120 Ω
chaque, en cas de lignes longues
(> env. 10m )
Rs Résistances d’alimentation bus:
500...1000 Ω chaque
Rb Résistance d’alimentation entrée
contact, 4,5 kΩ
Vz Diode Zener de protection 6,2 V
6. Elektrische Anschlüsse
Siehe Bild 5.
6. Electrical connections
See Fig. 5.
6. Raccordements électriques
Voir Fig. 5.
Rx Tx
GND
GND
RS 232
RS 485
30 31 32 33 34
No. 1
Bild 5 / Fig. 5
Synchroneingang für Leistungsmittelwerte oder
Hoch-/Niedertarif-Umschaltung.
Entrée de synchronisation pour valeurs moyennes
de puissance ou pour la commutation haut/bas tarif.
Synchronizing input for average power values or
switching between high / low tariff.
30 bis 34: Steck-Schraubklemmen
Querschnitt eindrähtig: 0,5 - 2,5 mm2
Querschnitt feindrähtig: 0,5 - 1,5 mm2
30 à 34: Bornes à vis
Section monoconducteur: 0,5 - 2,5 mm2
Section conducteur souple: 0,5 - 1,5 mm2
30 to 34: Plug-in screw terminals
Gauge single wire: 0.5 - 2.5 mm2
Gauge fine wire: 0.5 - 1.5 mm2

8
Programmieranschluss RS232
(Schalter in Stellung RS232)
Mit der PC-Software A200plus und ei-
nem Schnittstellenadapterkabel lassen
sich alle Einstellungen bequem und
übersichtlich vornehmen. Es stehen
alle Bus-Funktionen zur Verfügung. Die
Parallelschaltungen mehrerer Geräte ist
aber nicht möglich.
Digital-Input (Klemmen 33, 34)
Der Digitaleingang muss über einen
potentialfreien Kontakt oder einen Op-
tokoppler angesteuert werden.
Funktion Kontakt
(wählbar) (33, 34)
Synchronisation Ruhezustand:
Leistungsmittel- AUS
werte Impuls:
(Pulsdauer EIN
> 150 msec)
Umschaltung Hochtarif: AUS
Hochtarif/ Niedertarif: EIN
Niedertarif
Kontakt min typ. max
(33, 34)
EIN 1,3 mA
EIN 1,5 V
AUS 2,5 V 5 V
The RS232 programming interface
(switch in RS232 position).
All the configuration settings can
be clearly and easily made with the
A200plus PC software and an interface
adapter cable. All the bus functions
are available. However, parallel con-
nection of more than one device is not
possible.
Digital input (terminals 33, 34)
The digital input must be controlled by
a galvanically isolated contact or an
opto-coupler.
Function Contact
(selectable) (33, 34)
Synchronizing the Rest position:
average power Open
values (pulse Impuls:
duration Closed
> 150 msec)
Switching High tariff: Open
between Low tariff:
high/low tariff Closed
Contact Min Typ. Max
(33, 34)
Closed 1.3 mA
Closed 1.5 V
Open 2.5 V 5 V
Entrée de programmation RS232
(commutateur en position RS232)
A l’aide du logiciel A200plus et un
câble d’adaptation d’interface, tous
les réglages sont faciles à réaliser et à
vérifier. Toutes les fonctions bus sont
disponibles. La connexion en parallèle
de plusieurs appareils n’est toutefois
pas possible.
Entrée numérique (bornes 33, 34)
L’entrée numérique doit être réalisée
par un contact libre de potentiel ou par
un coupleur opto-électronique.
Fonction Contact
(selectable) (33, 34)
Synchronisation Repos: HORS
valeurs Impulsion: EN
moyennes
de puissance
(durée d’impulsion
> 150 msec)
Commutation Haut tarif: HORS
Haut tarif/ Bas tarif: EN
bas tarif
Contact min typ. max
(33, 34)
EN 1,3 mA
EN 1,5 V
HORS 2,5 V 5 V
Bus-Anschluss RS485
(Schalter in Stellung RS485)
Die Klemmen (30, 31, 32) sind gegen-
über dem A2.. galvanisch getrennt. Die
Signalleitungen (30, 31) müssen verdrillt
sein. GND (32) kann mit einem Draht,
oder durch die Leitungs-Abschirmung
angeschlossen werden. In gestörter
Umgebung müssen geschirmte Leitun-
gen verwendet werden.
Speise-Widerstände (Rs) müssen im
Interface des Bus-Masters vorhanden
sein. Einfache RS-Konverter haben die
Widerstände nicht eingebaut. Geräte
mit Widerständen sind z.B. W&T13601
(PC-Karte) bzw. W&T86201 (Konverter
von Wiesemann & Theis GmbH).
Stichleitungen vermeiden, ideal ist ein
reines Linien-Netz. Es können max. 32
Geräte verbunden werden. Bus-Ein-
stellungen sind über die A2..-Tasten,
oder via RS232-Anschluss möglich.
RS485 bus connection
(switch in RS485 position)
The terminals (30, 31, 32) are galvani-
cally isolated from the A2.. The signal
wires (30, 31) must be twisted. The
GND (32) can be connected with a wire
or the cable screen. Screened cables
must be used in an environment with
interference.
The supply resistors (Rs) must be in
the bus master interface. Simple RS
converters do not have these resistors.
Devices that have resistors are e.g.
W&T13601 (PC print), and W&T86201
converter from Wiesemann & Theis
GmbH.
Avoid drop cables. A straight network
is ideal. A maximum of 32 devices can
be connected. The bus configuration is
made with the A2.. buttons, or via the
RS232 interface.
Connexion au bus RS485
(commutateur en position RS485)
Les bornes (30, 31, 32) sont séparées
galvaniquement par rapport au A2.. .
Les lignes de signalisation (30, 31)
doivent être torsadées. La connexion
GND (32) peut être réalisée par un fil
ou par le blindage des lignes. Dans un
milieu perturbé, les lignes doivent être
blindées.
Les résistances d’alimentation (Rs)
doivent exister dans l’interface bus
Masters. Des convertisseurs RS simp-
les ne comportent pas ces résistances.
Des appareils qui comportent ces ré-
sistances sont p.ex. W&T13601 (carte
PC) resp. W&T86201 (convertisseur de
Wiesemann & Theis Sàrl).
Eviter les lignes ouvertes, un réseau
uniquement en ligne est idéal. Il est
possible de relier aux maximum 32
appareils. La configuration du bus se
fait soit par les touches des A2.., soit
par le raccordement RS232.

9
Prise submini,
à 9 pôles Fiche correspon-
dante à
EMMOD 201
max. 140 mm
Submin D-Buchse
9-polig Steckklemme
passend zu
zu EMMOD 201
max. 140 mm
88 20
18
49
59
Massbild
Croquis d’encombrement
Dimensional drawing
Bild 7 / Fig. 7
8. Select interface
The switch to the left of the terminals
(1) switches between the RS 232 and
RS 485 (Fig. 7).
8. Schnittstelle umschalten
Der Schalter (1) links neben den Klem-
men dient zum Umschalten zwischen
RS 232 und RS 485 (Bild 7).
(1)
RS485
(1)
RS232
8. Commutation d’interface
La commutateur (1) à gauche des bor-
nes sert à la commutation entre RS 232
et RS 485 (Fig. 7)
9-pole sub-D
connector Plug-in
terminals for
EMMOD 201
max. 140 mm
9. Accessories
Interface adapter cable
RS 232
152 603
Extension cable 9-pole 980 179
sub-D connectors, 2 m
Software A200plus* 146 557
Windows 95 or higher
The CD contains all
configuration software
presently available for
Camille Bauer products.
RS485 interface
definition* (MODBUS) ---
(is also on CD 146 557)
9. Zubehör
Schnittstellenadapter- 152 603
kabel RS 232
Verlängerungskabel 980 179
sub-D 9pol. 2 m
Software A200plus* 146 557
Windows 95 oder höher
Die CD enthält alle zur
Zeit verfügbaren Konfigu-
rations-Programme für
Camille Bauer-Produkte.
Schnittstellen-
beschreibung RS 485*
(MODBUS) ---
(auch auf CD 146 557
enthalten)
* Download kostenlos unter
http://www.camillebauer.com
* Download free of charge under
http://www.camillebauer.com
* Download sans frais sous
http://www.camillebauer.com
9. Accessoires
Câble d’adaptation 152 603
d’interface RS 232
Câble de rallonge 980 179
sub-D 9 pôles. 2 m
Software A200plus* 146 557
Windows 95 ou plus haut
En plus, ce CD contient
tous les programmes de
configuration actuelle-
ment disponibles pour
des produits
Camille Bauer.
Descriptif de l’interface
RS 485* (MODBUS) ---
(également compris sur
CD 146 557)

10
10. Konfigurationserklärung / Certificat de conformité / Declaration of conformity
Diese Erklärung bescheinigt die Übereinstimmung mit den This declaration certifies compliance with the above mentioned
genannten Richtlinien, beinhaltet jedoch keine Zusicherung directives but does not include a property assurance.
von Eigenschaften. Die Sicherheitshinweise der mitgelieferten The safety notes given in the product documentations, which are
Produktdokumentationen sind zu beachten. part of the supply, must be observed.
EG - KONFORMITÄTSERKLÄRUNG
DECLARATION OF CONFORMITY
Dokument-Nr./ EMMOD201.DOC
Document.No.:
Hersteller/ Camille Bauer AG
Manufacturer: Switzerland
Anschrift / Aargauerstrasse 7
Address: CH-5610 Wohlen
Produktbezeichnung/ Erweiterungsmodul für A2xx-Geräte / Modbus.
Product name: Extension module for A2xx device / Modbus.
Typ / Type: EMMOD 201
Das bezeichnete Produkt stimmt mit den Vorschriften folgender Europäischer Richtlinien
überein, nachgewiesen durch die Einhaltung folgender Normen:
The above mentioned product has been manufactured according to the regulations of the fol-
lowing European directives proven through compliance with the following standards:
Nr. / No. Richtlinie / Directive
89/336/EWG
89/336/EEC
Elektromagnetische Verträglichkeit - EMV - Richtlinie
Electromagnetic compatibility -EMC directive
EMV /
EMC
Fachgrundnorm /
Generic Standard
Messverfahren /
Measurement methods
Störaussendung /
Emission
EN 61000-6-4 : 2002 EN 55011 : 1998+A1:1999
Störfestigkeit /
Immunity
EN 61000-6-2 : 2002 IEC 61000-4-2 :
1995+A1:1998+A2:2001
IEC 61000-4-3 : 1996
+A1:1998+A22001
IEC 61000-4-4 : 1995+A1:2001
IEC 61000-4-5 : 1995+A1:2001
IEC 61000-4-6 : 1996+A1:2001
IEC 61000-4-11:1994+A1:2001
Nr. / No. Richtlinie / Directive
73/23/EWG
73/23/EEC
Elektrische Betriebsmittel zur Verwendung innerhalb bestimmter Span-
nungsgrenzen - Niederspannungsrichtlinie - CE-Kennzeichnung : 95
Electrical equipment for use within certain voltage limits - Low Voltage
Directive - Attachment of CE mark : 95
EN/Norm/Standard IEC/Norm/Standard
EN 61 010-1 : 2002 IEC 1010-1 : 2001
Ort, Datum /
Place, date: Wohlen, den 18. Dezember 2002
Unterschrift / M.Ulrich
Signature: Leiter Technik
1/10