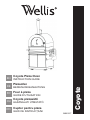
Wellis Coyote pizza oven Benutzerhandbuch
- Typ
- Benutzerhandbuch

EN
DE
FR
HU
RO
Coyote
WB00377
Coyote Pizza Oven
INSTRUCTION GUIDE
Pizzaofen
BEDIENUNGSANLEITUNG
Four à pizza
GUIDE D’UTILISATION
Coyote pizzasütő
HASZNÁLATI ÚTMUTATÓ
Cuptor pentru pizza
GHID DE INSTRUCȚIUNI

EN
IMPORTANT:
Save for electrical inspector’s use.
Installer: Leave installation instructions with the homeowner.
Homeowner: Keep installation instructions for future reference
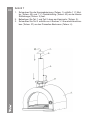
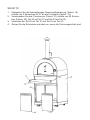
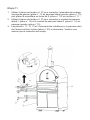
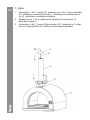
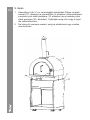
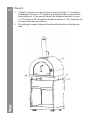
EN Coyote Pizza Oven
INSTRUCTION GUIDE
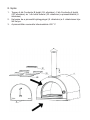
Instructions:
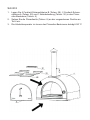
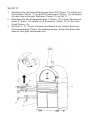
Cleaning of the pizza oven:
The oven burns with wood. To heat the oven, only wood or briquette
may be used. Place the wood into the rebox of the oven and light it!
Do not use gasoline or any other substance that may be det-
rimental to health! Let the wood completely burn down, push the
embers remaining from the wood to the edge of the cooking area, and
put the prepared pizza on top of the heated stone! Take the complete
pizza out with a pizza peel! When you’re done cooking, pull the cold
ashes into the ash box!
Let the pizza stone cool completely before cleaning!
Use the ash rake to pull the majority of ash out, and sweep the rest
out with the help of a wire brush!
Wipe the oven’s inside and outside with a wet, soft cloth if needed!
Do not use strong chemicals or substances that may damage the
surface!
WARNING: Do not use any ammable
liquids to start a re

Welcome
Thank you for purchasing your Coyote Pizza Oven Appliance! We appreciate
your business and we recommend that you read this entire User’s Manual
before operating your new appliance for the rst time.
This manual contains instructions on how to properly install and set up your
new range, as well as insights into the unique features that our product offers.
Please keep this manual for future reference, as it contains answers to ques-
tions that you might have as you begin to cook.
Thank you
This manual applies to the following models’ series:
Model # WB00377 (Coyote Pizza Oven)

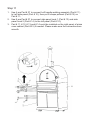
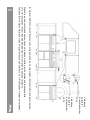
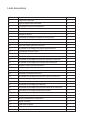
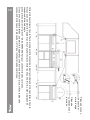
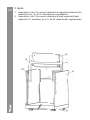
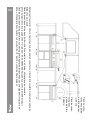
EN Parts Explosive Pictures

Explosive Part Name Quantity
1 Chimney coping 1
2 Chimney supporting rod 1
3 Chimney pipe assembly 1
4 Pizza oven cavity 1
5 Thermometer 1
6 Mica plate 1 4
7 Pizza oven door handle assembly 1
8 Pizza oven door assembly 1
9 Beam welding assembly 1
10 Cabinet left side panel 1
11 Left/Right handle welding assembly 1
12 S-shape Pothook 1
13 Pothook 1 3
14 Pothook 2 1
15 Cabinet top panel welding assembly 1
16 Condiment storage welding assembly 1
17 Kick panel plate 1
18 Supporting leg 2
19 Fixed caster 2
20 Universal caster with brake 2
21 Cabinet bottom panel welding assembly 1
22 Left door assembly 1
23 Right door assembly 1
24 Beam welding assembly 1
25 Cabinet right side panel welding assembly 1
26 back panel welding assembly 1
27 Ash pan welding assembly 1
28 Cordierite rebrick B 4
29 Cordierite rebrick A 2
30 Net Cover 1
31 Door hinge 4
32 Ash pan holder 2
33 Pizza wheel 1
Parts List

EN 34 Pizza cutter 1
35 Pizza oven brush 1
36 Large pizza oven shovel 1
37 ¼” Philips thumb head screw with antislip design 65
38 Philips thumb head screw 2
39 at head screw 24
40 1/4” nut 3
41 cabinet back connecting plate 2
42 cabinet front connecting plate 1
43 ¼” at gasket 3
44 ¼” spring washer 1

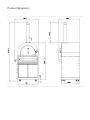
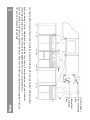
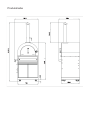
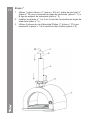
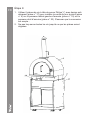
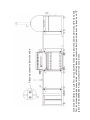
Product Dimension

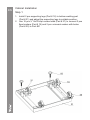
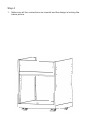
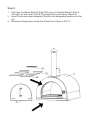
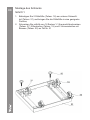
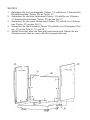
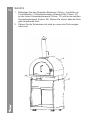
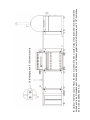
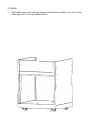
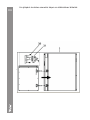
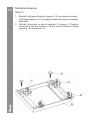
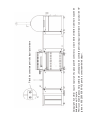
EN Cabinet Installation
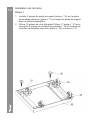
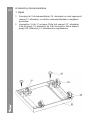
Step 1
1. Install 2 pcs supporting legs (Part # 18) to bottom welding part
(Part # 21) and adjust the supporting legs to suitable position;
2. Use 16 pcs ¼” at Philip’s screw head (Part # 37) to connect 2 pcs
xed casters (Part # 19) and 2 pcs universal casters with brake
(Part # 20) to Part #21

Step 2
1. Use 2 pcs Philips thumb head screw (Part # 38) to install Kick panel plate
(Part # 17) to Part # 21;
2. Use 3 pcs ¼” at Philip’s screw head (Part # 37) to connect left side panel
(Part # 10) to Part # 21;
3. Use 3 pcs Part # 37 to connect right side panel (Part # 25) to Part # 21;
4. Use 8 pcs Part # 37 to connect back panel (Part # 26) to Part #21, # 10
and #25;
5. Make sure all the connections are smooth, Do not over-tighten all the
screws until parts are lined up

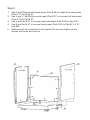
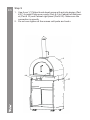
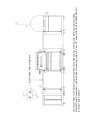
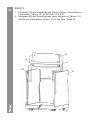
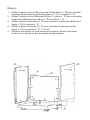
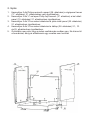
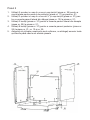
EN Step 3
1. Use 4 pcs Part # 37 to connect beam welding part (Part # 24) to
Part # 10 and Part # 25;
2. Use 4 pcs Part # 37 to connect top cover welding part (Part # 15)
to Part # 10 and Part # 25
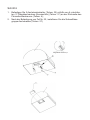
Door Stop: Front

Step 4
1. Make sure all the connections are smooth and the design is looking like
below picture

EN Step 5
1. Use 2 pcs ¼” 14” screw (Part # 37) to go through the two holes on
Pizza oven door handle assembly (Part # 67), then go through 4
pcs mica plates (Part # 6), 2 pcs ¼” at gasket (Part # 43), 2 pcs
¼” spring gasket (Part # 44), and 2 pcs ¼” hexagon nut (Part #40)
to install Part # 7 to Pizza oven door assembly (Part # 8)
2 x 1/4 14” screw
4 x mica plate
2 x 1/4” at gasket
2 x 1/4” spring gasket
2 x 1/4” hexagon nut

Step 6
1. Use 4 pcs ¼” Philips thumb head screw with anti-slip design (Part # 37) to
put 2 pcs ash pan holder (Part # 32) to the back of Pizza oven cavity (Part
# 4);
2. One part # 32 are installed, install ash pan welding assembly (Part # 27)
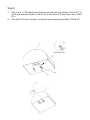
“a” Enlarged View

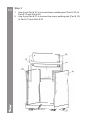
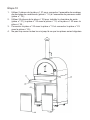
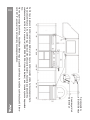
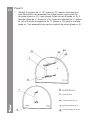
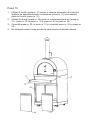
EN Step 7
1. Use 1 pc ¼” nut (Part # 40) and 1 pc ¼” at gasket (Part # 43) to
connect chimney coping (Part # 1) to chimney supporting rod (Part
# 2)
2. Install Part # 1 and # 2 to the top of Chimney Pipe Assembly (Part
# 3);
3. Use 4 pcs ¼” at Philip’s screw head (Part # 37) to connect Part #
3 to Pizza Oven Cavity (Part # 4)

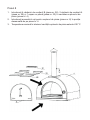
Step 8
1. Put 4 pcs Cordierite Brick B (Part # 28), 2 pcs Cordierite Brick A (Part #
29) and 1 pc net cover (Part # 30) inside Pizza oven Cavity (Part # 4)
2. Insert Pizza oven door assembly (Part #8) into designated position on Part
# 4.
3. Maximum Temperature inside the Pizza Oven Cavity is 430 °C

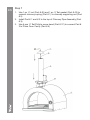
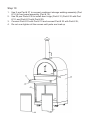
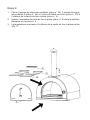
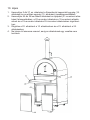
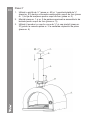
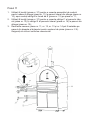
EN Step 9
1. Use 6 pcs ¼” Philips thumb head screw with anti-slip design (Part
# 37) to install Pizza oven cavity (Part # 4) to Cabinet left side pan-
el (Part # 10) and Cabinet right panel (Part # 25). Make sure the
connection is smooth;
2. Do not over-tighten all the screws until parts are lined u

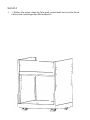
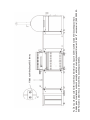
Step 10
1. Use 2 pcs Part # 37 to connect condiment storage welding assembly (Part
# 16) to front panel assembly (Part # 15);
2. Use 24 pcs Parts # 39 to install door hinge (Part # 31) Part # 22 with Part
# 10, and Part # 23 with Part # 25;
3. Connect Part # 22 with Part # 10 and connect Part # 23 with Part # 25;
4. Do not over-tighten all the screws until parts are lined up

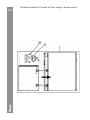
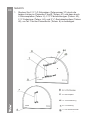
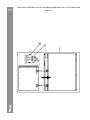
EN
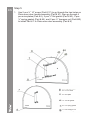
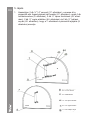
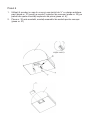
Detailed Installation Pictures for Door hinge is shown below:

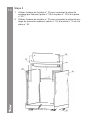
Step 11
1. Use 4 pcs Part # 37 to connect Left handle welding assembly (Part # 11)
to Left side panel (Part # 10), then put S-shape pothook (Part # 12) on
Part # 11;
2. Use 8 pcs Part # 37 to connect side panel hook 1 (Part # 13) and side
panel hook 2 (Part # 14) to the left panel (Part # 10);
3. Part # 11, # 12, # 13 and # 14 could be installed on the right panel of pizza
oven cabinet (Part #2 5) if needed. Please make sure the connections are
smooth.

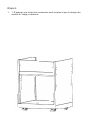
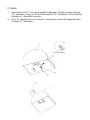
EN
You Coyote Pizza Oven Outdoor Cabinet could be connected with any other Coyote Outdoor Cabinet models.
If you are having a Corner Cabinet and you would like to connect it to another cabinet, use corner cabinet
connecting plate with 2 pcs 1/4" screws (Part # 06.02.00093-000-AO) to connect both cabinets;
If you are having a Sink Cabinet, Appliance Cabinet or Pizza oven Cabinet, use cabinet connecting plate with 2 pcs
1/4" screws to connect both cabinets.
Cabinet front
connecting
Plate
Corner Cabinet
Front connecting
plate
Seite wird geladen ...
Seite wird geladen ...
Seite wird geladen ...
Seite wird geladen ...
Seite wird geladen ...
Seite wird geladen ...
Seite wird geladen ...
Seite wird geladen ...
Seite wird geladen ...
Seite wird geladen ...
Seite wird geladen ...
Seite wird geladen ...
Seite wird geladen ...
Seite wird geladen ...
Seite wird geladen ...
Seite wird geladen ...
Seite wird geladen ...
Seite wird geladen ...
Seite wird geladen ...
Seite wird geladen ...
Seite wird geladen ...
Seite wird geladen ...
Seite wird geladen ...
Seite wird geladen ...
Seite wird geladen ...
Seite wird geladen ...
Seite wird geladen ...
Seite wird geladen ...
Seite wird geladen ...
Seite wird geladen ...
Seite wird geladen ...
Seite wird geladen ...
Seite wird geladen ...
Seite wird geladen ...
Seite wird geladen ...
Seite wird geladen ...
Seite wird geladen ...
Seite wird geladen ...
Seite wird geladen ...
Seite wird geladen ...
Seite wird geladen ...
Seite wird geladen ...
Seite wird geladen ...
Seite wird geladen ...
Seite wird geladen ...
Seite wird geladen ...
Seite wird geladen ...
Seite wird geladen ...
Seite wird geladen ...
Seite wird geladen ...
Seite wird geladen ...
Seite wird geladen ...
Seite wird geladen ...
Seite wird geladen ...
Seite wird geladen ...
Seite wird geladen ...
Seite wird geladen ...
Seite wird geladen ...
Seite wird geladen ...
Seite wird geladen ...
Seite wird geladen ...
Seite wird geladen ...
Seite wird geladen ...
Seite wird geladen ...
Seite wird geladen ...
Seite wird geladen ...
Seite wird geladen ...
Seite wird geladen ...
Seite wird geladen ...
Seite wird geladen ...
Seite wird geladen ...
Seite wird geladen ...
Seite wird geladen ...
Seite wird geladen ...
Seite wird geladen ...
Seite wird geladen ...
Seite wird geladen ...
Seite wird geladen ...
Seite wird geladen ...
Seite wird geladen ...
Seite wird geladen ...
Seite wird geladen ...
Seite wird geladen ...
Seite wird geladen ...
-
 1
1
-
 2
2
-
 3
3
-
 4
4
-
 5
5
-
 6
6
-
 7
7
-
 8
8
-
 9
9
-
 10
10
-
 11
11
-
 12
12
-
 13
13
-
 14
14
-
 15
15
-
 16
16
-
 17
17
-
 18
18
-
 19
19
-
 20
20
-
 21
21
-
 22
22
-
 23
23
-
 24
24
-
 25
25
-
 26
26
-
 27
27
-
 28
28
-
 29
29
-
 30
30
-
 31
31
-
 32
32
-
 33
33
-
 34
34
-
 35
35
-
 36
36
-
 37
37
-
 38
38
-
 39
39
-
 40
40
-
 41
41
-
 42
42
-
 43
43
-
 44
44
-
 45
45
-
 46
46
-
 47
47
-
 48
48
-
 49
49
-
 50
50
-
 51
51
-
 52
52
-
 53
53
-
 54
54
-
 55
55
-
 56
56
-
 57
57
-
 58
58
-
 59
59
-
 60
60
-
 61
61
-
 62
62
-
 63
63
-
 64
64
-
 65
65
-
 66
66
-
 67
67
-
 68
68
-
 69
69
-
 70
70
-
 71
71
-
 72
72
-
 73
73
-
 74
74
-
 75
75
-
 76
76
-
 77
77
-
 78
78
-
 79
79
-
 80
80
-
 81
81
-
 82
82
-
 83
83
-
 84
84
-
 85
85
-
 86
86
-
 87
87
-
 88
88
-
 89
89
-
 90
90
-
 91
91
-
 92
92
-
 93
93
-
 94
94
-
 95
95
-
 96
96
-
 97
97
-
 98
98
-
 99
99
-
 100
100
-
 101
101
-
 102
102
-
 103
103
-
 104
104


Wellis Coyote pizza oven Benutzerhandbuch
- Typ
- Benutzerhandbuch
in anderen Sprachen
Verwandte Artikel


Andere Dokumente
-
 Masterpro BGMP-9169-BK-ES Pizza Oven Benutzerhandbuch
-
LANDMANN Gasgrillwagen Bedienungsanleitung
-
Powerware 9125 Installationsanleitung
-
ADURO Prisma Pizza Oven Benutzerhandbuch
-
-
ESAB PLASMARC™ Air Curtain Benutzerhandbuch
-
Bartscher nt 501 Bedienungsanleitung
-
ESAB PT-31XL and PT-31XLPC Plasma Arc Cutting Torches Benutzerhandbuch
-
