LANDMANN Gasgrillwagen Bedienungsanleitung
- Kategorie
- Grillen
- Typ
- Bedienungsanleitung

LANDMANN
HOME OF FIRE
EN Assembly and operating
instructions FR Guide de montage
et d’utilisation NL Montage- en
gebruiksaanwijzing
DE AT CH NL ES IT SE
FI DK IS EE LT LV
NO
LANDMANN Germany GmbH
Am Heisterbusch 1
19258 Gallin
Deutschland
Tel: +49 40 67573 190
E-Mail: servi[email protected]
Website: https://landmann.de
GB IE
LANDMANN Ltd.
Unit 6
Blackstone Road
Stukeley Meadows Huntingdon
PE29 6EF
United Kingdom
Tel: +44 14 80 42 17 20
E-Mail: sales@landmann.co.uk
Website: https://landmann.com/uk
FR BE LU
LANDMANN Germany GmbH
Bureau Commercial France
Tel: +33 1 64 69 12 14
E-Mail: receptionfrance@landmann.de
Website: https://landmann.com/fr
PL CZ SK RU
LANDMANN Polska Sp. z o.o.
ul. Kuziennicza 13b
59-400 Jawor
Polska
Tel: +48 76 870 24 61
E-Mail: [email protected]
Website: www.landmann.pl
HU RO BG GR SI
HR BA RS ME
LANDMANN Hungária Kft.
Almáskert utca 4.
2220 Vecsés
Hungary
Tel: +36 29 55 50 70
E-Mail: [email protected]
Website: www.landmann.hu
© LANDMANN Germany GmbH
CALIANO 6.1 cooK
Montage- und
Gebrauchsanleitung
# 22152
DE Seite 1 Klappe diese Seite vor dem Lesen der Montage- und Gebrauchsanleitung auf. Auf der
Rückseite findest du alle Abbildungen, auf die verwiesen wird.
EN Page 10 Open this page before reading the assembly and operating instructions. On the back you will
find all the illustrations which are referred to.
FR Page 19 Déployez ce rabat avant de lire le guide de montage et d’utilisation. Vous trouverez au verso
toutes les illustrations auxquelles il est fait référence.
NL Pagina 28 Klap deze pagina vóór het lezen van de montage- en gebruiksaanwijzing open. Op de
achterkant vind je alle afbeeldingen waarnaar wordt verwezen.
37
22152_Cover_LM_M_628x290_V2.indd 1-3
22152_Cover_LM_M_628x290_V2.indd 1-3
05.12.2022 15:04:34
05.12.2022 15:04:34

A
1
25
2
3
4
5
6
9
11
12
16
17
15
19
27
20
26
22
13
14
23
18
10
21
24
x 2
M6 x 12 M6 x 50 M4 x 15
44 x 12 x 8 x 3 x
A B C D
a
a
C
b
D
b
E
30
B
29
35
28 28
33
32 3232323434
31
36
7
8
22152_Cover_LM_M_628x290_V2.indd 4-6
22152_Cover_LM_M_628x290_V2.indd 4-6
05.12.2022 15:04:36
05.12.2022 15:04:36

1
CALIANO 6.1 COOK
Symbole
Gefahrenzeichen: Dieses Symbol zeigt mögliche
Gefahren an. Die dazugehörenden Sicherheitshinweise
aufmerksam lesen und befolgen.
Ergänzende Informationen
Montage- und Gebrauchs anleitung vor Benutzung
lesen!
Für Lebensmittel geeignet.
Weitere Erläuterungen
Legendennummern werden folgendermaßen dargestellt: (1)
Bildverweise werden folgendermaßen dargestellt: (Bild A)
Liebe Kundin, lieber Kunde,
vielen Dank, dass du dich für einen Gasgrill von LANDMANN entschieden hast.
Diese Montage- und Gebrauchs anleitung hilft dir Schritt für Schritt, deinen gerade
erworbenen LANDMANN-Grill startklar zu machen. Weiter geben wir dir wichtige
Hinweise zum richtigen Gebrauch, zum sicheren Umgang und zur Pflege.
Nimm dir die Zeit, dich mit den Details deines neuen Equipments vertraut zu machen.
Denn wir wünschen dir nicht nur einen glatten Einstieg, sondern auch lange Freude an
deinem LANDMANN-Grill.
Wenn du Fragen zu deinem Grillmodell hast oder weitere Unterstützung benötigst,
hilft dir unser Service-Team gerne weiter. Die entsprechenenden Kontaktdaten findest
du auf dem Umschlag dieser Montage- und Gebrauchs anleitung.
Viel Spaß und eine leckere Grillzeit wünscht dir
dein LANDMANN-Team.
INHALT
Technische Daten 2
Lieferumfang 2
Geräteübersicht 3
Bestimmungsgemäßer Gebrauch 3
Sicherheitshinweise 3
Anforderungen an die gasführenden Komponenten 4
Hinweise zur Montage 5
Gasflasche anschließen 5
Dichtigkeitsprüfung 6
Grilltipps 6
Benutzung 6
Reinigung und Wartung 7
Aufbewahrung 9
Problembehebung 9
Entsorgung 9
EG-Konformitätserklärung 9
WARNUNG:
■Nur im Freien verwenden.
■Die Montage- und Gebrauchs anleitung vor Inbetriebnah-
me des Gerätes lesen.
■ACHTUNG: Zugängliche Teile können sehr heiß sein.
Kinder fernhalten.
■Das Gerät muss während des Betriebs von brennbaren
Materialien ferngehalten werden.
■Das Gerät während des Betriebs nicht bewegen.
■Nach Gebrauch die Gaszufuhr an der Gasflasche schließen.
■Keine Veränderungen am Gerät vornehmen.
DIESE MONTAGE- UND GEBRAUCHS-
ANLEITUNG VOR INBETRIEBNAHME LESEN!
Ein Nichtbeachten der aufgeführten Sicherheitshinweise,
Vorsichtsmaßnahmen und Arbeitsschritte kann zu schweren
oder gar tödlichen Verletzungen oder zu Sachschäden durch
Brand oder Explosion führen.
Bewahre diese Montage- und Gebrauchsanleitung für
spätere Fragen und weitere Nutzer auf. Sie gehört zum
Gerät. Hersteller und Importeur übernehmen keine Haftung,
wenn die Angaben in dieser Montage- und Gebrauchs-
anleitung nicht beachtet werden.
DE
22152_Inlay_M_LM_CE_V2.indb 122152_Inlay_M_LM_CE_V2.indb 1 05.12.2022 14:53:4105.12.2022 14:53:41

2
TECHNISCHE DATEN
Gerätebezeichnung: Gasgrill „CALIANO 6.1 cooK“ 2531-23
Modellnummer: 22152 PIN: 2531DN-0098
Land: BG, CY, CZ, DK, EE, FI, HU, HR, IS,
IT, LT, LV, MT, NL, NO, RO, SE, SI, SK AT, CH, CZ, DE PL BE, CH, CZ, ES, FR, GR, IE,
IT, LT, LU, LV, PT, SK, SI, TR
Gaskategorie: I3B/P (30) I3B/P (50) I3B/P (37) I3+ (28-30/37)
Gasart: G30 (Butan) , G31 (Propan)
oder deren Gemisch
G30 (Butan) , G31 (Propan)
oder deren Gemisch
G30 (Butan) , G31 (Propan)
oder deren Gemisch
G30 (Butan) G31 (Propan)
Gasdruck in mbar: 30 50 37 28 – 30 37
Wärmeleistung: 24,1 k W 24,1 kW 26,8 kW 24,1 k W 24,1 kW
Verbrauch: G30: 1754 g/h
G31: 1714 g/h
G30: 1754 g/h
G31: 1714 g/h
G30: 1754 g/h
G31: 1714 g/h
1754 g/h 1714 g/h
Ø Düse Hauptbrenner: 0,91 mm 0,80 mm 0,91 mm 0,91 mm 0,91 mm
Ø Düse Seitenbrenner: 0,76 mm 0,66 mm 0,76 mm 0,76 mm 0,76 mm
Zündung: Piezo
Druckminderer: nach EN 16129; Die nationalen Bestimmungen sind einzuhalten.
Gasschlauch: nach EN16436-1; max. 1,5 m; Die nationalen Vorschriften zur maximalen Verwendbarkeitsdauer sind zu beachten.
Abmessungen (L x H x B): Grill: ca. 177 x 117 x 60 cm; Pizzaofen-Aufsatz: ca. 42,5 x 35 cm.
Gewicht: ca. 62 kg
Gasflasche: Handelsübliche Gasflasche, Abmessungen siehe nebenstehende Abbildung.
ID Montage- und
Gebrauchsanleitung: Z 22152 M LM CE V2 1222 md
Hersteller: LANDMANN Germany GmbH, Am Heisterbusch 1, 19258 Gallin, Deutschland
Hergestellt in China.
LIEFERUMFANG
(Bild A, siehe Ausklappseite)
Pos. Bezeichnung Anz.
1Warmhalterost 1
2Grillrost 3
3Brennerabdeckung 6
4Fettauffangblech, Grill 1
5Grilleinheit (vormontiert) 1
6Seitenbrenner 1
7Halterung A 2
8 Halterung B 2
9Querstrebe 1
10 Türanschlag mit Magnet 4
11 Rückwand, oben 1
12 Rückwand, unten 1
13 Stütze, hinten rechts 1
14 Seitenwand 2
15 Rolle 2
16 Stütze, vorne rechts 1
17 Unterschranktür 3
18 Bodenplatte 1
19 Blende 1
20 Türhalterung 3
21 Rolle, feststellbar 2
22 Stütze, vorne links 1
23 Stütze, hinten links 1
24 Seitentisch, links 1
25 Pizzaofen-Aufsatz 1
26 Pizzastein 1
27 Fettauffangblech, Pizzaofen 1
Pos. Bezeichnung Anz.
Montagematerial:
ASchraube, M6 x 12 mm 44
BSchraube, M6 x 50 mm 12
CSchraube, M4 x 15 mm 8
DAbstandshülse 3
Montage- und Gebrauchsanleitung
Anleitung zum Druckminderer
1
1
Du benötigst noch:
• LP-Gasflasche (siehe Kapitel „Technische Daten“), 1 x
• Werkzeug für die Montage
Diese sind nicht im Lieferumfang enthalten.
BEACHTE!
• Überprüfe den Lieferumfang auf Vollständigkeit und die Be-
standteile auf Transportschäden. Sollten Teile fehlen oder be-
schädigt sein, wende dich an den Kundenservice (siehe Um-
schlag dieser Montage- und Gebrauchsanleitung). Kleinere
technische Änderungen, z. B. in Bezug auf das Montagemate-
rial, behalten wir uns vor.
• Entferne eventuelle Folien, Aufkleber oder Transportschutz
vom Gerät, jedoch niemals das Typenschild und eventuel-
le Warnhinweise!
max. 600 mm
max. Ø 300 mm
DE
22152_Inlay_M_LM_CE_V2.indb 222152_Inlay_M_LM_CE_V2.indb 2 05.12.2022 14:53:4205.12.2022 14:53:42

3
CALIANO 6.1 COOK
GERÄTEÜBERSICHT
(Bild B)
28 Deckelthermometer
29 Deckel Grillkammer
30 Deckelgriff
31 Gasanschluss
32 Reglerknopf Hauptbrenner
33 Reglerknopf Seitenbrenner
34 Reglerknopf Pizzaofen
35 Unterschrank
36 Frontblende
BESTIMMUNGSGEMÄSSER
GEBRAUCH
■Dieser Gasgrill ist zum Zubereiten von grillbaren Lebensmit-
teln konzipiert. Er wird mit Flüssiggas betrieben und ist zur
Verwendung im Freien bestimmt.
■Eine andere Verwendung ist nicht zulässig. Dies gilt insbeson-
dere für folgende vorhersehbare Fehlanwendungen:
○Betreibe den Grill nicht mit Holz, Holzkohle oder sonstigem
Brennmaterial, das nicht Flüssiggas (Propan / Butan) ist.
○Schließe den Grill niemals an das Erdgasnetz (Stadtgasnetz)
an! Die Ventile und Düsen sind ausschließlich für Flüssiggas-
flaschen ausgelegt.
○Verwende den Grill nicht als Heizung.
○Verwende den Grill nicht zum Erhitzen von anderen Stoffen
und Materialien als Lebensmitteln.
○Benutze den Grill niemals als Einbaugerät.
■Der Grill und die Gasflasche müssen gemäß den geltenden
Vorschriften verwendet und gelagert werden.
■Der Grill ist für den privaten Gebrauch, nicht für eine gewerb-
liche Nutzung bestimmt.
■Nutze den Grill ausschließlich für den angegebenen Zweck und
nur wie in dieser Montage- und Gebrauchsanleitung beschrie-
ben. Jede weitere Verwendung gilt als bestimmungswidrig.
Falsche Bedienung und unsachgemäße Behandlung können
eine Beeinträchtigung der Funktion oder Sach- sowie Perso-
nenschäden zur Folge haben.
■Von der Gewährleistung ausgeschlossen sind alle Mängel,
die durch unsachgemäße Behandlung, Beschädigung oder
Reparaturversuche entstehen. Dies gilt auch für den norma-
len Verschleiß sowie Fettablagerungen und Verfärbungen am
Grill und Zubehör.
SICHERHEITSHINWEISE
Verletzungsrisiken
■Der Grill ist nicht dafür bestimmt, von Kindern und Personen
mit eingeschränkten physischen, sensorischen oder geistigen
Fähigkeiten oder mangelnder Erfahrung und / oder mangeln-
dem Wissen benutzt zu werden.
■Kinder dürfen nicht mit dem Grill spielen. Stelle sicher, dass
Kinder keinen unbeaufsichtigten Zugang zum Grill haben,
auch wenn er ausgeschaltet ist. Falsche Benutzung kann
gefährlich sein.
■ACHTUNG: Zugängliche Teile können sehr heiß sein.
Kinder fernhalten! Lasse den Grill niemals unbeaufsichtigt,
wenn er in Betrieb oder noch heiß ist. Passe insbesondere
auf, dass keine Kinder oder Personen, die nicht in der Lage
sind, mögliche Gefahren richtig zu erkennen oder auf sie zu
reagieren, in die Nähe des heißen Grills gelangen.
■Trage Grillhandschuhe, die nach der Verordnung (EU)
2016/425 für persönliche Schutzausrüstung gemäß
DINEN407 (Hitzeschutzkategorie II) geprüft sind.
■Berühre während und nach der Benutzung des Grills keine
aufgeheizten Teile! Berühre ausschließlich die Griffe und Reg-
ler während der Grill in Betrieb ist oder unmittelbar nach dem
Ausschalten. Warte, bis sich der Grill abgekühlt hat, bevor er
transportiert, gereinigt oder verstaut wird.
■Den Grill während des Betriebes nicht bewegen!
■Das Konsumieren von Alkohol oder Drogen kann sich negativ
auf die Fähigkeit auswirken, den Grill ordnungsgemäß und si-
cher zu montieren, zu bewegen, zu lagern oder zu bedienen.
Risiken von Ersticken, Brand und Explosion
Gas ist sehr leicht entzündlich und verbrennt explosions-
artig. Es kann zu schweren Personen- oder Sachschäden
kommen, wenn sich ausströmendes Gas unkontrolliert
entzündet.
Flüssiggas ist schwerer als Sauerstoff. Es lagert sich daher
am Boden ab und verdrängt dort den Sauerstoff. Wenn
sich eine entsprechende Gaskonzentration bildet (z. B. bei
einer beschädigten Gasflasche), kann es zur Erstickung
infolge von Sauerstoffmangel kommen.
■Verwende ausschließlich die in dieser Montage- und
Gebrauchs anleitung angegebenen Gasarten, Gasflaschen,
Druckminderer und Gasschläuche (siehe Kapitel „Anforderun-
gen an die gasführenden Komponenten“).
■Benutze den Grill nur oberhalb der Erdgleiche (d. h. nicht in
Vertiefungen unterhalb des Erdniveaus) .
■Nur im Freien verwenden. Betreibe den Grill nicht in
Gebäuden, Garagen, überdachten Durchgängen, Zelten,
in anderen geschlossenen Bereichen, unter Markisen oder
brennbaren Konstruktionen.
■Benutze den Grill nicht in oder auf einem Fahrzeug. Dies
betrifft auch Wohnmobile, Wohnwagen und Boote.
■Verwende den Grill nicht, wenn sich in der Luft bzw. Umge-
bung leichtentzündliche oder explosive Substanzen befinden.
Lagere keinen Kraftstoff oder andere entflammbare Dämpfe
oder Flüssigkeiten in der Nähe des Grills und verwende der-
artige Stoffe nicht mit dem Grill. Sprühe keine Sprays in der
Nähe des Grills.
■Verwende den Grill niemals ohne einen Druckminderer (siehe
Kapitel „Anforderungen an die gasführenden Komponen-
ten“– „Druckminderer“)!
■Stelle sicher, dass der Druckminderer ordnungsgemäß ange-
schlossen und funktionsfähig ist sowie keine Beschädigungen
aufweist.
■Führe nach jedem Anschließen der Gasflasche oder wenn der
Grill längere Zeit nicht benutzt wurde, eine Dichtigkeitsprü-
fung aller gasführenden Komponenten durch (siehe Kapitel
„Dichtigkeitsprüfung“). Bei einem Gasleck darf der Grill
nicht benutzt werden.
■Dieses Gerät muss während des Betriebs von brennba-
ren Materialien ferngehalten werden. Es besteht Gefahr
von Feuer und Schwelbrand. Folgende Mindestabstände zu
brennbaren Materialien müssen eingehalten werden: 2 m
oberhalb und 1 m seitlich des Grills. Der Abstand zu schwer
entflammbaren Materialien, z. B. Hauswänden, muss mindes-
tens 0,6 m betragen.
Auch im Unterschrank dürfen während des Betriebs weder
die Wetterschutzhaube noch sonstige brennbare Materialien
gelagert werden.
■In der Nähe des Grills dürfen sich beim Anschließen der Gas-
flasche im Umkreis von 5 m keine Zündquellen befinden, vor
allem kein offenes Feuer oder brennende Zigaretten, Kerzen,
Lampen usw. Auch elektrische Geräte können eine Gefahr
darstellen, falls beim Anschließen Gas ausströmt.
■Verschließe niemals die Belüftungsöffnungen der Grilleinheit
sowie des Gasflaschenaufstellraumes und stelle sicher, dass
sie stets frei sind.
■Decke keine Öffnungen des Grills ab und stelle sicher, dass
sie nicht verstopft sind, bevor der Grill in Betrieb genommen
wird. Wie die meisten Geräte, die im Freien verwendet wer-
DE
22152_Inlay_M_LM_CE_V2.indb 322152_Inlay_M_LM_CE_V2.indb 3 05.12.2022 14:53:4205.12.2022 14:53:42

4
den, ist der Grill ein möglicher Unterschlupf für Spinnen und
Insekten. Verstopfungen der gasführenden Komponenten
können den Gasfluss behindern, was die Leistung vermindern
oder sogar einen gefährlichen Flammenrückschlag zur Folge
haben kann. Entferne Verstopfungen wie im Kapitel „Reini-
gung und Wartung“ beschrieben.
■Lasse den Grill nie unbeaufsichtigt, wenn er in Betrieb ist.
Sollte eine Flamme erlöschen, zünde sie sofort erneut oder
schließe die Gasflasche.
■Schließe bei Gasgeruch die Gaszufuhr an der Gasflasche und
lösche alle Flammen. Schalte keine elektrischen Geräte ein.
Ermittle und behebe vor erneuter Inbetriebnahme des Grills
die Ursache des Gasaustritts.
■Achte darauf, dass öl- und fettreiche Speisen nicht überhitzt
werden. Stelle keine mit Öl gefüllten Gefäße auf den Grill.
■Lösche einen Fettbrand nicht mit Wasser! Schalte sofort
sämtliche Brenner aus und lasse den Deckel geschlossen, bis
das Feuer erloschen ist.
■Schließe nach Gebrauch sofort die Gaszufuhr an der
Gasflasche.
■Decke den Grill nicht ab, solange er heiß ist.
■Keine Veränderungen am Gerät vornehmen! Jede Ände-
rung des Gerätes kann gefährlich sein.
■An Bauteilen, die vom Hersteller oder seinem Vertreter
versiegelt wurden, dürfen keine Manipulationen vor-
genommen werden.
■Reparaturen dürfen ausschließlich vom Hersteller bzw.
Kundenservice durchgeführt werden, um Gefährdungen
zu vermeiden. Solltest du einen Schaden bemerken oder im
Falle einer Störung, kontaktiere den Kundenservice (siehe
Umschlag dieser Montage- und Gebrauchsanleitung). Der Grill
darf bis zur Instandsetzung nicht benutzt werden, da eine
Fehlfunktion des Grills die Verletzungsgefahr erhöhen kann.
■Verwende nur Original-Zubehörteile des Herstellers, um die
Funktionsweise des Grills nicht zu beeinträchtigen und even-
tuelle Schäden oder Gefahren zu vermeiden.
■Demontiere niemals einen Reglerknopf, die Gasflasche oder
eines der gasführenden Elemente während des Betriebes.
■Transportiere den Grill nie mit einer angeschlossenen Gasfla-
sche. Grill und Gasflasche müssen immer getrennt voneinan-
der transportiert werden.
■Reinige den Grill regelmäßig wie im Kapitel „Reinigung und
Wartung“ beschrieben.
Gefährdungen durch Gas flaschen
■Beachte die Vorgaben des Herstellers oder Verleihers
der Gasflasche!
■Eine Gasflasche darf nicht in Kinderhände gelangen!
■Verwende niemals eine verbeulte oder rostige Gasflasche.
■Verwende niemals eine Gasflasche mit beschädigtem Ventil.
■Lege eine Gasflasche niemals hin. Installiere, transportiere
und lagere Gasflaschen (auch leere) immer in einer aufrech-
ten, sicheren Position.
■Lasse eine Gasflasche niemals fallen. Setze sie keinen Stößen
aus und beschädige sie nicht.
■Gasflaschen können bei Erwärmung explodieren. Verbrenne
niemals eine Gasflasche. Setze sie auch keiner extremen Hitze
(über 50 °C) bzw. direkter Sonneneinstrahlung aus. Lasse eine
Gasflasche nicht an einem heißen Tag im Auto. Achte darauf,
dass weder die Gasflasche noch der Gasschlauch den Grill
während des Betriebes berühren.
■Gasflaschen dürfen nur im Freien bei guter Belüftung (d. h.
nicht in z. B. Treppenhäusern, Fluren, Durchgängen und
Durchfahrten) und nur oberhalb der Erdgleiche (d. h. nicht in
Vertiefungen unterhalb des Erdniveaus) angeschlossen, be-
nutzt und gelagert werden.
■Stelle eine undichte Gasflasche sofort auf eine gut belüftete
Fläche im Freien, lasse das Gas ausströmen und warte, bis es
sich verflüchtigt hat. Gib die leere Gasflasche dann an den
Hersteller mit dem Hinweis auf Undichtigkeit zurück.
Bei Schwindelgefühl oder Übelkeit atme frische Luft ein und
nimm ggf. medizinische Hilfe in Anspruch.
■Schließe immer zuerst das Ventil der Gasflasche, bevor du
den Druckminderer von der Gasflasche trennst.
■Gasflaschen (auch leere), die nicht für die unmittelbare Ver-
wendung angeschlossen sind, dürfen nicht direkt neben
einem in Betrieb befindlichen Gerät, das mit Gas oder Strom
angetrieben wird, gelagert werden.
■Auch scheinbar leere Gasflaschen können noch Flüssiggas
enthalten und müssen daher mit der gleichen Sorgfalt wie
eine volle Gasflasche behandelt werden.
ANFORDERUNGEN AN DIE
GASFÜHRENDEN KOMPONENTEN
Der Grill wird mit Flüssiggas (Liquefied Petroleum Gas, LPG oder
LP-Gas) betrieben. Die Flüssiggase Propan, Butan sowie deren
Gemische bleiben bei Raumtemperatur und geringer Kompres-
sion (<10 bar) in einer Gasflasche flüssig. Wird die Gasflasche
geöffnet, entweicht der Druck, die Flüssigkeit expandiert und
geht in einen gasförmigen Zustand über.
Gasflasche
• Verwende ausschließlich Gasflaschen mit Propan- oder
Butan gas oder eine Mischung der beiden Gase. Die Gas-
flaschen müssen den nationalen Bestimmungen entsprechen
und dürfen nicht größer sein als im Kapitel „Technische
Daten“ angegeben.
Gaskartusche
• Ist der Grill für die Nutzung mit einer Gaskartusche zugelas-
sen, benutze ausschließlich Schraubkartuschen mit einem
7/16 “-Gewinde und einem maximalen Fassungsvermögen
von 450g / 800 ml.
Druckminderer
Der Druckminderer sorgt dafür, dass der Grill immer mit einem
gleichmäßigen Gasdruck versorgt wird.
• Verwende den mit dem Grill gelieferten Druckminderer.
Dieser ist geprüft und CE-zertifiziert. Er entspricht der Euro-
päischen Norm EN16129.
• Sollte der Grill ohne einen Druckminderer ausgeliefert wor-
den sein, beschaffe einen zur Gasflasche passenden Druck-
minderer. Achte darauf, dass er den nationalen Bestimmun-
gen entspricht.
Gasschlauch
• Benutze den mit dem Grill gelieferten Gasschlauch. War kein
Gasschlauch im Lieferumfang, beschaffe einen Gasschlauch,
der den nationalen Bestimmungen entspricht.
• Der Gasschlauch (bzw. die Schlauchleitung) darf nicht länger
als 1,5 m sein und muss die Vorgaben der Norm EN 16436-1
erfüllen.
• Beachte die nationalen Bestimmungen und tausche den
Gasschlauch aus, wenn sie es erfordern oder wenn der Gas-
schlauch das maximale Verwendungsdatum überschritten hat.
• Stelle vor jeder Nutzung sicher, dass der Gasschlauch keine
Knickstellen oder Risse hat und nicht abgenutzt ist. Bei einem
porösen oder defekten Gasschlauch darf der Grill nicht in
Betrieb genommen werden.
DE
22152_Inlay_M_LM_CE_V2.indb 422152_Inlay_M_LM_CE_V2.indb 4 05.12.2022 14:53:4205.12.2022 14:53:42

5
CALIANO 6.1 COOK
HINWEISE ZUR MONTAGE
BEACHTE!
■Halte Verpackungsmaterial von jungen Kindern und Tieren
fern! Es besteht Erstickungsgefahr.
• Die Montageschritte sind am Ende dieser Montage- und
Gebrauchsanleitung abgebildet. Befolge sie in der richtigen
Reihenfolge. Eine unsachgemäße Montage kann gefähr-
lich sein.
• Verwende nur einwandfreies und gut passendes Werkzeug.
Mit abgenutztem oder nicht passendem Werkzeug kannst du
die Schrauben nicht fest genug anziehen, aber auch so be-
schädigen, dass sie sich nicht mehr drehen lassen.
• Achte auf ausreichend Platz für die Montage und verwende
ggf. eine Unterlage, um den Grill oder empfindliche Böden
vor Kratzern zu schützen.
• Baue den Grill auf einem waagerechten, ebenen Untergrund
auf, damit er nicht schief wird.
• Wende beim Zusammenbau keine Gewalt an.
• Ziehe die Schraubverbindungen zunächst handfest und nach
erfolgreichem Montageschritt nochmals fest an. Ansonsten
kann es zu unerwünschten Spannungen kommen.
• Ziehe die Muttern an, bis sie fest anliegen, und drehe dann
eine Vierteldrehung weiter. Ziehe sie nicht zu fest an!
GASFLASCHE ANSCHLIESSEN
BEACHTE!
■Beachte vor dem Anschließen der Gasflasche das Kapitel
„Anfor derungen an die gasführenden Komponenten“.
■Wechsele die Gasflasche nur im Freien oder in einem gut be-
lüfteten Bereich, fern von Zündquellen (z. B. Kerzen, Zigaret-
ten, anderen flammenerzeugenden Geräten).
■Alle Verbindungsstücke müssen frei von Schmutz und un-
beschädigt sein.
■Die Gasflasche darf weder heiße Teile des Grills berühren
noch von der Wärmestrahlung erreicht werden.
■Der Gasschlauch darf nicht unter Spannung stehen, verdreht
oder geknickt sein und nicht den Grill berühren.
■Stelle nach dem Anschließen der Gasflasche sicher, dass
alle Verbindungen dicht sind (siehe Kapitel „Dichtigkeits-
prüfung“). Schraube den Druckminderer nur handfest an!
Verwende kein Werkzeug, damit die Dichtung des Ventils
nicht beschädigt wird und dadurch die Dichtheit nicht mehr
gewährleistet ist.
Wurde dein Grill ohne einen Druckminderer und ggf. Gas-
schlauch geliefert, beschaffe diese. Berücksichtige dabei die
nationalen Bestimmungen und die Vorgaben im Kapitel „Anfor-
derungen an die gasführenden Komponenten“ – „Druckminde-
rer“ bzw. „Gasschlauch“.
1. Platziere den fertig montierten Grill im Freien auf einem
stabilen, waagerechten und ebenen Untergrund. Sorge für
ausreichend Freiraum zu allen Seiten. Beachte bei der Wahl
des Aufstellortes das Kapitel „Sicherheitshinweise“.
2. Arretiere ggf. die feststellbaren Rollen durch Drehen der
Flügelmuttern.
3. Alle Reglerknöpfe müssen sich auf Aus-Position OFF (Pfeil
auf dem Reglerknopf zeigt nach oben) befinden. Sollte dies
nicht der Fall sein, drücke den Reglerknopf und drehe ihn auf
Aus-Position.
4. Stelle die Gasflasche aufrecht im sicheren Stand auf den
Boden neben den Grill. Das Ventil der Gasflasche muss ge-
schlossen sein.
5. Sorge dafür, dass der Bereich um den Grill und die Gasflasche
frei zugänglich und frei von Gegenständen ist.
6. Falls der Gasschlauch nicht bereits am Grill montiert ist,
befestige ein Ende des Gasschlauches am Gasanschluss
des Grills und ggf. das andere Ende am Druckminderer. Die
Befestigungs art hängt von der länderspezifischen Ausführung
des Gasschlauches ab.
7. Schließe den Druckminderer wie in der zugehörigen An-
leitung beschrieben an. Für den Fall, dass keine Anleitung
zum Druckminderer vorhanden ist, werden nachfolgend
einige der verschiedenen Anschlussvarianten beschrieben.
ANMERKUNG: Die Abbildungen können leicht abweichen.
8. Führe nach dem Anschließen der Gasflasche eine Dichtig-
keitsprüfung durch (siehe Kapitel „Dichtigkeitsprüfung“).
Druckminderer anbringen
Druckminderer mit Linksgewinde
(BildC)
1. Schraube den Druckminderer handfest auf das Ventilgewinde
der Gasflasche. Beachte, dass es ein Linksgewinde ist und
gegen den Uhrzeigersinn gedreht werden muss.
2. Damit das Gas ausströmt und du den Grill in Betrieb nehmen
kannst, drehe das Ventil(a) an der Gasflasche gegen den
Uhrzeigersinn. Um das Ventil zu schließen, drehe es im Uhr-
zeigersinn.
Druckminderer mit Hebel
(BildD)
1. Bewege den Hebel des Druckminderers(b) auf Aus-Position.
2. Drücke den Druckminderer auf das Gasflaschenventil, bis er
deutlich einrastet.
3. Damit das Gas ausströmt und du den Grill in Betrieb nehmen
kannst, bewege den Hebel auf Ein-Position. Zum Stoppen der
Gaszufuhr bewege den Hebel auf Aus-Position.
Druckminderer mit Manschette
(BildE)
1. Bewege den Hebel des Druckminderers(b) auf Aus-Position.
2. Schiebe die Manschette des Druckminderers nach oben und
halte sie dort.
3. Drücke den Druckminderer auf das Gasflaschenventil und
schiebe die Manschette zum Schließen nach unten.
4. Falls der Druckminderer nicht einrastet, wiederhole den Vor-
gang.
5. Damit das Gas ausströmt und du den Grill in Betrieb nehmen
kannst, bewege den Hebel auf Ein-Position. Zum Stoppen der
Gaszufuhr bewege den Hebel auf Aus-Position.
Druckminderer entfernen
1. Stelle sicher, dass das Ventil der Gasflasche bzw. des Druck-
minderers geschlossen ist.
2. Drehe den Reglerknopf des Grills auf, sodass das restliche Gas
aus dem System entweichen kann.
3. Um den Druckminderer zu entfernen, führe die Montage-
schritte in umgekehrter Reihenfolge durch.
DE
22152_Inlay_M_LM_CE_V2.indb 522152_Inlay_M_LM_CE_V2.indb 5 05.12.2022 14:53:4205.12.2022 14:53:42

6
DICHTIGKEITSPRÜFUNG
BEACHTE!
Suche niemals mit einer offenen Flamme nach Gaslecks!
Stelle vor der Überprüfung auf Lecks sicher, dass sich in
der Nähe keine offenen Flammen befinden und sich keine
Funken bilden können. Funken oder Flammen können
eine Explosion auslösen, die zu schweren oder gar töd-
lichen Verletzungen bzw. Sachschäden führen kann.
Nach dem Erstanschluss, nach jedem Wechsel der Gasflasche
oder wenn der Grill längere Zeit nicht benutzt wurde, muss die
Dichtigkeitsprüfung aller gasführenden Komponenten erfolgen,
um sicherzustellen, dass aus keiner Verbindung Gas entweicht.
Wenn dein Druckminderer ein Manometer hat, befolge die
Anweisungen in der Anleitung zum Druckminderer, um eine
Dichtigkeitsprüfung durchzuführen. Ansonsten verwende dafür
ein Lecksuchmittel aus dem Fachhandel und befolge die Herstel-
leranweisungen. Eine Dichtigkeitsprüfung nach Gehör ist
nicht sicher!
GRILLTIPPS
1. Bevor du mit dem Grillen beginnst, lege alles bereit, was du
dazu benötigst. Beim Grillen solltest du den Grill und das Grill-
gut stets im Blick haben und nicht immer wieder in die Küche
gehen müssen.
2. Vor der Zubereitung sollte das Fleisch Raumtemperatur ha-
ben, damit eine gute und gleichmäßige Garung erzielt wird.
3. Benutze saubere Grillroste. An Rückständen auf dem Grill-
rost bleibt dein neues Grillgut haften.
4. Leicht eingeöltes Grillgut wird gleichmäßiger gebräunt und
klebt weniger am Grillrost fest.
5. Reibe Gussroste vor dem Grillen mit Öl ein, damit das Grill-
gut nicht anhaftet.
6. Heize den Grill immer bei geschlossenem Deckel vor, damit
das Grillgut nicht am Grillrost haften bleibt und ein scharfes An-
braten möglich ist. Zudem werden so Rückstände vom letzten
Grillen abgebrannt. Auch wenn du bei einer mittleren oder nied-
rigen Hitzestufe grillen möchtest, solltest du den Grill vorheizen.
7. Lege nicht zu viel Grillgut auf den Grillrost. Lasse ausrei-
chend Platz zwischen den Stücken, um sie bequem greifen
und bewegen zu können.
8. Bei Verwendung einer Marinade, Soße oder Glasur mit
hohem Zuckeranteil oder anderen, leicht brennbaren
Zutaten streiche diese erst in den letzten 10 bis 15Minu-
ten des Grillvorganges auf.
9. Wir empfehlen, beim Grillen den Deckel geschlossen zu
halten. Dadurch wird die Gefahr von Stichflammen reduziert
und dein Grillgut schneller und gleichmäßiger gegart. Öffne
ihn nicht zu oft, um nach dem Grillgut zu sehen, damit nicht
unnötigerweise zu viel Luft eindringt und Wärme und Rauch
austreten.
10. Damit dein Steak ein tolles Grillmuster und eine leckere
Kruste bekommt, darfst du es nicht zu oft wenden. In den
meisten Fällen sollte das Grillgut nur ein einziges Mal gewen-
det werden, und zwar erst dann, wenn es die gewünschte
Farbe erreicht hat. Dadurch wird auch ein zu häufiges Öffnen
des Deckels vermieden.
11. Gares Grillgut kannst du auf dem Warmhalterost ablegen,
um es warmzuhalten, während du weiter grillst. Beachte,
dass es dabei weiter nachgart. Darüber hinaus kannst du auf
dem Warmhalterost Burger-Brötchen rösten oder Gemüse,
Meeresfrüchte usw. schonend garen, während du z. B. Fleisch
bei starker Hitze auf dem Grillrost zubereitest.
Direktes vs. indirektes Grillen
Direkt grillen
Dies ist die klassische Variante, bei der das Grillgut direkt über
dem Brenner liegt. Entsprechend groß ist die Hitze. Deshalb
eignet sich diese Methode gut für Grillgut mit kürzeren Garzei-
ten bis maximal 30Minuten und, um beispielsweise Burger oder
Steaks kurz und scharf anzugrillen. Auf diese Weise entsteht eine
köstliche Kruste, während das Innere saftig bleibt.
Indirekt grillen
Hier kommt die Hitze von Brennern neben dem Grillgut, der
Brenner direkt darunter bleibt ausgeschaltet. Gleichzeitig ist der
Deckel geschlossen, damit die Hitze nicht entweichen kann. Die-
se Grillmethode empfehlen wir für Grillgut mit langen Garzeiten
wie Spareribs, Pulled Pork oder ganzes Geflügel. Aber auch Fisch
und Gemüse lassen sich auf diese Weise schonend zubereiten.
Du kannst auch beide Grillmethoden miteinander kombinieren:
erst heiß anbraten und dann sanft fertiggaren.
BENUTZUNG
Grill in Betrieb nehmen
BEACHTE!
■Brenne den Grill mit den Grillrosten bzw. allen Zubehörteilen,
die in direkten Kontakt mit Lebensmitteln kommen, vor dem
ersten Gebrauch aus, um eventuelle Produktionsrückstän-
de zu entfernen. Erhitze dazu den Grill bei geschlossenem
Deckel mindestens 20 Minuten lang auf der höchsten Stufe.
Nach dem Abkühlen reinige die Zubehörteile. Beachte hierzu
auch das Kapitel „Reinigung und Wartung“.
■Verwende den Grill nur dann, wenn sich sämtliche Teile an
ihrem Platz befinden und der Grill ordnungsgemäß und in
Übereinstimmung mit den Montageschritten in dieser Monta-
ge- und Gebrauchsanleitung montiert wurde.
■Stelle vor jeder Benutzung sicher, dass der Grill unbeschädigt
sowie richtig aufgestellt ist. Beachte bei der Wahl des Auf-
stellortes das Kapitel „Sicherheitshinweise“.
■Stelle vor jeder Benutzung sicher, dass die Gasflasche sowie
der Druckminderer richtig angeschlossen und alle gasführen-
den Teile dicht sind (siehe Kapitel „Gasflasche anschließen“
und „Dichtigkeitsprüfung“).
■Kontrolliere den Grill vor jedem Gebrauch auf Fettablagerun-
gen. Entferne überschüssiges Fett und entleere und reinige
alle Teile des Fettauffangsystems, um Fettbrände zu vermei-
den (siehe Kapitel „Reinigung und Wartung“).
■Lege das Fettauffangsystem oder die Grillkammer nicht mit
Alufolie oder einer anderen Folie aus.
■Beim Zündvorgang muss der Deckel geöffnet sein. Zünde
jeden Brenner einzeln.
■Sollte die Flamme erlöschen oder ein Brenner nicht ge-
zündet haben, drehe den entsprechenden Reglerknopf auf
Aus-Position. Warte ca. 2 bis 5Minuten, bevor du es erneut
versuchst, damit sich das Gas verflüchtigen kann. Ansonsten
könnte es zu einer Verpuffung kommen.
■Beuge dich beim Zünden der Gasflamme nicht über die Grill-
fläche, da es zu einer Verpuffung kommen kann, wenn sich
Gas in der Grillkammer staut.
■Schütte niemals Wasser auf den heißen Grill, um Verbrennun-
gen und Verbrühungen zu vermeiden.
1. Öffne den Deckel.
2. Stelle sicher, dass sich alle Reglerknöpfe auf Aus-Position OFF
(Pfeil auf dem Reglerknopf zeigt nach oben) befinden. Falls
nicht, drücke den Reglerknopf und drehe ihn auf Aus- Position.
3. Öffne die Gaszufuhr an der Gasflasche.
DE
22152_Inlay_M_LM_CE_V2.indb 622152_Inlay_M_LM_CE_V2.indb 6 05.12.2022 14:53:4205.12.2022 14:53:42

7
CALIANO 6.1 COOK
4. Jeder Brenner ist mit einem eigenen Zündsystem ausgestattet
und lässt sich somit einzeln zünden: Drücke den Reglerknopf
des gewünschten Brenners und drehe ihn auf PositionHI
(maximale Leistung). Die Gaszufuhr wird aktiviert.
Bei einer Piezo-Zündung wird gleichzeitig ein Funke erzeugt,
was ein knallendes Geräusch erzeugt.
5. Kontrolliere, ob der Brenner gezündet wurde: Schaue vorsich-
tig nach, ob Flammen aus dem Brenner schlagen.
6. Sollte der Brenner nicht gezündet haben, drehe den Regler-
knopf auf Aus-Position OFF und versuche es nach ca. 2 bis
5Minuten noch einmal.
L Bei einer Piezo-Zündung lasse den Reglerknopf erst einige
Sekunden nach erfolgter Zündung los, damit die Flamme
nicht erlischt.
7. Zünde auf diese Weise auch die übrigen Brenner.
Grillen / Pizza backen / Kochen
BEACHTE!
■Beim Öffnen des Deckels kann heißer Dampf entweichen.
Halte Kopf und Hände daher aus der Gefahrenzone fern. Es
besteht Verbrühungsgefahr.
■Benutze Grillbesteck mit langen, hitzebeständigen Griffen
und zum Pizzabacken einen Pizzaheber.
Grillen
1. Heize den Grill nach dem Zünden der Brenner vor: Schließe
den Deckel und warte, bis das Deckelthermometer die ge-
wünschte Temperatur anzeigt.
Nach dem Vorheizen kannst du die Brenner, die du nicht be-
nötigst, ausschalten. Drehe dazu die entsprechenden Regler-
knöpfe auf PositionOFF (aus).
2. Öffne den Deckel und lege das Grillgut auf den Grillrost oder
ein sonstiges Zubehörteil, das du benutzt.
3. Wenn eine hohe Temperatur in der Grillkammer erzielt und
das Grillgut von allen Seiten gleichmäßiger gegart werden
soll, schließe den Deckel.
4. Reduziere bei Bedarf die Brennleistung, indem du den Regler-
knopf weiter zur Position LO(geringste Leistung) drehst.
5. Sobald das Grillgut die gewünschte Bräunung hat, wende es
mit einer Grillzange.
L Wenn du den Pizzaofen-Aufsatz abnimmst, stehen dir
2weitere Brenner zur Verfügung.
Pizza backen
• Für den Pizzaofen-Aufsatz sind 2 Brenner vorgesehen, die du
mit den zugehörigen Reglerknöpfen auf die gleiche Art wie
die Hauptbrenner zündest und regulierst.
• Wenn das Deckelthermometer die gewünschte Temperatur
anzeigt, lege die Pizza auf den Pizzastein. Benutze dazu einen
Pizzaheber. Verwende diesen auch, um die fertig gebackene
Pizza aus dem Pizzaofen-Aufsatz herauszuheben.
Kochen auf dem Seitenbrenner (cooK-Zone)
BEACHTE!
■Nutze auf dem Seitenbrenner ausschließlich Kochgeschirr,
welches für Gaskochstellen geeignet ist.
■Der Durchmesser des Kochgeschirrs muss 12 – 24 cm betra-
gen, damit es sicher auf dem Seitenbrenner steht.
• Klappe die Abdeckung des Seitenbrenners hoch und benutze
ihn wie einen Gaskocher, um z. B. Beilagen und Soßen direkt
am Grill zuzubereiten.
Grill außer Betrieb nehmen
1. Schließe das Ventil der Gasflasche.
2. Drehe alle Reglerknöpfe auf Aus-PositionOFF.
3. Lasse den Grill abkühlen, bevor du ihn bewegst.
4. Reinige den Grill nach dem Abkühlen (siehe Kapitel „Rei-
nigung und Wartung“). Übermäßige Ansammlungen von
Lebensmittelrückständen und Speisefett können zu einem
sogenannten Fettbrand führen.
REINIGUNG UND WARTUNG
BEACHTE!
■Lass alle Teile vor dem Reinigen so weit abkühlen, dass sie
nicht mehr heiß sind und berührt werden können.
■Nimm keine Reinigungstätigkeiten am Ventil des Druckmin-
derers vor! Es enthält sehr empfindliche Bauteile, die schon
bei leichtem Kontakt mit anderen Gegenständen beschädigt
werden könnten. Tauche den Druckminderer nicht in Wasser.
■Das Gassystem darf nur von einer qualifizierten Fachkraft ge-
reinigt werden. Zerlege auf keinen Fall die Reglereinheit.
■Das Innere eines Brenners darf nicht nass werden!
■Tauche den Grill nicht in Wasser und spritze ihn nicht mit
einem Wasserschlauch ab. Es darf keine Flüssigkeit in die gas-
führenden oder elektrischen Komponenten gelangen.
■Klemme die Gasflasche vor dem Reinigen des Grillgehäuses ab.
■Schütte niemals kaltes Wasser auf heiße Teile. Dies kann zu
Verbrennungen und Beschädigungen des Materials führen.
■Benutze niemals Spiritus oder sonstige entzündbare oder
ätzende Reiniger.
■Das mitgelieferte Zubehör ist nicht für die Spülmaschine
geeignet.
■Alle Teile müssen vor der Benutzung oder dem Verstauen
trocken sein.
Damit du lange Freude an deinem Grill hast, solltest du ihn
sauber halten. Wird er nicht gereinigt und gewartet, kann seine
Leistung im Laufe der Zeit abnehmen. Niedrige Temperaturen
und eine ungleichmäßige Hitzeverteilung sind Anzeichen dafür,
dass gasführende Komponenten gereinigt werden sollten. Durch
Speiserückstände am Grillrost bleibt das Grillgut haften. Fettabla-
gerungen können zu einem Fettbrand führen.
Fettauffangsystem reinigen (nach jeder
Benutzung)
■Benutze keine scheuernden Reinigungsmittel.
• Entleere und reinige alle Teile des Fettauffangsystems (Fett-
auffangblech, Fettauffangtopf oder Fettauffangschale) nach
bzw. vor jeder Nutzung. Spüle die Teile mit warmem Wasser,
Spülmittel und einem Schwamm ab. Am einfachsten ist die
Reinigung nach dem Gebrauch in lauwarmem (nicht heißem!)
Zustand.
Grillroste und Grillplatte aus Gusseisen reinigen
(nach jeder Benutzung)
Die Grillplatte reinigst du auf die gleiche Weise wie den Grillrost:
1. Lasse den Grillrost im Grill und entferne grobe Rückstände
mit einer Grillrost-Reinigungsbürste oder einem Spachtel.
2. Die verbleibenden Rückstände brennst du wie folgt ab: Schal-
te den Grill für ca. 30Minuten auf höchster Stufe (mindestens
300 °C) ein und schließe den Deckel.
3. Lasse den Grillrost soweit abkühlen, dass du ihn anfassen
kannst und bürste die Reste ab. Wische ihn dann ggf. mit
feuchtem Küchenpapier sauber.
4. Wir empfehlen, den sauberen Grillrost zur Pflege und Vorbe-
reitung für das nächste Grillen mit Pflanzenöl einzureiben.
DE
22152_Inlay_M_LM_CE_V2.indb 722152_Inlay_M_LM_CE_V2.indb 7 05.12.2022 14:53:4205.12.2022 14:53:42

8
Emaillierte Grillroste, Warmhalteroste, Brenner-
abdeckungen und sonstige emaillierte Teile
reinigen
■Benutze keine scheuernden Reinigungsmittel und keine
Bürsten mit Stahlborsten.
• Reinige Grill- und Warmhalteroste nach jeder Benutzung, die
anderen Komponenten bei Bedarf.
• Schabe grobe Rückstände mit einem Kunststoffspachtel ab
oder weiche sie in warmem Wasser ein.
• Verwende anschließend zum Reinigen warmes Wasser mit
etwas Spülmittel und einen Schwamm oder einen weichen
Lappen.
Edelstahlroste reinigen (nach jeder Benutzung)
• Reinige Edelstahlroste mit warmem Wasser, Spülmittel und
einem Schwamm oder rostfreien Putzkissen.
Grillkammer reinigen (bei Bedarf)
Während der Nutzung entsteht aus verdampftem Fett und Rauch
Kohlenstoff, der sich in der Grillkammer ablagert.
■Benutze keine scheuernden Reinigungsmittel.
1. Entferne in der gesamten Grillkammer alle Speisereste und
Fettansammlungen. Dazu kannst du z. B. einen Kunststoff-
spachtel benutzen.
2. Wische anschließend die Oberflächen mit einem weichen
Tuch sauber. Sollten stärkere Verschmutzungen vorhanden
sein, kannst du diese mit warmem Wasser, Spülmittel und
einem Schwamm abwaschen und mit einem nicht scheuern-
den Tuch trocken wischen.
Außenseiten reinigen (bei Bedarf)
Die Außenseiten des Grills bestehen aus unterschiedlichen Ma-
terialien und Oberflächen. Daher empfehlen wir je nach Art der
Oberfläche unterschiedliche Reinigungsmethoden.
Edelstahl-Oberflächen
• Verwende einen nicht-scheuernden Edelstahlreiniger und
befolge die Herstelleranweisungen. Benutze keine scheu-
ernden Pasten!
• Ansonsten kannst du zum Reinigen warmes Wasser, einen
Haushaltsreiniger und einen Schwamm verwenden. Spüle die
Oberflächen anschließend mit klarem Wasser ab und trockne
sie mit einem weichen Tuch.
L Wird der Grill einer besonders rauen Umgebung ausge-
setzt, muss die Außenseite des Grills häufiger gereinigt
werden. In chlorid- und sulfid-haltiger Umgebung, ins-
besondere in Küstenregionen, kann auch rostfreier Stahl
oxidieren oder Flecken aufweisen. Salzwasser, saurer
Regen, die nähere Umgebung von Pools und Whirlpools
und andere extreme Bedingungen, die von hoher Wärme
und Luftfeuchtigkeit gekennzeichnet sind, können zur
Fleckenbildung führen. Diese Flecken werden manchmal
mit Rost verwechselt.
Sie können einfach entfernt und vermieden werden:
Wasche die Flecken mit warmem Wasser und einem
Haushaltsreiniger ab, spüle die Oberfläche mit klarem
Wasser ab und trockne sie. Reibe alle rostfreien Stahlflä-
chen alle 3bis 4Wochen mit Leitungswasser und einem
Reinigungsmittel für rostfreien Stahl ab, um die Entste-
hung von Flecken zu vermeiden.
Lackierte, emaillierte Oberflächen und Kunststoffteile
■Benutze keine scheuernden Reinigungsmittel.
• Verwende zum Reinigen nur warmes Wasser mit etwas
Haushaltsreiniger sowie Küchen tücher oder einen weichen
Lappen. Reinige die Oberfläche, spüle sie ab und wischen sie
trocken.
Gasführende Komponenten reinigen (bei Bedarf)
Gasführende Komponenten sind ggf. verstopft und müssen
gereinigt werden, wenn
• Gasgeruch bei sehr gelber und schwacher Brennerflamme
wahrgenommen wird.
• die gewünschte Temperatur nicht erreicht wird.
• der Brenner ungleichmäßig heizt bzw. die Flamme flackert.
Gehe bei der Reinigung wie folgt vor:
• Reinige die komplette äußere Oberfläche der Brenner mit
einer sauberen Drahtbürste, um Speiserückstände und
Schmutz zu entfernen. Achte beim Reinigen darauf, nicht
die Zündelektrode zu verbiegen oder zu beschädigen.
Bürste vorsichtig um die Zündelektrode herum.
• Stelle insbesondere sicher, dass an jedem Brennerrohr die
Gasaustritts- und Lufteinlassöffnungen bzw. das Venturi-Rohr
frei sind. Reinige sie bei Bedarf z. B. mit einem Pfeifenreiniger
oder mit Druckluft.
• Den Gasanschluss sowie die Anschlüsse am Gasschlauch
kannst du bei Bedarf mit einem weichen Pinsel reinigen.
Pizzastein reinigen (nach jeder Benutzung)
BEACHTE!
■Reinige den Pizzastein nicht in der Spülmaschine und tauche
ihn nicht in Wasser!
■Benutze keine scheuernden Reinigungsmittel und keine Bürs-
ten mit Metallborsten.
• Lasse den Pizzastein nach dem Gebrauch vollständig abküh-
len und reinige ihn anschließend mit einem trockenen Tuch,
einem feuchten Küchenschwamm oder, bei hartnäckigen
Verkrustungen, mit einem Küchenschaber.
Wartungstätigkeiten
BEACHTE!
■Die Düsen darf nur eine Fachkraft austauschen.
Der Grill ist wartungsfrei, wenn er regelmäßig gereinigt wird.
Trotzdem müssen in Intervallen Kontrollen durchgeführt werden.
Richte die Intervalle nach der Nutzungshäufigkeit und den Um-
gebungsbedingungen, denen der Grill ausgesetzt ist.
• Kontrolliere, ob alle Teile des Grills vorhanden und montiert
sind (Sichtkontrolle).
• Kontrolliere, ob alle Verbindungen vorhanden und fest an-
gezogen sind. Ziehe sie ggf. nach.
• Das Gassystem muss jedes Mal geprüft werden, wenn eine
Gasflasche angeschlossen wird (siehe Kapitel „Dichtigkeits-
prüfung“).
• Der Gasschlauch muss ersetzt werden, wenn er poröse oder
beschädigte Stellen aufweist bzw. das maximale Verwendungs-
datum (siehe Kapitel „Technische Daten“) überschritten hat.
DE
22152_Inlay_M_LM_CE_V2.indb 822152_Inlay_M_LM_CE_V2.indb 8 05.12.2022 14:53:4205.12.2022 14:53:42

9
CALIANO 6.1 COOK
AUFBEWAHRUNG
BEACHTE!
■Schütze den Grill vor starkem Wind, lang anhaltender Feuch-
tigkeit, Regen, Schnee, Hagel oder anderen Witterungsein-
flüssen.
■Vor einem längeren Nichtgebrauch des Grills trenne die
Gasflasche vom Grill und lagere sie ordnungsgemäß (siehe
Kapitel „Sicherheits hinweise“ – „Gefährdungen durch Gas-
flaschen“).
• Bewahre den Grill im Freien an einem trockenen Platz auf.
Decke ihn (mit einer Wetterschutzhaube) ab, um die Bauteile
vor Feuchtigkeit, Staub, Insekten oder Spinnen zu schützen,
die in das Gehäuse des Grills gelangen und sich dort nieder-
lassen könnten.
• Reinige den Grill vor dem Einlagern (siehe Kapitel „Reinigung
und Wartung“).
• Wird der Grill im Innenbereich gelagert, muss er von der
Gasflasche getrennt werden. Verschließe diese ordnungsge-
mäß mit Verschlussmutter und Schutzkappe (je nach Ausfüh-
rung) und bewahre sie im Freien oberhalb der Erdgleiche (d. h.
nicht in Vertiefungen unterhalb des Erdniveaus) an einem gut
belüfteten Ort auf.
PROBLEMBEHEBUNG
Sollte es trotz hinreichender Sorgfalt und Pflege zu einer Störung
kommen, kann dir dieses Kapitel helfen, diese zu beheben.
Lässt sich mit den nachfolgenden Schritten das Problem nicht
lösen, kontaktiere den Kunden service (siehe Umschlag dieser
Montage- und Gebrauchsanleitung).
Versuche nicht, das Gassystem selbst zu reparieren!
Gasgeruch (evtl. bei sehr gelber und schwacher Flamme).
Leckage im Gassystem.
1. Schließe sofort die Gasflasche.
2. Unterbinde jegliche Flammen- oder Funkenbildung (schalte
keine elektrischen Geräte).
3. Ziehe alle Verschraubungen des Gassystems nach.
4. Überprüfe alle gasführenden Teile auf äußere Beschädigun-
gen; tausche defekte Teile gegen Original-Ersatzteile.
5. Kontrolliere die Dichtigkeit (siehe Kapitel „Dichtigkeitsprüfung“).
Die Brenner sind verstopft.
►Reinige sie wie im Kapitel „Reinigung und Wartung“ – „Gas-
führende Komponenten reinigen (bei Bedarf)“ beschrieben.
Die Düse des Einstellglieds (hinter der Frontblende) oder sonsti-
ges Gassystem ist verstopft.
►Lasse das Gassystem von einer Fachkraft reinigen.
Brenner zündet nicht.
Die Gasflasche ist leer.
►Tausche die Gasflasche.
Der Brenner ist verstopft.
►Reinige ihn wie im Kapitel „Reinigung und Wartung“ – „Gas-
führende Komponenten reinigen (bei Bedarf)“ beschrieben.
Beim Seitenbrenner: Das Zündkabel steckt nicht auf der Zündung.
►Sichtkontrolle. Stecke das Zündkabel ggf. auf.
Die Düse des Einstellglieds (hinter der Frontblende) oder sonsti-
ges Gassystem ist verstopft.
►Lasse das Gassystem von einer Fachkraft reinigen.
Die Zündung ist defekt.
►Lasse die Zündung von einer Fachkraft überprüfen und repa-
rieren bzw. ersetzen.
Die gewünschte Temperatur wird nicht erreicht./
Die Flamme ist klein oder flackert stark oder das
Flammenmuster ist unregelmäßig./ Einzelne Brenner
zünden nicht.
Die Gasflasche ist (fast) leer.
►Tausche die Gasflasche.
Die Brenner sind verstopft.
►Reinige sie wie im Kapitel „Reinigung und Wartung“ – „Gas-
führende Komponenten reinigen (bei Bedarf)“ beschrieben.
Der Gasschlauch ist geknickt.
►Richte den Gasschlauch aus.
Die Düse des Einstellglieds (hinter der Frontblende) oder sonsti-
ges Gassystem ist verstopft.
►Lasse das Gassystem von einer Fachkraft reinigen.
Verpuffung oder blubbernde / knallende Geräusche
Flammenrückschlag aufgrund von Verstopfungen am Brenner.
►Schließe sofort das Gasflaschenventil. Warte 5Minuten und
nimm den Grill erneut in Betrieb. Tritt die Störung weiterhin
auf, reinige die Brenner wie im Kapitel „Reinigung und War-
tung“ – „Gasführende Komponenten reinigen (bei Bedarf)“
beschrieben. Ansonsten lasse das Gassystem von einer Fach-
kraft reinigen.
Starkes Auammen
Das Grillgut ist fettig.
►Entferne große Fettmengen, lege das Fleisch auf eine Grill-
schale oder reduziere die Grilltemperatur.
Der Grill ist verschmutzt.
►Reinige den Grill (siehe Kapitel „Reinigung und Wartung“).
ENTSORGUNG
Zur Entsorgung des Grills zerlege ihn in seine Einzelteile und gib
Metalle und Kunststoffe in die Wiederverwertung.
Entsorge das Verpackungsmaterial umweltgerecht und
führe es der Wertstoffsammlung zu.
EG-KONFORMITÄTSERKLÄRUNG
Hiermit erklären wir, die Firma LANDMANN Germany GmbH,
dass das hier beschriebene Gasgerät der Verordnung (EU)
2016/426 entspricht.
Die Konformität wurde durch eine Baumusterprüfung gemäß der
Normen EN 498:2012 und EN 484:2019+AC2020 nachgewiesen.
Durchgeführt wurde die Baumusterprüfung von der notifizierten
Stelle DBI Certification A/S (2531).
Geräteidentifikationsnummer: 2531DN-0098
Für weitere Informationen wende dich bitte an unseren Kunden-
service.
DE
22152_Inlay_M_LM_CE_V2.indb 922152_Inlay_M_LM_CE_V2.indb 9 05.12.2022 14:53:4205.12.2022 14:53:42

10
Symbols
Danger symbol: This symbol indicates possible dangers.
Read the associated safety notices carefully and follow
them.
Supplementary information
Read the assembly and operating instructions before
use!
Suitable for use with food.
Further Explanations
Key numbers are shown as follows: (1)
Picture references are shown as follows: (Picture A)
Dear Customer,
Thank you for choosing a gas barbecue from LANDMANN. Please follow these
assembly and operating instructions step by step to get the LANDMANN barbecue you
have just purchased ready for use. In addition, we provide you with important notices
about how to use and handle the barbecue safely and how to look after it.
Take time to familiarise yourself with the detailed features of your new equipment.
For we not only want you to start off smoothly, but also enjoy using your
LANDMANN barbecue for a long time.
If you have any questions about your barbecue model or require further support,
our Service team will be happy to help. You will find the relevant contact details on the
cover of these assembly and operating instructions.
Your LANDMANN team hopes you enjoy many
delicious barbecues with it.
CONTENTS
Technical Data 11
Items Supplied 11
Device Overview 12
Intended Use 12
Safety Notices 12
Requirements Placed on the Gas-Carrying Components 13
Notices for Assembly 13
Connecting the Gas Cylinder 14
Leak Test 14
Barbecue Tips 14
Use 15
Cleaning and Maintenance 16
Storage 17
Troubleshooting 17
Disposal 18
EC Declaration of Conformity 18
WARNING:
■Use outdoors only.
■Read the assembly and operating instructions before using
the appliance.
■WARNING: accessible parts may be very hot. Keep young
children away.
■This appliance must be kept away from flammable materi-
als during use.
■Do not move the appliance during use.
■Turn off the gas supply at the gas cylinder after use.
■Do not modify the appliance.
READ THESE ASSEMBLY AND OPERATING
INSTRUCTIONS BEFORE YOU START USING
THE DEVICE!
A failure to follow the listed safety notices, precautionary meas-
ures and steps may lead to serious or even fatal injuries or to
material damage caused by a fire or explosion.
Keep these assembly and operating instructions for
future reference and other users. They belong to the device.
The manufacturer and importer do not accept any liability if the
information in these assembly and operating instructions is not
complied with.
EN
22152_Inlay_M_LM_CE_V2.indb 1022152_Inlay_M_LM_CE_V2.indb 10 05.12.2022 14:53:4305.12.2022 14:53:43

11
CALIANO 6.1 COOK
TECHNICAL DATA
Device name: Gas barbecue “CALIANO 6.1 cooK” 2531-23
Model number: 22152 PIN: 2531DN-0098
Country: BG, CY, CZ, DK, EE, FI, HU, HR, IS,
IT, LT, LV, MT, NL, NO, RO, SE, SI, SK AT, CH, CZ, DE PL BE, CH, CZ, ES, FR, GR, IE, IT,
LT, LU, LV, PT, SK, SI, TR
Gas category: I3B/P (30) I3B/P (50) I3B/P (37) I3+ (28-30/37)
Gas type: G30 (Butane), G31 (Propane)
or a mixture of them
G30 (Butane), G31 (Propane)
or a mixture of them
G30 (Butane), G31 (Propane)
or a mixture of them
G30 (Butane) G31 (Propane)
Gas pressure in mbar: 30 50 37 28 – 30 37
Heat output: 24.1 kW 24.1 kW 26.8 kW 24.1 kW 24.1 kW
Consumption: G30: 1754 g/h
G31: 1714 g/h
G30: 1754 g/h
G31: 1714 g/h
G30: 1754 g/h
G31: 1714 g/h
1754 g/h 1714 g/h
Ø of nozzle of main burner:
0.91 mm 0.80 mm 0.91 mm 0.91 mm 0.91 mm
Ø of nozzle of side burner: 0.76 mm 0.66 mm 0.76 mm 0.76 mm 0.76 mm
Ignition: Piezo
Pressure regulator: According to EN 16129; The national provisions must be complied with.
Gas hose: According to EN16436-1; max. 1.5 m; The national regulations regarding the maximum period of use must be followed.
Dimensions (L x H x W): Barbecue: approx. 177 x 117 x 60 cm; Pizza oven attachment: approx. 42.5 x 35 cm
Weight: approx. 62 kg
Gas cylinder: Standard gas cylinder, see adjacent illustration for dimensions.
ID of assembly and
operating instructions: Z 22152 M LM CE V2 1222 md
Manufacturer: LANDMANN Germany GmbH, Am Heisterbusch 1, 19258 Gallin, Germany
Made in China.
ITEMS SUPPLIED
(Picture A, see fold-out page)
Item Description No.
1Warming rack 1
2Grill rack 3
3Flame tamer 6
4Grease tray, barbecue 1
5Barbecue unit (preassembled) 1
6Side burner 1
7Holder A 2
8 Holder B 2
9Crossbar 1
10 Door stop with magnet 4
11 Back panel, top 1
12 Back panel, bottom 1
13 Support, back right 1
14 Side panel 2
15 Castor 2
16 Support, front right 1
17 Base cabinet door 3
18 Base plate 1
19 Trim 1
20 Door holder 3
21 Castor, lockable 2
22 Support, front left 1
23 Support, back left 1
24 Side table, left 1
25 Pizza oven attachment 1
26 Pizza stone 1
27 Grease tray, pizza oven 1
Item Description No.
Assembly materials:
AScrew, M6 x 12 mm 44
BScrew, M6 x 50 mm 12
CScrew, M4 x 15 mm 8
DSpacer sleeve 3
Assembly and operating instructions
Instructions for pressure regulator
1
1
You also require:
• LP gas cylinder (see the “Technical Data” chapter), 1 x
• Assembly tool
These are not supplied with the device.
PLEASE NOTE!
• Check the items supplied for completeness and the compo-
nents for transport damage. If any parts are missing or dam-
aged, contact the customer service department (see the cover
of these assembly and operating instructions). We reserve the
right to make minor technical changes, e.g. in relation to the
assembly materials.
• Remove any films, stickers or transport protection from the
device, but never the rating plate and possible warnings!
max. 600 mm
max. Ø 300 mm
EN
22152_Inlay_M_LM_CE_V2.indb 1122152_Inlay_M_LM_CE_V2.indb 11 05.12.2022 14:53:4305.12.2022 14:53:43

12
DEVICE OVERVIEW
(Picture B)
28 Thermometer in lid
29 Barbecue chamber lid
30 Lid handle
31 Gas connection
32 Main burner control knob
33 Side burner control knob
34 Pizza oven control knob
35 Base cabinet
36 Front panel
INTENDED USE
■This gas barbecue is intended to be used to prepare food that
can be grilled. It is operated with liquefied petroleum gas and
is intended to be used outdoors.
■Other uses are not permitted. This applies in particular to the
following possible misuses:
○Do not operate the barbecue with wood, charcoal or any
other type of fuel that is not liquefied petroleum gas (pro-
pane / butane).
○Never connect the barbecue to the gas network (municipal
gas network)! The valves and nozzles are only designed for
liquid gas cylinders.
○Do not use the barbecue for heating.
○Do not use the barbecue to heat up substances and materi-
als other than food.
○Never use the barbecue as a built-in device.
■The barbecue and the gas cylinder must be used and stored in
accordance with the applicable regulations.
■The barbecue is designed exclusively for personal and not for
commercial use.
■Use the barbecue only for the specified purpose and as
described in these assembly and operating instructions. Any
other use is deemed to be improper. Incorrect operation and
incorrect handling may impair the function or cause material
damage or personal injury.
■The warranty does not cover faults caused by incorrect
handling, damage or attempted repairs. The same applies to
normal wear and tear and to grease deposits and stains on
the barbecue and accessories.
SAFETY NOTICES
Risks of Injury
■The barbecue is not intended to be used by children and peo-
ple with reduced physical, sensory or mental abilities or a lack
of experience and/or knowledge.
■Children must not play with the barbecue. Ensure that chil-
dren do not have unsupervised access to the barbecue, even
when it is switched off. Incorrect use can be dangerous.
■WARNING: Accessible parts may be very hot. Keep
young children away! Never leave the barbecue unsuper-
vised when it is in operation or still hot. In particular, make
sure that no children or persons who are not capable of cor-
rectly recognising or reacting to possible dangers come near
the hot barbecue.
■Wear barbecue gloves which have been inspected in accordance
with Regulation (EU) 2016/425 for personal protective equip-
ment in line with DIN EN 407 (heat protection category II).
■Do not touch any heated parts while or after using the bar-
becue! Only ever touch the handles and control knobs while
the barbecue is in operation or immediately after it has been
switched off. Wait until the barbecue has cooled down before
it is transported, cleaned or stored away.
■Do not move the barbecue during operation!
■Consuming alcohol or drugs may have a negative effect on
your ability to assemble, move, store or operate the barbecue
safely and properly.
Risks of Suffocation, Fire and Explosion
Gas is extremely flammable and burns explosively. Serious
personal injury or damage to property may occur if escap-
ing gas ignites in an uncontrolled fashion.
Liquefied petroleum gas is heavier than oxygen. It there-
fore settles at the bottom and displaces the oxygen there.
If a corresponding concentration of gas forms (e.g. if a gas
cylinder is damaged), this may result in suffocation owing
to a lack of oxygen.
■Only ever use the gas types, gas cylinders, pressure regula-
tors and gas hoses which are specified in these assembly and
operating instructions (see the “Requirements Placed on the
Gas-Carrying Components” chapter).
■Only use the barbecue above ground level (i.e. do not use it in
depressions below ground level).
■Use outdoors only. Do not use the barbecue in buildings,
garages, covered passageways, tents, other enclosed areas,
under awnings or flammable structures.
■Do not use the barbecue in or on a vehicle. This also applies
to mobile homes, caravans and boats.
■Do not use the barbecue if there are highly flammable or
explosive substances in the air or surrounding space. Do not
store fuel or other flammable vapours or liquids near the bar-
becue and do not use such substances with the barbecue. Do
not spray any sprays close to the barbecue.
■Never use the barbecue without a pressure regulator (see
the “Requirements Placed on the Gas-Carrying Components”
chapter– “Pressure Regulator”)!
■Make sure that the pressure regulator is connected properly
and in good working order and does not have any damage.
■Each time the gas cylinder is connected or when the barbecue
has not been used for a prolonged period, perform a leak test
on all gas-carrying components (see the “Leak Test” chapter).
The barbecue must not be used if there is a gas leak.
■This device must be kept away from flammable materi-
als during use. There is a risk of fire and a smouldering fire.
The following minimum distances from flammable materials
must be maintained: 2 m above and 1 m to the side of the
barbecue. The distance from low-flammability materials, e.g.
building walls, must be at least 0.6 m.
While the barbecue is in use, neither the weatherproof cover
nor any other flammable materials may be stored in the base
cabinet either.
■When the gas cylinder is connected, there must be no ignition
sources within 5 m of the barbecue, in particular no naked
flames or burning cigarettes, candles, lamps, etc. Electrical de-
vices may also pose a danger if gas escapes when the cylinder
is connected.
■Never block up the ventilation openings of the barbecue unit
and the gas cylinder installation space and make sure that
they are always clear.
■Do not cover any openings of the barbecue and make sure
that they are not blocked before the barbecue is put into
operation. Like most devices that are used outdoors, the
barbecue is a possible hiding place for spiders and insects.
Any blockages in the gas-carrying components may impede
the flow of gas, which may reduce performance or even result
in a dangerous flashback. Remove blockages in the manner
described in the “Cleaning and Maintenance” chapter.
■Never leave the barbecue unsupervised when it is in opera-
tion. If a flame goes out, reignite it immediately or shut off
the gas cylinder.
■If you smell gas, turn off the gas supply on the gas cylinder
and extinguish all flames. Do not switch on any electrical
EN
22152_Inlay_M_LM_CE_V2.indb 1222152_Inlay_M_LM_CE_V2.indb 12 05.12.2022 14:53:4305.12.2022 14:53:43

13
CALIANO 6.1 COOK
devices. Find out the cause and fix the gas leak before you use
the barbecue again.
■Make sure that foodstuffs containing oil and fats are not over-
heated. Do not place any oil-filled vessels onto the barbecue.
■Do not extinguish a grease fire with water! Switch all burn-
ers off immediately and leave the lid closed until the fire has
extinguished.
■Turn off the gas supply at the gas cylinder immediately
after use.
■Do not cover the barbecue while it is still hot.
■Do not make any modifications to the device! Any modifi-
cation to the device may be dangerous.
■Components which have been sealed by the manufac-
turer or its agent must not be manipulated.
■Repairs may only be carried out by the manufacturer or
customer service department in order to avoid any hazards.
If you notice any damage or there is a fault, contact the
customer service department (see the cover of these assembly
and operating instructions). The barbecue must not be used
until it has been repaired as a malfunctioning barbecue may
increase the risk of injury.
■Use only original accessories from the manufacturer in order
to guarantee that there is no interference that may prevent
the barbecue from working and to avoid possible damage or
hazards.
■Never remove a control knob, the gas cylinder or one of the
gas-carrying components while the device is operating.
■Never transport the barbecue with a gas cylinder connected
to it. The barbecue and gas cylinder must always be transport-
ed separately from one another.
■Clean the barbecue regularly in the manner described in the
“Cleaning and Maintenance” chapter.
Hazards from Gas Cylinders
■Note the specifications of the manufacturer or lender of
the gas cylinder!
■A gas cylinder must be kept out of the reach of children!
■Never use a gas cylinder that is dented or rusty.
■Never use a gas cylinder with a damaged valve.
■Never lay a gas cylinder on its side. Always install, transport
and store gas cylinders (even empty ones) in an upright,
secure position.
■Never drop a gas cylinder. Do not subject it to impacts or
damage it.
■Gas cylinders may explode if they are heated. Never burn a
gas cylinder. Do not expose it to extreme heat (over 50°C) or
direct sunlight either. Do not leave a gas cylinder in a car on
a hot day. Make sure that neither the gas cylinder nor the gas
hose touch the barbecue while in use.
■Gas cylinders may only be connected, used and stored in an
outdoor space with good ventilation (i.e. not in stairwells, cor-
ridors or passageways, for example) and above ground level
(i.e. not in depressions below ground level).
■Move a leaking gas cylinder immediately to a well-ventilated
space outdoors, allow the gas to escape and wait until it has
dissipated. Then return the empty gas cylinder to the manu-
facturer and tell it that it has a leak.
If you feel dizzy or nauseous, breathe fresh air and seek medi-
cal assistance if necessary.
■Always close the valve on the gas cylinder first before you
disconnect the pressure regulator from the gas cylinder.
■Gas cylinders (including empty ones) which are not connected
up for immediate use must not be stored directly next to an
operating device that is being powered by gas or electricity.
■Even gas cylinders which appear to be empty may still contain
liquefied petroleum gas and must therefore be handled with
the same care as a full gas cylinder.
REQUIREMENTS PLACED ON THE
GAS-CARRYING COMPONENTS
The barbecue is operated using liquefied petroleum gas (LPG or LP
gas). The LPGs propane, butane and their mixtures remain liquid
at room temperature and low compression (< 10 bar) in a gas
cylinder. When the gas cylinder is opened, the pressure escapes,
the liquid expands and changes into a gas.
Gas Cylinder
• Only ever use gas cylinders containing propane or butane gas
or a mixture of the two gases. The gas cylinders must meet
the national regulations and must not be bigger than is speci-
fied in the “Technical Data” chapter.
Gas Cartridge
• If the barbecue is approved for use with a gas cartridge, only
ever use screw-on cartridges with a 7/16 “ thread and a maxi-
mum capacity of 450 g / 800 ml.
Pressure Regulator
The pressure regulator ensures that the barbecue is always sup-
plied with a consistent gas pressure.
• Use the pressure regulator that is supplied with the barbecue.
It has been tested and is CE-certified. It complies with the
European Standard EN 16129.
• If the barbecue has been supplied without a pressure regula-
tor, purchase a pressure regulator that matches the gas cylin-
der. Make sure that it complies with the national regulations.
Gas Hose
• Use the gas hose that is supplied with the barbecue. If the
items supplied did not include a gas hose, purchase a gas
hose that complies with the national regulations.
• The gas hose (or hose line) must be no longer than 1.5 m and
must satisfy the specifications of the standard EN16436-1.
• Note the national regulations and replace the gas hose if they
require it or if the gas hose has exceeded the maximum use-
by date.
• Before each use, make sure that the gas hose does not have
any kinks or tears and is not worn. If the gas hose has a leak
or is defective, the barbecue must not be put into operation.
NOTICES FOR ASSEMBLY
PLEASE NOTE!
■Keep the packaging material away from young children and
animals! There is a danger of suffocation.
• The assembly steps are shown at the end of these assembly
and operating instructions. Follow them in the correct order.
Incorrect assembly can be dangerous.
• Only use tools in perfect condition that fit properly. If you
use a tool that is worn or does not fit, you will not be able to
tighten the screws firmly enough, but you may also damage
them so that they can no longer be turned.
• Ensure there is sucient space to assemble the barbecue and
if necessary use a mat to protect the barbecue or delicate
floors from being scratched.
• Assemble the barbecue on a horizontal, flat surface to make
sure it is straight.
• Do not apply any force when assembling the barbecue.
• First tighten the screw connections so they are hand-tight and
then tighten them again once you have completed the assem-
bly step. Otherwise this may cause unwanted tension.
• Tighten the nuts until they fit firmly, and then turn them a
quarter turn more. Do not tighten them too hard!
EN
22152_Inlay_M_LM_CE_V2.indb 1322152_Inlay_M_LM_CE_V2.indb 13 05.12.2022 14:53:4305.12.2022 14:53:43

14
CONNECTING THE GAS CYLINDER
PLEASE NOTE!
■Before you connect the gas cylinder, note the “Requirements
Placed on the Gas-Carrying Components” chapter.
■Only change the gas cylinder outdoors or in a well-ventilated
space, away from ignition sources (e.g. candles, cigarettes,
other devices that produce flames).
■All connecting pieces must be free of any dirt and not be
damaged.
■The gas cylinder must not touch hot parts of the barbecue or
be within range of the heat radiation.
■The gas hose must not be under strain, twisted or bent and
must not touch the barbecue.
■When you have connected the gas cylinder, make sure that
all connections are tight (see the “Leak Test” chapter). Only
screw on the pressure regulator hand-tight! Do not use a tool
so that the seal of the valve is not damaged, which would
compromise the leaktightness.
If your barbecue has been supplied without a pressure regulator
and a gas hose, if applicable, purchase them. When you do this,
consider the national regulations and the specifications in the
“Requirements Placed on the Gas-Carrying Components” chapter
– “Pressure Regulator” and “Gas Hose”.
1. Place the fully assembled barbecue in an outdoor space on a
stable, horizontal and flat surface. Ensure there is sucient
clear space on all sides. When you are choosing where to set
up, note the “Safety Notices” chapter.
2. If necessary, lock the lockable castors by twisting the wing
nuts.
3. All control knobs must be in the Off position (arrow on the
control knob pointing upwards). If this is not the case, press
the control knob and turn it to the Off position.
4. Place the gas cylinder upright securely on the ground next to
the barbecue. The valve of the gas cylinder must be closed.
5. Make sure that the area around the barbecue and the gas
cylinder are freely accessible and clear of any objects.
6. If the gas hose is not already attached to the barbecue,
fix one end of the gas hose on the gas connection of the
barbecue and, if required, fix the other end on the pressure
regulator. The type of fixing depends on the country-specific
design of the gas hose.
7. Connect the pressure regulator as described in the associated
instructions. In the event that you do not have any instruc-
tions for the pressure regulator, a few of the different connec-
tion variants are described below. COMMENT: The illustrations
may differ slightly.
8. Perform a leak test after you have connected the gas cylinder
(see the “Leak Test” chapter).
Attaching the Pressure Regulator
Pressure Regulator with Left-Hand Thread
(PictureC)
1. Screw the pressure regulator hand-tight onto the valve thread
of the gas cylinder. Note that it is a left-hand thread and
needs to be screwed anticlockwise.
2. To allow the gas to flow out and you to start operating the
barbecue, turn the valve(a) on the gas cylinder anticlockwise.
To close the valve, turn it clockwise.
Pressure Regulator with Lever
(PictureD)
1. Move the lever of the pressure regulator(b) to the Off posi-
tion.
2. Press the pressure regulator onto the gas cylinder valve until it
clearly engages.
3. To allow the gas to flow out and you to start operating the
barbecue, move the lever to the On position. To stop the gas
supply, move the lever to the Off position.
Pressure Regulator with Sleeve
(Picture E)
1. Move the lever of the pressure regulator(b) to the Off posi-
tion.
2. Slide the sleeve of the pressure regulator upwards and hold it
there.
3. Press the pressure regulator onto the gas cylinder valve and
slide the sleeve downwards to close it.
4. If the pressure regulator does not engage, repeat the process.
5. To allow the gas to flow out and you to start operating the
barbecue, move the lever to the On position. To stop the gas
supply, move the lever to the Off position.
Removing the Pressure Regulator
1. Make sure that the valve of the gas cylinder or the pressure
regulator is closed.
2. Open up the control knobof the barbecue so that the rest of
the gas can escape from the system.
3. To remove the pressure regulator, perform the assembly steps
in reverse order.
LEAK TEST
PLEASE NOTE!
Never look for gas leaks using a naked flame! Before you
check for leaks, make sure that there are no naked flames
nearby and no sparks can form. Sparks or flames may
trigger an explosion that can cause serious or even fatal
injuries or material damage.
After you first connect it, each time you change the gas cylinder
or if the barbecue has not been used for a prolonged period, the
leak test must be performed on all gas-carrying components in
order to ensure that gas is not escaping from any of them.
If your pressure regulator has a manometer, follow the instruc-
tions in the guide for the pressure regulator to carry out a leak
test. To do this, use a standard leak detector agent and follow the
manufacturer’s instructions. Performing a leak test by listen-
ing is not safe!
BARBECUE TIPS
1. Before you start barbecuing, get everything together that
you will require. When you barbecue, you should always have
an eye on the barbecue and the food being cooked and not
need to keep going in the kitchen.
2. Before you cook meat, it should be at room temperature to
ensure good, even cooking.
3. Use clean grill racks. The new food you are cooking will
stick to any residues on the grill rack.
4. Food that has had a small amount of oil brushed on it
will brown more evenly and stick to the grill rack less.
5. Rub oil onto grill racks before you barbecue so that the
food being cooked does not stick.
6. Always preheat the barbecue with the lid closed so that
the food being cooked does not stick to the grill rack and
searing is possible. This will also burn off any residues from
EN
22152_Inlay_M_LM_CE_V2.indb 1422152_Inlay_M_LM_CE_V2.indb 14 05.12.2022 14:53:4305.12.2022 14:53:43

15
CALIANO 6.1 COOK
your last barbecue. Even if you want to cook on a medium or
low heat, you should still preheat the barbecue.
7. Do not place too much food to barbecue on the grill rack.
Leave a sucient amount of space between the pieces so
they can easily be picked up and moved.
8. If you are using a marinade, sauces or glaze with a high
sugar content or other ingredients which burn easily, only
spread them on in the last 10 to 15minutes of barbecuing.
9. We recommend that when you barbecue you keep the lid
closed. This reduces the risk of flash flames and ensures that
your food is barbecued faster and more evenly. Do not open
it too often to check on the food being cooked to prevent too
much air getting in and heat and smoke escaping unnecessarily.
10. To make sure your steak has a great barbecue pattern and
a delicious crust, you must not turn it too often. In most
cases, the food being cooked should only be turned once,
and only when it is the colour you want it to be. This will also
prevent the lid being opened too much.
11. You can place food that has already been barbecued on the
warming rack to keep it warm while you carry on barbecu-
ing. Please note that it will continue to be cooked a little. In
addition, you can use the warming rack to toast burger buns
or gently cook vegetables, seafood, etc. while you grill meat,
for example, on a high heat on the grill rack.
Direct vs. Indirect Grilling
Direct Grilling
This is the classic option in which the food being grilled is placed
directly over the burner. The level of heat is therefore high. This
means that this method is good for food with shorter cooking
times of no more than 30minutes and for quickly searing burgers
or steaks, for example. It produces a delicious crust while the
inside stays nice and juicy.
Indirect Grilling
This is where the heat comes from burners next to the food being
cooked; the burner directly beneath remains switched off. At the
same time, the lid is closed so that the heat cannot escape. We
recommend this method of barbecuing for food with long cook-
ing times such as spare ribs, pulled pork or whole poultry. But fish
and vegetables can also be gently cooked in this way.
You can also combine both grilling methods: first sear the food
hot and then finish cooking it gently.
USE
Putting the Barbecue into Operation
PLEASE NOTE!
■Burn off the barbecue with the grill racks and all accessories
that come into direct contact with food before you first use
them to remove any possible production residues. To do this,
heat the barbecue on the highest level with the lid closed for at
least 20 minutes. Clean the accessories once they have cooled
down. Also note the “Cleaning and Maintenance” chapter.
■Only use the barbecue if all parts are in their designated place
and the barbecue has been assembled properly in accordance
with the assembly steps in these assembly and operating
instructions.
■Each time before you use the barbecue, make sure that it
is undamaged and has been set up correctly. When you are
choosing where to set up, note the “Safety Notices” chapter.
■Before each use, make sure that the gas cylinder and the
pressure regulator have been connected correctly and all
gas-carrying parts are leaktight (see the “Connecting the Gas
Cylinder” and “Leak Test” chapters).
■Check the barbecue for any grease deposits before each use.
Remove excess grease and empty and clean all parts in the
grease collecting system to prevent any grease fires (see the
“Cleaning and Maintenance” chapter).
■Do not line the grease collecting system or barbecue chamber
with aluminium foil or another type of foil.
■The lid must be open during the ignition process. Ignite each
burner individually.
■If the flame goes out or a burner has not ignited, turn the cor-
responding control knob to the Off position. Wait approx. 2
to 5 minutes before trying again to allow the gas to dissipate.
Otherwise there may be a deflagration.
■When you are igniting the gas flame, do not bend over the
grill surface as there may be a deflagration if gas builds up in
the barbecue chamber.
■Never pour water onto the hot barbecue to avoid burns and
scalding.
1. Open the lid.
2. Make sure that all control knobs are in the Off position (arrow
on the control knob pointing upwards). If they are not, press
the control knob and turn it to the Off position.
3. Open the gas supply on the gas cylinder.
4. Each burner is equipped with its own ignition system and
so can be ignited individually: Press the control knob for the
burner you want and turn it to theHI (maximum power) posi-
tion. The gas supply is activated.
With a piezo ignition, a spark is also produced and this gener-
ates a popping noise.
5. Check whether the burner has been ignited: Look carefully to
see whether flames are emerging from the burner.
6. If the burner has not ignited, turn the control knob to the Off
position and try again after approx. 2 to 5minutes.
L With a piezo ignition, only let go of the control knob a
few seconds after ignition has taken place so that the
flame does not go out.
7. Ignite the rest of the burners in the same way too.
Barbecuing / Baking Pizza / Cooking
PLEASE NOTE!
■Hot steam may escape when the lid is opened. You should
therefore keep your head and hands out of the danger zone.
There is a danger of scalding.
■Use barbecue utensils with long, heat-resistant handles and a
pizza peel for baking pizza.
Barbecuing
1. Preheat the barbecue once the burners have been ignited:
Close the lidand wait until the temperature you want is dis-
played on the thermometer in the lid.
Once it has preheated, you can switch off the burners that
you do not need. To do this, turn the corresponding control
knobs to theOFF position.
2. Open the lid and place the food to be barbecued on the grill
rack or another accessory that you are using.
3. If you want to produce a high temperature in the barbecue
chamber and the food should be cooked more evenly from all
sides, close the lid.
4. Reduce the burner power if necessary by turning the control
knob towards the LO(lowest power) position.
5. As soon as the food being cooked is as brown as you want it
to be, turn it using barbecue tongs.
L If you opt for the pizza oven attachment, two more burn-
ers are available to you.
EN
22152_Inlay_M_LM_CE_V2.indb 1522152_Inlay_M_LM_CE_V2.indb 15 05.12.2022 14:53:4305.12.2022 14:53:43

16
Baking Pizza
• For the pizza oven attachment, there are two burners which
you ignite and control in the same way as the main burners
using the relevant control knobs.
• Once the thermometer in lid displays the temperature you
want, place the pizza on the pizza stone. Use a pizza peel to
do this. You should also use this tool to lever the baked pizza
off the pizza oven attachment.
Cooking on the Side Burner (cooK Zone)
PLEASE NOTE!
■On the side burner you should only ever use cookware that is
suitable for use on gas hobs.
■The diameter of the cookware must be 12 – 24 cm so that it
fits securely on the side burner.
• Flip up the cover of the side burner and use it like a gas hob
to prepare side dishes and sauces, for example, on the barbe-
cue directly.
Taking the Barbecue Out of Operation
1. Close the valve of the gas cylinder.
2. To do this, turn all control knobs to theOFF position.
3. Allow the barbecue to cool down before you move it.
4. Clean the barbecue once it has cooled down (see the “Clean-
ing and Maintenance” chapter). Excessive accumulations of
food residues and cooking fat may cause what is known as a
grease fire.
CLEANING AND MAINTENANCE
PLEASE NOTE!
■Allow all parts to cool down before you clean them until they
are no longer hot and can be touched.
■Do not perform any cleaning on the valve of the pressure
regulator! It contains very sensitive components which could
be damaged even on slight contact with other objects. Do not
immerse the pressure regulator in water.
■The gas system may only be cleaned by a qualified expert. Un-
der no circumstances should you dismantle the controller unit.
■The inside of a burner must not get wet!
■Do not immerse the barbecue in water and do not hose it
down. No liquid must get inside the gas-carrying or electrical
components.
■Disconnect the gas cylinder before cleaning the barbecue
housing.
■Never pour cold water onto hot parts. This may lead to burns
and material damage.
■Never use spirits or other flammable or abrasive cleaning
agents.
■The accessories supplied are not dishwasher-safe.
■All parts must be dry before they are used or stored away.
To allow you to enjoy using your barbecue for a long time, you
should keep it clean. If it is not cleaned and maintained, it may
not perform as well over time. Low temperatures and uneven
heat distribution are indications that gas-carrying components
should be cleaned. Food residues on the grill rack will cause the
food being cooked to stick on. Grease deposits may cause a
grease fire.
Cleaning the Grease Collecting System (After
Each Use)
■Do not use any abrasive cleaning agents.
• Empty and clean all parts of the grease collecting system
(grease tray or grease pan) after or before each use. Rinse the
parts with warm water, detergent and a sponge. The easiest
option is to clean them after use in a lukewarm (not hot!)
condition.
Cleaning the Cast-Iron Grill Racks and Grill Plate
(After Each Use)
You clean the grill plate in the same way as the grill rack:
1. Leave the grill rack in the barbecue and remove any coarse
residues with a grill rack cleaning brush or a spatula.
2. You burn off the remaining residues as follows: Switch on the
barbecue for approx. 30minutes at the highest level (at least
300°C) and close the lid.
3. Allow the grill rack to cool down until you can touch it and
brush off the residues. Then wipe it clean with a damp paper
towel if necessary.
4. We recommend rubbing vegetable oil into the clean grill rack
to maintain it and prepare it for your next barbecue.
Cleaning Enamelled Grill Racks, Warming Racks,
Flame Tamers and Other Enamelled Parts
■Do not use abrasive cleaning agents or brushes with
steel bristles.
• Clean the grill and warming racks after every use, and clean
the other components when necessary.
• Use a plastic spatula to scrape off coarse residues or soak
them in warm water.
• Then use warm water with a little detergent and a sponge or
soft cloth for cleaning.
Cleaning Stainless Steel Racks (After Each Use)
• Clean stainless steel racks with warm water, washing-up liquid
and a sponge or stainless steel cleaning pad.
Cleaning the Barbecue Chamber (If Necessary)
During use, evaporated grease and smoke produces carbon which
is deposited in the barbecue chamber.
■Do not use any abrasive cleaning agents.
1. Remove all food residues and deposits of grease throughout
the barbecue chamber. You can do this using a plastic spatula,
for example.
2. Then wipe the surfaces clean with a soft cloth. If there is
heavier soiling, you can wash it off with warm water, deter-
gent and a sponge and then wipe dry with a non-abrasive
cloth.
Cleaning the Outsides (If Necessary)
The outsides of the barbecue consist of different materials and
surfaces. We therefore recommend different cleaning methods
depending on the type of surface.
Stainless Steel Surfaces
• Use a non-abrasive stainless steel cleaner and follow the man-
ufacturer’s instructions. Do not use any abrasive pastes!
• Otherwise you can use warm water, a household cleaner
and a sponge for cleaning. Then rinse the surfaces with clear
water and dry them with a soft cloth.
L If the barbecue is exposed to a particularly harsh environ-
ment, the outside of the barbecue must be cleaned more
frequently. In an environment containing chloride and
sulphide, in particular in coastal regions, stainless steel
may also oxidise or display spots. Salt water, acid rain,
close proximity to pools and hot tubs and other extreme
EN
22152_Inlay_M_LM_CE_V2.indb 1622152_Inlay_M_LM_CE_V2.indb 16 05.12.2022 14:53:4305.12.2022 14:53:43

17
CALIANO 6.1 COOK
conditions characterised by great heat and humidity may
cause spots to be formed. These spots are sometimes
confused with rust.
They can easily be removed and avoided: Wash off the
spots with warm water and a household cleaner, rinse
the surface with clear water and dry it. Rub down all
stainless steel surfaces every 3 to 4 weeks with tap water
and a cleaning agent for stainless steel to prevent the
formation of spots.
Painted, Enamelled Surfaces and Plastic Parts
■Do not use any abrasive cleaning agents.
• Only use warm water with a little household cleaner and pa-
per towels or a soft cloth for cleaning. Clean the surface, rinse
it down and wipe it dry.
Cleaning Gas-Carrying Components (If Necessary)
Gas-carrying components may become blocked and need to be
cleaned if
• you smell gas and the burner flame is very yellow and weak.
• the temperature you want is not reached.
• the burner heats up unevenly or the flame flickers.
Clean them as follows:
• Clean the whole of the outer surface of the burners with a
clean wire brush to remove any food residues and dirt. When
you are cleaning, make sure that the ignition electrode
is not bent or damaged. Brush carefully around the ignition
electrode.
• In particular, make sure that at each burner tube the gas
outlet and air inlet openings or the venturi tube are clear. If
necessary, clean them for example with a pipe cleaner or with
compressed air.
• If you need to, you can clean the gas connection and the
connections on the gas hose with a soft brush.
Cleaning the Pizza Stone (After Each Use)
PLEASE NOTE!
■Do not clean the pizza stone in the dishwasher and do not
immerse it in water!
■Do not use abrasive cleaning agents or brushes with metal
bristles.
• After use, allow the pizza stone to cool down completely and
then clean it with a dry cloth, a damp kitchen sponge or, for
stubborn encrusted food, with a dough scraper.
Maintenance Tasks
PLEASE NOTE!
■The nozzles may only be replaced by an expert.
The barbecue does not require maintenance if it is cleaned regu-
larly. Despite this, it must be checked from time to time. Base the
intervals on how often it is used and the environmental conditions
under which the barbecue operates.
• Check whether all parts of the barbecue have been provided
and are fitted (visual check).
• Check whether all connections have been provided and are
securely tightened. Tighten them if necessary.
• The gas system must be checked each time that a gas cylinder
is connected (see the “Leak Test” chapter).
• The gas hose must be replaced if it has leaky or damaged sec-
tions or the maximum use-by date (see the “Technical Data”
chapter) has been exceeded.
STORAGE
PLEASE NOTE!
■Protect the barbecue from strong wind, persistent moisture,
rain, snow, hail or other weather conditions.
■If you are not going to use the barbecue for a prolonged pe-
riod, disconnect the gas cylinder from the barbecue and store
it properly (see the “Safety Notices” chapter – “Hazards from
Gas Cylinders”).
• Store the barbecue in a dry location outdoors. Cover the bar-
becue (with a weatherproof cover) to protect the components
from moisture, dust, insects or spiders which might get inside
the barbecue and become established there.
• Clean the barbecue before you store it away (see the “Clean-
ing and Maintenance” chapter).
• If the barbecue is stored indoors, it must be disconnected
from the gas cylinder. Seal it shut properly with a locking
nut and protective cap (depending on the design) and store it
in a well-ventilated place outdoors above ground level (i.e. not
in depressions below ground level).
TROUBLESHOOTING
If despite sucient care and maintenance a fault does occur, this
chapter may help you to fix it.
If the problem cannot be solved with the steps below, contact
the customer service department (see the cover of these assembly
and operating instructions).
Do not attempt to repair the gas system yourself!
Smell of gas (possibly with very yellow and weak
flame).
Leak in the gas system.
1. Shut off the gas cylinder immediately.
2. Do not create any flames or sparks (do not switch on any
electrical devices).
3. Tighten all the screw connections of the gas system.
4. Check all gas-carrying parts for external damage; replace
defective parts with genuine replacement parts.
5. Check for leaks (see the “Leak Test” chapter).
The burners are blocked.
►Clean them in the manner described in the “Cleaning and
Maintenance” chapter – “Cleaning Gas-Carrying Components
(If Necessary)”.
The nozzle of the adjustment element (behind the front panel) or
other gas system is blocked.
►Have the gas system cleaned by an expert.
Burner does not ignite.
The gas cylinder is empty.
►Replace the gas cylinder.
The burner is blocked.
►Clean it in the manner described in the “Cleaning and Main-
tenance” chapter – “Cleaning Gas-Carrying Components (If
Necessary)”.
For the side burner: The ignition cable is not plugged on the
ignition.
►Visual check. Plug on the ignition cable if necessary.
The nozzle of the adjustment element (behind the front panel) or
other gas system is blocked.
►Have the gas system cleaned by an expert.
The ignition is defective.
►Have the ignition checked and repaired or replaced by an
expert.
EN
22152_Inlay_M_LM_CE_V2.indb 1722152_Inlay_M_LM_CE_V2.indb 17 05.12.2022 14:53:4305.12.2022 14:53:43

18
The desired temperature is not reached./ The flame is
small or flickers a lot or the flame pattern is irregular./
Individual burners do not ignite.
The gas cylinder is (almost) empty.
►Replace the gas cylinder.
The burners are blocked.
►Clean them in the manner described in the “Cleaning and
Maintenance” chapter – “Cleaning Gas-Carrying Components
(If Necessary)”.
The gas hose is bent.
►Straighten the gas hose.
The nozzle of the adjustment element (behind the front panel) or
other gas system is blocked.
►Have the gas system cleaned by an expert.
Deflagration or bubbling / popping noises
Flashback caused by blockages on the burner.
►Close the gas cylinder valve immediately. Wait 5 minutes and
then start operating the barbecue again. If the fault persists,
clean the burners in the manner described in the “Cleaning
and Maintenance” chapter – “Cleaning Gas-Carrying Compo-
nents (If Necessary)”. Otherwise have the gas system cleaned
by an expert.
Strong Flare Up
The food being cooked is fatty.
►Remove large amounts of fat, place the meat on a grill tray
or reduce the barbecue temperature.
The barbecue is dirty.
►Clean the barbecue (see the “Cleaning and Maintenance”
chapter).
DISPOSAL
To dispose of the barbecue, dismantle it into its individual parts
and recycle any metals and plastic.
Dispose of the packaging material in an environmentally
friendly manner so that it can be recycled.
EC DECLARATION OF CONFORMITY
We, the company LANDMANN Germany GmbH, hereby declare
that the gas device described here conforms to the Regulation
(EU) 2016/426 .
The conformity was confirmed by a type test in accordance with
the standards EN 498:2012 and EN 484:2019+AC2020.
The type test was carried out by the notified body
DBI Certification A/S (2531).
Device identification number: 2531DN-0098
If you require more information, please contact our customer
service department.
EN
22152_Inlay_M_LM_CE_V2.indb 1822152_Inlay_M_LM_CE_V2.indb 18 05.12.2022 14:53:4305.12.2022 14:53:43
Seite wird geladen ...
Seite wird geladen ...
Seite wird geladen ...
Seite wird geladen ...
Seite wird geladen ...
Seite wird geladen ...
Seite wird geladen ...
Seite wird geladen ...
Seite wird geladen ...
Seite wird geladen ...
Seite wird geladen ...
Seite wird geladen ...
Seite wird geladen ...
Seite wird geladen ...
Seite wird geladen ...
Seite wird geladen ...
Seite wird geladen ...
Seite wird geladen ...
Seite wird geladen ...
Seite wird geladen ...
Seite wird geladen ...
Seite wird geladen ...
Seite wird geladen ...
Seite wird geladen ...
Seite wird geladen ...
Seite wird geladen ...
-
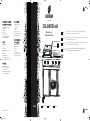 1
1
-
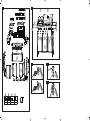 2
2
-
 3
3
-
 4
4
-
 5
5
-
 6
6
-
 7
7
-
 8
8
-
 9
9
-
 10
10
-
 11
11
-
 12
12
-
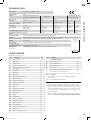 13
13
-
 14
14
-
 15
15
-
 16
16
-
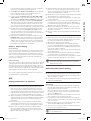 17
17
-
 18
18
-
 19
19
-
 20
20
-
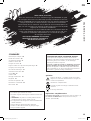 21
21
-
 22
22
-
 23
23
-
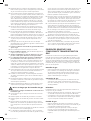 24
24
-
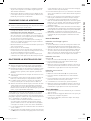 25
25
-
 26
26
-
 27
27
-
 28
28
-
 29
29
-
 30
30
-
 31
31
-
 32
32
-
 33
33
-
 34
34
-
 35
35
-
 36
36
-
 37
37
-
 38
38
-
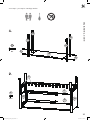 39
39
-
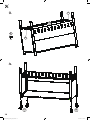 40
40
-
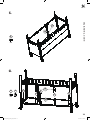 41
41
-
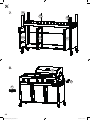 42
42
-
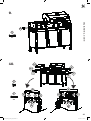 43
43
-
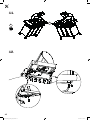 44
44
-
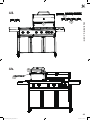 45
45
-
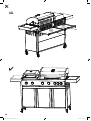 46
46


LANDMANN Gasgrillwagen Bedienungsanleitung
- Kategorie
- Grillen
- Typ
- Bedienungsanleitung
in anderen Sprachen
- English: LANDMANN Gasgrillwagen Operating instructions
- français: LANDMANN Gasgrillwagen Mode d'emploi
- Nederlands: LANDMANN Gasgrillwagen Handleiding
Verwandte Artikel
Andere Dokumente
-
IKEA 404.899.32 Benutzerhandbuch
-
Casselin CFOG6 Benutzerhandbuch
-
Burnhard FAT FRED Bedienungsanleitung
-
 Burnhard FRED JR. DELUXE Bedienungsanleitung
-
 Mestic MB-100 Benutzerhandbuch
-
RÖSLE Gas grill BBQ-Kitchen VIDERO G4-SK Vario+ Benutzerhandbuch
-
-
-
-
Weber Summit S-670 Bedienungsanleitung

