Sony rm vl 700 t Bedienungsanleitung
- Kategorie
- Empfänger
- Typ
- Bedienungsanleitung
Dieses Handbuch ist auch geeignet für

3-234-541-11 (1)
Integrated Remote
Commander
© 2001 Sony Corporation
RM-VL700T
Operating Instructions
Bedienungsanleitung
GB
DE

2
GB

3
GB
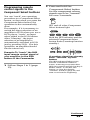
Features
The RM-VL700T Remote Commander provides centralized control of
all your AV components from a single remote commander and saves
the trouble of operating different AV components with different remote
control devices. The following are its main features.
Centralized control of Sony AV components with this one
remote commander
This Commander is preset at the factory to operate Sony brand
components, so you can use it out of the box as a control centre for
your Sony AV components.
Remote control signals for non-Sony components are also preset
This Commander is preset for most major brands components
including Sony. You can remote control your components by setting
the type and code number of each component (page 8).
Learning function for programming various other remote
control signals
This Commander has a Learning function, to “learn” the remote
control signals needed to operate other non-preset components or
functions. (To “teach” such signals to this Commander, use the remote
control supplied with the non-preset components.) (See page 15.)
In addition, the Commander can “learn” remote control signals
(infrared signals only) of non-Audio Visual components such as air-
conditioners, lights, etc. (Some specific appliances or functions may
not be available.) (page 23.)
Reassigning new components
You can assign Component Select buttons to freely operate other
components. This is useful when you have more than two of the same
kind of AV component (only if a Component Select button is free). (See
page 27.)
GB

4
GB
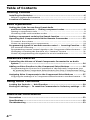
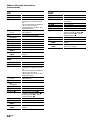
Table of Contents
Getting Started
Installing the Batteries .................................................................................6
When to replace the batteries ............................................................................ 6
Location of Controls .....................................................................................7
Basic Operations
Setting the Code for non-Sony Preset Audio
and Visual Components — Setting component codes...............................8
Setting a component code .................................................................................. 8
Checking if the code number works .............................................................. 10
Setting a component code by the Search function ....................................11
Operating Your Components with the Remote Commander ......................12
To control the volume....................................................................................... 13
Notes on operating your components ........................................................... 14
Programming signals of another remote control — Learning Function ....15
For accurate Learning....................................................................................... 18
Programming remote control signals to the Component Select buttons..... 19
Changing or erasing the function of a “learned” button ............................ 21
Notes on programming the signals for an air-conditioner ......................... 23
Advanced Features
Controlling the Volume of Visual Components Connected to an Audio
System......................................................................................................24
Adding an Extra Function to the Component Select Buttons.....................26
Programming the Power-On Command of the Selected Component just
by pressing that Component Select button (for Sony Components only)
.......................................................................................................................... 26
Assigning Other Components to the Component Select Buttons ..............27
Copying the settings of a Component Select button to another button.... 29
Using Other Functions
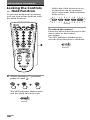
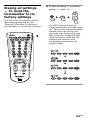
Locking the Controls — Hold Function.......................................................30
Erasing all settings — To reset the Commander to its factory settings.....31
Additional Information
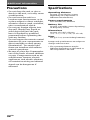
Precautions .................................................................................................32
Specifications..............................................................................................32
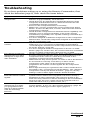
Troubleshooting ..........................................................................................33

5
GB
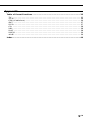
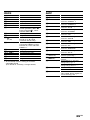
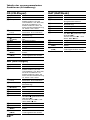
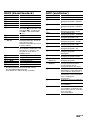
Appendix
Table of Preset Functions............................................................................35
TV ........................................................................................................................ 35
VCR ..................................................................................................................... 36
CBL (Cable box)................................................................................................. 36
SAT ...................................................................................................................... 37
DVD .................................................................................................................... 37
CD ....................................................................................................................... 38
MD....................................................................................................................... 38
DAT ..................................................................................................................... 38
DECK .................................................................................................................. 39
AMP .................................................................................................................... 39
Index ...........................................................................................................40

6
GB
Getting Started
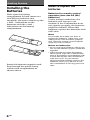
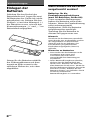
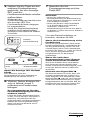
Installing the
Batteries
Slide open the battery
compartment lid and insert two
size R6(AA) batteries (not
supplied). Be sure to match up the
+ and – indications on the
batteries with the + and –
indications on the battery
compartment.
When to replace the
batteries
Batteries for remote control
operation (two size R6 (AA)
batteries)
Under normal conditions, the
batteries will last up to six
months. If the Commander does
not operate properly, the batteries
might be drained. When this
happens, replace the batteries with
new ones.
Note
Do not take more than one hour to
replace the batteries. Otherwise, your
setting of the code numbers (page 8)
and “learned” remote control signals
(page 15) will be erased.
Notes on batteries
• Do not use an old battery with a new
one or mix different types of batteries
together.
• If the electrolyte inside the battery
should leak, wipe the contaminated
area of the battery compartment with
a cloth and replace the old batteries
with new ones. To prevent the
electrolyte from leaking, remove the
batteries when you plan not to use
the Commander for a long period of
time.
Insert the batteries negative-and-
first through the guide clamp
within each compartment as
shown above.

7
GB
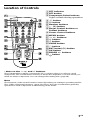
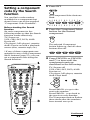
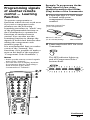
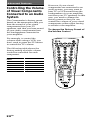
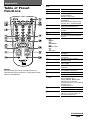
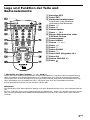
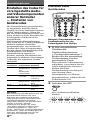
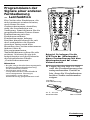
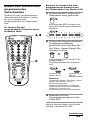
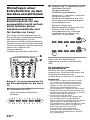
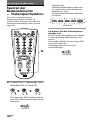
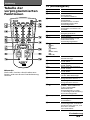
Location of Controls
1 SET indicator
2 SET button
3 Component Select buttons
Light or flash during operation.
4 t button
5 / button
6 Number buttons
7 -
(1-)
button
8 Player Control buttons or
Fastext buttons
9 Cursor Control buttons
0 MENU button
qa 2 +/– buttons*
qs % button*
qd 1
button
qf GUIDE button
qg a button
qh ENT (enter) (2-) button
qj OK button
qk PROGR +/– buttons
ql button
* Note on the 2 +/– and % buttons
The Commander controls or mutes the TV’s volume when you select a visual
component. The Commander controls or mutes the amplifier’s volume when you
select an audio component. You can change this setting also (page 24).
Note
The function of the control buttons varies depending on settings/operating modes.
The “Table of Preset Functions” (page 35) shows how the Commander generally
operates for each component in the factory preset mode.

8
GB
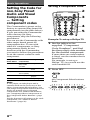
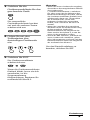
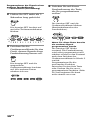
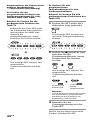
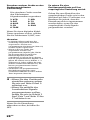
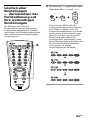
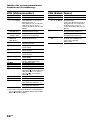
2 Press SET.
All Component Select buttons
flash.
Example: To set up a Philips’ TV
1 See the tables in the
supplied “Component
Code Numbers”, and find
the three-digit code number
for the desired component.
If more than one code number
is listed, use the number that is
listed first.
For example, to set up a
Philips’ TV, you would use the
code number 011.
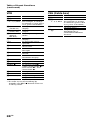
Component
Select Button
TV
VCR
CBL/SAT
DVD
AMP
Factory setting
Sony TV
Sony VHS
VCR
Sony SAT
Sony DVD
player
Sony amplifier
Preset
component(s)
TV
TV/VCR
Combo
VCR
Satellite
tuner (SAT)
DVD player
Amplifier
Setting a component code
Note
A CD player, an MD player and a
cassette deck can be set to any of the
above Component Select buttons. You
can assign Component Select buttons to
freely set signals of your desired
components. For further information,
see “Assigning Other Components to
the Component Select Buttons” (page
27) .
For the functions of buttons as for each
component, see “Table of Preset
Functions” (page 35).
Basic Operations
Setting the Code for
non-Sony Preset
Audio and Visual
Components
— Setting
component codes
The Commander is preset at the
factory to operate Sony brand AV
components (see the table below).
If you are using the Commander
with a factory-set Sony
components, skip the following
procedures.
You can use the Commander with
other major brand preset AV
components also. To use with
other AV components, or Sony
components which do not
function with the Commander,
you need to follow the procedures
to set the correct codes for each
component.
2
3
4
5

9
GB
3 Press the Component Select
button for the desired
component.
The selected Component
button lights up, and all other
buttons turn off.
4 Press the Number buttons
to enter the three-digit
component code number.
5 Press ENT.
The Component Select button
turns off.
If the Component Select button
flashes five times before
turning off, it means that the
setup is incomplete. Start over
from Step 2.
Continued
Notes
• If you press a component code
number that is not on the table in the
supplied “Component Code
Numbers”, or if you press a button in
the wrong order, the Component
button flashes five times, and then
turns off. Check the component code
number, and try setting it again.
• If you don’t input anything into the
Commander within 20 seconds
between each step, the setup
procedure will be cancelled. To set the
code, start over from Step 2.
• If you press SET while setting the
component code, all code numbers
will be lost, and the setup procedure
will be cancelled. Start over from Step
2.
To cancel setup, press SET.

10
GB
Setting the Code for non-Sony
Preset Audio and Visual
Components (continued)
Checking if the code
number works
1 Power on the component
with its power switch.
2 Press the corresponding
Component Select button
for the component you
have set up.
The Component button lights
up when you press it, and
turns off when you release it.
3 Aim the Commander at the
component and press 1.
The selected Component
button lights up when you
press a function button, and
turns off when you release it.
The component should power
off.
4 If you have succeeded,
check that the Commander
is operating the other
functions of your
component, such as channel
and volume control.
See page 12 for details.
If the Commander does not
seem to be working
Try repeating the setup procedures
using the other codes listed for your
component, or try setting the code
number using the Search function
(page 11).
Note on the 2 +/– and %
buttons
When you operate a visual
component, the TV button lights
up to indicate that the
Commander is controlling or
muting the TV’s volume.
When you operate an audio
component, the AMP button lights
up to indicate that the
Commander is controlling or
muting the amplifier’s volume.
It is recommended that you first
set the TV and AMP codes before
setting up any other components.
Note on buttons that have
already “learned” remote
control signals
If another signal has already been
programmed on a button using
the Learning function (page 15),
that “learned” signal will continue
to work even after you set the
component code number. To use it
as a preset function button, you
must first erase its “learned”
signal (page 21).

11
GB
Setting a component
code by the Search
function
You can find a code number
available for a component that
doesn’t have one in the supplied
“Component Code Numbers”.
Before starting the Search
function
Set each component to the
following status so that the Search
function works effectively.
TV: Power-on
VCR, CBL/SAT, DVD, AMP:
Power-off
CD player*, MD player*, cassette
deck*: Power-on with a playback
source (disc, cassette tape, etc.)
* If any of these components are
assigned to any of the Component
Select buttons (page 27), you can
set a component code using the
Search function.
Continued
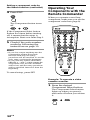
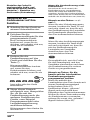
1 Press SET.
All Component Select buttons
flash.
2 Press the Component Select
button for the desired
component.
The selected Component
button lights up, and all other
buttons turn off.
3 Press PROGR+ or PROGR–
and 1 in turn until the
component reacts as
described in the following.
TV: Powers off
VCR, CBL/SAT, DVD, AMP:
Powers on
CD player, MD player, cassette
deck: Plays back
Press PROGR + to go to the
next code number.
Press PROGR – to go back to
the previous code number.
The Component button flashes
three times after the numbers
have turned one cycle.
1
3
2
4
3

12
GB
4 Press ENT.
The Component button turns
off.
If the Component Select button
flashes five times before turning
off, it means that the setup is
incomplete. Start over from Step 1.
5 Check if the code number
works by following the
instructions on page 10.
Notes
• If you don’t input anything into the
Commander within 20 seconds
between each step, the setup
procedure will be cancelled. To set the
code, start over from the beginning.
• If you press any button other than
PROGR +/– and 1 while setting the
component code, all code numbers
will be lost, and the setup procedure
will be cancelled. Start over from the
beginning.
To cancel setup, press SET.
Setting a component code by
the Search function (continued)
Example: To operate a video
cassette recorder
1 Press the desired
Component Select button.
The Component Select button
lights up when you press it,
and turns off when you release
it.
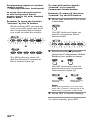
Operating Your
Components with the
Remote Commander
When you operate a non-Sony
component, make sure you set the
component code first (page 8).
1
2

13
GB
To control the volume
Press 2 +/– to control the
volume. Press % to mute the
sound. When you select a visual
component, the TV’s volume will
be controlled (TV lights up), and
when you select an audio
component, the amplifier’s
volume will be controlled (AMP
lights up). You can change this
setting also (page 24).
Notes
• If you used the Learning function
(page 15) to programme the 2 +/–
or % buttons to send a signal to any
other component, that signal will be
transmitted instead of the volume or
muting of the TV or amplifier when
you select that component.
• If you used the Learning function
(page 15) to programme the 2 +/–
or % buttons for the TV or AMP to
send a signal to any other
Component, that signal will be
transmitted only when you select TV
or AMP. When you select another
component, the preset volume control
signals for TV or AMP will be
transmitted.
• If you have assigned another
component to the TV or AMP buttons
(page 27), the volume of the TV or
amplifier cannot be controlled even if
you select another component.
Continued
2 Press any Player Control
button.
See “Table of Preset Functions”
(page 35) for the functions of
buttons for each component.
Note
The remote control signals may be
different for some components or
functions. In this case, programme the
remote control signals with the
Learning function (see page 15). Note,
however, that components and
functions that do not support the
remote control of infrared signals will
not work with this Commander.

14
GB
Notes on operating your
components
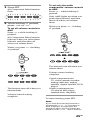
About the input select of a TV
Each time t is pressed, the input
is changed in order. It is also
possible to select directly by
pressing one of following Number
buttons while holding t pressed
when more than two VCRs are
connecting.
“t” + “0” : TV tuner
“t” + “1” : VIDEO1
“t” + “2” : VIDEO2
“t” + “3” : VIDEO3
“t” + “4” : VIDEO4
“t” + “5” : VIDEO5
“t” + “6” : VIDEO6
If the above operations do not
work, programme the remote
control signals of your component
in to the Commander using the
Learning function (page 15).
About the input select of a VCR
(only for Sony VCR)
Each time a is pressed, the input
is changed in order. It is also
possible to select directly by
pressing one of following Number
buttons while holding a pressed.
“a” + “0” : Tuner
“a” + “1” : LINE1
“a” + “2” : LINE2
“a” + “3” : LINE3
“a” + “4” : LINE4
“a” + “5” : DV in
When you use a Sony VCR, the
above commands are preset. For
other brands, it is possible to
“teach” the above sequential
button operations using the
Learning function (see page 15).
Operating Your Components
with the Remote Commander
(continued)

15
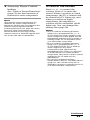
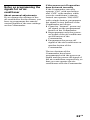
GB
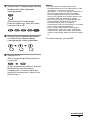
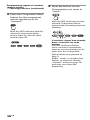
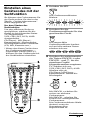
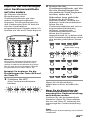
about 5 -10 cm
(2 -4 inches) away
Remote control for
your component
RM-VL700T
Continued
Programming signals
of another remote
control — Learning
Function
To operate components or
functions which do not work even
if you set a component code
number, use the following
Learning procedure to “teach” any
of the programmable buttons or
the Commander to operate the
functions of another remote
control. You can also use the
Learning function to change the
signals of individual buttons after
setting the component code
number (page 8).
It is recommended that you make
a note of the “learned” key
functions. (It is possible to make a
note on the back of the supplied
“Component Code Numbers.”)
Notes
• Some specific remote control signals
may not be “learned.”
• You can also use a display monitor
for computer display (including a
built-in tuner type), if the
Commander is “learned.”
Example: To programme the N
(Play) signal of your video
cassette recorder to the VCR N
(Play) button of the Commander
1 Place the RM-VL700T head
to head with your
component’s remote
control.
2 Press and hold SET for over
3 seconds.
The SET indicator lights up,
and all Component Select
buttons flash.
2,7
4
3
4

16
GB
Programming signals of another
remote control
— Learning Function (continued)
3 Press the Component Select
button for the component
whose signals are to be
“learned.”
Both the SET indicator and the
selected Component Select
button light up, and all other
buttons turn off.
4 Press the button on the
Commander you want to
“teach.”
Both the SET indicator and the
selected Component Select
button flash (Learning function
standby).
If another signal has already
been “learned” by that
button
The SET indicator flashes
twice, and the Commander
takes no action returning to its
state after the Component
Select button was pressed in
Step 3.
Either “teach” to another free
button, or clear the already
“learned” function (page 21)
and start over from the
beginning.

17
GB
5 Press and hold the button
on the other remote control,
until both the SET indicator
and the Component Select
button lights up again.
During data transfer, only the
SET indicator stays lit, and the
Component Select button turns
off.
After data transfer is complete,
the Commander returns to its
state in Step 3.
If the SET indicator flashes five
times
It means that “learning” is incomplete.
Repeat steps 4 and 5.
6 Repeat Steps 4 and 5 to
“teach” functions to other
buttons.
To “teach” another
component’s remote control
signal
After positioning the two remote
commanders as in Step 1 on page
15, press the corresponding
Component Select button, and then
follow Steps 4 and 5 to perform
Learning.
7 Press SET to finish setting.
Notes
• If you do not perform Learning steps
within 20 seconds at any point during
the process, Learning mode ends.
• If you do not perform Step 5 within
10 seconds after Step 4, the learning
procedure returns to Step 3. Repeat
Step 4.
To cancel setup, press SET.
If the Commander does not
seem to be working
If the “learned” button does not
operate properly, “teach” once again.
(For example, if the volume becomes
very loud after pressing 2 + only
once, noise may have interfered during
the Learning procedure.)
If you set a component code
after “learning” a signal
If you have programmed any signal on
a button by the Learning function, that
signal will work even after you set a
component code.
Note on the REC z signal
You can only “teach” to one button at a
time. Therefore you cannot teach a
sequential button operation (for
example REC z + B) to a single button
on the Commander. In this case,
“teach” the functions of each button on
your component to the Commander.
Continued
during data
transfer
data transfer
complete
remote control
of component

18
GB
Programming signals of another
remote control
— Learning Function (continued)
When you “teach” signals to
2 +/– or %
•If you used the Learning
function to programme the 2
+/– or % buttons to send any
signal to components other than
the TV or AMP, that signal will
be transmitted only by pressing
% when you select that
component.
•If you used the Learning
function to programme the 2
+/– or % buttons to send any
signal to the TV or AMP, that
signal will be transmitted only
after you select TV or AMP.
When you select other
components, the “learned”
signal will be transmitted.
To “teach” the signals for an air-
conditioner
See “Notes on programming the
signals for an air-conditioner” on
page 23.
For accurate Learning
•Do not move the remote units
during the Learning procedure.
•Be sure to keep holding down
the “learning” button until your
Commander reacts as described.
•Use fresh batteries in both
remote units.
•Avoid Learning in places subject
to direct sunlight or a strong
fluorescent light. (Noise may
interfere during the Learning
procedure.)
•The remote control detector area
may differ depending on each
remote unit. If Learning does not
work, try changing the positions
of the two remote control units.
•When you teach signals of an
interactive signal exchange
system remote control unit
(supplied with some of Sony’s
amplifiers) to the Commander,
the response signal of the main
unit may interfere with the
learning of the Commander. In
such a case, move to a place
where the signals will not reach
the main unit (e.g. other rooms,
etc.).
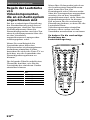
IMPORTANT
Be sure to place the
Commander out of the reach of
small children or pets, and lock
the controls using the Hold
function (page 30).
Components such as air
conditioners, heaters, electric
appliances, and electric
shutters or curtains receiving
an infrared signal can be
dangerous if misused.

19
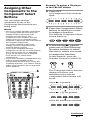
GB
2 Press and hold the
Component Select button
for the component whose
signals are to be “learned”
for over 3 seconds.
SET and all other Component
Select buttons light.
Both the SET indicator and the
selected Component Select
button flash (Learning function
standby).
If another signal has already
been “learned” by that
button
The SET indicator flashes twice,
and the Commander takes no
action, returning to its state after
SET was pressed and held in Step 2.
Either “teach” to another free
button, or clear the already
“learned” function (page 21) and
start over from the beginning.
Continued
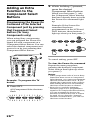
Programming remote
control signals to the
Component Select buttons
You can “teach” one operating
procedure to a Component Select
button, so that when you press the
Component Select button, the
operation is also automatically
done.
For example, if it is necessary to
switch the input selection of an
amplifier to DVD when you use a
DVD player, “teach” an input
select signal to the DVD button.
After “learning”, the input
selection of an amplifier is
automatically switched to DVD
just by pressing DVD. (For this
operation, an amplifier should
first be turned on.)
Example: To “teach” the DVD
input remote control signal of
your amplifier to the DVD
button of the Commander
1 Follow Steps 1 to 2 (page
15).

20
GB
Programming signals of another
remote control
— Learning Function (continued)
3 Press and hold the button
on the other remote control,
until the SET indicator
lights and all the
Component Select buttons
flash again.
During data transfer, only the
SET indicator stays lit, and the
Component Select button turns
off.
If the SET indicator flashes
five times
It means that “learning” is
incomplete. Repeat Steps 2 and 3.
4 Repeat Steps 2 and 3 to
“teach” remote control
signals to other buttons.
5 Press SET to finish
“learning.”
Notes
• If you do not perform Learning
steps within 20 seconds at any
point during the process,
Learning mode ends.
• If you do not perform Step 3
within 10 seconds after Step 2, the
Learning procedure returns to
Step 1. Repeat from Step 2 while
the Component Select button
lights.
To cancel “learning,” press SET.
Seite laden ...
Seite laden ...
Seite laden ...
Seite laden ...
Seite laden ...
Seite laden ...
Seite laden ...
Seite laden ...
Seite laden ...
Seite laden ...
Seite laden ...
Seite laden ...
Seite laden ...
Seite laden ...
Seite laden ...
Seite laden ...
Seite laden ...
Seite laden ...
Seite laden ...
Seite laden ...
Seite laden ...
Seite laden ...
Seite laden ...
Seite laden ...
Seite laden ...
Seite laden ...
Seite laden ...
Seite laden ...
Seite laden ...
Seite laden ...
Seite laden ...
Seite laden ...
Seite laden ...
Seite laden ...
Seite laden ...
Seite laden ...
Seite laden ...
Seite laden ...
Seite laden ...
Seite laden ...
Seite laden ...
Seite laden ...
Seite laden ...
Seite laden ...
Seite laden ...
Seite laden ...
Seite laden ...
Seite laden ...
Seite laden ...
Seite laden ...
Seite laden ...
Seite laden ...
Seite laden ...
Seite laden ...
Seite laden ...
Seite laden ...
Seite laden ...
Seite laden ...
Seite laden ...
Seite laden ...
-
 1
1
-
 2
2
-
 3
3
-
 4
4
-
 5
5
-
 6
6
-
 7
7
-
 8
8
-
 9
9
-
 10
10
-
 11
11
-
 12
12
-
 13
13
-
 14
14
-
 15
15
-
 16
16
-
 17
17
-
 18
18
-
 19
19
-
 20
20
-
 21
21
-
 22
22
-
 23
23
-
 24
24
-
 25
25
-
 26
26
-
 27
27
-
 28
28
-
 29
29
-
 30
30
-
 31
31
-
 32
32
-
 33
33
-
 34
34
-
 35
35
-
 36
36
-
 37
37
-
 38
38
-
 39
39
-
 40
40
-
 41
41
-
 42
42
-
 43
43
-
 44
44
-
 45
45
-
 46
46
-
 47
47
-
 48
48
-
 49
49
-
 50
50
-
 51
51
-
 52
52
-
 53
53
-
 54
54
-
 55
55
-
 56
56
-
 57
57
-
 58
58
-
 59
59
-
 60
60
-
 61
61
-
 62
62
-
 63
63
-
 64
64
-
 65
65
-
 66
66
-
 67
67
-
 68
68
-
 69
69
-
 70
70
-
 71
71
-
 72
72
-
 73
73
-
 74
74
-
 75
75
-
 76
76
-
 77
77
-
 78
78
-
 79
79
-
 80
80


Sony rm vl 700 t Bedienungsanleitung
- Kategorie
- Empfänger
- Typ
- Bedienungsanleitung
- Dieses Handbuch ist auch geeignet für
in anderen Sprachen
- English: Sony rm vl 700 t Owner's manual
Verwandte Papiere
-
Sony RM-VZ800 Bedienungsanleitung
-
Sony rm va 2500 t Bedienungsanleitung
-
-
-
Sony RM-AV2100T Bedienungsanleitung
-
-
Sony RM-AV3000T Bedienungsanleitung
-
-
-
Sonstige Unterlagen
-
Yamaha V2500 - AV Receiver Bedienungsanleitung
-
Yamaha RX-V1500 Bedienungsanleitung
-
-
Yamaha RX-V661 Bedienungsanleitung
-
-
Yamaha RX-V863 Bedienungsanleitung
-
Konig Electronic KN-URC10B Bedienungsanleitung
-
Panasonic PTAE900E Bedienungsanleitung