Panasonic S-22YA1E5 Bedienungsanleitung
- Kategorie
- Split-System-Klimaanlagen
- Typ
- Bedienungsanleitung

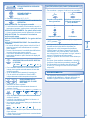
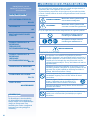
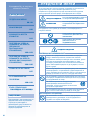
QUICK GUIDE / GUIDE RAPIDE
QUICK GUIDE / GUIDE RAPIDE
GUÍA RÁPIDA / KURZANLEITUNG
GUÍA RÁPIDA / KURZANLEITUNG
GUIDA RAPIDA / SNELLE GIDS
GUIDA RAPIDA / SNELLE GIDS
GUΙA RÁPIDO / ΣYNTOMOΣ O∆HГOΣ
GUΙA RÁPIDO / ΣYNTOMOΣ O∆HГOΣ
БЪРЗ СПРАВОЧНИК
БЪРЗ СПРАВОЧНИК
OPEN
CLOS
E
CLO
SE
OPEN
Operating Instructions
FS Multi Air Conditioner
Model No.
Indoor Unit
Outdoor Unit
S-22YA1E5 U-4LA1E5
S-28YA1E5 U-5LA1E5
S-36YA1E5 U-6LA1E5
S-45YA1E5 U-4LA1E5-1
S-56YA1E5 U-5LA1E5-1
U-6LA1E5-1
* U-8EA1E8
*
U-10EA1E
U-10EA1E8
© Panasonic HA Air-Conditioning (M) Sdn. Bhd. 2010.
Unauthorized copying and distribution is a violation
of law.
F567780
ENGLISH
ENGLISH
Before operating the unit, read these operating instructions thoroughly and keep them for future reference.
* Available to selected country
2 ~ 13
2 ~ 13
FRANÇAIS
Avant d’utiliser l’appareil, lisez ce mode d’emploi dans son intégralité et conservez-le pour toute référence ultérieure.
* Achetez pour un pays spécial
14 ~ 25
14 ~ 25
ESPAÑOL
Antes de utilizar la unidad, sírvase leer atentamente estas instrucciones de funcionamiento y conservarlas como
futuro elemento de consulta.
* Comprar para país especial
26 ~ 37
DEUTSCH
Bevor Sie das Gerät in Betrieb nehmen, lesen Sie bitte diese Bedienungsanleitung aufmerksam durch und bewahren Sie sie
für die künftige Verwendung auf.
* Für ein spezielles Land kaufen
38 ~ 49
38 ~ 49
ITALIANO
Prima di utilizzare l’unità si prega di leggere attentamente le istruzioni e di conservare questo opuscolo per potervi
fare riferimento in futuro.
* Acquisto per un paese speciale
50 ~ 61
NEDERLANDS
Lees voor u het apparaat gebruikt deze gebruiksinstructies grondig en bewaar ze voor toekomstig gebruik.
* Kopen voor uitzonderlijk staten
62 ~ 73
62 ~ 73
PORTUGUÊS
Antes de ligar a unidade, leia cuidadosamente este manual de utilização e guarde-o para futura referência.
* Compra para país especial
74 ~ 85
EΛΛΗΝΙΚΆ
Προτού θέσετε τη μονάδα σε λειτουργία, διαβάστε προσεκτικά αυτές τις οδηγίες χρήσης και φυλάξτε τις για
μελλοντική αναφορά.
* Αγορά για συγκεκριμένη χώρα
86 ~ 97
БЪЛГАРСКИ
БЪЛГАРСКИ
Преди да задействате климатика, прочетете внимателно инструкциите за употреба и ги запазете за бъдещи
справки.
* Покупка за специална страна
98 ~109
98 ~109

2
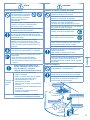
SAFETY PRECAUTIONS SAFETY PRECAUTIONS
To prevent personal injury, injury to others, or property damage, please
comply with the following.
Incorrect operation due to failure to follow instructions below may cause
harm or damage, the seriousness of which is classifi ed as below:
WARNING
WARNING
This sign warns of death or serious injury.
CAUTION
CAUTION
This sign warns of injury or damage to property.
The instructions to be followed are classifi ed by the following symbols:
This symbol denotes an action that is
PROHIBITED.
This symbol denotes an action that is
COMPULSORY.
Thank you for purchasing
Panasonic Air Conditioner
TABLE OF CONTENTS
TABLE OF CONTENTS
SAFETY PRECAUTIONS
2~3
INFORMATION
4
MULTI AIR CONDITIONER
FUNCTION
5
PRODUCT OVERVIEW &
OPERATIONS
(WIRELESS REMOTE
CONTROL)
6~7
PRODUCT OVERVIEW &
OPERATIONS
(WIRED REMOTE
CONTROL)
8~10
CARE & CLEANING
11
TROUBLESHOOTING
12~13
QUICK GUIDE
BACK COVER
NOTE
NOTE
The illustrations in this manual are for
explanation purposes only and may
differ from the actual unit. It is subjected
to change without notice for future
improvement.
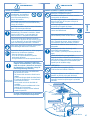
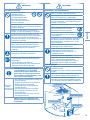
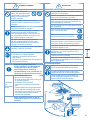
WARNING
WARNING
INDOOR UNIT AND OUTDOOR UNIT
This appliance is not intended for use by persons (including
children) with reduced physical, sensory or mental capabilities,
or lack of experience and knowledge, unless they have been
given supervision or instruction concerning use of the appliance
by a person responsible for their safety. Children should be
supervised to ensure that they do not play with the appliance.
Please consult authorized dealer or specialist to repair, install,
remove and reinstall the unit. Improper installation and handling
will cause leakage, electric shock or fi re.
Do not install the unit in a potentially explosive or fl ammable
atmosphere. Failure to do so could result in fi re.
Do not insert your fi ngers or other objects into the
air conditioner indoor or outdoor unit, rotating parts
may cause injury.
Do not touch the outdoor unit during lightning, it may cause
electric shock.
REMOTE CONTROL
Do not allow infants and small children to play with the remote
control to prevent them from accidentally swallowing the
batteries.

3
ENGLISH
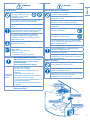
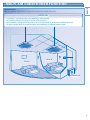
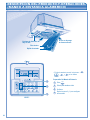
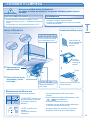
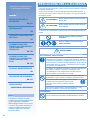
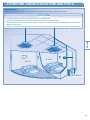
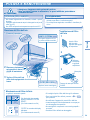
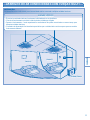
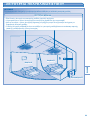
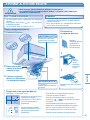
Air Outlet
Air Outlet
Air Outlet
Air Outlet
Air Inlet
Air Inlet
Air Inlet
Air Inlet
Air Inlet
Air Inlet
Indoor Unit
Power Supply
Outdoor Unit
Remote Control
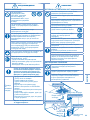
CAUTION
CAUTION
INDOOR UNIT AND OUTDOOR UNIT
Do not wash the indoor unit with water, benzene,
thinner or scouring powder.
Do not use for other purpose such as
preservation of food.
Do not use any combustible equipment in front of
the airfl ow outlet to avoid fi re propagation.
Do not expose yourself directly to cold air for a
long period.
Do not sit or step on the unit, you may
fall down accidentally.
Do not touch the sharp aluminium fi n,
sharp parts may cause injury.
Do not switch ON the indoor unit when waxing
the fl oor. After waxing, aerate the room properly
before operating the unit.
Do not install the unit in oily and smoky areas.
Ensure drainage pipe is connected properly.
Otherwise, leakage may occur.
Aerate the room regularly.
After long period of use, make sure the
installation rack is not deteriorate to prevent the
unit from falling down.
REMOTE CONTROL
Do not use rechargeable (Ni-Cd) batteries.
It may damage the remote control.
Remove the batteries if the unit is not going to be
used for a long period of time.
New batteries of the same type must be inserted
following the polarity stated to prevent
malfunction of the remote control.
WARNING
WARNING
POWER SUPPLY
Do not use modifi ed cord,
joint cord, extension cord or
unspecifi ed cord to prevent
overheating and fi re.
Do not share the same power outlet with other
equipment to prevent overheating and fi re.
Do not operate with wet hands to prevent electric
shock.
If the supply cord is damage, it must be replaced
by the manufacturer, its service agent or similarly
qualifi ed persons in order to avoid a hazard.
It is strongly recommended to be installed
with Earth Leakage Circuit Breaker (ELCB)
or Residual Current Device (RCD) to prevent
electric shock or fi re.
This equipment must be earthed to prevent
electrical shock or fi re.
Prevent electric shock by switching off the power
supply when:
- Before cleaning or servicing.
- Extended non-use.
- Abnormally strong lightning activity.
Stop using the product when any
abnormality/failure occurs and disconnect
the power plug or turn off the power
switch and breaker.
(Risk of smoke/fi re/electric shock)
Examples of
abnormality/
failure
• The ELCB trips frequently.
• Burning smell is observed.
• Abnormal noise or vibration of the unit is
observed.
• Water leaks from the indoor unit.
• Power cord or plug becomes abnormally hot.
• Fan speed cannot be controlled.
• The unit stops running immediately even if it is
switched on for operation.
• The fan does not stop even if the operation
is stopped.
Contact immediately your local dealer for
maintenance/repair.

4
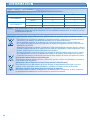
INFORMATION INFORMATION
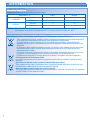
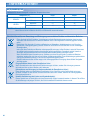
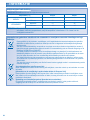
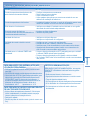
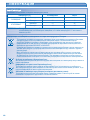
OPERATION CONDITION
OPERATION CONDITION
Use this air conditioner under the following temperature range
Temperature (°C) Indoor Outdoor
COOLING
Maximum 32 43
Minimum 21 -5
HEATING
Maximum 27 24
Minimum 16 -15
NOTICE: • This unit is still able to operate as a cooler with outdoor temperature as low as -5°C in a non-living room, such
as a computer room, with a room temperature of 21°C or above, and room humidity up to 80%.
Information for Users on Collection and Disposal of Old Equipment and used Batteries
These symbols on the products, packaging, and/or accompanying documents mean that used electrical and
electronic products and batteries should not be mixed with general household waste.
For proper treatment, recovery and recycling of old products and used batteries, please take them to
applicable collection points, in accordance with your national legislation and the Directives 2002/96/EC and
2006/66/EC.
By disposing of these products and batteries correctly, you will help to save valuable resources and prevent
any potential negative effects on human health and the environment which could otherwise arise from
inappropriate waste handling.
For more information about collection and recycling of old products and batteries, please contact your local
municipality, your waste disposal service or the point of sale where you purchased the items.
Penalties may be applicable for incorrect disposal of this waste, in accordance with national legislation.
For business users in the European Union
If you wish to discard electrical and electronic equipment, please contact your dealer or supplier for further
information.
[Information on Disposal in other Countries outside the European Union]
These symbols are only valid in the European Union. If you wish to discard these items, please contact your
local authorities or dealer and ask for the correct method of disposal.
Note for the battery symbol (bottom two symbol examples):
This symbol might be used in combination with a chemical symbol. In this case it complies with the requirement
set by the Directive for the chemical involved.
Pb

5
ENGLISH
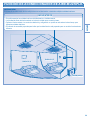
MULTI AIR CONDITIONER FUNCTION MULTI AIR CONDITIONER FUNCTION
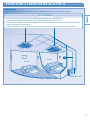
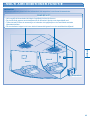
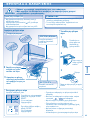
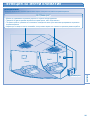
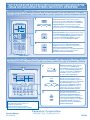
DEFINITION
Multi air conditioner system has one outdoor unit connected to multiple indoor units.
Outdoor unit
Outdoor unit
Room A
Room A
Room B
Room B
• It is possible to operate the indoor units individually or simultaneously.
• The operation mode priority is given to the fi rst unit that turned on.
• During operation, heating and cooling mode could not be activated at the same time for different indoor unit.
• The power indicator blinks to indicate the indoor unit is standing by for different operation mode.
INDOOR UNIT
INDOOR UNIT

ADDRESS
AUTOAUT
O
TIMER
ON
MODE
MODE
AIR SW
ING
FAN SPEED
OFF/ON
SET AC
RESET
RC RESET ADDRES
S
AIR SWING
TIMER
SET
CANCEL
SELECT
CLOCK
FAN SPEED
FILTER RESET
MANUAL
MODE
AUTO
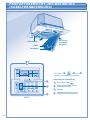
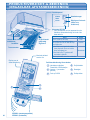
6
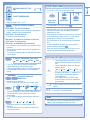
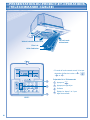
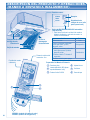
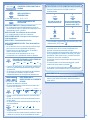
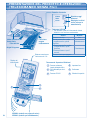
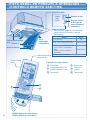
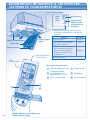
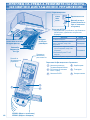
Air fi lter
Airfl ow direction louver
Intake grille
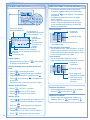
Control Panel
POWER
TIMER
FILTER
AUTO
Ray receiver
Remote control
display
Air is discharged
evenly
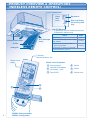
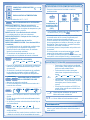
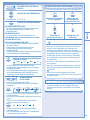
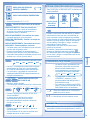
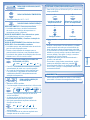
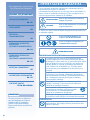
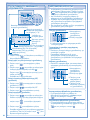
Remote Control Preparation
1
Press and pull out
4
Set time
2
Insert AAA or R03 batteries
(can be used ~ 1 year)
5
Confi rm
3
Press CLOCK
6
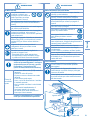
Close the cover
5
Auto OFF/ON button
• To operate the unit if the wireless remote control
is misplaced or malfunctioning.
Action Mode
Press once. Auto
Press and hold until you hear 1 beep,
then release.
Cooling
1. Press and hold until you hear 2
beeps then release.
2. Press the
SET
button for 5 seconds.
Heating
Press the button to turn off.
PRODUCT OVERVIEW & OPERATIONS
(WIRELESS REMOTE CONTROL)
PRODUCT OVERVIEW & OPERATIONS
(WIRELESS REMOTE CONTROL)
4
3
1
2
6
Transmitter
Maximum distances: 8m
Error Code Display
(For servicing used
only)
CZ-RWS1 (Heat-pump model)
CZ-RWC1 (Cooling model)

7
ENGLISH
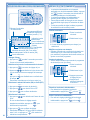
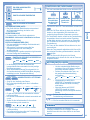
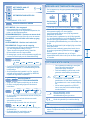
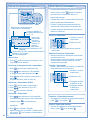
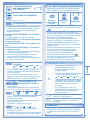
TO SET DAILY TIMER
TO SET DAILY TIMER
• To turn ON or OFF the unit at a preset time.
SELECT
TIMER
SET
Select ON or
OFF timer.
Set the time. Confi rm.
• To cancel ON or OFF timer, press
CANCEL
.
• When ON timer is set, the unit may start early before
the actual set time in order to achieve the desired
temperature on time.
• Timer operation is based on the clock set in the remote
control and repeats daily once set. For clock setting,
please refer to Remote Control preparation.
• The timer closest to the current time will be activated
fi rst.
• If timer is cancelled manually, you can restore the
previous setting by pressing
SET
.
• If the main power is switched off for an hour or more,
the clock and timer will need to be set again.
ADDRESS
• To avoid unintentional operation, you can
assign a different address to each indoor
unit.
• Press repeatedly to select your desired
address setting.
Address 1 Address 2Group Address 3
• By default, ADDRESS 1 is selected. You
do not need to change this setting for
normal operation.
• If the address is set to GROUP, more
than one indoor unit can be operated at
the same time.
RC RESET
Press to restore the remote control’s default
setting.
SET
AC RESET
Not used in normal operations.
HINT
HINT
• Use curtains to screen off sunlight and outdoor heat to
reduce power consumption during cool mode.
OPTIONAL SETTINGS
OPTIONAL SETTINGS
FAN SPEED
TO SELECT FAN SPEED (3 OPTIONS)
LOW MEDIUMAUTO HIGH
• For AUTO, the indoor fan speed is automatically
adjusted according to the operation mode.
• If the operation mode is set to Fan, the fan speed will
be fi xed at MEDIUM regardless of the temperature
setting.
AIR SWING
MANUAL
AUTO
TO ADJUST AIRFLOW
DIRECTION
• Keeps the room ventilated.
• The air is discharge evenly through 4 output vents.
AUTO
AUTO 1 AUTO 2 AUTO 3
• There are 3 options for auto vertical airfl ow direction.
• The vertical airfl ow louver swings up and down
automatically.
• Do not adjust the vertical airfl ow direction louvers by
hand.
MANUAL
• There are 4 options for manual vertical airfl ow
direction.
• The airfl ow direction can be adjusted as desired by
using remote control.
OFF/ON
TO TURN ON OR OFF THE
UNIT
POWER
TO SET TEMPERATURE
• Selection range: 16°C ~ 31°C.
MODE
TO SELECT OPERATION MODE
AUTO mode - For your convenience
• Unit selects operation mode according to temperature
setting, outdoor and room temperature.
HEAT mode - To enjoy warm air
• Unit takes a while to warm up.
FAN mode - To enables air circulation in the room
COOL mode - To enjoy cool air
DRY mode - To dehumidify the environment
• Unit operates at low fan speed to give a gentle cooling
operation.
• During soft dry operation, the indoor fan operates at a
low fan speed.
• The louvers movement might not align with the remote
control display.

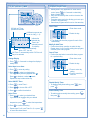
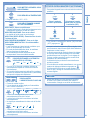
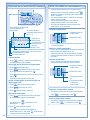
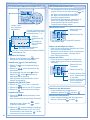
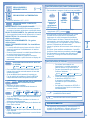
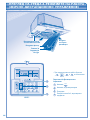
CHECK ODOUR WASH VENTILATION TEST RUN FILTER RESET
TEMP/
A/C No.
UP
DOWN
MODE
SELECT
SET
CANCEL
OFF
/
ON
TIMER/CLOCK
AIR SWING
ECONOMY
AUTO
AUTO
AUTO 123
FAN SPEED
AIR SWING
MON TUE WED THU FRI SAT SUN
ON
UP
DOWN
FAN
SPEED
AUTO
MODE
MANUAL
CZ-RT1
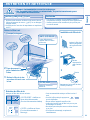
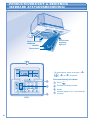
8
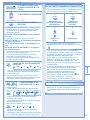
Remote Control Preparation
1
Press
S
ELECT
2
Press to set day
3
Confi rm
4
Repeat steps 2 and 3 to set the
current time.
• For normal operation, the
ODOUR WASH
,
ECONOMY
,
VENTILATION
and
TEST RUN
buttons are not in use.
3
1
2
PRODUCT OVERVIEW & OPERATIONS
(WIRED REMOTE CONTROL)
PRODUCT OVERVIEW & OPERATIONS
(WIRED REMOTE CONTROL)
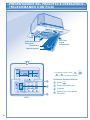
Air fi lter
Airfl ow direction louver
Intake grille
Air is discharged
evenly
CZ-RT1

9
ENGLISH
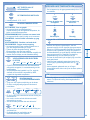
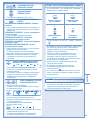
TO SET DAILY TIMER
TO SET DAILY TIMER
• To turn ON or OFF the unit at a preset time.
12
MODE
SELECT
Enter daily timer mode. Select ON or OFF timer.
34
UP
DOWN
SET
Set the time. Confi rm.
• To cancel ON or OFF timer, press
CANCEL
.
• When ON timer is set, the unit may start early before
the actual set time in order to achieve the desired
temperature on time.
• Timer operation is based on the clock set in the remote
control and repeats daily once set. For clock setting,
please refer to Remote Control preparation.
• The timer closest to the current time will be activated
fi rst.
• If timer is cancelled manually, you can restore the
previous setting by pressing
SET
.
• If the main power is switched off for an hour or more,
the clock and timer will need to be set again.
FAN
SPEED
TO SELECT FAN SPEED (3 OPTIONS)
LO MEDAUTO HI
• For AUTO, the indoor fan speed is automatically
adjusted according to the operation mode.
• If the operation mode is set to Fan, the fan speed will
be fi xed at MED regardless of the temperature setting.
AIR SWING
AUTO
MANUAL
TO ADJUST AIRFLOW
DIRECTION
• Keeps the room ventilated.
• The air is discharge evenly through 4 output vents.
AUTO
AUTO 1 AUTO 2 AUTO 3
• There are 3 options for auto vertical airfl ow direction.
• The vertical airfl ow louver swings up and down
automatically.
• Do not adjust the vertical airfl ow direction louvers by
hand.
MANUAL
• There are 4 options for manual vertical airfl ow
direction.
• The airfl ow direction can be adjusted as desired by
using remote control.
HINT
HINT
• Use curtains to screen off sunlight and outdoor heat to
reduce power consumption during cool mode.
OFF
/
ON
TO TURN ON OR OFF THE UNIT
UP
DOWN
TO SET TEMPERATURE
• Selection range: 16°C ~ 31°C.
MODE
TO SELECT OPERATION MODE
AUTO mode - For your convenience
• Unit selects operation mode according to temperature
setting, outdoor and room temperature.
HEAT mode - To enjoy warm air
• Unit takes a while to warm up.
FAN mode - To enables air circulation in the room
COOL mode - To enjoy cool air
DRY mode - To dehumidify the environment
• Unit operates at low fan speed to give a gentle cooling
operation.
• During soft dry operation, the indoor fan operates at a
low fan speed.
• The louvers movement might not align with the remote
control display.

• Weekly timer is only applicable for wired remote
control, press
MODE
for 3 seconds to select daily
timer or weekly timer.
• Daily timer and weekly timer could not be set at the
same time.
• Promotes energy saving by allowing you to set up to
6 timers in any given day.
• Same timer program cannot be set on the same day.
Check Timer
Modify Or Add Timer
• Perform check timer operation to select the day.
Repeat steps 4 to 8 to modify existing timer program,
or add any new timer program.
Cancel Timer
• Perform the step below to cancel the timer program
for a particular day.
10
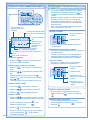
ON
OFF
TIMER
1
MON TUE WED THU FRI SAT SUN
23456
4. Press to cancel the
timer set.
Will light up if Timer
operation is selected
6 different programs can
be set in a day (1 ~ 6)
Time to be
selected (Interval
10 minutes)
ON-Timer. To automatically switch “ON” the unit.
OFF-Timer. To automatically
switch “OFF” the unit.
Day to be selected
Indicate the
selected day
CHECK ODOUR WASH VENTILATION TEST RUN FILTER RESET
TEMP/
A/C No.
UP
DOWN
MODE
SELECT
SET
CANCEL
OFF
/
ON
TIMER/CLOCK
AIR SWING
ECONOMY
AUTO
AUTO
AUTO 1 23
FAN SPEED
AIR SWING
MON TUE WED THU FRI SAT SUN
ON
UP
DOWN
FAN
SPEED
AUTO
MODE
MANUAL
CZ-RT1
CHECK ODOUR WASH VE
MODE
SELECT
SET
CANCEL
OFF
/
O
TIMER/CLOCK
ECONOMY
UP
DOWN
CZ-RT1
MODE
SELECT
SET
CANCEL
TIMER/CLOCK
ECONOMY
UP
DOWN
MODE
SELECT
SET
CANCEL
TIMER/CLOCK
ECONOMY
UP
DOWN
TO SET WEEKLY TIMER
TO SET WEEKLY TIMER
Change Display
1. Press
MODE
for 3 seconds to change the display to
weekly timer.
Select days to run timer
2. Press
SELECT
to enter day setting.
3. Press
to select your desired day.
The selected day will be highlighted with .
Press
SET
to deselect or select mark.
Repeat this step includes other day.
Select ON/OFF Timer
4. Press
SELECT
to enter Timer 1.
5. Press
to choose ON or OFF.
6. Press
SET
to confi rm the selection.
Select Timer
7. Press
to select your desired time.
If you want to set together with your desired
temperature, press
UP
DOWN
to select the temperature.
8. Press
SET
to confi rm the setting.
• Repeat steps 5 to 8 to set Timer 2 to 6, or press
CANCEL
to cancel the related timers.
Disable Weekly Timer
• To disable weekly timer setting, press
MODE
, then
press
CANCEL
.
Enable Weekly Timer
• To enable previous weekly timer setting, press
MODE
,
then press
SET
.
OPERATION DETAILS
OPERATION DETAILS
1. Enter timer mode.
2. Select the day.
3. The display will show the program for each of the
selected day.
1. Enter timer mode.
2. Select the day.
3. Press to enter day
setting.

OPEN
C
LOSE
CL
OSE
OPEN
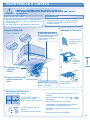
11
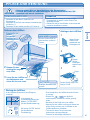
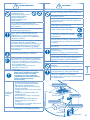
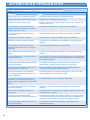
Air Filter Maintenance
Cleaning is needed when:
• lt is recommended to clean the air fi lter every 6
weeks.
• After the air fi lter is cleaned, press
FILTER RESET
/
FILTER RESET
to
reset.
• Do not operate without an air fi lter.
• Wash/rinse the air fi lter gently with water to avoid
damage to the air fi lter surface.
• Do not dry the part with a hair dryer or a stove.
• Replace any damaged air fi lter.
“FILTER RESET” appears on
the remote control display.
(For wired remote control)
“FILTER” lights up on the
indicator display.
(For wireless remote control)
ENGLISH
CARE & CLEANING CARE & CLEANING
• Switch off the power supply before cleaning.
• Do not touch the aluminium fi n, sharp parts may cause injury.
CLEANING INSTRUCTIONS
CLEANING INSTRUCTIONS
• Do not use benzene, thinner or scouring powder.
• Use only soap ( pH7) or neutral household detergent.
• Do not use water hotter than 40°C.
HINTS
HINTS
• Clean the fi lter regularly for best performance and to
reduce power consumption.
• Please consult your nearest dealer for seasonal
inspection.
2
2
Slowly pull down
Slowly pull down
the intake grille.
the intake grille.
3
3
Remove the air fi lter
Remove the air fi lter
from the tabs and pull it
from the tabs and pull it
downwards.
downwards.
1
1
Press the knobs.
Press the knobs.
Remove
Remove
CLOS
E
OPE
N
OPEN
CLOS
E
INDOOR UNIT
INDOOR UNIT
Wipe the unit gently with a
soft, dry cloth.
AIR FILTER
AIR FILTER
Vacuum, wash and dry.
Knob
Insert the air fi lter
to the tabs of the
intake grille.
Slowly bring
up the intake
grille.
Press the knobs to the
CLOSE side.
Remove Air Filter Air Filter Installation
1
1
2
2
3
3
AUTO FAN
COOL DRY
FILTER
RESET
AUTO
AUTO 123
FAN SPEED
AIR SWING
POWER
TIMER
FILTER
AUTO
CAUTION

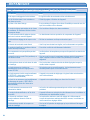
12
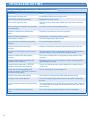
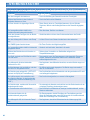
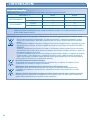
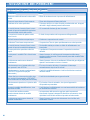
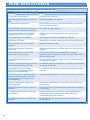
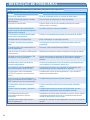
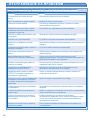
TROUBLESHOOTING TROUBLESHOOTING
Symptom
Symptom
Cause
Cause
Mist emerges from indoor unit. • Condensation effect due to cooling process.
Water fl owing sound during operation. • Refrigerant fl ow inside the unit.
The room has a peculiar odour. • This may be due to damp smell emitted by the wall, carpet, furniture or
clothing.
Indoor fan stops occasionally during automatic
fan speed setting.
• This helps to remove the surrounding odours.
Operation is delayed a few minutes after
restart.
• The delay is a protection to the unit’s compressor.
Outdoor unit emits water/steam. • Condensation or evaporation occurs on pipes.
Timer indicator is always on. • The timer setting repeats daily once set.
Indoor fan stops occasionally during heating
operation.
• To avoid unintended cooling effect.
Cracking sound can be heard during
operation.
• Changes of temperature cause the expansion/contraction of the unit.
Unit switch to FAN operation and air become
humid.
• This happens when the room temperature reaches the set temperature,
operation switches to FAN mode and the humidity increase.
Outdoor unit emits noise during heating
operation.
• This is due to changes infl ow of refrigerant gas when operation stops
and starts.
Operation does not stop immediately after
pressed the OFF/ON button.
• Discharging heat is in process. Operation will stops automatically after
approximately 60 seconds.
Operation stops occasionally. (“DEFROST”
appears on the remote control display)
• The unit is in defrosting mode, and the melted frost is drained from the
outdoor unit.
Airfl ow does not start immediately after
operation is started. (“PRE HEAT” appears on
the remote control display)
• The unit is warming up to provide warm air.
Operation starts after power resumes. • Auto restart is in function and operates under previous setting.
During dry mode, cold air blow out.
• The unit is running cooling operation with low fan speed to dehumidify
the room.
Fan speed change occasionally during heating
mode.
• The room temperature has reached the remote control setting. When the
room temperature drops again, the fan speed will resume to the remote
control settings.
Outdoor unit emits steam during heating
mode.
• This is due to defrost operation happens at the heat exchanger.
The following symptoms do not indicate malfunction.
The following symptoms do not indicate malfunction.

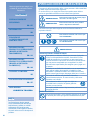
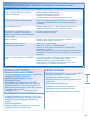
13
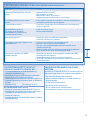
ENGLISH
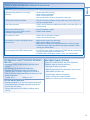
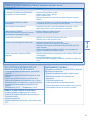
Symptom
Symptom
Check
Check
Heating/Cooling operation is not working
effi ciently.
• Set the temperature correctly.
• Close all doors and windows.
• Clean or replace the fi lters.
• Clear any obstruction at the air inlet and air outlet vents.
Heating mode cannot be operated. • The unit is forced to operate at cooling mode only in a non-living room,
such as a computer room.
Noisy during operation. • Check if the unit has been installed at an incline or the intake grille is not
closed properly.
Remote control does not work.
(Wireless remote control display is dim or
transmission signal is weak.)
• Insert the batteries correctly.
• Replace weak batteries.
The unit does not work. • Check if the circuit breaker is tripped.
• Check if timers have been set.
The unit does not receive the signal from the
remote control.
• Make sure the receiver not obstructed.
• Make sure the address is set correctly.
• Make sure the remote control signal transmission is within the range.
• Certain fl uorescent lights may interfere with signal transmitter. Please
consult your nearest dealer.
The unit stopped and TIMER indicator blinks. •
Turn OFF the power supply to reset the unit (TIMER indicator stop blinking).
•
Turn ON the power supply and restart the unit.
• If TIMER indicator blinks again, please consult your nearest dealer.
Check the following before calling for servicing.
Check the following before calling for servicing.
FOR SEASONAL INSPECTION AFTER EXTENDED
FOR SEASONAL INSPECTION AFTER EXTENDED
NON-USE
NON-USE
• Checking of remote control batteries (wireless remote
control).
• No obstruction at air inlet and air outlet vents.
• Use Auto OFF/ON button to select Cooling/Heating
operation, after 15 minutes of operation, it is normal to
have the following temperature difference between air inlet
and air outlet vents:
Cooling: ≥ 8°C Heating: ≥ 14°C
NON SERVICEABLE CRITERIAS
NON SERVICEABLE CRITERIAS
TURN OFF POWER SUPPLY then CALL Authorized
Distributor under the following conditions:
• Abnormal noise during operation.
• Water/foreign particles have entered the remote control.
• Water leaks from Indoor unit.
• Circuit breaker switches off frequently.
• Power cord becomes unnaturally warm.
• Switches or buttons are not functioning properly.
FOR EXTENDED NON-USE
FOR EXTENDED NON-USE
• Activate Heat Mode for 2~3 hours to remove moisture left
in the internal parts thoroughly to prevent mould growth.
• Turn off the power supply.
• Remove the remote control batteries (wireless remote
control).

14
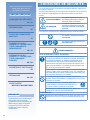
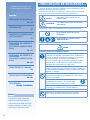
Pour éviter des blessures corporelles et des dégâts matériels, respectez les
instructions ci-dessous.
Tout dysfonctionnement dû au non-respect des instructions peut occasionner
des nuisances ou des dégâts dont la gravité est classée comme décrit
ci-après:
AVERTISSEMENT
AVERTISSEMENT
Ce symbole signale la présence
d’un danger pouvant provoquer des
blessures graves ou mortelles.
ATTENTION
ATTENTION
Ce symbole signale la présence
d’un danger pouvant provoquer des
blessures corporelles ou des dégâts
matériels.
Les instructions à respecter sont classées d’après les symboles suivants:
Ce symbole désigne une action
INTERDITE.
Ce symbole désigne une action
OBLIGATOIRE.
Nous vous remercions d’avoir
porté votre choix sur un
climatiseur Panasonic
TABLE DES MATIÈRES
TABLE DES MATIÈRES
CONSIGNES DE SÉCURITÉ
14~15
INFORMATIONS
16
FONCTION CLIMATISEUR
MULTIPLE
17
PRÉSENTATION DU
PRODUIT ET OPÉRATIONS
(TÉLÉCOMMANDE À
INFRAROUGE)
18~19
PRÉSENTATION DU
PRODUIT ET OPÉRATIONS
(TÉLÉCOMMANDE
CÂBLÉE)
20~22
ENTRETIEN ET NETTOYAGE
23
DÉPANNAGE
24~25
GUIDE RAPIDE
DOS DE COUVERTURE
REMARQUE
REMARQUE
Les illustrations de ce mode d’emploi
sont fournies à titre d’exemple
uniquement et peuvent présenter des
différences par rapport à l’appareil
proprement dit. Celui-ci peut être
modifi é sans préavis à des fi ns
d’amélioration.
AVERTISSEMENT
AVERTISSEMENT
UNITÉ INTÉRIEURE ET UNITÉ EXTÉRIEURE
UNITÉ INTÉRIEURE ET UNITÉ EXTÉRIEURE
Cet appareil n’est pas conçu pour être utilisé par des personnes
(y compris les enfants) aux capacités physiques, sensorielles
ou mentales diminuées, ou manquant d’expérience ou de
connaissances, sauf si une personne responsable de leur
sécurité leur a expliqué le fonctionnement de l’appareil et les
garde sous surveillance. Les enfants doivent être supervisés
afi n qu’ils ne jouent pas avec l’appareil.
Faites appel à votre revendeur agréé ou à un spécialiste pour
réparer, installer, retirer et réinstaller l’unité. Une installation et
une manipulation incorrectes risquent de provoquer des fuites,
une secousse électrique ou un incendie.
N’installez pas l’appareil dans un endroit susceptible de
contenir des produits explosifs ou infl ammables. Ceci pourrait
provoquer un incendie.
N’insérez pas les doigts ni d’autres objets dans
l’unité intérieure ou extérieure du climatiseur, car
les pièces rotatives risquent de vous blesser.
Ne touchez pas l’unité extérieure lors d’un orage, vous
risqueriez de subir une secousse électrique.
TÉLÉCOMMANDE
Maintenez la télécommande hors de portée des bébés et des
enfants pour éviter qu’ils n’avalent accidentellement les piles.
CONSIGNES DE SÉCURITÉ CONSIGNES DE SÉCURITÉ

15
Unité Intérieure
Alimentation
Unité Extérieure
Télécommande
Sortie d’air
Sortie d’air
Sortie d’air
Sortie d’air
Entrée d’air
Entrée d’air
Entrée d’air
Entrée d’air
Entrée d’air
Entrée d’air
FRANÇAIS
ATTENTION
ATTENTION
UNITÉ INTÉRIEURE ET UNITÉ EXTÉRIEURE
UNITÉ INTÉRIEURE ET UNITÉ EXTÉRIEURE
Ne nettoyez pas l’unité intérieure avec de l’eau,
du benzène, du diluant ou de la poudre à récurer.
N’utilisez pas l’appareil à d’autres fi ns que celles
prévues, notamment pour conserver des aliments.
N’utilisez pas d’appareils à combustible dans la
direction du fl ux d’air pour éviter la propagation
d’un incendie.
Évitez toute exposition directe à l’air froid pendant
une période prolongée.
Ne pas s’assoir ou marcher sur l’unité,
vous pourriez tomber accidentellement.
Ne touchez pas l’ailette en aluminium,
la partie tranchante peut provoquer des
blessures.
Ne pas mettre l’appareil en marche lorsque le
sol est en cours de cirage. Après le cirage, aérer
correctement la pièce avant de vous servir de
l’appareil.
Ne pas installer l’appareil dans des zones grasses
et enfumées.
Assurez-vous que la tuyauterie de vidange est
correctement raccordée afi n d’éviter des fuites
d’eau.
Aérez régulièrement la pièce.
Après une période d’inutilisation prolongée,
vérifi ez que la grille d’installation n’est pas
endommagée pour éviter que l’appareil ne tombe.
TÉLÉCOMMANDE
N’utilisez pas de piles rechargeables (Ni-Cd).
Cela pourrait endommager la télécommande.
Retirez les piles si vous envisagez de ne pas
utiliser l’appareil pendant une période prolongée.
Utilisez des piles de même type lorsque celles-ci
doivent être remplacées et introduisez-les en
respectant la polarité indiquée afi n d’éviter un
mauvais fonctionnement de la télécommande.
AVERTISSEMENT
AVERTISSEMENT
ALIMENTATION
N’utilisez pas de cordon, de
rallonge ou de cordon non-
spécifi é afi n d’éviter tout risque
de surchauffe et +d’incendie.
Ne partagez pas la prise d’alimentation avec
un autre appareil pour éviter tout risque de
surchauffe et d’incendie.
N’utilisez pas l’appareil avec les mains mouillées
afi n d’éviter tout risque de secousse électrique.
Si le cordon d’alimentation est endommagé,
il doit être remplacé par le fabriquant, par un
de ses techniciens ou par une personne qui
possède des qualifi cations équivalentes afi n
d’éviter tout risque.
Il est fortement recommandé d’installer l’appareil
avec un disjoncteur de fuite à la terre (DDFT)
ou un dispositif de courant résiduel (DCR) pour
éviter le risque d’électrocution ou d’incendie.
Ce matériel doit être mis à la terre pour éviter un
risque d’électrocution ou d’incendie.
Pour éviter un risque d’électrocution, coupez
l’alimentation dans les cas suivants :
- avant le nettoyage et l’entretien.
- lors d’une inutilisation prolongée.
-
lors d’une activité orageuse anormalement forte.
Cesser d’utiliser le produit lorsqu’une
anomalie ou défaillance quelconque
se produit et débrancher la fi che
d’alimentation ou mettre hors tension
l’interrupteur et le disjoncteur.
(Risque de fumée/feu/choc électrique)
Exemples
Exemples
d’anomalie
d’anomalie
ou
ou
défaillance
défaillance
• L’ELCB se déclenche fréquemment.
• Odeur de brûlé est observée.
• Un bruit ou des vibrations anormales de
l’unité sont observés.
• Fuite d’eau de l’unité intérieure.
• Le cordon d’alimentation ou la prise
deviennent anormalement chaud.
• La vitesse du ventilateur ne peut pas être
contrôlée.
• L’unité s’arrête de fonctionner
immédiatement même si elle est activée
pour opérer.
• Le ventilateur ne s’arrête pas même si
l’opération est arrêtée.
Contacter immédiatement votre revendeur
local pour l’entretien/réparation.

16
CONDITION D’UTILISATION
CONDITION D’UTILISATION
Utilisez ce climatiseur en respectant la plage de températures suivante
Température (°C) Unité intérieure Unité extérieure
REFROIDISSEMENT
Maximum 32 43
Minimum 21 -5
CHAUFFAGE
Maximum 27 24
Minimum 16 -15
ATTENTION: • Même lorsque la température extérieure est de -5°C, cet appareil est capable de refroidir une pièce que
vous n’utilisez pas souvent, comme le bureau, à une température de 21°C ou plus et un taux d’humidité de
80%.
Avis aux utilisateurs concernant la collecte et l’élimination des piles et des appareils électriques et
électroniques usagés
Apposé sur le produit lui-même, sur son emballage, ou fi gurant dans la documentation qui l’accompagne, ce
pictogramme indique que les piles et appareils électriques et électroniques usagés doivent être séparés des
ordures ménagères.
Afi n de permettre le traitement, la valorisation et le recyclage adéquats des piles et des appareils usagés,
veuillez les porter à l’un des points de collecte prévus, conformément à la législation nationale en vigueur
ainsi qu’aux directives 2002/96/CE et 2006/66/CE. En éliminant piles et appareils usagés conformément à
la réglementation en vigueur, vous contribuez à prévenir le gaspillage de ressources précieuses ainsi qu’à
protéger la santé humaine et l’environnement contre les effets potentiellement nocifs d’une manipulation
inappropriée des déchets.
Pour de plus amples renseignements sur la collecte et le recyclage des piles et appareils usagés, veuillez
vous renseigner auprès de votre mairie, du service municipal d’enlèvement des déchets ou du point de vente
où vous avez acheté les articles concernés. Le non-respect de la réglementation relative à l’élimination des
déchets est passible d’une peine d’amende.
Pour les utilisateurs professionnels au sein de l’Union européenne
Si vous souhaitez vous défaire de pièces d’équipement électrique ou électronique, veuillez vous renseigner
directement auprès de votre détaillant ou de votre fournisseur.
[Information relative à l’élimination des déchets dans les pays extérieurs à l’Union européenne]
Ce pictogramme n’est valide qu’à l’intérieur de l’Union européenne. Pour connaître la procédure applicable
dans les pays hors Union Européenne, veuillez vous renseigner auprès des autorités locales compétentes ou
de votre distributeur.
Note relative au pictogramme à apposer sur les piles (voir les 2 exemples ci-contre)
Le pictogramme représentant une poubelle sur roues barrée d’une croix est conforme à la réglementation.
Si ce pictogramme est combiné avec un symbole chimique, il remplit également les exigences posées par la
Directive relative au produit chimique concerné.
Pb
INFORMATIONS INFORMATIONS

17
FRANÇAIS
DÉFINITION
Le système de climatiseur multiple consiste en une unité extérieure raccordée à plusieurs unités intérieures.
Unité eextérieure
Unité eextérieure
Pièce A
Pièce A
Pièce B
Pièce B
• Il est possible de faire fonctionner les unités intérieures individuellement ou simultanément.
• Le mode de fonctionnement prioritaire est celui qu’utilise la première unité mise en route.
• Pendant le fonctionnement, le mode de chauffage et le mode de refroidissement ne peuvent pas être activés en même
temps sur différentes unités intérieures.
• Le voyant d’alimentation clignote pour indiquer que l’unité intérieure attend un mode de fonctionnement différent.
UNITÉ INTÉRIEURE
UNITÉ INTÉRIEURE
FONCTION CLIMATISEUR MULTIPLE FONCTION CLIMATISEUR MULTIPLE

ADDRESS
AUTOAUT
O
TIMER
ON
MODE
MODE
AIR SW
ING
FAN SPEED
OFF/ON
SET AC
RESET
RC RESET ADDRES
S
AIR SWING
TIMER
SET
CANCEL
SELECT
CLOCK
FAN SPEED
FILTER RESET
MANUAL
MODE
AUTO
18
Filtre à air
Volets d’orientation du
fl ux d’air
Grille d’admission
Panneau de command
POWER
TIMER
FILTER
AUTO
Récepteur à rayons
Écran de la
télécommande
L’air est évacué
uniformément
Préparation De La Télécommande
1
Appuyez et tirez
4
Réglez l’heure
2
Insérez des piles de type
AAA ou R03 (durée
d’utilisation d’environ 1 an)
5
Validez
3
Appuyez sur la touche
CLOCK (Horloge)
6
Refermez le
compartiment à piles
5
Touche auto OFF/ON (marche/arrêt automatique)
• Permet de mettre l’appareil en marche si vous avez
égaré la télécommande ou si elle inopérante.
Action
Mode de
fonctionnement
Appuyez une fois sur la touche. Auto
Maintenez cette touche enfoncée
jusqu’à ce que vous entendiez un
signal sonore, puis relâchez-la.
Refroidissement
1. Maintenez cette touche
enfoncée jusqu’à ce que
vous entendiez deux signaux
sonores, puis relâchez-la.
2. Appuyez sur le bouton
SET
pendant 5 secondes.
Chauffage
Appuyez sur la touche pour mettre l’appareil hors tension.
4
3
1
2
6
Distances maximales
du transmetteur : 8 m
Écran de code
d’erreurs (pour
l’entretien uniquement)
CZ-RWS1 (modèle pompe à chaleur)
CZ-RWC1 (modèle de refroidissement)
PRÉSENTATION DU PRODUIT ET OPÉRATIONS
(TÉLÉCOMMANDE À INFRAROUGE)
PRÉSENTATION DU PRODUIT ET OPÉRATIONS
(TÉLÉCOMMANDE À INFRAROUGE)

19
FRANÇAIS
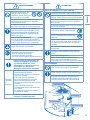
POUR RÉGLER LA MINUTERIE QUOTIDIENNE
POUR RÉGLER LA MINUTERIE QUOTIDIENNE
• Pour mettre l’appareil sous ou hors tension à une heure
prédéfi nie.
SELECT
TIMER
SET
Sélectionnez le
mode marche
(ON) ou arrêt
de la minuterie
(OFF).
Réglez l’heure. Confi rmez.
• Pour annuler la minuterie de marche (ON) ou d’arrêt
(OFF), appuyez sur
CANCEL
.
• Lorsque la minuterie de marche (ON) est réglée, l’unité
peut commencer avant l’heure réglée afi n d’atteindre la
température voulue à temps.
• Le fonctionnement de la minuterie dépend du réglage
de l’horloge dans la télécommande et se renouvelle
quotidiennement une fois réglée. Pour le réglage de
l’horloge, veuillez consulter la section concernant la
préparation de la télécommande.
• La minuterie la plus proche de l’heure actuelle sera
activée en premier.
• Si la minuterie est annulée manuellement, vous pouvez
restaurer le réglage précédent en appuyant sur
SET
.
• Si l’alimentation principale est coupée pendant une
heure ou plus, l’horloge et la minuterie devront être à
nouveau réglées.
ADDRESS
• Pour éviter un fonctionnement accidentel,
vous pouvez attribuer une adresse
différente à chaque unité intérieure.
• Appuyez plusieurs fois pour sélectionner
l’adresse de votre choix.
Address 1 Address 2Group Address 3
• L’adresse 1 est sélectionnée par défaut.
Vous n’avez pas besoin de changer ce
réglage en mode de fonctionnement
normal.
• Si l’adresse est réglée sur GROUP,
plusieurs unités intérieures peuvent
fonctionner en même temps.
RC RESET
Appuyez pour revenir aux réglages par
défaut de la télécommande.
SET
AC RESET
Non utilisé avec lors d’un fonctionnement
normal.
ASTUCE
ASTUCE
• Utilisez des rideaux pour faire barrage à la lumière
du soleil et à la chaleur extérieure pour réduire la
consommation d’énergie en mode de refroidissement.
RÉGLAGES FACULTATIFS
RÉGLAGES FACULTATIFS
FAN SPEED
POUR SÉLECTIONNER LA VITESSE DU
VENTILATEUR (3 OPTIONS)
LOW MEDIUMAUTO HIGH
• Pour AUTO, la vitesse du ventilateur intérieur est
automatiquement ajustée en fonction du mode de
fonctionnement.
• Si le mode de fonctionnement est réglé sur Fan
(ventilateur), la vitesse du ventilateur sera réglée sur
MEDIUM (intermédiaire), quel que soit le réglage de la
température.
AIR SWING
MANUAL
AUTO
POUR AJUSTER L’ORIENTATION
DU FLUX D’AIR
• Permet de ventiler la pièce.
• L’air est réparti de manière égale par l’intermédiaire
des 4 orifi ces d’évacuation.
AUTO
AUTO 1 AUTO 2 AUTO 3
• 3 sélections sont disponibles pour orienter
automatiquement le fl ux d’air vertical.
• La claire-voie du fl ux d’air se soulève et se baisse
automatiquement.
• Ne réglez pas manuellement la claire-voie du fl ux d’air
vertical.
MANUAL
• 4 sélections sont disponibles pour orienter
manuellement le fl ux d’air vertical.
• La direction du fl ux d’air peut être réglée à l’aide de la
télécommande.
OFF/ON
POUR METTRE L’APPAREIL
SOUS/HORS TENSION
POWER
POUR RÉGLER LA TEMPÉRATURE
• Plage de sélection: 16°C ~ 31°C.
MODE
POUR SÉLECTIONNER UN MODE DE
FONCTIONNEMENT
MODE AUTO - Selon vos préférences
• L’appareil sélectionne le mode de fonctionnement
selon la température extérieure et celle de la pièce.
MODE DE CHAUFFAGE - Pour un air chaud
• La chauffe de l’unité prend un peu de temps.
MODE FAN (VENTILATEUR) - Permet de faire circuler
l’air dans la pièce
MODE DE REFROIDISSEMENT - Pour un air frais
MODE DÉSHUMIDIFICATION - Pour déshumidifi er
l’atmosphère
• L’unité fonctionne en vitesse lente du ventilateur pour
fournir un refroidissement en douceur.
• En mode de déshumidifi cation lente, le ventilateur
intérieur fonctionne à vitesse lente.
• Le mouvement des claires-voies peut ne pas
correspondre à l’écran de la télécommande.

CHECK ODOUR WASH VENTILATION TEST RUN FILTER RESET
TEMP/
A/C No.
UP
DOWN
MODE
SELECT
SET
CANCEL
OFF
/
ON
TIMER/CLOCK
AIR SWING
ECONOMY
AUTO
AUTO
AUTO 123
FAN SPEED
AIR SWING
MON TUE WED THU FRI SAT SUN
ON
UP
DOWN
FAN
SPEED
AUTO
MODE
MANUAL
CZ-RT1
20
Préparation De La Télécommande
1
Appuyez sur
S
ELECT
2
Appuyez pour régler le jour
3
Confi rmez
4
Répétez les étapes 2 et 3 pour
régler l’heure actuelle.
• En mode de fonctionnement normal, il n’est pas
nécessaire d’utiliser les touches
ODOUR WASH
,
ECONOMY
,
VENTILATION
et
TEST RUN
.
3
1
2
Filtre à air
Volets d’orientation du fl ux d’air
Grille d’admission
L’air est évacué
uniformément
CZ-RT1
PRÉSENTATION DU PRODUIT ET OPÉRATIONS
(TÉLÉCOMMANDE CÂBLÉE)
PRÉSENTATION DU PRODUIT ET OPÉRATIONS
(TÉLÉCOMMANDE CÂBLÉE)
Seite wird geladen ...
Seite wird geladen ...
Seite wird geladen ...
Seite wird geladen ...
Seite wird geladen ...
Seite wird geladen ...
Seite wird geladen ...
Seite wird geladen ...
Seite wird geladen ...
Seite wird geladen ...
Seite wird geladen ...
Seite wird geladen ...
Seite wird geladen ...
Seite wird geladen ...
Seite wird geladen ...
Seite wird geladen ...
Seite wird geladen ...
Seite wird geladen ...
Seite wird geladen ...
Seite wird geladen ...
Seite wird geladen ...
Seite wird geladen ...
Seite wird geladen ...
Seite wird geladen ...
Seite wird geladen ...
Seite wird geladen ...
Seite wird geladen ...
Seite wird geladen ...
Seite wird geladen ...
Seite wird geladen ...
Seite wird geladen ...
Seite wird geladen ...
Seite wird geladen ...
Seite wird geladen ...
Seite wird geladen ...
Seite wird geladen ...
Seite wird geladen ...
Seite wird geladen ...
Seite wird geladen ...
Seite wird geladen ...
Seite wird geladen ...
Seite wird geladen ...
Seite wird geladen ...
Seite wird geladen ...
Seite wird geladen ...
Seite wird geladen ...
Seite wird geladen ...
Seite wird geladen ...
Seite wird geladen ...
Seite wird geladen ...
Seite wird geladen ...
Seite wird geladen ...
Seite wird geladen ...
Seite wird geladen ...
Seite wird geladen ...
Seite wird geladen ...
Seite wird geladen ...
Seite wird geladen ...
Seite wird geladen ...
Seite wird geladen ...
Seite wird geladen ...
Seite wird geladen ...
Seite wird geladen ...
Seite wird geladen ...
Seite wird geladen ...
Seite wird geladen ...
Seite wird geladen ...
Seite wird geladen ...
Seite wird geladen ...
Seite wird geladen ...
Seite wird geladen ...
Seite wird geladen ...
Seite wird geladen ...
Seite wird geladen ...
Seite wird geladen ...
Seite wird geladen ...
Seite wird geladen ...
Seite wird geladen ...
Seite wird geladen ...
Seite wird geladen ...
Seite wird geladen ...
Seite wird geladen ...
Seite wird geladen ...
Seite wird geladen ...
Seite wird geladen ...
Seite wird geladen ...
Seite wird geladen ...
Seite wird geladen ...
Seite wird geladen ...
Seite wird geladen ...
Seite wird geladen ...
Seite wird geladen ...
-
 1
1
-
 2
2
-
 3
3
-
 4
4
-
 5
5
-
 6
6
-
 7
7
-
 8
8
-
 9
9
-
 10
10
-
 11
11
-
 12
12
-
 13
13
-
 14
14
-
 15
15
-
 16
16
-
 17
17
-
 18
18
-
 19
19
-
 20
20
-
 21
21
-
 22
22
-
 23
23
-
 24
24
-
 25
25
-
 26
26
-
 27
27
-
 28
28
-
 29
29
-
 30
30
-
 31
31
-
 32
32
-
 33
33
-
 34
34
-
 35
35
-
 36
36
-
 37
37
-
 38
38
-
 39
39
-
 40
40
-
 41
41
-
 42
42
-
 43
43
-
 44
44
-
 45
45
-
 46
46
-
 47
47
-
 48
48
-
 49
49
-
 50
50
-
 51
51
-
 52
52
-
 53
53
-
 54
54
-
 55
55
-
 56
56
-
 57
57
-
 58
58
-
 59
59
-
 60
60
-
 61
61
-
 62
62
-
 63
63
-
 64
64
-
 65
65
-
 66
66
-
 67
67
-
 68
68
-
 69
69
-
 70
70
-
 71
71
-
 72
72
-
 73
73
-
 74
74
-
 75
75
-
 76
76
-
 77
77
-
 78
78
-
 79
79
-
 80
80
-
 81
81
-
 82
82
-
 83
83
-
 84
84
-
 85
85
-
 86
86
-
 87
87
-
 88
88
-
 89
89
-
 90
90
-
 91
91
-
 92
92
-
 93
93
-
 94
94
-
 95
95
-
 96
96
-
 97
97
-
 98
98
-
 99
99
-
 100
100
-
 101
101
-
 102
102
-
 103
103
-
 104
104
-
 105
105
-
 106
106
-
 107
107
-
 108
108
-
 109
109
-
 110
110
-
 111
111
-
 112
112


Panasonic S-22YA1E5 Bedienungsanleitung
- Kategorie
- Split-System-Klimaanlagen
- Typ
- Bedienungsanleitung
in anderen Sprachen
- français: Panasonic S-22YA1E5 Le manuel du propriétaire
- español: Panasonic S-22YA1E5 El manual del propietario
- italiano: Panasonic S-22YA1E5 Manuale del proprietario
- Nederlands: Panasonic S-22YA1E5 de handleiding
- português: Panasonic S-22YA1E5 Manual do proprietário
Verwandte Artikel
-
Panasonic U6LA1E5 Bedienungsanleitung
-
-
-
-
Panasonic KITYH43DB4E5 Bedienungsanleitung
-
-
-
Panasonic KITF43DTE5 Bedienungsanleitung