Lenco DAR-040 Bedienungsanleitung
- Kategorie
- CD-Radios
- Typ
- Bedienungsanleitung

DAR-040
User Manual DAB+/FM radio with Bluetooth, CD player and USB
Gebruikershandleiding DAB+/FM-radio met Bluetooth, CD-speler en USB
Bedienungsanleitung DAB+/UKW-Radio mit Bluetooth, CD-Spieler und USB
Guide d'utilisation Radio DAB+/FM Bluetooth, lecteur CD et USB
Manual de usuario de radio DAB+/FM con Bluetooth, reproductor de CD y USB

Version 0.3.
Index
English ................................................................................................................................................................... 3
Nederlands ......................................................................................................................................................... 12
Deutsch ............................................................................................................................................................... 22
Français ............................................................................................................................................................... 32
Español ............................................................................................................................................................... 42

3
English
DAR-040
CAUTION:
Usage of controls or adjustments or performance of procedures other than those specified herein
may result in hazardous radiation exposure.
This unit should not be adjusted or repaired by anyone except qualified service personnel.
PRECAUTIONS BEFORE USE
KEEP THESE INSTRUCTIONS IN MIND:
1. Do not use this device near water.
2. Clean only with a slightly damp cloth.
3. Do not cover or block any ventilation openings. When placing the device on a shelf, leave 5 cm (2”)
free space around the whole device.
4. Install in accordance with the supplied user manual.
5. Don’t step on or pinch the power adaptor. Be very careful, particularly near the plugs and the
cable’s exit point. Do not place heavy items on the power adaptor, which may damage it. Keep
the entire device out of children’s reach! When playing with the power cable, they can
seriously injure themselves.
6. Unplug this device during lightning storms or when unused for a long period.
7. Keep the device away from heat sources such as radiators, heaters, stoves, candles and other
heat-generating products.
8. Avoid using the device near strong magnetic fields.
9. Electrostatic discharge can disturb normal usage of this device. If so, simply reset and restart
the device following the instruction manual. During file transmission, please handle with care
and operate in a static-free environment.
10. Warning! Never insert an object into the product through the vents or openings. High voltage
flows through the product and inserting an object can cause electric shock and/or short circuit
internal parts. For the same reason, do not spill water or liquid on the product.
11. Do not use in wet or moist areas such as bathrooms, steamy kitchens or near swimming pools.
12. Do not use this device when condensation may occur.
13. Although this device is manufactured with the utmost care and checked several times before
leaving the factory, it is still possible that problems may occur, as with all electrical appliances.
If you notice smoke, an excessive build-up of heat or any other unexpected phenomena, you
should disconnect the plug from the main power socket immediately.
14. This device must be well ventilated at all time!
15. This device must operate on a power source as specified on the specification label. If you are
not sure of the type of power supply used in your home, consult your dealer or local power
company.
16. The socket outlet must be installed near the equipment and must be easily accessible.
17. Do not overload ac outlets or extension cords. Overloading can cause fire or electric shock.
18. Devices with class 1 construction should be connected to a main socket outlet with a protective
earthed connection.
19. Devices with class 2 construction do not require an earthed connection.
20. Keep away from rodents. Rodents enjoy biting on power cords.
21. Always hold the plug when pulling it out of the main supply socket. Do not pull the power cord.
This can cause a short circuit.
22. Avoid placing the device on any surfaces that may be subject to vibrations or shocks.
23. To protect the device during a thunderstorm, unplug the ac power adaptor.
24. When the device is not in use for long periods, unplug the ac power adaptor for safety reasons.
25. To clean the device, use a soft dry cloth. Do not use solvents or petrol based fluids. To remove
severe stains, you may use a damp cloth with dilute detergent.
26. The supplier is not responsible for damage or lost data caused by malfunction, misuse,
modification of the device or battery replacement.
27. Do not interrupt the connection when the device is formatting or transferring files. Otherwise,
data may be corrupted or lost.
28. The usb memory stick should be plugged into the unit directly. Don’t use an usb extension
cable because it can cause interference resulting in failing of data.
29. The apparatus shall not be exposed to dripping or splashing and make sure that no objects
filled with liquids, such as vases, are placed on or near the apparatus.

4
30. To completely disconnect the power input, the mains plug of the apparatus shall be
disconnected from the mains, as the disconnect device is the mains plug of apparatus.
31. The mains plug of the apparatus should not be obstructed or should be easily accessed during
intended use.
32. Battery shall not be exposed to excessive heat such as sunshine, fire or the like.
33. Minimum distance of 10cm around the apparatus is needed for sufficient ventilations.
34. The ventilation should not be impeded by covering the ventilation openings with items such as
newspapers, table-cloths, curtains etc.
35. No naked flame sources such as lighted candles should be placed on the apparatus.
36. Attention should be drawn to the environmental aspects of battery disposal.
37. The apparatus can only be used in moderate extremely cold or climates warm environments
should be avoided.
38. The rating label has been marked on the bottom panel of the apparatus.
39. This device is not intended for use by people (including children) with physical, sensory or
mental disabilities, or a lack of experience and knowledge, unless they’re under supervision or
have received instructions about the correct use of the device by the person who is responsible
for their safety.
40. This product is intended for household use only and not for commercial or industrial use.
41. Make sure the unit is adjusted to a stable position. Damage caused by using this product in an
unstable position or by failure to follow any other warning or precaution contained within this
user manual will not be covered by warranty.
42. Never remove the casing of this apparatus.
43. Never place this apparatus on other electrical equipment.
44. Do not use or store this product in a place where it is subject to direct sunlight, heat, excessive
dust or vibration.
45. Do not clean this product with water or other liquids.
46. Do not block or cover the slots and holes in the product.
47. Do not push foreign objects into the slots or holes in the product.
48. Do not allow children access to plastic bags.
49. Please check that the voltage on the type plate of your appliance corresponds with your house
electricity supply (type plate is located on the back of the unit).
50. Protect the power cord from being walked on or pinched, particularly at plugs, convenience
receptacles, and the point where they exit from the apparatus.
51. Only use attachments/accessories specified by the manufacturer.
52. Refer all servicing to qualified service personnel. Servicing is required when the apparatus has
been damaged in any way, such as the power supply cord or the plug, when liquid has been
spilled or objects have fallen into the apparatus, when the apparatus has been exposed to rain
or moisture, does not operate normally, or has been dropped.
53. Do not use a damaged power cord or plug or a loose outlet. Doing so may result in fire or
electric shock.
Warning: prolonged exposure to loud sounds from personal music players may lead to temporary or
permanent hearing loss.

5
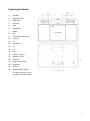
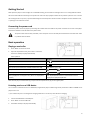
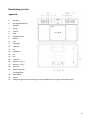
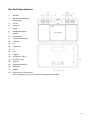
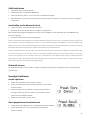
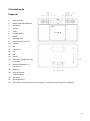
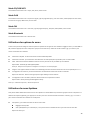
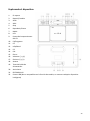
Exploring the device
1. Standby
2. Repeat/Shuffle
3. Backward
4. Forward
5. Stop
6. Play/Pause
7. Mode
8. LCD
9. CD compartment door
10. P1/Prog
11. P2
12. Info/Menu
13. P3
14. P4+
15. Enter
16. Volume (-) & (+)
17. Station (-) & (+)
18. Antenna
19. Power cord socket
20. Earphone
21. AUX IN
22. USB port(Not support
charging function, do not
connect any smart device)

6
Getting Started
Never place the player in direct sunlight. For comfortable viewing, we recommend a soft light. Place it on a sturdy platform of which
the surface should be flat and steady, so the product can’t fall or hit by any objects. Make sure the product is placed in such a manner
that nothing can fall on top of it, as pressure will damage or break the product. Prevent insertion of objects into the ventilation slots,
or openings in the cabinet at all time.
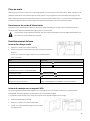
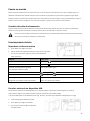
Connecting the power cord
Connect the power cord to the player by connecting the small flat end of the cable to the power connection on the rear of the player.
Connect the wide flat end of the cable to the power outlet.
The power outlet must be easily accessible, so that the power cord can be easily disconnected from the outlet when there
is a problem with the device.
Basic operation
Playing a music disc
1. Press “Mode” to choose CD mode
2. Open CD compartment cover, place a disc in and close it.
Once disc is loaded, and play automatically.
Other operation
TO
Do this
Pause
Press once. To return to playback, press this button again
Stop
Press once
Select previous/next folder (only available in MP3 CD or USB)
Press “Station (-)/(+)” once
Next/Fast forward
/Press and hold
Previous/Fast backward
/Press and hold
Repeat play(Repeat mode appear every 10 secs on display when
enabled)
Press “Repeat/Shuffle” button to select between Normal
play/Repeat One/Repeat All/Shuffle
Note: Resume play is cancelled when (1) you open the CD compartment or (2) you turn off the power
Listening music on a USB device
You can listen to audio files stored on a USB device (a digital music player or USB storage media). Audio files in MP3 and WMA can be
played on this unit.
* (The onboard usb port is not designed for charging. Please don’t connect any smart device for charging)
1. Connect the USB device to the USB port
2. Press “Mode” to choose USB mode
3. Once USB is loaded, it will play automatically.

7
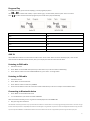
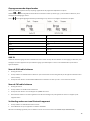
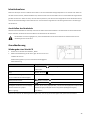
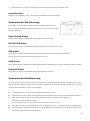
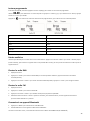
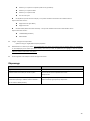
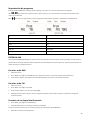
Program Play
In CD/USB Stop mode, press and hold “P1/Prog”, to enter program play menu.
Use and to select track number, or press “Station (-)/(+)” to select folder, and then press “enter” to confirm.
Press to confirm and store the whole program list, then it will start to play automatically.
EN
EN
Track
Track
Program
Program
Folder
Folder
Track
Track
Audio CD
Audio CD
MP3 CD/USB
MP3 CD/USB
AUX IN
Use the AUX IN connection to connect external audio sources. Press “mode” button to choose “Auxiliary Input”, then connect
external device via AUX IN socket at the back, then you could play the audio file on the external device.
Listening to DAB radio
1. Extend the antenna.
2. Press “Mode” to choose DAB mode. (If this is your first time to use, it will scan station automatically.)
3. Press “Station” button to choose available DAB stations, press “Enter” to change station.
Listening to FM radio
1. Extend the antenna.
2. Press “Mode” to choose FM mode.
3. Press “Station” button to move every 0.05MHz
4. Press and hold “Station” button for 2 seconds and then release button, it will scan and stop at next broadcast station.
Connecting to Bluetooth device
1. Press “Mode” to choose Bluetooth mode.
2. Turn on Bluetooth in your devices and select “DAR-040”.
When connected successfully, it has a ring sound and the display shows “BT-CONNECTED”
3. Play your songs from the device.
Note: Bluetooth connectivity performance may vary with brand and model of the connected device. It was always suggested using latest firmware for the device may get
the best connection performance. Compatibility with all devices and media types is not guaranteed. The presence of other functioning Bluetooth devices during connection
may lead to operational difficulties. The Bluetooth transmitter and receiver hardware in this unit has an approximate operational range of 30 feet in open space.

8
Generally Bluetooth devices can communicate with each other clearly within a regular sized room or office. Operation between different rooms will depends on the
construction of the room. It is important to recognize the fact that Bluetooth communication range may be substantially reduced if the signal passes through a solid object.
Human bodies, brick and concrete walls, and heavy furniture or bookcases will reduce the operational range of your Bluetooth device. Glass, dry-wall or wood paneled walls
and office partitions may have a less severe but noticeable effect. You should position your Bluetooth devices closer to each other if you observe communication difficulties.
Disconnecting Bluetooth
To disconnect Bluetooth device, press and hold “Play/pause” until a ring sound, the display will show a blinking “BT-LINK”.
Other Operations
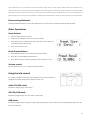
Store Stations
1. Select the station you wish to presets.
2. Press and hold “P1/P2/P3” buttons to store station directly.
3. Press and hold “P4+” to display Preset store menu, press “Station” buttons to
select which preset number you like.
4. Press “Enter” button to save.
Recall Preset Stations
1. Press “P1/P2/P3” button once, to direct recall the station stored
2. Press “P4+” once to display Preset Recall menu.
3. Press “Station” buttons to select preset station and press “Enter” to recall.
Volume control
You could press volume (-) or (+) to adjust the speaker loudness.
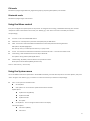
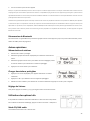
Using the Info control
It is possible to change the information that is displayed on the LCD at each mode. To
change the information display, press “Info/menu” button once.
Audio CD/AUX mode
Information cycling through: Time and date.
MP3 CD/USB mode
Information cycling through: Time, date, album, artist and title.
DAB mode
Information cycling through: DLS, signal strength, programme type (PTY), channel name, channel number/frequency, signal error rate,
bit rate, time and date.

9
FM mode
Information cycling through: Radio text, programme type (PTY), frequency, Mono/Stereo, time and date.
Bluetooth mode
Information cycling through: Time and date.
Using the Menu control
It let you to configure some system option or this product. To change the menu setting, under DAB or FM mode, press and hold
“Info/menu” button until entered to menu mode, use “Station(-)/(+)” and “Enter” to choose and confirm your selection
correspondingly.
*Full scan - it will scan available DAB stations.
*Manual tune - manually select a particular channel/frequency for DAB station.
*DRC - This function reduces the difference between the loudest and quietest audio being broadcast.
DRC options: off (default)/high/low
Note: DRC only works if it is enabled by the broadcaster for a specific station.
*Prune - This removes all invalid stations indicated in the station list with a ‘?’ in front of the station name.
^Scan setting - select the method of scans and stop at FM mode.
Scan options: Strong stations (default)/All stations
^Audio setting - By default, all stereo stations are reproduced in stereo.
Audio options: Stereo allowed (default)/Forced mono)
Remarks: * DAB mode only, ^ FM mode only
Using the System menu
You can set different functions in System menu. Under DAB or FM mode, press and hold “Info/menu” and select “System”, then press
“Enter” to login to. Use “Station (-)/(+)” and “Enter” to choose and confirm your selection correspondingly.
Time - can set your time and date format..
Set Time/Date
Auto update - You can choose the update method of time and date.
Update options:
Update from Any (default)
Update from DAB
Update from FM
No update
Set 12/24 hour - You can change the time format on the display.
Time format options:
Set 24 hour (default)
Set 12 hour

10
Set date format - You can change the date format on the display.
Date format options:
DD-MM-YYYY (default)
MM-DD-YYYY
Language - There have 4 languages option.
Language options: English/German/French/Italian
Factory Reset - A factory reset clears all user defined settings, replacing them with the original default values, so time/date,
preferences/settings, DAB station list and preset stations are all lost.
SW version - It shows the software version of the player.
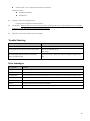
Trouble Shooting
Problem:
Solutions:
The device does not turn on
Make sure the AC power cord is connected to the correctly.
The CD player does not play even when a CD is in place
Place the CD with label side up.
Clean the CD.
FM Hiss/DAB Burbling/intermittent cut-out/DAB No
stations available message
Check/move antenna. Move radio. Rescan local (high-strength) stations
only.
Error messages
Error messages
Meaning
‘Service not available’
No DAB reception.
‘Signal error’
The DAB signal has been interrupted.
‘No DAB Station’
The listed station cannot be found. (No Name): The current station does not broadcast an identity name.
‘No stations found’
No DAB stations are available, check aerial.
‘No Radio Text’
No RDS text information is available on this station.
‘No PTY’
No RDS programme type information is available.
‘No Name’
No RDS station name is being broadcast.

11
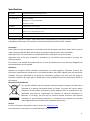
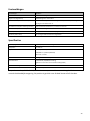
Specifications
Description:
CD/MP3/DAB/FM Bluetooth Digital Radio
Speaker:
2 x 3W rms
Frequency Ranges:
FM: 87.5-108MHz;
DAB/DAB+: 174.928-239.200 MHz;
Bluetooth: 2.4GHz
LCD Display:
16-Characters x 2 lines display
Power Requirements:
110-240V AC, 50/60Hz (AC power supply)
(please use our provided power cord)
Approx. Dimensions:
335mm x 210mm x 125mm
USB:
USB2.0 Full Speed
This product operates at 2400 - 2483.5 MHz and is designated only to be used inside a normal
household environment. This product is suited for this purpose within all EU counties.
Guarantee
Lenco offers service and warranty in accordance with the European law, which means that in case of
repairs (both during and after the warranty period) you should contact your local dealer.
Important note: It is not possible to send products that need repairs to Lenco directly.
Important note: If this unit is opened or accessed by a non-official service center in any way, the
warranty expires.
This device is not suitable for professional use. In case of professional use, all warranty obligations of
the manufacturer will be voided.
Disclaimer
Updates to Firmware and/or hardware components are made regularly. Therefore some of the
instruction, specifications and pictures in this documentation may differ slightly from your particular
situation. All items described in this guide for illustration purposes only and may not apply to
particular situation. No legal right or entitlements may be obtained from the description made in
this manual.
Disposal of the Old Device
This symbol indicates that the relevant electrical product or battery should not be
disposed of as general household waste in Europe. To ensure the correct waste
treatment of the product and battery, please dispose them in accordance to any
applicable local laws of requirement for disposal of electrical equipment or
batteries. In so doing, you will help to conserve natural resources and improve
standards of environmental protection in treatment and disposal of electrical
waste (Waste Electrical and Electronic Equipment Directive).
Service
For more information and helpdesk support, please visit www.lenco.com
Lenco Benelux BV, Thermiekstraat 1a, 6361 HB Nuth, The Netherlands.

12
Nederlands
DAR-040
LET OP:
Gebruik van bedieningen of afstellingen of uitvoer van procedures anders dan gespecificeerd in deze
documentatie kan leiden tot blootstelling aan schadelijke straling.
Dit apparaat dient uitsluitend te worden aangepast of gerepareerd door gekwalificeerd
onderhoudspersoneel.
VOORZORGSMAATREGELEN VOOR GEBRUIK
ONTHOUD DE VOLGENDE INSTRUCTIES:
1. Gebruik dit apparaat niet in de buurt van water.
2. Reinig het uitsluitend met een licht vochtige doek.
3. Bedek of blokkeer de ventilatie-openingen niet. Wanneer u het apparaat op een schap plaatst,
dient u 5 cm (2”) vrije ruimte rondom het gehele apparaat te behouden.
4. Installeer het product volgens de meegeleverde gebruikershandleiding.
5. Nooit op de stroomadapter stappen of deze indrukken. Wees voornamelijk voorzichtig in de
buurt van de stekkers en het punt waar de kabel uit het apparaat komt. Plaats geen zware
voorwerpen op de stroomadapter, om beschadiging ervan te voorkomen. Houd het gehele
apparaat buiten bereik van kinderen! Wanneer kinderen met de voedingskabel spelen, kunnen
zij ernstig letsel oplopen.
6. Haal de stekker uit het stopcontact tijdens onweer of wanneer u deze langere tijd niet gebruikt.
7. Houd het apparaat uit de buurt van hittebronnen, zoals radiateurs, verwarmingen, kachels,
kaarsen en andere hittegenererende producten.
8. Gebruik dit apparaat niet in de buurt van krachtige magnetische velden.
9. Elektrostatische ontlading kan normaal gebruik van dit apparaat verstoren. U hoeft het
apparaat in dit geval slechts te resetten en opnieuw op te starten volgens de
gebruikershandleiding. Wees voorzichtig tijdens bestandsoverdracht en doe dat in een
omgeving zonder statische verstoringen.
10. Waarschuwing! Steek nooit een voorwerp via de ventilatie- of andere openingen in het product.
Er is hoogspanning in het product aanwezig en als u er een object insteekt, kan dat een
elektrische schok veroorzaken en/of kortsluiting in de interne onderdelen. Mors om dezelfde
reden geen water of vloeistof op het product.
11. Gebruik het toestel niet in vochtige ruimtes, zoals badkamers, stomende keukens of in de buurt
van zwembaden.
12. Gebruik dit apparaat niet wanneer condensatie kan optreden.
13. Alhoewel dit apparaat met grote zorg gefabriceerd en verschillende keren geïnspecteerd is
voordat het de fabriek verlaat, is het nog steeds mogelijk dat er problemen optreden, zoals met
alle elektrische apparaten. Als u rook, een overmatige hitteontwikkeling of enig ander
onverwacht verschijnsel opmerkt, moet u onmiddellijk de stekker van het netsnoer uit het
stopcontact halen.
14. Dit apparaat moet te allen tijde goed worden geventileerd!
15. Dit apparaat moet aangedreven worden door een voedingsbron, zoals aangegeven op het
specificatieplaatje. Als u twijfelt over het type voeding dat gebruikt wordt in uw huis, raadpleeg
dan a.u.b. uw dealer of plaatselijk energiebedrijf.
16. Het stopcontact moet in de buurt van de apparatuur zijn geïnstalleerd en eenvoudig te
bereiken zijn.
17. Overbelast stopcontacten of verlengsnoeren niet. Overbelasting kan brand of een elektrische
schok veroorzaken.
18. Apparaten met een Klasse 1 structuur dienen te worden aangesloten op een stopcontact met
een beschermende aardverbinding.
19. Apparaten met een Klasse 2 structuur vereisen geen aardverbinding.
20. Houd ze uit de buurt van knaagdieren. Knaagdieren knauwen graag aan voedingskabels.
21. Houd altijd de stekker vast wanneer u deze uit het stopcontact trekt. Trek nooit aan de
voedingskabel. Dit kan tot een kortsluiting leiden.
22. Vermijd om het toestel te plaatsen op een ondergrond die blootgesteld kan worden aan
trillingen of schokken.
23. Om het apparaat tijdens onweer te beschermen, haalt u de netvoedingadapter uit het
stopcontact.
24. Wanneer het apparaat voor een lange periode niet in gebruik is, haalt u de netvoedingadapter
om veiligheidsredenen uit het stopcontact.

13
25. Gebruik een zacht, droog doekje om het apparaat te reinigen. Gebruik geen oplosmiddelen of
op benzine gebaseerde vloeistoffen. U kunt een vochtig doekje met verdund
schoonmaakmiddel gebruiken om hardnekkige vlekken te verwijderen.
26. De leverancier is niet verantwoordelijk voor schade of verloren gegevens veroorzaakt door
storing, misbruik, modificatie van het apparaat of batterijvervanging.
27. Onderbreek nooit de verbinding wanneer het apparaat formatteert of bestanden overdraagt.
De gegevens kunnen anders corrupt of verloren raken.
28. De USB-geheugenstick dient direct in het apparaat te worden gestoken. Gebruik geen
USB-verlengkabel, omdat die kan leiden tot storingen met foutieve gegevens als gevolg.
29. Het apparaat mag niet worden blootgesteld aan druppels of spatten en zorg ervoor dat er geen
met vloeistof gevulde voorwerpen, zoals vazen, op of nabij het apparaat zijn geplaatst.
30. Om de verbinding met de stroomaansluiting volledig te verbreken, moet de stekker van het
apparaat uit het stopcontact worden gehaald, omdat de stekker van het apparaat de
hoofdschakelaar is.
31. De stekker van het apparaat mag niet worden belemmerd en moet tijdens gebruik eenvoudig
toegankelijk worden gehouden.
32. Batterijen mogen niet aan overmatige hitte, zoals zonlicht, open vuur e.d. worden blootgesteld.
33. Een afstand van minimaal 10 cm rondom het apparaat is nodig voor voldoende ventilatie.
34. De ventilatie mag niet worden gehinderd door het bedekken van de ventilatieopeningen met
voorwerpen zoals kranten, tafelkleden, gordijnen etc.
35. Plaats geen bronnen met een open vlam, zoals brandende kaarsen, op het apparaat.
36. Aandacht voor het milieu is nodig bij het verwijderen van de batterijen.
37. Het apparaat kan alleen worden gebruikt in gematigde klimaten. Extreem koude of warme
omgevingen moeten worden vermeden.
38. Het nominale specificatielabel is te vinden op het paneel aan de onderkant van het apparaat.
39. Dit apparaat is niet bestemd voor gebruik door mensen (inclusief kinderen) met fysieke,
zintuiglijke of geestelijke gebreken of gebrek aan kennis en ervaring, tenzij zij onder toezicht
staan of instructies hebben over het juiste gebruik van het apparaat hebben gekregen van de
persoon die verantwoordelijk is voor hun veiligheid.
40. Dit product is alleen voor huishoudelijk gebruik bedoeld en niet voor commercieel of
industrieel gebruik.
41. Verzeker u ervan dat het apparaat in een stabiele positie staat opgesteld. Schade, veroorzaakt
door het gebruik van dit product in een onstabiele positie, of door het niet naleven van
waarschuwingen of voorzorgsmaatregelen genoemd in deze handleiding, valt niet onder de
garantie.
42. Verwijder nooit de behuizing van dit apparaat.
43. Plaats dit apparaat nooit op andere elektrische apparatuur.
44. Dit product niet gebruiken of opslaan op plaatsen waar het wordt blootgesteld aan direct
zonlicht, hitte, buitensporig veel stof of trillingen.
45. Reinig dit product niet met water of andere vloeistoffen.
46. Bedek of blokkeer de gleuven en de gaten in het product niet.
47. Stop geen vreemde voorwerpen in de gleuven of gaten van het product.
48. Geef kinderen geen gelegenheid in aanraking met plastic zakken te komen.
49. Controleer of de spanning op het specificatieplaatje van uw apparaat overeenkomt met het
lichtnet in uw huis (specificatieplaatje is te vinden op de achterzijde van het apparaat).
50. Zorg ervoor dat niemand op de voedingskabel kan gaan staan of dat de kabel kan worden
ingedrukt, voornamelijk bij stekkers, stopcontacten en het punt waar kabels uit het apparaat
komen.
51. Gebruik uitsluitend uitbreidingen/accessoires gespecificeerd door de fabrikant.
52. Laat alle reparaties over aan gekwalificeerd onderhoudspersoneel. Onderhoud is vereist als het
toestel hoe dan ook is beschadigd, zoals bijvoorbeeld het netsnoer of de stekker, wanneer er
vloeistof of een voorwerp in het apparaat is terechtgekomen, wanneer het apparaat is
blootgesteld aan regen of vocht, als het niet normaal werkt of is gevallen.
53. Gebruik nooit een beschadigde voedingskabel of stekker of een los stopcontact. Dit vormt
namelijk een risico op brand of elektrische schokken.
Waarschuwing: Langdurige blootstelling aan luid geluid van persoonlijke muziekspelers kan leiden
tot tijdelijke of permanente gehoorbeschadiging.

14
Beschrijving van het
apparaat
1. Stand-by
2. Herhaal/Willekeurig
Afspelen
3. Terug
4. Vooruit
5. Stop
6. Afspelen/Pauze
7. Modus
8. LCD
9. CD-klepje
10. P1/Prog
11. P2
12. Info/Menu
13. P3
14. P4+
15. Invoeren
16. Volume (-) & (+)
17. Station (-) & (+)
18. Antenne
19. Aansluiting voor
voedingskabel
20. Koptelefoon
21. AUX IN
22. USB-poort (geen ondersteuning voor de oplaadfunctie, sluit geen smartphone aan)

15
Aan de slag
Plaats de speler nooit in direct zonlicht. Wij raden zacht licht voor een comfortabele weergave. Plaats het apparaat op een stevig
platform waarvan het oppervlak vlak en stabiel is, zodat het product niet kan vallen of door enigerlei voorwerpen kan worden
gestoten. Zorg ervoor het product zodanig te plaatsen dat er niets op kan vallen, omdat het product beschadigd zal worden of kan
breken wegens toegepaste druk. Steek geen voorwerpen in de ventilatieopeningen of andere openingen in de behuizing.
De voedingskabel aansluiten
Sluit de voedingskabel aan op de speler door het kleine, platte uiteinde van de kabel in de stroomaansluiting op de achterzijde van de
speler te steken. Sluit het brede, platte uiteinde van de kabel aan op het stopcontact.
Het stopcontact moet eenvoudig bereikbaar worden gehouden, zodat de voedingskabel gemakkelijk van het stopcontact
kan worden losgekoppeld in het geval dat het apparaat een probleem vertoont.
Algemene bediening
Een muziekdisk afspelen
1. Druk op “Mode” om de cd-modus te selecteren.
2. Open het klepje van de cd-houder, plaats een disk en sluit het klepje.
Zodra de disk is geladen, zal deze automatisch worden afgespeeld.
Overige bediening
Functie
Actie
Pauze
Druk eenmaal op . Druk nogmaals op deze toets om het afspelen te hervatten.
Stop
Druk eenmaal op .
De vorige/volgende folder selecteren (alleen
beschikbaar in de modus MP3-cd of USB)
Druk eenmaal op “Station (-)/(+)”.
Volgende/Snel vooruit spoelen
/Drukken en vasthouden
Vorige/Snel achteruit spoelen
/Drukken en vasthouden
Herhaald afspelen (de herhaalmodus wordt
elke 10 seconden op de display weergegeven
wanneer actief).
Druk op de knop “Repeat/Shuffle (Herhalen/Willekeuring)” om te kiezen tussen
Normaal afspelen/Een keer herhalen/Alles herhalen/Willekeurig afspelen
Opmerking: Het afspelen wordt geannuleerd wanneer u (1) de cd-houder opent of (2) het apparaat uitschakelt.
Naar muziek op een USB-apparaat luisteren
U kunt luisteren naar audiobestanden die zijn opgeslagen op een USB-apparaat (een digitale muziekspeler of USB-opslagmedium). Dit
apparaat kan audiobestanden afspelen in het formaat MP3 en WMA.
* (De USB-poort op het apparaat is niet ontworpen voor het opladen. Sluit geen smartphone aan voor het opladen)
1. Sluit het USB-apparaat aan op de USB-poort.
2. Druk op “Mode” om de USB-modus te selecteren.
3. Zodra de USB is geladen, wordt deze automatisch
afgespeeld.

16
Geprogrammeerde afspeelmodus
Houd in de CD/USB-stopmodus de knop “P1/Prog” ingedrukt om het programma afspeelmenu te openen.
Gebruik en om het gewenste tracknummer te selecteren of druk op “Station (-)/(+)” om een folder te selecteren, druk
vervolgens ter bevestiging op “Enter”.
Druk op om de gehele geprogrammeerde lijst te bevestigen en op te slaan en vervolgens automatisch af te spelen.
EN
NL
Track
Track
Program
Programmering
Folder
Folder
Track
Track
Audio CD
Audio-cd
MP3 CD/USB
MP3-cd/USB
AUX IN
Gebruik de “AUX IN”-ingang om externe audiobronnen aan te sluiten. Druk op de toets “Mode” om “Aux-ingang” te selecteren, sluit
vervolgens een extern apparaat aan op de “AUX IN”-ingang op de achterzijde en u kunt nu de audiobestanden op het externe
apparaat afspelen.
Naar de DAB-radio luisteren
1. Verleng de antenne.
2. Druk op “Mode” om de DAB-modus te selecteren. (als u deze functie voor het eerst gebruikt, zal het apparaat automatisch naar
stations zoeken).
3. Druk op de toets “Station” om beschikbare DAB-stations te selecteren en druk op “Enter” om van station te wisselen.
Naar de FM-radio luisteren
1. Verleng de antenne.
2. Druk op “Mode” om de FM-modus te selecteren.
3. Druk op de toets “Station” om met stappen van 0,05MHz te scannen.
4. Houd de toets “Station” 2 seconden ingedrukt en laat de toets vervolgens los; het apparaat zal scannen en stoppen op het
volgende station.
Verbinding maken met een Bluetooth-apparaat
1. Druk op “Mode” om de Bluetooth-modus te kiezen.
2. Zet de Bluetooth aan op uw apparaten en selecteer "DAR-040".
Wanneer er verbinding is gemaakt, is er een beltoon to horen en toont het scherm “BT-CONNECTED (BT-AANGESLOTEN)"

17
3. Speel de nummers vanaf het apparaat af.
Opmerking: De prestatie van de Bluetooth-verbinding hangt af van het merk en model van het aangesloten apparaat. Voor de beste verbindingsprestaties wordt het altijd
aanbevolen om de nieuwste firmware voor het apparaat te gebruiken. Compatibiliteit met alle apparaten en type media is niet gegarandeerd. De aanwezigheid van andere
functionerende Bluetooth-apparaten tijdens de verbinding kan leiden tot problemen met de werking. De hardware van de Bluetooth-zender en ontvanger in dit apparaat
heeft een gebruiksbereik van 30 meter in open ruimte.
Over het algemeen kunnen Bluetooth-apparaten goed met elkaar communiceren in een kamer of kantoor met een normale afmeting. De werking tussen verschillende
kamers hangt af van de bouw van de kamer. Het is belangrijk om te weten dat het communicatiebereik van de Bluetooth aanzienlijk kan worden verminderd als het signaal
door een stevig object gaat. Menselijk lichaam, stenen en betonnen muren, evenals zwaar meubilair of boekenkasten verminderen het bereik van uw Bluetooth-apparaat.
Glazen wanden, gipskartonwanden of houten paneelwanden en kantoorwanden kunnen een minder ernstig maar merkbaar effect hebben. U moet uw Bluetooth-apparaten
dichter bij elkaar plaatsen als u problemen met de communicatie ondervindt.
Verbinding met Bluetooth verbreken
Om de verbinding met het Bluetooth-apparaat te verbreken, houdt u “Play/pause (Afspelen/Pauzeren)” ingedrukt totdat u een
beltoon hoort. Op het scherm verschijnt een knipperende "BT-LINK".
Overige bedieningen
Stations opslaan
1. Selecteer het station dat u in het geheugen wilt opslaan.
2. Houd de knoppen “P1/P2/P3" ingedrukt om het station direct op te slaan.
3. Houd “P4+” ingedrukt om het menu Preset store (Opgeslagen
voorkeuzestations) weer te geven, druk op de knoppen “Station” om het
voorgeprogrammeerde nummer te selecteren.
4. Druk op de knop “Enter” om op te slaan.
Voorkeuzezenders oproepen
1. Druk eenmaal op de knop “P1 / P2 / P3” om de opgeslagen station op te
roepen
2. Druk eenmaal op “P4 +” om het menu Preset Recall (Voorkeuzezenders
oproepen) weer te geven.
3. Druk op de knoppen “Station” om het voorkeuzestation te selecteren en druk op “Enter” om op te roepen.
Volumeregeling
U kunt op volume (-) of (+) drukken om het luidsprekervolume aan te passen.
De informatiefunctie gebruiken
U kunt de informatie veranderen die in elke modus op de LCD wordt weergegeven. Druk
eenmaal op de toets “Info/menu” om de informatieweergave te veranderen.

18
Audio-cd/AUX-modus
Informatiecyclus: Tijd en datum.
MP3-cd/USB-modus
Informatiecyclus: Tijd, datum, album, artiest en titel.
DAB-modus
Informatiecyclus: DLS, signaalsterkte, programmatype (PTY), kanaalnaam, kanaalnummer/-frequentie, waarde signaalfout, bitrate, tijd
en datum.
FM-modus
Informatiecyclus: Radiotekst, programmatype (PTY), frequentie, mono/stereo, tijd en datum.
Bluetooth-modus
Informatiecyclus: Tijd en datum.
De menubediening gebruiken
U kunt hiermee bepaalde systeemopties of dit product configureren. Om de menu-instelling te veranderen, houdt u in de DAB of
FM-modus de knop “Info/Menu” ingedrukt totdat de menu-modus is geopend. Gebruik "Station (-)/(+)" en "Enter" om uw keuze te
selecteren en te bevestigen.
*Volledige scan – het apparaat zoekt naar beschikbare DAB-stations.
*Handmatig afstemmen – handmatig een bepaald kanaal of bepaalde frequentie selecteren voor een DAB-station.
*DRC – Deze functie verkleint het verschil tussen de meest en minst luide uitgezonden audio.
DRC-opties: uit (standaard)/hoog/laag
Opmerking: DRC werkt alleen wanneer beschikbaar gesteld door de uitzender voor een specifiek station.
*Bijwerken – Deze optie verwijdert alle ongeldige stations aangegeven in de stationlijst met een ‘?’ vóór de stationsnaam.
^Scaninstelling – Selecteer hier de scan- en stopmethode in FM-modus.
Scanopties: Krachtige stations (standaard)/Alle stations
^Audio-instelling - Alle stereo stations worden standaard in stereo gereproduceerd.
Audio-opties: Stereo toegestaan (standaard)/Geforceerd mono
Opmerking: * alleen in DAB-modus, ^ alleen in FM-modus
Het systeemmenu gebruiken
U kunt verschillende functies in het menu System (Systeem) instellen. In de DAB of FM-modus houdt u de toets “Info/menu”
ingedrukt en selecteert u “System (Systeem)”, en drukt u vervolgens op “Enter” om te openen. Gebruik “Station (-)/(+)” en “Enter” om
uw selectie te kiezen en bevestigen.

19
Tijd - hiermee kunt u uw tijd- en datumformaat instellen.
Instellen tijd en datum
Auto update - U kunt de update-methode van de tijd en datum kiezen.
Updateopties:
Update via willekeurig (standaard)
Update via DAB
Update via FM
Geen update
12/24 uur instellen - U kunt de tijdformaat op het scherm wijzigen.
Opties voor het tijdformaat:
Stel 24 uur in (standaard)
Stel 12 uur in
Datumformaat instellen - U kunt de datumnotatie op het scherm wijzigen.
Opties voor het datumformaat:
DD-MM-JJJJ (standaard)
MM-DD-JJJJ
Taal – Er zijn 4 taalopties beschikbaar.
Taalopties: Engels/Duits/Frans/Italiaans
Fabrieksterugstelling - Een fabrieksterugstelling wist alle door u bepaalde instellingen en vervangt deze door de aanvankelijke
standaard waarden; tijd/datum, voorkeuren/instellingen, DAB-stationlijst en stationgeheugens raken allemaal verloren.
SW-versie – Dit toont de softwareversie van de speler.
Probleemoplossing
Probleem:
Oplossingen:
Het apparaat gaat niet aan.
Verifieer dat de AC-voedingskabel correct is aangesloten.
De cd-speler speelt niet zelfs al is er een cd geplaatst
Plaats de cd met de bedrukte zijde omhoog.
Reinig de CD.
FM ruis/DAB ratelen/intermitterende onderbreking/DAB
melding “No stations available” (Geen stations beschikbaar)
Controleer/beweeg de antenne. Verplaats de radio. Zoek opnieuw
naar alleen lokale (krachtige) stations.

20
Foutmeldingen
Foutmeldingen
Betekenis
‘Service not available’ (Service onbeschikbaar)
Geen DAB-ontvangst.
‘Signal error’ (Signaalfout)
Het DAB-signaal is onderbroken.
‘No DAB Station’ (Geen DAB-station)
Het station in de lijst kan niet worden gevonden. (Geen naam): Het huidige station
zendt geen identiteitsnaam uit.
‘No stations found’ (Geen stations gevonden)
Geen beschikbare DAB-stations; controleer de antenne.
‘No Radio Text’ (Geen radiotekst)
Er is op dit station geen RDS-tekstinformatie beschikbaar.
‘No PTY’ (Geen PTY)
Er is geen RDS-informatie over het programmatype beschikbaar.
‘No Name’ (Geen naam)
Er wordt geen RDS-stationsnaam uitgezonden.
Specificaties
Omschrijving:
CD/MP3/DAB/FM-Bluetooth digitale radio
Luidspreker:
2 x 3W rms
Frequentiebereik:
FM: 87,5-108MHz;
DAB/DAB+: 174,928-239,200 MHz;
Bluetooth: 2.4 GHz
LCD-Scherm:
Weergave 16 tekens x 2 lijnen
Stroomvereisten:
110-240V AC, 50/60Hz (AC-voeding)
(gebruik a.u.b. de door ons verstrekte voedingskabel)
Benaderde afmetingen:
335 mm x 210 mm x 125 mm
USB:
USB2.0 Full-Speed
Dit product werkt op 2400 - 2483,5 MHz en is ontworpen om alleen te worden gebruikt in een
normale huishoudelijke omgeving. Dit product is geschikt voor dit doel binnen alle EU-landen.
Seite laden ...
Seite laden ...
Seite laden ...
Seite laden ...
Seite laden ...
Seite laden ...
Seite laden ...
Seite laden ...
Seite laden ...
Seite laden ...
Seite laden ...
Seite laden ...
Seite laden ...
Seite laden ...
Seite laden ...
Seite laden ...
Seite laden ...
Seite laden ...
Seite laden ...
Seite laden ...
Seite laden ...
Seite laden ...
Seite laden ...
Seite laden ...
Seite laden ...
Seite laden ...
Seite laden ...
Seite laden ...
Seite laden ...
Seite laden ...
Seite laden ...
-
 1
1
-
 2
2
-
 3
3
-
 4
4
-
 5
5
-
 6
6
-
 7
7
-
 8
8
-
 9
9
-
 10
10
-
 11
11
-
 12
12
-
 13
13
-
 14
14
-
 15
15
-
 16
16
-
 17
17
-
 18
18
-
 19
19
-
 20
20
-
 21
21
-
 22
22
-
 23
23
-
 24
24
-
 25
25
-
 26
26
-
 27
27
-
 28
28
-
 29
29
-
 30
30
-
 31
31
-
 32
32
-
 33
33
-
 34
34
-
 35
35
-
 36
36
-
 37
37
-
 38
38
-
 39
39
-
 40
40
-
 41
41
-
 42
42
-
 43
43
-
 44
44
-
 45
45
-
 46
46
-
 47
47
-
 48
48
-
 49
49
-
 50
50
-
 51
51


Lenco DAR-040 Bedienungsanleitung
- Kategorie
- CD-Radios
- Typ
- Bedienungsanleitung
in anderen Sprachen
- français: Lenco DAR-040 Le manuel du propriétaire
- español: Lenco DAR-040 El manual del propietario
- Nederlands: Lenco DAR-040 de handleiding
Verwandte Papiere
-
Lenco PDR-050BU Bedienungsanleitung
-
-
-
-
-
-
-
Lenco DAR-070 Benutzerhandbuch
-
-
Lenco SCD-69 Benutzerhandbuch