
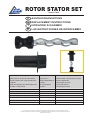
ROTOR STATOR SET
Version 16.10
Technical changes, misprints and mistakes reserved! Newest information about our products can be found online
Technische Änderungen, Druckfehler und Irrtümer vorbehalten! Aktuelle Informationen zu unseren Produkten nden Sie auf:
http://www.pro-pumpe.de
D AUSTAUSCHANLEITUNG
GB REPLACEMENT INSTRUCTIONS
I ISTRUZIONI DI SCAMBIO
E LAS INSTRUCCIONES DE INTERCAMBIO
de
Ersatzteile der unten aufgeführten Pumpen:
Spare parts for the pumps listed below:
Pezzi di ricambio per le pompe elencate
di seguito:
Piezas de repuesto para las bombas enu-
meradas a continuación:
Ersatzteil-Nr.:
Spare part no.:
Numero della pezza di
ricambio:
No de la pieza de
repuesto:
Artikel-Nummer: www.pumpen-pro.de
Article number: www.pumpen-pro.de
Numero dell‘articolo:
www.pumpen-pro.de
Número del artículo:
www.pumpen-pro.de
ROTOR / STATOR SCREW-STAR 370-4 4QGD1.2-50-0.37 5 008 009 001
ROTOR / STATOR SCREW-STAR 550-4 4QGD1.5-60-0.55 5 008 009 002
ROTOR / STATOR SCREW-STAR 750-4 4QGD2.5-60-0.75 5 008 009 003
ROTOR / STATOR SCREW-STAR 1100 QDCB-1100 KP09101
ROTOR / STATOR SCREW-STAR 500-1 QGD1.5-50-0.55 BP09101
ROTOR / STATOR SCREW-STAR 550-1100 QDCB-550 KP09100
ROTOR / STATOR SCREW-STAR 750-2 QGD2-50-0.75 BP09102

D AUSTAUSCH DES ROTOR-STATOR-SETS
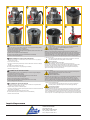
1. Die Pumpe senkrecht mit dem Kabel - wie auf Abb. - auf eine geeignete Unterlage stellen.
Beginnen Sie mit dem Entfernen der 2 Halteösen.
2. Danach lösen und entfernen Sie die 4 Halteschrauben.
3. Die Wasseranschlussplatte (druckseitig) kann dann abgehoben werden. Darauf achten, daß
das Kabel nicht beschädigt wird.
4. Entfernen Sie vorsichtig die Gummirückschlagklappe
5/6. Stator aus der Deckplatte entfernen (mit Schraubendreher heraushebeln)
7. Nehmen Sie das Pumpengehäuse ab
8. Der Rotor liegt jetzt frei.
Mit einer Wasserpumpenzange zwischen Motor und Haltemue die Motorwelle
festhalten und die Haltemue gegen Uhrzeigersinn abschrauben
Achtung! Linksgewinde
Die Montage erfolgt in umgekehrter Reihenfolge.
Achtung: vor der Wiedermontage die Muttern der Motorplatte durch Ausblasen säubern.
Die Pumpe in die angezeigte Position bringen (Kabel zeigt nach vorne). Wenn das Kabel durch
die Abdeckungen gezogen ist (auf scharfe Kanten achten) und die Önungen exakt uchten,
ist das Einschrauben der ca. 10cm langen Halteschrauben in die Gewinde der Motorhalteplatte
relativ einfach. Die 4 Halteschrauben exakt gleichmässig über kreuz im Wechsel anziehen.
GB REPLACEMENT OF THE ROTOR-STATOR SET
1.
Put the pump vertically on a suitable base, with the cable as shown in g. Begin by
removing the 2 eyelets.
2.
Then remove the 4 screws
.
3. The water connection plate (pressure side) can then be lifted o. Be careful not to damage
the cable.
4. Carefully remove the rubber check valve
5/6. Remove the stator from the cover plate (using a screwdriver)
7. Remove the pump housing
8. The rotor is now free.
Use a water pump pliers between the engine and the mounting sleeve to hold the
motor shaft and unscrew the retaining sleeve counterclockwise
Attention! left thread
The assembly is carried out in the reverse order.
Caution: Before reinstalling, clean the nuts of the engine plate by blowing it out.
Move the pump to the indicated position (cable pointing to the front). When the cable is pulled
through the covers (look for sharp edges) and the openings exactly aligned, screwing in
the 10cm long holding screws into the threads of the motor support plate is relatively easy.
Tighten the 4 retaining screws exactly and uniformly.
I
SCAMBIO DEL KIT ROTORE-STATORE
1. La pompa verticale con il cavo - come nell‘immagine - messa su un supporto adeguato
Comincia con la rimozione dei 2 occhielli.
2. Dopo allenta e rimuove le 4 viti di ssaggio.
3. La piastra di collegamento dell‘acqua (lato di pressione) può essere sollevata.
Fa attenzione che il cavo non sarà danneggiato.
4. Rimuove con attenzione il ap di non ritorno di gomma.
5/6. Rimuove lo statore dalla piastra di copertura (sollevare con un cacciavite)
7. Rimuove l‘alloggiamento della pompa
8. Il rotore è ora libero
Con una tenaglie per pompa d‘acqua tra il motore ed il supporto, mantene premuto
l‘albero del motore e svita il supporto contro il senso orario
Attenzione! Filo sinistro
Il montaggio riusce in ordine inverso.
Attenzione: prima del montaggio nuovo, i dadi della piastra del motore puliti attraverso soaggio.
La pompa si porta nella posizione indicata (il cavo indica davanti). Quando il cavo si tira
attraverso il coperchio (presta attenzione ai bordi taglienti) e le aperture sono esattamente
allineate, l‘avvitamento delle vite di ssaggio lunghi di circa 10cm nel lo della piastra del mo-
tore è semplice. Attira i 4 viti di ssaggio esattamente uguali trasversalmente alternativamente.
E
EL CAMBIO DEL KIT ROTOR-STATOR
1. La bomba vertical con el cable - como en la imagen - colocada en un soporte adecuado
Comience con la eliminación de las 2 ojales
2. Después aojar y quitar los 4 tornillos de jación.
3. La placa de conexión de agua (lado de presión) puede entonces ser elevada. Preste atención,
que el cable no será dañado.
4. Quite usted con atención la aleta de retención de goma
5/6. Quite el stator de la placa de cobertura (sacar con un destornillador)
7. Quite la carcasa de la bomba
8. El rotor se encuentra ahora libre
Con una tenaza per bomba de agua entre el motor y el soporte, el eje del motor
mantenido presado y destornillar el soporte en contra de las agujas del reloj.
Atención! Rosca izquierda
El montaje logra en orden inverso.
Atención: antes del montaje nuevo, las tuercas de la placa del motor limpiadas a través el sopleado.
La bomba se trae en la posición indicada (cable indica adelante). Cuando el cable es tirado a
través la cubiertura (preste atención a los bordes alados) y las aberturas son alineadas exacta-
mente, el atornillado de los tornillos lungos de circa 10cm en la rosca de la placa de soporte del
motor es muy fácil. Los 4 tornillos de jación apretar exactamente igual en cruz alternativamente.
1
5
2
6
3
7
4
8
Imprint/Impressum
1A Pro Handels GmbH
www.pro-pumpe.de
Email: info@1a-pro-handel.de
Tel.: (+49) 0611-9 45 87 76-0
Fax: (+49) 0611-9 45 87 76-11
de
-
 1
1
-
 2
2


in anderen Sprachen
- English: Profi-pumpe Rotor Owner's manual
- español: Profi-pumpe Rotor El manual del propietario
- italiano: Profi-pumpe Rotor Manuale del proprietario
Andere Dokumente
-
Malaguti KYMCO 125 - KY - MA 12 Benutzerhandbuch
-
-
-
-
-
 Hach Lange APA 6000 Maintenance And Troubleshooting Manual
-
Mase IS 3500 Usage Manual
-
-
