

User Manual
Version 1.2
If you are having diiculty using the cloudAshur remote management console,
please contact our technical department by email - support@istorage-uk.com
or by phone on +44 (0) 20 8991 6260.
www.istorage-uk.com

3
Introduction
cloudAshur links
cloudAshur KeyWriter (patent pending) makes sharing of data in the cloud, via email
and file transfer services (e.g. WeTransfer) between authorised users a breeze with
ultimate security and peace of mind, allowing users to securely share data with one
another, in real-time, regardless of their location.
cloudAshur KeyWriter clones all critical security parameters including the randomly
generated encryption key, all PINs and administrator defined configurations between
the Master cloudAshur hardware security module and as many secondary cloudAshur
hardware security modules as required using any o the shelf USB hub (we recommend
using a 10 port USB hub), allowing authorised users to securely share data with one
another, in real-time, regardless of their location.
The critical security parameters never leave the cloudAshur hardware security module
and are stored in the Common Criteria EAL4+ ready secure microprocessor.
The process of cloning the encrypted encryption key and all critical credentials
between the Master cloudAshur hardware security module and the Secondary
cloudAshur hardware security modules is protected by a secure protocol incorporated
within the iStorage cloudAshur secure microcontroller. The protocol is implemented
using cryptographic algorithms, all of which are FIPS certified. Every cloudAshur
has a unique certificate issued by a root of trust, which ensures that only iStorage
cloudAshur hardware security modules can be used during the key exchange process.
The cloudAshur hardware security modules never output the established session
key when running the secure protocol and the sensitive data being copied is only
decrypted in the validated recipient cloudAshur hardware security module. The
iStorage KeyWriter software running on the PC coordinates the operations required
by the secure protocol, however the software has zero visibility of both the session key
and decrypted data, making it impossible for a hacker to access or retrieve any critical
security parameters stored within the cloudAshur hardware security module.
The following complete and detailed user manuals can be found by clicking
the link below:
https://istorage-uk.com/product-documentation/
• cloudAshur Hardware Security Module complete and detailed user manual
• cloudAshur Remote Management user manual
Key features


5
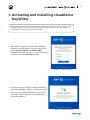
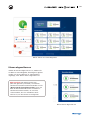
1. Activating and Installing cloudAshur
KeyWriter
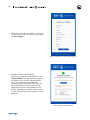
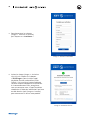
1. After purchasing your cloudAshur KeyWriter
software, you will receive an email containing
your License number and PIN number,
complete the fields (Image 1: License Activation)
and then click the ‘Activate’ button.
Please note: If you purchased your cloudAshur Remote Management software directly from
iStorage, follow the instructions contained in the email from iStorage, then skip ‘section 1’
and proceed to ‘section 2: Registration and Login’.
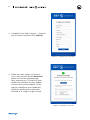
2. You will receive a notice of a verification email
sent from iStorage (Image 2: Verification email).
Please click on the link provided in the email,
and follow the instructions to complete the
activation process.
Image 1: - License Activation
Image 2: - Verification email

6
3. Complete all the fields (Image 3: - Complete
your activation) and then click ‘Confirm’.
4. Follow the steps (Image 4: Activation
successful) and click on the ‘Download’
button to install the KeyWriter app.
Next, authenticate (7-15 digit PIN) your
cloudAshur hardware security module
and connect to your computer. Finally,
register and login to your cloudAshur
KeyWriter app using the information
received as in ‘Image 4’ to get started.
Image 3: - Complete your activation
Image 4: - Activation successful

7
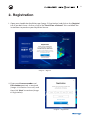
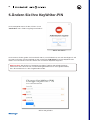
2. Registration
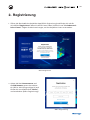
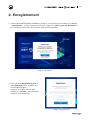
Image 5: - Register
Image 6: - Registration
1. Open your cloudAshur KeyWriter app (Image 5: Registration) and click on the ‘Register’
tab. If you don’t have a license, click on the ‘Don’t have a license?’ link and follow the
instructions to purchase your KeyWriter license.
2. Enter your License number and
PIN number precisely as received
(Image 4: Activation successful) and
then click ‘Next’ to continue (Image
6: Registration).

8
3. Setting your cloudAshur
Master Device
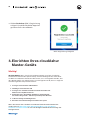
Image 7: - Registration successful
3. Click Continue (Image 7: Registration
successful) and the KeyWriter app will
launch and is ready for use.
Before cloning: As you will be cloning all security parameters from one cloudAshur
hardware security module (Master device) to any number of secondary cloudAshur
hardware security modules, it is important to ensure the ‘Master device’ has been
pre-configured by the administrator to include as many of the following:
If your cloudAshur hardware security module has been disabled from cloning, refer
to section 19 of the cloudAshur Hardware Security Module user manual for complete
and detailed instructions of all configurations.
Important!
1. Setting a User PIN Policy
2. Adding a User PIN
3. Setting your cloudAshur hardware security module to enable
KeyWriter cloning
4. Configuring the cloudAshur hardware security module Encryption
Mode - AES-XTS (default) or AES-ECB
5. Configuring a Self-Destruct PIN
6. Setting the unattended Auto-Lock

9
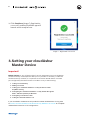
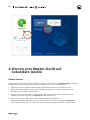
Setting the Master Device
Image 8: - Setting the Master Device
Please note: You will be required to enter your KeyWriter app PIN each time you launch the
cloudAshur KeyWriter app. This is the PIN that was sent in an email to you together with
the license number. The KeyWriter app PIN can be changed see section 5: ‘Change your
KeyWriter PIN’. In addition, ensure your ‘Master device’ is unlocked and connected to your
computer before setting the master device.
1. Master Device - (Image 8: Setting the Master Device) when you connect your Master cloudAshur
hardware security module to the KeyWriter for the first time, the cloudAshur hardware security
module will show as ‘Master device - Status ‘Unassigned’ together with the device serial number.
2. Auto-Lock - checking this box will copy the ‘Auto-Lock’ setting, if one has been configured, from the
master cloudAshur device to the secondary cloudAshur device. Please refer to the user manual for
further information about the ‘Auto-Lock’ feature.User Name.
3. User PIN Policy - checking this box will copy the ‘User PIN Policy’ setting, if one has been configured,
from the master cloudAshur device to the secondary cloudAshur device. Please refer to the user
manual for further information about the ‘User PIN Policy’ feature.
4. Disable Master Device - checking this box will disable the cloning feature of the Master cloudAshur
device once a cycle of the cloning process has successfully completed. If you intend to continue to
clone from the Master device to additional secondary devices, leave the checkbox unchecked.
5. Once you are happy with your settings (steps 2-4 above), click the ‘Set as Master’ button. Your Master
cloudAshur status will now show up as ‘Active’ as seen below in ‘Image 9: Master Device Active’.

10
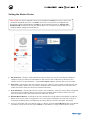
Start Cloning
Image 9: - Master Device Active
1. Click the ‘Start’ button. Every secondary device will be cloned one at a time until cloning of
all devices is complete. The cloudAshur hardware security modules are now ready for use see
‘Image 11: Device cloned’.
2. To save your settings (Auto-Lock and User PIN Policy) locally on your computer, click ‘Export’
and save.
3. The next time you need to clone more secondary devices and wish to import your ‘saved’
settings, click on the ‘Import’ button and navigate to where you saved your settings - see step 2.
With your cloudAshur Master device active, insert up to 9 cloudAshur ‘Secondary devices’ (on a 10 port
USB hub) and proceed as follows, see below ‘Image 10: Cloning Secondary devices’.
4. Cloning from Master Device to
Secondary Devices

11
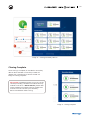
Image 10: - Cloning Secondary devices
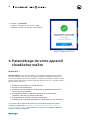
Image 11: - Cloning complete
Cloning Complete
Once cloning is complete, all cloudAshur secondary
devices that have been successfully cloned will
appear with a checkmark as ‘Device cloned ‘see
Image 11: Cloning complete’.
Please note: The Administrator can use any of the
cloned (secondary) cloudAshur hardware security
modules and set as a ‘Master Device’, please refer
to the cloudAshur hardware security module user
manual to first ensure that your secondary
device is enabled to allow cloning.

12
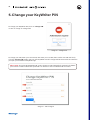
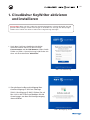
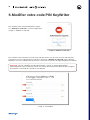
Image 12: - Change PIN
Image 13: - PIN changed
To change your KeyWriter PIN, click on ‘Change PIN’
as seen on ‘Image 12: Change PIN’.
To change your PIN, enter your current PIN, next enter your new PIN, then confirm new PIN and finally
click the ‘Change PIN’ button and your new KeyWriter PIN will change and become active the next time
you open your cloudAshur KeyWriter app.
Please note: The ‘Change KeyWriter PIN’ screen (Image 13: PIN Changed) will automatically detect
your License number and the text input fields can be set to show or hide the PIN characters.
5. Change your KeyWriter PIN


Benutzerhandbuch
Version 1.2
Wenn Sie Probleme mit der cloudAshur Remote Management Console haben,
wenden Sie sich bitte per E-Mail oder telefonisch an unsere Technische
Support-Abteilung: support@istorage-uk.com oder +44 (0) 20 8991 6260.
www.istorage-uk.com

15
Einführung
cloudAshur-Links
cloudAshur KeyWriter (Patent ausstehend) macht die gemeinsame Nutzung von Daten in der
Cloud per E-Mail und über Datenübertragungsdienste (z. B. WeTransfer) zwischen autorisierten
Benutzern einfach möglich und sorgt für ultimative Sicherheit und Gelassenheit. Benutzer
können so Daten unabhängig von ihrem Standort sicher und in Echtzeit gemeinsam nutzen.
iStorage KeyWriter klont unter Verwendung eines handelsüblichen USB-Hubs (wir empfehlen
die Verwendung eines 10-Port-USB-Hubs) alle kritischen Sicherheitsparameter einschließlich
des zufällig erzeugten Verschlüsselungsschlüssels, alle PINS und vom Administrator
definierten Konfigurationen zwischen dem Master-cloud-Ashur-Hardwaremodul und so vielen
sekundären cloudAshur-Modulen wie benötigt. Autorisierte Benutzer können damit Daten in
Echtzeit und unabhängig von ihrem Standort gemeinsam nutzen.
Die kritischen Sicherheitsparameter verlassen zu keiner Zeit das cloudAshur-
Hardwaresicherheitsmodul und werden im sicheren, Common-Criteria-EAL4+-fähigen
Mikroprozessor gespeichert.
Das Klonen des verschlüsselten Verschlüsselungsschlüssels und aller kritischen
Anmeldedaten vom cloudAshur-Hardwaresicherheitsmodul auf die sekundären cloudAshur-
Hardwaresicherheitsmodule ist durch ein sicheres Protokoll geschützt, das in den
sicheren iStorage-cloudAshur-Microcontroller integriert ist. Das Protokoll ist mithilfe FIPS-
zertifizierter kryptografischer Algorithmen integriert. Jedes cloudAshur verfügt über ein
eindeutiges Zertifikat, das von einem Vertrauensanker ausgestellt wurde und sicherstellt,
dass während des Schlüsselaustauschprozesses ausschließlich iStorage-cloudAshur-
Hardwaresicherheitsmodule verwendet werden können.
Der erstellte Sitzungsschlüssel wird von den cloudAshur-Hardwaresicherheitsmodulen
beim Ausführen des sicheren Protokolls niemals ausgegeben. Die kopierten sensiblen Daten
werden ausschließlich im validierten cloudAshur-Hardwaresicherheitsmodul entschlüsselt.
Die auf dem PC ausgeführte iStorage-KeyWriter-Software koordiniert die aufgrund des
sicheren Protokolls erforderlichen Abläufe. Jedoch sind weder der Sitzungsschlüssel noch die
entschlüsselten Daten in der Software sichtbar, wodurch es für Hacker unmöglich ist, auf im
cloudAshur-Hardwaresicherheitsmodul gespeicherte Sicherheitsparameter zuzugreifen oder
diese abzurufen.
Die folgenden vollständigen und detaillierten Bedienungsanleitungen finden Sie,
indem Sie auf den folgenden Link klicken:
https://istorage-uk.com/product-documentation/
• Vollständiges und detailliertes Benutzerhandbuch für das cloudAshur-Hardware-
Sicherheitsmodul
• cloudAshur Remote Management Benutzerhandbuch
Hauptfunktionen


17
1. CloudAshur KeyWriter aktivieren
und installieren
1. Nach dem Kauf Ihrer cloudAshur-KeyWriter-
Software erhalten Sie eine E-Mail mit Ihrer
Lizenznummer und der PIN Nummer, füllen Sie die
Felder aus (Bild 1: Lizenzaktivierung) und klicken Sie
dann auf die Schaltfläche "Aktivieren".
Zu beachten: Wenn Sie Ihre cloudAshur-Remote-Management-Software direkt bei iStorage
gekauft haben, befolgen Sie die Anweisungen in der E-Mail von iStorage und überspringen
SieAbschnitt 1. Gehen Sie weiter zu "Abschnitt 2: Registrierung und Login".
2. Sie erhalten eine Benachrichtigung über
eine Bestätigungs-E-Mail von iStorage
(Bild 2: Bestätigungs-E-Mail). Klicken Sie auf
den Link in der E-Mail und befolgen Sie die
Anweisungen, um den Aktivierungsvorgang
abzuschließen.
Bild 1: Lizenzaktivierung
Bild 2: Bestätigungs-E-Mail

18
3. Füllen Sie alle Felder aus (Bild 3: – Schließen
Sie Ihre Aktivierung ab) und klicken Sie dann
auf "Bestätigen".
4. Befolgen Sie die Schritte (Bild 4:
Aktivierung erfolgreich) und klicken Sie auf
"Herunterladen", um die KeyWriter-App zu
installieren. Als nächstes authentifizieren
Sie (7–15 stellige PIN) Ihr cloudAshur-
Hardwaresicherheitsmodul und stellen Sie
eine Verbindung zu Ihrem Computer her.
Registrieren Sie sich und melden Sie sich
bei der cloudAshur-KeyWriter-App mit den
in "Bild 4"erhaltenen Anweisungen an, um zu
beginnen.
Bild 3: Schließen Sie Ihre Aktivierung ab
Bild 4: Aktivierung erfolgreich

19
2. Registrierung
Bild 5: Registrieren
Bild 6: Registrierung
1. Önen Sie die cloudAshur KeyWriter-App (Bild 5: Registrierung) und klicken Sie auf die
Schaltfläche"Registrieren". Wenn Sie keine Lizenz haben, klicken Sie auf "Sie haben noch
keine Lizenz?" Folgen Sie den Anweisungen, um Ihre KeyWriter-Lizenz zu erwerben.
2. Geben Sie Ihre Lizenznummer und
die PIN Nummer genau wie erhalten
ein (Bild 4: Aktivierung erfolgreich) und
klicken Sie anschließend auf "Weiter",
um fortzufahren (Bild 6: Registrierung).

20
3. Einrichten Ihres cloudAshur
Master-Geräts
Bild 7: Registrierung erfolgreich
3. Klicken Fortfahren (Bild 7: Registrierung
erfolgreich) und die KeyWriter-App wird
gestartet und ist einsatzbereit.
Vor dem Klonen: Wenn Sie alle Sicherheitsparameter von einem cloudAshur-
Hardwaresicherheitsmodul (Master-Gerät) auf eine beliebige Anzahl sekundärer
cloudAshur-Hardwaresicherheitsmodule klonen, muss sichergestellt werden, dass
das „Master-Gerät“ vom Administrator so vorkonfiguriert wurde, dass es möglichst
viele der folgenden Komponenten enthält:
Wenn das Klonen Ihres cloudAshur-Hardwaresicherheitsmoduls deaktiviert
wurde, lesen Sie Abschnitt 19 des Benutzerhandbuchs zum cloudAshur-
Hardware-Sicherheitsmodul für eine vollständige und detaillierte Anleitung aller
Konfigurationen.
Wichtig!
1. Festlegen einer Benutzer-PIN-Richtlinie
2. Hinzufügen einer Benutzer-PIN
3. Festlegen des cloudAshur-Hardwaresicherheitsmoduls zum
Aktivieren des KeyWriter-Klonens
4. Konfigurieren des CloudAshur-Hardwaresicherheitsmodul-
Verschlüsselungsmodus – AES-XTS (Standard) oder AES-ECB
5. Selbstzerstörungs-PIN konfigurieren
6. Einstellen der unbeaufsichtigten automatischen Sperre
Seite wird geladen ...
Seite wird geladen ...
Seite wird geladen ...
Seite wird geladen ...
Seite wird geladen ...
Seite wird geladen ...
Seite wird geladen ...
Seite wird geladen ...
Seite wird geladen ...
Seite wird geladen ...
Seite wird geladen ...
Seite wird geladen ...
Seite wird geladen ...
Seite wird geladen ...
Seite wird geladen ...
Seite wird geladen ...
Seite wird geladen ...
-
 1
1
-
 2
2
-
 3
3
-
 4
4
-
 5
5
-
 6
6
-
 7
7
-
 8
8
-
 9
9
-
 10
10
-
 11
11
-
 12
12
-
 13
13
-
 14
14
-
 15
15
-
 16
16
-
 17
17
-
 18
18
-
 19
19
-
 20
20
-
 21
21
-
 22
22
-
 23
23
-
 24
24
-
 25
25
-
 26
26
-
 27
27
-
 28
28
-
 29
29
-
 30
30
-
 31
31
-
 32
32
-
 33
33
-
 34
34
-
 35
35
-
 36
36
-
 37
37


in anderen Sprachen
- English: iStorage cloudAshur User manual
- français: iStorage cloudAshur Manuel utilisateur