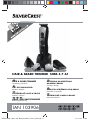
Silvercrest SHBS 3.7 A1 Operating Instructions Manual
- Kategorie
- Haarschneider
- Typ
- Operating Instructions Manual

HAIR & BEARD TRIMMER SHBS 3.7 A1
IAN 103906
HAIR & BEARD TRIMMER
Operating instructions
HAJ- ÉS SZAKÁLLVÁGÓ
Kezelési útmutató
ZASTŘIHOVAČ VLASŮ A VOUSŮ
Návod k obsluze
HAAR- UND BARTSCHNEIDER
Bedienungsanleitung
MASZYNKA DO STRZYŻENIA
WŁOSÓW I BRODY
Instrukcja obsługi
APARAT ZA STRIŽENJE LAS IN BRADE
Navodilo za uporabo
ZASTRIHÁVAČ VLASOV A BRADY
Návod na obsluhu
KRA103906_Haar_und_Bartschneider_Cover_LB4.indd 2 11.12.14 15:04

English.................................................... 2
Polski ................................................... 24
Magyar ................................................ 46
Slovenšina........................................... 70
esky ................................................... 90
Slovenina .......................................... 110
Deutsch............................................... 130
ID: SHBS 3.7 A1_15_V1.2
BB.5$B%ERRN6HLWH'LHQVWDJ'H]HPEHU

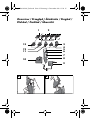
Overview / Przegld / Áttekintés / Pregled /
Pehled / Prehad / Übersicht
B
A
12
3
4
5
6
7
8
10
9
11
13
12
BB.5$B%ERRN6HLWH'LHQVWDJ'H]HPEHU

2
GB
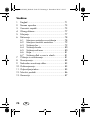
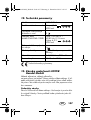
Contents
1. Overview ..................................................... 3
2. Intended purpose .......................................... 5
3. Safety information ......................................... 5
4. Items supplied .............................................. 9
5. Charging ................................................... 10
6. Operation .................................................. 10
6.1 Changing the cutting attachments ........ 11
6.2 Changing the comb attachments.......... 11
6.3 Cutting hair ...................................... 12
6.4 Trimming a beard.............................. 13
6.5 Cutting a hairline............................... 14
6.6 Shaving............................................ 14
6.7 Trimming nose and ear hair................ 14
7. Cleaning and care ...................................... 15
8. Storage ..................................................... 17
9. Reordering parts ......................................... 17
10. Disposal .................................................... 17
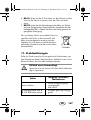
11. Troubleshooting .......................................... 19
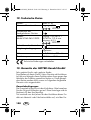
12. Technical specifications ............................... 20
13. Warranty of HOYER Handel GmbH .............. 20
BB.5$B%ERRN6HLWH'LHQVWDJ'H]HPEHU

3
GB
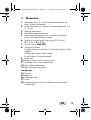
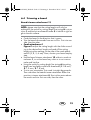
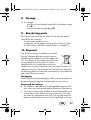
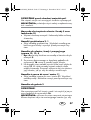
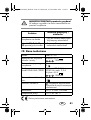
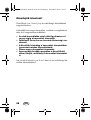
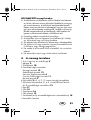
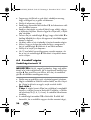
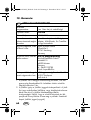
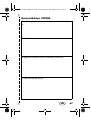
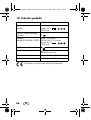
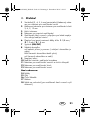
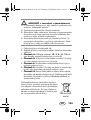
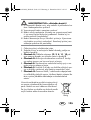
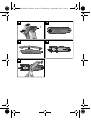
1. Overview
1 Adjustable (3, 4, 5, 6 mm) comb attachment for the
beard trimmer attachment
2 Comb attachments for the hair trimmer attachment 3, 6,
9, 12 mm
3 Shaving attachment
4 Precision trimmer attachment
5 Hair and beard trimmer with connection for plug-in
power unit cable/battery charger
6 Switch for cutting length fine tuning 1: 0.8 mm /
2: 1.3 mm / 3:1.8mm
7 On/off switch (ON/OFF)
8 Charging indicator
lit green: device in operation / charging: battery is fully
charged
flashing red: battery almost empty
lit red: battery is being charged
9 Power unit
10 Battery charger with charge contact
11 Nose/ear hair trimmer attachment
12 Hair trimmer attachment
13 Beard trimmer attachment
not shown:
14 Scissors
15 Blade oil
16 Cleaning brush
17 Comb
18 Storage bag (for the hair and beard trimmer and its
accessories)
BB.5$B%ERRN6HLWH'LHQVWDJ'H]HPEHU

4
GB
Thank you for your trust!
Congratulations on your new 5in1 hair and beard trimmer.
For a safe handling of the device and in order to get to know
the entire scope of features:
• Thoroughly read these operating instructions
prior to initial commissioning.
• Above all, observe the safety instructions!
• The device should only be used as described in
these operating instructions.
• Keep these operating instructions for reference.
• If you pass the device on to someone else,
please include these operating instructions.
We hope you enjoy your new 5in1 hair and beard trimmer!
BB.5$B%ERRN6HLWH'LHQVWDJ'H]HPEHU

5
GB
2. Intended purpose
The 5in1 hair and beard trimmer is intended exclusively for
trimming human hair. Only use the device for dry hair.
The device is designed for private home use and must not be
used for commercial purposes. The device must only be used
indoors.
Foreseeable misuse
WARNING! Risk of material damage!
Do not use the device to cut artificial hair or animal hair.
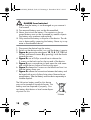
3. Safety information
Warnings
If necessary, the following warnings will be used in these op-
erating instructions:
DANGER! High risk: failure to observe this warning
may result in injury to life and limb.
WARNING! Moderate risk: failure to observe this warning
may result in injury or serious material damage.
CAUTION: low risk: failure to observe this warning may result
in minor injury or material damage.
NOTE: circumstances and specifics that must be observed
when handling the device.
Instructions for safe operation
~
This device can be used by children
from the age of 8 and people with re-
stricted physical, sensory or intellectual
abilities or people without adequate ex-
perience and/or understanding, if they
are supervised or instructed on how to
BB.5$B%ERRN6HLWH'LHQVWDJ'H]HPEHU

6
GB
use this device safely and if they are
aware of the resulting danger. Children
must not play with the device. Cleaning
and maintenance by the user must not
be performed by children without su-
pervision.
~
Keep children under the age of 8 away
from the device and the power cable.
~
Only use the included original power
adaptor for mains operation.
DANGER for children
~ Packing materials are not children's toys. Children should
not be allowed to play with the plastic bags: There is a
risk of suffocation!
~ Keep the device out of the reach of children.
DANGER! Risk of electric shock due to mois-
ture
~ Protect the device from moisture, water drops and water
splashes.
~ Never touch the device with wet hands.
~ The device, the battery charger and the power unit must
not fall into water or other liquids and must not be rinsed
under running water.
~ If the device has fallen into water, pull out the power unit
immediately, and only then remove the device from the
water. Do not use the device again, but have this checked
by a specialist.
~ Should liquid enter the device, have it checked before
starting the device up again.
BB.5$B%ERRN6HLWH'LHQVWDJ'H]HPEHU

7
GB
~ If the device is used in a bathroom, the power unit must be
pulled out after use, as the proximity of water represents a
hazard, even when the device is switched off.
~ Installation of a residual current device (FI/RCD) with a rat-
ed residual operating current of no more than 30 mA is
recommended to provide additional protection. Ask your
electrician for advice. The installation should only be car-
ried out by a qualified electrician.
DANGER! Risk of electric shock
~ Never put the device into operation if there are visible
damages to the device, the battery charger or the cable or
if the device has been dropped before.
~ Connect the cable to the device/battery charger before
plugging the power unit into a wall socket.
~ Only connect the power unit to a properly installed, easily
accessible wall socket, the voltage of which corresponds
to the specifications on the rating plate. The wall socket
must continue to be easily accessible after the device is
plugged in.
~ Ensure that the cable cannot be damaged by sharp edges
or hot surfaces.
~ Ensure that the cable is not trapped or crushed.
~ When removing the power unit from the wall socket, al-
ways pull the power unit and never the cable.
~ Pull the power unit out of the wall socket, …
… after every use,
… after each charging process,
… if there is a fault,
… before connecting the device to the cable,
… before you clean the device and
… during thunderstorms.
~ To avoid any risk, do not make modifications to the de-
vice. Repairs must be carried out by a specialist workshop
or the Service Centre.
BB.5$B%ERRN6HLWH'LHQVWDJ'H]HPEHU

8
GB
DANGER from batteries
~ Protect the battery against mechanical damages. Fire
hazard!
~ Do not expose the device to direct sunshine or heat. The
ambient temperature should not be lower than -10 °C and
higher than +40 °C.
~ The charge contacts on the device must not be connected
by metallic objects.
~ The
battery
may only be charged with the original acces-
sory (power unit).
~ The battery only removed for disposal must not be used
again.
~ Should the electrolyte solution leak out of the
battery
,
avoid contact with eyes, mucous membranes and skin.
Rinse immediately with plenty of clean water and consult a
doctor. The electrolyte solution can cause irritation.
WARNING! Risk of injury from cutting
~ The points of the comb attachments, the hair trimmer at-
tachment, the beard trimmer attachment and the precision
trimmer attachment are sharp. Handle with care.
~ Do not use the device if the attachment shows damages.
~ Switch off the device before pinning up or changing the
attachments and each time before cleaning.
WARNING! Risk of injury
~ Place the cable in such a way that no one trips over it or
steps on it.
~ Do not push the nose/ear hair trimmer attachment too
deep into the nostril or the ear canal.
~ Do not use the device on open wounds, cuts, sunburn or
blisters.
WARNING! Risk of material damage
~
The battery charger is fitted with non-slip silicon feet. As fur-
niture is coated with a variety of different varnishes and
acrylics and treated with different cleaning agents, we can-
not rule out that some of these substances could damage
and soften the rubber feet. If necessary, place a non-slip mat
under the battery charger.
BB.5$B%ERRN6HLWH'LHQVWDJ'H]HPEHU

9
GB
~ Use the original accessories only.
~ Never place the device on hot surfaces (e.g. hob plates)
or near heat sources or open fire.
~ Do not cover the power unit to prevent overheating.
~ Do not exert too much pressure on the shaving foil of the
shaving attachment, to avoid damaging the shaving foil.
~ Do not detach the shaving foil from the shaving foil frame,
and do not clean it using the brush.
~ Do not use any astringent or abrasive cleaning agents.
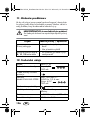
4. Items supplied
1 5in1 hair and beard trimmer5
1Power unit9
1 Battery charger10
5 Interchangeable cutting attachments:
hair trimmer attachment12
beard trimmer attachment13
precision trimmer attachment4
nose/ear hair trimmer attachment11
shaving attachment3
4 Comb attachments2 for the hair trimmer attachment 3, 6,
9, 12 mm
1 Adjustable (3, 4, 5, 6 mm) comb attachment1 for the beard
trimmer attachment13
1Comb17
1Scissors14
1Cleaning brush16
1 Blade oil15
1 Storage bag (for the hair and beard trimmer and its acces-
sories)18
1 Operating Instructions
BB.5$B%ERRN6HLWH'LHQVWDJ'H]HPEHU

10
GB
5. Charging
NOTES:
• Before first use (without cable), and for every charging
procedure afterwards, charge the hair and beard trim-
mer5 for approx. 90 minutes.
• When the batteries are nearly empty, the charging indica-
tor8 flashes red during operation. The device can then
only be used for a short time without being connected to
the electricity supply.
1. Place the battery charger10 on a level surface.
2. Connect the power unit9 to the battery charger10.
3. Switch off the device with the on/off switch7 if necessary.
4. Insert the power unit9 into a readily accessible wall sock-
et whose voltage matches the voltage stated on the rating
plate.
5. Put the hair and beard trimmer5 into the battery charg-
er10.
6. The charging indicator8 is lit red and the battery is
charged. When the battery is fully charged, the charging
indicator is lit green. When the battery is fully charged,
the device can be used for approximately 60 minutes with-
out being connected to the power supply.
6. Operation
Regardless of the charging state of the battery, the 5in1 hair and
beard trimmer can always be mains-operated.
1. For mains operation, ensure that the hair and beard trim-
mer5 is switched off.
2. Connect the power unit9 to the connector of the hair and
beard trimmer5.
3. Insert the power unit9 into a readily accessible wall sock-
et whose voltage matches the voltage stated on the rating
plate.
4. Switch on the device with the on/off switch7.
BB.5$B%ERRN6HLWH'LHQVWDJ'H]HPEHU

11
GB
6.1 Changing the cutting attachments
WARNING! Risk of injury!
Switch off
the hair and beard trimmer5
, before you attach or
remove the attachments.
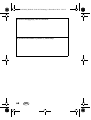
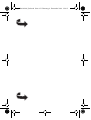
• Figure A: to remove the attachments12,3,4,11,13
use your thumbs to press the attachment towards the rear
of the hair and beard trimmer5.
• Figure B: to attach the attachments, put the lower flap of
the attachment12,3,4,11,13 into the slot in the hair
and beard trimmer5 and press the upper part of the at-
tachment against the hair and beard trimmer until it audi-
bly locks into place and sits firmly in position.
6.2 Changing the comb attachments
Pushing on
• To attach the comb attachments2 +1 carefully slide the
appropriate comb attachment over the hair or beard trim-
mer attachment12 /13. Press the lower part of the comb
attachments2 firmly until they lock into place.
Removing
• To remove the comb attachments2 loosen the comb at-
tachment at its lower end and pull it off the hair and beard
trimmer5.
• Slide the comb attachment1 for the beard trimmer attach-
ment13 upwards from the hair and beard trimmer5.
BB.5$B%ERRN6HLWH'LHQVWDJ'H]HPEHU

12
GB
6.3 Cutting hair
Hair trimmer attachment12
NOTES:
• The hair to be dressed must be dry.
• The cutting length may deviate depending on the cutting
angle.
• Place a sheet or cape around throat and neck to prevent
cut-off hair from dropping into the collar.
• Comb the hair well.
• First, start with a comb attachment2 with a longer cutting
length and then, in the course of the cutting process, use
shorter cutting lengths step by step.
• Start by cutting the hair in the neck or on the sides and cut
towards the centre of the head. Then, cut the front section
of the hair towards the centre of the head.
• Hold the hair and beard trimmer5 in such a way that the
comb attachment2 lies as flat as possible on the head.
Move the device evenly through the hair.
• If possible, cut against direction of hair growth.
• In order to catch all the hair, move the hair and beard trim-
mer5 several times through each section of the hair.
• Comb the hair repeatedly and well.
• In order to achieve a straight cutting line for cutting lengths
over 12 mm, the hair and beard trimmer5 should be
passed through the hair several times from different direc-
tions.
BB.5$B%ERRN6HLWH'LHQVWDJ'H]HPEHU

13
GB
6.4 Trimming a beard
Beard trimmer attachment13
NOTE: please note that the cutting lengths will only be
achieved if the switch for cutting length fine tuning6 is at po-
sition 1 and the hair and beard trimmer5 is held at a right an-
gle to the skin surface.
• Comb the beard in the direction that it grows.
• Trim the beard downwards from ear to chin. First trim one
side, then the other.
• Comb attachment1
Figure C: adjust the cutting length with the slider accord-
ing to the desired hair length and read off the cutting
length using the marking on the side of the comb attach-
ment1 (3, 4, 5, 6 mm). Now, shorten your beard step-by-
step.
• Use the beard trimmer attachment13 without a comb at-
tachment1, to cut the beard very short or to cut a mous-
tache and hairline.
• Using the switch for cutting length fine tuning
6
the cutting
length can be slightly varied with three levels (
1
: 0.8 mm /
2
: 1.3 mm /
3
: 1.8 mm).
• To trim your moustache, first comb it straight downwards.
Then use either the beard trimmer attachment13 or the
precision trimmer attachment4. Start at the centre above
the mouth and trim first one side, then the other.
BB.5$B%ERRN6HLWH'LHQVWDJ'H]HPEHU

14
GB
6.5 Cutting a hairline
Precision trimmer attachment4
• Use the precision trimmer attachment4 to shorten and
shape moustaches, whiskers, sideburns or eyebrows.
• Put the edge of the attachment at the desired hairline
height and move the hair and beard trimmer5 down-
wards.
6.6 Shaving
Shaving attachment3
NOTE: your skin must be clean and dry.
• Hold the hair and beard trimmer5 at a right angle to the
skin surface and gently guide it over your face.
• Shave against the direction of your beard growth.
• Stretch your skin in complicated areas, such as the chin, to
achieve better results.
6.7 Trimming nose and ear hair
Nose/ear hair trimmer attachment11
• Insert only the metal tip slowly into a nostril or an ear.
• Slowly move the hair and beard trimmer5 with a circular
motion to trim the hair.
BB.5$B%ERRN6HLWH'LHQVWDJ'H]HPEHU

15
GB
7. Cleaning and care
DANGER! Risk of electric shock!
Unplug the power unit9 from the wall socket before cleaning
the hair and beard trimmer5 and the battery charger10.
WARNING! Risk of injury!
Always switch the hair and beard trimmer5 off before clean-
ing.
WARNING! Risk of material damage!
Do not use any astringent or abrasive cleaning agents.
NOTE: clean and oil the device after every use.
Hair and beard trimmer5 and battery charger10
• Wipe the casing of the hair and beard trimmer and the
battery charger with a damp cloth.
Comb attachments2,1
• Remove the comb attachment. Rinse the comb attachment
with water and let it dry before using it again.
Hair trimmer, beard trimmer and precision trimmer
attachments12,13,4
1. Figure A: remove the attachment from the hair and beard
trimmer5 by pressing it with the thumb towards the rear.
2. Remove the hair remnants from the attachment using the
cleaning brush16 included in the delivery.
3. Apply a few drops of blade oil15 to the cutting edge of
the attachment. Using a soft cloth, wipe off the surplus oil,
if necessary. Only use acid-free oil, such as e.g. sewing
machine oil.
Nose/ear hair trimmer attachment11
• Remove the nose/ear hair trimmer attachment11. Rinse it
with water and let it dry completely before using it again.
BB.5$B%ERRN6HLWH'LHQVWDJ'H]HPEHU

16
GB
Shaving attachment3
WARNING!
Do not detach the shaving foil from the shaving foil frame, and
do not clean it using the cleaning brush16.
NOTE: from time to time, oil the cutting blade with a few
drops of acid-free oil (e.g. sewing machine oil). Attach the
shaving attachment to the hair and beard trimmer5 and let it
run for a few seconds without using it. Using a soft cloth, wipe
off the surplus oil, if necessary.
1. Remove the shaving attachment3.
2. Press the button on the side of the shaving attachment and
remove the shaving foil frame. While removing the shav-
ing foil frame, only hold it at the side and do not press
against the shaving foil.
3. Clean the cutting blade using the included cleaning
brush16.
4. Clean the shaving foil in the shaving foil frame under run-
ning water and allow it to dry completely before putting it
back on the shaving attachment3.
5. Put the shaving foil frame back onto the shaving attach-
ment
3
. While attaching the frame, make sure that the fas-
tening tabs on the shaving foil frame fit into the appropriate
recesses on the shaving attachment, and press the shaving
foil frame gently downwards until it audibly locks into place.
BB.5$B%ERRN6HLWH'LHQVWDJ'H]HPEHU

17
GB
8. Storage
• For storage …
… put the hair and beard trimmer5 in the battery charg-
er10 or
… use the included storage bag18.
9. Reordering parts
Parts such as the shaving foil frame for the shaving attach-
ment3 can be ordered:
- on www.hoyerhandel.com or
- through the service centre hotline which is listed in Chap-
ter "Warranty of HOYER Handel GmbH" on page 20.
10. Disposal
The symbol showing a wheelie bin crossed
through indicates that the product requires
separate refuse collection in the European Un-
ion. This applies to the product and all acces-
sories marked with this symbol. Products
identified with this symbol may not be dis-
carded with normal household waste, but must be taken to a
collection point for recycling electric and electronic applianc-
es. Recycling helps to reduce the consumption of raw materials
and protect the environment.
Packaging
When disposing of the packaging, make sure you comply with
the environmental regulations applicable in your country.
Removing the battery
• This device is operated with a rechargeable lithium-ion bat-
tery, which you must remove before disposing of the device.
• You must be technically minded to remove the battery, oth-
erwise there is the danger of injuring yourself. If you do
not have any experience with tools, you should have the
batteries removed by a person who is qualified to do this.
BB.5$B%ERRN6HLWH'LHQVWDJ'H]HPEHU

18
GB
DANGER from batteries!
~ Ensure that the battery is not damaged as you remove it.
Fire hazard!
~ The removed battery must not be disassembled.
~ Never short-circuit the battery. The contacts on the re-
moved battery must not be connected by metallic objects.
The battery may overheat and explode.
~ Only remove the battery to dispose of the device. The de-
vice is destroyed by removing the battery. Never try to op-
erate a disassembled device.
1. Disconnect the device from the mains.
2. Switch on the device and let it run until the battery is empty.
3. Figure A: remove the attachment12,3,4,11,13 from
the hair and beard trimmer5 by pressing it with the thumb
towards the rear.
4. Figure D: use a Phillips screwdriver to release the
3 screws on the back and on the top end of the device.
5. Figure E: use a screwdriver to lever open the side seam
and unfold the two halves of the housing apart.
6. Figure F: release the 3 screws on the board and turn it so
that the battery faces you.
7.
Figure G:
release the connections between the battery and
the board with a pair of pliers/wire cutters. Remove the ex-
posed battery. Take the battery and the device separately to
suitable disposal.
The lithium-ion battery used for this device
may not be treated as household waste. The
battery must be disposed of properly. Con-
tact battery distributors or local waste dispos-
al points for this.
Li-ions
BB.5$B%ERRN6HLWH'LHQVWDJ'H]HPEHU
Seite wird geladen ...
Seite wird geladen ...
Seite wird geladen ...
Seite wird geladen ...
Seite wird geladen ...
Seite wird geladen ...
Seite wird geladen ...
Seite wird geladen ...
Seite wird geladen ...
Seite wird geladen ...
Seite wird geladen ...
Seite wird geladen ...
Seite wird geladen ...
Seite wird geladen ...
Seite wird geladen ...
Seite wird geladen ...
Seite wird geladen ...
Seite wird geladen ...
Seite wird geladen ...
Seite wird geladen ...
Seite wird geladen ...
Seite wird geladen ...
Seite wird geladen ...
Seite wird geladen ...
Seite wird geladen ...
Seite wird geladen ...
Seite wird geladen ...
Seite wird geladen ...
Seite wird geladen ...
Seite wird geladen ...
Seite wird geladen ...
Seite wird geladen ...
Seite wird geladen ...
Seite wird geladen ...
Seite wird geladen ...
Seite wird geladen ...
Seite wird geladen ...
Seite wird geladen ...
Seite wird geladen ...
Seite wird geladen ...
Seite wird geladen ...
Seite wird geladen ...
Seite wird geladen ...
Seite wird geladen ...
Seite wird geladen ...
Seite wird geladen ...
Seite wird geladen ...
Seite wird geladen ...
Seite wird geladen ...
Seite wird geladen ...
Seite wird geladen ...
Seite wird geladen ...
Seite wird geladen ...
Seite wird geladen ...
Seite wird geladen ...
Seite wird geladen ...
Seite wird geladen ...
Seite wird geladen ...
Seite wird geladen ...
Seite wird geladen ...
Seite wird geladen ...
Seite wird geladen ...
Seite wird geladen ...
Seite wird geladen ...
Seite wird geladen ...
Seite wird geladen ...
Seite wird geladen ...
Seite wird geladen ...
Seite wird geladen ...
Seite wird geladen ...
Seite wird geladen ...
Seite wird geladen ...
Seite wird geladen ...
Seite wird geladen ...
Seite wird geladen ...
Seite wird geladen ...
Seite wird geladen ...
Seite wird geladen ...
Seite wird geladen ...
Seite wird geladen ...
Seite wird geladen ...
Seite wird geladen ...
Seite wird geladen ...
Seite wird geladen ...
Seite wird geladen ...
Seite wird geladen ...
Seite wird geladen ...
Seite wird geladen ...
Seite wird geladen ...
Seite wird geladen ...
Seite wird geladen ...
Seite wird geladen ...
Seite wird geladen ...
Seite wird geladen ...
Seite wird geladen ...
Seite wird geladen ...
Seite wird geladen ...
Seite wird geladen ...
Seite wird geladen ...
Seite wird geladen ...
Seite wird geladen ...
Seite wird geladen ...
Seite wird geladen ...
Seite wird geladen ...
Seite wird geladen ...
Seite wird geladen ...
Seite wird geladen ...
Seite wird geladen ...
Seite wird geladen ...
Seite wird geladen ...
Seite wird geladen ...
Seite wird geladen ...
Seite wird geladen ...
Seite wird geladen ...
Seite wird geladen ...
Seite wird geladen ...
Seite wird geladen ...
Seite wird geladen ...
Seite wird geladen ...
Seite wird geladen ...
Seite wird geladen ...
Seite wird geladen ...
Seite wird geladen ...
Seite wird geladen ...
Seite wird geladen ...
Seite wird geladen ...
Seite wird geladen ...
Seite wird geladen ...
Seite wird geladen ...
Seite wird geladen ...
Seite wird geladen ...
Seite wird geladen ...
Seite wird geladen ...
Seite wird geladen ...
Seite wird geladen ...
Seite wird geladen ...
-
 1
1
-
 2
2
-
 3
3
-
 4
4
-
 5
5
-
 6
6
-
 7
7
-
 8
8
-
 9
9
-
 10
10
-
 11
11
-
 12
12
-
 13
13
-
 14
14
-
 15
15
-
 16
16
-
 17
17
-
 18
18
-
 19
19
-
 20
20
-
 21
21
-
 22
22
-
 23
23
-
 24
24
-
 25
25
-
 26
26
-
 27
27
-
 28
28
-
 29
29
-
 30
30
-
 31
31
-
 32
32
-
 33
33
-
 34
34
-
 35
35
-
 36
36
-
 37
37
-
 38
38
-
 39
39
-
 40
40
-
 41
41
-
 42
42
-
 43
43
-
 44
44
-
 45
45
-
 46
46
-
 47
47
-
 48
48
-
 49
49
-
 50
50
-
 51
51
-
 52
52
-
 53
53
-
 54
54
-
 55
55
-
 56
56
-
 57
57
-
 58
58
-
 59
59
-
 60
60
-
 61
61
-
 62
62
-
 63
63
-
 64
64
-
 65
65
-
 66
66
-
 67
67
-
 68
68
-
 69
69
-
 70
70
-
 71
71
-
 72
72
-
 73
73
-
 74
74
-
 75
75
-
 76
76
-
 77
77
-
 78
78
-
 79
79
-
 80
80
-
 81
81
-
 82
82
-
 83
83
-
 84
84
-
 85
85
-
 86
86
-
 87
87
-
 88
88
-
 89
89
-
 90
90
-
 91
91
-
 92
92
-
 93
93
-
 94
94
-
 95
95
-
 96
96
-
 97
97
-
 98
98
-
 99
99
-
 100
100
-
 101
101
-
 102
102
-
 103
103
-
 104
104
-
 105
105
-
 106
106
-
 107
107
-
 108
108
-
 109
109
-
 110
110
-
 111
111
-
 112
112
-
 113
113
-
 114
114
-
 115
115
-
 116
116
-
 117
117
-
 118
118
-
 119
119
-
 120
120
-
 121
121
-
 122
122
-
 123
123
-
 124
124
-
 125
125
-
 126
126
-
 127
127
-
 128
128
-
 129
129
-
 130
130
-
 131
131
-
 132
132
-
 133
133
-
 134
134
-
 135
135
-
 136
136
-
 137
137
-
 138
138
-
 139
139
-
 140
140
-
 141
141
-
 142
142
-
 143
143
-
 144
144
-
 145
145
-
 146
146
-
 147
147
-
 148
148
-
 149
149
-
 150
150
-
 151
151
-
 152
152
-
 153
153
-
 154
154
-
 155
155
-
 156
156


Silvercrest SHBS 3.7 A1 Operating Instructions Manual
- Kategorie
- Haarschneider
- Typ
- Operating Instructions Manual
in anderen Sprachen
- slovenčina: Silvercrest SHBS 3.7 A1
- polski: Silvercrest SHBS 3.7 A1
Verwandte Artikel
-
Silvercrest SHBS 3.7 A1 Operating Instructions Manual
-
-
Silvercrest SHBS 600 A1 Operating Instructions Manual
-
Silvercrest SRR 3.7 B1 Bedienungsanleitung
-
-
Silvercrest SHBS 3.7 B1 - IAN 273441 Bedienungsanleitung
-
-
-
-
