Modular 318009 Benutzerhandbuch
- Kategorie
- Kochfelder
- Typ
- Benutzerhandbuch

UK SALAMANDERS
Installation-Use-Maintenance
FR SALAMANDRES
Installation-Emploi-Entretien
DE SALAMANDER
Installation-Gebrauch-Wartung
NL STRALINGSGRILLS
Installatie-Gebruik-Onderhoud
MOD.
_SG-GN 1/1
_SE-GN 2/3
_SE-GN 1/1
Doc.n°
252.448.00
Edition
02
Modular Salamanders G23M 1/45

UK - INSTALLATION – USE - MAINTENANCE
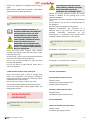
I. GENERAL PRESCRIPTIONS
READ THIS MANUAL CAREFULLY. IT
PROVIDES IMPORTANT INFORMATION
FOR SAFE INSTALLATION, USE AND
MAINTENANCE OF THE APPLIANCE.
FAILURE TO COMPLY WITH WHAT IS
PRESENTED BELOW MAY COMPROMISE
THE SAFETY OF THE EQUIPMENT.
THE MANUFACTURER WILL NOT BE
LIABLE FOR ANY DAMAGE OR INJURY
RESULTING FROM FAILURE TO
OBSERVING THE FOLLOWING RULES.
TRANSLATION OF THE ORIGINAL
INSTRUCTIONS.
APPLIANCES NEED PRECAUTIONS FOR
INSTALLATION, PLACING AND/OR
FIXATION AND CONNECTION TO THE
MAINS.
SEE SECTION “INSTALLATION
INSTRUCTIONS”.
THE APPLIANCES NEED PRECAUTIONS
FOR CLEANING. SEE THE SECTION “
INSTRUCTION FOR CLEANING”.
THE SYMBOL “ HIGH VOLTAGE” IS
PLACED ON A PANEL THAT GIVES ACCESS
TO A PART WITH HIGH VOLTAGE.
Keep this manual in a safe place, known to all users,
so that it can be consulted throughout the working
life of the appliance.
This equipment is designed for cooking food. It is
intended for industrial use. Any other use is to be
considered improper
This appliance is not intended for use by people
(including children) with limited physical, sensory or
mental abilities or without experience and
knowledge of it.
Unless they are supervised or instructed in its use
by a person responsible for their saf
ety.
Do not leave de appliance unattended in presence
of children and ensure that the latter do not have
acces to the appliance.
The appliance must be used by trained personnel.
Do not leave the appliance unattended when
operating.
DO NOT STORE " AMMABLE MATERIALS
IN CLOSE PROXIMITY TO THE
APPLIANCE. FIRE HAZARD.
The appliance must be installed in a well-ventilated
room.
Inadequate ventilation causes asphyxia. Do not
obstruct the ventilation system of the place where
the
appliance is installed. Do not obstruct the vents or
ducts of this or other appliances.
In the event of an appliance fault or malfunction,
shut the gas shut
-
off valve and/or switch the
appliance off at the main switch installed upline.
Installation and conversion to a different type of gas
must be carried out by qualified technicians
au
thorized by the manufacturer, in compliance with
current safety standards and the instructions in this
manual.
Appliance maintenance and conversion to a
different type of gas must be carried out by
qualified technicians authorized by the
manufacturer, in compliance with current safety
standards and the instructions in this manual.
Clean the appliance following the instructions given
in Chapter “ INSTRUCTIONS FOR CLEANING”.
DISPOSAL OF PACKING AND OF
THE APPLIANCE
PACKING
The packing is made using environmentally friendly
materials. The plastic recyclable components are:
-
the transparent cover, the bags containing the
instructions manual and nozzles (made of
Modular Salamanders G23M 2/45

Polyethylene - PE).
-
the straps (in Polypropylene - PP).
APPLIANCE
-
The appliance is manufactured 90% from recyclable
metals (stainless steel, aluminium sheet, copper.. ..
).
-
The appliance must be scrapped in compliance with
current regulations governing such disposal.
-
Make the appliance unusable before scrapping.
-
It must be disposed of properly.
THE SYMBOL SHOWING A CROSSED-OUT
WASTE CONTAINER ON THE UNIT
OR
PACKAGE INDICATES THAT, AT THE END
OF ITS LIFE CYCLE, THE PRODUCT MUST
BE COLLECTED SEPARATE FROM OTHER
WASTE.
THE DIFFERENTIATED COLLECTION OF THIS
EQUIPMENT IS ORGANISED AND MANAGED BY
THE PRODUCER.
THE USER WHO INTENDS TO GET RID OF THIS
EQUIPMENT SHALL CONTACT THE PRODUCER AND
FOLLOW THE SYSTEM THAT THE LATTER HAS USED
IN ORDER TO COLLECT THE EQUIPMENT
SEPARATELY AT THE END OF ITS LIFE.
PROPER SEPARATE COLLECTION HELPS PREVENT
POSSIBLE NEGATIVE IMPACTS ON THE
ENVIRONMENT AND HEALTH, AND FAVOURS THE
REUSE AND/OR RECYCLING OF THE UNIT’S
MATERIALS.
ABUSIVE DISPOSAL OF THE PRODUCT BY THE
HOLDER WILL RESULT IN THE APPLICATION OF
PENALTIES AS PER CURRENT STANDARDS.
II. INSTRUCTIONS FOR
INSTALLATION
REMINDERS FOR THE INSTALLER
READ THIS MANUAL CAREFULLY. IT
PROVIDES IMPORTANT INFORMATION
FOR SAFE INSTALLATION, USE AND
MAINTENANCE OF THE APPLIANCE.
FAILURE TO COMPLY WITH WHAT IS
PRESENTED BELOW MAY COMPROMISE
THE SAFETY OF THE EQUIPMENT.
THE MANUFACTURER WILL NOT BE
LIABLE FOR ANY DAMAGE OR INJURY
RESULTING FROM FAILURE TO
OBSERVING THE FOLLOWING RULES.
Identify the specific appliance model. The model
number is detailed on the packing and on the
appliance dataplate.
The appliance must be installed in a well-ventilated
room.
Installation and conversion to a different type of gas
must be carried out by qualified technicians
authorized by the manufacturer, in compliance with
current safety standards and the instructio
ns in this
manual.
Appliance maintenance and conversion to a
different type of gas must be carried out by
qualified technicians authorized by the
manufacturer, in compliance with current safety
standards and the instructions in this manual.
Do not obstruct any air vents or drains present on
the appliance.
Do not tamper with appliance components.
REFERENCE STANDARDS AND LAWS
-
Install the appliance in accordance with the safety
standards in force in the country.
UNPACKING
-
Check the state of the packing and in the event of
damage, ask the delivery person to inspect the
goods.
-
Remove the packing.
-
Remove the protective film from the outer panels.
Use a suitable solvent to remove any residual
adhesive from the panels.
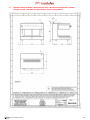
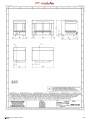
POSITIONING
The overall dimensions of the appliance and the
position of connections are given on the installation
diagram at the end of this manual.
The appliance can be installed singly or in
combination with other appliances in the same
product range.
The appliance is not suitable for integrated
installation.
Position the appliance at least 10 cm from adjacent
walls.
If the appliance is to be be placed near walls,
dividers, kitchen furniture, decorative elements etc.
this must be made of non
-combustible materials
Modular Salamanders G23M 3/45

Otherwise, they must be covered with suitable
non
-combustible heat insulating materials.
Level the appliance by means of the height-
adjustable feet
APPLIANCE ASSEMBLY WITH BASE AND BRIDGE
Follow the instructions provided with the type of
support utilized.
FUMES EXHAUST SYSTEM
Create a fumes exhaust system based on the " Type
" of appliance. The " Type " is stated on the
appliance dataplate.
" A1 " TYPE APPLIANCE
Position the “A1” type appliance below an extractor
hood to ensure smoke and fumes generated by
cooking are removed.
" B21 " TYPE APPLIANCE
Position the “B21” type appliance below an
extractor hood.
" B11 " TYPE APPLIANCE
Fit the “B11” type appliance with a suitable fl ue,
available from the appliance manufacturer. Follow
the assembly instructions provided
with the flue.
Connect the flue to a 150/155 mm diameter hose,
heat resistant to 300°C.
Vent to the outside or into an effi cient fl ue. The
hose length must not exceed 3 metres.
CONNECTIONS
The position and dimensions of connections are
given in the installation diagram at the end of this
manual.
CONNECTION TO THE GAS SUPPLY
-
Check that the appliance is designed to operate
with the type of gas supply present on site. Check
the information given on the decals on the packing
and appliance.
-
Convert the appliance to the local gas type, if
necessary. Follow the instructions at the next
paragraph “Conversion to a different type of gas”.
-
On top appliances a rear connection is also
available. Remove the plug present and screw it
tightly onto the front connector.
-
A rapid-action gas shut-off valve must be fitted
upstream of the appliance in an easily accessible
position.
-
Do not use connection pipes having a diameter
smaller than that of the appliance's gas connector.
-
Once the appliance has been installed, check for gas
leaks at the connection points.
ELECTRICAL CONNECTIONS
Check if the appliance is designed to operate at the
voltage and frequency of the power supply present
on site. Check the details given on the appliance
dataplate and plaque near the terminal board.
Install upstream of the equipment in an easily
accessi
ble place, an all-
pole disconnecting device
with a contact gap of allowing full disconnection
under the conditions of overvoltage category III.
A flexible rubber cable with insulation specifications
not lower than type H05 RN
-
F must be used for
connection.
Connect the power supply cable to the terminal
board as shown in the wiring diagram supplied with
the appliance.
Secure the power supply cable with the cable
clamp.
Protect the power supply cable on the outside of
the appliance with a rigid plastic or metal pipe.
If the power supply cable is damaged, it must be
replaced by the manufacturer or his service centre
or by a person with similar qualifications to prevent
any risk.
THE SYMBOL “ HIGH VOLTAGE” IS
PLACED ON A PANEL THAT GIVES ACCESS
TO A PART WITH HIGH VOLTAGE.
PROTECTIVE EARTH AND EARTH BONDING
CONNECTIONS
Connect the appliance to an efficient ground circuit.
Connect the earth conductor to the terminal with
the symbol
next to the main terminal board.
Connect the metal structure of the appliance to the
equipotential node. Connect the conductor to the
ter
minal with the symbol
on the outside part of
the bottom.
CONNECTION TO THE WATER SUPPLY
Modular Salamanders G23M 4/45

-
The appliance must be connected to a potable
water supply. The water inlet pressure must be
between 150 kPa and 300 kPa. Use a pressure
reducer if the inlet pressure is above the maximum
permitted level.
-
Install the appliance in accordance with EN 1717
-
Install a mechanical filter and a shut-off valve
upstream of the appliance in an easily accessible
point.
-
Make sure the water circuit is free of ferrous
particles before connecting the filter and the
appliance.
-
Seal any unused connectors with a plug.
-
Once the appliance has been installed, check for gas
leaks at the connection points.
CONNECTION TO THE WATER DRAIN
The water drainage system must be made using
materials resistant to temperatures of 100 °C. The
bottom of the appliance must not be subjected to
steam produced by drainage of hot water.
Install a siphoned floor drain with grating below the
water drain c
ock of Boiling pans and in front of Bratt
pans.
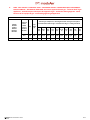
CONVERSION TO ANOTHER
TYPE OF GAS
Table Tab1 specifies:
-
which gas can be used for the appliance.
-
the nozzles and settings for each gas that can be
used.
-
For nozzles, the number indicated in table TAB1 is
also stamped on the body of nozzles.
To convert the appliance to the local gas type,
follow the instructions given in TAB1 andcarry out
the st
eps below:
-
Replace the main burner nozzle (UM).
-
Adjust the main burner's air regulator to distance A.
-
Replace the pilot burner nozzle (UP).
-
Adjust the pilot burner air " ow (if necessary).
-
Replace the gas valve minimum nozzle (Um).
-
Affix the adhesive tab indicating the new type of gas
used.
-
The nozzles and adhesive tabs are supplied with the
appliance.
REPLACING THE NOZZLE AND THE MAIN BURNER
PRIMARY AIR REGULATION
-
Remove the radiant panel cover.
-
Remove nozzle UM and replace it with the one
indicated in table TAB1.
-
Retighten nozzle UM.
-
Slacken screw V and position the air regulator at
distance A as indicated in table TAB1.
-
Retighten screw V fully.
-
Reassemble all parts. For assembly, proceed in
reverse order.
REPLACING THE MINIMUM ADJUSTMENT SCREW
-
Remove the control panel.
-
Remove nozzle UM and replace it with the one
indicated in table TAB1.
-
Retighten nozzle UM.
-
Reassemble all parts. For assembly, proceed in
reverse order.
REPLACING THE PILOT BURNER NOZZLE
-
Remove the radiant panel cover.
-
Undo connector R.
-
Remove nozzle UP and replace it with the one
indicated in table TAB1.
-
Retighten connector R. Reassemble all parts.
-
Following, in reverse order, the sequence used for
their removal.
COMMISSIONING
Following installation, conversion to a different type
of gas or any maintenance operations, check
appliance operation. In the event of any
malfunction, consult the next Paragraph "
Troubleshooting " .
GAS APPLIANCES
Switch on the appliance as directed in the
instructions and reminders for use given in Chapter
“ INSTRUCTIONS FOR USE “ and check:
-
the gas supply pressure (see next Paragraph).
-
the correct ignition of the burners and the
effectiveness of the fumes removal system.
CHECKING THE GAS SUPPLY PRESSURE
-
To measure the gas supply pressure
use a
manometer with a minimum definition of 0,1 mbar.
-
Remove the control panel.
Modular Salamanders G23M 5/45

-
Remove the screw from on pressure test point PP
and connect the manometer to the test point.
-
Make the measurement with the appliance in
operation.
IMPORTANT! IF THE GAS SUPPLY
PRESSURE IS NOT WITHIN THE LIMITS
(MIN.
- MAX) INDICATED IN TABLE TAB2,
CEASE OPERATION OF THE APPLIANCE
AND CONTACT THE GAS UTILITY
COMPANY.
-
Disconnect the manometer and retighten the
retaining screw on the pressure connec
tion.
ELECTRIC EQUIPMENT
Switch on the appliance as directed in the
instructions and reminders for use given in Chapter
“ INSTRUCTIONS FOR USE “ and check:
-
the current values of each phase.
-
the correct operation of the heating elements.
III. INSTRUCTIONS FOR USE
REMINDERS FOR THE USER
READ THIS MANUAL CAREFULLY. IT
PROVIDES IMPORTANT INFORMATION
FOR SAFE INSTALLATION, USE AND
MAINTENANCE OF THE APPLIANCE.
THE MANUFACTURER WILL NOT BE
LIABLE FOR ANY DAMAGE OR INJURY
RESULTING FROM FAILURE TO
OBSERVING THE FOLLOWING RULES.
For after-sales service, contact technical assistance
centres authorized by the manufacturer and
demand the use of original spare parts.
Have the appliance serviced at least twice a year.
The manufacturer recommends taking out a service
contract.
The appliance is designed for professional use and
must be operated by trained personnel.
The appliance is to be used for cooking food as
specified in the prescriptions for use. Any other use
is considered to be improper.
Do not allow the appliance to operate empty for
prolonged periods.
Only pre-
heat the oven just
before use.
Do not leave the appliance unattended while in
operation.
In the event of an appliance fault or malfunction,
shut the gas shut
-
off valve and/or switch the
appliance off at the main switch installed upline.
Clean the appliance following the instructions given
in Chapter “ INSTRUCTIONS FOR CLEANING”.
DO NOT STORE " AMMABLE MATERIALS
IN CLOSE PROXIMITY TO THE
APPLIANCE. FIRE HAZARD.
Do not obstruct any air vents or drains present on
the appliance.
Do not tamper with appliance components.
Keep this manual in a safe place, known to all users,
so that it can be consulted throughout the working
life of the appliance.
Installation and appliance maintenance must be
carried out by qualified technicians authorized by
the manufacturer, in compliance with current safety
standards and the instructions in this manual.
Appliance maintenance and conversion to a
different type
of gas must be carried out by
qualified technicians authorized by the
manufacturer, in compliance with current safety
standards and the instructions in this manual.
USING THE GAS SALAMANDER
The salamanders are appliances designed for the
cooking and au gratin preparation of foods,
obtained by the radiance emitted by high
-
temperature heating elements located over the
food.
The salamanders are appliances for cooking food
and must only be used by professionally qualified
personnel as indicated in this instruction manual.
Any other improper use can be dangerous.
BURNER IGNITION AND EXTINCTION
The gas tap control knob has the following
positions:
OFF
PILOT IGNITION
MAX. FLAME
MIN. FLAME
PILOT IGNITION
Modular Salamanders G23M 6/45

Press the knob down simultaneously with the
piezoelectric unit .
Press the knob down for 10-
15
seconds and then leave it; the pilot burner will
remain on.
MAIN BURNER IGNITION
To light the main burner, turn the knob from “pilot
on” to “max. flame”.
For the minimum flame, turn the knob from “max.
flame” to “min. flame”.
TURNING OFF
Turn the knob from “max. flame” or “min. flame”
to “pilot on”.
To shut off the pilot, press the knob lightly and turn
it to “off”.
USING THE ELECTRICAL SALAMANDER
The salamanders are appliances designed for the
cooking and au gratin preparation of foods,
obtained by the radiance emitted by high
-
temperature heating elements located over the
food.
The GN 2/3 models are equipped with a single
heating group.
The GN 1/1 models are equipped with two
independent heating elements, making it possible
to use two zones at different temperatures.
The salamanders are appliances for cooking food
and must only be used by professionally qualified
personnel as indicated in this instruction manual.
Any other improper use can be dangerous.
SWITCHING ON AND OFF
The control knob has the following positions:
OFF
MINIMUM TEMPERATURE
INTERMEDIATE TEMPERATURES
MAXIMUM WATER TEMPERATURE
SWITCHING ON
Turn the control knob to the chosen position.
The green indicator light switches on.
TURNING OFF
Turn the knob to position " 0 " .
The green indicator light switches off.
AT THE END OF SERVICE
Switch the heating off.
PROLONGED DISUSE
Before any prolonged disuse of the appliance,
proceed as follows:
-
Clean the appliance thoroughly.
-
Rub stainless steel surfaces with a cloth soaked in
vaseline oil to create a protective film.
-
Close cocks or main switches ahead of the
appliances.
Following prolonged disuse, proceed as follows:
Modular Salamanders G23M 7/45

-
Inspect the appliance thoroughly before using it
again.
-
Allow electric appliances to operate at the lowest
temperature for at least 60 minutes.
IV. INSTRUCTIONS FOR CLEANING
REMINDERS FOR CLEANING
READ THIS MANUAL CAREFULLY. IT
PROVIDES IMPORTANT INFORMATION
FOR SAFE INSTALLATION, USE AND
MAINTENANCE OF THE APPLIANCE.
THE MANUFACTURER WILL NOT BE
LIABLE FOR ANY DAMAGE OR INJURY
RESULTING FROM FAILURE TO
OBSERVING THE FOLLOWING RULES.
DISCONNECT THE APPLIANCE ELECTRIC
SUPPLY, IF PRESENT, BEFORE CARRYING
OUT ANY OPERATION.
Clean the satin finish stainless steel exterior
surfaces, the cooking wells and the surface of the
hotplates every day.
At least twice a year, have an authorized technician
clean the internal parts of the appliance.
Do not use corrosive products to clean the floor
beneath the appliance.
Do not use direct or high pressure water jets to
clean the appliance.
SATIN FINISH STAINLESS STEEL SURFACES
Clean the surfaces with a cloth or sponge using
water and proprietary non
-
abrasive detergents.
Follow the direction of the satin finish lines. Rinse
repeatedly and dry thoroughly.
Do not use pan scourers or other iron items.
Do not use chemical products containing chlorine.
Do not use sharp objects which might scratch and
damage the surfaces.
V. INSTRUCTIONS FOR
MAINTENANCE
REMINDERS FOR THE MAINTENANCE
TECHNICIAN
THE MANUFACTURER WILL NOT BE
LIABLE FOR ANY DAMAGE OR INJURY
RESULTING FROM FAILURE TO
OBSERVING THE FOLLOWING RULES.
Identify the specific appliance model. The model
number is detailed on the packing and on the
appliance dataplate.
The appliance must be installed in a well-ventilated
room.
Do not obstruct any air vents or drains present on
the appliance.
Do not tamper with appliance components.
Appliance maintenance and conversion to a
different type of gas must be carried out by
qualified technicians authorized by the
manufacturer, in
compliance with current safety
standards and the instructions in this manual.
CONVERSION TO ANOTHER TYPE OF
GAS
See Chapter “ Instructions for installation “.
COMMISSIONING
See Chapter “ Instructions for installation “.
TROUBLESHOOTING
ELECTRIC SALAMANDER
THE APPLIANCE DOES NOT HEAT.
Possible causes:
-
Temperature thermostat defective.
-
Heating elements defective.
HEATING CANNOT BE ADJUSTED.
Possible causes:
-
Temperature thermostat defective.
GAS SALAMANDER
THE PILOT BURNER DOES NOT LIGHT.
Possible causes:
-
Insufficient gas supply pressure.
Modular Salamanders G23M 8/45

-
Blocked tubing or nozzle.
-
Defective gas tap or valve.
-
Igniter defective or not properly connected.
-
Igniter or igniter wire defective.
PILOT BURNER GOES OUT DURING USE.
Possible causes:
-
Insufficient gas supply pressure.
-
Defective gas tap or valve.
-
Defective thermocouple or insufficient heating.
-
Thermocouple incorrectly connected to gas tap or
valve.
-
The gas cock and/or gas valve knob is not being
pressed enough.
THE MAIN BURNER DOES NOT LIGHT (EVEN
THOUGH PILOT IS LIT).
Possible causes:
-
Insufficient gas supply pressure.
-
Blocked tubing or nozzle.
-
Defective gas tap or valve.
-
Defective burner (gas outlet holes clogged).
HEATING CANNOT BE ADJUSTED.
Possible causes:
-
Defective gas tap
REPLACING COMPONENTS
REMINDERS FOR REPLACING COMPONENTS
SHUT THE GAS SHUT-OFF VALVE
AND/OR SWITCH THE APPLIANCE OFF AT
THE MAIN SWITCH INSTALLED
UPSTREAM.
AFTER REPLACING A GAS SYSTEM
COMPONENT, CHECK FOR GAS LEAKS AT
CONNECTION POINTS.
DISCONNECT THE APPLIANCE ELECTRIC
SUPPLY, IF PRESENT, BEFORE CARRYING
OUT ANY OPERATION.
AFTER REPLACING AN ELECTRICAL
SYSTEM COMPONENT, CHECK IT IS
CORRECTLY WIRED.
ELECTRIC SALAMANDER
REPLACING THE KNOB AND INDICATOR LIGHT
-
Remove the control panel.
-
Remove and replace the component.
-
Reassemble all parts. For assembly, proceed in
reverse order.
REPLACING THE HEATING ELEMENT
-
Remove the control panel.
-
Remove and replace the component.
-
Reassemble all parts. For assembly, proceed in
reverse order.
GAS SALAMANDER
GAS VALVE, PILOT, PIEZOELECTRIC DEVICE AND
SPARK PLUG SUBSTITUTION.
-
Remove the radiant panel cover.
-
Remove and replace the component.
-
Reassemble all parts. For assembly, proceed in
reverse order.
RADIANT PANELS SUBSTITUTION
-
Remove the radiant panel cover.
-
To remove radiant panels rotate them around the
burner branches
-
Reassemble all parts. For assembly, proceed in
reverse order.
CLEANING THE INTERIOR
Check the condition of the inside of the appliance.
Remove any built-up dirt.
MAIN COMPONENTS
ELECTRIC SALAMANDER
-
Control knob
-
Energy regulator
-
Heating element
-
Indicator light
Modular Salamanders G23M 9/45

GAS SALAMANDER
-
GAS COCK
-
MAIN BURNER
-
Pilot burner
-
Thermocouple
-
Igniter
-
Piezoelectric ignition
Modular Salamanders G23M 10/45

FR - INSTALLATION – EMPLOI - ENTRETIEN
I. AVERTISSEMENTS GÉNÉRAUX
LIRE ATTENTIVEMENT CE MANUEL. IL
DONNE DES INFORMATIONS
IMPORTANTES POUR L'INSTALLATION,
L'UTILISATION ET L'ENTRETIEN DE
L'APPAREIL EN TOUTE SÉCURITÉ.
LE DÉFAUT DE SE CONFORMER À CE QUI
EST PRÉSENTÉ CI DESSOUS PEUT
COMPROMETTRE LA SÉCURITÉ DE
L'ÉQUIPEMENT.
LE FABRICANT DE L'APPAREIL DÉCLINE
TOUTE RESPONSABILITÉ EN CAS DE
DOMMAGES DÛS AU NON RESPECT DES
CONSIGNES CI DESSOUS.
TRADUCTION DES INSTRUCTIONS
D'ORIGINE.
LES ÉQUIPEMENTS ONT BESOIN DE
QUELQUES PRÉCAUTIONS POUR
L’INSTALLATION, LE POSITIONNEMENT
ET/OU LE FIXAGE ET LE BRANCHEMENT
ÉLECTRIQUE.
VOIR SECTION
“INSTRUCTIONS POUR L'INSTALLATION”.
LES ÉQUIPEMENTS ONT BESOIN DE
PRÉCAUTIONS POUR LE NETTOYAGE.
VOIR SECTION “INSTRUCTION POUR LE
NETTOYAGE”.
LE SYMBOLE "HAUTE TENSION" EST
PLACÉ SUR UN PANNEAU QUI DONNE
ACCÈS À UNE PARTIE AVEC HAUTE
VOLTAGE.
Conserver ce manuel dans un endroit sûr et connu
afin de pouvoir le consulter pendant toute la durée
de vie utile de l'appareil.
Cet appareil est conçu pour la cuisson d'aliments. Il
est destiné à un usage industriel. Toute autre
utilisation est réputée impropre.
Cet appareil n'est pas approprié à l'emploi de la part
de personnes (y compris les enfants) avec capacités
physiques,
sensorielles ou mentales, réduites ou sans
expérience ni connaissance.
A moins qu'une personne responsable de leur
sécurité ne les surveille ou les instruit au sujet de
l'utilisation de l'appareil.
Eviter de laisser le dispositif sans survelliance en
présence d’enfants et s’asseurer qu’ils ne l’utilissent
pas ou qu’ils ne journent avec.
Le personnel devant utiliser l'appareil doit avoir
suivi une formation spéciale. Surveiller l'appareil
pendant
son
fonctionnement.
NE PAS STOCKER DE SUBSTANCES IN "
AMMABLES À PROXIMITÉ DE
L'APPAREIL. DANGER D'INCENDIE.
Installer l'appareil seulement dans des locaux
suffisamment aérés.
Toujours installer l'appareil dans un local aéré. Une
mauvaise aération peut être la cause d'asphyxies.
Ne
pas
obstruer le système d'aération du local où cet
appareil est installé. Ne pas obstruer les bouches
d'aération
et
d'évacuation de cet appareil ou d'autres appareils.
En cas de panne ou de dysfonctionnement de
l'appareil, fermer le robinet d'arrèt du gaz et/ou
désactiver l'interrupteur général d'alimentation
électrique installés en amont de l'appareil.
L'installation et la conversion à un autre type de gaz
doivent être effectués par des installateurs qualifiés
et agréés par le fabricant, conformément aux
normes de sécurité en vigueur et aux consignes
données dans ce manuel.
L'entretien et la conversion à un autre type de gaz
de l'appareil doivent être effectués par des
installateurs qualifiés et agréés par le fabricant,
conformément aux normes de sécurité en vigueur
et aux consignes données dans ce manuel.
Effectuer le nettoyage conformément aux
instructions données dans le Chapitre “
INSTRUCTIONS POUR LE NETTOYAGE “.
ÉLIMINATION DE L'EMBALLAGE ET DE
Modular Salamanders G23M 11/45

L'APPAREIL
EMBALLAGE
L'emballage est réalisé dans des matériaux
compatibles avec l'environnement. Les éléments en
matière plastique recyclables sont:
-
la couverture transparente, les sachets du manuel
d'instructions et des injecteurs (en polyéthylène
-
PE).
-
les feuillards (en polypropylène - PP).
APPAREIL
-
L'appareil est réalisé à plus de % dans des matériaux
métalliques recyclables (acier inox, tôle aluminée,
cuivre, etc. ).
-
L'appareil doit être mis au rebut conformément à la
réglementation en vigueur.
-
Le rendre inutilisable avant son élimination.
-
Ne pas le jeter dans la nature.
LE SYMBOLE DE LA POUBELLE BARRÉE
REPORTÉ SUR L’APPAREIL ET LA BOÎTE
INDIQUE QUE LE PRODUIT À LA FIN DE
SA PROPRE VIE UTILE DOIT ÊTRE
RAMASSÉ SÉPARÉMENT DES AUTRES
DÉCHETS.
LA COLLECTE DIFFÉRENTIÉE DE CET APPAREIL
AYANT ATTEINT LA FIN DE SA VIE EST ORGANISÉE
ET GÉRÉE PAR LE FABRICANT.
LE CLIENT SOUHAITANT SE DÉFAIRE DE CET
APPAREIL DEVRA DONC CONTACTER LE FABRICANT
ET SUIVRE LA PROCÉDURE QUE CE DERNIER A
ADOPTÉE AFIN DE PERMETTRE LA COLLECTE
SÉPARÉE DE L’APPAREIL ARRIVÉ EN FIN DE VIE.
UNE COLLECTE ET UN TRI DES DÉCHETS CONTRIBUE
A ÉVITER LES
POSSIBLES EFFETS NÉGATIFS SUR
L’ENVIRONNEMENT ET SUR LA SANTÉ ET FAVORISE
LA RÉUTILISATION ET/OU LE RECYCLAGE DES
MATÉRIAUX DONT EST COMPOSÉ L’APPAREIL.
L’ÉLIMINATION ABUSIVE DU PRODUIT DE LA PART
DU PROPRIÉTAIRE COMPORTE L’APPLICATION DES
SANCTIONS ADMI
NISTRATIVES PRÉVUES PAR LES
NORMES EN VIGUEUR.
II. INSTRUCTIONS POUR
L'INSTALLATION
AVERTISSEMENTS POUR
L'INSTALLATEUR
LIRE ATTENTIVEMENT CE MANUEL. IL
DONNE DES INFORMATIONS
IMPORTANTES POUR L'INSTALLATION,
L'UTILISATION ET L'ENTRETIEN DE
L'APPAREIL EN TOUTE SÉCURITÉ.
LE DÉFAUT DE SE CONFORMER À CE QUI
EST PRÉSENTÉ CI DESSOUS PEUT
COMPROMETTRE LA SÉCURITÉ DE
L'ÉQUIPEMENT.
LE FABRICANT DE L'APPAREIL DÉCLINE
TOUTE RESPONSABILITÉ EN CAS DE
DOMMAGES DÛS AU NON RESPECT DES
CONSIGNES CI DESSOUS.
Repérer le modèle d'appareil. Le modèle est indiqué
sur l'emballage et la plaque signalétique de
l'appareil.
Installer l'appareil seulement dans des locaux
suffisamment aérés.
L'installation et la conversion à un autre type de gaz
doivent être effectués par des installateurs qualifiés
et agréés par le fabricant, conformément aux
normes de sécurité en vigueur et aux consignes
données dans ce manuel.
L'entretien et la conversion à un autre type de gaz
de l'appareil doivent être effectués par des
installateurs qualifiés et agréés par le fabricant,
conformément aux normes de sécurité en vigueur
et aux consignes données dans ce manuel.
Ne pas obstruer les orifices d'aération et
d'évacuation de l'appareil.
Ne pas manipuler les pièces de l'appareil.
NORMES ET TEXTES DE LOI DE
RÉFÉRENCE
-
Installer le appareils en conformité avec les normes
de sécurité en vigueur dans le pays.
DÉBALLAGE
-
Contrôler l'état de l'emballage et demander au
transporteur d'inspecter la marchandise en cas de
dommages évidents.
-
Enlever l'emballage.
-
Enlever la pellicule protégeant les panneaux
extérieurs. Éliminer les éventuels résidus de colle
avec un solvant adapté.
MISE EN PLACE
Modular Salamanders G23M 12/45

Les dimensions de l'appareil et la position des
raccordements sont indiquées dans le schéma
d'installation figurant à la fin de ce manuel.
L'appareil peut être installé seul ou avec d'autres
appareils de la même gamme.
Cet appareil ne peut pas être encastré.
Installer l'appareil à une distance de 10 cm
minimum des murs.
Si l’équipement doit être mis prés de murs,
séparations, éléments décoratives, etc. ceux
-
ci
doivent être faits en matériaux incombustibles
Dans le cas contraire ils doivent être couverts
avec
matériaux thermo
-isolants incombustibles ;
Mettre l'appareil d'aplomb à l'aide des pieds
réglables.
MONTEGE DE L'APPAREIL SUR UN SOCLE EN PONT
Suivre les instructions données avec le type de
support utilisé.
SYSTÈME D'ÉVACUATION DES FUMÉES
Prévoir un système d'évacuation des fumées
conformément au " Type " d'appareil. Le " Type "
est indiqué sur la plaque signalétique de l'appareil.
APPAREIL DE TYPE " A1 "
Mettre les appareils de type “A1” sous une hotte
aspirante pour assurer l'évacuation des fumées et
des vapeurs de cuisson.
APPAREIL DE TYPE " B21 "
Installer l'appareil de type “B21” sous une hotte
aspirante.
APPAREIL DE TYPE " B11 "
Monter le conduit de cheminée à demander au
fabricant sur l'appareil de type “B11”. Suivre les
instructions de montage jointes au conduit de
cheminée.
Raccorder au conduit de cheminée un tuyau d'un
diamètre de 150/155 mm, résistant à une
température de 300°C.
Poursuivre vers l'extérieur ou dans un conduit de
cheminée effi cace. La longueur du tuyau ne doit
pas dépasser 3 mètres.
RACCORDEMENTS
La position et la dimension des raccordements sont
précisées sur le schéma d'installation figurant à la
finde ce manuel.
RACCORDEMENTE À LA CONDUITE DE GAZ
-
Vérifier si l'appareil est prévu pour le type de gaz
qui l'alimentera. Contrôler les indications sur les
talons figurant sur l'emballage et sur l'appareil.
-
Si nécessaire, adapter l'appareil au type de gaz
utilisé. Suivre les instructions du Paragraphe
“Adaptation à un autre type de gaz”.
-
Sur les appareils hauts, un raccordement à l'arrière
est disponible. Dévisser le bouchon et le visser de
façon étanche sur le raccordement avant.
-
Installer un robinet d'arrêt à fermeture rapide en
amont de l'appareil, dans un endroit facilement
accessible.
-
Ne pas utiliser de tuyaux de raccordement d'un
diamètre inférieur à celui du raccordement de gaz
de l'appareil.
-
Après le raccordement, vérifier qu'il n'y ait pas de
fuites au niveau du raccordement.
BRANCHEMENT ÉLECTRIQUE
Vérifier si l'appareil est prévu pour fonctionner à la
tension et à la fréquence auxquelles il sera
alimenté. Contrôler la plaque signalétique placée
sur l'appareil et placée à côté de la borne.
Installé en amont de l'appareil dans un endroit
facilement
accessible, tous les pôles dispositif de
déconnexion avec une distance d'ouverture des
contacts qui permet une déconnexion complète
dans les conditions de la catégorie de surtension III.
Utiliser un cordon d'alimentation flexible avec gaine
isolante en caoutchouc ayant des caractéristiques
au moins égales au type H05 RN-F.
Relier le cordon d'alimentation à la plaque à bornes
selon les indications du schéma électrique remis
avec l'appareil.
Bloquer le cordon d'alimentation avec le presse-
étoupe.
Protéger le cordon d'alimentation à l'extérieur de
l'appareil avec un conduit en métal ou en plastique
rigide.
Si le câble d’alimentation est endommagé, il doit
être remplacé pour le fabricant ou pour son service
d’assistance ou pour une personne avec
qualification similaire, afin de prévenir touts
risques.
LE SYMBOLE "HAUTE TENSION" EST
PLACÉ SUR UN PANNEAU QUI DONNE
ACCÈS À UNE PARTIE AVEC HAUTE
Modular Salamanders G23M 13/45

VOLTAGE.
MISE À LA TERRE ET NOUED EQUIPOTENTIEL
Brancher l'appareil sous tension à une prise de terre
efficace. Relier le conducteur de terre à la borne
portant le symbole situé à côté de la plaque à
bornes d'arrivée de la ligne.
Relier la structure métallique de l'appareil sous
tension à un noeud équipotentiel. Relier le
conducteur à la borne portant le symbole situé
sur la partie extérieure du fond.
RACCORDEMENT AU RÉSEAU HYDRIQUE
-
Alimenter l'appareil avec de l'eau potable. La
pression d'alimentation de l'eau doit être de 150
kPa à 300 kPa. Utiliser un réducteur si la pression
d'alimentation est supérieure à celle maximale
indiquée.
-
Installer l'appareil conformément à la norme EN
1717
-
Installer un filtre mécanique et un robinet d'arrêt en
amont de l'appareil, dans un endroit facilement
accessible.
-
Éliminer les éventuels dépôts ferreux des tuyaux de
raccordement avant de raccorder le filtre et
l'appareil.
-
Fermer les raccords n'étant pas reliés avec un
bouchon étanche.
-
Après le raccordement, vérifier qu'il n'y ait pas de
fuites au niveau du raccordement.
RACCORDEMENT À L'ÉVACUATION DES EAUX
USÉES
Les conduits d'évacuation doivent être réalisés dans
des matériaux résistant à une température de 100
°C. La vapeur dégagée par l'évacuation d'eau
chaude ne doit pas entrer en contact avec le fond
de l'appareil.
Prévoir un puisard siphonné et grillagé sous le
robinet d'évacuation des eaux des casseroles et en
face des braisières.
ADAPTATION À UN AUTRE
TYPE DE GAZ
Le tableau Tab1 indique:
-
les gaz pouvant être utilisés pour le fonctionnement
de l'appareil.
-
les injecteurs et les réglages pour chaque gaz
pouvant être utilisé.
-
Pour les injecteurs, le nombre indiqué dans le
tableau TAB1 est estampillé sur le corps de
l'injecteur.
Pour adapter l'appareil au type de gaz qui
l'alimentera, suivre les instructions du tableau TAB1
et effectuer les opérations ci dessous:
-
Remplacer l'injecteur du brûleur principal (UM).
-
Placer l'aérateur du brûleur principal à la distance A.
-
Remplacer l'injecteur de la veilleuse (UP).
-
Régler l'air de la veilleuse (si nécessaire).
-
Remplacer la veilleuse du minimum du robinet de
gaz (Um).
-
Apposer la plaquette adhésive indiquant le nouveau
type de gaz utilisé sur l'appareil.
-
Les injecteurs et les plaquettes adhésives sont livrés
avec l'appareil.
REMPLACEMENT DE LA BUSE ET LE RÉGLAGE DE
L'AIR PRIMAIRE DU BRÛLEUR PRINCIPAL,
-
Lever le couvercle du panneau radiant.
-
Démonter l'injecteur UM et le remplacer par celui
indiqué dans le tableau TAB1.
-
Revisser à fond l'injecteur UM.
-
Desserrer la vis V et placer l'aérateur à la distance A
indiquée dans le tableau TAB1.
-
Revisser à fond la vis V.
-
Remonter toutes les pièces. Effectuer dans l'ordre
inverse les opérations de démontage.
REMPLACEMENT DE LA VIS DU MINIMUM
-
Démonter le panneau de commandes.
-
Démonter l'injecteur UM et le remplacer par celui
indiqué dans le tableau TAB1.
-
Revisser à fond l'injecteur UM.
-
Remonter toutes les pièces. Effectuer dans l'ordre
inverse les opérations de démontage.
REMPLACEMENT DE L'INJECTEUR DE LA VEILLEUSE
-
Lever le couvercle du panneau radiant.
-
Dévisser le raccord R.
-
Démonter l'injecteur UP et le remplacer par celui
indiqué dans le tableau TAB1.
-
Revisser à fond le raccord R. Remonter toutes les
pièces.
-
Après, dans l'ordre inverse, la séquence utilisée
pour leur élimination.
Modular Salamanders G23M 14/45

MISE EN SERVICE
Après l'installation, l'adaptation à un autre type de
gaz ou des interventions d'entretien, vérifier le
fonctionnement de l'appareil. En cas de
dysfonctionnements, consulter le paragraphe "
Résolution des dysfonctionnements " .
APPAREIL À GAZ
Mettre l'appareil en marche conformément aux
instructions d'utilisation fi gurant au chapitre “
INSTRUCTIONS POUR L'UTILISATION “ et vérifier:
-
la pression d'alimentation du gaz (voir le
paragraphe suivant).
-
la régularité d'allumage des brûleurs et
l'efficacité
de l'installation d'évacuation des fumées.
VÉRIFICATION DE LA PRESSION D'ALIMENT ATION
DU GAZ
-
Utiliser un manomètre d'une précision égale ou
supérieure à 0,1 mbar.
-
Démonter le panneau de commandes.
-
Enlever la vis d'étanchéité de la prise de pression PP
et relier le manomètre.
-
Effectuer la mesure avec l'appareil en marche.
ATTENTION! SI LA PRESSION
D'ALIMENTATION DU GAZ NE RENTRE
PAS DANS LES VALEURS LIMITES (MIN.
-
MAX) INDIQUÉES DANS LE TABLEAU
TAB2, INTERROMPRE LE
FONCTIONNEMENT DE L'APPAREIL ET
CON
-TACTER LA SOCIÉTÉ DE
DISTRIBUTION DE GAZ.
-
Détacher le manomètre et revisser à fond la vis
d'étanchéité sur la prise de pression.
EQUIPEMENTS ELECTRIQUES
Mettre l'appareil en marche conformément aux
instructions d'utilisation fi gurant
au chapitre “
INSTRUCTIONS POUR L'UTILISATION “ et vérifier:
-
les valeurs du courant de chaque phase.
-
la régularité d'allumage des résistances de
chauffage.
III. INSTRUCTIONS POUR
L'UTILISATION
AVERTISSEMENTS POUR L'UTILISATEUR
LIRE ATTENTIVEMENT CE MANUEL. IL
DONNE DES INFORMATIONS
IMPORTANTES POUR L'INSTALLATION,
L'UTILISATION ET L'ENTRETIEN DE
L'APPAREIL EN TOUTE SÉCURITÉ.
LE FABRICANT DE L'APPAREIL DÉCLINE
TOUTE RESPONSABILITÉ EN CAS DE
DOMMAGES DÛS AU NON RESPECT DES
CONSIGNES CI DESSOUS.
Pour l'assistance, s'adresser uniquement aux
centres techniques agréés par le fabricant et exiger
des pièces détachées originales.
Faire contrôler l'appareil au moins deux fois par an.
Il convient de stipuler un contrat d'entretien.
Cet appareil est destiné à un usage professionnel et
doit donc être utilisé par du personnel formé à cet
effet.
L'appareil est destiné à la cuisson d'aliments comme
indiqué dans les avertissements. Toute autre
utilisation est impropre.
Éviter de faire marcher l'appareil à vide pendant de
longues périodes. Préchauffer l'appareil juste avant
de l'utiliser.
Surveiller l'appareil pendant son fonctionnement.
En cas de panne ou de dysfonctionnement de
l'appareil, fermer le robinet d'arrèt du gaz et/ou
désactiver l'interrupteur général d'alimentation
électrique installés en amont de l'appareil.
Effectuer le nettoyage conformément aux
instructions données dans le Chapitre “
INSTRUCTIONS POUR LE NETTOYAGE “.
NE PAS STOCKER DE SUBSTANCES IN "
AMMABLES À PROXIMITÉ DE
L'APPAREIL. DANGER D'INCENDIE.
Ne pas obstruer les orifices d'aération et
d'évacuation de l'appareil.
Ne pas manipuler les pièces de l'appareil.
Conserver ce manuel dans un endroit sûr et connu
afin de pouvoir le consulter pendant toute la durée
de vie utile de l'appareil.
L'installation l'entretien de l'appareil doivent être
effectués par des installateurs qualifiés et agréés
par le fabricant, conformément aux normes de
sécurité en vigueur et aux consignes données dans
ce manuel.
L'entretien et la conversion à un autre type de gaz
de l'appareil doivent être effectués par des
installateurs qualifiés et agréés par le fabricant,
conformément aux normes de sécurité en vigueur
et aux consignes données dans ce manuel.
Modular Salamanders G23M 15/45

UTILIZSATION DE SALAMANDRE A GAZ
Les salamandres sont des appareils conçus pour la
cuisson et les gratins d'aliments obtenus à travers le
rayonnement émis par des résistances électriques à
haute température situées sur l'aliment.
Les salamandres doivent être utilisée exclusivement
par du personnel qualifié dans le respect des
instructions figurant dans le présent manuel. Tout
utilisation autre que celle prévue pourrait être
dangereuse.
ALLUMAGE ET EXTINCTION DES BRULEURS
La manette de commande du robinet de gaz a les
positions d'utilisation suivantes:
ÉTEINT
ALLUMAGE VEILLEUSE GAZ
FLAMME MAX.
FLAMME MIN.
ALLUMAGE DE LA VEILLEUSE
Appuyer sur le bouton et sur le bouton poussoir
piézoélectrique dans le même temps. Maintenir
enfoncé pour 10
-
15 secondes et en suite livrer; le
brûleur pilote restera allumé.
ALLUMAGE DU BRULEUR PRINCIPAL
Pour allumer le brûleur principal, tourner la
manette de la position “allumage veilleuse gaz” en
position “flamme maximum”.
Pour obtenir le minimum, tourner la manette de la
position “flamme maximum” à la position “flamme
minimum”.
ARRÊT
Tourner la manette de la position “flamme
maximum” ou “flamme minimum” à la position
“allumage veilleuse gaz”.
Pour éteindre la veilleuse gaz, appuyer
partiellement sur la manette et la tourner en
position “éteint”.
UTILIZSATION DE SALAMANDRE
ELECTRIQUE
Les salamandres sont des appareils conçus pour la
cuisson et les gratins d'aliments obtenus à
travers le
rayonnement émis par des résistances électriques à
haute température situées sur l'aliment.
Les modèles GN 2/3 sont dotés d'un unique groupe
chauffant.
Les modèles GN 1/1 sont dotés de deux groupes
chauffants indépendants donnant ainsi la
possibilité
d'utiliser deux zones à température différenciée.
Les salamandres doivent être utilisée exclusivement
par du personnel qualifié dans le respect des
instructions figurant dans le présent manuel.
Tout
utilisation autre que celle prévue pourrait être
dangereuse.
ALLUMAGE ET EXTINCTION DU
CHAUFFAGE
La manette de commande du sélecteur a les
positions d'utilisation suivantes:
ÉTEINT
TEMPÉRATURE DE CUISSON
MINIMUM
TEMPÉRATURES INTERMÉDIAIRES
TEMPÉRATURE MAXIMUM
ALLUMAGE
Tourner la manette du sélecteur dans la position
Modular Salamanders G23M 16/45

d'utilisation choisie.
Le voyant vert s'allume.
ARRÊT
Tourner la manette du sélecteur dans la position " 0
" .
Le voyant vert s'éteint.
EN FIN DE SERVICE
Éteindre le chauffage.
PÉRIODES D'INACTIVITÉ
Avant une période d'inactivité prévue, procéder
comme suit:
-
Nettoyer soigneusement l'appareil.
-
Passer un chiffon imbibé d'un peu d'huile de
vaseline sur toutes les surfaces de façon à étaler un
film de protection.
-
Fermer les robinets ou interrupteurs généraux en
amont des appareils.
Après une période d'inactivité prolongée, procéder
comme suit:
-
Contrôler l'appareil avant de le réutiliser.
-
Faire fonctionner les appareils électriques à la
température minimum pendant au moins 60
minutes.
IV. INSTRUCTIONS POUR LE
NETTOYAGE
AVERTISSEMENTS POUR LE NETTOYAGE
LIRE ATTENTIVEMENT CE MANUEL. IL
DONNE DES INFORMATIONS
IMPORTANTES POUR L'INSTALLATION,
L'UTILISATION ET L'ENTRETIEN DE
L'APPAREIL EN TOUTE SÉCURITÉ.
LE FABRICANT DE L'APPAREIL DÉCLINE
TOUTE RESPONSABILITÉ EN CAS DE
DOMMAGES DÛS AU NON RESPECT DES
CONSIGNES CI DESSOUS.
COUPER L'ALIMENTATION ÉLECTRIQUE
DE L'APPAREIL, SI SOUS TENSION,
AVANT TOUTE OPÉRATION.
Nettoyer tous les jours les surfaces extérieures en
acier inox poli, la surface des cuves de cuisson, la
surface des plaques de cuisson.
Faire nettoyer les pièces
internes de l'appareil au
moins deux fois par an par un technicien agréé.
Ne pas utiliser de produits corrosifs pour nettoyer le
sol sous l'appareil.
Ne pas laver l'appareil avec des jets d'eau directs ou
à haute pression.
SURFACES POLIES EN ACIER INOXYDABLE
Nettoyer les surfaces avec un chiffon ou une
éponge en utilisant de l'eau et des produits
nettoyants non abrasifs. Passer le chiffon dans le
sens du polissage. Rincer souvent et sécher ensuite
soigneusement.
Ne pas utiliser de tampons à récurer ni d'autres
objets en fer.
Ne pas utiliser de produits chimiques contenant du
chlore.
Ne pas utiliser d'objets pointus pouvant rayer la
surface.
V. INSTRUCTIONS POUR
L'ENTRETIEN
AVERTISSEMENTS POUR LE TECHNICIEN
D'ENTRETIEN
LE FABRICANT DE L'APPAREIL DÉCLINE
TOUTE RESPONSABILITÉ EN CAS DE
DOMMAGES DÛS AU NON RESPECT DES
CONSIGNES CI DESSOUS.
Repérer le modèle d'appareil. Le modèle est indiqué
sur l'emballage et la plaque signalétique de
l'appareil.
Installer l'appareil seulement dans des locaux
suffisamment aérés.
Ne pas obstruer les orifices d'aération et
d'évacuation de l'appareil.
Ne pas manipuler les pièces de l'appareil.
L'entretien et la conversion à un autre type de gaz
de l'appareil doivent être effectués par des
installateurs qualifiés et agréés par le fabricant,
conformément aux normes de sécurité en vigueur
et aux consignes données dans ce manuel.
ADAPTATION À UN AUTRE TYPE DE GAZ
Modular Salamanders G23M 17/45

Voir le chapitre “ Instructions pour l'installation “.
MISE EN SERVICE
Voir le chapitre “ Instructions pour l'installation “.
RÉSOLUTION DES
DYSFONCTIONNEMENTS
SALAMANDRE ELECTRIQUE
L'APPAREIL NE CHAUFFE PAS.
Causes possibles:
-
Le thermostat de réglage de la température est
défectueux.
-
Les résistances sont défectueuses.
LE CHAAFFAGE NE SE RÈGLE PAS.
Causes possibles:
-
Le thermostat de réglage de la température est
défectueux.
SALAMANDRE A GAZ
LA VEILLEUSE NE S'ALLUME PAS.
Causes possibles:
-
La pression d'alimentation du gaz est insuffisante.
-
La conduite ou l'injecteur est obstrué (e).
-
Le robinet de gaz ou la valve de gaz est en panne.
-
La bougie d'allumage est mal reliée ou défectueuse.
-
L'allumeur ou le câble de la bougie est en panne.
LA VEILLEUSE NE RESTE PAS ALLUMÉE OU S'ÉTEINT
PENDANT L'UTILISATION.
Causes possibles:
-
La pression d'alimentation du gaz est insuffisante.
-
Le robinet de gaz ou la valve de gaz est en panne.
-
Le thermocouple est défectueux ou n'est pas
suffisamment chauffé.
-
Le thermocouple est mal relié au robinet ou à la
valve de gaz.
-
La manette du robinet de gaz et/ou de la soupape à
gaz n’est pa
s suffisamment pressée.
LE BRÛLEUR PRINCIPAL NE S'ALLUME PAS (MÊME
SI LA VEILLEUSE EST ALLUMÉE).
Causes possibles:
-
La pression d'alimentation du gaz est insuffisante.
-
La conduite ou l'injecteur est obstrué (e).
-
Le robinet de gaz ou la valve de gaz est en panne.
-
Le bruleur est défectueux (orifices de sortie du gaz
bouchés).
LE CHAAFFAGE NE SE RÈGLE PAS.
Causes possibles:
-
Le robinet de gaz est en panne.
REMPLACEMENT DE PIÈCES
AVERTISSEMENTS POUR LE REMPLACEMENT DES
PIÈCES
FERMER LE ROBINET D'ARRÊT DU GAZ
ET/OU DÉSACTIVER L'INTERRUPTEUR
GÉNÉRAL D'ALIMENTATION ÉLECTRIQUE
INSTALLÉS EN AMONT DE L'APPAREIL.
APRÈS LE REMPLACEMENT D'UNE PIÈCE
DU CIRCUIT DE GAZ, VÉRIFIER L'ABSENCE
DE FUITES AUX POINTS DE
RACCORDEMENT AU CIRCUIT.
COUPER L'ALIMENTATION ÉLECTRIQUE
DE L'APPAREIL, SI SOUS TENSION,
AVANT TOUTE OPÉRATION.
APRÈS LE REMPLACEMENT D'UN
COMPOSANT DU CIRCUIT ÉLECTRIQUE,
VÉRIFIER QU'IL EST CORRECTEMENT
RELIÉ AU CÂBLAGE.
SALAMANDRE ELECTRIQUE
REMPLACEMENT DU SÉLECTEUR ET DU VOYANT
-
Démonter le panneau de commandes.
-
Retirer et remplacer le composant.
-
Remonter toutes les pièces. Effectuer dans l'ordre
inverse les opérations de démontage.
REMPLACEMENT DE LA RÉSISTANCE
-
Démonter le panneau de commandes.
-
Retirer et remplacer le composant.
-
Remonter toutes les pièces. Effectuer dans l'ordre
inverse les opérations de démontage.
Modular Salamanders G23M 18/45

SALAMANDRE A GAZ
SUBSTITUTION DU ROBINET DU GAZ, DU PILOTE,
DU DISPOSITIF PIÉZOÉLECTRIQUE ET DE LA BOUGIE
D’ASCENSION.
-
Lever le couvercle du panneau radiant.
-
Retirer et remplacer le composant.
-
Remonter toutes les pièces. Effectuer dans l'ordre
inverse les opérations de démontage.
SUBSTITUTION DES PANNEAU RADIANT
-
Lever le couvercle du panneau radiant.
-
Démonter les panneaux radiants les tournant
autour les branches du brûleur
-
Remonter toutes les pièces. Effectuer dans l'ordre
inverse les opérations de démontage.
NETTOYAGE DES PIÈCES INTERNES
Contróler l'état des pièces se trouvant à l'intérieur
de l'appareil.
Enlever la saleté s'étant éventuellement déposée.
PIÈCES PRINCIPALES
SALAMANDRE ELECTRIQUE
-
Sélecteur
-
Régulateur d'énergie
-
Résistance
-
Voyant
SALAMANDRE A GAZ
-
Robinet De Gaz
-
Brûleur Principal
-
Veilleuse
-
Thermocouple
-
Bougie d'allumage
-
Allumeur piézoélectrique
Modular Salamanders G23M 19/45

DE - INSTALLATION – GEBRAUCH - WARTUNG
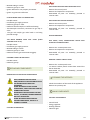
I. ALLGEMEINE HINWEISE
LESEN SIE DIESE ANLEITUNG
AUFMERKSAM DURCH. SIE ENTHÄLT
WICHTIGE HINWEISE ZUR
INSTALLATIONS, GEBRAUCHS
-UND
WARTUNGSSICHERHEIT DES GERÄTS.
NICHTBEACHTUNG WAS IST UNTEN
DARGESTELLT ERFÜLLEN KANN ZUR
BEEINTRÄCHTIGUNG DER SICHERHEIT
DER GERÄTE.
DER GERÄTEHERSTELLER IST NICHT
HAFTBAR FÜR EVENTUELLE SCHÄDEN,
DIE DURCH MISSACHTUNG DER
NACHSTEHENDEN PFLICHTEN
VERURSACHT WERDEN.
ÜBERSETZUNG DER URSPRÜNGLICHEN
ANWEISUNGEN.
BEI DER INSTALLIERUNG, LAGERUNG
UND/ODER BEFESTIGUNG, SCHALTUNG
AN DEN STROMNETZ DER GERÄTE BITTE
DIE SICHERHAITSMAßNAHMEN
BEACHTEN.
BITTE DEN KAPITEL
"MONTAGEANLEITUNG" LESEN
BEI DER REINIGUNG DER GERÄTE
BEACHTEN SIE DIE
SICHERHEITSMAßNAHMEN FÜR
REINIGUNG. BITTE DEN KAPITEL
"REINIGUNGSANLEITUNG" LESEN.
DAS SYMBOL "GEFÄHRLICHE
SPANNUNG" BEDEUTET, DASS DIESE
TEILEN SIND VON GEFÄHRLICHER
SPANNUNG BETROFFEN
Bewahren Sie diese Anleitung an einem sicheren
und bekannten Ort auf, damit sie während der
Nutzungsdauer des Geräts eingesehen werden
kann.
Dieses Geräte wurde für das Kochen von Speisen
entwickelt. Es ist für den industriellen Gebrauch
bestimmt.
Jeder
andere Gebrauch ist bestimmungsfremd.
Dieses Gerät darf nicht durch Personen (Kinder
eingeschlossen) benutzt werden, die körperlich
behindert,
in ihrer
Wahrnehmungsfähigkeit oder ihren geistigen
Kräften eingeschränkt sind oder denen Erfahrung
und Kenntnisse fehlen.
Außer wenn
sie durch eine für ihre Sicherheit verantwortliche
Person überwacht oder in den Gebrauch des
Gerätes eingewiesen werden.
Vermeiden Sie es, das Gerät in Anwesenheit von
Kindern unbeaufsichtigt zu lassen und stellen Sie
sicher, dass es nicht von ihnen ben
utz wird order sie
mit ihm spielen.
Das Bedienungspersonal des Gerätes muss geschult
werden. Das Gerät muss während des Betriebes
überwacht werden.
BEWAHREN SIE KEINE ENT " AMMBAREN
STOFFE IN NÄHE DES GERÄTS AUF.
BRANDGEFAHR.
Installieren Sie das Gerät nur in gut belüfteten
Räumen.
Eine unzureichende Belüftung führt zu Erstickung.
Das Belüftungssystem des Raumes, in dem das
Gerät
installiert
wird, nicht verdecken. Die Belüftungs
- oder
Auslassöffnungen dieses oder anderer Geräte nicht
verdecken.
Schlielen Sie bei Defekten oder Betriebsstòrungen
den Ga
-
sabsperrhahn und/oder unterbrechen Sie
die Stromversor
-gung
am Hauptschalter, die beide
dem Geràt vorgeschaltet sind.
Installation und Umstellung auf einen anderen
Gasbetrieb und sind durch qualifiziertes und vom
Hersteller autorisiertes Personal entsprechend den
einschlägigen Sicherheitsbestimmungen und diesen
Anleitungen vorzunehmen.
Wartung und Umstellung auf einen anderen
Gasbetrieb des Geräts sind durch qualifiziertes und
vom Hersteller autorisiertes Personal entsprechend
den einschlägigen Sicherheitsbestimmungen und
diesen Anleitungen vorzunehmen.
Modular Salamanders G23M 20/45
Seite wird geladen ...
Seite wird geladen ...
Seite wird geladen ...
Seite wird geladen ...
Seite wird geladen ...
Seite wird geladen ...
Seite wird geladen ...
Seite wird geladen ...
Seite wird geladen ...
Seite wird geladen ...
Seite wird geladen ...
Seite wird geladen ...
Seite wird geladen ...
Seite wird geladen ...
Seite wird geladen ...
Seite wird geladen ...
Seite wird geladen ...
Seite wird geladen ...
Seite wird geladen ...
Seite wird geladen ...
Seite wird geladen ...
Seite wird geladen ...
Seite wird geladen ...
Seite wird geladen ...
Seite wird geladen ...
-
 1
1
-
 2
2
-
 3
3
-
 4
4
-
 5
5
-
 6
6
-
 7
7
-
 8
8
-
 9
9
-
 10
10
-
 11
11
-
 12
12
-
 13
13
-
 14
14
-
 15
15
-
 16
16
-
 17
17
-
 18
18
-
 19
19
-
 20
20
-
 21
21
-
 22
22
-
 23
23
-
 24
24
-
 25
25
-
 26
26
-
 27
27
-
 28
28
-
 29
29
-
 30
30
-
 31
31
-
 32
32
-
 33
33
-
 34
34
-
 35
35
-
 36
36
-
 37
37
-
 38
38
-
 39
39
-
 40
40
-
 41
41
-
 42
42
-
 43
43
-
 44
44
-
 45
45


Modular 318009 Benutzerhandbuch
- Kategorie
- Kochfelder
- Typ
- Benutzerhandbuch
in anderen Sprachen
- English: Modular 318009 User manual
- français: Modular 318009 Manuel utilisateur
- Nederlands: Modular 318009 Handleiding
Verwandte Artikel
-
Modular 318772 Benutzerhandbuch
-
-
-
-
-
-
-
-
Modular Function Linea 650 FU FPE/55 Installation - Use - Maintenance