
UK
COOKERS, GAS AND ELECTRIC HOBS 600-650
Installation-Use-Maintenance
FR
FOURNEAUX, PLAQUES GAZ ET ELECTRIQUES 600-650
Installation-Emploi-Entretien
DE
HERDE, GAS- UND ELEKTROHERDE 600-650 Installation-
Gebrauch-Wartung
NL
FORNUIZEN, KOOKPLATEN OP GAS & ELEKTRISCH 600-650
Installatie-Gebruik-Onderhoud
MOD.
_60/30 PCG…
_60/60 PCG…
_60/90 PCG…
_60/60 CFG
_60/60 CFGE
_60/60 CFGE/P 2/3
_60/90 CFGE
_60/90 CFGE/P
_60/40 PCG-D
_60/60 PCG-D
_60/30 PCE…
_60/60 PCE…
_60/90 PCE…
_60/60 CFE
_60/60 CFE/P 2/3
_60/90 CFE
_60/90 CFE/P
_60/40 PCE-D
_60/60 PCE-D
_CEG/70
_CEG/110
_65/40 PG/40 P
_65/40 PCG
_65/70 PCG
_65/70 CFG
_65/70 CFGE
_65/40 PCG/P
_65/70 PCG/P
_65/70 CFG/P
_65/70 CFGE/P
_65/110 CFG
_65/110 CFGE
_65/110 CFGG
_65/40 PCE
_65/70 PCE
_65/70 CFE
_65/70 TPG
_65/70 TPFG
_65/110 TPFG
_FPG/55
_FPE/55
Doc.n°
252.453.00
Edition
04
modular gassolidtop ma 2020 1/90

UK - INSTALLATION – USE - MAINTENANCE ................................................................................................................................ 4
I. GENERAL PRESCRIPTIONS ........................................................................................................................................................................... 4
1. DISPOSAL OF PACKING AND OF THE APPLIANCE ............................................................................................................................................................ 4
2. SAFETY DEVICES.............................................................................................................................................................................................................. 5
II. INSTRUCTIONS FOR INSTALLATION ............................................................................................................................................................. 5
3. REMINDERS FOR THE INSTALLER .................................................................................................................................................................................... 5
4. REFERENCE STANDARDS AND LAWS .............................................................................................................................................................................. 5
5. UNPACKING .................................................................................................................................................................................................................... 6
6. POSITIONING .................................................................................................................................................................................................................. 6
7. CONNECTIONS ................................................................................................................................................................................................................ 6
8. CONVERSION TO ANOTHER TYPE OF GAS ....................................................................................................................................................................... 7
9. COMMISSIONING ........................................................................................................................................................................................................... 8
III. INSTRUCTIONS FOR USE ..............................................................................................................................................................................9
10. REMINDERS FOR THE USER ............................................................................................................................................................................................ 9
11. USING THE GAS HOB ...................................................................................................................................................................................................... 9
12. USING THE HOTPLATE/SIMPLE SERVICE ....................................................................................................................................................................... 10
13. GAS OVEN 600 SERIES USE ........................................................................................................................................................................................... 11
14. GAS OVEN 650 SERIES USE ........................................................................................................................................................................................... 11
15. GAS STOCKPOT STOVE USE ........................................................................................................................................................................................... 12
16. ELECTRIC COOK TOP/ELECTRIC STOCKPOT STOVE USE ................................................................................................................................................. 12
17. ELECTRIC CONVECTION OVEN USE ............................................................................................................................................................................... 13
18. ELECTRIC MULTIFUNCTION OVEN (600 SERIES) USE ..................................................................................................................................................... 13
19. PROLONGED DISUSE ..................................................................................................................................................................................................... 14
IV. INSTRUCTIONS FOR CLEANING .................................................................................................................................................................. 14
20. REMINDERS FOR CLEANING ......................................................................................................................................................................................... 14
V. INSTRUCTIONS FOR MAINTENANCE .......................................................................................................................................................... 14
21. REMINDERS FOR THE MAINTENANCE TECHNICIAN ...................................................................................................................................................... 14
22. CONVERSION TO ANOTHER TYPE OF GAS ..................................................................................................................................................................... 14
23. COMMISSIONING ......................................................................................................................................................................................................... 14
24. TROUBLESHOOTING ..................................................................................................................................................................................................... 14
25. REPLACING COMPONENTS ........................................................................................................................................................................................... 16
26. CLEANING THE INTERIOR .............................................................................................................................................................................................. 18
27. MAIN COMPONENTS .................................................................................................................................................................................................... 18
FR - INSTALLATION – EMPLOI - ENTRETIEN ............................................................................................................................... 19
I. AVERTISSEMENTS GÉNÉRAUX ................................................................................................................................................................... 19
1. ÉLIMINATION DE L'EMBALLAGE ET DE L'APPAREIL ....................................................................................................................................................... 20
2. DISPOSITIFS DE SÉCURITÉ ............................................................................................................................................................................................. 20
II. INSTRUCTIONS POUR L'INSTALLATION ...................................................................................................................................................... 20
3. AVERTISSEMENTS POUR L'INSTALLATEUR .................................................................................................................................................................... 20
4. NORMES ET TEXTES DE LOI DE RÉFÉRENCE .................................................................................................................................................................. 21
5. DÉBALLAGE ................................................................................................................................................................................................................... 21
6. MISE EN PLACE ............................................................................................................................................................................................................. 21
7. RACCORDEMENTS ........................................................................................................................................................................................................ 21
8. ADAPTATION À UN AUTRE TYPE DE GAZ ...................................................................................................................................................................... 22
9. MISE EN SERVICE .......................................................................................................................................................................................................... 24
III. INSTRUCTIONS POUR L'UTILISATION ......................................................................................................................................................... 24
10. AVERTISSEMENTS POUR L'UTILISATEUR ....................................................................................................................................................................... 24
11. UTILISATION DU PLAN DE CUISSON AU GAZ ................................................................................................................................................................. 25
12. UTILISATION DE LA PLAQUE COUP-DE-FEU À GAZ/ SIMPLE SERVICE ............................................................................................................................ 25
13. UTILISATION FOUR GAZ SERIE 600 ............................................................................................................................................................................... 26
14. UTILISATION FOUR GAZ SERIE 650 ............................................................................................................................................................................... 26
15. UTILISATION RECHAUD GAZ ......................................................................................................................................................................................... 27
16. UTILISATION TABLE DE CUISSON ELECTRIQUE/RECHAUD ELECTRIQUE ........................................................................................................................ 28
17. MODE D’EMPLOI DU FOUR ÉLECTRIQUE À CONVENTION ............................................................................................................................................ 28
18. UTILISATION FOUR ELECTRIQUE MULTIFUNCTION (SERIE 600) .................................................................................................................................... 28
19. PÉRIODES D'INACTIVITÉ ................................................................................................................................................................................................ 29
IV. INSTRUCTIONS POUR LE NETTOYAGE ........................................................................................................................................................ 30
20. AVERTISSEMENTS POUR LE NETTOYAGE ...................................................................................................................................................................... 30
V. INSTRUCTIONS POUR L'ENTRETIEN ........................................................................................................................................................... 30
21. AVERTISSEMENTS POUR LE TECHNICIEN D'ENTRETIEN ................................................................................................................................................ 31
22. ADAPTATION À UN AUTRE TYPE DE GAZ ...................................................................................................................................................................... 31
23. MISE EN SERVICE .......................................................................................................................................................................................................... 31
24. RÉSOLUTION DES DYSFONCTIONNEMENTS .................................................................................................................................................................. 31
25. REMPLACEMENT DE PIÈCES.......................................................................................................................................................................................... 31
26. NETTOYAGE DES PIÈCES INTERNES ............................................................................................................................................................................... 32
27. PIÈCES PRINCIPALES ..................................................................................................................................................................................................... 34
DE - INSTALLATION – GEBRAUCH - WARTUNG .......................................................................................................................... 35
I. ALLGEMEINE HINWEISE ............................................................................................................................................................................. 35
1. ENTSORGUNG DER VERPACKUNG UND DES GERÄTS ................................................................................................................................................... 35
2. SICHERHEITS VORRICHTUNGEN .................................................................................................................................................................................... 36
II. INSTALLATIONSANLEITUNGEN .................................................................................................................................................................. 36
3. HINWEISE FÜR DEN INSTALLATIONSTECHNIKER ........................................................................................................................................................... 36
4. BEZUGSNORMEN UND -GESETZE ................................................................................................................................................................................. 37
modular gassolidtop ma 2020 2/90

5. AUSPACKEN .................................................................................................................................................................................................................. 37
6. GERÄTEAUFSTELLUNG .................................................................................................................................................................................................. 37
7. ANSCHLÜSSE ................................................................................................................................................................................................................. 37
8. UMSTELLUNG AUF EINE ANDERE GASART.................................................................................................................................................................... 38
9. INBETRIEBNAHME ........................................................................................................................................................................................................ 40
III. BEDIENUNGSANWEISUNGEN .................................................................................................................................................................... 40
10. HINWEISE FÜR DEN BENUTZER .................................................................................................................................................................................... 40
11. GEBRAUCH DERGASKOCHMULDE ................................................................................................................................................................................. 41
12. GEBRAUCH DES GLUHPLA TTENHERDES/WÀRME-PLATTEN ......................................................................................................................................... 41
13. VERWENDUNF VOM GAS OFEN (SERIE 600) ................................................................................................................................................................. 42
14. VERWENDUNG VON GAS-BACKOFEN (SERIE 650) ........................................................................................................................................................ 42
15. VERWENDUNG VON GAS-HOCKERKOCHER .................................................................................................................................................................. 43
16. VERWENDUNG VON ELEKTROHERD/ELEKTRISCHER HOCKERKOCHER ......................................................................................................................... 44
17. VERWENDUNG DES HEIΒLUFT OFEN ............................................................................................................................................................................ 44
18. VERWENDUNG VON MULTIFUNKTIONS-ELEKTROBACKOFEN (SERIE 600).................................................................................................................... 45
19. STILLSTANDZEITEN ....................................................................................................................................................................................................... 45
IV. REINIGUNGSANLEITUNGEN ...................................................................................................................................................................... 46
20. REINIGUNGSHINWEISE ................................................................................................................................................................................................. 46
V. WARTUNGSANLEITUNGEN ........................................................................................................................................................................ 46
21. HINWEISE FÜR DEN WARTUNGSTECHNIKER ................................................................................................................................................................ 46
22. UMSTELLUNG AUF EINE ANDERE GASART.................................................................................................................................................................... 47
23. INBETRIEBNAHME ........................................................................................................................................................................................................ 47
24. ABHILFE BEI BETRIEBSSTÖRUNGEN .............................................................................................................................................................................. 47
25. ERSATZ VON BAUTEILEN............................................................................................................................................................................................... 47
26. REINIGUNG DER INNEREN GERÀTETEILE ...................................................................................................................................................................... 48
27. HAUPTKOMPONENTEN ................................................................................................................................................................................................ 50
NL - INSTALLATIE - GEBRUIK - ONDERHOUD ............................................................................................................................. 51
I. ALGEMENE MEDEDELINGEN .....................................................................................................................................................................51
1. VERWIJDERING VERPAKKING EN APPARATUUR ........................................................................................................................................................... 52
2. VEILIGHEIDSINRICHTINGEN .......................................................................................................................................................................................... 52
II. AANWIJZINGEN VOOR DE INSTALLATIE ..................................................................................................................................................... 52
3. MEDEDELINGEN VOOR DE INSTALLATEUR ................................................................................................................................................................... 53
4. REFERENTIENORMEN EN -WETTEN .............................................................................................................................................................................. 53
5. UITPAKKEN ................................................................................................................................................................................................................... 53
6. PLAATSING ................................................................................................................................................................................................................... 53
7. AANSLUITINGEN ........................................................................................................................................................................................................... 53
8. AANPASSING OP EEN ANDER GASTYPE ........................................................................................................................................................................ 54
9. INBEDRIJFSTELLING ...................................................................................................................................................................................................... 56
III. GEBRUIKSAANWIJZINGEN ......................................................................................................................................................................... 56
10. MEDEDELINGEN VOOR DE GEBRUIKER ......................................................................................................................................................................... 56
11. GEBRUIK VAN DE KOOKPLAAT GAS .............................................................................................................................................................................. 57
12. GEBRUIK VAN DE GRILLPLATEN/SIMPLE SERVICE ......................................................................................................................................................... 57
13. GEBRUIK VAN DE OVEN GAS 600 .................................................................................................................................................................................. 58
14. GEBRUIK VAN DE OVEN GAS 650 .................................................................................................................................................................................. 58
15. GEBRUIK VAN DE GROTE GASPIT .................................................................................................................................................................................. 59
16. GEBRUIK VAN DE KOOKPLAAT ELEKTRISCH/GROTE PIT ELEKTRISCH ............................................................................................................................ 59
17. GEBRUIK VAN DE OVEN ELEKTRISCH CONVECTIE ......................................................................................................................................................... 60
18. GEBRUIK VAN DE OVEN ELEKTRISCH MULTIFUNCTIONEEL (SERIE 600) ........................................................................................................................ 60
19. INUTILITEITSPERIODE ................................................................................................................................................................................................... 61
IV. AANWIJZINGEN VOOR DE REINIGING ........................................................................................................................................................ 62
20. MEDEDELINGEN VOOR DE REINIGING .......................................................................................................................................................................... 62
V. ONDERHOUDSAANWIJZINGEN.................................................................................................................................................................. 62
21. MEDEDELINGEN VOOR HET ONDERHOUDSPERSONEEL ............................................................................................................................................... 62
22. AANPASSING OP EEN ANDER GASTYPE ........................................................................................................................................................................ 63
23. INBEDRIJFSTELLING ...................................................................................................................................................................................................... 63
24. STORINGEN OPLOSSEN ................................................................................................................................................................................................. 63
25. VERVANGING VAN DE COMPONENTEN ........................................................................................................................................................................ 63
26. REINIGING VAN DE INTERNE ONDERDELEN...................................................................................................................................................................64
27. HOOFDCOMPONENTEN .................................................................................................................................................................................................64
VI. SCHEMI DI INSTALLAZIONE – INSTALLATIONS PLAN - INSTALLATION DIAGRAM – SCHEMA D’INSTALLATION – ESQUEMA DE INSTALACION
- INSTALLATIESCHEMA'S ..................................................................................................................................................................................... 67
VII. FIGURE – ABB. – FIG. FIGURE-FIG.-IMAGE-ABB.-CIFRAS-AFBEELDINGEN............................................................................................. 84
VIII. TAB1 - DATI TECNICI - TECHNICAL DATA - TECHNISCHE DATEN - CARACTERISTIQUES TECHNIQUES - DATOS TECNICOS - TECHNISCHE
GEGEVENS UGELLI E REGOLAZIONI - NOZZLES AND SETTINGS - BUSES ET LES PARAMÈTRES - DUSEN UND EINSTELLUNGEN - BOQUILLAS Y LOS AJUSTES - VERSTUIVERS EN
REGELINGEN ........................................................................................................................................................................................................... 85
IX. TAB2 - DATI TECNICI - TECHNICAL DATA - TECHNISCHE DATEN - CARACTERISTIQUES TECHNIQUES - DATOS TECNICOS - TECHNISCHE
GEGEVENS CATEGORIE E PRESSIONI - CATEGORIES AND PRESSURES - CATÉGORIES ET PRESSIONS - KATEGORIEN E DRUCK - LAS CATEGORÍAS Y LAS PRESIONES -
CATEGORIEËN EN DRUK ............................................................................................................................................................................................. 86
X. TAB3 - DATI TECNICI - TECHNICAL DATA - TECHNISCHE DATEN - CARACTERISTIQUES TECHNIQUES - DATOS TECNICOS - TECHNISCHE
GEGEVENS DATI TECNICI APPARECCHIATURE GAS - TECHNICAL DATA OF GAS APPLIANCES - CARACTÉRISTIQUES TECHNIQUES DES APPAREILS À GAZ - TECHNISCHE DATEN
GASGERATE - DATOS TÉCNICOS DE LOS EQUIPOS DE GAS - TECHNISCHE GEGEVENS GASAPPARATUUR ............................................................................................ 87
XI. TAB4 - DATI TECNICI - TECHNICAL DATA - TECHNISCHE DATEN - CARACTERISTIQUES TECHNIQUES - DATOS TECNICOS- TECHNISCHE
GEGEVENS DATI TECNICI APPARECCHIATURE ELETTRICHE - DATI TECNICI ATECHNICAL DATA OF ELECTRIC APPLIANCES - CARACTÈRISTIQUES TECHNIQUES DES APPAREILS
ELECTRIQUES - TECHNISCHE DATEN ELEKTROGERATE - DATOS TÉCNICOS DE LOS EQUIPOS ELÉCTRICOS - TECHNISCHE GEGEVENS ELEKTRISCHE APPARATUUR ..................... 89
modular gassolidtop ma 2020 3/90

UK - INSTALLATION – USE - MAINTENANCE
I. GENERAL PRESCRIPTIONS
READ THIS MANUAL CAREFULLY. IT
PROVIDES IMPORTANT INFORMATION
FOR SAFE INSTALLATION, USE AND
MAINTENANCE OF THE APPLIANCE.
FAILURE TO COMPLY WITH WHAT IS
PRESENTED BELOW MAY
COMPROMISE THE SAFETY OF THE
EQUIPMENT.
THE MANUFACTURER WILL NOT BE
LIABLE FOR ANY DAMAGE OR INJURY
RESULTING FROM FAILURE TO
OBSERVING THE FOLLOWING RULES.
TRANSLATION OF THE ORIGINAL
INSTRUCTIONS.
APPLIANCES NEED PRECAUTIONS FOR
INSTALLATION, PLACING AND/OR
FIXATION AND CONNECTION TO THE
MAINS.
SEE SECTION “INSTALLATION
INSTRUCTIONS”.
THE APPLIANCES NEED PRECAUTIONS
FOR CLEANING. SEE THE SECTION
“
INSTRUCTION FOR CLEANING”.
THE SYMBOL “ HIGH VOLTAGE” IS
PLACED ON A PANEL THAT GIVES
ACCESS TO A PART WITH HIGH
VOLTAGE.
Keep this manual in a safe place, known to all
users, so that it can be consulted throughout the
working life of the appliance.
This equipment is designed for cooking food. It is
intended for industrial use. Any other use is to be
considered improper
This appliance is not intended for use by people
(including children) with limited physical, sensory
or mental abilities or without experience and
knowledge of it.
Unless they are supervised or instructed in its use
by a person responsible for their safety.
Do not leave de appliance unattended in presence
of children and ensure that the latter do not have
acces to the appliance.
The appliance must be used by trained personnel.
Do not leave the appliance unattended when
operating.
DO NOT STORE " AMMABLE
MATERIALS IN CLOSE PROXIMITY TO
THE APPLIANCE. FIRE HAZARD.
The appliance must be installed in a well-
ventilated room.
Inadequate ventilation causes asphyxia. Do not
obstruct the ventilation system of the place where
the
appliance is installed. Do not obstruct the vents or
ducts of this or other appliances.
In the event of an appliance fault or malfunction,
shut the gas shut
-
off valve and/or switch the
appliance off at the main switch installed upline.
Installation and conversion to a different type of
gas must be carried out by qualified technicians
authorized by the manufacturer, in compliance
with current safety standards and the instructions
in this manual.
Appliance maintenance and conversion to a
different type of gas must be carried out by
qualified technicians authorized by the
manufacturer, in compliance with current safety
standards and the instructions in this manual.
Clean the appliance following the instructions
given in Chapter “ INSTRUCTIONS FOR CLEANING”.
1. DISPOSAL OF PACKING AND OF THE
APPLIANCE
PACKING
modular gassolidtop ma 2020 4/90

The packing is made using environmentally
friendly materials. The plastic recyclable
components are:
-
the transparent cover, the bags containing the
instructions manual and nozzles (made of
Polyethylene - PE).
-
the straps (in Polypropylene - PP).
APPLIANCE
The appliance is manufactured 90% from
recyclable metals (stainless steel, aluminium
sheet, copper.. .. ).
The appliance must be scrapped in compliance
with current regulations governing such disposal.
Make the appliance unusable before scrapping.
It must be disposed of properly.
THE SYMBOL SHOWING A CROSSED-
OUT WASTE CONTAINER ON THE UNIT
OR PACKAGE INDICATES THAT, AT THE
END OF ITS LIFE CYCLE, THE PRODUCT
MUST BE COLLECTED SEPARATE FROM
OTHER WASTE.
THE DIFFERENTIATED COLLECTION OF THIS
EQUIPMENT IS ORGANISED AND MANAGED BY
THE PRODUCER.
THE USER WHO INTENDS TO GET RID OF THIS
EQUIPMENT SHALL CONTACT THE PRODUCER
AND FOLLOW THE SYSTEM THAT THE LATTER HAS
USED IN ORDER TO COLLECT THE
EQUIPMENT
SEPARATELY AT THE END OF ITS LIFE.
PROPER SEPARATE COLLECTION HELPS PREVENT
POSSIBLE NEGATIVE IMPACTS ON THE
ENVIRONMENT AND HEALTH, AND FAVOURS THE
REUSE AND/OR RECYCLING OF THE UNIT’S
MATERIALS.
ABUSIVE DISPOSAL OF THE PRODUCT BY THE
HOLDER WILL RESULT IN THE APPLICATION OF
PENALTIES AS PER CURRENT STANDARDS.
2. SAFETY DEVICES
ELECTRIC OVEN
SAFETY THERMOSTAT
THE MANUFACTURER WILL NOT BE
LIABLE FOR ANY DAMAGE OR INJURY
RESULTING FROM FAILURE TO
OBSERVING THE FOLLOWING RULES.
The appliance is equipped with a manual reset
safety thermostat that interrupts heating when
the operating temperature exceeds the maximum
permitted value.
To restore appliance operation, remove the
control panel and press the thermostat reset
button. This procedure must only be carried out
by a qualified, authorized technician.
II. INSTRUCTIONS FOR
INSTALLATION
3. REMINDERS FOR THE INSTALLER
READ THIS MANUAL CAREFULLY. IT
PROVIDES IMPORTANT INFORMATION
FOR SAFE INSTALLATION, USE AND
MAINTENANCE OF THE APPLIANCE.
FAILURE TO COMPLY WITH WHAT IS
PRESENTED BELOW MAY
COMPROMISE THE SAFETY OF THE
EQUIPMENT.
THE MANUFACTURER WILL NOT BE
LIABLE FOR ANY DAMAGE OR INJURY
RESULTING FROM FAILURE TO
OBSERVING THE FOLLOWING RULES.
Identify the specific appliance model. The model
number is detailed on the packing and on the
appliance dataplate.
The appliance must be installed in a well-
ventilated room.
Installation and conversion to a different type of
gas must be carried out by qualified technicians
authorized by the manufacturer, in compliance
with current safety standards and the instructio
ns
in this manual.
Appliance maintenance and conversion to a
different type of gas must be carried out by
qualified technicians authorized by the
manufacturer, in compliance with current safety
standards and the instructions in this manual.
Do not obstruct any air vents or drains present on
the appliance.
Do not tamper with appliance components.
4. REFERENCE STANDARDS AND LAWS
Install the appliance in accordance with the safety
standards in force in the country.
modular gassolidtop ma 2020 5/90

5. UNPACKING
Check the state of the packing and in the event of
damage, ask the delivery person to inspect the
goods.
Remove the packing.
Remove the protective film from the outer panels.
Use a suitable solvent to remove any residual
adhesive from the panels.
6. POSITIONING
The overall dimensions of the appliance and the
position of connections are given on the
installation diagram at the end of this manual.
The appliance can be installed singly or in
combination with other appliances in the same
product range.
The appliance is not suitable for integrated
installation.
Position the appliance at least 10 cm from
adjacent walls.
If the appliance is to be be placed near walls,
dividers, kitchen furniture, decorative elements
etc. this must be made of non
-combustible
materials
Otherwise, they must be covered with suitable
non
-combustible heat insulating materials.
Level the appliance by means of the height-
adjustable feet
APPLIANCE ASSEMBLY WITH BASE AND BRIDGE
Follow the instructions provided with the type of
support utilized.
FUMES EXHAUST SYSTEM
Create a fumes exhaust system based on the "
Type " of appliance. The " Type " is stated on the
appliance dataplate.
" A1 " TYPE APPLIANCE
Position the “A1” type appliance below an
extractor hood to ensure smoke and fumes
generated by cooking are removed.
" B21 " TYPE APPLIANCE
Position the “B21” type appliance below an
extractor hood.
" B11 " TYPE APPLIANCE
Fit the “B11” type appliance with a suitable fl ue,
available from the appliance manufacturer.
Follow
the assembly instructions provided with the flue.
Connect the flue to a 150/155 mm diameter hose,
heat resistant to 300°C.
Vent to the outside or into an effi cient fl ue. The
hose length must not exceed 3 metres.
7. CONNECTIONS
The position and dimensions of connections are
given in the installation diagram at the end of this
manual.
CONNECTION TO THE GAS SUPPLY
Check that the appliance is designed to operate
with the type of gas supply present on site. Check
the information given on the decals on the packing
and appliance.
Convert the appliance to the local gas type, if
necessary. Follow the instructions at the next
paragraph “Conversion to a different type of gas”.
On top appliances a rear connection is also
available. Remove the plug present and screw it
tightly onto the front connector.
A rapid-action gas shut-off valve must be fitted
upstream of the appliance in an easily accessible
position.
Do not use connection pipes having a diameter
smaller than that of the appliance's gas connector.
Once the appliance has been installed, check for
gas leaks at the connection points.
ELECTRICAL CONNECTIONS
Check if the appliance is designed to operate at
the voltage and frequency of the power supply
present on site. Check the details given on the
appliance dataplate and plaque near the terminal
board.
Install upstream of the equipment in an easily
accessi
ble place, an all-
pole disconnecting device
with a contact gap of allowing full disconnection
under the conditions of overvoltage category III.
A flexible rubber cable with insulation
specifications not lower than type H05 RN
-F must
be used for connection.
modular gassolidtop ma 2020 6/90

Connect the power supply cable to the terminal
board as shown in the wiring diagram supplied
with the appliance.
Secure the power supply cable with the cable
clamp.
Protect the power supply cable on the outside of
the appliance with a rigid plastic or metal pipe.
If the power supply cable is damaged, it must be
replaced by the manufacturer or his service centre
or by a person with similar qualifications to
prevent any risk.
THE SYMBOL “ HIGH VOLTAGE” IS
PLACED ON A PANEL THAT GIVES
ACCESS TO A PART WITH HIGH
VOLTAGE.
PROTECTIVE EARTH AND EARTH BONDING
CONNECTIONS
Connect the appliance to an efficient ground
circuit. Connect the earth conductor to the
terminal with the symbol
next to the main
terminal board.
Connect the metal structure of the appliance to
the equipotential node. Connect the conductor to
the terminal with the symbol on the outside
part of the bottom.
CONNECTION TO THE WATER SUPPLY
The appliance must be connected to a potable
water supply. The water inlet pressure must be
between 150 kPa and 300 kPa. Use a pressure
reducer if the inlet pressure is above the
maximum permitted level.
Install a mechanical filter and a shut-off valve
upstream of the appliance in an easily accessible
point.
Make sure the water circuit is free of ferrous
particles before connecting the filter and the
appliance.
Seal any unused connectors with a plug.
Once the appliance has been installed, check for
gas leaks at the connection points.
CONNECTION TO THE WATER DRAIN
The water drainage system must be made using
materials resistant to temperatures of 100 °C. The
bottom of the appliance must not be subjected to
steam produced by drainage of hot water.
Install a siphoned floor drain with grating below
the water drain cock of Boiling pans and in front of
Bratt pans.
8. CONVERSION TO ANOTHER
TYPE OF GAS
Table Tab1 specifies:
-
which gas can be used for the appliance.
-
the nozzles and settings for each gas that can be
used.
For nozzles, the number indicated in table TAB1 is
also stamped on the body of nozzles.
To convert the appliance to the local gas type,
follow the instructions given in TAB1 andcarry out
the steps below:
-
Replace the main burner nozzle (UM).
-
Adjust the main burner's air regulator to distance
A.
-
Replace the pilot burner nozzle (UP).
-
Adjust the pilot burner air " ow (if necessary).
-
Replace the gas valve minimum nozzle (Um).
-
Affix the adhesive tab indicating the new type of
gas used.
-
The nozzles and adhesive tabs are supplied with
the appliance.
GAS HOB
REPLACING THE MAIN BURNER NOZZLE
Remove the control panel.
Remove pan stand grids, basins and burners.
Remove nozzle UM and replace it with the one
indicated in table TAB1.
Retighten nozzle UM.
Reassemble all parts. For assembly, proceed in
reverse order.
REPLACING THE MINIMUM ADJUSTMENT SCREW
Remove the control panel.
Remove nozzle UM and replace it with the one
indicated in table TAB1.
Retighten nozzle UM.
Reassemble all parts. For assembly, proceed in
reverse order.
GAS SOLID TOP RANGES
modular gassolidtop ma 2020 7/90

REPLACING THE NOZZLE AND THE MAIN BURNER
PRIMARY AIR REGULATION
Remove the control panel.
Remove nozzle UM and replace it with the one
indicated in table TAB1.
Retighten nozzle UM.
Slacken screw V and position the air regulator at
distance A as indicated in table TAB1.
Retighten screw V fully.
Reassemble all parts. For assembly, proceed in
reverse order.
REPLACING THE MINIMUM ADJUSTMENT SCREW
Remove the control panel.
Remove nozzle UM and replace it with the one
indicated in table TAB1.
Retighten nozzle UM.
Reassemble all parts. For assembly, proceed in
reverse order.
REPLACING THE PILOT BURNER NOZZLE
Remove the control panel and internal guards.
Undo connector R.
Remove nozzle UP and replace it with the one
indicated in table TAB1.
Retighten connector R. Reassemble all parts.
Following, in reverse order, the sequence used for
their removal.
GAS OVEN
REPLACING THE NOZZLE AND THE MAIN BURNER
PRIMARY AIR REGULATION
Open the oven door.
remove the sole and the protection panel
Slacken screw V.
remove the UM nozzle.
Retighten nozzle UM.
Place the aeration adjuster at the distance A
specified in the table TAB1.
Retighten screw V fully.
Reassemble all parts. For assembly, proceed in
reverse order.
REPLACING THE MINIMUM ADJUSTMENT SCREW
Remove the control panel.
Remove nozzle UM and replace it with the one
indicated in table TAB1.
Retighten nozzle UM.
Reassemble all parts. For assembly, proceed in
reverse order.
GAS STOCKPOT
STOVE
REPLACING THE NOZZLE AND THE MAIN BURNER
PRIMARY AIR REGULATION
Remove the control panel.
Remove nozzle UM and replace it with the one
indicated in table TAB1.
Retighten nozzle UM.
Slacken screw V and position the air regulator at
distance A as indicated in table TAB1.
Retighten screw V fully.
Reassemble all parts. For assembly, proceed in
reverse order.
REPLACING THE MINIMUM ADJUSTMENT SCREW
Remove the control panel.
Remove nozzle UM and replace it with the one
indicated in table TAB1.
Retighten nozzle UM.
Reassemble all parts. For assembly, proceed in
reverse order.
REPLACING THE PILOT BURNER NOZZLE
Remove the control panel.
Undo connector R.
Remove nozzle UP and replace it with the one
indicated in table TAB1.
Retighten connector R. Reassemble all parts.
Following, in reverse order, the sequence used for
their removal.
9. COMMISSIONING
Following installation, conversion to a different
type of gas or any maintenance operations, check
appliance operation. In the event of any
malfunction, consult the next Paragraph "
Troubleshooting " .
GAS APPLIANCES
Switch on the appliance as directed in the
instructions and reminders for use given in
modular gassolidtop ma 2020 8/90

Chapter “ INSTRUCTIONS FOR USE “ and check:
-
the gas supply pressure (see next Paragraph).
-
the correct ignition of the burners and the
effectiveness of the fumes removal system.
CHECKING THE GAS SUPPLY PRESSURE
To measure the gas supply pressure use a
manometer with a minimum definition of 0,1
mbar.
Remove the control panel.
Remove the screw from on pressure test point PP
and connect the manometer to the test point.
Make the measurement with the appliance in
operation.
IMPORTANT! IF THE GAS SUPPLY
PRESSURE IS NOT WITHIN THE LIMITS
(MIN.
- MAX) INDICATED IN TABLE
TAB2, CEASE OPERATION OF THE
APPLIANCE AND CONTACT THE GAS
UTILITY COMPANY.
Disconnect the manometer and retighten the
retaining screw on the pressure connect
ion.
ELECTRIC EQUIPMENT
Switch on the appliance as directed in the
instructions and reminders for use given in
Chapter “ INSTRUCTIONS FOR USE “ and check:
-
the current values of each phase.
-
the correct operation of the heating elements.
III. INSTRUCTIONS FOR USE
10.REMINDERS FOR THE USER
READ THIS MANUAL CAREFULLY. IT
PROVIDES IMPORTANT INFORMATION
FOR SAFE INSTALLATION, USE AND
MAINTENANCE OF THE APPLIANCE.
THE MANUFACTURER WILL NOT BE
LIABLE FOR ANY DAMAGE OR INJURY
RESULTING FROM FAILURE TO
OBSERVING THE FOLLOWING RULES.
For after-sales service, contact technical
assistance centres authorized by the manufacturer
and demand the use of original spare parts.
Have the appliance serviced at least twice a year.
The manufacturer recommends taking out a
service contract.
The appliance is designed for professional use and
must be operated by trained personnel.
The appliance is to be used for cooking food as
specified in the prescriptions for use. Any other
use is considered to be improper.
Do not allow the appliance to operate empty for
prolonged periods.
Only pre-
heat the oven just
before use.
Do not leave the appliance unattended while in
operation.
In the event of an appliance fault or malfunction,
shut the gas shut
-
off valve and/or switch the
appliance off at the main switch installed upline.
Clean the appliance following the instructions
given in Chapter “ INSTRUCTIONS FOR CLEANING”.
DO NOT STORE " AMMABLE
MATERIALS IN CLOSE PROXIMITY TO
THE APPLIANCE. FIRE HAZARD.
Do not obstruct any air vents or drains present on
the appliance.
Do not tamper with appliance components.
Keep this manual in a safe place, known to all
users, so that it can be consulted throughout the
working life of the appliance.
Installation and appliance maintenance must be
carried out by qualified technicians authorized by
the manufacturer, in compliance with current
safety standards and the instructions in this
manual.
Appliance maintenance and conversion to a
different type
of gas must be carried out by
qualified technicians authorized by the
manufacturer, in compliance with current safety
standards and the instructions in this manual.
11.USING THE GAS HOB
The appliance is designed for cooking foods
contained in pots and pans.
Check that the flame spreaders are correctly
placed on the burners.
BURNER IGNITION AND EXTINCTION
The gas tap control knob has the following
positions:
modular gassolidtop ma 2020 9/90

OFF
MAX. FLAME
MIN. FLAME
MAIN BURNER IGNITION
To switch on the pilot burner rotate the knob from
the “off” position to the “maximum flame”
position
For the minimum flame, turn the knob from
“max. flame” to “min. flame”.
TURNING OFF
to switch off the main burner turn the knob to the
"off" position.
12.USING THE GAS HOB
The appliance is designed for cooking foods
contained in pots and pans.
The highest temperatures are in the centre of the
hotplate.
Check that the flame spreader is correctly placed
on the burner. Raise the central disc on the
hotplate.
BURNER IGNITION AND EXTINCTION
The gas tap control knob has the following
positions:
OFF
PILOT IGNITION
MAX. FLAME
MIN.
FLAME
PILOT IGNITION
Press and turn knob to “pilot on”.
Press the knob down fully and light the pilot using
the piezoelectric igniter.
Hold the knob down for about 20 seconds before
releasing it. If the pilot flame goes out, repeat the
operation.
The pilot flame can be seen through the peep hole
on the control panel.
The pilot light can be lit by bringing an open flame
up to the noz
zle.
Raise the central disc on the
hotplate.
MAIN BURNER IGNITION
To light the main burner, turn the knob from “pilot
on” to “max. flame”.
For the minimum flame, turn the knob from
“max. flame” to “min. flame”.
TURNING OFF
Turn the knob from “max. flame” or “min. flame”
to “pilot on”.
To shut off the pilot, press the knob lightly and
turn it to “off”.
13.USING THE HOTPLATE/SIMPLE
SERVICE
The appliance is designed for cooking foods
contained in pots and pans.
The highest temperatures are in the centre of the
hotplate.
Check that the flame spreader is correctly placed
on the burner. Raise the central disc on the
hotplate.
BURNER IGNITION AND EXTINCTION
The gas tap control knob has the following
positions:
OFF
PILOT IGNITION
MAX. FLAME
MIN. FLAME
PILOT IGNITION
Press and turn knob to “pilot on”.
Press the knob down fully and light the pilot using
the piezoelectric igniter.
Hold the knob down for about 20 seconds before
releasing it. If the pilot flame goes out, repeat the
operation.
The pilot flame can be seen through the peep hole
on the control panel.
modular gassolidtop ma 2020 10/90

The pilot light can be lit by bringing an open flame
up to the noz
zle.
Raise the central disc on the
hotplate.
MAIN BURNER IGNITION
To light the main burner, turn the knob from “pilot
on” to “max. flame”.
For the minimum flame, turn the knob from
“max. flame” to “min. flame”.
TURNING OFF
Turn the knob from “max. flame” or “min. flame”
to “pilot on”.
To shut off the pilot, press the knob lightly and
turn it to “off”.
14.GAS OVEN 600 SERIES USE
The appliance is designed for cooking foods placed
on the grilles provided.
Do not leave the door even partially open during
use.
ATTENTION: WHEN THE OVEN GAS
MODE IS ON THE GRILL DOESN’T
WORK
BURNER IGNITION AND EXTINCTION
The thermostat control knob has the following
positions:
OFF
MINIMUM TEMPERATURE
INTERMEDIATE TEMPERATURES
MAXIMUM WATER TEMPERATURE
MAIN BURNER IGNITION
Turn the knob to the chosen temperature setting
for cooking.
Press the knob for 5
-
10 seconds. The burner is
turned on electrically.
If the burner doesn’t turn on,
open the oven door
for 1 minute and repeat the operation.
TURNING OFF
to switch off the main burner turn the knob to the
"off" position.
ELECTRIC GRILL SWITCH ON/OFF
The energy regulator control knob has the
following positions:
OFF
MINIMUM TEMPERATURE
INTERMEDIATE TEMPERATURES
MAXIMUM WATER TEMPERATURE
ELECTRIC GRILL SWITCH ON
Turn the energy regulator knob to any position
between “MIN” and “MAX”.
The yellow and the internal oven indicator lamps
turn on.
TURNING OFF
Turn the energy regulator knob to position " Off " .
15. GAS OVEN 650 SERIES USE
The appliance is designed for cooking foods placed
on the grilles provided.
Do not leave the door even partially open during
use.
modular gassolidtop ma 2020 11/90

BURNER
IGNITION AND EXTINCTION
the control knob of the thermostatic tap has the
following positions use:
OFF
MINIMUM TEMPERATURE
INTERMEDIATE TEMPERATURES
MAXIMUM WATER
TEMPERATURE
MAIN BURNER IGNITION
Turn the knob to the chosen temperature setting
for cooking.
Press the knob down simultaneously with the
piezoelectric unit . Press the knob down for 10
-15
seconds and then leave it; the pilot burner will
remain on.
If it turns off, repeat the operation.
TURNING OFF
to switch off the main burner turn the knob to the
"off" position.
16.GAS STOCKPOT STOVE USE
The appliance is designed for cooking foods
contained in pots and pans.
Check that the flame spreaders are correctly
placed on the burners.
BURNER IGNITION AND EXTINCTION
The gas tap control knob has the following
positions:
OFF
PILOT IGNITION
MAX. FLAME
MIN. FLAME
PILOT IGNITION
Press and turn knob to “pilot on”.
Press the knob down fully and light the pilot with a
flame.
Hold the knob down for about 20 seconds before
releasing it. If the pilot flame goes out, repeat the
operation.
MAIN BURNER IGNITION
To light the main burner, turn the knob from “pilot
on” to “max. flame”.
For the minimum flame, turn the knob from
“max. flame” to “min. flame”.
TURNING OFF
Turn the knob from “max. flame” or “min. flame”
to “pilot on”.
To shut off the pilot, press the knob lightly and
turn it to “off”.
17.ELECTRIC COOK TOP/ELECTRIC
STOCKPOT STOVE USE
The appliance is designed for cooking foods
contained in pots and pans.
Use flat bottomed pans.
Do not leave the hotplates switched on with no
pan or an empty pan in place.
Do not pour cold liquids onto the hot hotplate.
modular gassolidtop ma 2020 12/90

SWITCHING ON AND OFF
The control knob has the following positions:
OFF
MINIMUM TEMPERATURE
INTERMEDIATE TEMPERATURES
MAXIMUM WATER TEMPERATURE
SWITCHING ON
Turn the control knob to the chosen position.
The green indicator light switches on.
Lighting up of green indicator “A” signals that the
corresponding hot
-plate is on.
TURNING OFF
Turn the knob to position " 0 " .
The green indicator light switches off.
18.ELECTRIC CONVECTION OVEN USE
The appliance is designed for cooking foods placed
on the grilles provided.
Do not leave the door even partially open during
use.
The appliance is equipped with a manual reset
safety thermostat that interrupts heating when
the operating temperature exceeds the maximum
permitted value.
SWITCHING ON AND OFF
The thermostat control knob has the following
positions:
OFF
MINIMUM TEMPERATURE
INTERMEDIATE TEMPERATURES
MAXIMUM WATER TEMPERATURE
SWITCHING ON
Turn the thermostat knob to the chosen
temperature setting for cooking.
the yellow and the green indicator lamp turn on.
The yellow indicator light switches off when the
oven reaches the set temperature.
the green lamp indicate that the appliance is
under voltage
TURNING OFF
Turn the thermostat knob to position " 0 " .
the yellow and the green indicator lamp turn off.
19. ELECTRIC MULTIFUNCTION OVEN
(600 SERIES) USE
The appliance is designed for cooking foods placed
on the grilles provided.
Do not leave the door even partially open during
use.
The appliance is equipped with a manual reset
safety thermostat that interrupts heating when
the operating temperature exceeds the maximum
permitted value.
SWITCHING ON AND OFF
The electric oven is controlled by two knobs (for
selecting the type of heating and the cooking
temperature). A yellow indicator light indicates
operation of the heating elements.
The control knob has the following positions:
modular gassolidtop ma 2020 13/90

OFF
OVEN LAMP
UPPER AND LOWER HEATING
ELEMENTS
UPPER AND INNER HEATING
ELEMENTS WITH FAN
GRILL HEATING ELEMENT
GRILL HEATING ELEMENT WITH FAN
The thermostat control knob has the following
positions:
OFF
MINIMUM TEMPERATURE
INTERMEDIATE
TEMPERATURES
MAXIMUM WATER TEMPERATURE
SWITCHING ON
Turn the control knob to the chosen position.
Turn the thermostat knob to the chosen
temperature setting for cooking.
the yellow and the green indicator lamp turn on.
The yellow indicator light switches off when the
oven reaches the set temperature.
the green lamp indicate that the appliance is
under voltage
TURNING OFF
Turn the thermostat knob to position " 0 " .
Turn the knob to position " 0 " .
20.PROLONGED DISUSE
Before any prolonged disuse of the appliance,
proceed as follows:
-
Clean the appliance thoroughly.
-
Rub stainless steel surfaces with a cloth soaked in
vaseline oil to create a protective film.
-
Leave pot lids open.
-
Close cocks or main switches ahead of the
appliances.
Following prolonged disuse, proceed as follows:
-
Inspect the appliance thoroughly before using it
again.
-
Allow electric appliances to operate at the lowest
temperature for at least 60 minutes.
IV. INSTRUCTIONS FOR CLEANING
21.REMINDERS FOR CLEANING
READ THIS MANUAL CAREFULLY. IT
PROVIDES IMPORTANT INFORMATION
FOR SAFE INSTALLATION, USE AND
MAINTENANCE OF THE APPLIANCE.
THE MANUFACTURER WILL NOT BE
LIABLE FOR ANY DAMAGE OR INJURY
RESULTING FROM FAILURE TO
OBSERVING THE FOLLOWING RULES.
DISCONNECT THE APPLIANCE ELECTRIC
SUPPLY, IF PRESENT, BEFORE
CARRYING OUT ANY OPERATION.
Clean the satin finish stainless steel exterior
surfaces, the cooking wells and the surface of the
hotplates every day.
At least twice a year, have an authorized
technician clean the internal parts of the
appliance.
Do not use corrosive products to clean the floor
beneath the appliance.
Do not use direct or high pressure water jets to
clean the appliance.
SATIN
FINISH STAINLESS STEEL SURFACES
Clean the surfaces with a cloth or sponge using
water and proprietary non
-
abrasive detergents.
Follow the direction of the satin finish lines. Rinse
modular gassolidtop ma 2020 14/90

repeatedly and dry thoroughly.
Do not use pan scourers or other iron items.
Do not use chemical products containing chlorine.
Do not use sharp objects which might scratch and
damage the surfaces.
ELECTRIC HOTPLATES
Clean surfaces with a damp cloth.
Switch on for a few minutes to dry rapidly.
Lubricate surfaces with a fine coat of food grade
oil.
HOTPLATE RANGE
Clean surfaces with a damp cloth.
Switch on for a few minutes to dry rapidly.
Lubricate surfaces with a fine coat of food grade
oil.
V. INSTRUCTIONS FOR
MAINTENANCE
22.REMINDERS FOR THE MAINTENANCE
TECHNICIAN
THE MANUFACTURER WILL NOT BE
LIABLE FOR ANY DAMAGE OR INJURY
RESULTING FROM FAILURE TO
OBSERVING THE FOLLOWING RULES.
Identify the specific appliance model. The model
number is detailed on the packing and on the
appliance dataplate.
The appliance must be installed in a well-
ventilated room.
Do not obstruct any air vents or drains present on
the appliance.
Do not tamper with appliance components.
Appliance maintenance and conversion to a
different type of gas must be carried out by
qualified technicians authorized by the
manufacturer, in compliance with current safety
standards and the instructions in this manual.
23.CONVERSION TO ANOTHER TYPE OF
GAS
See Chapter “ Instructions for installation “.
24.COMMISSIONING
See Chapter “ Instructions for installation “.
25.TROUBLESHOOTING
GAS HOB
THE MAIN BURNER DOESN’T TURN ON
Possible causes:
-
Insufficient gas supply pressure.
-
Blocked tubing or nozzle.
-
Defective gas tap or valve.
-
Defective burner (gas outlet holes clogged).
GAS SOLID TOP RANGES
THE PILOT BURNER DOES NOT LIGHT.
Possible causes:
-
Insufficient gas supply pressure.
-
Blocked tubing or nozzle.
-
Defective gas tap or valve.
-
Igniter defective or not properly connected.
-
Igniter or igniter wire defective.
PILOT BURNER GOES OUT DURING USE.
Possible causes:
-
Insufficient gas supply pressure.
-
Defective gas tap or valve.
-
Defective thermocouple or insufficient heating.
-
Thermocouple incorrectly connected to gas tap or
valve.
-
Knob of gas tap or valve not pressedsufficiently.
THE MAIN BURNER DOES NOT LIGHT (EVEN
THOUGH PILOT IS LIT).
Possible causes:
-
Insufficient gas supply pressure.
-
Blocked tubing or nozzle.
-
Defective gas tap or valve.
-
Defective burner (gas outlet holes clogged).
modular gassolidtop ma 2020 15/90

GAS OVEN
THE MAIN
BURNER DOESN’T TURN ON
Possible causes:
-
Insufficient gas supply pressure.
-
Blocked tubing or nozzle.
-
Defective gas tap or valve.
-
Defective burner (gas outlet holes clogged).
HEATING CANNOT BE ADJUSTED.
Possible causes:
-
Defective gas tap
GAS STOCKPOT STOVE
THE PILOT BURNER DOES NOT LIGHT.
Possible causes:
-
Insufficient gas supply pressure.
-
Blocked tubing or nozzle.
-
Defective gas tap or valve.
-
Igniter defective or not properly connected.
-
Igniter or igniter wire defective.
PILOT BURNER GOES OUT DURING USE.
Possible causes:
-
Insufficient gas supply pressure.
-
Defective gas tap or valve.
-
Defective thermocouple or insufficient heating.
-
Thermocouple incorrectly connected to gas tap or
valve.
-
Knob of gas tap or valve not pressedsufficiently.
THE MAIN BURNER DOES NOT LIGHT (EVEN
THOUGH PILOT IS LIT).
Possible causes:
-
Insufficient gas supply pressure.
-
Blocked tubing or nozzle.
-
Defective gas tap or valve.
-
Defective burner (gas outlet holes clogged).
ELECTRIC COOK TOP/ELECTRIC STOCKPOT STOVE
THE HOTPLATE DOES NOT HEAT.
Possible causes:
-
Hotplate defective.
ELECTRIC OVEN
THE APPLIANCE DOES NOT HEAT.
Possible causes:
-
Temperature thermostat defective.
-
Heating elements defective.
-
Safety thermostat tripped.
HEATING CANNOT BE ADJUSTED.
Possible causes:
-
Temperature thermostat defective.
26.REPLACING COMPONENTS
REMINDERS FOR REPLACING COMPONENTS
SHUT THE GAS SHUT-OFF VALVE
AND/OR SWITCH THE APPLIANCE OFF
AT THE MAIN SWITCH INSTALLED
UPSTREAM.
AFTER REPLACING A GAS SYSTEM
COMPONENT, CHECK FOR GAS LEAKS
AT CONNECTION POINTS.
DISCONNECT THE APPLIANCE ELECTRIC
SUPPLY, IF PRESENT, BEFORE
CARRYING OUT ANY OPERATION.
AFTER REPLACING AN ELECTRICAL
SYSTEM COMPONENT, CHECK IT IS
CORRECTLY WIRED.
GAS HOB
REPLACING THE GAS TAP.
-
Remove the control panel.
-
Remove and replace the component.
-
Reassemble all parts. For assembly, proceed in
reverse order.
GAS SOLID TOP RANGES
REPLACING THE GAS TAP AND PIEZO IGNITER.
-
Remove the control panel.
modular gassolidtop ma 2020 16/90

-
Remove and replace the component.
-
Reassemble all parts. For assembly, proceed in
reverse order.
REPLACING THE MAIN BURNER, PILOT BURNER,
THERMOCOUPLE AND IGNITER.
-
Remove the hotplate.
-
Remove the control panel and internal guards.
-
Remove and replace the component.
-
Reassemble all parts. For assembly, proceed in
reverse order.
GAS OVEN
THERMOSTATIC TAP AND PIEZOELECTRIC UNIT
REPLACEMENT
-
Remove the control panel.
-
Remove the bulb from its seat on the side of the
oven.
-
Remove and replace the component.
-
Reassemble all parts. For assembly, proceed in
reverse order.
REPLACING THE BURNER
-
Open the oven door.
-
Remove the floor and the plate positioned on top
of the burner.
-
Remove and replace the component.
-
Reassemble all parts. For assembly, proceed in
reverse order.
REPLACING THE THERMOCOUPLE
-
Remove the control panel.
-
Open the oven door.
-
Remove the floor and the plate positioned on top
of the burner.
-
Remove and replace the component.
-
Reassemble all parts. For assembly, proceed in
reverse order.
GAS STOCKPOT STOVE
REPLACING THE GAS TAP.
-
Remove the control panel.
-
Remove and replace the component.
-
Reassemble all parts. For assembly, proceed in
reverse order.
REPLACING THE MAIN BURNER, PILOT BURNER,
THERMOCOUPLE AND IGNITER.
-
Remove the control panel.
-
Remove and replace the component.
-
Reassemble all parts. For assembly, proceed in
reverse order.
ELECTRIC COOK TOP/ELECTRIC STOCKPOT STOVE
REPLACING THE KNOB AND INDICATOR LIGHT
-
Remove the control panel.
-
Remove and replace the component.
-
Reassemble all parts. For assembly, proceed in
reverse order.
REPLACING THE HOTPLATE.
-
Remove the control panel and internal guards.
-
Remove and replace the component. Screw spacer
M8 taken from the old part onto the new one.
-
Reassemble all parts. For assembly, proceed in
reverse order.
ELECTRIC OVEN
REPLACING THE KNOB AND INDICATOR LIGHT
-
Remove the control panel.
-
Remove and replace the component.
-
Reassemble all parts. For assembly, proceed in
reverse order.
REPLACING THE WORKING THERMOSTAT AND
SAFETY THERMOSTAT
-
Remove the control panel.
-
Remove the bulb from its seat on the side of the
oven.
-
Remove and replace the component.
-
Reassemble all parts. For assembly, proceed in
reverse order.
REPLACING THE HEATING ELEMENT
-
Remove the oven floor (only for lower heating
elements).
modular gassolidtop ma 2020 17/90

-
Undo the screw securing the element to the oven
and pull the element out by approx.
10 cm.
-
Reassemble all parts. For assembly, proceed in
reverse order.
27.CLEANING THE INTERIOR
Check the condition of the inside of the appliance.
Remove any built-up dirt.
Check and clean the fumes exhaust system.
28.MAIN COMPONENTS
GAS
HOB
-
Gas Cock
-
Main Burner
-
Pilot burner
-
Thermocouple
GAS SOLID TOP RANGES
-
Gas Cock
-
Main Burner
-
Pilot burner
-
Thermocouple
-
Igniter
-
Piezoelectric ignition
GAS OVEN
-
Gas Cock
-
Main Burner
-
Pilot burner
-
Thermocouple
-
Igniter
-
Piezoelectric ignition
GAS STOCKPOT STOVE
Gas Cock
Main Burner
Pilot burner
Thermocouple
Igniter
ELECTRIC HOB
-
Control knob
-
Hotplate
-
Indicator light
ELECTRIC OVEN
-
Control knob
-
Working thermostat
-
Safety thermostat
-
Heating element
-
Indicator light
modular gassolidtop ma 2020 18/90

FR - INSTALLATION – EMPLOI - ENTRETIEN
I. AVERTISSEMENTS GÉNÉRAUX
LIRE ATTENTIVEMENT CE MANUEL. IL
DONNE DES INFORMATIONS
IMPORTANTES POUR L'INSTALLATION,
L'UTILISATION ET L'ENTRETIEN DE
L'APPAREIL EN TOUTE SÉCURITÉ.
LE DÉFAUT DE SE CONFORMER À CE
QUI EST PRÉSENTÉ CI DESSOUS PEUT
COMPROMETTRE LA SÉCURITÉ DE
L'ÉQUIPEMENT.
LE FABRICANT DE L'APPAREIL DÉCLINE
TOUTE RESPONSABILITÉ EN CAS DE
DOMMAGES DÛS AU NON RESPECT
DES CONSIGNES CI DESSOUS.
TRADUCTION DES INSTRUCTIONS
D'ORIGINE.
LES ÉQUIPEMENTS ONT BESOIN DE
QUELQUES PRÉCAUTIONS POUR
L’INSTALLATION, LE POSITIONNEMENT
ET/OU LE FIXAGE ET LE BRANCHEMENT
ÉLECTRIQUE.
VOIR SECTION
“INSTRUCTIONS POUR
L'INSTALLATION”.
LES ÉQUIPEMENTS ONT BESOIN DE
PRÉCAUTIONS POUR LE NETTOYAGE.
VOIR SECTION “INSTRUCTION POUR LE
NETTOYAGE”.
LE SYMBOLE "HAUTE TENSION" EST
PLACÉ SUR UN PANNEAU QUI DONNE
ACCÈS À UNE PARTIE AVEC HAUTE
VOLTAGE.
Conserver ce manuel dans un endroit sûr et connu
afin de pouvoir le consulter pendant toute la
durée de vie utile de l'appareil.
Cet appareil est conçu pour la cuisson d'aliments.
Il est destiné à un usage industriel. Toute autre
utilisation est répu
tée impropre.
Cet appareil n'est pas approprié à l'emploi de la
part de personnes (y compris les enfants) avec
capacités
physiques,
sensorielles ou mentales, réduites ou sans
expérience ni connaissance.
A moins qu'une personne responsable de leur
sécurité ne les surveille ou les instruit au sujet de
l'utilisation de l'appareil.
Eviter de laisser le dispositif sans survelliance en
présence d’enfants et s’asseurer qu’ils ne
l’utilissent pas ou qu’ils ne journent avec.
Le personnel devant utiliser l'appareil doit avoir
suivi une formation spéciale. Surveiller l'appareil
pendant
son
fonctionnement.
NE PAS STOCKER DE SUBSTANCES IN "
AMMABLES À PROXIMITÉ DE
L'APPAREIL. DANGER D'INCENDIE.
Installer l'appareil seulement dans des locaux
suffisamment aérés.
Toujours installer l'appareil dans un local aéré.
Une mauvaise aération peut être la cause
d'asphyxies.
Ne pas
obstruer le système d'aération du local où cet
appareil est installé.
Ne
pas obstruer les bouches
d'aération
et
d'évacuation de cet appareil ou d'autres appareils.
En cas de panne ou de dysfonctionnement de
l'appareil, fermer le robinet d'arrèt du gaz et/ou
désactiver l'interrupteur général d'alimentation
électrique installés en amont de l'appareil.
L'installation et la conversion à un autre type de
gaz doivent être effectués par des installateurs
qualifiés et agréés par le fabricant, conformément
aux normes de sécurité en vigueur et aux
consignes données dans ce manuel.
L'entretien et la conversion à un autre type de gaz
de l'appareil doivent être effectués par des
installateurs qualifiés et agréés par le fabricant,
conformément aux normes de sécurité en vigueur
et aux consignes données dans ce manuel.
modular gassolidtop ma 2020 19/90

Effectuer le nettoyage conformément aux
instructions données dans le Chapitre “
INSTRUCTIONS POUR LE NETTOYAGE “.
1. ÉLIMINATION DE L'EMBALLAGE ET
DE L'APPAREIL
EMBALLAGE
L'emballage est réalisé dans des matériaux
compatibles avec l'environnement. Les éléments
en matière plastique recyclables sont:
-
la couverture transparente, les sachets du manuel
d'instructions et des injecteurs (en polyéthylène
-
PE).
-
les feuillards (en polypropylène - PP).
APPAREIL
L'appareil est réalisé à plus de % dans des
matériaux métalliques recyclables (acier inox, tôle
aluminée, cuivre, etc. ).
L'appareil doit être mis au rebut conformément à
la réglementation en vigueur.
Le rendre inutilisable avant son élimination.
Ne pas le jeter dans la nature.
LE SYMBOLE DE LA POUBELLE BARRÉE
REPORTÉ SUR L’APPAREIL ET LA BOÎTE
INDIQUE QUE LE
PRODUIT À LA FIN DE
SA PROPRE VIE UTILE DOIT ÊTRE
RAMASSÉ SÉPARÉMENT DES AUTRES
DÉCHETS.
LA COLLECTE DIFFÉRENTIÉE DE CET APPAREIL
AYANT ATTEINT LA FIN DE SA VIE EST ORGANISÉE
ET GÉRÉE PAR LE FABRICANT.
LE CLIENT SOUHAITANT SE DÉFAIRE DE CET
APPAREIL
DEVRA DONC CONTACTER LE
FABRICANT ET SUIVRE LA PROCÉDURE QUE CE
DERNIER A ADOPTÉE AFIN DE PERMETTRE LA
COLLECTE SÉPARÉE DE L’APPAREIL ARRIVÉ EN FIN
DE VIE.
UNE COLLECTE ET UN TRI DES DÉCHETS
CONTRIBUE A ÉVITER LES POSSIBLES EFFETS
NÉGATIFS SUR
L’ENVIRONNEMENT ET SUR LA
SANTÉ ET FAVORISE LA RÉUTILISATION ET/OU LE
RECYCLAGE DES MATÉRIAUX DONT EST
COMPOSÉ L’APPAREIL.
L’ÉLIMINATION ABUSIVE DU PRODUIT DE LA
PART DU PROPRIÉTAIRE COMPORTE
L’APPLICATION DES SANCTIONS
ADMINISTRATIVES PRÉVUES PAR LES NO
RMES EN
VIGUEUR.
2. DISPOSITIFS DE SÉCURITÉ
FOUR ÉLECTRIQUE
THERMOSTAT DE SÉCURITÉ
LE FABRICANT DE L'APPAREIL DÉCLINE
TOUTE RESPONSABILITÉ EN CAS DE
DOMMAGES DÛS AU NON RESPECT
DES CONSIGNES CI DESSOUS.
Un thermostat de sécurité à rétablissement
manuel qui coupe le chauffage lorsque la
température de service dépasse celle maximum
admise est monté dans l'appareil.
Pour rétablir le fonctionnement de l'appareil, il
faut enlever le panneau de commandes et
appuyer sur le bouton de rétablissement du
thermostat. Cette opération peut être effectuée
uniquement par un technicien qualifié et agréé.
II. INSTRUCTIONS POUR
L'INSTALLATION
3. AVERTISSEMENTS POUR
L'INSTALLATEUR
LIRE ATTENTIVEMENT CE MANUEL. IL
DONNE DES INFORMATIONS
IMPORTANTES POUR L'INSTALLATION,
L'UTILISATION ET L'ENTRETIEN DE
L'APPAREIL EN TOUTE SÉCURITÉ.
LE DÉFAUT DE SE CONFORMER À CE
QUI EST PRÉSENTÉ CI DESSOUS PEUT
COMPROMETTRE LA SÉCURITÉ DE
L'ÉQUIPEMENT.
LE FABRICANT DE L'APPAREIL DÉCLINE
TOUTE RESPONSABILITÉ EN CAS DE
DOMMAGES DÛS AU NON RESPECT
DES CONSIGNES CI DESSOUS.
Repérer le modèle d'appareil. Le modèle est
indiqué sur l'emballage et la plaque signalétique
de l'appareil.
Installer l'appareil seulement dans des locaux
suffisamment aérés.
L'installation et la conversion à un autre type de
gaz doivent être effectués par des installateurs
qualifiés et agréés par le fabricant, conformément
aux normes de sécurité en vigueur et aux
consignes données dans ce manuel.
modular gassolidtop ma 2020 20/90
Seite wird geladen ...
Seite wird geladen ...
Seite wird geladen ...
Seite wird geladen ...
Seite wird geladen ...
Seite wird geladen ...
Seite wird geladen ...
Seite wird geladen ...
Seite wird geladen ...
Seite wird geladen ...
Seite wird geladen ...
Seite wird geladen ...
Seite wird geladen ...
Seite wird geladen ...
Seite wird geladen ...
Seite wird geladen ...
Seite wird geladen ...
Seite wird geladen ...
Seite wird geladen ...
Seite wird geladen ...
Seite wird geladen ...
Seite wird geladen ...
Seite wird geladen ...
Seite wird geladen ...
Seite wird geladen ...
Seite wird geladen ...
Seite wird geladen ...
Seite wird geladen ...
Seite wird geladen ...
Seite wird geladen ...
Seite wird geladen ...
Seite wird geladen ...
Seite wird geladen ...
Seite wird geladen ...
Seite wird geladen ...
Seite wird geladen ...
Seite wird geladen ...
Seite wird geladen ...
Seite wird geladen ...
Seite wird geladen ...
Seite wird geladen ...
Seite wird geladen ...
Seite wird geladen ...
Seite wird geladen ...
Seite wird geladen ...
Seite wird geladen ...
Seite wird geladen ...
Seite wird geladen ...
Seite wird geladen ...
Seite wird geladen ...
Seite wird geladen ...
Seite wird geladen ...
Seite wird geladen ...
Seite wird geladen ...
Seite wird geladen ...
Seite wird geladen ...
Seite wird geladen ...
Seite wird geladen ...
Seite wird geladen ...
Seite wird geladen ...
Seite wird geladen ...
Seite wird geladen ...
Seite wird geladen ...
Seite wird geladen ...
Seite wird geladen ...
Seite wird geladen ...
Seite wird geladen ...
Seite wird geladen ...
Seite wird geladen ...
Seite wird geladen ...
-
 1
1
-
 2
2
-
 3
3
-
 4
4
-
 5
5
-
 6
6
-
 7
7
-
 8
8
-
 9
9
-
 10
10
-
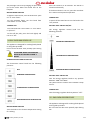 11
11
-
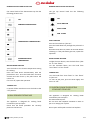 12
12
-
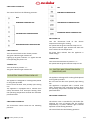 13
13
-
 14
14
-
 15
15
-
 16
16
-
 17
17
-
 18
18
-
 19
19
-
 20
20
-
 21
21
-
 22
22
-
 23
23
-
 24
24
-
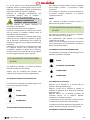 25
25
-
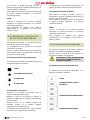 26
26
-
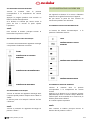 27
27
-
 28
28
-
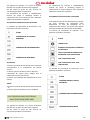 29
29
-
 30
30
-
 31
31
-
 32
32
-
 33
33
-
 34
34
-
 35
35
-
 36
36
-
 37
37
-
 38
38
-
 39
39
-
 40
40
-
 41
41
-
 42
42
-
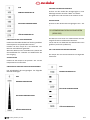 43
43
-
 44
44
-
 45
45
-
 46
46
-
 47
47
-
 48
48
-
 49
49
-
 50
50
-
 51
51
-
 52
52
-
 53
53
-
 54
54
-
 55
55
-
 56
56
-
 57
57
-
 58
58
-
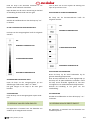 59
59
-
 60
60
-
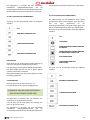 61
61
-
 62
62
-
 63
63
-
 64
64
-
 65
65
-
 66
66
-
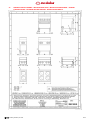 67
67
-
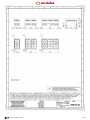 68
68
-
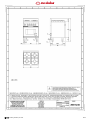 69
69
-
 70
70
-
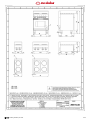 71
71
-
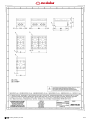 72
72
-
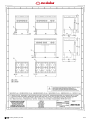 73
73
-
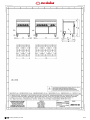 74
74
-
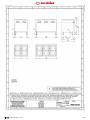 75
75
-
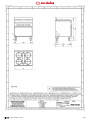 76
76
-
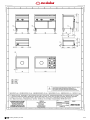 77
77
-
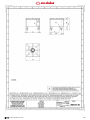 78
78
-
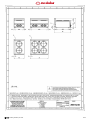 79
79
-
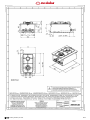 80
80
-
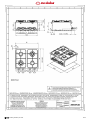 81
81
-
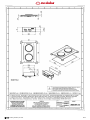 82
82
-
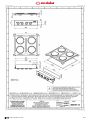 83
83
-
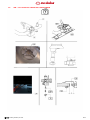 84
84
-
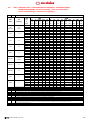 85
85
-
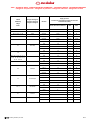 86
86
-
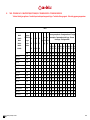 87
87
-
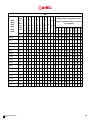 88
88
-
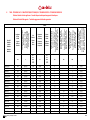 89
89
-
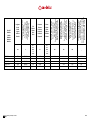 90
90


in anderen Sprachen
- English: Modular 316104 User manual
- français: Modular 316104 Manuel utilisateur
- Nederlands: Modular 316104 Handleiding
Verwandte Artikel
-
Modular 318190 Benutzerhandbuch
-
Modular Function Linea 650 FU FPE/55 Installation - Use - Maintenance
-
-
-
-
-
-
-
Andere Dokumente
-
GGM Gastro EON20 Bedienungsanleitung
-
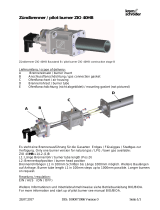 Kromschroder ZIO 40HB Zündbrenner / pilot burner Bedienungsanleitung
-
Bartscher SERIE 650 SNACK Instructions For Installation, Operation And Service
-
Whirlpool PP 40 DCDR F Benutzerhandbuch
-
Scholtes PP 40 TC F Bedienungsanleitung
-
HOTPOINT/ARISTON XBC 902 GH DC/HA Benutzerhandbuch
-
Indesit PPF Q40TC BNV Bedienungsanleitung
-
Indesit PP Q40 TC SF Benutzerhandbuch
-
Indesit PMG 41 DCDR Series Bedienungsanleitung
-
PCE instruments PCE-HVAC 4 Benutzerhandbuch
