
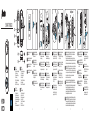
SMART-RING20
1 5 8
3 7 Optional
2 6 9
4
Haal de spanning van de
beltrafo af.
Trennen Sie den Strom
vom Transformator.
Débranchez l’alimentation
du transformateur.
Disconnect the power from
the transformer.
1. Lens
2. Microfoon
3. Status indicatie lampje
4. Deurbelknop
5. Stroomaansluiting
6. Reset knop
7. Micro USB aansluiting
8. Luidspreker
9. Micro SD kaart poort
1. Objectif
2. Microphone
3. Voyant de statut
4. Bouton de sonnette
5. Connexion électrique
6. Bouton de réinitialisation
7. Connexion micro USB
8. Orateur
9. Port de la carte micro SD
1. Linse
2. Mikrofon
3. Statusanzeigelampe
4. Türklingelknopf
5. Stromanschluss
6. Reset-Knopf
7. Micro-USB-Anschluss
8. Lautsprecher
9. Micro-SD-Kartenschlitz
1. Lens
2. Microphone
3. Status indicator light
4. Doorbell button
5. External power port
6. Reset button
7. Micro USB connection
8. Speaker
9. Micro SD card slot
Verwijder de bestaande
deurbelknop en koppel de
beldraden los.
Retirez le bouton de
sonnette existant et
débranchez les ls de la
sonnette.
Remove the existing
doorbell and disconnect the
bell wires.
Entfernen Sie den
vorhandenen Türklingel-
knopf und trennen Sie die
Klingeldrähte.
Drill holes at the desired
location in the doorframe
and install the angled wall
mount.
Optional: Insert a micro
SD-card into the SD-card
slot on the bottom of the
doorbell. (Not inlcuded,
supports up to 128Gb).
Loosen the screws on the
back of the SMART-RING20
two turns (±1.5mm)
Place the SMART-RING20
onto the mounting.
Attention: top rst!
Fix the SMART-RING20 to
the mounting plate with the
locking screw, using the
included Torx wrench.
Attach the mounting plate
with ‘UP’ facing the top, on
the angled wall mount.
Boor gaten op de gewenste
locatie in het deurkozijn en
monteer de hoekwand-
bevestiging.
Percez des trous à l’endroit
souhaité dans l’encadre-
ment de la porte et montez
le support mural d’angle.
Bohren Sie an der gewün-
schten Stelle Löcher in den
Türrahmen und montieren
Sie die Wandhalterung.
Plaats de bevestigings-
plaat met ‘UP’ aan de
bovenzijde op de
hoekwandbevestiging.
Placez le support de
montage avec ‘UP’ en
haut sur le support mural
d’angle.
Platzieren Sie die
Montagehalterung mit
„UP“ nach oben auf die
Wandhaterung.
Optioneel: Plaats een micro
SD kaartje aan de onder-
zijde in het SD kaart slot.
(exclusief, max. 128 GB).
Facultatif: insérez une carte
micro SD en bas dans le
port pour la carte micro SD
(pas inclus, max. 128 Go).
Optional: Führen Sie eine
Micro-SD-Karte unten in
den SD-Kartenschlitz ein.
(Nicht enthalten, max.
128 GB)
Draai de schroefjes aan de
achterzijde van de
SMART-RING20 2 slagen
los (±1,5 mm).
Détournez les vis à l’arrière
de la SMART-RING20 deux
tours (± 1,5 mm).
Önen Sie die Schrauben
auf der Rückseite des
SMART-RING20 für 2
Umdrehungen (±1,5 mm).
Verbind de beldraad uit de muur met de schroefjes aan de
achterzijde van de SMART-RING20. Links of rechts maakt
niet uit. Draai de schroeven weer vast.
Optioneel: Indien de beldraad uit de muur te kort is, kun je
gebruik maken van de draadverlengers. Soldeer deze vast aan
de beldraad en isoleer de draad met krimpkous of isolatietape.
Connectez le l de la sonnette du mur avec les vis à l’arrière du
SMART-RING20. La gauche ou la droite n’a pas d’importance.
Serrez les vis. Facultatif : si le l de la sonnette du mur est trop
court, vous pouvez utiliser un prolonger de l. Soudez-les au l
de la sonnette et isolez le l avec des gaines thermo
rétractables ou du ruban isolant.
Schließen Sie mit den Schrauben den Klingendraht von der
Wand an der Rückseite des SMART-RING20 an. Ob links oder
rechts spielt keine Rolle. Ziehen Sie die Schrauben wieder fest.
Optional: Wenn der Klingeldraht aus der Wand zu kurz ist,
können Sie die Drahtverlängerungen verwenden. Löten Sie
diese an den Klingeldraht und isolieren Sie den Draht mit einem
Schrumpfschlauch oder mit Isolierband.
Connect the bell wires from the wall with the screws on the back
of the SMART-RING20. Left and right doesn’t matter. Tighten the
screws again. Optional: If the bell wire from the wall is too short,
you can use the wire extenders. Solder these to the bell wire and
insulate the wire with heatshrink tubing or insulation tape.
Plaats de SMART-RING20
in de bevestigingsbeugel.
Let op: boven eerst!
Insérez le SMART-RING20
dans le support de montage.
Attention : premièrement
en haut !
Platzieren Sie den
SMART-RING20 in der
Montagehalterung.
Achtung: Oben zuerst!
Draai het borgschroefje
met behulp van de
inbussleutel tool vast in de
onderkant van de SMART-
RING20.
Tournez la vis de
verrouillage dans le fond du
SMART-RING20 à l’aide de
l’outil en forme de L.
Drehen Sie die Verschluss-
schraube mit dem
L-förmigen Schrauben-
schlüssel unten am
SMART-RING20 fest.
NL
NL
NL NL NL NL NL NL NL NL
FR
FR
FR
FR FR FR
FR
FR
FR
FR
DE
DE
DE
DE DE
DE
DE
DE
DE
DE
GB
GB
GB
GB
GB
GB
GB
GB
GB
GB
1 2 3 4 5 6
ON
OFF
1.5 mm
2x
2x
1x

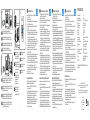
DECLARATION OF CONFORMITY
Hereby, Hesdo declares that the radio equipment type Alecto SMART-RING20
is in compliance with directive 2014/53/EU.
The full text of the EU declaration of conformity is available at the following
internet address: http://DOC.hesdo.com/SMART-RING20-DOC.pdf
Transport protocol:
Wireless frequency:
Operating temperature:
Input voltage:
Operating system:
Operating App:
Sensor type:
Resolution:
Megapixels:
Viewing angle:
Motion detection:
Motion detection range:
IR specication:
Audio:
Video compression standard:
IP classication:
Communication protocol:
Storage:
Dimensions:
Wi
2.4 GHz
-20°C ~ 50°C, <90% humidity
8~24VAC 50Hz
Android™ and iOS
Smart Life
1/3” CMOS
1920x1080p
2.0MP
55º vertically, 100º horizontally
3 levels
Up to 10 meters (most sensitive)
High power LED with ICR
One- or two-way audio
H.263, 32Kbps~2Mbps
IP54
TCP/IP, HTTP, DHCP, DNS
Supports local micro SD card
storage (max. 128GB)
115x45x26mm
SPECIFICATIONS
Hesdo BV
Azielaan 12
5232 BA, ‘s-Hertogenbosch
The Netherlands
www.alectosmart.com v1.0
10
11
7 98 10 11 12
Open de behuizing van de bestaande binnen bel.
Draai de schroefjes TRANS en FRONT 2 slagen los (±1,5 mm).
Ouvrez le logement de la sonnette intérieure existante.
Détournez les vis TRANS et FRONT deux tours (±1,5mm).
Önen Sie das Gehäuse der vorhandenen Innenglocke. Önen Sie
die Schrauben TRANS und FRONT für 2 Umdrehungen (±1,5 mm).
Open the housing of the existing bell chime.
Loosen the screws TRANS and FRONT 2 turns (±1.5mm).
Plaats de 2 aansluitingen van de ‘mechanical chime’ (het kleine
kastje) achter de 2 schroefjes TRANS en FRONT. Links of
rechts maakt niet uit. Draai de schroeven weer vast.
Placez les 2 connexions du ‘mechanical chime’ (la petite boîte)
derrière les 2 vis TRANS et FRONT. La gauche ou la droite n’a
pas d’importance. Retournez les vis.
Platzieren Sie die 2 Anschlüsse des „mechanical chime“ (das Käst-
chen) hinter die 2 Schrauben TRANS und FRONT. Ob links oder
rechts spielt keine Rolle. Ziehen Sie die Schrauben wieder an.
Place the 2 connections of the ‘mechanical chime’ (the small
box) behind the 2 screws TRANS and FRONT. Left or right
doesn’t matter. Tighten the screws again.
NL
NL
12 13
Maak de ‘mechanical
chime’ met de 3M tape vast
in of buiten de behuizing
van de bestaande bel.
Fixez le ‘mechanical chime’
avec le ruban 3M à l’intérieur
ou à l’extérieur du logement
de la sonnette existante.
Befestigen Sie den
„mechanical chime“ mit
dem 3M-Band innerhalb
oder außerhalb des
Gehäuses der
vorhandenen Glocke.
Zet de spanning weer terug
op de beltrafo.
Branchez l’alimentation du
transformateur.
Schalten Sie den Transfor-
mator wieder ein.
Download de ‘Smart Life’ app in de Apple App Store of
Google Play Store.
Open de Smart Life app.
Maak een nieuw account aan of log in op uw bestaande account.
Kies ‘+’ rechtsboven in het scherm.
Selecteer ‘Camerabewaking’ in de linker kolom en kies ‘Smart
doorbell’.
Het status indicatie lampje is in het begin constant rood.
Daarna hoor je een toon en begint het lampje rood te knipperen.
De SMART-RING20 is dan verbinding aan het zoeken met de
router. Druk in de app op ‘De Volgende Stap’.
Als na 2 minuten het lampje nog niet rood knippert, reset de
SMART-RING20 dan door met het reset pinnetje 5 seconden het
reset knopje in te drukken. Zie de overzichtstekening op pagina 1.
Kies het wi netwerk (zelfde als de router) en voer het
wachtwoord in. Druk in de app op ‘Bevestigen’.
Houd de QR code op ongeveer 15-20 cm afstand voor de lens
van de SMART-RING20.
Je hoort ‘dong-dong-dong’, het status indicatie lampje gaat blauw
knipperen en wordt daarna constant blauw. Druk in de app op
‘Hoor Een Toon’. Hoor je geen toon, ga dan terug naar stap 6 en
controleer of alle stappen goed zijn uitgevoerd.
Het duurt even voordat de connectie tussen de SMART-RING20
en de router is gemaakt. Druk daarna op ‘Doorgaan’.
Kies in de app voor ‘Mechanical chime’. Dit zorgt ervoor dat de
bestaande binnenbel gaat wanneer er wordt aangebeld.
Druk op ‘Voltooien’.
Gefeliciteerd! De installatie is geslaagd.
Téléchargez l’application “Smart Life” sur l’App Store
d’Apple ou sur le Play Store de Google.
Ouvrez l’application Smart Life.
Créez un nouveau compte ou connectez-vous à votre compte existant.
Choisissez “+” en haut à droite de l’écran.
Sélectionnez “Vidéosurveillance” dans la colonne de gauche et
choisissez “Smart Doorbell”.
Le voyant d’état est au début constamment rouge.
Vous entendrez alors un signal sonore et la lumière se mettra
à clignoter en rouge. Le SMART-RING20 est alors connecté au
routeur. Appuyez sur “L’étape Suivante” dans l’application.
Si après 2 minutes, le voyant ne clignote pas en rouge, réinitiali-
sez le SMART-RING20 en appuyant sur le bouton de réinitialisati-
on avec la goupille de réinitialisation pendant 5 secondes. Voir le
dessin de synthèse à la page 1.
Sélectionnez le réseau wi (le même que celui du routeur) et entrez
le mot de passe in. Appuyez sur “Conrmer” dans l’application.
Tenez le code QR à environ 15-20 cm devant l’objectif du
SMART-RING20.
Vous entendrez “dong-dong-dong”, le voyant d’état clignotera en
bleu puis deviendra bleu xe. Appuyez sur “J’ai entendu le bip” dans
l’application. Si vous n’entendez pas de signal, retournez à l’étape 6
et vériez si toutes les étapes ont été correctement exécutées.
Il faut un certain temps avant que la connexion entre le SMART-
RING20 et le routeur ne soit établie. Appuyez ensuite sur “Terminé”.
Sélectionnez “Mechanical chime” dans l’application. Cela permet
de s’assurer que la sonnerie d’appel existante retentit lorsque l’on
sonne à la porte. Appuyez sur “Fini”.
Félicitations ! L’installation a été un succès.
Laden Sie im Apple App Store oder Google Play Store
die „Smart Life“ App herunter.
Önen Sie die Smart Life App.
Erstellen Sie ein neues Konto oder melden sie sich mit Ihrem
vorhandenen Konto an.
Tippen Sie oben rechts auf „+“
Wählen Sie in der linken Spalte „Videoüberwachung“ aus und
tippen Sie auf „Smart Doorbell“.
Im Beginn ist die Statusanzeigelampe konstant rot. Danach hören Sie
einen Ton und die Lampe beginnt zu blinken. Der SMART-RING20
sucht jetzt Verbindung mit dem Router. Drücken Sie in der App auf „Der
Nächste Schritt“. Wenn die Lampe nach 2 Minuten immer noch blinkt,
resetten Sie dann den SMART-RING20, indem Sie mit der Reset-Nadel
5 Sekunden den Reset-Knopf eindrücken. Siehe Übersicht auf Seite 1.
Wählen Sie das WLAN-Netzwerk (dasselbe wie der Router) und
führen Sie das Passwort ein. Drücken Sie in der App auf „OK“.
Halten Sie den QR-Code auf ungefähr 15 - 20 cm vor die Linse
des SMART-RING20.
Sie hören jetzt „dong-dong-dong“, die Statusanzeigelampe blinkt jetzt
blau und brennt danach konstant blau. Drücken Sie in der App auf
„Signalton gehört“. Hören sie keinen Ton, gehen Sie dann zurück nach
Schritt 6 und kontrollieren Sie, ob alle Schritte gut ausgeführt wurden.
Es dauert etwas, bis die Verbindung zwischen dem SMART-
RING20 und dem Router hergestellt ist. Drücken Sie daraufhin
auf „Fertigstellung“.
Wählen Sie in der App „Mechanische Klingel“. Das sorgt dafür,
dass die bestehende Innenglocke läutet, wenn geklingelt wird.
Drücken Sie „Fertigstellung“.
Glückwunsch! Die Installation war erfolgreich!
Download the ‘Smart Life’ app from the Apple App Store or
Google Play Store.
Open the Smart Life app.
Create a new account or log in to your existing account.
Choose ‘+’ at the top right of the screen.
Select ‘Video Surveillance’ in the left column and choose ‘Smart
Doorbell’.
The status indicator light is in the beginning constantly red.
Then you will hear a tone and the light starts blinking red.
The SMART-RING20 is then connected to the router.
Press ‘next step’ in the app.
If the light doesn’t blink red after 2 minutes, reset the SMART-
RING20 by pressing the reset button with the reset pin for 5
seconds. Refer to the overview drawing on page 1.
Select the WiFi network (same as the router) and enter the pass-
word. Press ‘Conrm’ in the app.
Hold the QR code at about 15-20 cm distance in front of the lens
of the SMART-RING20.
You will hear ‘dong-dong-dong’, the status indicator light will blink
blue and then turn solid blue. Press ‘I Heard a Prompt’ in the app.
If you don’t hear a tone, go back to step 6 and check if all steps
have been performed correctly.
It takes some time before the connection between the SMART-
RING20 and the router is established. Then press ‘Done’.
Choose ‘Mechanical chime’ in the app. This ensures that the
existing inner bell rings when the doorbell rings. Press ‘Complete’.
Congratulations! The installation was successful.
NL NL
NL
Installatie Smart Life app Installation de l’application Smart Life Installation der Smart Life App Installation Smart Life app
Gebruikerstips Smart Life app:
Conseils d’utilisation de l’application Smart Life :
Benutzertipps für die Smart Life App:
User tips Smart Life app:
ON
OFF
* Extendable with the Alecto SMART-BELL-RING wireless chime
(not included).
14.
15.
16.
17.
18.
19.
20.
21.
22.
23.
24.
25.
14.
15.
16.
17.
18.
19.
20.
21.
22.
23.
24.
25.
14.
15.
16.
17.
18.
19.
20.
21.
22.
23.
24.
25.
14.
15.
16.
17.
18.
19.
20.
21.
22.
23.
24.
25.
Door rechtsboven in beeld op het potloodje te drukken, kunt u
verschillende dingen aanpassen/instellen, zoals:
En appuyant sur le crayon en haut à droite de l’écran, vous pouvez
ajuster/régler diverses choses, telles que :
Wenn Sie rechts oben im Bild auf den Stift drücken, können Sie
verschiedene Dinge anpassen/einstellen, wie z.B.:
By pressing the pencil at the top right of the screen, you can adjust/set
various things, such as:
• Verander de naam van de SMART-RING20 in bijvoorbeeld
‘voordeur’ of ‘werkplaats’.
• U kunt kiezen tussen Eénwegs- of tweewegse Audio. We raden aan
om de SMART-RING20 op ‘Tweewegse Audio’ in te stellen.
Zo kunnen zowel u als de persoon voor de deur elkaar horen.
• Bewegingsdetectie meldingen in- of uitschakelen.
• Het gevoeligheidsniveau van de bewegingssensor. Stel een lage
gevoeligheid in als u bijvoorbeeld aan een drukke straat woont.
• Verwijder de SMART-RING20 door helemaal onderaan op
‘Verwijder Toestel’ te drukken.
• Changez le nom du SMART-RING20 en par exemple “porte d’entrée”
ou “atelier”.
• Vous pouvez choisir entre un son Audio unidrectionnel ou un son
‘Audio bidirectionnel’. Nous recommandons de régler le SMART-
RING20 sur un son Audio bidirectionnel. De cette façon, vous et la
personne qui se trouve devant la porte pouvez vous entendre.
• Activer ou désactiver les alertes de détection de mouvement.
• Le niveau de sensibilité du capteur de mouvement. Fixer un Faible
sensibilité, par exemple, vous vivez dans une rue très fréquentée.
• Pour retirer le SMART-RING20, appuyez en bas de l’écran ‘Enlevez l’appareil’.
• Den Namen des SMART-RING20 beispielsweise in „Haustür“ oder
„Werkstatt“ verändern.
• Zwischen Einweg- oder Zweiwegaudio wählen. Wir empfehlen den
SMART-RING20 auf „Zwei-wege-Audio“ einzustellen. Auf diese
Weise können die Person vor der Tür und Sie einander hören.
• Bewegungserkennungsmeldungen aktivieren oder deaktivieren.
• Die Empndlichkeit des Bewegungsmelders. Stellen Sie eine nie-
drige Empndlichkeit ein, wenn Sie zum Beispiel auf einer belebten
Straße wohnen.
• Den SMART-RING20 entfernen, indem Sie ganz unten auf „Das
Gerät entfernen“ drücken.
• Change the device name of the SMART-RING20 to e.g. ‘front door’
or ‘workshop’.
• You can choose between One-Way or Two-Way Talk. We recom-
mend setting the SMART-RING20 to ‘Two-Way Talk’. In this way
both you and the person in front of the door can hear each other.
• Enable or disable motion detection alerts.
• The sensitivity level of the motion sensor. Set a low sensitivity when,
for example, you live on a busy street.
• To remove the SMART-RING20, press ‘Remove Device’ at the
bottom of the screen.
FR DE GB
FR
FR
DE
DE
GB
GB
1.5 mm
Secure the mechanical
chime with the 3M tape
inside or outside the
housing of the existing bell.
Turn the power back on the
transformer.
FR
FR
DE
DE
GB
GB
-
 1
1
-
 2
2


in anderen Sprachen
- English: Alecto SMART-RING20 User manual
- français: Alecto SMART-RING20 Manuel utilisateur
- Nederlands: Alecto SMART-RING20 Handleiding
Verwandte Papiere
Sonstige Unterlagen
-
Pass and Seymour Smart Video Doorbell Installationsanleitung
-
Caliber HWC501 Bedienungsanleitung
-
-
Perel SCAMSET8N Benutzerhandbuch
-
Silvercrest 284941 Assembly, Operating And Safety Instructions
-
DoorBird DB-D101S Bedienungsanleitung
-
Me Bell 200 Bedienungsanleitung
-
-