Parkside PAEXS 20-Li B2 Benutzerhandbuch
- Kategorie
- Elektrowerkzeuge
- Typ
- Benutzerhandbuch

Cordless Orbital Sander 20V PAEXS 20-Li B2
Cordless Orbital Sander 20V
Translation of the original instructions
Accu-excenterschuurmachine 20 V
Vertaling van de originele gebruiksaanwijzing
IAN 385566_2107
Akku-Exzenterschleifer 20 V
Originalbetriebsanleitung

GB /IE Translation of the original instructions Page X4
NL Vertaling van de originele gebruiksaanwijzing Pagina 17
DE / AT / CH Originalbetriebsanleitung Seite 32
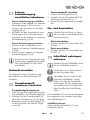
Before reading, unfold the page containing the illustrations and familiarise yourself with all functions of
the device.
Vouw vóór het lezen de pagina met de afbeeldingen open en maak u vertrouwd met alle functies van het
apparaat.
Klappen Sie vor dem Lesen die Seite mit den Abbildungen aus und machen Sie sich anschließend mit
allen Funktionen des Gerätes vertraut.

10
6
612
1
3
5
11
12
4
2
6
9
7
7a
8
10
10
7b
10a

4
GB IE
Content
Introduction .................................4
Intended purpose .........................4
General description ......................5
Scope of delivery .............................. 5
Overview .........................................5
Functional description ........................5
Technical data .............................. 5
Charging time ..................................6
Safety instructions ........................6
Symbols and icons ............................6
General Safety Directions for Power
Tools ................................................7
Special safety instructions for orbital
sanders ..........................................10
Residual risks .................................. 10
Initial start-up ............................ 11
Attaching /removing / emptying dust
collection box .................................11
How to connect/remove external dust
extraction ....................................... 11
Setting the rotational speed ..............12
Mounting/adjusting the additional
handle ........................................... 12
Attaching/removing sanding sheet .... 12
Switching on and off .......................12
Removing/inserting the battery ......... 12
Checking the charge level of the
rechargeable battery .......................13
Removing/changing the
sanding disc ...................................13
Practical tips ..............................13
Cleaning/Maintenance ...............14
Cleaning ........................................14
Maintenance ..................................14
Storage ......................................14
Disposal/environmental
protection ..................................14
Replacement parts/accessories ...15
Guarantee .................................15
Repair Service ............................16
Service-Center ............................16
Importer .................................... 16
Introduction
Congratulations on the purchase of your
new device. With it, you have chosen a
high quality product.
During production, this equipment has
been checked for quality and subjected to
a nal inspection. The functionality of your
equipment is therefore guaranteed.
The operating instructions constitute
part of this product. They contain im-
portant information on safety, use and dis-
posal. Before using the product, familiarise
yourself with all of the operating and safe-
ty instructions. Use the product only as de-
scribed and for the applications specied.
Keep this manual safely and in the event
that the product is passed on, hand over
all documents to the third party.
Intended purpose
The device is intended for dry sanding of
wood, metal or paint.
Any other use that is not explicitly ap-
proved in these instructions may result in
damage to the equipment and represent a
serious danger to the user.
The user or operator is responsible for ac-
cidents causing injury to other people or
damage to property.
This equipment is not suitable for commer-
cial use. Commercial use will invalidate the
guarantee.
The device is part of the Parkside
X20VTEAM series and can be oper-
ated using Parkside X20VTEAM series
batteries. The batteries may only be
UKCA declaration of conformity ... 48
Translation of the original
EC declaration of conformity ........49
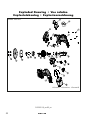
Exploded Drawing .....................52

5
GB IE
charged using chargers from the Parkside
X20VTEAM series.
General description
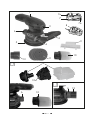
An illustration of the most
important functional compo-
nents can be found on the
fold-out page.
Scope of delivery
Unpack the device and check for
completeness:
- Cordless orbital sander
- Dust collection box
- Additional handle incl. screw and wing
nut (pre-mounted)
- Adapter for external dust extraction
- Sanding sheet (grain size 60, 80, 120,
240)
- Sanding sheet xer
- Instruction manual
The Battery and charger are not
included in delivery.
Overview
1 On/Off switch
2 Rotational speed selection wheel
3 Additional handle
4 Wing nut
4a Screw
5 Sanding disc
6 Connection for dust extraction
7 Rechargeable battery
7a Release button
7b Button for charge level indicator
8 Charger
9 Sanding sheet xer
10 Dust collection box
10a Filter bag
11 Sanding sheet
12 Adapter for dust extraction
13 Handle unit
14 Phillips screw
Functional description
The orbital sander has a rotating sanding
disc for processing wood, metal or paint.
Please refer to the descriptions below for
information on how the operating elements
work.
Technical data
Cordless orbital
sander ....................PAEXS 20-Li B2
Nominal voltage U ...................... 20 V
Idle speed n0 .............3000 - 12000 min-1
Idle vibration frequency
n0 ...........................6000 - 24000 rpm
Weight (without battery)...approx. 1.25 kg
Sanding disc .......................... ø 125 mm
Protection type .................................IPX0
Sound power level
(LpA) ................... 76,4 dB(A); KpA= 3 dB
Sound power level
(LWA) ................. 87,4 dB(A); KWA= 3 dB
Vibration (ah) .......14,4 m/s2; K= 1.5 m/s2
Battery ........................................... Li-Ion
Temperature...........................max. 50°C
Charging process ...................4 - 40°C
Operation .......................... -20 - 50°C
Storage .................................0 - 45°C
The specied total vibration values and the
stated noise emission values have been
measured according to a standardised test
method and can be used to compare one
power tool with another.
The specied total vibration values and the
stated specied noise emission values can
also be used for a provisional assessment
of the load.

6
GB IE
Warning: The vibration and noise
emissions may deviate from the
specied values during actual use
of the power tool, depending on
how the power tool is being used
and, in particular, what kind of ma-
terial is being worked on.
Try to keep the exposure to vibra-
tions as low as possible. Examples
of measures to reduce vibration
exposure are the wearing of gloves
when using the tool and limiting the
working hours. All parts of the op-
erating cycle have to be considered
while doing so (for example, times
when the power tool is switched off
and times when it is switched on
but running without any load).
Charging time
The device is part of the Parkside X20V
TEAM series and can be operated with
batteries of the Parkside X20V TEAM
series.
Batteries of the Parkside X20V TEAM
series may only be charged using chargers
of the Parkside X20V TEAM series.
We recommend that you operate this ap-
pliance with the following batteries only:
PAP20 B1, PAP 20 B3.
We recommend charging these batteries
with the following chargers: PLG 20 A3,
PLG 20 A4, PLG 20 C1, PLG 20 C3,
PDSLG 20 A1.
An up-to-date list of battery compatibility
can be found at: www.lidl.de/akku
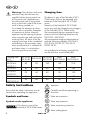
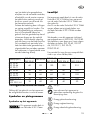
Charging time
(min) PAP20A1
PAP20B1 PAP20A2 PAP20A3
PAP20B3
Smart
PAPS204A1
Smart
PAPS208A1
PLG20A1
PLG20A4
PLG20C1
60 90 120 120 210
PLG20A2 45 60 80 80 165
PLG20A3
PLG20C3 35 45 60 50 120
PDSLG20A1 35 45 60 50 120
Smart
PLGS2012A1 35 40 40 40 50
Safety instructions
Ensure that the safety instructions are ob-
served when operating the appliance.
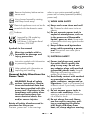
Symbols and icons
Symbols on the appliance:
This device is part of the
Parkside X20VTEAM series
Attention!
Carefully read these operating in-
structions.
Wear ear protection.
Wear eye protection.
Wear respiratory protection.
Wear safety gloves.

7
GB IE
refers to your mains-operated (corded)
power tool or battery-operated (cordless)
power tool).
1) WORK AREA SAFETY
a) Keep work area clean and well
lit. Cluttered or dark areas invite ac-
cidents.
b) Do not operate power tools in
explosive atmospheres, such as
in the presence of ammable
Iiquids, gases or dust. Power tools
create sparks which may ignite the dust
or fumes.
c) Keep children and bystanders
away while operating a power
tool. Distractions can cause you to
lose control.
2) ELECTRICAL SAFETY
a) Power tool plugs must match
the outlet. Never modify the
plug in any way. Do not use
any adapter plugs with earthed
(grounded) power tools. Unmodi-
ed plugs and matching outlets will
reduce risk of electric shock.
b) Avoid body contact with earthed
or grounded surfaces, such as
pipes, radiators, ranges and re-
frigerators. There is an increased risk
of electric shock if your body is earthed
or grounded.
c) Do not expose power tools to
rain or wet conditions. Water
entering a power tool will increase the
risk of electric shock.
d) Do not abuse the cord. Never
use the cord for carrying, pull-
ing or unplugging the power
tool. Keep cord away from
heat, oil, sharp edges or moving
Remove the battery before mainte-
nance work.
Injury hazard caused by rotating
tool! Keep hands away.
Electrical appliances must not be dis-
posed of with the domestic waste.
Producer
Imported for GB market by:
Lidl Great Britain Ltd.
Lidl House, 14 Kingston Road
Surbiton, KT5 9NU
Symbols in the manual
Warning symbols with in-
formation on damage and
injury prevention.
Instruction symbols with information
on preventing damage.
Help symbols with information on
improving tool handling.
General Safety Directions for
Power Tools
WARNING! Read all safety
notices, instructions, illustra-
tions and technical data that
have been provided with this
power tool. Omissions in the
compliance with safety direc-
tions and instructions can
cause electrical shock, re
and/or severe injuries.
Retain all safety directions and in-
structions for future use.
The term „power tool“ in the warnings

8
GB IE
parts. Damaged or entangled cords
increase the risk of electric shock.
e) When operating a power tool
outdoors, use an extension cord
suitable for outdoor use. Use of a
cord suitable for outdoor use reduces
the risk of electric shock.
f) If operation of the power tool in
a damp environment is unavoid-
able, please use a residual cur-
rent circuitry. The use of a residual
current circuitry reduces the risk of an
electric shock.
3) PERSONAL SAFETY
a) Stay alert, watch what you are
doing and use common sense
when operating a power tool.
Do not use a power tool while
you are tired or under the inu-
ence of drugs, alcohol or medi-
cation. A moment of inattention white
operating power tools may result in
serious personal injury.
b) Use personal protective equip-
ment. Always wear eye protec-
tion. Protective equipment such as dust
mask, non-skid safety shoes, hard hat,
or hearing protection used for appro-
priate conditions will reduce personal
injuries.
c) Prevent unintentional starting.
Ensure the switch is in the off-
position before connecting to
power source and/or battery
pack, picking up or carrying the
tool. Carrying power tools with your
nger on the switch or energising pow-
er tools that have the switch on invites
accidents.
d) Remove any adjusting key or
wrench before turning the pow-
er tool on. A wrench or a key left at-
tached to a rotating part of the power
tool may result in personal injury.
e) Do not overreach. Keep proper
footing and balance at all times.
This enables better control of the power
tool in unexpected situations.
f) Dress properly. Do not wear
loose clothing or jewellery. Keep
your hair, clothing and gloves
away from moving parts. Loose
clothes, jewellery or long hair can be
caught in moving parts.
g) If dust extraction and collection
devices can be installed, make
sure that these are connected
and used correctly. Use of dust
collection can reduce dust-related haz-
ards.
h) Do not allow yourself to be
lulled into a false sense of se-
curity and do not disregard the
safety rules for power tools,
even if you are familiar with the
power tool after using it many
times. Careless action can lead to
serious injuries within a fraction of a
second.
4) POWER TOOL USE AND CARE
a) Do not force the power tool. Use
the correct power tool for your
application. The correct power tool
will do the job better and safer at the
rate for which it was designed.
b) Do not use the power tool if the
switch does not turn it on and
off. Any power tool that cannot be
controlled with the switch is dangerous
and must be repaired.
c) Remove the plug from the wall
socket and/or remove the re-
chargeable battery before you
change the device’s settings,

9
GB IE
change accessory parts or put
away the power tool. Such pre-
ventive safety measures reduce the risk
of starting the power tool accidentaIly.
d) Store idle power tools out of the
reach of children and do not al-
low persons unfamiliar with the
power tool or these instructions
to operate the power tool. Power
tools are dangerous in the hands of
untrained users.
e) Look after the power tool and
application tool carefully. Check
for misalignment or binding
of moving parts, breakage of
parts and any other condition
that may affect the power tool’s
operation. If damaged, have the
power tool repaired before use.
Many accidents are caused by poorly
maintained power tools.
f) Keep cutting tools sharp and
clean. Properly maintained cutting
tools with sharp cutting edges are less
Iikely to bind and are easier to control.
g) Use the power tool, accessories
and tool bits etc. in accordance
with these instructions, taking
into account the working condi-
tions and the work to be per-
formed. Use of the power tool for op-
erations different from those intended
could result in a hazardous situation.
h) Keep handles and grip surfaces
dry, clean and free from oil and
grease. Slippery handles and grip
surfaces do not permit safe operation
and control over the power tool in un-
expected situations.
5) CAREFUL HANDLING AND USE
OF BATTERY DEVICES
a) Charge the batteries only in
chargers that are recommended
by the manufacturer. Risk of re if
a charger that is suitable for a specic
type of battery is used with other bat-
teries.
b) In the power tools, use only the
batteries designed for the pur-
pose. The use of other batteries may
result in injuries and risk of re.
c) Keep the unused battery away
from paper clips, coins, keys,
nails, screws and other small
metal objects, which could cause
bridging of the contacts. A short
circuit between the battery contacts
may cause burns or re.
d) If used incorrectly, liquid may
leak from the battery. Avoid
contact with this. In the event of
accidental contact, rinse off with
water. If the liquid gets into eyes,
seek medical assistance. Leaking bat-
tery uid may cause skin irritations or
burns.
e) Do not use damaged or altered
batteries. Damaged or altered batter-
ies can be unpredictable and lead to
re, explosion or risk of injury.
f) Do not expose batteries to re
or elevated temperatures. Fire or
temperatures over 130°C can cause
an explosion.
g) Follow all instructions for charg-
ing and never charge the bat-
tery or the battery-powered tool
outside the temperature range
stated in the operating instruc-
tions. Incorrect charging or charging
outside the permitted temperature
range may destroy the battery and in-
crease the risk of re.

10
GB IE
6) SERVICE
a) Have your power tool serviced
by a qualied repair person us-
ing only identical replacement
parts. This will ensure that the safety
of the power tool is maintained.
b) Never repair damaged batter-
ies. All battery repairs should be car-
ried out by the manufacturer or author-
ised customer service centres only.
Observe the safety in-
formation and notes on
charging and proper use
as shown in the instruction
manual for your battery
and charger from the Park-
side X20VTeam series. A
detailed description of the
charging process and further
information can be found in
the separate operating in-
structions.
Special safety instructions
for orbital sanders
Warning! Sanding can result
in the formation of hazard-
ous dusts (e.g. arising from
materials such as paints
containing lead, materials
containing asbestos, metals
or some wood types), which
can present a health hazard
to the operator or persons
in the vicinity if touched or
inhaled. Make sure that the
workplace is well ventilated.
Always wear safety goggles,
safety gloves and respiratory
protection. Attach a dust ex-
traction system.
a) Secure the workpiece. A work-
piece that is retained with clamping ap-
pliances or a vice is held more securely
than with your hand.
b) Only use the power tool for dry
sanding. Do not scrape moist
materials. Penetration of water into
the power tool increases the risk of
electric shock.
c) Avoid overheating the sanded
object and the sander itself. Pos-
sible re hazard.
d) The workpiece gets hot dur-
ing grinding. Do not touch the
machined area, allow it to cool
down. There is a risk of burning. Do
not use coolants or the like.
e) Always empty the dust con-
tainer before work breaks.
Sanding dust in the dust sack, micro
lter, paper sack (or in the lter sack or
extraction system lter) can self-ignite
under unfavourable conditions such as
ying sparks caused by grinding met-
als. Particular hazards are caused if
the sanding dust is mixed with paint,
polyurethane residues or other chemi-
cal substances, or if the sanded object
is hot after long working periods.
Please check the operating manual of
your vacuum cleaner whether it is suit-
able for the suction of grinding chips.
f) Avoid working with materials that may
be harmful to health, e.g. asbestos or
lead paints.
g) Wait for the sanding plate to come to a
stop before putting the device down.
Residual risks
Even if properly operating and handling
this electric tool, some residual risks will
remain. Due to its construction and build,
this electric tool may present the following
hazards:

11
GB IE
a) Lung damage, if suitable respiratory
protection is not worn;
b) Abrasions.
c) Ear damage if working without ear pro-
tection.
d) Eye damage if suitable eye protection
is not worn.
e) Damage to your health caused by
swinging your hands and arms when
operating the appliance for longer pe-
riods of time or if the unit is not held or
maintained properly.
Warning! During operation, this
electric tool generates an electro-
magnetic eld which, under certain
circumstances, may impair the
functionality of active or passive
medical implants. To reduce the risk
of serious or lethal injuries, we rec-
ommend that persons with medical
implants consult their doctor and
the manufacturer of their medical
implant before operating the ma-
chine.
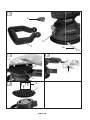
Initial start-up
Attaching /removing /
emptying dust collection
box
Attaching the dust collection
box:
1. Before connecting, ensure that the dust
collection box (10) is rmly closed.
2. You must keep the dust collection box
(10) slightly slanted when pushing it
on. Slide the dust collection box (10)
all the way onto the connection for dust
extraction (6). The nose of the dust col-
lection box (6) must be inserted into the
groove (10) of the connector (6).
3. Then tighten the dust collection box
(10) clockwise to lock.
Removing the dust
collectionbox:
4. Grasp the dust collection box (10) by
the black section.
Unlock the dust collection box (10)
counterclockwise and pull the dust col-
lection box (10) off.
Emptying the dust collection box:
5. Open the dust collection box (10) by
squeezing it on the transparent part
and pulling the two parts apart.
6. Pull the lter bag (10a) from the mouth-
piece.
7. Empty the lter bag.
8. Reattach the lter bag by pulling the
opening of the lter bag over the ring
on the mouthpiece.
9. Close the dust collection box (10)
again. Make sure the lter bag ts cor-
rectly.
Empty the dust collection box regu-
larly to ensure optimal suction.
How to connect/remove
external dust extraction
Connecting external dust
extraction:
1. Push the external dust extraction adap-
tor (12) as far as it will go on the dust
extraction connector (6).
2. Connect the extraction hose from a
vacuum cleaner (sold separately) to the
external dust extraction adaptor (12).
Removing external dust extraction
1. Remove the extraction hose from the
external dust extraction adaptor (12).
2. Disconnect the adapter for external
dust extraction (12).

12
GB IE
If necessary, you can connect the
suction tube of a vacuum cleaner
directly to the device without an
adapter.
Setting the rotational speed
You can set the rotational speed variable
via the rotational speed selection wheel
(2).
Mounting/adjusting the
additional handle
Mounting the additional handle
1. If necessary, loosen the wing nut (4)
and screw (4a) from the additional
handle (3).
2. Slide the additional handle (3) over the
handle unit (13) on the tool.
3. Fix the additional handle (3) with the
screw (4a) and wing nut (4).
Adjusting the additional handle
1. Loosen the wing nut (4).
2. Adjust the additional handle (3) to the
desired position.
3. Tighten the wing nut (4) again.
Attaching/removing
sanding sheet
Clean the sanding disc before you
attach a sanding sheet.
Always remove the battery before
working on the tool.
Use only appropriate sanding sheet
sizes. Sanding sheets, which ex-
tend beyond the sanding disc, can
cause injuries and can cause the
sanding sheets to block or tear.
The sanding disc (5) is tted with Velcro for
rapid attachment of the sanding sheet (11).
Removing sanding sheet:
Remove the sanding sheet (11) from the
sanding disc (5).
Attaching sanding sheet:
Press the sanding sheet (11) evenly onto
the sanding disc (5).
Ensure that the sanding sheet lies ush and
the holes are placed directly above the
extraction openings of the sanding disc
(5). Use the sanding sheet xer (9) for this
purpose.
The sanding disc will continue
to run after switching off.
Wait until the sanding disc
has come to a complete stop.
Switching on and off
Switch the machine on before you
approach the material to be sand-
ed.
Switching on the device
1. Slide the On/Off switch to position
“1”.
Switching off the device
2. Slide the On/Off switch to position
“0”.
Removing/inserting the
battery
1. To remove the battery (7) from the de-
vice, press the release button (7a) on
the battery and pull the battery (7) out.
2. To insert the battery (7), push the bat-
tery (7) along the guide rail into the
device. You will hear it click into place.

13
GB IE
Checking the charge level of
the rechargeable battery
The battery charge level indicator signal-
ises the state of charge of the battery (7).
Press the button for the charge level indica-
tor (7b) on the battery.
The charge level of the battery is indicated
by illumination of the corresponding LED
light.
3 LEDs illuminated (red, orange and green):
Battery charged
2 LEDs illuminated (red and orange):
Battery partially charged
1 LED illuminated (red):
Battery needs to be charged
Charge the battery (7) when only
the red LED on the level indicator is
illuminated.
Removing/changing the
sanding disc
1. If necessary, remove the sandpaper
sheet (5).
2. Loosen the four Phillips screws (14).
3. Remove the sanding disc (5) from the
motor unit.
4. Install the sanding disc (5) again in
reverse order.
Make sure that the extraction openings
on the sanding disc line up with the
threaded holes in the motor unit.
Replacement sanding discs are
available from our online shop (see
“Spare parts/Accessories”).
Practical tips
When working with the ap-
pliance, always wear suita-
ble clothing and appropriate
protective equipment.
Prior to each use it must be
ensured that the appliance is
working correctly.
Personal protective equip-
ment and a fully functional
appliance reduce the risk of
injuries and accidents.
Do not use the device without a
dust collection box or external dust
extraction. Use of a dust extraction
can reduce hazards caused by
dust.
When using sanding sheets without
ventilation holes, dust extraction
is not possible. Make sure that the
workplace is well ventilated.
Remove the battery before carrying
out any adjustments, maintenance
or repair work.
• Move the appliance against the work-
piece once it is switched on.
• After machining, lift the sanding disc
up before turning off the device.
• Clean the sanding disc before attach-
ing a sanding sheet.
• Only work with sanding sheets in per-
fect condition to achieve good sanding
results.
• Work with low and even pressure and
even forward pressure. This protects the
appliance and the sanding sheet.
• Do not use the same sanding sheet to
sand different materials (e.g. metal and
then wood).
• Empty the dust collection box or the

14
GB IE
vacuum cleaner regularly in order to
ensure optimal suction.
Cleaning/Maintenance
Remove the battery before carrying
out any adjustments, maintenance
or repair work.
Repair and servicing work not
described in this manual should
always be carried by our Service
Centre. Use only original parts.
The following cleaning and servicing
should be done regularly. This will ensure
a long and reliable service life.
Cleaning
Do not spray the appliance
with water and do not im-
merse it in water. Electric
shock hazard!
• Keep clean the ventilation slots, motor
housing and handles of the appliance.
Use a damp cloth or a brush.
Do not use cleaning agents or solvents.
You may otherwise irreparably dam-
age the appliance.
• Clean the sanding sheet with a vacuum
cleaner or knock it out.
Maintenance
The equipment is maintenance free.
Storage
• Store the device in a dry place well out
of reach of children.
• Empty the dust collection box before
storing the device (see “Connecting/
removing/emptying the dust collection
box”).
Disposal/environmental
protection
Remove the rechargeable battery before
disposing of the device.
The device, accessories and packaging
should be properly recycled.
Instructions on how to dispose of the re-
chargeable battery can be found in the
separate instruction manual for your bat-
tery and charger.
Electrical devices do not belong in
domestic waste.
• Take the device to a recycling plant.
The plastic and metal parts used on
your device can be properly sorted ac-
cording to materials and grades and
efciently recycled. Please contact our
service centre for more information.
• We will dispose of any defective devic-
es that you send to us free of charge.
• Defective or used batteries must be
recycled in accordance with Directive
2006/66/EC.
• Dispose of batteries in a discharged
state. We recommend covering the con-
tacts with an adhesive strip to protect
against short circuits. Do not open the
battery.
• Dispose of the batteries according to
local standards. Hand in the batteries
at a used battery collection point where
they are recycled in an environmentally
friendly manner. For more information,
please contact your local waste man-
agement provider or our service centre.

15
GB IE
Replacement parts/
accessories
Spare parts and accessories can be
obtained at
www.grizzlytools.shop
If you have issues ordering, please use the
contact form. If you have any other ques-
tions, please contact the service centre (see
page 16).
3 Additional handle .......... 91106225
5 Sanding disc ................. 91106226
9 Sanding sheet xer ........ 91106224
10 Dust collection box ........ 91106227
11 Sanding sheet
1 x grain size 60 .......... 30211123
1 x grain size 80 .......... 30211124
1 x grain size 120 ........ 30211125
1 x grain size 240 ........ 30211126
12 Adapter for dust
extraction ..................... 91106223
Guarantee
Dear Customer,
This equipment is provided with a 3-year
guarantee from the date of purchase.
In case of defects, you have statutory rights
against the seller of the product. These
statutory rights are not restricted by our
guarantee presented below.
Terms of Guarantee
The term of the guarantee begins on the
date of purchase. Please retain the original
receipt. This document is required as proof
of purchase.
If a material or manufacturing defect
occurs within three years of the date of
purchase of this product, we will repair or
replace – at our choice – the product for
you free of charge. This guarantee requires
the defective equipment and proof of pur-
chase to be presented within the three-year
period with a brief written description of
what constitutes the defect and when it oc-
curred.
If the defect is covered by our guarantee,
you will receive either the repaired product
or a new product. No new guarantee pe-
riod begins on repair or replacement of the
product.
Guarantee Period and Statutory
Claims for Defects
The guarantee period is not extended by
the guarantee service. This also applies for
replaced or repaired parts. Any damages
and defects already present at the time of
purchase must be reported immediately af-
ter unpacking. Repairs arising after expiry
of the guarantee period are chargeable.
Guarantee Cover
The equipment has been carefully pro-
duced in accordance with strict quality
guidelines and conscientiously checked
prior to delivery.
The guarantee applies for all material and
manufacturing defects. This guarantee
does not extend to cover product parts that
are subject to normal wear and may there-
fore be considered as wearing parts (e.g.
lter insert, sanding paper) or to cover
damage to breakable parts.
This guarantee shall be invalid if the prod-
uct has been damaged, used incorrectly or
not maintained. Precise adherence to all of
the instructions specied in the operating
manual is required for proper use of the
product. Intended uses and actions against
which the operating manual advises or
warns must be categorically avoided.
The product is designed only for private
and not commercial use. The guarantee

16
GB IE
will be invalidated in case of misuse or
improper handling, use of force, or inter-
ventions not undertaken by our authorised
service branch.
Processing in Case of Guarantee
To ensure efcient handling of your query,
please follow the directions below:
• Please have the receipt and item num-
ber (IAN 385566_2107) ready as
proof of purchase for all enquiries.
• Please nd the item number on the rat-
ing plate.
• Should functional errors or other de-
fects occur, please initially contact the
service department specied below
by telephone or by e-mail. You will
then receive further information on the
processing of your complaint.
• After consultation with our customer
service, a product recorded as defec-
tive can be sent postage paid to the
service address communicated to you,
with the proof of purchase (receipt) and
specication of what constitutes the
defect and when it occurred. In order
to avoid acceptance problems and
additional costs, please be sure to use
only the address communicated to you.
Ensure that the consignment is not sent
carriage forward or by bulky goods,
express or other special freight. Please
send the equipment inc. all accessories
supplied at the time of purchase and
ensure adequate, safe transport pack-
aging.
Repair Service
For a charge, repairs not covered by
the guarantee can be carried out by
our service branch, which will be happy to
issue a cost estimate for you.
We can handle only equipment that has
been sent with adequate packaging and
postage.
Attention: Please send your equipment to
our service branch in clean condition and
with an indication of the defect.
Equipment sent carriage forward or by
bulky goods, express or other special
freight will not be accepted.
We will dispose of your defective devices
free of charge when you send them to us.
Service-Center
GB Service Great Britain
Tel.: 0800 404 7657
E-Mail: [email protected]
IAN 385566_2107
IE Service Ireland
Tel.: 1800 101010
E-Mail: [email protected]
IAN 385566_2107
Importer
Please note that the following address is
not a service address. Please initially con-
tact the service centre specied above.
Grizzly Tools GmbH & Co. KG
Stockstädter Straße 20
63762 Großostheim
Germany
www.grizzlytools.de
Imported for GB market by:
Lidl Great Britain Ltd.
Lidl House, 14 Kingston Road
Surbiton, KT5 9NU

NL
17
Inhoud
Inleiding ....................................17
Gebruiksdoel .............................17
Algemene beschrij ving ...............18
Omvang van de levering .................18
Overzicht ....................................... 18
Funktiebeschr ving ..........................18
Technische gegevens ..................18
Laadt d .........................................19
Veiligheidsvoorschriften .............19
Symbolen en pictogrammen .............19
Algemene veiligheidsinstructies voor
elektrisch gereedschap ....................20
Speci eke veiligheidsinstructies voor
excenterschuurmachines ...................24
Restrisico’s ......................................24
Inbedrij fstelling ..........................25
Stofbak monteren/verw deren/
leegmaken .....................................25
Externe stofafzuiging aansluiten/
verw deren ....................................25
Toerental instellen ............................26
Hulphandgreep monteren/afstellen ...26
In- en uitschakelen ........................... 26
Schuurpapierblad aanbrengen/
verw deren ....................................26
De accu verw deren/plaatsen .......... 26
Laadtoestand van de accu
controleren .....................................27
Schuursch f demonteren/vervangen .. 27
Werkinstructies ..........................27
Reiniging en onderhoud .............28
Reiniging .......................................28
Onderhoud ....................................28
Bewaring ................................... 28
Afvalverwij dering/
Milieubescherming .....................28
Reserveonderdelen/accessoires .. 29
Garantie ....................................30
Reparatieservice ........................31
Service-Center ............................31
Importeur ..................................31
Inleiding
Hartel k gefeliciteerd met de aankoop van
uw nieuw apparaat. Daarmee hebt u voor
een hoogwaardig product gekozen.
Dit apparaat werd t dens de productie op
kwaliteit gecontroleerd en aan een eind-
controle onderworpen. De functionaliteit
van uw apparaat is b gevolg verzekerd.
De gebruiksaanw zing vormt een
bestanddeel van dit product. Ze om-
vat belangr ke aanw zingen voor veilig-
heid, gebruik en afvalverw dering. Maak
u vóór het gebruik van het product met alle
bedienings- en veiligheidsinstructies ver-
trouwd. Gebruik het product uitsluitend zo-
als beschreven en voor de aangegeven
toepassingsgebieden. Bewaar de handlei-
ding goed en overhandig alle documenten
b het doorgeven van het product mee aan
derden.
Gebruiksdoel
Het apparaat is bedoeld voor het droog
schuren van hout, metaal of verf.
Elke andere toepassing, die in deze hand-
leiding niet uitdrukkel k wordt toegelaten,
kan schade aan het apparaat aanrichten
en kan een ernstig gevaar voor de gebrui-
ker betekenen.
De producent is niet verantwoordel k voor
beschadigingen, die door onrechtmatig
gebruik of verkeerde bediening worden
veroorzaakt.
Dit apparaat is niet geschikt voor commer-
cieel gebruik.
Het apparaat maakt deel uit van de reeks
Parkside X20VTEAM en kan met ac-
cu‘s van de reeks Parkside X20VTEAM
worden gebruikt. De accu‘s mogen alleen
met originele laders van de serie Parkside
X20VTEAM worden geladen.
Vertaling van de originele
CE-conformiteitsverklaring .........50
Explosietekening ........................52

NL
18
Algemene beschrij ving
De afbeelding van de be-
langr kste functionele on-
derdelen bevindt zich op de
uitklappagina.
Omvang van de levering
Pak het apparaat uit en controleer, of de
inhoud volledig is.
- Excentrieksch fsl pmachine
- Stofbak
- Extra handgreep incl. schroef en vleu-
gelmoer (voorgemonteerd)
- Adapter voor externe stofafzuiging
- Schuurpapier (korrel 60, 80, 120, 240)
- Schuurpapier xeermiddel
- Gebruiksaanw zing
Batter en lader z n niet inbegre-
pen.
Overzicht
1 Aan-/uitknop
2 Wieltje voor toerentalselectie
3 Hulphandgreep
4 Vleugelmoer
4a Schroef
5 Schuursch f
6 Aansluiting voor de stofafzuiging
7 Accu
7a Ontgrendelknop
7b Knop voor laadindicator
8 Lader
9 Schuurpapier xeermiddel
10 Stofbak
10a Filterzak
11 Schuurpapier
12 Adapter voor stofafzuiging
13 Handgreephouder
14 Kruiskopschroef
Funktiebeschrij ving
De excenterschuurmachine is voorzien van
een roterende schuursch f voor het bewer-
ken van hout, metaal of verf.
De functie van de verschillende bedie-
ningsonderdelen is hieronder beschreven.
Technische gegevens
Accu-excenterschuur-
machine ..................PAEXS 20-Li B2
Nominale spanning U.................. 20 V
Toerental zonder last
n0 ..........................3000 - 12000 min-1
Trilsnelheid zonder last
n0 ..........................6000 - 24000 min-1
Gewicht (zonder batter ) ....... ca. 1,25 kg
Schuursch f ............................ ø 125 mm
Beschermingsklasse .......................... IPX0
Geluidsdrukniveau
(LpA) ................... 76,4 dB(A), KpA= 3 dB
Geluidssterkte (LWA) 87,4 dB(A); KWA= 3 dB
Vibratie (ah) .........14,4 m/s2; K= 1,5 m/s2
Accu .............................................. Li-Ion
Temperatuur ..........................max. 50 °C
Laadproces ...........................4 - 40 °C
Bedr f................................ -20 - 50 °C
Opslag .................................0 - 45 °C
De aangegeven totale trillingswaarden en
de aangegeven geluidsemissiewaarden
z n gemeten volgens een genormeerde
testprocedure en kunnen worden gebruikt
om een elektrisch gereedschap met een
ander gereedschap te vergel ken.
De aangegeven totale trillingswaarden en
de aangegeven geluidsemissiewaarden
kunnen ook worden gebruikt voor een
voorlopige inschatting van de belasting.
Waarschuwing:
De trillings- en geluidsemissies kun-
nen t dens het werkel ke gebruik

NL
19
van het elektrische gereedschap
afw ken van de vermelde waarden,
afhankel k van de manier waarop
het elektrische werktuig wordt ge-
bruikt en vooral van de aard van
het bewerkte werkstuk.
Probeer de belasting door trillingen
zo gering mogel k te houden. Om
de trillingsbelasting te reduceren,
kunt u b voorbeeld t dens het
gebruik van het gereedschap hand-
schoenen dragen en de werkt d
beperken. Houd daarb rekening
met alle fasen van de bedr fscyclus
(b voorbeeld ook periodes wan-
neer het elektrische gereedschap is
uitgeschakeld en periodes wanneer
het weliswaar is ingeschakeld maar
zonder belasting draait).
Laadtij d
Het apparaat maakt deel uit van de reeks
Parkside X20V TEAM en kan met accu’s
van de reeks Parkside X20V TEAM wor-
den gebruikt.
Accu’s van de reeks Parkside X20V TEAM
mogen alleen met originele laders van
de reeks Parkside X20V TEAM worden
geladen.
We bevelen u aan dit apparaat uitsluitend
met volgende accu’s: PAP 20 B1, PAP 20 B3.
We bevelen u aan deze accu’s met volgen-
de laders te laden: PLG 20A3, PLG 20
A4, PLG 20 C1, PLG 20 C3,
PDSLG 20 A1.
Een actuele l st van de accu-compatibiliteit
vindt u op: www.lidl.de/akku
Veiligheidsvoorschriften
Gelieve b het gebruik van het apparaat
de veiligheidsinstructies in acht te nemen.
Symbolen en pictogrammen
Symbolen op het apparaat:
Dit apparaat maakt deel uit
van Parkside X20VTeam
Let op!
Lees alvorens het apparaat te
gebruiken aandachtig de gebruiks-
aanw zing door.
Draag gehoorbescherming.
Draag oogbescherming.
Draag ademhalingsbescherming.
Laadt d (min.) PAP20A1
PAP20B1 PAP20A2 PAP20A3
PAP20B3
Smart
PAPS204A1
Smart
PAPS208A1
PLG20A1
PLG20A4
PLG20C1
60 90 120 120 210
PLG20A2 45 60 80 80 165
PLG20A3
PLG20C3 35 45 60 50 120
PDSLG20A1 35 45 60 50 120
Smart
PLGS2012A1 35 40 40 40 50

NL
20
Het in de veiligheidsinstructies gebruikte
begrip „Elektrisch gereedschap“ heeft
betrekking op elektrisch gereedschap met
netvoeding (met netsnoer) en op elektrisch
gereedschap met batter voeding (zonder
netsnoer).
1) Veiligheid op de wekplaats
a) Houd uw werkruimte netjes en
goed verlicht. Wanorde of onverlich-
te werkomgevingen kunnen tot ongeval-
len leiden.
b) Werk met het elektrische ge-
reedschap niet in een explosie-
ve omgeving, waarin er zich
brandbare vloeistoffen, gassen
of stoffen bevinden. Elektrisch ge-
reedschap produceert vonken, die het
stof of de dampen kunnen doen ontste-
ken.
c) Houd kinderen en andere per-
sonen tij dens het gebruik van
het elektrische gereedschap op
een veilige afstand. In geval van
a eiding kunt u de controle over het
apparaat verliezen.
2) Elektische veiligheid
a) De aansluitstekker van het elek-
trische gereedschap moet in het
stopcontact passen. De stekker
mag op geen enkele manier ver-
anderd worden. Gebruik geen
adapterstekkers samen met
geaard elektrisch gereedschap.
Ongew zigde stekkers en passende
stopcontacten doen het risico voor een
elektrische schok afnemen.
b) Vermij d lichamelij k contact met
geaarde oppervlakken, zoals
van buizen, verwarmingsinstal-
laties, fornuizen en koelkasten.
Draag beschermende
handschoenen.
Verw der de accu voor onder-
houdswerkzaamheden.
Verwondingsgevaar door roterend
werktuig! Houd de handen uit de
buurt van het apparaat.
Machines horen niet b huishoude-
l k afval thuis.
Symbolen in de gebruiksaanwij
zing:
Gevaarsymbool met infor-
matie over de preventie van
personen- of zaakschade
Gebodsteken met informatie over
de preventie van schade
Aanduidingsteken met informatie
over hoe u het apparaat beter kunt
gebruiken
Algemene
veiligheidsinstructies voor
elektrisch gereedschap
WAARSCHUWING! Lees alle
veiligheidsaanwij zingen,
instructies, borden en tech-
nische gegevens die voor dit
elektrische gereedschap gel-
den. Verzuim b de naleving van
de veiligheidsinstructies en aanw -
zingen kan een elektrische schok,
brand en/of ernstige verwondingen
veroorzaken.
Bewaar alle veiligheidsinstructies
en aanwij zing voor de toekomst.
Seite wird geladen ...
Seite wird geladen ...
Seite wird geladen ...
Seite wird geladen ...
Seite wird geladen ...
Seite wird geladen ...
Seite wird geladen ...
Seite wird geladen ...
Seite wird geladen ...
Seite wird geladen ...
Seite wird geladen ...
Seite wird geladen ...
Seite wird geladen ...
Seite wird geladen ...
Seite wird geladen ...
Seite wird geladen ...
Seite wird geladen ...
Seite wird geladen ...
Seite wird geladen ...
Seite wird geladen ...
Seite wird geladen ...
Seite wird geladen ...
Seite wird geladen ...
Seite wird geladen ...
Seite wird geladen ...
Seite wird geladen ...
Seite wird geladen ...
Seite wird geladen ...
Seite wird geladen ...
Seite wird geladen ...
Seite wird geladen ...
Seite wird geladen ...
Seite wird geladen ...
Seite wird geladen ...
Seite wird geladen ...
Seite wird geladen ...
-
 1
1
-
 2
2
-
 3
3
-
 4
4
-
 5
5
-
 6
6
-
 7
7
-
 8
8
-
 9
9
-
 10
10
-
 11
11
-
 12
12
-
 13
13
-
 14
14
-
 15
15
-
 16
16
-
 17
17
-
 18
18
-
 19
19
-
 20
20
-
 21
21
-
 22
22
-
 23
23
-
 24
24
-
 25
25
-
 26
26
-
 27
27
-
 28
28
-
 29
29
-
 30
30
-
 31
31
-
 32
32
-
 33
33
-
 34
34
-
 35
35
-
 36
36
-
 37
37
-
 38
38
-
 39
39
-
 40
40
-
 41
41
-
 42
42
-
 43
43
-
 44
44
-
 45
45
-
 46
46
-
 47
47
-
 48
48
-
 49
49
-
 50
50
-
 51
51
-
 52
52
-
 53
53
-
 54
54
-
 55
55
-
 56
56


Parkside PAEXS 20-Li B2 Benutzerhandbuch
- Kategorie
- Elektrowerkzeuge
- Typ
- Benutzerhandbuch
in anderen Sprachen
- English: Parkside PAEXS 20-Li B2 User manual
- Nederlands: Parkside PAEXS 20-Li B2 Handleiding
Verwandte Artikel
-
Parkside PAEXS 20-Li A1 Translation Of The Original Instructions
-
-
Parkside PKGA 20-Li B1 Original Instructions Manual
-
-
-
-
-
Parkside PAMFW 20-LI A1 Instructions Manual
-
-