ETNA VW744HM Bedienungsanleitung
- Kategorie
- Geschirrspüler
- Typ
- Bedienungsanleitung

VW744HM
INSTRUCTIONS FOR USE
BEDIENUNGSANLEITUNG
DISHWASHER
GESCHIRRSPÜLER

EN User instruction EN 3 - EN 30
DE Bedienungsanleitung DE 3 - DE 30
Pictograms used - Verwendete Piktogramme
Important information - Wichtige Informationen
Tip - Tipp

Contact a registered installer to fit your appliance
(see “Installation instructions”). Do not connect the
appliance to the electrical mains until the installation is
complete.
This appliance is intended to be used in household and
similar applications such as:
▷staff kitchen areas in shops, offices and other working
environments;
▷farmhouses;
▷by clients in hotels, motels and other residential type
environments;
▷bed and breakfast type environments.
For EN60335-1:
• This appliance can be used by children aged from
8 years and above and persons with reduced physical,
sensory or mental capabilities or lack of experience
and knowledge if they have been given supervision or
instruction concerning use of the appliance in a safe
way and understand the hazards involved. Children
shall not play with the appliance. Cleaning and user
maintenance shall not be done by children without
supervision.
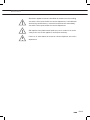
SAFETY INSTRUCTIONS

For IEC60335-1:
• This appliance is not intended for use by persons
(including children) with reduced physical, sensory
or mental capabilities, or lack of experience and
knowledge, unless they have been given supervision or
instruction concerning use of the appliance by a person
responsible for their safety.
• Packaging material could be dangerous for children!
• This appliance is for indoor household use only.
• To protect against the risk of electrical shock, do not
immerse the unit, cord or plug in water or other liquid.
• Please unplug before cleaning and performing
maintenance on the appliance.
• Use a soft cloth moistened with mild soap, and then
use a dry cloth to wipe it again.
Earthing Instructions
• This appliance must be earthed. In the event of a
malfunction or breakdown, earthing will reduce the
risk of an electric shock by providing a path of least
resistance of electric current. This appliance is equipped
with an earthing conductor plug.
• The plug must be plugged into an appropriate outlet
that is installed and earthed in a ccordance with all local
codes and ordinances.
• Improper connection of the equipment-earthing
conductor can result in the risk of an electric shock.
SAFETY INSTRUCTIONS

• Check with a qualified electrician or service
representative if you are in doubt whether the appliance
is properly grounded.
• Do not modify the plug provided with the appliance, if it
does not fit the outlet.
• Have a proper outlet installed by a qualified electrician.
• Do not abuse, sit on, or stand on the door or dish rack
of the dishwasher.
• Do not operate your dishwasher unless all enclosure
panels are properly in place.
• Open the door very carefully if the dishwasher is
operating, there is a risk of water squirting out.
• Do not place any heavy objects on or stand on the door
when it is open. The appliance could tip forward.
When loading items to be washed:
▷Locate sharp items so that they are not likely to
damage the door seal;
▷Warning: Knives and other utensils with sharp points
must be loaded in the basket with their points facing
down or placed in a horizontal position.
• Some dishwasher detergents are strongly alkaline.
They can be extremely dangerous if swallowed.
Avoid contact with the skin and eyes and keep children
away from the dishwasher when the door is open.
SAFETY INSTRUCTIONS

• Check that the detergent powder is empty after
completion of the wash cycle.
• Do not wash plastic items unless they are marked
“dishwasher safe” or the equivalent.
• For unmarked plastic items not so marked, check the
manufacturer's recommendations.
• Use only detergent and rinse agents recommended for
use in an automatic dishwasher.
• Never use soap, laundry detergent, or hand washing
detergent in your dishwasher.
• The door should not be left open, since this could
increase the risk of tripping.
• If the supply cord is damaged, it must be replaced
by the manufacturer or its service agent or a similarly
qualified person in order to avoid a hazard.
• During installation, the power supply must not be
excessively or dangerously bent or flattened.
• Do not tamper with controls.
• The appliance needs to be connected to the main water
valve using new hose sets. Old sets should not be
reused.
• To save energy, the appliance will go to standby mode
automatically when there is no operation during some
time.
• When the appliance is not in use keep the door closed.
You might trip over an open door.
SAFETY INSTRUCTIONS

EN 3
Your dishwasher
Introduction 4
Using your dishwasher
Description 5
Quick start 5
Control panel 6
Water softener 8
Adding salt 9
Preparing and loading dishes 10
Function of the rinse aid and dishwasher detergent 12
Filling the rinse aid reservoir 13
Filling the detergent dispenser 14
Programming your dishwasher
Wash cycle table 15
Saving energy 16
Starting a wash cycle 16
Changing the program mid-cycle 16
Forget to add a dish? 17
Auto open 17
Maintenance
Filtering system 18
Cleaning the spray arms 19
Caring for the dishwasher 20
Cleaning the door 21
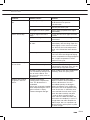
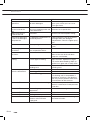
Errors
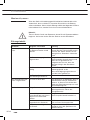
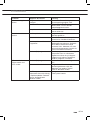
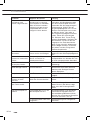
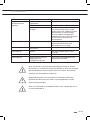
What should I do, if... 22
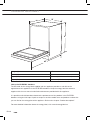
Technical data sheet 26
Loading the baskets according to EN60436 27
Tips for using the cutlery rack 29
Your dishwasher and the environment
Disposal 30
CONTENTS

EN 4
Introduction
You have chosen to purchase a Etna dishwasher.
Optimum user comfort and easy operation were paramount during the development of this
product.
This manual describes how you can get the most out of your dishwasher. It provides you with
information on how to operate the appliance, as well as background information about how it
works. You will furthermore also find maintenance tips.
The safety instructions that are relevant during the installation are included in the installation
guide. This is intended for the installation technician.
Read this manual before using the appliance. Keep this manual somewhere safe so that
subsequent users can also benefit from the information contained within.
You can find the most recent version of the instructions for use on our website.
YOUR DISHWASHER

EN 5
USING YOUR DISHWASHER
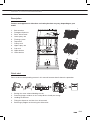
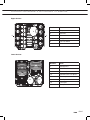
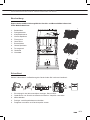
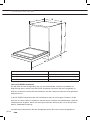
Description
Features and appearance of baskets and cutlery baskets may vary, depending on your
model.
1. Salt container
2. Detergent dispenser
3. Rinse aid reservoir
4. Lower spray arm
5. Filtering system
6. Top nozzle
7. Cutlery rack
8. Upper spray arm
9. Cup rack
10. Upper basket
11. Lower basket
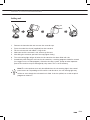
Quick start
Please read the corresponding content in this manual for more details about the operation.
Inside Outside
1. Setting the water softener/loading the salt.
2. Removing larges residues on the cutlery/dishes. Avoid pre-rinsing.
3. Loading the baskets.
4. Filling the dispenser and the rinse aid reservoir.
5. Selecting a program and running the dishwasher.
6
15
4
2 3 11
10
89
7

EN 6
USING YOUR DISHWASHER
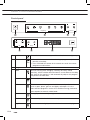
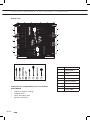
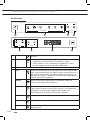
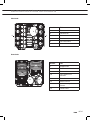
Control panel
1 2 3 4
5 6 78
Programs Functions
Alt Delay
Programs Functions Alt Delay
1 On/Off
1 2 3 4
5 6 78
Programs Functions
Alt Delay
Programs Functions Alt Delay
Press this button to turn on your dishwasher, the screen lights up.
7 Start
1 2 3 4
5 6 78
Programs Functions
Alt Delay
Programs Functions Alt Delay
• Press this button to start after selecting a programme (and
possibly a function).
• Press and hold this button for 3 seconds to cancel the current
programme and function.
2 Programs
Auto
1 2 3 4
5 6 78
Programs Functions
Alt Delay
Programs Functions Alt Delay
An auto sensing wash for lightly, normally or heavily soiled
crockery, with or without dried-on food. A sensor detects how dirty
the water in the machine is and automatically adjusts the program
temperature and duration.
Intensive
1 2 3 4
5 6 78
Programs Functions
Alt Delay
Programs Functions Alt Delay
For heavily soiled items, include pots and pans, with dried on food.
ECO
1 2 3 4
5 6 78
Programs Functions
Alt Delay
Programs Functions Alt Delay
This is the standard program suitable for normally soiled loads,
such as pots, plates, glasses and lightly soiled pans. It is the
most efficient program in terms of its combined energy and water
consumption for normaly soiled loads.
Glass
1 2 3 4
5 6 78
Programs Functions
Alt Delay
Programs Functions Alt Delay
For lightly soiled crockery and glass.
90 min
1 2 3 4
5 6 78
Programs Functions
Alt Delay
Programs Functions Alt Delay
For normally soiled loads that need a quick wash.
Rapid
1 2 3 4
5 6 78
Programs Functions
Alt Delay
Programs Functions Alt Delay
A shorter wash for lightly soiled loads that do not need drying.

EN 7
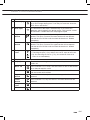
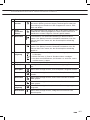
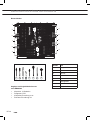
Functions
3Extra drying
1 2 3 4
5 6 78
Programs Functions
Alt Delay
Programs Functions Alt Delay
The drying effect is improved by a higher temperature in the final
rinse and a longer drying time. It can only be used with Intensive,
ECO, Glass and 90 min.
4Auto open
1 2 3 4
5 6 78
Programs Functions
Alt Delay
Programs Functions Alt Delay
The dishwasher door opens automatically at the end of the
program, which improves the drying results. This function cannot
be selected in combination with the program Rapid.
5 Upper
basket
1 2 3 4
5 6 78
Programs Functions
Alt Delay
Programs Functions Alt Delay
Touch this key for specifically cleaning the load in the upper
basket. The spray system of the lower basket will not operate.
You do not have to wait until the whole dishwasher is loaded
completely.
Lower
basket
1 2 3 4
5 6 78
Programs Functions
Alt Delay
Programs Functions Alt Delay
Touch this key for specifically cleaning the load in the lower
basket. The spray system of the upper basket will not operate.
You do not have to wait until the whole dishwasher is loaded
completely.
6 Delayed
start
1 2 3 4
5 6 78
Programs Functions
Alt Delay
Programs Functions Alt Delay
1 2 3 4
5 6 78
Programs Functions
Alt Delay
Programs Functions Alt Delay
• Touch these keys to set a delayed start (up to 24 hours).
• Touching the plus (+) key delays the start in steps of one hour.
• By first touching the minus (-) key, the maximum time of 24
hours is set immediately.
8Display with indicators
Display To show the remaining time, temperature, delayed start time, error
codes etc.
Rinse aid
1 2 3 4
5 6 78
Programs Functions
Alt Delay
Programs Functions Alt Delay
If this indicator is lit, it means the dishwasher is low on dishwasher
rinse aid and requires a refill.
Salt
1 2 3 4
5 6 78
Programs Functions
Alt Delay
Programs Functions Alt Delay
If this indicator is lit, it means the dishwasher is low on dishwasher
salt and needs to be refilled.
Upper
basket
1 2 3 4
5 6 78
Programs Functions
Alt Delay
Programs Functions Alt Delay
If this indicator is lit, only the dishes in the upper basket will be
washed.
Lower
basket
1 2 3 4
5 6 78
Programs Functions
Alt Delay
Programs Functions Alt Delay
If this indicator is lit, only the dishes in the lower basket will be
washed.
Delayed
start
1 2 3 4
5 6 78
Programs Functions
Alt Delay
Programs Functions Alt Delay
If this indicator is lit, a delayed start has been set.
Water faucet
1 2 3 4
5 6 78
Programs Functions
Alt Delay
Programs Functions Alt Delay
If this indicator is lit, it means the water faucet is closed.
USING YOUR DISHWASHER

EN 8
USING YOUR DISHWASHER
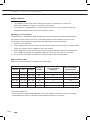
Water softener
• The hardness of the water varies from place to place. If hard water is used in the
dishwasher, deposits will form on the dishes and utensils.
• The appliance is equipped with a special softener that uses a salt container specifically
designed to eliminate lime and minerals from the water.
Adjusting salt consumption
The dishwasher is designed to allow for adjustment in the amount of salt consumed based on
the hardness of the water used. This is intended to optimise and customise the level of salt
consumption. Please follow the steps below for adjustment in salt consumption.
1. Switch on the appliance;
2. Touch program key Auto for more than 5 seconds to open the water softener settings mode
within 60 seconds after the appliance was switched on;
3. Touch program key Auto to select the correct setting according to your local environment.
The settings will change in the following sequence: H3->H4->H5->H6>H1->H2->H3;
4. Press the On/Off button to confirm the setting and to end the setting mode.
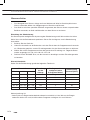
Water hardness table
Adjust the salt consumption according to the table below:
Water hardness Setting in
display
Regeneration occurs
every X program
sequence*
Salt consumption
(grams/cycle)
ºClarke ºdH mmol/l
0 - 6 0 - 5 0 - 0.94 H1 No regeneration 0
7 - 14 6 - 11 1.0 - 2.0 H2 10 9
15 - 21 12 - 17 2.1 - 3.0 H3 5 12
22 - 28 18 - 22 3.1 - 4.0 H4 3 20
29 - 42 23 - 34 4.1 - 6.0 H5 2 30
43 - 69 35 - 55 6.1 - 9.8 H6 1 60
The factory setting: H3
* Every cycle with a regeneration operation consumes additional 3.0 litres of water, the energy
consumption increases by 0.02 kWh and the program extents by 4 minutes.

EN 9
USING YOUR DISHWASHER
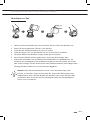
Adding salt
1. Remove the lower basket and unscrew the reservoir cap.
2. Place the end of the funnel (supplied) into the container
3. Fill the salt reservoir with about 1.5 kg of salt.
4. Add water until the reservoir is full; water may flow out.
5. After filling the container, put back the cap (tighten firmly).
6. The salt warning light will go off after the salt container has been filled with salt.
7. Immediately after filling the salt into the salt container, a washing program should be started
(we suggest to use a short program). Otherwise the filter system, pump or other important
parts of the machine may be damaged by salty water. This is out of warranty.
Note! The salt container must only be refilled when the salt warning light in the control
panel comes on. Depending on how well the salt dissolves, the salt warning light may
still be on even though the salt container is filled. If salt has spilled, run a soak or quick
program to remove it.

EN 10
Preparing and loading dishes
• Consider buying utensils which are identified as dishwasher-proof.
• For particular items, select a program with the lowest possible temperature.
• To prevent damage, do not take glass and cutlery out of the dishwasher immediately after
the program has ended.
For washing the following cutlery/dishes are not suitable:
▷Cutlery with wooden, horn china or mother-of-pearl handles
▷Plastic items that are not heat resistant
▷Older cutlery with glued parts that are not temperature resistant
▷Bonded cutlery items or dishes
▷Pewter or cooper items
▷Crystal glass
▷Steel items subject to rusting
▷Wooden platters
▷Items made from synthetic fibres
For washing the following cutlery/dishes are of limited suitability:
▷Some types of glasses can become dull after a large number of washes
▷Silver and aluminum parts have a tendency to discolour during washing
▷Glazed patterns may fade if machine washed frequently
Recommendations for loading the dishwasher
Scrape off any large amounts of leftover food. Soften remnants of burnt food in pans. It is not
necessary to rinse the dishes under running water. For best performance of the dishwasher,
follow these loading guidelines. Features and appearance of baskets and cutlery baskets
may vary, depending on your model.
• Place objects in the dishwasher in the following way:
▷Items such as cups, glasses, pots/pans, etc. are faced downwards.
▷Curved items, or ones with recesses, should be loaded aslant so that water can run off.
▷All utensils are stacked securely and cannot tip over.
▷All utensils are placed in the way that the spray arms can rotate freely during washing.
▷Load hollow items such as cups, glasses, pans etc. with the opening facing downwards
so that water cannot collect in the container or a deep base.
▷Dishes and items of cutlery must not lie inside one another, or cover each other.
▷To avoid damage, glasses should not touch one another.
▷The upper basket is designed to hold more delicate and lighter dishware such as glasses,
coffee and tea cups.
▷Long bladed knives stored in an upright position are a potential hazard!
USING YOUR DISHWASHER

EN 11
▷Long and / or sharp items of cutlery such as carving knives must be positioned
horizontally in the upper basket.
▷Please do not overload your dishwasher. This is important for good results and for
reasonable consumption of energy.
Note: Very small items should not be washed in the dishwasher as they could
easily fall out of the basket.
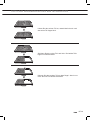
Loading the upper basket
The upper basket is designed to hold more delicate and lighter
dishware such as glasses, coffee and tea cups and saucers, as
well as plates, small bowls and shallow pans (as long as they are
not too dirty). Position the dishes and cookware so that they will
not get moved by the spray of water.
Loading the lower basket
We suggest that you place large items and the most difficult
to clean items into the lower basket: such as pots, pans, lids,
serving dishes and bowls. It is preferable to place serving dishes
and lids on the side of the racks in order to avoid blocking the
rotation of the top spray arm.
Loading the cutlery rack
Cutlery should be placed separately from each other in the appropriate positions. Avoid
overfilling the cutlery rack and stacking cutlery, this may cause bad performance.
Warning! Do not let any item extend through the bottom.
Removing the dishes
To prevent water dripping from the upper basket into the lower basket, we recommend that you
empty the lower basket first, followed by the upper basket.
Warning! Items will be hot! To prevent damage, do not take glass and cutlery out of the
dishwasher for around 15 minutes after the program has ended.
USING YOUR DISHWASHER

EN 12
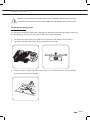
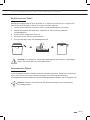
Folding back the cup shelves
To make room for taller items in the dishwasher basket, raise the cup rack upwards. You can
then lean the tall glasses against it. You can also remove it when it is not required for use.
CRASH
Function of the rinse aid and dishwasher detergent
The rinse aid is released during the final rinse to prevent water from forming droplets on your
dishes, which can leave spots and streaks. It also improves drying by allowing water to roll off
the dishes. Your dishwasher is designed to use liquid rinse aids.
Warning! Only use branded rinse aid for dishwasher. Never fill the rinse aid dispenser
with any other substances (e.g. Dishwasher cleaning agent, liquid detergent). This
would damage the appliance.
When to refill the rinse aid dispenser
The regularity of the dispenser needing to be refilled depends on how often dishes are washed
and the rinse aid setting used.
• The Low Rinse Aid indicator will be lit when more rinse aid is needed.
• Do not overfill the rinse aid dispenser.
Function of the dishwasher detergent
The chemical ingredients that compose the detergent are necessary to remove, crush and
dispense all dirt out of the dishwasher. Most of the commercial quality detergents are suitable for
this purpose.
USING YOUR DISHWASHER

EN 13
Warning! Proper use of the dishwasher detergent
- Use only detergent specifically made for dishwashers use.
- Keep your dishwasher detergent fresh and dry.
- Fill the detergent dispenser with dishwasher detergent immediately before starting the
wash programme.
- Dishwasher detergent is corrosive! Keep dishwasher detergent out of the reach
of children.
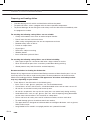
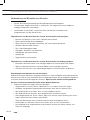
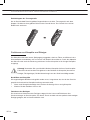
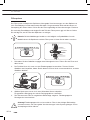
Filling the rinse aid reservoir
1. Open the reservoir cap.
2. Carefully pour in the rinse-aid into its dispenser, whilst avoiding it to overflow.
3. Close the reservoir cap.
Note: Clean up any spilled rinse aid with an absorbent cloth to avoid excessive foaming
during the next wash.
Adjusting the rinse aid reservoir
To achieve a better drying performance with limited rinse aid, the dishwasher is designed to
adjust the consumption by the user. If the dishes are not drying properly or are spotted, select
a higher setting until your dishes are spot-free. Select a lower setting if there are sticky whitish
stains on your dishes or a bluish film on glassware or knife blades.
1. Switch on the appliance.
2. Within 60 seconds after step 1, touch program key Auto for more than 5 seconds.
3. Touch the Delayed start plus (+) key to enter the setting mode. The rinse aid indicator
blinks.
USING YOUR DISHWASHER

EN 14
4. Touch the program key Auto to select the proper setting according to your using habits.
The settings will change in the following sequence: D1->D2->D3->D4->D5->D1. The
factory setting is D3.
5. Press the On/Off button to confirm the setting and to end the setting mode.
Setting Amount of rinse aid (ml)
D1 1.2
D2 2.4
D3 3.6
D4 4.8
D5 6.0
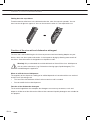
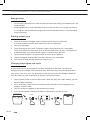
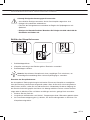
Filling the detergent dispenser
1. Open the flap; press the button.
2. Add detergent into the cavity for the main wash cycle.
3. Close the flap by sliding it and press until it locks.
Note: Be aware that depending on the soiling of water, setting may be different.
Please observe the manufacturer's recommendations on the detergent packaging.
USING YOUR DISHWASHER

EN 15
PROGRAMMING YOUR DISHWASHER
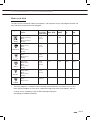
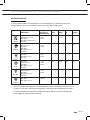
Wash cycle table
The table shows information about the programs. Consumption values and program duration are
only indicative except for the ECO program.
Program Steps of the wash
cycle
Detergent
pre wash/
main wash
Running
time (min)
Energy
(kWh)
Water
(l)
Rinse
aid
1 2 3 4
5 6 78
Programs Functions
Alt Delay
Programs Functions Alt Delay
Auto
Pre-wash (45°C)
Wash (55~65°C)
Rinse
Rinse (50~60°C)
Drying
5/19g
(1 or 2
pieces)
102-174 0,940-
1,450
10,3-16,9 Yes
1 2 3 4
5 6 78
Programs Functions
Alt Delay
Programs Functions Alt Delay
Intensive
Pre-wash
Wash (72°C)
Rinse
Rinse
Rinse (72°C)
Drying
5/19g
(1 or 2
pieces)
225 1,880 16,7 Yes
1 2 3 4
5 6 78
Programs Functions
Alt Delay
Programs Functions Alt Delay
ECO(1)
Wash (50°C)
Rinse
Rinse (45°C)
Drying
24g
(1 or 2
pieces)
205 0,769 9,5 Yes
1 2 3 4
5 6 78
Programs Functions
Alt Delay
Programs Functions Alt Delay
Glass
Pre-wash
Wash (50°C)
Rinse
Rinse (50°C)
Drying
5/19g
(1 or 2
pieces)
110 0,730 16,5 Yes
1 2 3 4
5 6 78
Programs Functions
Alt Delay
Programs Functions Alt Delay
90 min
Pre-wash
Wash (60°C)
Rinse
Rinse (50°C)
Drying
5/19g
(1 or 2
pieces)
90 0,920 13,6 Yes
1 2 3 4
5 6 78
Programs Functions
Alt Delay
Programs Functions Alt Delay
Rapid
Wash (55°C)
Rinse
Rinse (45°C)
18g
(1 piece)
35 0,670 11,3 No
(1) The ECO program is suitable to clean normally soiled tableware, that for this use, it is the
most efficient program in terms of its combined energy and water consumption, and it is
used to assess compliance with the EU ecodesign legislation.
According to standard EN 60436

EN 16
Saving energy
• Pre-rinsing of tableware items leads to increased water and energy consumption and is not
recommended.
• Washing tableware in a household dishwasher usually consumes less energy and water in
the use phase than hand dishwashing when the household dishwasher is used according
to the instructions.
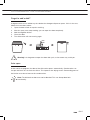
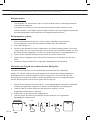
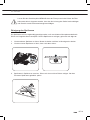
Starting a wash cycle
1. Draw out the lower and upper basket, load the dishes and push them back.
It is commended to load the lower basket first, then the upper one.
2. Pour in the detergent.
3. Insert the plug into the socket. The power supply can be found on the “rating plate”
which is located on the side of the inner dishwasher door, where also the serial number is
mentioned. Make sure that the water supply is turned on to full pressure.
4. Open the door and press the on/off button to switch on the appliance.
5. Choose a program (and possibly a function) and press the start button.
6. Then close the door, the dishwasher will start its cycle.
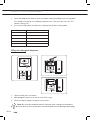
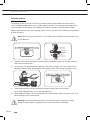
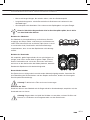
Changing the program mid-cycle
A wash cycle can only be changed if it has been running for a short time. Otherwise the
detergent may have already been released and the dishwasher may have already drained the
wash water. If this is the case, the dishwasher needs to be reset and the detergent dispenser
must be refilled. To reset the dishwasher, follow the instructions below:
1. Open the door a little to stop the dishwasher. When the spray arm stops working, you can
open the door completely.
2. Press and hold the Start button for more than three seconds to set the appliance into
program selection mode.
3. You can change the program to the desired cycle setting.
4. Press the Start button and close the door; the dishwasher will start its cycle.
3 sec
PROGRAMMING THE DISHWASHER
Seite wird geladen ...
Seite wird geladen ...
Seite wird geladen ...
Seite wird geladen ...
Seite wird geladen ...
Seite wird geladen ...
Seite wird geladen ...
Seite wird geladen ...
Seite wird geladen ...
Seite wird geladen ...
Seite wird geladen ...
Seite wird geladen ...
Seite wird geladen ...
Seite wird geladen ...
Seite wird geladen ...
Seite wird geladen ...
Seite wird geladen ...
Seite wird geladen ...
Seite wird geladen ...
Seite wird geladen ...
Seite wird geladen ...
Seite wird geladen ...
Seite wird geladen ...
Seite wird geladen ...
Seite wird geladen ...
Seite wird geladen ...
Seite wird geladen ...
Seite wird geladen ...
Seite wird geladen ...
Seite wird geladen ...
Seite wird geladen ...
Seite wird geladen ...
Seite wird geladen ...
Seite wird geladen ...
Seite wird geladen ...
Seite wird geladen ...
Seite wird geladen ...
Seite wird geladen ...
Seite wird geladen ...
Seite wird geladen ...
Seite wird geladen ...
Seite wird geladen ...
Seite wird geladen ...
Seite wird geladen ...
Seite wird geladen ...
Seite wird geladen ...
Seite wird geladen ...
Seite wird geladen ...
-
 1
1
-
 2
2
-
 3
3
-
 4
4
-
 5
5
-
 6
6
-
 7
7
-
 8
8
-
 9
9
-
 10
10
-
 11
11
-
 12
12
-
 13
13
-
 14
14
-
 15
15
-
 16
16
-
 17
17
-
 18
18
-
 19
19
-
 20
20
-
 21
21
-
 22
22
-
 23
23
-
 24
24
-
 25
25
-
 26
26
-
 27
27
-
 28
28
-
 29
29
-
 30
30
-
 31
31
-
 32
32
-
 33
33
-
 34
34
-
 35
35
-
 36
36
-
 37
37
-
 38
38
-
 39
39
-
 40
40
-
 41
41
-
 42
42
-
 43
43
-
 44
44
-
 45
45
-
 46
46
-
 47
47
-
 48
48
-
 49
49
-
 50
50
-
 51
51
-
 52
52
-
 53
53
-
 54
54
-
 55
55
-
 56
56
-
 57
57
-
 58
58
-
 59
59
-
 60
60
-
 61
61
-
 62
62
-
 63
63
-
 64
64
-
 65
65
-
 66
66
-
 67
67
-
 68
68


ETNA VW744HM Bedienungsanleitung
- Kategorie
- Geschirrspüler
- Typ
- Bedienungsanleitung
in anderen Sprachen
- English: ETNA VW744HM Operating instructions
Andere Dokumente
-
Whirlpool WFF 4O33 DLTG X @ Benutzerhandbuch
-
Whirlpool ADG 190 A+ Benutzerhandbuch
-
Nordmende DFSN60 Benutzerhandbuch
-
-
Bauknecht GSFS 60002 A+ Benutzerhandbuch
-
Electrolux GA55SLICN Benutzerhandbuch
-
-
Samsung DW6KM6041SS/EG Bedienungsanleitung
-
ECG EDF 6027 QWA++ Benutzerhandbuch
-