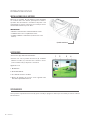
Celestron 71221 Benutzerhandbuch
- Kategorie
- Monokulare
- Typ
- Benutzerhandbuch
Dieses Handbuch eignet sich auch für

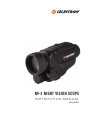
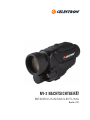
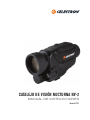
INSTRUCTION MANUAL
Model #71221
NV-2 NIGHT VISION SCOPE


ENGLISH I 3
Table of Contents
Introduction . . . . . . . . . . . . . . . . . . . . . . . . . . . . . . . . . . . . . . . . . . . . . . . . 4
Notes on Use in Low Light and Complete Darkness . . . . . . . . . . . . . . . . . . . . . . . . 4
What’s in the Box . . . . . . . . . . . . . . . . . . . . . . . . . . . . . . . . . . . . . . . . . . . . . 5
Accessories . . . . . . . . . . . . . . . . . . . . . . . . . . . . . . . . . . . . . . . . . . . . . . . 5
Operating Instructions . . . . . . . . . . . . . . . . . . . . . . . . . . . . . . . . . . . . . . . . . . 6
Battery Installation . . . . . . . . . . . . . . . . . . . . . . . . . . . . . . . . . . . . . . . . . . . . 6
Power On. . . . . . . . . . . . . . . . . . . . . . . . . . . . . . . . . . . . . . . . . . . . . . . . . 6
Power Off . . . . . . . . . . . . . . . . . . . . . . . . . . . . . . . . . . . . . . . . . . . . . . . . 6
Observing . . . . . . . . . . . . . . . . . . . . . . . . . . . . . . . . . . . . . . . . . . . . . . . . 7
Adjusting the Brightness of the Screen . . . . . . . . . . . . . . . . . . . . . . . . . . . . . . . . . 7
Adjusting the Infrared Beam . . . . . . . . . . . . . . . . . . . . . . . . . . . . . . . . . . . . . . . 8
Still Image Recording . . . . . . . . . . . . . . . . . . . . . . . . . . . . . . . . . . . . . . . . . . 8
Playing Back . . . . . . . . . . . . . . . . . . . . . . . . . . . . . . . . . . . . . . . . . . . . . . . 9
Deleting Files. . . . . . . . . . . . . . . . . . . . . . . . . . . . . . . . . . . . . . . . . . . . . . . 10
Video Recording . . . . . . . . . . . . . . . . . . . . . . . . . . . . . . . . . . . . . . . . . . . . . 10
Setting the Time . . . . . . . . . . . . . . . . . . . . . . . . . . . . . . . . . . . . . . . . . . . . . 11
Digital Zoom . . . . . . . . . . . . . . . . . . . . . . . . . . . . . . . . . . . . . . . . . . . . . . . 11
Video Out . . . . . . . . . . . . . . . . . . . . . . . . . . . . . . . . . . . . . . . . . . . . . . . . 12
Connecting to a Computer . . . . . . . . . . . . . . . . . . . . . . . . . . . . . . . . . . . . . . . 12
Power Management . . . . . . . . . . . . . . . . . . . . . . . . . . . . . . . . . . . . . . . . . . . 12
Battery . . . . . . . . . . . . . . . . . . . . . . . . . . . . . . . . . . . . . . . . . . . . . . . . . . 12
Charging the Battery. . . . . . . . . . . . . . . . . . . . . . . . . . . . . . . . . . . . . . . . . . . 12
Technical Specifications . . . . . . . . . . . . . . . . . . . . . . . . . . . . . . . . . . . . . . . . . 13
Maintenance and Safety . . . . . . . . . . . . . . . . . . . . . . . . . . . . . . . . . . . . . . . . . 13
Celestron Two Year Limited Warranty . . . . . . . . . . . . . . . . . . . . . . . . . . . . . . . . . 14

4 I ENGLISH
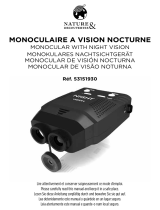
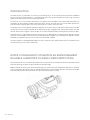
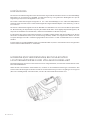
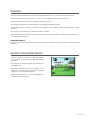
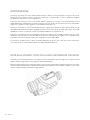
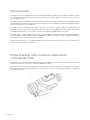
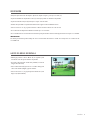
The Celestron NV-2 Night Vision Scope is designed for use during the day or at night. It offers both standard and night
vision viewing, still image and video recording, and in-device playback. The optical magnification is 4.5x and the digital
zoom is 5.0x.
The Celestron NV-2 Night Vision Scope features a VGA 640x480 color display screen for enhanced image quality during
daylight viewing. At night, the Celestron NV-2 Night Vision Scope can resolve some objects up to 219 yd (200 m) away in
complete darkness.
The Celestron NV-2 Night Vision Scope records all still and video files to its removable memory card. Memory card use
equals ½ hour of video for each gigabyte of memory card size (for example, a 2GB card equals 1 hour of video, while a
32GB card equals 16 hours).
The Celestron NV-2 Night Vision Scope includes a USB 2.0 cable. This cable may be used to charge the unit with a USB plug
(not included), and to transfer recorded files to a computer. An audio and video output cable is also included for connecting to
both PAL and NTSC monitors.
One AW 18650 3.7V 2,200 mAh rechargeable lithium ion battery is included. This provides the Celestron NV-2 Night
Vision Scope with 2-3 hours of battery life.
NOTES ON USE IN LOW LIGHT AND COMPLETE DARKNESS
The night vision performance of the Celestron NV-2 Night Vision Scope will be enhanced in complete darkness when
the infrared beam is activated. This will increase the clarity of the image.
Adjust the focus wheel of the infrared beam to observe subjects at different distances. The Celestron NV-2 Night Vision
Scope uses a low illumination CCD. It can be used in low light (but not completely dark) environments without the
infrared beam being activated.
INTRODUCTION

ENGLISH I 5
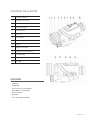
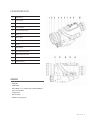
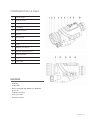
WHAT’S IN THE BOX
1 Objective Lens
2 Focus Wheel
3 Battery Compartment
4 Infrared Beam
5 Port Cover
6-7 +/- Button
8 Mode Button
9 Power/Enter Button
10 Eyepiece
11 Tripod Adapter
12 Memory Card Slot
13 Audio/Video Port
14 Charging Indication Light
15 USB Port
ACCESSORIES
• AV Cable
• USB Cable
• AW 18650 3.7V 2,200 mAh Rechargeable
Lithium Ion Battery
• Carrying Case
• Hand Strap
• Lens Cloth

6 I ENGLISH
Remove the battery compartment cover, insert the battery with
the cathode facing inward, then replace the battery compartment
cover tightly and turn on the device. Once the screen is illumi-
nated, the Celestron NV-2 Night Vision Scope is ready to use.
IMPORTANT:
• Only use the correct battery model
• The battery must be fully charged
• The battery must be installed correctly
(cathode facing inward)
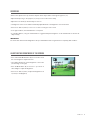
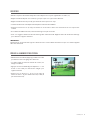
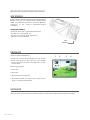
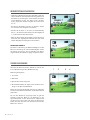
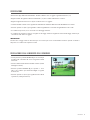
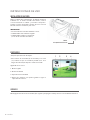
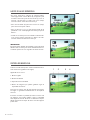
POWER ON
• Remove the objective lens cap.
• Press the Power Button (9) one time. Look through eyepiece
(10). Once you see the screen is turned on (like the picture on
the right), the device is working.
What the icons mean:
1. Photo mode
2. Battery life
3. Memory card is installed
4. The number of pictures that can be recorded based on the
memory capacity
BATTERY INSTALLATION
OPERATING INSTRUCTIONS
Battery
Compartment Cover
POWER OFF
Press and hold the Power Button (9) for 3 seconds to turn off the Celestron NV-2 Night Vision Scope.
1 2 3 4

ENGLISH I 7
OBSERVING
• Remove the objective lens cap. Point the objective at the subject and look through the eyepiece (10).
• Adjust the diopter ring on the eyepiece (10) until you can see the screen clearly.
• Adjust the focus wheel (2) until the subject is in focus.
• The brightness of the screen will be automatically adjusted based on the brightness of the environment.
• Press the +/- buttons (6 & 7) to zoom in or out. The zoom range is from 1x to 8x.
• In low light conditions, the infrared beam is not required.
• In complete darkness, using the infrared beam is suggested. Adjust the brightness of the infrared beam to observe the
subject clearly.
IMPORTANT:
Do not block the Celestron NV-2 Night Vision Scope’s infrared beam when using the device in completely dark conditions.
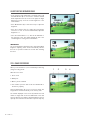
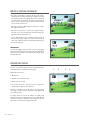
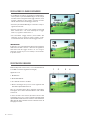
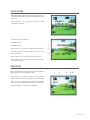
ADJUSTING THE BRIGHTNESS OF THE SCREEN
• Press and hold the Mode Button (8) for 3 seconds to enter
the screen brightness adjustment menu.
• The number indicates the current brightness of the screen
(see the image on the right).
• Press the Mode Button (8) to move the “*” up or down to
select “Bright” to adjust the brightness.
• Press the +/- buttons (6 & 7) to adjust the brightness from
1 (lowest) to 9.9 (brightest).

8 I ENGLISH
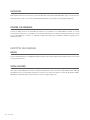
ADJUSTING THE INFRARED BEAM
• In the observing (still image/video recording) mode, hold
the Mode Button (8) for 3 seconds to enter the infrared
beam adjustment menu (as shown on the right). The digits
behind the “Lamp” show the current brightness of the
infrared beam.
• Press Mode Button (8) to select the “Lamp” to adjust the
brightness.
• Press the +/- buttons (6 & 7) to adjust the screen bright-
ness from 0 to 9. 9. To close the infrared beam, adjust the
brightness to 0.
• Once the infrared beam is on, “NL” will be indicated on
the upper left corner. The number behind the “NL” is the
current brightness setting of the infrared beam.
IMPORTANT:
The screen brightness adjustment menu and infrared beam
brightness adjusting menu will be automatically exited if
there are no operations made in 5 seconds after activating
the menu.
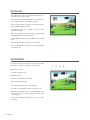
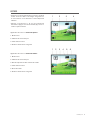
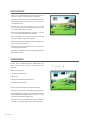
STILL IMAGE RECORDING
When you turn the device on, it is automatically in observing
(image recording) mode.
What the icons mean:
1. Photo mode
2. Battery life
3. Memory card is installed
4. The number of pictures that can be recorded based on
the memory capacity
Click the Enter Button (9) once to record one image. The
image will be saved automatically on the memory card.
The number displayed on the screen (4) indicates the total
number of images that can be recorded based on the card
memory capacity. This number is determined by the memory
capacity of the card. The actual number of pictures may vary.
1 2 3 4

ENGLISH I 9
PLAYING BACK
• Press the Mode Button (8) to enter playback mode. All
video and images saved on the memory card will be
recognized and automatically played back.
• Press the +/- Button (6 & 7) to select files. Press the Enter
Button (9) to play and pause the playback.
What the icons mean in Photo Playback:
1. Playback mode
2. Battery indicator
3. Memory card is installed
4. Total number of files saved
What the icons mean in Video Playback:
1. Playback mode
2. Battery indicator
3. Date and length of the video
4. Memory card is installed
5. Length of the video
6. Total number of files saved
1 2 3 4 5 6
1 2 3 4

10 I ENGLISH
DELETING FILES
• In playback mode, press and hold the Enter Button (9) to
select the file you want to delete.
• The file information will be displayed on the screen. Press
the +/- Button (6 & 7) to select the file to delete.
• Press the Enter Button (9) again to confirm the deletion.
Press the Mode Button (8) to exit.
• In playback mode, press +/- Button (6 & 7) to select
different recordings.
• Video and images will be automatically recognized and
played back based on the time sequence.
• In video playback mode, press Enter Button (9) to play the
video.
• Press the Enter Button (9) again to pause the video.
• Press the Mode Button (8) to go back to observing (image
recording) mode.
VIDEO RECORDING
In observing (image recording) mode, press the Mode
Button (8) once to enter the video recording mode.
What the icons mean:
1. In video recording mode
2. Battery indicator
3. Date and recording time remaining
4. Recording time remaining
• Press the Enter Button (9) to start recording.
• The video is automatically saved to the memory card.
• Recording time remaining (4) is calculated based on the
memory capacity of card. It may differ from the actual
recording time.
• Press the Enter Button (9) again to pause or exit video
recording.
1 2 3 4

ENGLISH I 11
SETTING THE TIME
• Press and hold the Enter Button (9) to enter the menu, and
press the Mode Button (8) to select “Time Set.”
• Press the +/- Button (6 & 7) to enter time setting mode.
1. Time Format Selection
2. Date Set
3. Time Set
• Press the +/- Button (6 & 7) to switch time format.
• Press the Enter Button (9) to switch the cursor to a different
position.
• Press the +/- Button (6 & 7) to adjust the date and time.
• Press the Enter Button (9) again to exit time setting mode.
DIGITAL ZOOM
Digital zoom can be used in observing (image recording)
and video recording mode.
• Press the + Button (7) once to zoom in by 1x. The maximum
zoom power is 5x above the standard magnification level.
• Press – Button (6) once to zoom out by 1x. The minimum
zoom power is 1x (equal to the standard magnification
level).
• The zoom power is indicated on the screen (5).
1 2 3 4 5
1
2
3

12 I ENGLISH
POWER MANAGEMENT
BATTERY
One AW 18650 3.7V 2,200 mAh rechargeable lithium ion battery is included. To protect your battery, please allow the
battery to charge for 10 hours before using it for the first time.
CHARGING THE BATTERY
A USB cable for connection to an external power source is included. Connect the USB cable to the USB Port (15)
on the Celestron NV-2 Night Vision Scope. Connect the other end of the cable to a USB power port or AC adapter
appropriate to the voltage of the country in which the device is being charged.
VIDEO OUT
To play a video on other monitors, connect the video cable to the Audio/Video Output plug (13) and connect to the monitor.
The video can be played on the monitor. At the same time, it will also play on the device’s screen.
CONNECTING TO A COMPUTER
Connect the Celestron NV-2 Night Vision Scope to a computer using the USB 2.0 cable. After the device is successfully
connected, the computer will automatically recognize the content on the memory card. When using the USB cable to
connect to a computer, the device must have a fully charged battery for optimal performance.

ENGLISH I 13
Optical Specifications
Magnification 4.5×
Objective Lens Diameter 40mm
Field of View 5°× 3.75°
Diopter ±10
Detection Distance in Low Light Condition 2m - ∞
Detection Distance in Complete Dark Condition Up to 219 yd (200 m) on reflective subjects
Power Source Specifications
Operating Voltage 3.7V
Battery Rechargeable lithium ion battery
Other Specifications
Dimension (L × W × H) 161×58×77mm
Weight 0.61 lb/275 g
TECHNICAL SPECIFICATIONS
MAINTENANCE AND SAFETY
• The Celestron NV-2 Night Vision Scope is designed to operate properly between 23°F and 104°F, and at a humidity
level less than 80%.
• The Celestron NV-2 Night Vision Scope should always be stored in its case when it is not in use.
• Store the Celestron NV-2 Night Vision Scope in a cool, dry and clean place.
• The Celestron NV-2 Night Vision Scope is not waterproof or fog proof. Avoid dropping it on the ground or bumping it.
• Charge the device immediately when the LCD screen cannot be turned on. Charge the battery monthly to avoid damage
to the battery.
• Using a can of compressed air, blow away any dust or debris on the lens. To remove dirt or fingerprints, use a very
small amount of isopropyl alcohol and clean with the supplied microfiber cloth.

14 I ENGLISH
CELESTRON TWO YEAR LIMITED WARRANTY
A. Celestron warrants this product to be free from defects in materials and workmanship for two years. Celestron will repair or replace such
product or part thereof which, upon inspection by Celestron, is found to be defective in materials or workmanship. As a condition to the
obligation of Celestron to repair or replace such product, the product must be returned to Celestron together with proof-of-purchase
satisfactory to Celestron.
B. The proper Return Authorization Number must be obtained from Celestron in advance of return. Please submit your request to
Celestron’s online technical support center at https://www.celestron.com/pages/technical-support to receive the number to be
displayed on the outside of your shipping container.
All returns must be accompanied by a written statement setting forth the name, address, and daytime telephone number of the owner, together
with a brief description of any claimed defects. Parts or product for which replacement is made shall become the property of Celestron.
The customer shall be responsible for all costs of transportation and insurance, both to and from the factory of Celestron, and shall be required
to prepay such costs.
Celestron shall use reasonable efforts to repair or replace any product covered by this warranty within thirty days of receipt. In the event repair
or replacement shall require more than thirty days, Celestron shall notify the customer accordingly. Celestron reserves the right to replace any
product which has been discontinued from its product line with a new product of comparable value and function.
This warranty shall be void and of no force of effect in the event a covered product has been modified in design or function, or subjected
to abuse, misuse, mishandling or unauthorized repair. Further, product malfunction or deterioration due to normal wear is not covered
by this warranty.
CELESTRON DISCLAIMS ANY WARRANTIES, EXPRESSED OR IMPLIED, WHETHER OF MERCHANTABILITY OR FITNESS FOR A PARTICULAR USE, EXCEPT AS EXPRESSLY SET FORTH
HEREIN. THE SOLE OBLIGATION OF CELESTRON UNDER THIS LIMITED WARRANTY SHALL BE TO REPAIR OR REPLACE THE COVERED PRODUCT, IN ACCORDANCE WITH THE
TERMS SET FORTH HEREIN. CELESTRON EXPRESSLY DISCLAIMS ANY LOST PROFITS, GENERAL, SPECIAL, INDIRECT OR CONSEQUENTIAL DAMAGES WHICH MAY RESULT FROM
BREACH OF ANY WARRANTY, OR ARISING OUT OF THE USE OR INABILITY TO USE ANY CELESTRON PRODUCT. ANY WARRANTIES WHICH ARE IMPLIED AND WHICH CANNOT
BE DISCLAIMED SHALL BE LIMITED IN DURATION TO A TERM OF TWO YEARS FROM THE DATE OF ORIGINAL RETAIL PURCHASE.
Some states do not allow the exclusion or limitation of incidental or consequential damages or limitation on how long an implied warranty
lasts, so the above limitations and exclusions may not apply to you.
This warranty gives you specific legal rights, and you may also have other rights which vary from state to state. Celestron reserves the right
to modify or discontinue, without prior notice to you, any model or style product. If warranty problems arise or if you need assistance in using
your product, please visit Celestron’s online technical support center at https://www.celestron.com/pages/technical-support.
FCC NOTE: This equipment has been tested and found to comply with the limits for a Class B digital device, pursuant to part 15 of the
FCC Rules. These limits are designed to provide reasonable protection against harmful interference in a residential installation. This equip-
ment generates, uses, and can radiate radio frequency energy and, if not installed and used in accordance with the instructions, may cause
harmful interference to radio communications. However, there is no guarantee that interference will not occur in a particular installation. If
this equipment does cause harmful interference to radio or television reception, which can be determined by turning the equipment off and
on, the user is encouraged to try to correct the interference by one or more of the following measures:
• Reorient or relocate the receiving antenna.
• Increase the separation between the equipment and receiver.
• Connect the equipment into an outlet on a circuit different from that to which the receiver is connected.
• Consult the dealer or an experienced radio/TV technician for help.
Product design and specifications are subject to change without prior notification.
This product is designed and intended for use by those 14 years of age and older.
© 2019 Celestron • All rights reserved
celestron.com/pages/technical-support
Telephone: 1(800) 421-9649
2835 Columbia Street • Torrance, CA 90503 USA
71221
06-19

MODE D'EMPLOI
Modèle #71221
LUNETTE DE VISION NOCTURNE NV-2


FRANÇAIS I 3
Table des matières
Introduction . . . . . . . . . . . . . . . . . . . . . . . . . . . . . . . . . . . . . . . . . . . . . . . . 4
Notes concernant l’utilisation en environnement de faible luminosité ou dans l’obscurité totale . . 4
Contenu de la boîte. . . . . . . . . . . . . . . . . . . . . . . . . . . . . . . . . . . . . . . . . . . . 5
Accessoires . . . . . . . . . . . . . . . . . . . . . . . . . . . . . . . . . . . . . . . . . . . . . . . 5
Instructions d’utilisation . . . . . . . . . . . . . . . . . . . . . . . . . . . . . . . . . . . . . . . . . 6
Installation de la pile . . . . . . . . . . . . . . . . . . . . . . . . . . . . . . . . . . . . . . . . . . . 6
Allumer . . . . . . . . . . . . . . . . . . . . . . . . . . . . . . . . . . . . . . . . . . . . . . . . . . 6
Éteindre. . . . . . . . . . . . . . . . . . . . . . . . . . . . . . . . . . . . . . . . . . . . . . . . . . 6
Observation . . . . . . . . . . . . . . . . . . . . . . . . . . . . . . . . . . . . . . . . . . . . . . . 7
Régler la luminosité de l’écran. . . . . . . . . . . . . . . . . . . . . . . . . . . . . . . . . . . . . . 7
Régler le faisceau infrarouge . . . . . . . . . . . . . . . . . . . . . . . . . . . . . . . . . . . . . . 8
Prendre des photos . . . . . . . . . . . . . . . . . . . . . . . . . . . . . . . . . . . . . . . . . . . 8
Visualiser les images . . . . . . . . . . . . . . . . . . . . . . . . . . . . . . . . . . . . . . . . . . . 9
Supprimer des fichiers. . . . . . . . . . . . . . . . . . . . . . . . . . . . . . . . . . . . . . . . . . 10
Enregistrer des vidéos . . . . . . . . . . . . . . . . . . . . . . . . . . . . . . . . . . . . . . . . . . 10
Régler l’heure . . . . . . . . . . . . . . . . . . . . . . . . . . . . . . . . . . . . . . . . . . . . . . 11
Zoom numérique . . . . . . . . . . . . . . . . . . . . . . . . . . . . . . . . . . . . . . . . . . . . . 11
Sortie vidéo. . . . . . . . . . . . . . . . . . . . . . . . . . . . . . . . . . . . . . . . . . . . . . . . 12
Connexion à un ordinateur. . . . . . . . . . . . . . . . . . . . . . . . . . . . . . . . . . . . . . . . 12
Gestion de l’alimentation . . . . . . . . . . . . . . . . . . . . . . . . . . . . . . . . . . . . . . . . 12
Pile . . . . . . . . . . . . . . . . . . . . . . . . . . . . . . . . . . . . . . . . . . . . . . . . . . . . 12
Charger la pile . . . . . . . . . . . . . . . . . . . . . . . . . . . . . . . . . . . . . . . . . . . . . . 12
Caractéristiques techniques. . . . . . . . . . . . . . . . . . . . . . . . . . . . . . . . . . . . . . . 13
Entretien et sécurité . . . . . . . . . . . . . . . . . . . . . . . . . . . . . . . . . . . . . . . . . . . 13
Garantie limitée Celestron de deux ans . . . . . . . . . . . . . . . . . . . . . . . . . . . . . . . . 14

4 I FRANÇAIS
La lunette de vision nocturne NV-2 est conçue pour être utilisée de jour ou de nuit. Elle permet l’observation standard et
par vision nocturne, la capture de photos ou l’enregistrement vidéo, ainsi que la visualisation du contenu. Le grossissement
optique est de 4,5x et le grossissement numérique est de 5x.
La lunette de vision nocturne NV-2 de Celestron est équipée d’un écran VGA couleur de 640x480 permettant une
visualisation de bonne qualité pendant l’observation diurne. De nuit, la lunette de vision nocturne NV-2 de Celestron
peut transmettre l’image d’objets situés à une distance de 200 m dans l’obscurité totale.
La lunette de vision nocturne NV-2 de Celestron enregistre tous les fichiers photo et vidéo dans la carte mémoire amovible.
La carte mémoire peut contenir l’équivalent d’une demi-heure de vidéo par gigaoctet de capacité (par exemple, une carte
mémoire de 2 Go peut enregistrer 1 heure de vidéo, et une carte mémoire de 32 Go peut enregistrer 16 heures de vidéo).
La lunette de vision nocturne NV-2 de Celestron est livrée avec un câble USB 2.0. Ce câble peut être utilisé pour charger
l’unité avec une fiche USB (non incluse), et pour transférer des fichiers enregistrés vers un ordinateur. Un câble de connexion
audio/vidéo est également inclus pour la connexion à des écrans PAL et NTSC.
Une pile au lithium-ion rechargeable AW 18650 3,7 V 2200 mAh est incluse. Cette dernière donne à la lunette de vision
nocturne NV-2 environ 2 à 3 heures d’autonomie.
NOTES CONCERNANT L’UTILISATION EN ENVIRONNEMENT
DE FAIBLE LUMINOSITÉ OU DANS L’OBSCURITÉ TOTALE
Les performances de vision nocturne de la lunette de vision nocturne NV-2 seront améliorées dans l’obscurité totale lorsque
le faisceau infrarouge est activé. Ce dernier améliore la clarté de l’image.
Réglez la molette de mise au point du faisceau infrarouge pour observer des sujets à différentes distances. La lunette de
vision nocturne NV-2 de Celestron utilise un CCD basse illumination. Il peut être utilisé dans des environnements de faible
luminosité (mais pas dans l’obscurité totale) sans que le faisceau infrarouge soit activé.
INTRODUCTION

FRANÇAIS I 5
CONTENU DE LA BOÎTE
1 Lentille de l’objectif
2 Molette de mise au point
3 Compartiment des piles
4 Faisceau infrarouge
5 Cache des ports
6-7 Bouton +/-
8 Bouton Mode
9 Bouton Entrée/Alimentation
10 Oculaire
11 Adaptateur de trépied
12 Logement pour carte mémoire
13 Port Audio/Vidéo
14 Voyant indicateur de charge
15 Port USB
ACCESSOIRES
• Câble AV
• Câble USB
• Pile au lithium-ion rechargeable
AW 18650 3,7 V 2200 mAh
• Étui de transport
• Dragonne
• Tissu de nettoyage d’objectif

6 I FRANÇAIS
Retirez le cache du compartiment de pile, insérez la pile avec
la cathode orientée vers l’intérieur, puis remettez le cache soi-
gneusement en place et allumez l’appareil. La lunette de vision
nocturne NV-2 de Celestron est prête à l’utilisation lorsque
l’écran s’illumine.
IMPORTANT :
• Utilisez exclusivement le modèle de pile correct
• La pile doit être complètement chargée
• La pile doit être installée correctement
(la cathode orientée vers l’intérieur)
ALLUMER
• Retirez le capuchon de la lentille d’objectif.
• Appuyez sur le bouton d’alimentation (9) une fois. Regardez
dans l’oculaire (10). L’appareil est en fonctionnement lorsque
l’écran s’illumine (comme illustré sur la droite).
Signifi cation de l’icône :
1. Mode photo
2. Autonomie de la pile
3. La carte mémoire est installée
4. Le nombre de photos qui peuvent être enregistrées dépend
de la capacité de la mémoire.
INSTALLATION DE LA BATTERIE
INSTRUCTIONS D’UTILISATION
Cache
du compartiment des piles
ÉTEINDRE
Maintenez le bouton d’alimentation (9) appuyé pendant 3 secondes pour éteindre la lunette de vision nocturne NV-2
de Celestron.
1 2 3 4
Seite wird geladen ...
Seite wird geladen ...
Seite wird geladen ...
Seite wird geladen ...
Seite wird geladen ...
Seite wird geladen ...
Seite wird geladen ...
Seite wird geladen ...
Seite wird geladen ...
Seite wird geladen ...
Seite wird geladen ...
Seite wird geladen ...
Seite wird geladen ...
Seite wird geladen ...
Seite wird geladen ...
Seite wird geladen ...
Seite wird geladen ...
Seite wird geladen ...
Seite wird geladen ...
Seite wird geladen ...
Seite wird geladen ...
Seite wird geladen ...
Seite wird geladen ...
Seite wird geladen ...
Seite wird geladen ...
Seite wird geladen ...
Seite wird geladen ...
Seite wird geladen ...
Seite wird geladen ...
Seite wird geladen ...
Seite wird geladen ...
Seite wird geladen ...
Seite wird geladen ...
Seite wird geladen ...
Seite wird geladen ...
Seite wird geladen ...
Seite wird geladen ...
Seite wird geladen ...
Seite wird geladen ...
Seite wird geladen ...
Seite wird geladen ...
Seite wird geladen ...
Seite wird geladen ...
Seite wird geladen ...
Seite wird geladen ...
Seite wird geladen ...
Seite wird geladen ...
Seite wird geladen ...
Seite wird geladen ...
Seite wird geladen ...
-
 1
1
-
 2
2
-
 3
3
-
 4
4
-
 5
5
-
 6
6
-
 7
7
-
 8
8
-
 9
9
-
 10
10
-
 11
11
-
 12
12
-
 13
13
-
 14
14
-
 15
15
-
 16
16
-
 17
17
-
 18
18
-
 19
19
-
 20
20
-
 21
21
-
 22
22
-
 23
23
-
 24
24
-
 25
25
-
 26
26
-
 27
27
-
 28
28
-
 29
29
-
 30
30
-
 31
31
-
 32
32
-
 33
33
-
 34
34
-
 35
35
-
 36
36
-
 37
37
-
 38
38
-
 39
39
-
 40
40
-
 41
41
-
 42
42
-
 43
43
-
 44
44
-
 45
45
-
 46
46
-
 47
47
-
 48
48
-
 49
49
-
 50
50
-
 51
51
-
 52
52
-
 53
53
-
 54
54
-
 55
55
-
 56
56
-
 57
57
-
 58
58
-
 59
59
-
 60
60
-
 61
61
-
 62
62
-
 63
63
-
 64
64
-
 65
65
-
 66
66
-
 67
67
-
 68
68
-
 69
69
-
 70
70


Celestron 71221 Benutzerhandbuch
- Kategorie
- Monokulare
- Typ
- Benutzerhandbuch
- Dieses Handbuch eignet sich auch für
in anderen Sprachen
- English: Celestron 71221 User manual
- français: Celestron 71221 Manuel utilisateur
- español: Celestron 71221 Manual de usuario
- italiano: Celestron 71221 Manuale utente
Verwandte Artikel
-
Celestron 48028 Benutzerhandbuch
-
-
-
Celestron 21063 Benutzerhandbuch
-
-
-
Celestron 48029 Benutzerhandbuch
-
Celestron AstroMaster EQ Telescope Series Benutzerhandbuch
-
-
Celestron COSMOS LCD Portable Microscope Benutzerhandbuch