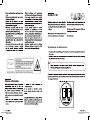
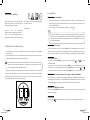
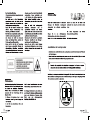
ESSENTIELB MS-E-500-D Bedienungsanleitung
- Typ
- Bedienungsanleitung


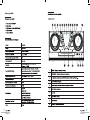
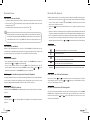
EQ
TUNING
SOURCE
+
-
VOLUME
USBMIC
AUX
+
-
SUPER
BASS
/
SCAN
SELECT
INFO
MENU
1
1
2
2
3
3
4
4
5
5
6
6
8
8
12
12
10
10
11
11
7
7
9
9
13
13
15
15
14
14
17
17
18
18
16
16
19
19

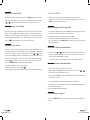
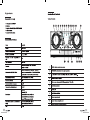
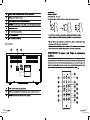
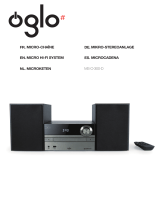
LI NE I N
20 21 22
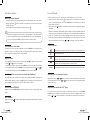
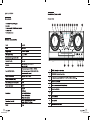
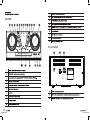
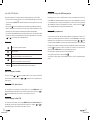
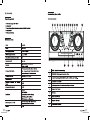
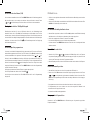
SOURCE
INFO/MENU EQ PROG/PRESET
MIC.VOL
MUTE
SELECT
VOLUME
PLAY MODE
BASSSCAN
1
2
3
4
5
6
7
9
11
13
15
17
8
10
12
14
16
18


LINE IN

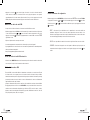
utilisation de base
utilisation de base
V.1.0
10
11
V.1.0
utilisation de base
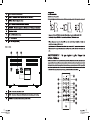
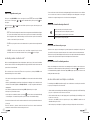
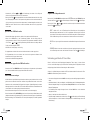
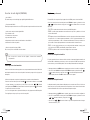
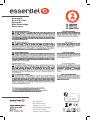
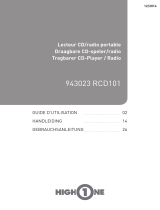
Allumer ou éteindre l'appareil
1. Pour allumer la micro-chaîne, branchez l'extrémité du cordon d'alimentation sur une prise murale.
2. Appuyez sur la touche de la télécommande ou de l'appareil (4). La micro-chaîne s'allume sur la
dernière source active.
3. Pour éteindre la micro-chaîne, appuyez à nouveau sur la touche .
Votre appareil est équipé d'une fonction de mise en veille automatique. Si, dans un délai de 15
minutes, aucun signal audio n'est détecté (hors radio FM/DAB), celui-ci se met automatiquement
en veille. La diode rouge (STANDBY) à gauche de l'écran LCD s'allume en rouge.
Sélectionner une source audio
Sélectionnez votre source de lecture en appuyant sur la touche SOURCE de la télécommande ou de
l'appareil. Le mode choisi s'affiche sur l'écran LCD. Appuyez de manière répétée jusqu’à obtenir la
source : DAB, FM, CD, USB, BLUETOOTH, AUX ou LINE IN.
Régler le volume
• Pour augmenter ou diminuer le volume, tournez la molette VOLUME de l'appareil ou appuyez sur les
touches
SOURCE
INFO/MENU EQ PROG/PRESET
MIC.VOL
MUTE
SELECT
VOLUME
PLAY MODE
BASSSCAN
1
2
3
4
5
6
7
9
11
13
15
17
8
10
12
14
16
18
(11) et
SOURCE
INFO/MENU EQ PROG/PRESET
MIC.VOL
MUTE
SELECT
VOLUME
PLAY MODE
BASSSCAN
1
2
3
4
5
6
7
9
11
13
15
17
8
10
12
14
16
18
(13) de la télécommande.
• Pour désactiver le volume, appuyez sur la touche MUTE (14) de la télécommande. Pour réactiver le
son, appuyez à nouveau sur la touche MUTE (14) ou bien appuyez sur les touches
SOURCE
INFO/MENU EQ PROG/PRESET
MIC.VOL
MUTE
SELECT
VOLUME
PLAY MODE
BASSSCAN
1
2
3
4
5
6
7
9
11
13
15
17
8
10
12
14
16
18
(11) et
SOURCE
INFO/MENU EQ PROG/PRESET
MIC.VOL
MUTE
SELECT
VOLUME
PLAY MODE
BASSSCAN
1
2
3
4
5
6
7
9
11
13
15
17
8
10
12
14
16
18
(13)
de la télécommande ou tournez la molette VOLUME (13) située à l’avant de l’appareil.
Ajuster la qualité du son en fonction de la musique (Equaliseur)
Votre chaîne dispose d'un ensemble de pré-réglages sonores (équaliseur) adaptés à chaque type de
musique. Appuyez plusieurs fois sur la touche EQ (10) de la télécommande ou sur la façade (3) pour
choisir le réglage sonore de votre choix : FLAT, POP, JAZZ, CLASSIC ou ROCK.
Activer le mode SUPER BASS
Appuyez sur la touche SUPER BASS pour améliorer le rendu de basses. Un voyant s'allume sur la
façade.
Effets lumineux
Appuyez sur la touche
EQ /
ID 3
T U N I N G
IR
FU N CT I O N
STANDBY
/10+
/10
SU PE R
BASS
/
PA IR/
SCA N /
SELEC T
M EN U /
IN FO /
pour activer les effets lumineux (clignotement, lumière, rythme...) autour des
haut-parleurs.
lire un CD audio
Votre micro-chaîne peut lire les CD audio ainsi que les MP3 enregistrés sur CD-R ou CD-RW.
1. Allumez le lecteur à l'aide de la touche de l'appareil ou de la télécommande. Sélectionnez la
source CD en appuyant plusieurs sur la touche SOURCE de la télécommande ou de l'appareil
jusqu'à atteindre le mode CD.
2. Appuyez sur la touche pour ouvrir le compartiment à disque puis placez un disque (face imprimée
vers le haut).
3. Refermez le compartiment. L'appareil charge le disque, et affiche sur l’écran les informations relatives au
contenu du CD, comme le temps total et le nombre de pistes. La lecture débute ensuite automatiquement.
4. Pour les CD contenant des fichiers audio au format MP3, la micro-chaîne débute la lecture par la
première piste du premier album dans l’ordre alphabétique. Pour accéder directement à une autre
piste, appuyez brièvement sur les touches et sur la façade ou sur la télécommande .
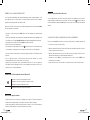
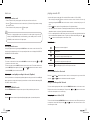
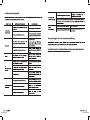
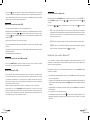
Fonctions de base
Permet de lancer la lecture, de mettre la lecture en pause ou de reprendre la lecture.
Permet d’arrêter la lecture.
Permet d’accéder à la piste précédente.
Maintenez cette touche appuyée pour lire à rebours en vitesse accélérée.
Permet d’accéder à la piste suivante.
Maintenez cette touche appuyée pour lire en vitesse accélérée.
MEM/
FOLD±10
Avancer ou reculer la lecture de 10 pistes.
En lecture MP3/USB, permet d'accéder au dossier suivant ou au dossier précédent.
Aller à une piste / un passage de la piste
Appuyez sur les touches et sur la télécommande ou sur la façade pour passer directement
à une piste. Maintenez les touches et appuyées pour avancer ou reculer rapidement dans
un morceau/une piste.
Aller à une piste au-delà de la 10
ème
place
Pour sélectionner une piste/morceau au-delà de la 10ème place, appuyez sur la touche MEM/
FOLD±10 sur la télécommande. Chaque appui avance la sélection de 10. Appuyez ensuite sur les
touches et sur la télécommande ou sur la façade pour sélectionner une piste/morceau.

utilisation de base
utilisation de base
V.1.0
12
13
V.1.0
Naviguer entre les dossiers (USB)
Pour sélectionner un dossier, maintenez appuyées les touches MEM/FOLD±10 sur la télécommande.
Chaque appui vous fait passer au dossier précédent ou suivant. Appuyez ensuite sur les touches
et sur la télécommande pour sélectionner une piste/morceau dans ce dossier .
Répétition de lecture / Lecture aléatoire
Lors de la lecture d'un CD audio ou de fichiers MP3, vous pouvez sélectionner une option de répétition.
Appuyez sur la touche PLAY de la télécommande pour répéter la lecture d'une piste (REP 1), une
deuxième fois pour répéter la lecture de l’ensemble du disque (REP ALL) et une troisième fois pour une
lecture aléatoire (RANDOM). Une quatrième fois pour désactiver la répétition - ou bien appuyez sur la
touche STOP
SOURCE
INFO/MENU EQ PROG/PRESET
MIC.VOL
MUTE
SELECT
VOLUME
PLAY MODE
BASSSCAN
1
2
3
4
5
6
7
9
11
13
15
17
8
10
12
14
16
18
(18) de la télécommande. L'écran affiche le mode dé répétition.
Programmer une liste de lecture
Vous pouvez créer une liste de lecture (playlist) personnalisée d'un maximum de 20 pistes CD ou 99
pistes pour d'autres supports. En mode STOP, appuyez sur la touche PROG (9), l'écran affiche MEM
P01. Sélectionnez le numéro de la piste à sélectionner à l'aide des touches et . Appuyez
ensuite à nouveau sur PROG pour valider. L'écran affiche MEM P02 puis sélectionnez un autre numéro
de piste. Répétez l’opération aussi souvent que nécessaire (20 pistes maximum). Appuyez ensuite
sur la touche pour débuter la lecture. Celle-ci s’effectue dans l’ordre que vous avez défini.
Utilisez la touche MEM/FOLD±10 pour naviguer dans votre programmation.
L'écran affiche les informations de la piste en cours de lecture.
Pour arrêter la playlist, appuyez sur la touche STOP
EQ /
ID 3
T U N IN G
IR
FU N C T IO N
STANDBY
/10+
/10
SU PER
BASS
/
PA IR/
SC A N /
SEL EC T
M EN U /
IN F O /
.
Pour effacer la playlist, appuyez sur la touche STOP et éjectez le disque. La programmation est effacée.
écouter la radio FM
1. Branchez au dos de la micro-chaîne le câble d'antenne fourni et déployez-le entièrement.
2. Allumez la micro-chaîne, et sélectionnez la source RADIO en appuyant plusieurs fois sur la touche
SOURCE de la télécommande ou de l'appareil.
Effectuer un balayage complet de la bande FM
1. Lorsque la radio est allumée, appuyez sur la touche SCAN pour effectuer un balayage complet de la
bande FM. Les trente premières stations trouvées sont mémorisées.
2. Pour interrompre la recherche, appuyez à nouveau sur la touche SCAN.
3. Le balayage de la bande FM s’interrompt lorsque une station de radio a été trouvée.
4. Vous pouvez appuyer sur la touche MEM/FOLD±10 pour affiner votre recherche, comme indiqué
dans le paragraphe suivant.
Rechercher une station de radio manuellement
1. Utilisez les touches et ou tournez la molette TUNING jusqu’à obtenir une fréquence
de réception optimale. A chaque mouvement de la molette ou chaque appui sur l'une des deux
touches, la fréquence diminue/augmente de 0,05 MHz.
2. Si la réception est mauvaise, ajustez la disposition de l’antenne FM ou changez de fréquence.
Mémoriser des stations de radio manuellement
1. Lorsque la radio est allumée, réglez la station FM de votre choix.
2. Maintenez appuyée la touche PROG. Preset 01 s'affiche à l'écran. Utilisez les touches et
pour sélectionner le numéro de mémoire de votre choix.
3. Appuyez sur la touche SELECT pour valider la programmation de la station FM. Répétez l’opération
aussi souvent que nécessaire.
• Les stations programmées restent mémorisées, même après avoir éteint l’appareil.
• La programmation d’une nouvelle station sous un numéro déjà attribué efface automatiquement la
station précédemment enregistrée.
• Vous pouvez programmer jusqu’à 30 stations de radio.
Écouter une fréquence enregistrée
Utilisez la touche MEM/FOLD±10 sur la télécommande pour sélectionner la fréquence enregistrée de
votre choix.

utilisation de base
utilisation de base
V.1.0
14
15
V.1.0
écouter la radio numérique (DAB/DAB+)
• Le DAB + qu'est ce que c'est ?
C'est le nom européen de la radio numérique qui signifie Digital Audio Broadcast
• Pourquoi une radio DAB + ?
Pour améliorer l'expérience musicale comme la TNT a permis d'améliorer l'expérience audiovisuelle
sur la TV
• Quels sont les avantages de la radio numérique DAB+ ?
- une meilleure qualité de son
- pas d'interférence ou de grésillement
- un plus large choix de stations
- recherche facilitée : les radios sont classées par ordre alphabétique
- plus d'informations visibles sur l'écran
• Ai-je besoin d'un équipement supplémentaire pour la DAB+ ?
Non, choisissez simplement DAB + sur votre micro-chaîne
Pour la réception des stations de radio numériques, l'antenne doit impérativement être
déployée sur toute sa longueur.
Première mise en service
Lorsque la micro-chaîne est allumée pour la première fois, celle-ci bascule automatiquement en mode
DAB, et débute une recherche automatique des stations disponibles. Une barre de progression indique
l'avancée de la recherche.
• Au terme de la recherche, la première station trouvée dans l'ordre alphanumérique est diffusée.
• Pour sélectionner une autre station, appuyez sur la touche SCAN/
EQ /
ID 3
T U N IN G
IR
FU N C T IO N
STANDBY
/10+
/10
SU PER
BASS
/
PA IR/
SC A N /
SEL EC T
M EN U /
IN F O /
(18) de la télécommande ou
sur la touche SCAN sur la façade puis faites défiler les stations à l'aide des touches et .
Vous pouvez également tourner la molette TUNING sur la façade. Appuyez ensuite sur la touche
pour valider. La station sélectionnée est diffusée.
• Si aucune station n'est reçue, l'écran indique qu'il n'y a pas de station DAB disponible. Cela signifie
qu'aucune réception, ou seulement une réception très faible, n'est possible.
Naviguer dans les menus
En mode DAB, maintenez appuyée la touche MENU pour accéder au menu DAB.
Sélectionnez le menu de votre choix en faisant tourner la molette TUNING de l'appareil ou en appuyant
sur les touches et de la télécommande, puis appuyez sur la touche pour valider. Les
menus disponibles sont :
• full scan : permet de rechercher toutes les stations de radio DAB disponibles.
• manual : permet de régler manuellement un canal/une fréquence spécifique et de l’ajouter à la liste
des stations déjà mémorisées.
• DRC : Certaines stations du réseau DAB prennent en charge un contrôle du volume qui agit de manière
active pendant la lecture. Si le volume augmente soudainement, le DRC le baisse automatiquement.
Si le volume baisse soudainement, le DRC l’augmente automatiquement. La même procédure est
appliquée lorsque le volume baisse soudainement : la micro-chaîne augmentera à nouveau le volume.
• prune : Si votre liste comprend des stations que vous ne recevez plus (vous pouvez être dans une
autre zone), vous pouvez sélectionner l'option prune pour les retirer et nettoyer la liste des stations.
• systeme : permet d'accéder aux menus de configuration de votre micro-chaîne.
Effectuer une recherche automatique
Il est possible de mettre à jour la liste des stations reçues en relançant une recherche automatique des
stations DAB. De nouvelles stations et de nouveaux services seront ajoutés à la diffusion DAB. Pour
bénéficier des nouvelles stations et des nouveaux services DAB disponibles, effectuez régulièrement
une recherche automatique.
1. Maintenez appuyée la touche MENU pour accéder aux menus de configuration.
2. Sélectionnez le menu SCAN en faisant tourner la molette TUNING de l'appareil ou en appuyant
sur les touches et de la télécommande, puis appuyez sur la touche . La recherche
automatique débute.
3. Vous pouvez également appuyer sur la touche SCAN de la télécommande ou de l'appareil.
Effectuer une recherche manuelle
La recherche manuelle vous permet d'effectuer une recherche précise sur une fréquence. Ceci est utile
si vous voulez obtenir la meilleure réception possible pour une station en particulier ou que vous voulez
obtenir la liste des canaux d'une certaine fréquence sans devoir effectuer une recherche complète.
1. Maintenez appuyée la touche MENU pour accéder aux menus de configuration.
2. Sélectionnez le menu manual en faisant tourner la molette TUNING de l'appareil ou en appuyant sur
les touches et de la télécommande, puis appuyez sur la touche .
3. Utilisez les touches et de la télécommande ou tournez la molette pour commuter entre
les plages de fréquences 5A à 13 F.

utilisation de base
utilisation de base
V.1.0
16
17
V.1.0
4. Appuyez sur la touche pour ouvrir la plage sélectionnée. Lors de la recherche manuelle,
aucune station n'est diffusée. Les stations trouvées sur la plage de fréquences sont ajoutées
automatiquement à la liste des stations déjà mémorisées. Pour y accéder, appuyez sur la touche
MENU pour quitter la recherche manuelle puis parcourez la liste des stations mémorisées.
Mémoriser une station de radio DAB
1. Lorsque la micro-chaîne est allumée, sélectionnez la station DAB de votre choix.
2. Maintenez appuyée la touche PROG sur la télécommande (9). Le numéro de mémoire 01 clignote sur
l'écran. Utilisez les touches et pour sélectionner le numéro de mémoire de votre choix.
Appuyez sur la touche pour valider la programmation de la station DAB. La mention stored
apparaît sur l'écran.
3. Répétez l’opération aussi souvent que nécessaire.
• Les stations programmées restent mémorisées, même après avoir éteint l’appareil.
• La programmation d’une nouvelle station sous un numéro déjà attribué efface automatiquement la
station précédemment enregistrée.
• Vous pouvez programmer jusqu’à 30 stations de radio.
Écouter une station de radio DAB mémorisée
• Utilisez la touche MEM/FOLD±10 sur la télécommande pour sélectionner le numéro de mémoire de
votre choix (de 1 à 30) et écouter la station de radio mémorisée.
Afficher les informations DAB
• En mode DAB+, la micro-chaîne affiche les informations sur la station en cours de lecture. En plus
de l'heure actuelle, cela comprend le nom de la station de radio sélectionnée ainsi que d'autres
informations transmises par les DLS (Dynamic Label Segment) secondaires de l'émetteur. Il peut s'agir
par exemple du titre et du nom de l'artiste ou encore d'informations de contact ou d'informations
supplémentaires fournies par l'émetteur.
• Lorsque les informations font plus de 16 caractères, elles sont affichées sous forme de texte défilant.
• En appuyant plusieurs fois sur la touche INFO/MENU, vous pouvez faire défiler le menu Info et
visualiser toutes les informations disponibles (type d’émission (PTY), nom de la station, canal et
fréquence, taux d’erreur du signal, débit binaire et type audio, informations de texte DLS, infos DL
Plus (si disponibles), heure, date, force du signal).
Accéder aux menus de configuration
Maintenez appyée la touche INFO/MENU, puis sélectionnez le menu systeme avec la molette TUNING
de l'appareil ou les touches et de la télécommande. Appuyez sur la touche pour valider.
Utilisez les touches et pour faire défiler les différentes options, puis appuyez sur la touche
pour valider.
» reset : Sélectionnez y pour réinitialiser tous les paramètres de votre micro-chaîne aux
paramètres d'origine de l'usine. La liste des stations disponibles sera aussi effacée et les
mémoires de pré-réglages seront effacées. Après la réinitialisation d'usine, la micro-chaîne lance
un nouveau balayage automatique et renouvelle la liste des stations.
» sW ver: Cette option affiche le numéro de la version du logiciel installé sur votre micro-chaîne.
» language : Sélectionnez la langue de votre choix parmi les différentes options proposées en
tournant la molette de réglage vers la droite ou vers la gauche. Appuyez sur la touche pour
valider

utilisation de base
utilisation de base
V.1.0
18
19
V.1.0
établir une connexion bluetooth*
Si vous possédez un périphérique audio bluetooth
*
(smartphone, tablette, ordinateur portable...), vous
pouvez appairer celui-ci à la micro-chaîne. La connexion bluetooth
*
permet d’écouter la musique
enregistrée sur votre appareil audio sans utiliser de câble.
Allumez la micro-chaîne, et sélectionnez la source BT en appuyant plusieurs fois sur la touche SOURCE
de la télécommande ou de l'appareil.
1. A gauche de l'écran, une diode bleue PAIR clignote sur l'écran, indiquant que le mode appairage
est actif.
2. Veuillez vous référer ensuite au mode d’emploi de votre appareil audio bluetooth
*
pour l’appairage avec la
micro-chaîne. Celle-ci se nomme Essb_MS-E-500-D dans la liste des périphériques bluetooth
*
détectés.
3. L’appairage est réussi lorsque la diode bleue PAIR devient fixe sur la façade.
4. Débutez la lecture sur votre appareil audio.
5. Pour interrompre la lecture, appuyez sur la touche de la micro chaîne, de la télécommande ou de
votre smartphone. Ou changez la source de lecture sur la micro-chaîne ou la télécommande.
• Cette micro-chaîne peut être appairée à l’ensemble des appareils équipés de la technologie sans fil
bluetooth
*
.
• Une fois l’appairage effectué, le dernier appareil audio bluetooth
*
mémorisé se connecte
automatiquement dès que la source bluetooth* est sélectionnée.
• L'appareil ne peut être appairé qu'à un seul périphérique bluetooth* à la fois. Pour appairer un
autre appareil, annulez l'appairage bluetooth* de votre périphérique puis répétez les étapes 1 à 4
précédentes avec le nouveau périphérique.
Utilisation de la télécommande en mode bluetooth
*
• Appuyez sur cette touche pour démarrer la lecture.
• Appuyez une seconde fois pour mettre en pause la lecture.
• Appuyez à nouveau pour reprendre la lecture.
MEM/FOLD±10
Permet d’accéder à la piste suivante ou précédente.
Détection des appels entrants
• Lorsqu’un appel est reçu ou composé, le smartphone met en pause la lecture de la musique. La
transmission de la musique depuis votre téléphone vers la micro-chaîne s'interrompt.
• Lorsque l’appel prend fin, le téléphone reprend la lecture à l’endroit où celle-ci a été interrompue, et
diffuse à nouveau la musique sur les haut-parleurs de la micro-chaîne.
Annuler la connexion bluetooth* active
Si vous souhaitez annuler l'association entre la micro-chaîne et votre smartphone, pour l'associer à
un autre smartphone, maintenez enfoncée pendant 5 secondes la touche de la micro-chaîne ou
de la télécommande. La diode bleue PAIR clignote à nouveau sur l'écran et la mention Not Connected
s'affiche.
connecter la micro-chaîne à une source auxiliaire
La prise Jack 3,5mm AUX (19) vous permet de connecter un lecteur audio, et de diffuser la musique de
ce lecteur sur les enceintes de la micro-chaîne.
1. Branchez l'extrémité d'un câble Jack 3,5mm /Jack 3,5mm (non fourni) dans la prise AUX (19) située à
l'avant de l'appareil, à droite du tiroir CD.
2. Branchez l'autre extrémité dans la prise de sortie audio de votre lecteur média. Consultez la notice
d’utilisation du fournisseur pour obtenir davantage d’informations.
3. Sélectionnez la source AUX (19) en appuyant plusieurs fois sur la touche SOURCE de la
télécommande ou de l'appareil.
4. Débutez la lecture sur votre source auxiliaire, le son transite par les enceintes de la micro-chaîne.

consignes d'usage
21
V.1.0
utilisation de base
V.1.0
20
connecter un support amovible USB
Allumez la micro-chaîne.
1. Branchez la clé USB contenant les fichiers à lire sur le port USB (17) situé à l'avant droit de l'appareil,
à droite du tiroir à CD.
2. Sélectionnez la source USB en appuyant plusieurs fois sur la touche SOURCE de la télécommande
ou de l'appareil.
3. L'écran affiche le nombre de fichiers lisibles et dossier trouvés sur la clé.
4. La lecture débute automatiquement au fichier 1. Pour mettre en pause, appuyez sur la touche
de la micro-chaîne ou de la télécommande. Pour accéder directement à une autre piste, utilisez les
touches et . Pour arrêter la lecture, appuyez sur la touche STOP
EQ /
ID 3
T U N IN G
IR
FU N C T IO N
STANDBY
/10+
/10
SU PER
BASS
/
PA IR/
SC A N /
SEL EC T
M EN U /
IN F O /
.
5. La lecture des fichiers sur la Clé USB est similaire à celle des pistes CD. Reportez vous à cette
section pour en savoir plus.
brancher un microphone
L'entrée microphone MIC (18) est compatible avec tous les modes. Vous pouvez chanter par dessus
n'importe quel support ou bien en direct.
1. Branchez un microphone filaire doté d'un jack 3,5 mm à la prise MIC (18) sur le panneau avant de
l'appareil, à droite du tiroir CD et mettez le bouton du micro sur ON.
2. Appuyez sur le bouton MIC.VOL de la télécommande pour activer le microphone, puis appuyez sur
les touches
SOURCE
INFO/MENU EQ PROG/PRESET
MIC.VOL
MUTE
SELECT
VOLUME
PLAY MODE
BASSSCAN
1
2
3
4
5
6
7
9
11
13
15
17
8
10
12
14
16
18
et
SOURCE
INFO/MENU EQ PROG/PRESET
MIC.VOL
MUTE
SELECT
VOLUME
PLAY MODE
BASSSCAN
1
2
3
4
5
6
7
9
11
13
15
17
8
10
12
14
16
18
pour augmenter ou diminuer le volume du microphone. Pour cesser d'utiliser
le microphone, appuyez à nouveau sur le bouton MIC.VOL de la télécommande. Si vous n'appuyez
pas à nouveau sur le bouton, la mini-chaîne reviendra automatiquement au contrôle du volume du
général après 5 secondes d'inactivité..
entretien et nettoyage
Nettoyage de l’appareil
1. Débranchez l’appareil de la prise de courant avant tout nettoyage.
2. Nettoyez l’appareil uniquement à l’aide d’un chiffon doux et sec.
3. N’utilisez aucun nettoyant liquide ou aérosol.
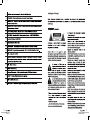
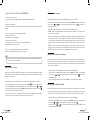
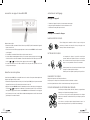
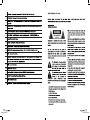
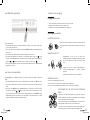
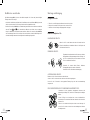
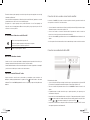
Remarques concernant les disques
MANIPULATION DES DISQUES
Tenez le disque par les extrémités et veillez à ce que vos doigts ne
touchent pas la surface de lecture. Ne collez pas de papier et ne
mettez pas d’autocollant sur les disques.
NETTOYAGE DES DISQUES
Les empreintes de doigts et la poussière sur un disque
peuvent entraîner une qualité médiocre et une distorsion
du son. Avant la lecture, nettoyez le disque avec un chiffon
propre et sec en partant du centre vers les extrémités.
N’utilisez jamais d’alcool, de benzène, de diluant, de liquide
nettoyant ou d’autres produits chimiques.
N’utilisez pas d’air comprimé pour nettoyer les poussières.
RANGEMENT DES DISQUES
Rangez le disque dans son boîtier après utilisation.
N’exposez pas les disques à des environnements très froids, humides ou chauds.
Ne le laissez jamais dans un véhicule en stationnement exposé aux rayons du soleil.
DISQUES ENDOMMAGÉS OU DE FORME NON STANDARD
• N’utilisez pas de disques fendus, ébréchés, déformés, ou ayant d’autres
dommages car ils pourraient endommager le lecteur.
• Ce lecteur est conçu pour être utilisé uniquement avec des disques
traditionnels, totalement circulaires. N’utilisez pas de disques ayant une
autre forme.
• Ne soulevez et ne déplacez jamais l’appareil durant la lecture : les
disques tournent à grande vitesse et pourraient être endommagés.

SOURCE
INFO/MENU EQ PROG/PRESET
MIC.VOL
MUTE
SELECT
VOLUME
PLAY MODE
BASSSCAN
1
2
3
4
5
6
7
9
11
13
15
17
8
10
12
14
16
18
SOURCE
INFO/MENU EQ PROG/PRESET
MIC.VOL
MUTE
SELECT
VOLUME
PLAY MODE
BASSSCAN
1
2
3
4
5
6
7
9
11
13
15
17
8
10
12
14
16
18

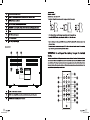
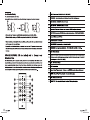
EQ
TUNING
SOURCE
+
-
VOLUME
USBMIC
AUX
+
-
SUPER
BASS
/
SCAN
SELECT
INFO
MENU
1
1
2
2
3
3
4
4
5
5
6
6
8
8
12
12
10
10
11
11
7
7
9
9
13
13
15
15
14
14
17
17
18
18
16
16
19
19

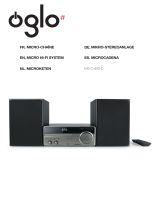
LI NE I N
20 21 22
SOURCE
INFO/MENU EQ PROG/PRESET
MIC.VOL
MUTE
SELECT
VOLUME
PLAY MODE
BASSSCAN
1
2
3
4
5
6
7
9
11
13
15
17
8
10
12
14
16
18


LINE IN

V.1.0
32
33
V.1.0
basic use
Switching the unit on or off
1. To turn on the micro hi-fi system, plug the end of the power cord into a wall socket.
2. Press the button on the remote control or on the device (4). The micro hi-fi system turns on using
the last active source.
3. To turn off the micro hi-fi system, press the button again.
Your device is equipped with an auto sleep function. If no audio signal is detected for 15
minutes (excluding FM/DAB radio), it will automatically go into standby mode. The red LED
(STANDBY) on the left side of the LCD lights up red.
Selecting an audio source
Select your playback source by pressing the SOURCE button on the remote control or the device. The
selected mode is displayed on the LCD. Press repeatedly until the source is displayed: DAB, FM, CD,
USB, BLUETOOTH, AUX or LINE IN.
Adjusting the volume
• To increase or decrease the volume, turn the VOLUME knob on the unit or press the
SOURCE
INFO/MENU EQ PROG/PRESET
MIC.VOL
MUTE
SELECT
VOLUME
PLAY MODE
BASSSCAN
1
2
3
4
5
6
7
9
11
13
15
17
8
10
12
14
16
18
(11) and
SOURCE
INFO/MENU EQ PROG/PRESET
MIC.VOL
MUTE
SELECT
VOLUME
PLAY MODE
BASSSCAN
1
2
3
4
5
6
7
9
11
13
15
17
8
10
12
14
16
18
(13) buttons on the remote control.
• To mute the volume, press the MUTE (14) button on the remote control. To turn the sound back on,
press the MUTE (14) button again, or press the
SOURCE
INFO/MENU EQ PROG/PRESET
MIC.VOL
MUTE
SELECT
VOLUME
PLAY MODE
BASSSCAN
1
2
3
4
5
6
7
9
11
13
15
17
8
10
12
14
16
18
(11) and
SOURCE
INFO/MENU EQ PROG/PRESET
MIC.VOL
MUTE
SELECT
VOLUME
PLAY MODE
BASSSCAN
1
2
3
4
5
6
7
9
11
13
15
17
8
10
12
14
16
18
(13) buttons on the remote control or
turn the VOLUME (13) knob on the front of the unit.
Adjusting the sound quality according to the music (Equaliser)
Your hi-fi system has a set of sound presets (equaliser) adapted to each type of music. Press the EQ (10)
button on the remote control or the front panel (3) several times to select the desired sound setting: FLAT,
POP, JAZZ, CLASSIC or ROCK.
Activating SUPER BASS mode
Press the SUPER BASS button to improve bass response. A lamp on the front panel comes on.
Light effects
Press the
EQ /
ID 3
T U N I N G
IR
FU N CT I O N
STANDBY
/10+
/10
SU PE R
BASS
/
PA IR/
SCA N /
SELEC T
M EN U /
IN FO /
button to activate the light effects (flashing, light, rhythm, etc.) around the speakers.
playing an audio CD
Your micro hi-fi system can play audio CDs as well as MP3s recorded on CD-R or CD-RW.
1. Turn on the player using the button on the device or remote control. Select the CD source by
repeatedly pressing the SOURCE button on the remote control or on the unit until you get to CD
mode.
2. Press the button to open the CD tray, and then place a CD in it (printed side up).
3. Close the tray. The device loads the CD, and displays information about its contents, such as total time
and number of tracks, on the screen. Playback then starts automatically.
4. For CDs containing audio files in MP3 format, the micro hi-fi system starts playback with the first
track of the first album in alphabetical order. To go directly to another track, briefly press the
and buttons on the front panel or on the remote control.
Basic Functions
Starts, pauses or resumes playback.
Stops playback.
Goes to the previous track.
Press and hold to play backwards at high speed.
Goes to the next track.
Press and hold to play forwards at high speed.
MEM/
FOLD±10
Fast-forwards or rewinds playback by 10 tracks.
In MP3/USB playback, goes to the next or previous folder.
Goes to a track/section of the track
Press the and buttons on the remote control or on the front panel to go to a track. Hold
down the and buttons to fast-forward or rewind a song/track.
Going to a track beyond the 10
th
track
To select a track/song beyond the 10th one, press the MEM/FOLD±10 button on the remote control.
Each press moves the selection ahead by 10. Then press the and buttons on the remote
control or the front panel to select a track/song.
Navigating between folders (USB)
To select a folder, hold down the MEM/FOLD±10 buttons on the remote control. Each press takes you
to the previous or next folder. Then press the and buttons on the remote control to select
a track/song in the folder.

V.1.0
34
35
V.1.0
Repeat/Shuffle
When playing an audio CD or MP3 files, you can select a repeat option. Press the PLAY button on the
remote control to repeat a track (REP 1), a second time to repeat the entire CD (REP ALL), and a third time
for random playback (RANDOM). A fourth time to disable repeat - or press the STOP
SOURCE
INFO/MENU EQ PROG/PRESET
MIC.VOL
MUTE
SELECT
VOLUME
PLAY MODE
BASSSCAN
1
2
3
4
5
6
7
9
11
13
15
17
8
10
12
14
16
18
(18) button on the
remote control. The display shows the repeat mode.
Programming a playlist
You can create a custom playlist of up to 20 CD tracks or 99 tracks for other media. In STOP mode,
press the PROG (9) button; the screen displays MEM P01. Select the desired track number using the
and buttons. Then press PROG again to confirm. The screen displays MEM P02, then select
another track number. Repeat as often as necessary (20 tracks maximum). Then press the button
to start playback. Do this in the order you have defined. Use the MEM/FOLD±10 button to browse
through your programming.
The screen displays the information about the track being played back.
To stop the playlist, press STOP
EQ /
ID 3
T U N IN G
IR
FU N C T IO N
STANDBY
/10+
/10
SU PER
BASS
/
PA IR/
SC A N /
SEL EC T
M EN U /
IN F O /
.
To erase the playlist, press the STOP button and eject the CD. The programming is erased.
listening to FM radio
1. Connect the antenna cable provided to the back of the micro hi-fi system, and fully unfold it.
2. Turn on the micro hi-fi system and select the RADIO source by repeatedly pressing the SOURCE
button on the remote control or the unit.
Performing a full scan of the FM band
1. When the radio is turned on, press the SCAN button to fully scan the FM band. The first thirty
stations found are stored.
2. To interrupt the search, press the SCAN button again.
3. Scanning of the FM band stops when a radio station is found.
4. You can then turn the MEM/FOLD±10 knob to refine your search, as described in the next section.
Manually searching for a radio station
1. Use the and buttons or turn the TUNING knob until you get optimal reception frequency.
With each movement of the knob or each press on one of the two buttons, the frequency decreases/
increases by 0.05 MHz.
2. If reception is poor, adjust the FM antenna or change the frequency.
Manually storing radio stations
1. When the radio is turned on, select the FM station of your choice.
2. Press and hold the PROG button. Preset 01 appears on the screen. Use the and buttons
to select the desired memory number. Press the SELECT button to confirm the programming of the
FM station. Repeat as often as necessary.
• The programmed stations remain stored even after switching off the device.
• Programming a new station under an already assigned number automatically erases the previously
saved station.
• You can program up to 30 radio stations.
Listening to a saved frequency
Use the MEM/FOLD±10 button on the remote control to select the desired stored frequency.

V.1.0
36
37
V.1.0
Listening to digital radio (DAB/DAB+)
• What is DAB+?
It is the European name for digital radio which means Digital Audio Broadcast
• What is the purpose of DAB+ radio?
To improve the musical experience, like TNT has improved the audiovisual experience on TV
• What are the advantages of DAB+ digital radio?
- better sound quality
- no interference or crackling
- a wider choice of stations
- easier searching: radio stations are listed in alphabetical order
- more information visible on the screen
• Do I need additional equipment for DAB+?
No, just select DAB+ on your micro hi-fi system
To receive digital radio stations, the antenna must be fully extended.
Turning on the unit for the first time
When the micro hi-fi system is turned on for the first time, it automatically switches to DAB mode and
starts an automatic search for available stations. A progress bar indicates the progress of the search.
• At the end of the search, the first station found in alphanumeric order is broadcast.
• To select another station, press the SCAN/
EQ /
ID 3
T U N IN G
IR
FU N C T IO N
STANDBY
/10+
/10
SU PER
BASS
/
PA IR/
SC A N /
SEL EC T
M EN U /
IN F O /
(18) button on the remote control or the SCAN button
on the front panel and then scroll through the stations using the and buttons. You can also
turn the TUNING knob on the front panel. Then press the button to confirm. The selected station
is broadcast.
• If no station is received, the display indicates that there are no DAB stations available. This means
that there is no reception, or only very weak reception.
Browsing the menus
In DAB mode, press and hold the MENU button to access the DAB menu.
Select the desired menu by turning the TUNING knob on the device or by pressing the and
buttons on the remote control, and then press the button to confirm. The following menus are
available:
• full scan : searches for all available DAB radio stations.
• manual: allows you to manually set a specific channel/frequency and add it to the list of stations
already stored.
• DRC: Some stations in the DAB network support a volume control which is active during playback.
If the volume suddenly increases, the DRC automatically decreases it. If the volume suddenly
decreases, the DRC automatically increases it. The same procedure is applied when the volume
suddenly decreases: the micro hi-fi system will increase the volume again.
• prune: If your list includes stations that you no longer receive (you may be in another area), you can
select the prune option to remove them and clean up the list of stations.
• system : provides access to the configuration menus of your micro hi-fi system.
Performing an automatic search
You can update the list of stations received by doing another automatic search for DAB stations. New
stations and services will be added to the DAB broadcast. To get the new stations and new DAB
services available, regularly perform an automatic search.
1. Press and hold the MENU button to access the configuration menus.
2. Select the SCAN menu by turning the TUNING knob on the device or by pressing the and
buttons on the remote control, and then press the button . The automatic search starts.
3. You can also press the SCAN button on the remote control or on the device.
Performing a manual search
The manual search allows you to perform a specific search over a frequency. This is useful if you want
to get the best reception possible for a particular station or if you want to get the channel list of a
certain frequency without having to perform a full search.
1. Press and hold the MENU button to access the configuration menus.
2. Select the manual menu by turning the TUNING knob on the device or by pressing the and
buttons on the remote control, and then press the button.
3. Press the and buttons on the remote control or turn the knob to switch between the
frequency ranges 5A to 13 F.
4. Press the button to open the selected range. When searching manually, no station is broadcast.
The stations found on the frequency range are automatically added to the list of stations already
stored. To access it, press the MENU button to stop the manual search, and then browse the list of
stored stations.
Storing a DAB radio station
1. When the micro hi-fi system is turned on, select the DAB station of your choice.
2. Press and hold the PROG button on the remote control (9). Memory number 01 flashes on the

V.1.0
38
39
V.1.0
display. Press the and buttons to select the desired memory number. Press the button
to confirm the programming of the DAB station. Stored appears on the display.
3. Repeat as often as necessary.
• The programmed stations remain stored even after switching off the device.
• Programming a new station under an already assigned number automatically erases the previously
saved station.
• You can program up to 30 radio stations.
Listening to a stored DAB radio station
• Use the MEM/FOLD±10 button on the remote control to select the memory number of your choice
(1 to 30) and listen to the stored radio station.
Displaying DAB information
• In DAB+ mode, the micro hi-fi system displays information about the station being played. In addition
to the current time, this includes the name of the selected radio station as well as other information
transmitted by the secondary DLS (Dynamic Label Segment) of the transmitter. This may, for example,
be the title and name of the artist or contact information or additional information provided by the
transmitter.
• When the information is longer than 16 characters, it is displayed as scrolling text.
• By pressing the INFO/MENU button several times, you can scroll through the Info menu and view all
the information available (program type (PTY), station name, channel and frequency, signal error rate,
bit rate and audio type, DLS text information, DL Plus info (if available), time, date, signal strength).
Accessing the configuration menus
Press and hold the INFO/MENU button, and then select the system menu with the unit’s TUNING
knob or the et buttons on the remote control. Press the button to confirm.
Press the and buttons to scroll through the various options, and then press the button
to confirm.
» reset : Select y to reset all of your micro hi-fi system’s settings to the original factory settings.
The list of available stations will also be erased and the preset memories will be erased. After the
factory reset, the micro hi-fi system will start a new automatic scan and update the station list.
» sW ver: This option displays the version number of the software installed on your micro hi-fi
system.
» language : Select the language of your choice from the various options available by turning the
setting knob to the right or left. Press the button to confirm
connecting via Bluetooth*
If you have a Bluetooth
*
audio device (smartphone, tablet, laptop, etc.), you can pair it to the micro hi-
fi system. The Bluetooth
*
connection allows you to listen to the music recorded on your audio device
without using a cable.
Turn on the micro hi-fi system and select the BT source by repeatedly pressing the SOURCE button
on the remote control or the unit.
1. On the left side of the display, a blue PAIR LED flashes on the screen, indicating that pairing mode
is active.
2. Then please refer to the operating instructions for your Bluetooth
*
audio device to pair it with the micro hi-fi
system. It is called Essb_MS-E-500-D in the list of detected Bluetooth
*
devices.
3. Pairing is successful when the blue PAIR LED becomes steady on the front panel.
4. Start playback on your audio source.
5. To pause playback, press the button on the micro hi-fi system, remote control or your smartphone.
Or change the playback source on the micro hi-fi system or remote control.
• This micro hi-fi system can be paired to all devices equipped with Bluetooth
*
wireless technology.
• After pairing, the last Bluetooth
*
audio device stored will automatically connect as soon as Bluetooth*
source is selected.
• The unit can only be paired to one Bluetooth* device at a time. To pair another device, cancel the
Bluetooth* pairing for your device and then repeat the previous steps 1 to 4 with the new device.
Using the remote control in Bluetooth
*
• Press this button to start playback.
• Press a second time to pause playback.
• Press again to resume playback.
MEM/FOLD±10
Go to the next or previous track.
Seite laden ...
Seite laden ...
Seite laden ...
Seite laden ...
Seite laden ...
Seite laden ...
Seite laden ...
Seite laden ...
Seite laden ...
Seite laden ...
Seite laden ...
Seite laden ...
Seite laden ...
Seite laden ...
Seite laden ...
Seite laden ...
Seite laden ...
Seite laden ...
Seite laden ...
Seite laden ...
Seite laden ...
Seite laden ...
Seite laden ...
Seite laden ...
Seite laden ...
Seite laden ...
Seite laden ...
Seite laden ...
Seite laden ...
Seite laden ...
Seite laden ...
Seite laden ...
Seite laden ...
Seite laden ...
Seite laden ...
Seite laden ...
Seite laden ...
-
 1
1
-
 2
2
-
 3
3
-
 4
4
-
 5
5
-
 6
6
-
 7
7
-
 8
8
-
 9
9
-
 10
10
-
 11
11
-
 12
12
-
 13
13
-
 14
14
-
 15
15
-
 16
16
-
 17
17
-
 18
18
-
 19
19
-
 20
20
-
 21
21
-
 22
22
-
 23
23
-
 24
24
-
 25
25
-
 26
26
-
 27
27
-
 28
28
-
 29
29
-
 30
30
-
 31
31
-
 32
32
-
 33
33
-
 34
34
-
 35
35
-
 36
36
-
 37
37
-
 38
38
-
 39
39
-
 40
40
-
 41
41
-
 42
42
-
 43
43
-
 44
44
-
 45
45
-
 46
46
-
 47
47
-
 48
48
-
 49
49
-
 50
50
-
 51
51
-
 52
52
-
 53
53
-
 54
54
-
 55
55
-
 56
56
-
 57
57


ESSENTIELB MS-E-500-D Bedienungsanleitung
- Typ
- Bedienungsanleitung
in anderen Sprachen
- English: ESSENTIELB MS-E-500-D Owner's manual
- français: ESSENTIELB MS-E-500-D Le manuel du propriétaire
- español: ESSENTIELB MS-E-500-D El manual del propietario
- Nederlands: ESSENTIELB MS-E-500-D de handleiding
Verwandte Papiere


Sonstige Unterlagen
-
 High One CD RCD101 Bedienungsanleitung
-
 Oglo MB-O-700-D Bedienungsanleitung
-
 Oglo# MS-O-300-D Bedienungsanleitung
-
 Oglo# MS-O-400-D Bedienungsanleitung
-
Lenco DAR-045BK Benutzerhandbuch
-
Silvercrest KH2307 Bedienungsanleitung
-
audizio Salerno DAB+ Radio Bedienungsanleitung
-
Medion MD 84597 Benutzerhandbuch
-
Lenco DAR-060 Benutzerhandbuch
-
Muse Micro-chaîne M39 DBT Bedienungsanleitung


