Brayer BR1108 Benutzerhandbuch
- Kategorie
- Kaffeemaschinen
- Typ
- Benutzerhandbuch
Dieses Handbuch eignet sich auch für

Instruction manual
Инструкция по эксплуатации
Espresso machine BR1115
Рожковая кофеварка BR1115
brayer.ru

СОДЕРЖАНИЕ
EN ......................................................................................................................................3
DE ....................................................................................................................................20
RU ...................................................................................................................................39
KZ ....................................................................................................................................58

3
EN
ATTENTION!
For additional protection it is reasonable to install a
residual current device (RCD) with nominal operation
current not exceeding 30 mA, to install RCD, contact
a specialist.
EN
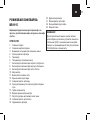
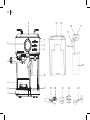
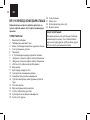
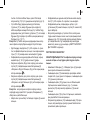
ESPRESSO MACHINE BR1115
The coee maker is designed for brewing espresso
coee, making cappuccino coee or latte coee.
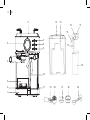
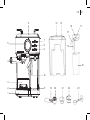
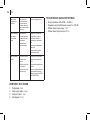
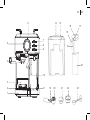
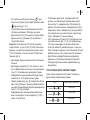
DESCRIPTION
1. Removable tray
2. Removable tray grid
3. Pullout tray for small cups
4. Filter holder handle
5. Thermometer
6. Cup warming tray
7. «Espresso»-button for making espresso
8. Cappuccino button «Cappuccino»
9. Latte button «Latte»
10. Cappuccinator
11. Power switch «0/I»
12. Water tank lid
13. Removable water tank
14. Cappuccinator pipe angle adjustment bar
15. Cappuccinator pipe
16. Upper lid of the cappuccinator
17. Milk/frothed milk supply control knob
18. Removable milk container
19. Filter retainer
20. Filter holder
21. Small lter
22. Large coee lter
23. Measuring spoon

4
EN
1
211
3
4
5
12
613
16
15
17
18
14
19 20 21 22 23
10
9
8
7

5
EN
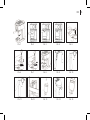
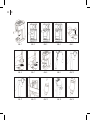
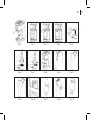
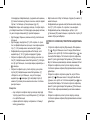
Рiс. 1 Рiс. 3
Рiс. 7
Рiс. 11
Рiс. 5
Рiс. 9 Рiс. 10
Рiс. 2
Рiс. 6
Рiс. 4
Рiс. 8
Рiс. 12 Рiс. 13 Рiс. 14 Рiс. 15

6
EN
SAFETY MEASURES AND COFFEE MAKER
OPERATION RECOMMENDATIONS
Read the operation instructions carefully before using
the coee maker and keep it for future reference.
• Use the coee maker for its intended purpose only, as
specied in this manual.
• Mishandling the coee maker can lead to its breakage
and cause harm to the user or damage to his/her
property and it is not covered by warranty.
• The coee maker is intended for making espresso and
cappuccino coee and warming up ready drinks. Do not
warm any other liquids.
• Make sure that the operating voltage of the coee
maker indicated on the label corresponds to your home
mains voltage.
• The power plug is equipped with a grounding contact,
plug it into the socket with
• reliable grounding contact. In case of short circuit the
grounding reduces the risk of electric shock.
• Contact an electrical technician, if you are not sure that
your sockets are installed properly and grounded.
• To prevent re do not use adapters designed for
connecting the power plug to the mains socket without
grounding contact.
• In case of sparking in the mains socket and occurrence
of smell of burning, unplug the unit and apply to the
organization maintaining your home mains.
• If smoke appears from the unit body, unplug the unit
and take measures to prevent re spreading.
• Use and store the coee maker at the temperature above
0 °C.
• Do not use the coee maker outdoors.
• It is not recommended to use the unit during lightning
storms.
• Protect the unit from impacts, falling, vibrations and other
mechanical stress.
• Never leave the plugged-in coee maker unattended.
• To avoid re, electric shock or physical injuries, do not
immerse the power plug, the power cord or the coee
maker body into water or any other liquids.
• Do not use the coee maker in proximity to the kitchen
sink, in bathrooms, near swimming pools or other
containers lled with water.
• If the unit is dropped into water, unplug it immediately,
and only then you can take the unit out of water.
• Do not use the coee maker near heating appliances,
heat sources or open ame.
• Do not use the unit in places where aerosols are used or
sprayed, and in proximity to inammable liquids.
• Place the coee maker on a at stable surface; do not
place it on the edge of a table. Do not let the power cord
hang from the edge of the table and make sure it does
not touch hot surfaces or sharp edges of furniture.
• Do not place the coee maker on hot surfaces.
• Do not touch the power cord and the power plug with wet
hands.
• Use only the coee maker parts and accessories
supplied with the unit.
• Before switching the coee maker on, make sure that all
removable parts are installed properly.

7
EN
• Ensure that the water level in the water tank is not
below the minimal mark.
• Do not switch the coee maker on if the water tank is
empty.
• To avoid getting burns by hot steam be careful when
frothing milk or warming the ready drinks.
• The lter holder surface, the cappuccinator pipe and
the cappuccinator tip can get rather hot. Be cautious
and careful when in contact with hot surfaces.
• Do not remove the lter holder during coee maker
operation.
• Let the unit cool down completely before cleaning and
removing the accessories.
• Unplug the coee maker before cleaning or when you
are not using it. When unplugging the coee maker
hold only the power cord plug and carefully remove it
from the mains socket, do not pull the power cord —
this can lead to damage of the power cord or the socket
or cause short circuit.
• For children safety reasons do not leave polyethylene
bags, used as a packaging, unattended.
ATTENTION! Do not allow children to play with
polyethylene bags or packaging lm. Danger of
suocation!
• Place the unit out of reach of children during the
operation and cooling down.
• This unit is not intended for usage by physically or
mentally disabled persons (including children) or
• by persons lacking experience or knowledge if they are
not under supervision of a person who is responsible for
their safety or if they are not instructed by this person on
the usage of the unit.
• From time to time check the power cord and the power
plug integrity.
• If the power cord is damaged, it should be replaced
by the manufacturer, a maintenance service or similar
qualied personnel to avoid danger.
• Do not repair the unit by yourself. Do not disassemble
the unit by yourself, if any malfunction is detected, and
after it was dropped, unplug the unit and apply to the
service center.
• Transport the coee maker in the original package.
• Keep the unit out of reach of children and disabled
persons.
COFFEE MAKER IS INTENDED FOR HOUSEHOLD
USE ONLY, DO NOT USE THE COFFEE MAKER FOR
COMMERCIAL OR LABORATORY PURPOSES.
BEFORE USING THE COFFEE MAKER
After unit transportation or storage at low temperature,
it is necessary to keep it for at least three hours at room
temperature.
• The coee maker is not intended for usage by children.
• Do not leave children unattended to prevent using the
unit as a toy.
• Do not allow children to touch the unit and the power
cord during the coee maker operation.

8
EN
• Unpack the coee maker and remove all the packaging
materials.
• Keep the original package.
• Read the safety measures and operating
recommendations.
• Check the delivery set.
• Examine the coee maker for damages, in case of
damage do not plug it into the mains.
• Make sure that the specications of power supply
voltage specied on the lower panel of the unit
correspond to the specications of your mains. When
the unit is used in the mains with 60 Hz frequency, it
does not need any additional settings.
• Wipe the surface of the coee maker body with a clean,
slightly damp cloth to remove dust.
• Before using the coee maker for the rst time, wash
all removable parts (1, 2, 12, 13, 16, 18, 20, 21, 22, 23)
with warm water and neutral detergent and dry them.
BEFORE USING THE UNIT
ATTENTION! If you switch the coee maker on and
don’t perform any actions, the coee maker will
switch o in 15 minutes. To switch the coee maker
on press any button (7, 8, 9).
• Place the coee maker on a steady at heat-resistant
surface, the distance from the side walls of the coee
maker should be at least 20 cm, and the gap above the
coee maker should be at least 30 cm.
• Do not use the coee maker under kitchen shelves of
cupboards. They can be damaged by the steam released
during the coee maker operation.
• The coee maker should be placed out of reach of small
children.
Attention! Before making coee for the rst time it is
recommended to wash the broiler, the cappuccinator lid (16)
and the milk container (18).
• Make sure that the removable tray (1) and the tray grid
(2) are installed to their places.
• Remove the lid (12), remove the water tank (13).
• Fill the tank (10) with cold water up to the maximal level
mark, install the tank (13) back to its place.
Note: the tank (13) is intended for water only, do not ll the
tank (10) with other liquids, such as milk.
• Take the container (18), pull it towards yourself and
remove it, remove the cappuccinator from the container
(18) (pic. 1). Fill the container with water up to the
maximal level mark.
Note: the cappuccinator container (18) is intended for milk
only, do not ll the container (18) with other liquids, use
water only in the cappuccinator lid (16) washing mode.
• Install the cappuccinator lid (16) on the container (18)
and install the cappuccinator back to its place until the
lock clicking.
Notes: after installing the container (18) with the lid (16)
back to its place always check if the cappuccinator is
installed and xed properly.

9
EN
• Set the milk supply intensity control knob (17) to the
middle position.
• Install one of the coee lters (21 or 22) into the lter
holder (20) matching the ledge on the lter (21 or 22)
with the hole on the holder (20) and turn the lter (21
or 22) counter/clockwise. Do not add ground coee
into the lter (21 or 22) when preparing the coee
maker for work.
• Install the lter holder (20) into the installation place «
» and turn the handle (4) to the right as far as it will
go « » (pic. 2, 3, 4).
• Place a cup of suitable height and capacity of at least
300 ml on the tray grid (2).
• Direct the cappuccinator pipe (15) into the cup using
the cappuccinator pipe angle adjustment bar (14).
Note: You can change the length of the cappuccinator
pipe (15) by turning the pipe (15) counterclockwise, then
extend it to the required length, and x the pipe (15) by
turning it clockwise (g. 9).
• Insert the power plug into the mains socket.
• Switch the coee maker on by setting the power switch
(11) «0/I» to the position «I», the indicator (7, 8, 9) will
light up and start ashing.
• When the coee maker is ready for operation, the
indicator (7, 8, 9) will glow constantly.
• To switch the cleaning mode on press the
«Cappuccino»-button (8) twice. After cleaning is
nished, all the light indicators of the control buttons
(7, 8, 9) will light up.
• After you nish cleaning the coee maker, switch the
coee maker o by setting the switch (11) «0/I» to the
position «0».
• Pour the water out of the cup, take the container (18),
pull it towards yourself and remove (pic. 1), remove the
cappuccinator lid (16) from the container (18), pour the
remaining water from the container (18). Slightly lift the
front part of the tray (1) and remove it, pour the water
out of it and install the tray (1) back to its place.
• Turn the lter holder handle (4) to the left and remove it
(pic. 2, 3, 4). Wait until the lter holder (20) cools down
completely and remove the installed lter (21 or 22)
turning it counter/clockwise. Wash the lter (21 or 22)
and install it into the lter holder (20).
• If necessary, clean the boiler and the cappuccinator lid
(16) several times.
• After cleaning the coee maker is ready for operation.
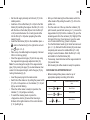
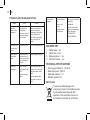
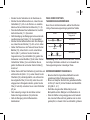
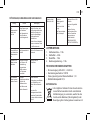
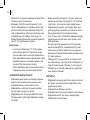
CHOOSING THE APPROPRIATE CUP
• Before making coee, please, select a cup of
appropriate capacity according to the table:
Drink Estimated amount of the ready
drink
Espresso: оne / double 90 ml/130 ml
Cappuccino: оne / double
150 ml/270 ml
Latte: one / double
280 ml/400 ml

10
EN
Notes: this table has guide values of the amount of the
ready drink and is only used to select the volume of the
required cup.
RULES OF MAKING ESPRESSO
• Use fresh-ground coee beans or ground coee for
«espresso» coee makers.
• Make even and slightly tamp the ground coee in the
lter (21 or 22), you can do it with the back side of
the measuring spoon (23) (pic. 5, 6, 7).
• Strength of ready coee depends on the quality and
grinding degree of coee beans.
• If coee is pouring out too long, this means the
coee powder is too ne it is tamped too strongly; in
this case use coarse-ground coee and choose the
tamping degree experimentally.
THERMOMETER (5)
• The built-in thermometer (5) shows the boiler
temperature, if the boiler temperature is over 80°С,
you can make coee.
• When the coee maker is not used, the thermometer
(5) will show the room temperature.
MAKING ESPRESSO
ATTENTION!
- Do not remove the lter holder (20) during making
coee.
- Do not remove the lter holder (20) right after making
coee, as there is redundant pressure inside, wait a
little before removing the lter holder (20).
• Remove the lid (12), remove the water tank (13).
• Fill the tank (13) with cold water, do not exceed the
maximal level mark, install the tank (13) back to its place.
• Install one of the coee lters (21 or 22), depending on
the amount of ready coee, into the lter holder (20)
matching the ledge on the lter (21 or 22) with the hole
on the holder (20) and turn the lter (21 or 22) counter/
clockwise.
• Add the required amount of ground coee into the lter
(21 or 22) with a measuring spoon (23) and slightly tamp
the coee in the lter (21 or 22) with the back side of the
measuring spoon (23) (pic. 5, 6, 7).
• Install the lter holder (20) into the installation place «
» and turn the handle (4) to the right as far as it will go «
» (pic. 2, 3, 4).
• Place a cup of suitable height and capacity (see the table
CHOOSING THE APPROPRIATE CUP) on the grid (2); if
you use small cups, take the pullout tray (3) by the lower
part and pull it towards yourself, place the cups on it.
• Insert the power plug into the mains socket (pic. 8).
• Note: - During preliminary heating, you can warm up the
cups that will be used for making coee by placing them
on the tray (6).
• Switch the coee maker on by setting the power switch
(11) «0/I» to the position «I», the indicator (7, 8, 9) will
light up and start ashing.

11
EN
• When the coee maker is ready for operation, the light
indicator (7, 8, 9) will glow constantly.
• To make one cup of espresso, use the small lter (21)
and press the «Espresso»-button (7) once; the light
indicator « » will light up.
• To make two cups of espresso, use the larger lter (22)
and press the «Espresso»-button (7) twice; the light
indicator « » will light up. In this case set one big or
two small cups on the grid (2 or 3).
Notes:
- if you need to switch the coee maker o during the
espresso making, press the «Espresso»-button (7)
again;
- successive making of coee should be performed
with intervals 2-3 min.
• Remove the cup with ready drink from the grid (2 or 3).
• After you nish using the coee maker, switch the
coee maker o by setting the switch (11) «0/I» to the
position «0».
• Wait until the coee maker cools down, remove the
lter holder (20) and wash the installed lter (21 or 22).
ESPRESSO PORTION SETTING
• When making espresso, press and hold the button
(7) « » for 3 seconds, the one cup indicator « » will
be ashing. When the desired amount of espresso is
dispensed, release the button (7). The maximal amount
of one cup of coee is about 90 ml.
• Next time when you make espresso, the preset amount
of ready coee will be poured into the cup.
• When making espresso, press twice and hold the button
(7) « » for 3 seconds, the two cups indicator « » will
be ashing. When the desired amount of espresso is
dispensed, release the button (7). Maximal amount of
double portion of coee is about 130 ml.
• Next time when you make espresso, the preset amount
of ready coee will be poured into the cup
Notes:
- minimal and maximal amount of espresso
are specied in the table «CHOOSING THE
APPROPRIATE CUP»;
- if you need to make a lesser amount of coee then it
was set, press the button (7) again when the cup is
lled with necessary amount of ready coee.
Return to the factory settings
• To return to the factory settings switch the coee maker
o by setting the switch (11) «0/I» to the position «0».
• Press and hold the button (7) «Espresso», switch the
coee maker on by setting the power switch (11) «0/I»
to the position «I», the buttons « » and « » indicators
will ash 5 times.
• The coee maker is ready for operation with the factory
settings.

12
EN
MAKING CAPPUCCINO
ATTENTION! When making cappuccino be careful to
avoid burns by outgoing hot steam.
• Make sure that the removable tray (1) and the tray grid
(2) are installed to their places.
• Fill the tank (13) with cold water, do not exceed the
maximal level mark, install the tank (13) back to its
place.
• Take the container (18), pull it towards yourself and
remove it (pic. 1), remove the cappuccinator lid (16)
from the container (18).
• Fill the container (18) with milk, do not exceed the
maximal level mark.
• Install the cappuccinator lid (16) on the container (18)
and install the cappuccinator back to the installation
place until the lock clicking.
• Install one of the coee lters (21 or 22) into the lter
holder (20) matching the ledge on the lter (19 or 20)
with the hole on the holder (20) and turn the lter (21 or
22) counter/clockwise.
• Add the required amount of ground coee into the lter
(21 or 22) with a measuring spoon (23) and slightly
tamp the coee in the lter (21 or 22) with the back side
of the measuring spoon (23) (pic. 5, 6, 7).
• Install the lter holder (20) into the installation place «
» and turn the handle (4) to the right as far as it will
go « » (pic. 2, 3, 4).
• Place a cup of suitable height and capacity on the grid
(2) (see the table «CHOOSING THE APPROPRIATE
CUP»).
Note: During preliminary heating, you can warm up the
cups that will be used for making coee by placing them on
the tray (6).
• Direct the cappuccinator pipe (15) into the cup using
the cappuccinator pipe angle adjustment bar (14), if
necessary, change the length of the cappuccinator pipe
(15) (g. 9).
• Turn the frothed milk supply (intensity) control knob (17)
to the right (in this position it produces more frothed
milk). Turn the frothed milk supply (intensity) control knob
(17) to the left (in this position it produces less frothed
milk) (pic. 10, 11).
Notes: you can adjust the milk foam supply intensity when
making cappuccino.
• Insert the power plug into the mains socket.
• Switch the coee maker on by setting the power switch
(11) «0/I» to the position «I», the indicator (7, 8, 9) will
light up and start ashing.
• When the coee maker is ready for operation, the light
indicator (7, 8, 9) will glow constantly.
• To make one cup of cappuccino use a small lter (21)
and press the «Cappuccino»-button (8) once; the light
indicator « » will light up.

13
EN
• To make two cups of cappuccino use a big lter (20)
and press the «Cappuccino»-button (8) twice; the light
indicator « » will light up.
Note: if you need to switch the coee maker o
during the cappuccino making, press the button (6)
«Cappuccino» again.
• Remove the cup with the ready drink from the grid (2).
• After you nish using the coee maker, switch the
coee maker o by setting the switch (11) «0/I» to the
position «0».
• Wait until the coee maker cools down, remove the
lter holder (20) and wash the lter (21 or 22).
• If there is some milk left in the cappuccinator, remove
the cappuccinator and put it in the fridge (pic. 12). If
you used all the milk during the coee making, it is
recommended to remove and wash the cappuccinator
(see the chapter «CAPPUCCINATOR CLEANING»).
MAKING LATTE
ATTENTION! When making latte be careful to avoid
burns by outgoing hot steam.
• Make sure that the removable tray (1) and the tray grid
(2) are installed to their places.
• Fill the tank (13) with cold water, do not exceed the
maximal level mark, install the tank (13) back to its
place.
• Take the container (18), pull it towards yourself and
remove it (pic. 1), remove the cappuccinator lid (16)
from the container (18).
• Fill the container (18) with milk, do not exceed the maximal
level mark.
• Install the cappuccinator lid (16) on the container (18) and
install the cappuccinator back to its place until the lock
clicking.
• Install one of the coee lters (21 or 22) into the lter
holder (20) matching the ledge on the lter (21 or 22) with
the hole on the holder (20) and turn the lter (21 or 22)
counter/clockwise.
• Add the required amount of ground coee into the lter
(21 or 22) with a measuring spoon (22) and slightly tamp
the coee in the lter (21 or 22) with the back side of the
measuring spoon (23) (pic. 5, 6, 7).
• Install the lter holder (20) into the installation place «
» and turn the handle (4) to the right as far as it will go «
» (pic. 2, 3, 4).
• Place a cup of suitable height and capacity on the grid (2)
(see the table «CHOOSING THE APPROPRIATE CUP»).
• Note: - During preliminary heating, you can warm up the
cups that will be used for making coee by placing them
on the tray (6).
• Direct the cappuccinator pipe (15) into the cup using
the cappuccinator pipe angle adjustment bar (14), if
necessary, change the length of the cappuccinator pipe
(15) (g. 9).
• Turn the frothed milk supply (intensity) control knob (17)
to the right (in this position it produces more frothed milk).
Turn the frothed milk supply (intensity) control knob (17) to
the left (in this position it produces less frothed milk) (pic.
10, 11).

14
EN
Notes: you can adjust the milk foam supply intensity when
making latte.
• Insert the power plug into the mains socket.
• Switch the coee maker on by setting the power switch
(11) «0/I» to the position «I», the indicator (7, 8, 9) will
light up and start ashing.
• When the coee maker is ready for operation, the light
indicator (7, 8, 9) will glow constantly.
• To make one cup of latte use a small lter (21) and
press the «Latte»-button (9) once; the light indicator «
» will light up.
• To make two cups of latte use a big lter (20) and press
the «Latte»-button (9) twice; the light indicator « » will
light up.
Note: if you need to switch the coee maker o during the
latte making, press the «Latte»-button (9) again.
• Remove the cup with the ready drink from the grid (2).
• After you nish using the coee maker, switch the
coee maker o by setting the switch (11) «0/I» to the
position «0».
• Wait until the coee maker cools down, remove the
lter holder (20) and wash the lter (21 or 22).
• If there is some milk left in the cappuccinator, remove it
and put the cappuccinator into the fridge (pic. 12), if you
used all milk during making coee, it is recommended
to remove the cappuccinator and clean it (see the
chapter «CAPPUCCINATOR CLEANING»).
MAKING FROTHED MILK
• You can make necessary amount of frothed milk anytime.
• You can use the frothed milk for making hot chocolate,
macchiato, masala tea etc.
• It is important that milk for making frothed milk is fresh and
cold and without additives.
• Take usual whole milk with fat status from 4% to 6%,
cream fat status is not less than 10%.
• Prepare the coee maker as described in the chapters
above, but do not add ground coee into the lters (21 or
22).
• Place a cup of suitable height and capacity on the grid (2).
• Direct the cappuccinator pipe (15) into the cup using
the cappuccinator pipe angle adjustment bar (14), if
necessary, change the length of the cappuccinator pipe
(15) (g. 9).
• Turn the frothed milk supply (intensity) control knob (17)
to the right (in this position it produces more frothed milk)
(pic. 11).
Notes: you can adjust the milk foam supply intensity when
making.
• Switch the coee maker on by setting the power switch
(11) «0/I» to the position «I», the indicator (7, 8, 9) will light
up and start ashing.
• When the coee maker is ready for operation, the light
indicator (7, 8, 9) will glow constantly.
• Press and hold the «Cappuccino»-button (8) for 3
seconds, the indicators « » and « » will light up.

15
EN
• After making the necessary amount of frothed milk stop
the process by pressing the «Cappuccino»-button (8)
again.
• Remove the cup with frothed milk and use the frothed
milk for the intended purpose.
• After you nish using the coee maker, switch the
coee maker o by setting the switch (11) «0/I» to the
position «0».
• If there is some milk left in the cappuccinator, remove it
and put the cappuccinator into the fridge (pic. 12), if you
used all milk during making coee, it is recommended
to remove the cappuccinator and clean it (see the
chapter «CAPPUCCINATOR CLEANING»).
CAPPUCCINATOR CLEANING
• We recommend cleaning the cappuccinator after the
milk container (18) is empty.
• Take the container (18) and remove it (pic. 1), remove
the cappuccinator lid (16) from the container (18).
• Wash the container (18) with a neutral detergent,
remove the milk intake pipe from the cappuccinator lid
(16) and wash it, rinse all the parts, dry them and install
the milk intake pipe back to its place.
• Turn the steam nozzle counterclockwise and remove
it from the cappuccinator (16) body (pic. 11), wash the
nozzle.
• Remove the cappuccinator pipe (15) by turning the
pipe (15) counterclockwise, rinse the pipe (15), install it
back to its place, x the pipe (15) by turning it clockwise
(g. 9).
• Grasp the left side and raise the silicone plug (pic. 14),
rinse the cappuccinator lid (16) under a warm water jet,
close the silicone plug.
• Install the steam nozzle back to its place and turn it
clockwise (pic. 15).
• Prepare the coee maker as described in the chapters
above, but do not add ground coee into the lter (21 or
22).
• Place a cup of suitable height and capacity on the grid
(2).
• Fill the container (18) with water, do not exceed the
maximal level mark.
• Install the cappuccinator lid (16) on the container (18)
and install the cappuccinator back to its place until the
lock clicking.
• Direct the cappuccinator pipe (15) into the cup using
the cappuccinator pipe angle adjustment bar (14), if
necessary, change the length of the cappuccinator pipe
(15) (g. 9).
• Turn the frothed milk supply (intensity) control knob (175)
to the right to the position « ».
• Switch the coee maker on by setting the power switch
(11) «0/I» to the position «I», the indicator (7, 8, 9) will
light up and start ashing.
• When the coee maker is ready for operation, the light
indicator (7, 8, 9) will glow constantly.
• Press and hold the «Latte»-button (9) for 3 seconds, the
indicators « » and « » will light up.

16
EN
• After you nish using the coee maker, switch the
coee maker o by setting the switch (11) «0/I» to the
position «0».
• Wait until the coee maker cools down, take the
container (18), pull it towards yourself and remove it
(pic. 1), remove the cappuccinator lid (14) from the
container (18).
• Pour the remaining water out of the container (18), wipe
the container with a dry cloth and dry the cappuccinator
lid (16).
• Before assembling make sure that the cappuccinator lid
and the container are dry. Install the cappuccinator lid
(16) on the container (18) and install the cappuccinator
on the coee maker.
DESCALING
• Scale inside the boiler aects the taste of ready coee,
slows down the coee making and reduces the service
life of the coee maker.
• Note that the thicker the scale, the more dicult it is to
remove, that’s why we recommen regularly removing
scale for eective operation of the coee maker (see
the table).
Water type Cleaning frequency
Soft (ltered) water Every 80 coee making cycles
Hard (tap) water Every 40 coee making cycles
• The buttons (7, 6, 9) light indicators ashing by rotation
will remind you about descaling.
• You can use special descaling agents for espresso coee
makers or coee machines to remove scale. You can also
use table vinegar or citric acid solution (2 teaspoons of
citric acid per 1 liter of water).
• Follow the instructions on the usage of the descaling
agent, pour it into the water tank (13).
• Install one of the coee lters (21 or 22) into the lter
holder (20) matching the ledge on the lter (21 or 22) with
the hole on the holder (20) and turn the lter (21 or 22)
counter/clockwise.
• Place a cup of suitable height and capacity on the grid (2).
• Direct the cappuccinator pipe (15) into the cup using
the cappuccinator pipe angle adjustment bar (14), if
necessary, change the length of the cappuccinator pipe
(15) (g. 9).
• Insert the power plug into the mains socket.
• Switch the coee maker on by setting the «0/I» power
switch (11) to the «I» position.
• To switch the cleaning mode on, press simultaneously the
button (9) «Latte» and the button (7) «Espresso».
• In the descaling mode the light indicators slowly ash
by rotation, after 30 minutes the light indicators will start
ashing faster. Remove the container (13), drain the
remaining descaling solution and ll the container (13) with
clean water. Install the container (13) back to its place.
• Pour the descaling solution out from the cup, place the
cup on the grid (2).

17
EN
• Simultaneously the button (9) «Latte» and the button
(7) «Espresso» to continue cleaning the coee maker.
In approximately 30 minutes the coee maker cleaning
will be nished, and the coee maker will switch to the
standby mode, all buttons (7, 8, 9) light indicators will
glow constantly.
Notes:
- You can temporarily switch the descaling notication
o by pressing any of the buttons (7, 8, 9) and make
coee. After the coee making the coee maker will
remind you about descaling again with ashing light
indicators.
- Do not delay descaling of the coee maker for a long
time and perform cleaning as soon as possible.
CLEANING THE COFFEE MAKER
• Unplug the coee maker and wait until it cools down
completely.
• Clean the coee maker body with a soft, slightly damp
cloth and then wipe it dry.
• Do not use abrasive cleaners and solvents to clean the
coee maker body.
• You can wash the coee lters (21 and 22) in a
dishwashing machine. Clean the openings in the lters
(21, 22) with a small brush.
• Do not immerse the coee maker body, the power cord
and the power plug into water or any other liquids.
• Wash the water tank (13) and the milk container (18)
with warm water and soft detergent, then dry them.
• If there is mineral scale in the water tank (13), pour
some citric acid solution or table vinegar in the water
tank (13). After mineral scale dissolves, wash the
water tank (13).
• Slightly lift the front part of the tray (1) and remove it,
pour the water out of it, remove the grid (2) from the
tray (1), wash the tray (1) and the grid (2) with water
and neutral detergent, dry them and install back to
their places.
STORAGE
• Before taking the coee maker away for long storage,
unplug it and let the unit cool down.
• Clean the coee maker.
• Pack the coee maker in the original package.
• Use and store the coee maker at the temperature
above 0 °C.
• Keep the coee maker in a dry cool place out of
reach of children and disabled persons.

18
EN
TROUBLES AND TROUBLESHOOTING
Problem Cause Solution
The coee
maker can't be
switched on
No voltage in the
mains socket.
The power plug is not
completely inserted
into the socket
Make sure that the mains
socket is operating by
connecting a known good
electric appliance to it.
Disconnect the power plug
and connect it into the
socket
Water leaks from
the lower part of
the unit
The water tray is full Pour out water from the tray
Coee leakage
from the lter
holder
Loose connection of
the lter and boiler
gasket, ground coee
got on the edges of
the lter
Clean the edges of the lter
Coee has a
foreign smell
Wrong process of
scale removal in the
boiler
Improper storage of
coee.
See the chapters «Before
using the unit», «Descaling»
and perform them several
times
Use fresh ground coee.
Keep coee in a dry cool
place.
Steam doesn’t
froth milk
You used skimmed
milk
Milk is not cold
enough
The cappuccinator
pipe is blocked
Use only whole milk with fat
content 4-6%
Use cold milk
Clean the cappuccinator
pipe and the cappuccinator
lid (see the chapter
«CLEANING THE
CAPPUCCINATOR»)
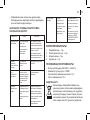
DELIVERY SET
1. Coee maker – 1pc.
2. Coee lter – 2 pcs.
3. Measuring spoon – 1 pc.
4. Instruction manual – 1 pc.
TECHNICAL SPECIFICATIONS
• Power supply 220-240 V, ~ 50-60 Hz
• Rated input power: 1300 W
• Water tank capacity: 1,5 l
• Milk tank capacity: 0,5 l
RECYCLING
To prevent possible damage to the
environment or harm to the health of people
by uncontrolled waste disposal, after
expiration of the service life of the unit or
the batteries (if included), do not discard

19
EN
them with usual household waste, take the unit and the
batteries to specialized stations for further recycling.
The waste generated during the disposal of products
is subject to mandatory collection and consequent
disposal in the prescribed manner.
For further information about recycling of this product
apply to a local municipal administration, a household
waste disposal service or to the shop where you
purchased this product.
The manufacturer reserves the right to change the
design, structure and specications not aecting
general operation principles of the unit, without prior
notice.
The unit operating life is 3 years
The manufacturing date is specied in the serial
number.
In case of any malfunctions, it is necessary to apply
promptly to the authorized service center.

20
DE
ACHTUNG!
Als zusätzlicher Schutz ist es zweckmäßig, den
FI-Schalter mit Nennstrom maximal bis 30 mA im
Stromversorgungskreis aufzustellen; wenden Sie sich
dafür an einen Spezialisten.
DE
ESPRESSOKAFFEEMASCHINE
BR1115
Die Kaeemaschine ist zum Kochen von Espresso,
Cappuccino oder Latte-Kaee bestimmt.
BESCHREIBUNG
1. Abnehmbare Schale
2. Abnehmbares Gitter der Schale
3. Ausziehbare Platte für kleine Tassen
4. Gri des Filterhalters
5. Thermometer
6. Tassenaufheizplatte
7. «Espresso»-Taste für Espressozubereitung
8. „Cappuccino“-Taste für Cappuccinozubereitung
9. „Latte“-Taste für Lattezubereitung
10. Cappuccinatore
11. Netzschalter «0/I»
12. Deckel des Wasserbehälters
13. Abnehmbarer Wasserbehälter
14. Cappuccinatore-Rohr-Neigungsregler
15. Cappuccinatore-Rohr
16. Oberdeckel des Cappuccinatores
17. Milch-/Milchschaumzufuhrregler
18. Abnehmbarer Milchbehälter
19. Filterfesthalter
20. Filterhalter
21. Kleiner Filter
22. Großer Kaeelter
23. Messlöel
Seite wird geladen ...
Seite wird geladen ...
Seite wird geladen ...
Seite wird geladen ...
Seite wird geladen ...
Seite wird geladen ...
Seite wird geladen ...
Seite wird geladen ...
Seite wird geladen ...
Seite wird geladen ...
Seite wird geladen ...
Seite wird geladen ...
Seite wird geladen ...
Seite wird geladen ...
Seite wird geladen ...
Seite wird geladen ...
Seite wird geladen ...
Seite wird geladen ...
Seite wird geladen ...
Seite wird geladen ...
Seite wird geladen ...
Seite wird geladen ...
Seite wird geladen ...
Seite wird geladen ...
Seite wird geladen ...
Seite wird geladen ...
Seite wird geladen ...
Seite wird geladen ...
Seite wird geladen ...
Seite wird geladen ...
Seite wird geladen ...
Seite wird geladen ...
Seite wird geladen ...
Seite wird geladen ...
Seite wird geladen ...
Seite wird geladen ...
Seite wird geladen ...
Seite wird geladen ...
Seite wird geladen ...
Seite wird geladen ...
Seite wird geladen ...
Seite wird geladen ...
Seite wird geladen ...
Seite wird geladen ...
Seite wird geladen ...
Seite wird geladen ...
Seite wird geladen ...
Seite wird geladen ...
Seite wird geladen ...
Seite wird geladen ...
Seite wird geladen ...
Seite wird geladen ...
Seite wird geladen ...
Seite wird geladen ...
Seite wird geladen ...
Seite wird geladen ...
Seite wird geladen ...
Seite wird geladen ...
Seite wird geladen ...
Seite wird geladen ...
-
 1
1
-
 2
2
-
 3
3
-
 4
4
-
 5
5
-
 6
6
-
 7
7
-
 8
8
-
 9
9
-
 10
10
-
 11
11
-
 12
12
-
 13
13
-
 14
14
-
 15
15
-
 16
16
-
 17
17
-
 18
18
-
 19
19
-
 20
20
-
 21
21
-
 22
22
-
 23
23
-
 24
24
-
 25
25
-
 26
26
-
 27
27
-
 28
28
-
 29
29
-
 30
30
-
 31
31
-
 32
32
-
 33
33
-
 34
34
-
 35
35
-
 36
36
-
 37
37
-
 38
38
-
 39
39
-
 40
40
-
 41
41
-
 42
42
-
 43
43
-
 44
44
-
 45
45
-
 46
46
-
 47
47
-
 48
48
-
 49
49
-
 50
50
-
 51
51
-
 52
52
-
 53
53
-
 54
54
-
 55
55
-
 56
56
-
 57
57
-
 58
58
-
 59
59
-
 60
60
-
 61
61
-
 62
62
-
 63
63
-
 64
64
-
 65
65
-
 66
66
-
 67
67
-
 68
68
-
 69
69
-
 70
70
-
 71
71
-
 72
72
-
 73
73
-
 74
74
-
 75
75
-
 76
76
-
 77
77
-
 78
78
-
 79
79
-
 80
80


Brayer BR1108 Benutzerhandbuch
- Kategorie
- Kaffeemaschinen
- Typ
- Benutzerhandbuch
- Dieses Handbuch eignet sich auch für