mothercare Burigotto Copa Stroller 0724864 Benutzerhandbuch
- Kategorie
- Kinderwagen
- Typ
- Benutzerhandbuch
Dieses Handbuch eignet sich auch für

copa
IT Istruzioni d’uso
EN Instructions for use
FR Notice d’emploi
DE Gebrauchsanleitung
ES Instrucciones de uso
RU Инструкции по пользованию

3
2
1

5
4
6

3
44
2
2
1
1
2
5
5
6 6
9
7
8

3
1
2
10
11
12
1
2

- 6 -
IT_Italiano
Grazie per aver acquistato un prodotto Burigotto.
ATTENZIONE
_ IMPORTANTE: LEGGERE
ATTENTAMENTE E CONSERVARE
PER FUTURO RIFERIMENTO. La
sicurezza del bambino potrebbe
essere messa a rischio se non si
eseguono queste istruzioni.
_ Questo articolo è stato progettato
per il trasporto di 1 bambino nella
seduta.
_ Non utilizzare questo articolo per
un numero di occupanti superiori a
quanto previsto dal costruttore.
_ Questo prodotto è omologato per
bambini dalla nascita sino a 4 anni
di età o peso massimo di 22 kg, a
seconda della condizione che si
presenta prima.
_ ATTENZIONE: utilizzare sempre
il sistema di ritenuta. Utilizzare
sempre la cintura di sicurezza a
cinque punti.
Agganciare sempre il cinturino
girovita al cinturino spartigambe.
_ Per bambini appena nati si
raccomanda di regolare lo
schienale nella posizione più bassa.
_ Il frontalino, se presente, non è
progettato per reggere il peso
del bambino; il frontalino non è
progettato per sollevare la seduta
con il peso del bambino. Il frontalino
non sostituisce il cinturino di
sicurezza.
_ ATTENZIONE Prima dell'uso
assicurarsi che tutti i
meccanismi di bloccaggio siano
correttamente agganciati.
_ ATTENZIONE Prima dell'uso
controllare che i meccanismi
di aggancio della seduta, della
navicella o del seggiolino auto
siano correttamente agganciati.
_ ATTENZIONE Per evitare lesioni
o ferimenti assicurarsi che il
bambino sia a debita distanza
durante le operazioni di apertura
e chiusura del prodotto
_ ATTENZIONE Non lasciare che
il bambino giochi con questo
prodotto.
Questo articolo non è un gioco.
_ ATTENZIONE Le operazioni di
assemblaggio e di preparazione
dell’articolo devono essere
effettuate solo da adulti.
_ Non utilizzate questo articolo se
presenta parti mancanti o rotture.
_ ATTENZIONE Non lasciare mai il
bambino incustodito.
_ Azionare sempre il freno quando si
è fermi e durante le operazioni di
carico e scarico del bambino.
_ Non inserire le dita nei meccanismi.
_ Prestare attenzione alla presenza
del bambino quando si effettuano
operazioni di regolazione dei
meccanismi (maniglione, schienale).
_ Qualsiasi carico applicato
all’impugnatura e/o allo schienale
e/o lateralmente al prodotto può
compromettere la stabilità del
prodotto.
_ Non introdurre nel cestello carichi
per un peso superiore a 5 kg. Non
inserire nei portabibite (se presente)
pesi superiori a quanto specificato
nel portabibite stesso e mai
bevande calde. Non inserire nelle
tasche delle capotte (se presenti)
pesi superiori a 0.2 Kg.
_ Non utilizzare l'articolo in vicinanza
di scale o gradini; non utilizzare
vicino a fonti di calore, fiamme libere
o oggetti pericolosi a portata delle
braccia del bambino.
_ Utilizzare unicamente le parti di
ricambio fornite o consigliate dal
produttore/distributore.
_ ATTENZIONE Questo prodotto
non è adatto per correre o
pattinare.
_ ATTENZIONE Non aggiungere alcun
materassino non approvato dal
costruttore.
_ Non utilizzare accessori non
approvati dal costruttore.

- 7 -
Le immagini riferite ai dettagli tessili potrebbero
differire dalla collezione acquistata.
ISTRUZIONI D'USO
Prima di aprire il passeggino, se presenti, rimuovere
(senza utilizzare lame) tutti i fustellati e protezioni
presenti sul prodotto.
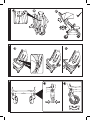
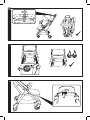
1 APRIRE IL PASSEGGINO: sganciare la leva di sicurezza
(fig. a), impugnare il maniglione lateralmente da
entrambe le parti (fig. b) e contemporaneamente
sollevare il passeggino verso l'alto.
La corretta apertura è data dal click laterale di
aggancio del passeggino (fig. c).
2 FRONTALINO: è possibile aprirlo solo da un lato,
destro o sinistro, per facilitare l'ingresso del bambino,
premendo il bottone sotto si esso.
E' anche possibile toglierlo completamente, premendo
il bottone posto sotto di esso da entrambe le parti e
sfilarlo.
Per rimontarlo riposizionarlo nelle sedi fino al click.
3 RUOTE ANTERIORI FISSE O PIROETTANTI:
Ruote anteriori fisse: abbassare la leva blocca ruote (fig. a).
Ruote anteriori piroettanti: sollevare la leva blocca ruote (fig. b).
4 CAPOTTINA:
E' possibile estendere la capottina (fig. a).
È dotata di una finestra osserva bimbo (fig. b).
E' possibile chiudere l'ultimo spicchio (fig. c).
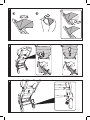
5 REGOLAZIONE DELLO SCHIENALE:
Sollevare la maniglia posta sullo schienale e regolarlo
all’ altezza desiderata (fig. a).
Per sollevare lo schienale tirare verso l'alto l’anello
come in figura (fig. b).
6 FRENO:
per bloccare il passeggino premere la leva freno.
Per sbloccare il passeggino agire in senso contrario.
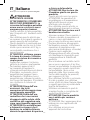
7 CINTURA DI SICUREZZA 5 PUNTI:
per agganciarle, inserire le due fibbie del cinturino
girovita (con bretelle agganciate freccia_1) nel
cinturino spartigambe fino al click (freccia_2).
Per sganciare, premere il pulsante tondo posto
centralmente alla fibbia (freccia_3) e tirare verso
l’esterno il cinturino girovita (freccia_4).
8 Per stringere il cinturino girovita tirare, da entrambi i
lati, nel senso della freccia (freccia_5), per allentarlo
agire in senso contrario.
Regolare la lunghezza facendo scorrere le asole in
modo che le cinghie tengano ben fermo il corpo del
bimbo (freccia_6).
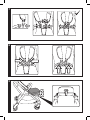
9 REGOLAZIONE DEL POGGIAGAMBE:
Per regolare il poggiagambe nella posizione
desiderata, premere la leva posta sotto la pedanetta.
10 CHIUSURA DEL PASSEGGINO:
Le ruote anteriori devono essere piroettanti.
Impugnare il maniglione e contemporaneamente
premere verso sinistra la linguetta posta sul di
esso (freccia 1) e premere il pulsante posto sotto il
maniglione (freccia 2) per poi abbassare il passeggino
verso il basso (freccia 3) e chiuderlo.
Una volta chiuso, il passeggino sta in piedi da solo.
11 SGANCIO RUOTE ANTERIORI:
Per sganciare le ruote anteriori e ridurre l'ingombo del
passeggino premere sulla linguetta ed estrarle (fig. b).
INFORMAZIONI DI PRODOTTO
12 Informazioni del prodotto.
Queste informazioni sono indispensabili in caso di reclamo.
PULIZIA E MANUTENZIONE
Le operazioni di pulizia devono essere effettuate solo
da adulti.
MANUTENZIONE DELL'ARTICOLO: proteggere da
agenti atmosferici: acqua, pioggia o neve; l’esposizione
continua e prolungata al sole potrebbe causare
cambiamenti di colore in molti materiali; conservare
questo articolo in un posto asciutto. Eseguire controlli
ed interventi di manutenzione sulle parti principali ad
intervalli regolari.
PULIZIA DEL TELAIO: periodicamente pulire le parti in
plastica con un panno umido senza utilizzare solventi
o altri prodotti simili; mantenere asciutte tutte le parti
in metallo per prevenire la ruggine; mantenere pulite
tutte le parti in movimento (meccanismi di regolazione,
meccanismi di aggancio, ruote...) da polvere o sabbia e
se occorre, lubrificarle con olio leggero.
PULIZIA DELLE PARTI IN TESSUTO: Spazzolare le parti in
tessuto per allontanare la polvere;
• Per il lavaggio attenersi all'etichetta cucita sulla sacca
del prodotto.
• non candeggiare al cloro;
• non stirare;
• non lavare a secco;
• non smacchiare con solventi;
• non asciugare a mezzo di asciugabiancheria a tamburo
rotativo.
SERVIZIO ASSISTENZA BURIGOTTO
Se fortuitamente parti del modello vengono perse
o danneggiate, usare solo pezzi di ricambio originali
Burigotto. Per eventuali riparazioni, sostituzioni,
informazioni sui prodotti, vendita di ricambi originali
e accessori, contatta il Servizio Assistenza PegPerego
indicando, il numero seriale del prodotto.
tel. 0039/039/60.88.213
numero verde: 800/147.414
e-mail [email protected]
sito internet www.burigotto.com
Tutti i diritti di proprietà intellettuale relativi
ai contenuti di questo manuale d’istruzione
appartengono a PegPerego S.p.A. e sono tutelati dalle
leggi vigenti.

- 8 -
EN_English
Thank you for choosing a Burigotto product.
WARNING
_ IMPORTANT: READ THE
INSTRUCTIONS CAREFULLY
BEFORE USE AND KEEP FOR
FUTURE REFERENCE. The child’s
safety could be at risk if these
instructions are not followed.
_ This product was designed for the
transport of 1 child in the seat.
_ Do not use this product for a
number of occupants greater than
that intended by the manufacturer.
_ This product is suitable from birth
up to 22 kg or 4 years, whichever
comes firts.
_ WARNING: Always use the
restraint system. Always use the
five-point safety harness.
Always lock the waist strap with the
crotch strap.
_ For new born babies is
recommended to use the backrest
in the most reclined position
_ The front bar(if present)has not
been designed to support the
child’s weight; the front bar has
not been designed to lift the seat
with the child's weight. The front
bar does not replace the seat belt.
_ WARNING Ensure that all the
locking devices are engaged
before use.
_ WARNING Check that the pram
body or seat unit or car seat
attachment devices are correctly
engaged before use.
_ WARNING To avoid injury ensure
that the child is kept away
when unfolding and folding this
product.
_ WARNING Do not let the child
play with this product.
This product is not a toy.
_ WARNING The assembly and
preparation of the product must be
carried out by an adult.
_ Do not use this product if there are
parts missing or signs of breakage.
_ WARNING Never leave the child
unattended.
_ Always apply the brake when
stationary and when loading or
unloading children.
_ Do not insert fingers into the
mechanisms.
_ Be careful not to hurt the child
when adjusting the mechanisms
(handlebar, backrest … ).
_ Any load applied to the handle and/
or the backrest and/or laterally to
the product can compromise the
stability of the product.
_ Do not load the baskets over 5
Kg. Do not put weight in the cup
holder (if present) in excess of
those indicated on the cup holders
themselves and never hot drinks. Do
not put loads of more than 0.2 Kg in
the hood pockets (if present).
_ Do not use the product near to
stairs or steps, heat sources, naked
flames or dangerous objects within
reach of the child.
_ Only replacement parts supplied or
recommended by the manufacturer/
distributor shall be used.
_ WARNING This product is not
suitable for running or skating.
_ WARNING Do not add any
mattress are not approved by the
manufacturer.
_ Do not use accessories which are
not approved by the manufacturer.
The images referring to the textile details may
differ from the collection purchased.
INSTRUCTIONS
Before opening the stroller, if present, remove all
the die-cut elements and protections present on the
product (without using a blade).
1 OPENING THE STROLLER: unfasten the safety lever (fig.
a), hold the handle on the two sides (fig. b) and at the
same time raise the stroller upwards.
The stroller is fully open when you hear a clicking
sound (fig. c).
2 FRONT BAR: this can only be opened on one side,
either to the right or left, by pressing the underneath
button, so as to help the child get in and out of the
stroller.
It can also be removed completely by pressing the two
underneath buttons and pulling it off.
To reposition it, insert the two sides into the
appropriate slots until you hear them click.

- 9 -
3 FIXED OR SWIVELLING FRONT WHEELS:
Fixed front wheels: lower the wheel locking lever (fig. a).
Swivelling front wheels: lift the wheel locking lever (fig.
b).
4 HOOD:
It is possible to extend the hood (fig. a).
This is equipped with a window so you can check on
your child (fig. b).
The last section of fabric can be folded away (fig. c).
5 BACKREST ADJUSTMENT:
Lift the handle placed on the backrest to adjust the
latter to the desired height (fig. a).
To raise the backrest, pull the ring upwards as shown
in the figure (fig. b).
6 BRAKE:
To lock the stroller press on the brake lever.
Do the opposite to release the brake.
7 FIVE POINT SAFETY HARNESS: to fasten it, push the two
waist strap buckles (with the shoulder straps attached
(arrow_1) into the leg divider until they click into place
(arrow_2). To unfasten it, press the round button in the
centre of the buckle (arrow_3) and pull the waist straps
out (arrow_4).
8 To tighten the waist strap, pull on both sides in the
direction of the arrow (arrow_5). To loosen it, move it
in the opposite direction.
To adjust the length, slide the buckles until the straps
are taut around the child’s body (arrow_6).
9 ADJUSTING THE FOOTREST:
To adjust the footrest to the desired position, press the
lever located underneath.
10 CLOSING THE STROLLER:
The front wheels must be set to swivelling.
Taking hold of the handlebar, push the red tab to the
left (arrow 1) and at the same time press the button
beneath the handle (arrow 2), then lower the stroller
downwards (arrow 3) to close it.
Once folded, the stroller stands upright.
11 REMOVING THE FRONT WHEELS:
To remove the front wheels and reduce the overall
dimensions of the stroller, press on the tab and pull
them out (fig. b).
PRODUCT INFORMATION
12 Product information.
This information is essential in the event of a
complaint.
CLEANING AND MAINTENANCE
Cleaning must only be carried out by adults.
PRODUCT MAINTENANCE: protect from the weather:
water, rain, or snow; prolonged and continuous
exposure to bright sunlight may give rise to colour
changes of various different materials; store this
product in a dry place. The maintenance have to be
regularly.
CLEANING THE CHASSIS: periodically clean all plastic
parts with a damp cloth. Do not use solvent or
similar cleaning products; keep all metal parts dry to
prevent rusting; keep moving parts clean (adjustment
mechanisms, locking mechanisms, wheels, ...) and free
of dust and sand and, if necessary, lubricate with light
machine oil.
CLEANING FABRIC PARTS: Brush the fabric parts to
remove dust.
• When washing, closely follow the instructions stated
on the label sewn into the cover.
• Do not use chlorine bleach.
• Do not iron.
• Do not dry clean.
• Do not remove stains with solvents.
• Do not tumble dry.
BURIGOTTO AFTER-SALES SERVICE
If any parts of the item get lost or damaged, only
use genuine Burigotto spare parts. For any repairs,
replacements, information on the products and sales
of genuine spare parts and accessories, contact the
PegPerego Assistance Service and state the serial
number of the product.
tel. 0039/039/60.88.213
e-mail [email protected]
website www.burigotto.com
All intellectual property rights on the contents of
this manual are property of PegPerego S.p.A. and are
protected by the laws in force.

- 10 -
FR_Français
Merci d’avoir choisi un produit Burigotto.
AVERTISSEMENTS
_ IMPORTANT: LIRE LES
INSTRUCTIONS SUIVANTES
ATTENTIVEMENT AVANT
UTILISATION ET LES CONSERVER
POUR LES BESOINS ULTÉRIEURS
DE RÉFÉRENCE.
La sécurité de
l’enfant pourrait être menacée si
ces instructions ne sont pas suivies.
_ Cet article a été conçu pour
transporter 1 enfant sur le siège.
_ Ne pas utiliser lorsque le nombre
d’occupants est supérieur aux
prescriptions du fabricant.
_ Ce produit est homologué pour les
enfants de la naissance jusqu'à 4 ans
ou pesant au maximum 22 kg.
_
AVERTISSEMENT: toujours utiliser le
système de retenue. Toujours utiliser
la ceinture de sécurité à 5 points.
Toujours accrocher la ceinture ventrale
à la sangle d’entrejambes.
_ Pour les nouveaux-nés, il est
recommandé d'abaisser le dossier
dans la position la plus inclinée.
_ La barre frontale, le cas échéant, n’a
pas été conçue pour supporter le
poids de l’enfant ; elle n’a pas non plus
été conçue pour soulever l’assise avec
le poids de l’enfant. La barre frontale
ne remplace pas la sangle de sécurité.
_ AVERTISSEMENT S’assurer
que tous les dispositifs de
verrouillage sont enclenchés
avant utilisation
_ AVERTISSEMENT Vérifier que
les dispositifs de fixation de
la nacelle, du siège ou du
siège-auto sont correctement
enclenchés avant utilisation.
_ AVERTISSEMENT Pour éviter
toute blessure, maintenir l’enfant
à l’écart lors du dépliage et du
pliage du produit
_ AVERTISSEMENT Ne pas laisser
un enfant jouer avec ce produit.
Ce produit n'est pas un jouet.
_ AVERTISSEMENT Les opérations
d’assemblage et de préparation de
l’article doivent être effectuées par
des adultes.
_ Ne pas utiliser cet article si des
pièces sont manquantes ou cassées.
_ AVERTISSEMENT Ne jamais laisser
un enfant sans surveillance.
_ Toujours actionner le frein à l'arrêt
et lorsque l’enfant est installé dans
l’article ou qu’il en est retiré.
_ Ne pas mettre les doigts dans les
mécanismes.
_ Prêter attention à la position de
l’enfant lors des opérations de réglage
des éléments mobiles (anse, dossier).
_ Toute charge appliquée à la poignée
et/ou au dossier et/ou de côté sur
le produit peut compromettre la
stabilité du produit.
_ Ne pas utiliser le panier pour
transporter des charges supérieures
à 5 kg. Ne pas introduire dans le
porte-boissons (le cas échéant)
des charges supérieures à celles
indiquées sur le porte-boissons lui-
même; ne jamais y introduire de
boissons chaudes. Ne pas introduire
dans les poches de la capote (le cas
échéant) des objets dont le poids
excède 0,2 kg.
_ Ne pas utiliser l’article à proximité
d’escaliers ou de marches; ne pas
l’utiliser à proximité de sources de
chaleur, de flammes directes ou
d’objets dangereux se trouvant à la
portée de l’enfant.
_ N’utiliser que les pièces de rechange
fournies ou conseillées par le
fabricant/distributeur.
_ AVERTISSEMENT Ce produit ne
convient pas pour faire du jogging
ou des promenades en rollers.
_ AVERTISSEMENT Ne pas ajouter de
matelas qui ne soit pas approuvé
par le fabricant.
_ Ne pas utiliser d'accessoires non
approuvés par le fabricant.
Les images se référant aux détails textiles
pourraient être différentes de la collection achetée.

- 11 -
INSTRUCTIONS D’UTILISATION
Avant d'ouvrir la poussette, le cas échéant, retirer (sans
utiliser de lames) tous les éléments en carton et toutes
les protections présentes sur le produit.
1 OUVRIR LA POUSSETTE: détacher le levier de sécurité
(fig. a), saisir l’anse des deux côtés (fig. b) et soulever
simultanément la poussette vers le haut.
L’ouverture correcte est confirmée par le déclic latéral
d’accrochage de la poussette (fig. c).
2 BARRE DE SÉCURITÉ: elle peut être ouverte d’un seul
côté seulement, à droite ou à gauche, pour faciliter
l’entrée de l’enfant, en appuyant sur le bouton situé en
dessous d’elle.
Elle peut également être enlevée entièrement, en
appuyant sur le bouton situé en dessous des deux
côtés pour la retirer.
Pour la remettre en place, la positionner à nouveau
dans les emplacements jusqu’au déclic.
3 ROUES AVANT FIXES OU PIVOTANTES:
Roues avant fixes: baisser le levier qui bloque les roues
(fig. a).
Roues avant pivotantes: soulever le levier qui bloque
les roues (fig. b).
4 CAPOTE:
Il est possible d’allonger la capote (fig. a).
Elle est munie d’une fenêtre pour observer l’enfant (fig.
b).
Il est possible de fermer le dernier pan (fig. c).
5 RÉGLAGE DU DOSSIER:
Soulever la poignée située sur le dossier et le régler à la
hauteur souhaitée (fig. a).
Pour soulever le dossier, tirer l’anneau vers le haut
comme indiqué sur la figure (fig. b).
6 FREIN:
Pour bloquer la poussette, appuyer sur le levier du
frein.
Pour débloquer la poussette, suivre la procédure
inverse.
7 CEINTURE DE SÉCURITÉ À 5 POINTS : pour l’accrocher,
enclencher les deux boucles de la ceinture ventrale
(bretelles attachées, flèche_1) dans la sangle
d’entrejambes jusqu’au déclic (flèche_2). Pour la
décrocher, appuyer sur le bouton rond situé au centre
de la boucle (flèche_3) et tirer la ceinture ventrale vers
l’extérieur (flèche_4).
8 Pour serrer la ceinture ventrale, tirer des deux côtés
dans le sens indiqué par la flèche (flèche_5) ; pour la
desserrer, procéder à l’opération contraire.
Régler la longueur en faisant défiler les fentes afin
que les sangles tiennent bien fermement le corps de
l’enfant (flèche_6).
9 RÉGLAGE DU REPOSE-PIED:
Pour régler le repose-pied sur la position souhaitée,
appuyer sur le levier situé sous le marchepied.
10 FERMETURE DE LA POUSSETTE:
Les roues avant doivent être pivotantes.
Saisir l’anse et pousser simultanément vers la gauche
la languette située dessus (flèche 1) et appuyer sur le
bouton situé sous l’anse (flèche 2) pour rabattre ensuite
la poussette vers le bas (flèche 3) et la fermer.
Une fois fermée, la poussette tient debout toute seule.
11 DÉCROCHAGE DES ROUES AVANT:
Pour décrocher les roues avant et réduire
l’encombrement de la poussette, appuyer sur la
languette et les retirer (fig. b).
INFORMATIONS SUR LE PRODUIT
12 Informations sur le produit.
Ces informations sont essentielles en cas de plainte.
NETTOYAGE ET ENTRETIEN
Les opérations de nettoyage doivent être effectuées
uniquement par un adulte.
ENTRETIEN DE L’ARTICLE: protéger l’article des agents
atmosphériques (eau, pluie ou neige); une exposition
continue et prolongée au soleil pourrait entraîner
un changement de couleur de nombreux matériaux;
ranger cet article dans un lieu sec. Effectuer des
contrôles et des interventions d’entretien sur les pièces
principales à des intervalles réguliers.
NETTOYAGE DU CHÂSSIS: nettoyer régulièrement les
pièces en plastique à l’aide d’un linge humide; ne
pas utiliser de solvants ou autres produits similaires.
Veiller à ce que toutes les pièces métalliques restent
sèches pour prévenir la formation de rouille. Maintenir
le bon état de propreté de toutes les pièces mobiles
(mécanismes de réglage, mécanismes de fixation,
roues, etc.) en enlevant poussière ou sable; graisser
avec une huile légère si nécessaire.
NETTOYAGE DES ÉLÉMENTS EN TISSU: brosser les
éléments en tissu pour éliminer la poussière.
• Pour le lavage, suivre les instructions figurant sur
l’étiquette cousue sur la sacoche du produit.
• ne pas blanchir au chlore ;
• ne pas repasser ;
• ne pas laver à sec ;
• ne pas utiliser de solvants pour enlever les taches ;
• ne pas sécher dans un sèche-linge à tambour rotatif.
SERVICE D’ASSISTANCE BURIGOTTO
En cas de perte de pièces ou de rupture de l'une
d'elles, utiliser exclusivement des pièces de
rechange originales Burigotto. Pour toute réparation,
remplacement, informations sur les produits, vente de
pièces détachées d’origine et accessoires, contactez
le service après-vente PegPerego en indiquant, le
numéro de série du produit.
tél. 0039/039/60.88.213
Numéro vert pour le SAV en France: 0 800 913 540
e-mail [email protected]
site Internet www.burigotto.com
Tous les droits de propriété intellectuelle relatifs au
contenu de ce manuel appartiennent à PegPerego SpA
et sont protégés par la loi.

- 12 -
DE_Deutsch
Vielen Dank, dass Sie sich für ein Burigotto Produkt
entschieden haben.
WARNUNG
_ WICHTIG: ANLEITUNGEN
FÜR SPÄTERE RÜCKFRAGEN
AUFBEWAHREN. Die Sicherheit
des Kindes könnte gefährdet
werden, sollten diese
Anweisungen ni cht beachtet
werden.
_ Dieser Artikel wurde für den
Transport eines Kindes auf dem Sitz
ausgelegt.
_ Diesen Artikel nicht für eine größere
Anzahl Kinder verwenden, als vom
Hersteller vorgesehen.
_ Dieses Produkt ist für Kinder von der
Geburt an bis zu einem Alter von vier
Jahren oder bis zu einem Gewicht
von maximal 22kg zugelassen.
_ WARNUNG: Verwenden Sie
immer das Rückhaltesystem.
Stets den 5-Punkte-
Sicherheitsgurt verwenden.
Befestigen Sie immer den Bauchgurt
am Schrittgurt.
_ Für Neugeborene wird empfohlen,
die Rückenlehne vollkommen nach
unten zu neigen.
_ Der Rückhaltebügel (falls vorhanden)
ist nicht darauf ausgelegt, dem
Gewicht des Kindes standzuhalten.
Er ist nicht darauf ausgelegt, das
Kind im Sitz hochzuheben und
ersetzt nicht den Sicherheitsgurt.
_ WARNUNG Vergewissern Sie
sich vor Gebrauch, dass alle
Verriegelungen eingerastet sind.
_ WARNUNG Vergewissern Sie sich
vor der Verwendung, dass der
Kinderwagenaufsatz oder der
Sitzeinheit oder die
Befestigungselemente des
Autositzes korrekt eingerastet
sind.
_ WARNUNG Vergewissern Sie sich,
dass das Kind beim Aufklappen
und Zusammenklappen des
Wagens außer Reichweite ist, um
Verletzungen zu vermeiden.
_ WARNUNG Lassen Sie Ihr Kind
nicht mit dem Produkt spielen.
Dieses Produkt ist kein Spielzeug.
_ WARNUNG Die Vorgänge zur
Montage und Vorbereitung
des Artikels dü rfen nur von
Erwachsenen ausgeführt werden.
_ Diesen Artikel nicht verwenden,
wenn fehlende Teile oder Brüche
festgestellt werden.
_ WARNUNG Lassen Sie das Kind
nie unbeaufsichtigt.
_ Wenn der Wagen steht und
während des Hereinsetzens und
Herausnehmens des Kindes immer
die Bremse betätigen.
_ Achten Sie darauf, die Finger nicht in
die Mechanismen einzuklemmen.
_ Auf das Kind achten, wenn
Vorgänge zum Einstellen der
Mechanismen vorgenommen
werden (Griff, Rückenlehne).
_ Jegliche Belastung von Griff und/
oder Rückenlehne bzw. seitliche
Belastungen des Produkts
können die Stabilität des Produkts
beeinträchtigen.
_ Den Korb mit nicht mehr als 5 kg
Gewicht belasten. Geben Sie in den
Flaschenhalter (falls vorhanden)
keine Gewichte, die über den
Angaben auf dem Flaschenhalter
selbst liegen und nie warme
Getränke. Geben Sie in die Taschen
des Verdecks (falls vorhanden) keine
Gewichte von mehr als 0,2 kg.
_ Den Artikel nicht in der Nähe
von Treppen oder Stufen
verwenden. Nicht in der Nähe von
Wärmequellen, offenem Feuer
oder gefährlichen Gegenständen
in Reichweite der Arme des Kindes
verwenden.
_ Verwenden Sie ausschließlich vom
Hersteller/Händler gelieferte oder
empfohlene Ersatzteile.
_ WARNUNG dieses produkt ist
nicht zum joggen oder skaten

- 13 -
geeignet.
_ WARNUNG Keinerlei nicht vom
Hersteller genehmigte Matratzen
hinzufügen.
_ Verwenden Sie keine nicht
vom Hersteller genehmigten
Zubehörteile.
Die Abbildungen in Bezug auf die Textildetails
können von der gekauften Kollektion abweichen.
GERAUCHSANWEISUNG
Vor dem Öffnen des Buggys alle vorhandenen
Schutz- und Kartonteile entfernen (ohne Klingen zu
verwenden).
1 BUGGY ÖFFNEN: Sicherheitshebel lösen (Abb. a),
Lenker auf beiden Seiten festhalten (Abb. b) und
gleichzeitig den Buggy hochheben.
Wenn der Buggy seitlich einrastet und es klickt, ist er
richtig geöffnet (Abb. c).
2 RÜCKHALTEBÜGEL: Der Rückhaltebügel kann nur auf
einer Seite (rechts oder links) zum Ein- und Aussteigen
des Kindes geöffnet werden. Dazu auf den Knopf unter
der sich öffnenden Seite drücken.
Durch Drücken auf die Knöpfe auf beiden Seiten kann
der Rückhaltebügel gelöst und komplett abgenommen
werden.
Für die erneute Montage, den Rückhaltebügel bis zum
Klicken in die Aussparung schieben.
3 FESTE ODER SCHWENKBARE VORDERRÄDER:
Festgestellte Vorderräder: Sperrhebel für die Räder
nach unten drücken (Abb. a).
Schwenkbare Vorderräder: Sperrhebel für die Räder
nach oben ziehen (Abb. b).
4 VERDECK:
Das Verdeck kann ausgeklappt werden (Abb. a).
Es hat ein Fenster, durch das man das Kind sehen kann
(Abb. b).
Das letzte Teilstück kann geschlossen werden (Abb. c).
5 EINSTELLUNG DER RÜCKENLEHNE:
Den Griff an der Rückseite der Rückenlehne anheben
und diese auf die gewünschte Position einstellen (Abb.
a).
Zum Hochstellen der Rückenlehne den Ring wie in der
Abbildung (Abb. b) gezeigt, nach oben ziehen.
6 BREMSE:
Zum Blockieren der Buggyräder auf den Bremshebel
treten.
Um die Bremse wieder zu lösen, in Gegenrichtung
betätigen.
7 FÜNF-PUNKT-SICHERHEITSGURT: Stecken Sie zum
Schließen des Sicherheitsgurtes die zwei Schnallen
des Bauchgurtes (mit angeschlossenen Schultergurten
(Pfeil_1) bis zum Einrasten in den Beingurt (Pfeil_2).
Drücken Sie zum Öffnen des Sicherheitsgurtes den
runden Knopf in der Mitte der Schnalle (Pfeil_3) und
ziehen Sie den Bauchgurt nach außen (Pfeil_4).
8 Den Beckengurt beidseitig in Pfeilrichtung
(Pfeil_5) festziehen, zum Lockern des Gurts in die
entgegengesetzte Richtung ziehen.
Gurt über die Gürtelschlaufen so regulieren, dass er
fest am Körper des Kindes anliegt (Pfeil_6).
9 EINSTELLUNG DER BEINAUFLAGE:
Hebel unter dem Fußbrett drücken, um die Beinauflage
in die gewünschte Position zu bringen.
10 BUGGY SCHLIESSEN:
Die Vorderräder müssen schwenkbar sein.
Lenkgriff festhalten und gleichzeitig den Schieber
nach links schieben (Pfeil 1) und den Knopf unter dem
Lenkgriff drücken (Pfeil 2); Buggy dann nach unten
absenken (Pfeil 3) und schließen.
Zusammengeklappt bleibt der Buggy von alleine
stehen.
11 ABNEHMEN DER VORDERRÄDER:
Um die Räder abzunehmen und den Buggy kompakter
zu machen, auf das Knöpfchen drücken und Räder
abnehmen (Abb. b).
PRODUKTINFORMATIONEN
12 Produktinformationen.
Diese Informationen werden bei einer Reklamation
benötigt.
REINIGUNG UND PFLEGE
Die Reinigung sollte ausschließlich durch Erwachsene
erfolgen.
PFLEGE DES ARTIKELS: vor Witterungseinflüssen
schützen: Wasser, Regen oder Schnee; eine längere
Bestrahlung durch die Sonne kann zu Farbänderungen
der verschiedenen Materialien führen; diesen Artikel
an einem trockenen Ort aufbewahren. Führen Sie in
regelmäßigen Abständen Wartungen der wichtigsten
Bauteile durch.
REINIGUNG DES GESTELLS: die Kunststoffteile
regelmäßig mit einem feuchten Lappen reinigen
– keine Lösungsmittel oder ähnliche Produkte
verwenden; sämtliche Metallteile trocken halten,
um einem eventuellen Rosten vorzubeugen; alle
beweglichen Teile (Einstellungsmechanismen,
Befestigungsmechanismen, Räder,…) von Staub oder
Sand unbedingt sauber halten und, wenn nötig, mit
Leichtöl schmieren.
REINIGUNG DER STOFFTEILE:
Die Stoffteile abbürsten, um Staub zu entfernen.
• Zum Waschen beachten Sie bitte das in den
Produktbezug eingenähte Etikett.
• Nicht bleichen.
• Nicht bügeln.
• Nicht Trockenreinigen.
• Nicht mit Lösungsmitteln behandeln.
• Nicht im Wäschetrockner mit rotierender Trommel
trocknen.
KUNDENDIENST BURIGOTTO
Sollten Teile des Modells verloren gehen oder
beschädigt werden, ersetzen Sie diese bitte
ausschließlich durch originale Burigotto-Teile. Für
Reparaturen, Ersatzteile, Produktinformationen
und Anbieter von originalen Ersatzteilen und
Zubehör wenden Sie sich bitte an den PegPerego
Kundendienst. Halten Sie hierfür, die Seriennummer
des betreffenden Produktes bereit.
Tel. 0039/039/60.88.213
E-Mail [email protected]
Webseite www.burigotto.com
Alle Rechte geistigen Eigentums bezüglich der Inhalte
dieser Bedienungsanleitung gehören PegPerego
S.p.A. und werden von den geltenden Bestimmungen
geschützt.

- 14 -
ES_Español
Le agradecemos haber elegido un producto Burigotto.
ADVERTENCIA
_ IMPORTANTE: LEER
LAS INTRUCCIONES
CUIDADOSAMENTE ANTES
DEL USO Y MANTENERLAS
PARA FUTURAS CONSULTAS.
La seguridad del niño podría
ponerse en riesgo en caso
de incumplimiento de estas
instrucciones.
_ Este artículo ha sido diseñado para
transportar a 1 niño en el asiento.
_ No utilizar este artículo para un
número de ocupantes superior al
previsto por el fabricante.
_ Este producto está homologado
para niños desde el nacimiento a
los 4 años de edad o con un peso
máximo de 22 kg.
_ ADVERTENCIA Usar siempre
el sistema de retención. Usar
siempre el cinturón de seguridad
de 5 puntos
Enganchar siempre la correa de la
cintura a la correa de separación de
las piernas.
_ Para los bebés se recomienda el
uso del respaldo en la posición más
reclinada.
_ La barra frontal, si está presente, no
está diseñada para sostener el peso
del niño; la barra frontal no está
diseñada para levantar el asiento
con el peso del niño. La barra
frontal no sustituye al cinturón de
seguridad.
_ ADVERTENCIA Asegurarse de que
todos los dispositivos de cierre
están engranados antes del uso.
_ ADVERTENCIA Comprobar que
los dispositivos de sujeción del
capazo, del asiento o de la silla
de coche están correctamente
engranados antes del uso.
_ ADVERTENCIA Para evitar
lesiones, asegúrese de que el
niño se mantiene alejado durante
el desplegado y el plegado de
este producto.
_ ADVERTENCIA No permita que el
niño juegue con este producto.
Este producto no es un juguete.
_ ADVERTENCIA Las operaciones
de ensamblaje y preparación del
artículo deben ser efectuadas solo
por adultos.
_ No utilizar este artículo si alguna de
sus partes falta o está averiada.
_ ADVERTENCIA No dejar nunca al
niño desatendido.
_ Accione siempre el freno cuando no
se está en movimiento y mientras
sienta y retira al niño del producto.
_ No introduzca los dedos en estos
mecanismos.
_ Preste atención a la presencia
del niño al efectuar operaciones
de regulación de los diferentes
mecanismos (asa, respaldo).
_ Cualquier carga aplicada al mango,
a la parte posterior o al lateral
del producto puede perjudicar la
estabilidad del mismo.
_ No coloque cargas que pesen más
de 5 kg en la cesta. No introduzca
bebidas calientes ni pesos
superiores a los especificados en el
portabebidas (si corresponde). No
introduzca pesos superiores a 0,2
kg en los bolsillos de las capotas (si
corresponde).
_ No utilice este artículo cerca de
escaleras o escalones, fuentes de
calor, llamas u objetos peligrosos al
alcance del niño.
_ Utilice exclusivamente los repuestos
provistos o aconsejados por el
fabricante/distribuidor.
_ ADVERTENCIA Este producto
no es adecuado para correr o
patinar.
_ ADVERTENCIA No añadir ningún
colchón no aprobado por el
fabricante.
_ No utilice accesorios no aprobados
por el fabricante.
Las imágenes referidas a los detalles textiles

- 15 -
pueden diferir de la colección comprada.
INSTRUCCIONES DE USO
Antes de abrir la silla de paseo, si los hay, retire (sin
utilizar cuchillas) todo el troquelado y los protectores
del producto.
1 APERTURA DE LA SILLA DE PASEO: Desenganche la
palanca de seguridad (fig. a), agarre el asa lateralmente
por ambos lados (fig. b) y levante la silla de paseo
simultáneamente.
La correcta apertura se indica con el «clic» lateral de
enganche de la silla de paseo (fig. c).
2 BARRA FRONTAL: Solo se puede abrir por un lado,
derecho o izquierdo, pulsando el botón que se
encuentra debajo para facilitar la entrada del niño.
También es posible retirarla por completo pulsando
el botón ubicado debajo por ambos lados y
extrayéndola.
Para volver a montarla, vuelva a colocarla en los
alojamientos hasta oír un clic.
3 RUEDAS DELANTERAS FIJAS O PIVOTANTES:
Ruedas anteriores fijas: baje la palanca de bloqueo (fig.
a).
Ruedas anteriores pivotantes: levante la palanca de
bloqueo (fig. a).
4 CAPOTA:
La capota se puede extender (fig. a).
Cuenta con una ventanilla para ver al niño (fig. b).
La última sección se puede cerrar (fig. c).
5 REGULACIÓN DEL RESPALDO:
Levante la manija que se encuentra en el respaldo y
ajústelo a la altura deseada (fig. a).
Para elevar el respaldo, tire de la anilla hacia arriba
como se muestra en la imagen (fig. b).
6 FRENO:
Presione la palanca de freno para bloquear la silla de
paseo.
Para desbloquear la silla de paseo, realice la operación
inversa.
7 CINTURÓN DE SEGURIDAD DE 5 PUNTOS: Para
engancharlo, introducir las dos hebillas del cinturón
ventral (con los tirantes enganchados como muestra
la flecha_1) en la tira entrepiernas hasta oír el clic
(flecha_2). Para desengancharlo, pulsar el botón
redondo colocado en el centro de la hebilla (flecha_3)
y tirar hacia afuera del cinturón ventral (flecha_4).
8 Para ajustar la correa de la cintura, tirar de ambos lados
en el sentido de la flecha (flecha_5); para aflojarla,
deslizarla en sentido contrario.
Ajuste la longitud deslizando los ojales de modo que
las correas sujeten firmemente el cuerpo del niño
(flecha_6).
9 REGULACIÓN DEL APOYAPIERNAS:
Para ajustar el apoyapiernas a la posición deseada,
pulse la palanca ubicada debajo de la peana.
10 CIERRE DE LA SILLA DE PASEO:
Las ruedas delanteras deben estar en posición
pivotante.
Agarre el asa y, al mismo tiempo, empuje hacia la
izquierda la lengüeta ubicada encima (flecha 1) y pulse
el botón colocado debajo del asa (flecha 2) para luego
bajar la silla de paseo hacia abajo (flecha 3) y cerrarla.
Cuando está cerrada, la silla de paseo se mantiene de
pie sola.
11 DESENGANCHE DE LAS RUEDAS DELANTERAS:
Para desenganchar las ruedas delanteras y reducir
el tamaño de la silla de paseo, pulse la lengüeta y
extráigalas (fig. b).
INFORMACIÓN SOBRE EL PRODUCTO
12 Información sobre el producto.
Esta información es indispensable en caso de
reclamación.
LIMPIEZA Y MANTENIMIENTO
Las operaciones de limpieza siempre deben realizarse
por personas adultas.
MANTENIMIENTO DEL PRODUCTO: proteger contra
agentes atmosféricos (agua, lluvia o nieve). Una
exposición contínua y prolongada al sol podría causar
cambios de color de muchos materiales. Conservar
este producto en un lugar seco. Realizar controles e
intervenciones de mantenimiento habituales en las
partes principales.
LIMPIEZA DEL CHASIS: Limpiar periódicamente las
partes de plástico con un paño húmedo sin usar
solventes u otros productos similares. Mantener secas
todas las partes de metal para prevenir la oxidación.
Mantener limpias todas las partes móviles (dispositivo
de regulación, de enganche, ruedas...) quitando el
polvo o la arena y, en caso necessario, engrasarlas con
aceites ligeros.
LIMPIEZA DE LAS PARTES DE TEJIDO:
Cepillar las partes de tejido para protegerlas del polvo.
• Para el lavado atenerse a la etiqueta cosida a la bolsa
del producto.
• No utilizar lejía a base de cloro.
• No planchar.
• No lavar en seco.
• No eliminar las manchas con disolventes.
• No secar en secadoras con tambor rotativo.
SERVICIO DE ASISTENCIA BURIGOTTO
Si se pierden o dañan algunas partes del modelo,
utilizar únicamente repuestos originales Burigotto.
Para cualquier reparación, sustitución, información
acerca de los productos, venta de repuestos
originales y accesorios, contactar con el Servicio de
Asistencia PegPerego indicando, el número de serie
del producto.
tel. 0039/039/60.88.213
e-mail [email protected]
sito internet www.burigotto.com
Todos los derechos de propiedad intelectual sobre
los contenidos de este manual de instrucciones
pertenecen a PegPerego S.p.A. y están protegidos por
las leyes vigentes.

- 16 -
RU_Pусский
Благодарим вас за то, что вы выбрали продукцию
компании Burigotto.
ПРЕДУПРЕЖДЕНИЕ
_ ВАЖНО! ВНИМАТЕЛЬНО
ПРОЧИТАЙТЕ ЭТИ
ИНСТРУКЦИИ И СОХРАНИТЕ
ИХ ДЛЯ ПОСЛЕДУЮЩЕГО
ИСПОЛЬЗОВАНИЯ.
Невыполнение этих
инструкций может поставить
под угрозу безопасность
ребенка.
_ Данное изделие предназначено
для перевозки в коляске 1
ребенка.
_ Не используйте данное
изделие для большего числа
пассажиров, чем предусмотрено
производителем.
_ Данное изделие предназначено
для детей с рождения и до 4 лет
или весом до 22 кг.
_ ВНИМАНИЕ Всегда пользуйтесь
системой предохранительного
крепления. Всегда
используйте систему ремней с
пятиточечным креплением.
Всегда блокируйте поясной
ремень с помощью лямки,
проходящей между ногами.
_ Для младенцев мы рекомендуем
раскладывать спинку полностью.
_ Передний бампер (при
наличии) не предназначен для
выдерживания веса ребенка.
Он не предназначен для
поднимания сиденья вместе
с сидящим в нем ребенком
и не заменяет собой ремень
безопасности.
_ ВНИМАНИЕ Перед
пользованием убедитесь,
что задействованы все
фиксирующие приспособления.
_ ВНИМАНИЕ Перед
пользованием убедитесь
в правильности установки
устройств на корпусе коляски,
сиденья и автокресла.
_ ВНИМАНИЕ Во избежание
травм при раскладывании
и складывании коляски
убедитесь, что ребенка в ней
нет.
_ ВНИМАНИЕ Не разрешайте
ребенку играться с изделием.
Данное изделие не является
игрушкой.
_ ВНИМАНИЕ Сборку и подготовку
изделия должен выполнять
взрослый.
_ Не пользуйтесь данным изделием
в случае отсутствия каких-
либо деталей или при наличии
признаков неисправности.
_ ВНИМАНИЕ Никогда не
оставляйте ребенка без
присмотра.
_ Всегда активируйте тормоз,
оставляя коляску в неподвижном
состоянии, а также усаживая
ребенка в коляску и вынимая его.
_ Не вставляйте пальцы в
механизмы.
_ Будьте осторожны, чтобы не
травмировать ребенка при
регулировке механизмов (ручки,
спинки и т.п.).
_ Любая нагрузка, оказываемая
на ручку и/или на спинку, и/
или сбоку на изделие, может
негативно отразиться на его
устойчивости.
_ Не нагружайте корзины весом
свыше 5кг. Не вставляйте в
держатель стаканчика (при его
наличии) вес, превышающий
значение, указанное
непосредственно на держателе,
а также никогда не наливайте
в стаканчик горячие напитки.
Не помещайте в карманы
капюшона (при их наличии) вес,
превышающий 0,2кг.
_ Не пользуйтесь изделием вблизи
лестниц или ступенек, источников
тепла, открытого пламени или
опасных предметов, находящихся
в пределах досягаемости ребенка.

- 17 -
_ Используйте только запасные
части, поставляемые или
рекомендуемые производителем/
дистрибьютором.
_ ВНИМАНИЕ Данное изделие
не предназначено для
использования во время
пробежек или катания на
коньках.
_ ВНИМАНИЕ Не следует класть в
изделие матрац, не одобренный
производителем.
_ Не следует использовать
аксессуары, не одобренные
производителем.
Иллюстрации, на которых изображены
элементы из ткани, могут не соответствовать
приобретенной коллекции.
ИНСТРУКЦИЯ ПО ЭКСПЛУАТАЦИИ
Перед раскладыванием коляски с нее следует
убрать (не используя острые лезвия) все защитные
прокладки и упаковку.
1 КАК РАСКЛАДЫВАЕТСЯ КОЛЯСКА: открыть
защитную блокировку (рис. A), взяться за ручку
управления с двух сторон по бокам (рис. b) и
одновременно приподнять коляску вверх.
При полном открытии сбоку раздастся щелчок
защелки коляски (рис. с).
2 ПЕРЕДНИЙ ПОРУЧЕНЬ: он открывается при нажатии
кнопки, размещенной снизу, только с одной
стороны - справа или слева - для удобства посадки
ребенка.
Его можно полностью снять, нажав на кнопку снизу
с обеих сторон и открепив поручень.
Для того, чтобы установить его обратно, вставьте
поручень в гнезда до щелчка.
3 ФИКСИРОВАННЫЕ ИЛИ ПОВОРОТНЫЕ ПЕРЕДНИЕ
КОЛЕСА:
Фиксированные передние колеса: опустить рычаг
блокировки колес (рис. a).
Поворотные передние колеса: поднять рычаг
блокировки колес (рис. b).
4 КАПЮШОН:
Капюшон раскладывается (рис. а).
На нем есть смотровое окошко (рис. b).
Последнюю секцию можно закрыть (рис. с).
5 РЕГУЛИРОВКА СПИНКИ:
Потянуть вверх ручку, расположенную сзади на
спинке, и установить нужную высоту (рис. а).
Для поднятия спинки нужно потянуть вверх за
кольцо, как показано на рисунке (рис. b).
6 ТОРМОЗ:
для того, чтобы зафиксировать коляску, нужно
нажать на рычаг тормоза.
Для разблокирования коляске следует произвести
обратную операцию.
7 ПЯТИТОЧЕЧНЫЙ РЕМЕНЬ БЕЗОПАСНОСТИ: перед
регулированием подножки убедитесь, что ее
покрытие установлено должным образом. Если это
не так, установите его правильно. Чтобы застегнуть
ремень безопасности, вставьте до щелчка две
защелки поясного ремня (с прикреплёнными
к ним лямками, см. стрелка_1) в пряжку на
вставке для разделения ног (стрелка_2). Чтобы
расстегнуть ремень, нажмите на круглую кнопку,
расположенную в центре пряжки (стрелка_3) и
потяните поясной ремень наружу (стрелка_4).
8 Для подтягивания поясного ремня потянуть с
обеих сторон, в направлении стрелки (стрелка_5),
чтобы отпустить — выполнить обратное действие.
Для регулировки длины ремни протягиваются
через прорези таким образом, чтобы корпус
ребенка был хорошо зафиксирован (стрелка 6).
9 РЕГУЛИРОВКА ОПОРЫ ДЛЯ НОГ:
Для того, чтобы установить опору для ног в
нужном положении, следует нажать на рычаг,
который расположен под подставкой.
10 СКЛАДЫВАНИЕ КОЛЯСКИ
Передние колеса должны находиться в
поворачивающемся состоянии.
Взяться за ручку управления, одновременно нажав
влево расположенный на ней язычок (стрелка 1)
и нажав на кнопку под ручкой (стрелка 2), чтобы
опустить коляску вниз (стрелка 3) и сложить ее.
Сложенная коляска может стоять без
дополнительной опоры.
11 ОТКРЕПЛЕНИЕ ПЕРЕДНИХ КОЛЕС
Для того, чтобы снять с коляски передние колеса в
целях экономии места, нужно нажать на язычок и
открепить их (рис. b).
ИНФОРМАЦИЯ ОБ ИЗДЕЛИИ
12 Информация об изделии.
Данные сведения требуются при представлении
рекламации.
ЧИСТКА И УХОД
Операции по чистке должны выполнять только
взрослые.
УХОД ЗА ИЗДЕЛИЕМ: защитите изделие от
атмосферных осадков - снега или дождя.
Постоянная и продолжительная подверженность
солнечным лучам может вызвать цветовые
изменения многих материалов. Храните это
изделие в сухом месте. Регулярно осуществляйте
осмотр и техобслуживание основных частей
устройства.
ЧИСТКА ШАССИ: периодически очищайте
пластмассовые детали влажной тряпкой, без
использования растворителей и сходных веществ.
Держите металлические части изделия сухими,
чтобы предотвратить образование ржавчины.
Поддерживайте чистоту всех движущихся деталей
(регулировочные и соединительные детали, колеса
и т.д.), удаляя пыль и песок. При необходимости,
смажьте их легким маслом.
ЧИСТКА ТКАНЫХ ЧАСТЕЙ:
Почистите тканевые детали щеткой, чтобы удалить
пыль.
• При стирке точно следуйте инструкциям на
этикетке, вшитой в чехол изделия.
• Не использовать хлорный отбеливатель.
• Не гладить.
• Не подвергать химической чистке.
• Не удалять пятна растворителями.
• Не сушить в сушке.
СЛУЖБА ОБСЛУЖИВАНИЯ
BURIGOTTO
В случае утери или порчи аксессуаров,
применяйте только фирменные запасные части
производства компании Burigotto. Для выполнения
ремонта, замены запасных частей и получения
информации об устройстве обращайтесь в службу
послепродажного обслуживания PegPerego,
сообщив, серийный номер продукта:
Срок службы: 3 года
Гарантийный срок: 12 месяцев

- 18 -
тел.: 0039/039/60.88.213
e-mail [email protected]
сайт в интернете: www.burigotto.com
Изготовитель: PEGPEREGO S.P.A.
(Пег Перего С.П.А.); Адрес: Via de Gasperi 50 - 20862
ARCORE (MB), Italy (Виа де Гаспери 50,
20862 Аркоре (МБ), Италия).
Страна производства: Италия
Соответствует требованиям
технического регламента ТР ТС
007/2011

- 19 -

IMPORTED AND DISTRIBUITED BY:
PEGPEREGO S.p.A.
VIA DE GASPERI 50, 20862 ARCORE MB ITALIA
tel. 0039 039 60881 fax 0039 039 615869
Servizio Post Vendita - After Sale: tel. 0039 039 6088213
www.burigotto.com
FI002001I319
Tutti i diritti di proprietà intellettuale relativi ai contenuti di questo manuale d’istruzione appartengono a PegPerego
S.p.A. e sono tutelati dalle leggi vigenti.
All of the intellectual property rights for the contents of this instruction manual belong to PegPerego S.p.A. and are
protected by the laws in force.
-
 1
1
-
 2
2
-
 3
3
-
 4
4
-
 5
5
-
 6
6
-
 7
7
-
 8
8
-
 9
9
-
 10
10
-
 11
11
-
 12
12
-
 13
13
-
 14
14
-
 15
15
-
 16
16
-
 17
17
-
 18
18
-
 19
19
-
 20
20


mothercare Burigotto Copa Stroller 0724864 Benutzerhandbuch
- Kategorie
- Kinderwagen
- Typ
- Benutzerhandbuch
- Dieses Handbuch eignet sich auch für
in anderen Sprachen
- English: mothercare Burigotto Copa Stroller 0724864 User guide
- français: mothercare Burigotto Copa Stroller 0724864 Mode d'emploi
- español: mothercare Burigotto Copa Stroller 0724864 Guía del usuario
- italiano: mothercare Burigotto Copa Stroller 0724864 Guida utente
- русский: mothercare Burigotto Copa Stroller 0724864 Руководство пользователя
Andere Dokumente
-
Peg-Perego Book Bedienungsanleitung
-
-
-
Peg Perego Pliko Switch Easy Drive Benutzerhandbuch
-
Peg Perego Pliko P3 Compact Benutzerhandbuch
-
-
Peg Perego TRIO EASY DRIVE Bedienungsanleitung
-
-
-
Peg Perego Aria Twin Benutzerhandbuch