Sony cassette tuner xr ca670x Benutzerhandbuch
- Kategorie
- Auto-Medienempfänger
- Typ
- Benutzerhandbuch
Dieses Handbuch eignet sich auch für

GB
DE
FR
IT
NL
Operating Instructions
Bedienungsanleitung
Mode d’emploi
Istruzioni per l’uso
Gebruiksaanwijzing
FM/MW/LW Cassette Car Stereo
3-247-837-31 (1)
Wichtig!
Bitte nehmen Sie sich etwas Zeit, um den Geräte-Pass vollständig
auszufüllen. Dieser befindet sich auf der hinteren Umschlagseite dieser
Bedienungsanleitung.
Si dichiara che l’apparecchio è stato fabbricato in conformità all’art. 2, Comma 1 del D.M. 28.08.
1995 n. 548.
XR-CA670X
For installation and connections, see the supplied installation/connections manual.
Zur Installation und zum Anschluss siehe die mitgelieferte Installations-/Anschlussanleitung.
En ce qui concerne l’installation et les connexions, consulter le manuel d’installation/
raccordement fourni.
Per l’installazione e i collegamenti, fare riferimento al manuale di istruzioni per
l’installazione e i collegamenti in dotazione.
Zie voor het monteren en aansluiten van het apparaat de bijgeleverde handleiding “Installatie
en aansluitingen”.
© 2003 Sony Corporation
FM
/
MW
/
LW
Cassette Car Stereo

2
Welcome !
Thank you for purchasing this Sony Cassette
Player. You can enjoy its various features even
more with:
• Optional CD/MD units (both changers and
players)*
1
.
• CD TEXT information (displayed when a CD
TEXT disc*
2
is played on a connected optional
CD unit with the CD TEXT function).
• Optional controller accessories
Card remote commander RM-X114
Rotary commander RM-X4S
*1 This unit works with Sony products only.
*2 A CD TEXT disc is an audio CD that includes
information such as the disc name, artist name,
and track names. This information is recorded on
the disc.

3
Table of Contents
Location of controls . . . . . . . . . . . . . . . . . . . 4
Precautions . . . . . . . . . . . . . . . . . . . . . . . . . . 6
Notes on Cassettes. . . . . . . . . . . . . . . . . . . . . 6
Getting Started
Resetting the unit. . . . . . . . . . . . . . . . . . . . . . 7
Detaching the front panel . . . . . . . . . . . . . . . 7
Setting the clock . . . . . . . . . . . . . . . . . . . . . . 8
Cassette Player
Listening to a tape . . . . . . . . . . . . . . . . . . . . . 9
Playing a tape in various functions . . . . . . . 10
Radio
Storing stations automatically
— Best Tuning Memory (BTM). . . . . . . 10
Receiving the stored stations. . . . . . . . . . . . 11
Storing only the desired stations . . . . . . . . . 11
RDS
Overview of RDS . . . . . . . . . . . . . . . . . . . . 12
Automatic retuning for best reception results
— AF (Alternative Frequencies) . . . . . . 12
Receiving traffic announcements
— TA (Traffic Announcement)/
TP (Traffic Programme) . . . . . . . . . . . . . 13
Presetting RDS stations with AF
and TA setting. . . . . . . . . . . . . . . . . . . . . 14
Tuning in stations by programme type
— PTY (Programme types) . . . . . . . . . . 14
Setting the clock automatically
— CT (Clock Time) . . . . . . . . . . . . . . . . 15
Other Functions
Using the rotary commander. . . . . . . . . . . . 16
Adjusting the balance and fader . . . . . . . . . 17
Quickly attenuating the sound . . . . . . . . . . 17
Changing the sound and display settings
— Menu . . . . . . . . . . . . . . . . . . . . . . . . . 18
Setting the equalizer (EQ3). . . . . . . . . . . . . 18
Setting the Dynamic Soundstage Organizer
(DSO). . . . . . . . . . . . . . . . . . . . . . . . . . . 19
CD/MD Unit (optional)
Playing a CD or MD. . . . . . . . . . . . . . . . . . 20
Display items . . . . . . . . . . . . . . . . . . . . . . . 20
Playing tracks repeatedly
— Repeat Play . . . . . . . . . . . . . . . . . . . . 21
Playing tracks in random order
— Shuffle Play. . . . . . . . . . . . . . . . . . . . 21
Labelling a CD
— Disc Memo . . . . . . . . . . . . . . . . . . . . 22
Locating a disc by name
— List-up. . . . . . . . . . . . . . . . . . . . . . . . 23
Additional Information
Maintenance . . . . . . . . . . . . . . . . . . . . . . . . 23
Removing the unit. . . . . . . . . . . . . . . . . . . . 25
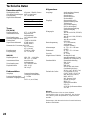
Specifications . . . . . . . . . . . . . . . . . . . . . . . 26
Troubleshooting . . . . . . . . . . . . . . . . . . . . . 27
Error displays/Messages . . . . . . . . . . . . . . . 28

4
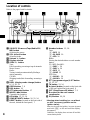
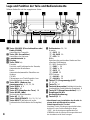
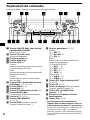
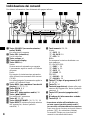
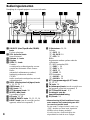
Location of controls
Refer to the pages listed for details.
a SOURCE (Power on/Tape/Radio/CD/
MD) button
Selecting the source
b SEL (select) button
Selecting items.
c Volume +/– button
d Display window
e SEEK +/– button
Tape:
Fast-forwarding, reversing a tape Automatic
Music Sensor
Radio:
Tuning in stations automatically/finding a
station manually.
CD/MD:
Skipping tracks/fast-forwarding, reversing a
track.
f DSPL (display mode change) button
8, 12, 20, 22
g OPEN button 7, 9
h DSO button 19
i ATT (attenuate) button 17
j MODE (o) button
Changing the operation
k AF button 12, 13, 14
l SENS/BTM/MTL button 10, 11, 14
m RESET button (located on the front side of
the unit, behind the front panel) 7
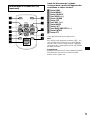
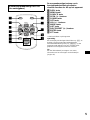
n Number buttons 15, 18
Tape:
(3): REP 10
(5): BL SKIP 10
(6): ATA 10
Radio:
Storing the desired station on each number
button.
CD (MP3 files)/MD:
(1): DISC – 20
(2): DISC + 20
(3): REP 21
(4): SHUF 21
MP3 files:
(5): ALBM – 20
(6): ALBM + 20
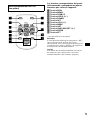
o PTY (programme type) /LIST button
15, 22, 23
p TA button 13, 14
q Z (eject) button (located on the front side
of the unit, behind the front panel) 9
r OFF (Stop/Power off) button* 7, 9
s Receptor for the card remote
commander
t EQ3 button 18, 19
* Warning when installing in a car without
an ACC (accessory) position on the
ignition switch
After turning off the ignition, be sure to press
and hold (OFF) on the unit until the display
disappears.
Otherwise, the display does not turn off and this
causes battery drain.
LIST
AF SENS
BTM/MTL
SEL
ATT
MODE
S
O
U
R
C
E
PTY TA
123456
O
FF
O
P
E
N
DSO EQ3
SEEK
D
S
P
L
XR-CA670X
REP
SHUF
BL SKIP/
ALBM /ATA
DISC

5
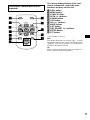
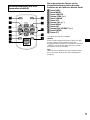
The corresponding buttons of the card
remote commander control the same
functions as those on this unit.
a DSPL button
b MENU button*
c SOURCE button
d SEEK (+/–) buttons
e SOUND button
f OFF button
g VOL (+/–) buttons
h MODE button
i LIST button
j DISC/PRESET (+/–) buttons
k ENTER button
l ATT button
* Not available for this unit
Note
If the display disappears by pressing (OFF), it cannot
be operated with the card remote commander unless
(SOURCE) on the unit is pressed, or a cassette tape is
inserted to activate the unit first.
Tip
Refer to “Replacing the lithium battery” for details on
how to replace the batteries (page 24).
Card remote commander RM-X114
(optional)
DISC
–
ATTOFF
DSPL MODE
SOURCE
DISC
+
VOL
+
–
PRESET
+
SEEK
+
SEEK
–
PRESET –
SOUND
EN
TE
R
MENU
LIST

6
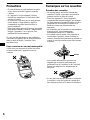
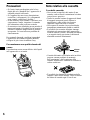
Precautions
• If your car was parked in direct sunlight, allow
the unit to cool off before operating it.
• If no power is being supplied to the unit, check
the connections first. If everything is in order,
check the fuse.
• If no sound comes from the speakers of a 2-
speaker system, set the fader control to the
centre position.
• When a tape is played back for a long period,
the cassette may become warm because of the
built-in power amplifier. However, this is not a
sign of malfunction.
If you have any questions or problems
concerning your unit that are not covered in this
manual, please consult your nearest Sony dealer.
To maintain high quality sound
Be careful not to splash juice or other soft drinks
onto the unit or tapes.
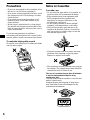
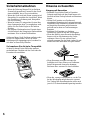
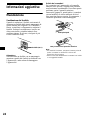
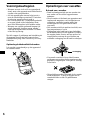
Notes on Cassettes
Cassette care
• Do not touch the tape surface of a cassette, as
any dirt or dust will contaminate the heads.
• Keep cassettes away from equipment with
built-in magnets such as speakers and
amplifiers, as erasure or distortion on the
recorded tape could occur.
• Do not expose cassettes to direct sunlight,
extremely cold temperatures, or moisture.
• Slack in the tape may cause the tape to be
caught in the machine. Before you insert the
tape, use a pencil or similar object to turn the
reel and take up any slack.
• Distorted cassettes and loose labels can cause
problems when inserting or ejecting tapes.
Remove or replace loose labels.
• The sound may become distorted while playing
the cassette. The cassette player head should be
cleaned after each 50 hours of use.
The use of cassettes longer than 90 minutes
is not recommended except for long
continuous play
The tape used for these cassettes is very thin and
tends to stretch easily.
Frequent playing and stopping of these tapes
may cause them to become entangled in the
cassette deck mechanism.
Slack

7
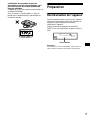
Getting Started
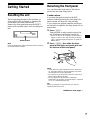
Resetting the unit
Before operating the unit for the first time, or
after replacing the car battery or changing the
connections, you must reset the unit.
Remove the front panel and press the RESET
button with a pointed object, such as a ballpoint
pen.
Note
Pressing the RESET button will erase the clock setting
and some stored contents.
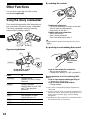
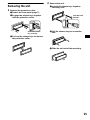
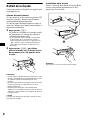
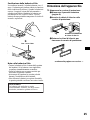
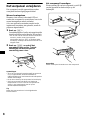
Detaching the front panel
You can detach the front panel of this unit to
protect the unit from being stolen.
Caution alarm
If you turn the ignition switch to the OFF
position without removing the front panel, the
caution alarm will beep for a few seconds.
If you connect an optional amplifier and do not
use the built-in amplifier, the beep sound will be
deactivated.
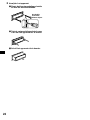
1 Press (OFF)*.
Tape playback or radio reception stops (the
key illumination and display remain on).
* If your car has no ACC position on the ignition
switch, be sure to turn the unit off by pressing
(OFF) until the display disappears to avoid car
battery drain.
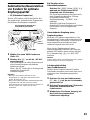
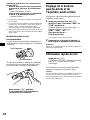
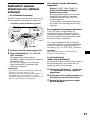
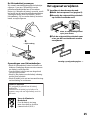
2 Press ( OPEN), then slide the front
panel to the right, and gently pull out
the left end of the front panel.
Notes
• If you detach the panel while the unit is still turned
on, the power will turn off automatically to prevent
the speakers from being damaged.
• Do not drop or put excessive pressure on the front
panel and its display window.
• Do not subject the front panel to heat/high
temperature or moisture. Avoid leaving it in a parked
car or on a dashboard/rear tray.
Tip
When carrying the front panel with you, use the
supplied front panel case.
RESET button
continue to next page t
1
2

8
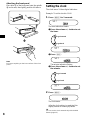
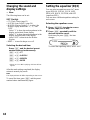
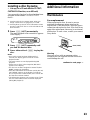
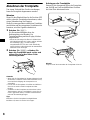
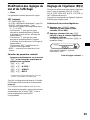
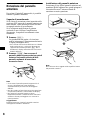
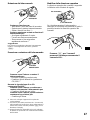
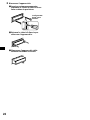
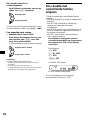
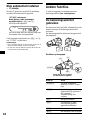
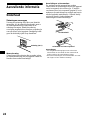
Attaching the front panel
Place hole A of the front panel onto the spindle
B on the unit, then lightly push the left side in.
Note
Do not put anything on the inner surface of the front
panel.
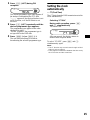
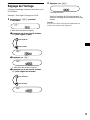
Setting the clock
The clock uses a 24-hour digital indication.
Example: To set the clock to 10:08
1 Press (DSPL) for 2 seconds.
The hour indication flashes.
1Press the volume +/– button to set
the hour.
2Press (SEL).
The minute indication flashes.
3Press the volume +/– button to set
the minute.
2 Press (DSPL).
The clock starts.
After the clock setting is completed, the
display returns to normal play mode.
Tip
You can set the clock automatically with the RDS
feature (page 15).
A
B
x
to go forward
to go back
to go forward
to go back

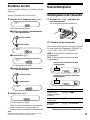
9
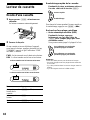
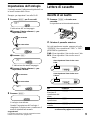
Cassette Player
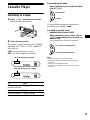
Listening to a tape
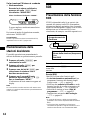
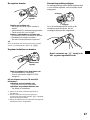
1 Press (OPEN) and insert a cassette.
Playback starts automatically.
2 Close the front panel.
If a cassette is already inserted, press (SOURCE)
repeatedly until “FWD” or “REV” appears to
start playback.
FWD:The side facing up is played.
REV: The side facing down is played.
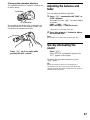
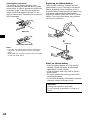
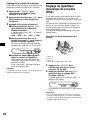
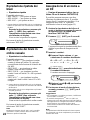
Fast-winding the tape
During playback, press and hold either
side of (SEEK).
To start playback during fast-forwarding or
rewinding, press (MODE) (o).
Locating a specific track
— Automatic Music Sensor (AMS)
During playback, press either side of
(SEEK) momentarily for each track you
want to skip.
You can skip up to 9 tracks at one time.
Note
The AMS function may not work when:
– the blanks between tracks are shorter than 4
seconds.
– there is noise between tracks.
– there are long sections of low volume or quiet
sections.
To Press
Change the tape’s
playback direction
(MODE) (o)
Stop playback (OFF)
Eject the cassette (OPEN) then Z
The side facing up is played.
The side facing down is played.
SEEK
Fast-forward
Rewind
SEEK
To locate succeeding tracks
To locate preceding tracks

10
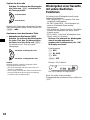
Playing a tape in various
functions
You can play the tape in various functions:
• REP (Repeat Play) repeats the current track.
• BL SKIP (Blank Skip) skips blanks longer than
8 seconds.
• ATA (Automatic Tuner Activation) turns on the
tuner automatically when fast-winding the tape.
• MTL (Metal) lets you play a metal or CrO2
tape.
During tape playback, press the
desired function button repeatedly
until “ON” in the display appears.
Function buttons
(3): REP
(5): BL SKIP
(6): ATA
(SENS): MTL
Example: ATA function
ATA function starts.
To return to normal play mode, select “OFF.”
Radio
The unit can store up to 6 stations per band
(FM1, FM2, FM3, MW and LW).
Caution
When tuning in stations while driving, use Best
Tuning Memory to prevent accidents.
Storing stations
automatically
— Best Tuning Memory (BTM)
The unit selects the stations with the strongest
signals within the selected band, and stores them
in the order of their frequency.
1 Press (SOURCE) repeatedly to select
the radio.
2 Press (MODE) repeatedly to select the
band.
3 Press (SENS) (BTM) for 2 seconds.
A beep sounds when the setting is stored.
Notes
• If only a few stations can be received due to weak
signals, some number buttons will retain their former
settings.
• When a number is indicated in the display, the unit
starts storing stations from the one currently
displayed.

11
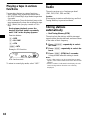
Receiving the stored stations
1 Press (SOURCE) repeatedly to select
the radio.
2 Press (MODE) repeatedly to select the
band.
3 Press the number button ((1) to (6))
on which the desired station is stored.
If preset tuning does not work
— Automatic tuning/Local Seek Mode
Automatic tuning:
Press either side of (SEEK ) to search
for the station (automatic tuning).
Scanning stops when the unit receives a
station. Repeat until the desired station is
received.
Local Seek Mode:
If the automatic tuning stops too
frequently, press (SENS) repeatedly
until “LOCAL-ON” appears.
Only the stations with relatively strong
signals will be tuned in.
To cancel the local seek mode, select “LOCAL-
OFF.”
Tip
If you know the frequency of the station you want to
listen to, press and hold either side of (SEEK) to
locate the approximate frequency, then press (SEEK)
repeatedly to fine adjust to the desired frequency
(manual tuning).
If FM stereo reception is poor
— Monaural Mode
During radio reception, press (SENS)
repeatedly until “MONO-ON” appears.
The sound improves, but becomes monaural
(“ST” disappears).
To return to normal play mode, select “MONO-
OFF.”
Tip
If FM broadcasts are difficult to hear, set DSO to
“OFF” (page 19).
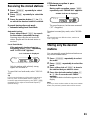
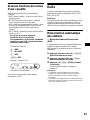
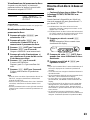
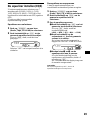
Storing only the desired
stations
You can manually preset the desired stations on
any chosen number button.
1 Press (SOURCE) repeatedly to select
the radio.
2 Press (MODE) repeatedly to select the
band.
3 Press either side of (SEEK) to tune in
the station that you want to store.
4 Press the desired number button ((1)
to (6)) for 2 seconds until “MEM”
appears.
The number button indication appears in the
display.
Note
If you try to store another station on the same number
button, the previously stored station will be erased.
“LCL” indicator is displayed.
“MONO” indicator is displayed.

12
RDS
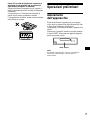
Overview of RDS
FM stations with Radio Data System (RDS)
service send inaudible digital information along
with the regular radio programme signal. For
example, one of the following will be displayed
upon receiving a station with RDS capability.
RDS services
RDS data offers you other conveniences, such as:
• Automatic retuning of a programme, helpful
during long-distance drives. — AF t page 12
• Receiving traffic announcements, even
when enjoying another programme/source.
— TA t page 13
• Selecting stations by the type of programme
— PTY t page 14
• Automatic clock time setting. — CT
t page 15
Notes
• Depending on the country or region, not all of the
RDS functions are available.
• RDS may not work properly if the signal strength is
weak or if the station you are tuned to is not
transmitting RDS data.
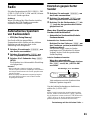
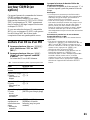
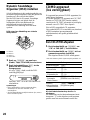
Automatic retuning for best
reception results
— AF (Alternative Frequencies)
The AF function allows the radio to always tune
into the area’s strongest signal for the station you
are listening to.
1 Select an FM station (page 10).
2 Press (AF) repeatedly until “AF-ON”
appears.
The unit starts searching for an alternative
frequency with a stronger signal in the same
network.
If “NO AF” flashes, the currently tuned into
station does not have an alternative frequency.
Notes
• If you want to change the on/off setting while playing
a CD, press (AF).
• When there is no alternative frequency in the area or
when you do not need to search for one, turn the AF
function off by selecting “AF-OFF.”
To Press
Switch Clock/
Station name
(DSPL)
Displayable items
• Music source
• Function
Displayable items
• Station name (frequency)
•Clock
• RDS data
Frequencies change automatically.
98.5 MHz
Station
102.5 MHz
96.0 MHz

13
For stations without alternative
frequencies
Press (SEEK) (+) or (SEEK) (–) while
the station name is flashing (within 8
seconds).
The unit starts searching for another
frequency with the same PI (Programme
Identification) data (“PI SEEK” appears).
If the unit cannot find the same PI, the unit
returns to the previously selected frequency.
Staying with one regional programme
When AF function is on: this unit’s factory-set
setting restricts reception to a specific region, so
you won’t be switched to another regional station
with a stronger frequency.
If you leave this regional programme’s reception
area or would like to take advantage of the whole
AF function, press (AF) for 2 seconds until
“REG-OFF” appears.
Note
This function does not work in the United Kingdom
and in some other areas.
Local Link function
(United Kingdom only)
This function enables you to select other local
stations in the area, even if they are not stored on
your number buttons.
1 Press the number button ((1) to (6))
that has a local station stored on it.
2 Within 5 seconds, press the number
button of the local station again.
3 Repeat this procedure until the
desired local station is received.
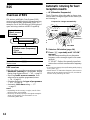
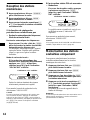
Receiving traffic
announcements
— TA (Traffic Announcement)/TP (Traffic
Programme)
By activating TA and TP, you can automatically
tune in an FM station broadcasting traffic
announcements. These settings function
regardless of the current FM programme/source,
CD/MD; the unit switches back to the original
source when the bulletin is over.
Press (TA) repeatedly until “TA-ON”
appears.
The unit starts searching for traffic
information stations.
“TP” indicates reception of such stations, and
“TA” flashes during an actual traffic
announcement. The unit will continue
searching for stations available with TP if
“NO TP” is indicated.
To cancel all traffic announcements, select “TA-
OFF.”
Tip
You can also cancel the current announcement by
pressing (SOURCE) or (MODE).
Presetting the volume of traffic
announcements
You can preset the volume level of the traffic
announcements so you won’t miss hearing them.
1 Press the volume +/– button to adjust
the desired volume level.
2 Press (TA) for 2 seconds.
“TA” appears and the setting is stored.
Receiving emergency announcements
If either AF or TA is on, the unit will switch to
emergency announcements, if one comes in
while listening to an FM station, or CD/MD.
To Press
Cancel current
announcement
(TA)

14
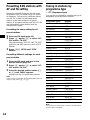
Presetting RDS stations with
AF and TA setting
When you preset RDS stations, the unit stores
each station’s AF/TA setting (on/off) as well as
its frequency. You can select a different setting
(for AF, TA, or both) for individual preset
stations, or the same setting for all preset
stations. If you preset stations with “AF-ON” the
unit automatically stores stations with the
strongest radio signal.
Presetting the same setting for all
preset stations
1 Select an FM band (page 10).
2 Press (AF) and/or (TA) to select “AF-
ON” and/or “TA-ON.”
Note that selecting “AF-OFF” and “TA-OFF”
applies to non-RDS stations as well as RDS
stations.
3 Press (SENS) (BTM) until “BTM”
flashes.
Presetting different settings for each
preset station
1 Select an FM band, and tune in the
desired station (page 10).
2 Press (AF) and/or (TA) to select “AF-
ON” and/or “TA-ON.”
3 Press the desired number button ((1)
to (6)) until “MEM” appears.
Repeat from step 1 to preset other stations.
Note
If you want to change the AF/TA setting while you are
playing a CD, press (AF) or (TA).
Tuning in stations by
programme type
— PTY (Programme types)
You can tune in a station by selecting the type of
programme you would like to listen to.
Note
You cannot use this function in some countries where
no PTY data is available.
Programme types Display
News NEWS
Current Affairs AFFAIRS
Information INFO
Sports SPORT
Education EDUCATE
Drama DRAMA
Culture CULTURE
Science SCIENCE
Va ri ed VAR IE D
Popular Music POP M
Rock Music ROCK M
Easy Listening EASY M
Light Classical LIGHT M
Classical CLASSICS
Other Music Type OTHER M
Weather WEATHER
Finance FINANCE
Children’s Programmes CHILDREN
Social Affairs SOCIAL A
Religion RELIGION
Phone In PHONE IN
Travel TRAVEL
Leisure LEISURE
Jazz Music JAZZ
Country Music COUNTRY
National Music NATION M
Oldies Music OLDIES
Folk Music FOLK M
Documentary DOCUMENT

15
1 Press (PTY) (LIST) during FM
reception.
The current programme type name appears if
the station is transmitting the PTY data.
“--------” appears if the received station is not
an RDS station, or if the RDS data is not
received.
2 Press (PTY) (LIST) repeatedly until the
desired programme type appears.
The programme types appear in the order
shown in the table.
“NONE” appears if the programme type is
not specified in the RDS data.
3 Press (SEEK) (+) or (SEEK) (–).
The unit starts searching for a station
broadcasting the selected programme type.
Setting the clock
automatically
— CT (Clock Time)
The CT data from the RDS transmission sets the
clock automatically.
Selecting “CT-ON”
During radio reception, press (SEL)
and (2) simultaneously
The clock is set.
After one second, the display returns to
normal radio reception mode.
To select “CT-OFF”, press (SEL) and (2)
simultaneously again.
Notes
• The CT function may not work even though an RDS
station is being received.
• There might be a difference between the time set by
the CT function and the actual time.

16
Other Functions
You can also control the unit with a rotary
commander (optional).
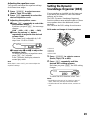
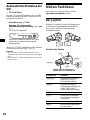
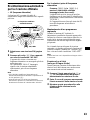
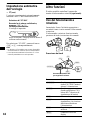
Using the rotary commander
First, attach the appropriate label depending on
how you want to mount the rotary commander.
The rotary commander works by pressing
buttons and/or rotating controls.
By pressing buttons
By rotating the control
Rotate and release to:
– Locate the beginning of tracks on the tape.
– Tune in stations automatically.
– Skip tracks on the disc.*
1
Rotate, hold, and release to:
– Fast-wind the tape.
– Find a station manually.
– Fast-forward/reverse a track.*
1
Tip
To start playback while fast-winding the tape, press
(MODE).
By pushing in and rotating the control
Push in and rotate the control to:
– Receive preset stations.
– Change discs during CD (MD) playback*
1
.
During playback of a CD containing MP3
files*
3
Push in and repeat rotating quickly to:
– Change discs one by one.
Push in, then rotate and hold to:
– Change albums.
*1 Only if the corresponding optional equipment is
connected.
*2 If your car has no ACC (accessory) position on the
ignition key switch, after turning off the ignition, be
sure to press and hold (OFF) until the display
disappears.
*3 Available only when optional CD unit with the MP3
file control function is connected.
Press To
(SOURCE) Change source
(Radio/CD*
1
/MD*
1
/Tape)/
Power on
(MODE) Change operation
(Radio band/CD unit*
1
/MD
unit*
1
/Tape playback
direction)
(ATT) Attenuate sound
(OFF)*
2
Stop playback or radio
reception/Power off
(SEL) Adjust and select
(DSPL) Change the display item
SEL
DSPL
MODE
SEL
DSPL
MODE
OFF
Rotate the VOL control
to adjust the volume.
(SOURCE)
(SEL)
(ATT)
(DSPL)
(OFF)
(MODE)
SEEK/AMS
control
PRESET/DISC
control

17
Changing the operative direction
The operative direction of controls is factory-set
as shown below.
If you need to mount the rotary commander on
the right hand side of the steering column, you
can reverse the operative direction.
Press (SEL) for 2 seconds while
pushing the VOL control.
Adjusting the balance and
fader
You can adjust the balance and fader.
1 Press ( SEL ) repeatedly until “BAL” or
“FAD” appears.
Each time you press (SEL), the item changes
as follows:
LOW* t MID* t HI* t
BAL (left-right)
t FAD (front-rear)
* When EQ3 is activated (page 18).
2 Press the volume +/– button to adjust
the selected item.
Note
Adjust within 3 seconds after selecting the item.
Quickly attenuating the
sound
Press (ATT).
After “ATT-ON” momentarily appears, the
“ATT” appears in the display.
To restore the previous volume level, press
(ATT) again.
Tip
When the interface cable of a car telephone is
connected to the ATT lead, the unit decreases the
volume automatically when a telephone call comes in
(Telephone ATT function).
To increase
To decrease

18
Changing the sound and
display settings
— Menu
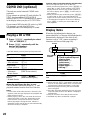
The following items can be set:
SET (Set Up)
• CT (Clock Time) (page 15)
• A.SCRL (Auto Scroll)* (page 20).
• M.DSPL (Motion Display) — to select the
Motion Display mode from “1,” “2,” and
“OFF.”
– Select “1” to show decoration patterns in the
display and activate Demo display.
– Select “2” to show decoration patterns in the
display and deactivate Demo display.
– Select “OFF” to deactivate the Motion
Display.
• BEEP — to turn the beeps on or off.
Selecting the desired item
Press (SEL) and the desired preset
number button simultaneously.
(SEL) + (2): CT
(SEL) + (3): A.SCRL*
(SEL) + (4): M.DSPL
(SEL) + (6): BEEP
* When no CD or MD is playing, this item will not
appear.
After the mode setting completed, the display
returns to normal play mode.
Note
The displayed item will differ depending on the source.
To cancel the item, press (SEL) and the preset
number button simultaneously again.
Setting the equalizer (EQ3)
You can select an equalizer curve for 7 music
types (XPLOD, VOCAL, CLUB, JAZZ,
NEWAGE, ROCK, CUSTOM, and OFF
(equalizer OFF)).
You can store a different equalizer setting for
each source.
Selecting the equalizer curve
1 Press (SOURCE) to select a source
(Radio, Tape, CD or MD).
2 Press (EQ3) repeatedly until the
desired equalizer curve.
Each time you press (EQ3), the item
changes.
To cancel the equalizing effect, select “OFF.”

19
Adjusting the equalizer curve
You can store and adjust the equalizer settings
for different tone ranges.
1 Press (SOURCE) to select a source
(Radio, Tape, CD or MD).
2 Press (EQ3) repeatedly to select the
desired equalizer curve.
3 Adjusting the equalizer curve.
1 Press (SEL) repeatedly to select the
desired tone range.
Each time you press (SEL), the tone range
changes.
LOW t MID t HI (t BAL t FAD)
2 Press the volume +/– button
repeatedly to adjust to the desired
volume level.
The volume level is adjustable by 1 dB
steps from –10 dB to +10 dB.
3 Repeat step 1 and 2 to adjust the
equalizer curve.
To restore the factory-set equalizer curve,
press ( SEL ) for 2 seconds.
After 3 seconds, the display returns to
normal play mode.
Note
When EQ3 is set to “OFF,” you cannot adjust the
equalizer settings.
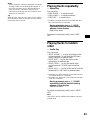
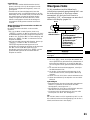
Setting the Dynamic
Soundstage Organizer (DSO)
If your speakers are installed into the lower part
of the doors, the sound will come from below
and may not be clear.
The DSO (Dynamic Soundstage Organizer)
function creates a more ambient sound as if there
were speakers above the dashboard (virtual
speakers).
You can store the DSO setting for each source.
DSO mode and image of virtual speakers
*1 DSO-1
*2 DSO-2
*3 DSO-3
*4 DSO-OFF
1 Press (SOURCE) to select a source
(Radio, Tape, CD or MD).
2 Press (DSO) repeatedly until the
desired DSO setting appears.
Each time you press (DSO), the DSO setting
changes.
To cancel the DSO function, select “OFF.”
Notes
• Depending on the type of car interior or type of
music, DSO may not have a desirable affect.
• If FM broadcasts are difficult to hear, set DSO to
OFF.
*3
*2
*1
*4
*4
*3
*2
*1

20
CD/MD Unit (optional)
This unit can control external CD/MD units
(optional).
If you connect an optional CD unit with the CD
TEXT function and the CUSTOM FILE
function, the CD TEXT information will appear
in the display when you play a CD TEXT disc.
If you connect MP3 playable CD units (e.g. MP3
CD changer), you can play MP3 files;
compressed audio files with quality of sound.
Playing a CD or MD
1 Press (SOURCE) repeatedly to select
“CD” or “MD (MS*).”
2 Press (MODE) repeatedly until the
desired unit appears.
CD/MD playback starts.
* MS: MG Memory Stick System-up Player MGS-X1
When the last file on the disc is over
The file number indication returns to “1,” and
playback restarts from the first file of the disc.
Notes
• If a disc with no MP3 files (tracks) is inserted, “CD”
appears in the disc type display to start playback but
there will be no sound.
• Before playing a track, this unit reads all track and
album information on the disc. Depending on the
track structure, it may take more than a minute
before play begins. During this time, “READ” is
displayed. Please wait for play to start automatically
when the reading is complete.
Cautions when connecting MGS-X1 and MD unit(s)
This unit recognizes MGS-X1 as an MD unit.
• When you want to play MGS-X1, press (SOURCE) to
select “MS” or “MD.” If “MS” appears in the source
display, MGS-X1 starts to play. If “MD” appears in
the source display, press (MODE) to select “MS,” to
start playback.
• When you want to play an MD unit, press (SOURCE)
to select “MD” or “MS.” If your desired MD unit
appears in the source display, it starts to play. If “MS”
or another MD unit appears in the source display,
press (MODE) to select your desired MD unit, to
start playback.
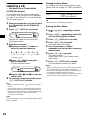
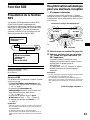
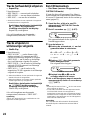
Display items
When the disc/album/track changes, any
prerecorded title*
1
of the new disc/album/track is
automatically displayed (if the Auto Scroll
function is set to “ON,” names exceeding 8
characters will be scrolled (page 18)).
*1 When pressing (DSPL), “NO NAME” indicates that
there is no disc name, album name, or track name,
and “NO ID3” indicates that there is no ID3 tag.
*2 While displaying an ID3 tag, the album number
does not appear.
*3 If the disc has been labelled by this unit using the
CUSTOM FILE function, Disc Memo is displayed
preferentially.
*4 Only for CD TEXT discs with the artist name.
*5 Available only when an MP3 file is played.
To Press
Stop playback (OFF)
Skip discs
–Disc selection
(1) (–)
(2) (+)
Skip albums
–album selection
(5) (–)
(6) (+)
Skip tracks
–Automatic
Music Sensor
(SEEK) (./>)
[once for each track]
Fast-forward/
reverse
–Manual Search
(SEEK) (m/M)
[hold to desired point]
To Press
Switch display
item
(DSPL)
Displayable items
• Track number/Elapsed
playing time
• Disc name*
1
*
3
/
Artist name
*
4
• Track name*
1
• Album name*
1
*
5
•ID3 tag*
1
*
5
Source
Disc/Album*
2
number
Seite wird geladen ...
Seite wird geladen ...
Seite wird geladen ...
Seite wird geladen ...
Seite wird geladen ...
Seite wird geladen ...
Seite wird geladen ...
Seite wird geladen ...
Seite wird geladen ...
Seite wird geladen ...
Seite wird geladen ...
Seite wird geladen ...
Seite wird geladen ...
Seite wird geladen ...
Seite wird geladen ...
Seite wird geladen ...
Seite wird geladen ...
Seite wird geladen ...
Seite wird geladen ...
Seite wird geladen ...
Seite wird geladen ...
Seite wird geladen ...
Seite wird geladen ...
Seite wird geladen ...
Seite wird geladen ...
Seite wird geladen ...
Seite wird geladen ...
Seite wird geladen ...
Seite wird geladen ...
Seite wird geladen ...
Seite wird geladen ...
Seite wird geladen ...
Seite wird geladen ...
Seite wird geladen ...
Seite wird geladen ...
Seite wird geladen ...
Seite wird geladen ...
Seite wird geladen ...
Seite wird geladen ...
Seite wird geladen ...
Seite wird geladen ...
Seite wird geladen ...
Seite wird geladen ...
Seite wird geladen ...
Seite wird geladen ...
Seite wird geladen ...
Seite wird geladen ...
Seite wird geladen ...
Seite wird geladen ...
Seite wird geladen ...
Seite wird geladen ...
Seite wird geladen ...
Seite wird geladen ...
Seite wird geladen ...
Seite wird geladen ...
Seite wird geladen ...
Seite wird geladen ...
Seite wird geladen ...
Seite wird geladen ...
Seite wird geladen ...
Seite wird geladen ...
Seite wird geladen ...
Seite wird geladen ...
Seite wird geladen ...
Seite wird geladen ...
Seite wird geladen ...
Seite wird geladen ...
Seite wird geladen ...
Seite wird geladen ...
Seite wird geladen ...
Seite wird geladen ...
Seite wird geladen ...
Seite wird geladen ...
Seite wird geladen ...
Seite wird geladen ...
Seite wird geladen ...
Seite wird geladen ...
Seite wird geladen ...
Seite wird geladen ...
Seite wird geladen ...
Seite wird geladen ...
Seite wird geladen ...
Seite wird geladen ...
Seite wird geladen ...
Seite wird geladen ...
Seite wird geladen ...
Seite wird geladen ...
Seite wird geladen ...
Seite wird geladen ...
Seite wird geladen ...
Seite wird geladen ...
Seite wird geladen ...
Seite wird geladen ...
Seite wird geladen ...
Seite wird geladen ...
Seite wird geladen ...
Seite wird geladen ...
Seite wird geladen ...
Seite wird geladen ...
Seite wird geladen ...
Seite wird geladen ...
Seite wird geladen ...
Seite wird geladen ...
Seite wird geladen ...
Seite wird geladen ...
Seite wird geladen ...
Seite wird geladen ...
Seite wird geladen ...
Seite wird geladen ...
Seite wird geladen ...
Seite wird geladen ...
Seite wird geladen ...
Seite wird geladen ...
Seite wird geladen ...
Seite wird geladen ...
Seite wird geladen ...
Seite wird geladen ...
Seite wird geladen ...
Seite wird geladen ...
Seite wird geladen ...
Seite wird geladen ...
Seite wird geladen ...
Seite wird geladen ...
Seite wird geladen ...
Seite wird geladen ...
Seite wird geladen ...
Seite wird geladen ...
Seite wird geladen ...
Seite wird geladen ...
Seite wird geladen ...
-
 1
1
-
 2
2
-
 3
3
-
 4
4
-
 5
5
-
 6
6
-
 7
7
-
 8
8
-
 9
9
-
 10
10
-
 11
11
-
 12
12
-
 13
13
-
 14
14
-
 15
15
-
 16
16
-
 17
17
-
 18
18
-
 19
19
-
 20
20
-
 21
21
-
 22
22
-
 23
23
-
 24
24
-
 25
25
-
 26
26
-
 27
27
-
 28
28
-
 29
29
-
 30
30
-
 31
31
-
 32
32
-
 33
33
-
 34
34
-
 35
35
-
 36
36
-
 37
37
-
 38
38
-
 39
39
-
 40
40
-
 41
41
-
 42
42
-
 43
43
-
 44
44
-
 45
45
-
 46
46
-
 47
47
-
 48
48
-
 49
49
-
 50
50
-
 51
51
-
 52
52
-
 53
53
-
 54
54
-
 55
55
-
 56
56
-
 57
57
-
 58
58
-
 59
59
-
 60
60
-
 61
61
-
 62
62
-
 63
63
-
 64
64
-
 65
65
-
 66
66
-
 67
67
-
 68
68
-
 69
69
-
 70
70
-
 71
71
-
 72
72
-
 73
73
-
 74
74
-
 75
75
-
 76
76
-
 77
77
-
 78
78
-
 79
79
-
 80
80
-
 81
81
-
 82
82
-
 83
83
-
 84
84
-
 85
85
-
 86
86
-
 87
87
-
 88
88
-
 89
89
-
 90
90
-
 91
91
-
 92
92
-
 93
93
-
 94
94
-
 95
95
-
 96
96
-
 97
97
-
 98
98
-
 99
99
-
 100
100
-
 101
101
-
 102
102
-
 103
103
-
 104
104
-
 105
105
-
 106
106
-
 107
107
-
 108
108
-
 109
109
-
 110
110
-
 111
111
-
 112
112
-
 113
113
-
 114
114
-
 115
115
-
 116
116
-
 117
117
-
 118
118
-
 119
119
-
 120
120
-
 121
121
-
 122
122
-
 123
123
-
 124
124
-
 125
125
-
 126
126
-
 127
127
-
 128
128
-
 129
129
-
 130
130
-
 131
131
-
 132
132
-
 133
133
-
 134
134
-
 135
135
-
 136
136
-
 137
137
-
 138
138
-
 139
139
-
 140
140
-
 141
141
-
 142
142
-
 143
143
-
 144
144
-
 145
145
-
 146
146
-
 147
147
-
 148
148
-
 149
149
-
 150
150


Sony cassette tuner xr ca670x Benutzerhandbuch
- Kategorie
- Auto-Medienempfänger
- Typ
- Benutzerhandbuch
- Dieses Handbuch eignet sich auch für
in anderen Sprachen
- English: Sony cassette tuner xr ca670x User manual
- français: Sony cassette tuner xr ca670x Manuel utilisateur
- italiano: Sony cassette tuner xr ca670x Manuale utente
- Nederlands: Sony cassette tuner xr ca670x Handleiding