Seite wird geladen ...


ENGLISH
2
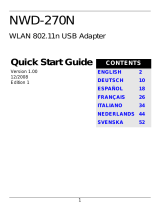
Hardware Connections
1
2
3
4
5

ENGLISH
3
Connect to the NBG4115
Connect to:
http://192.168.1.1
Enter the default password
of “1234”, then change it
when prompted.
Select a mode:
Wizard or Advanced.
1
2
3
ENGLISH

4
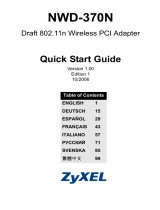
Set Up Your Internet Connection
Connect to the NBG4115 then select Wizard mode:
System Name: Enter up to 30
characters for the device’s
name.
Domain Name: Leave this
blank unless your ISP gave you
this information.
Name (SSID): Enter up to 30
characters for the network
name as it appears to other
wireless devices.
Security: Select a security
type. The option selected here
may require additional
configuration.
Connection Type: Select how
you will connect to the Internet.
This information is provided by
your ISP. The options available
here vary according to the
selected connection type.

ENGLISH
5
Set Up Your 3G Connection
On Step 3 of the Wizard, configure the following:
• Connection Type - Select Mobile 3G.
• PIN Code - Enter the 4-digit Personal Identification Number
(PIN) for the SIM card on your 3G device.
• APN Code - Enter the Access Point Name (APN) of the 3G
network to which you will connect.
• Dial Number - Enter the dial-up number used to sign into
your 3G account.
• User Name and Password - Enter up to 50 alphanumeric
characters for your 3G account user name and password.
Note: If you use a USB 3G device with your NB4115, then all
incoming and outgoing WAN connections are made through it
and not the WAN port.

6
Set Up a WPS Connection
Place the devices you want
to connect near one
another.
Press the WPS button on
the NBG4115.
The WLAN light blinks.
Press the WPS button on a
compatible device (such as
the NWD-270N) within 2
minutes of pressing the
button on the NBG4115.
The WLAN light on the
NBG4115 shines steadily
when connected.
1
2
3

ENGLISH
7
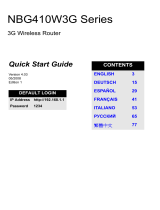
NetUSB
TM
NetUSB allows you to work with the USB devices connected
directly to the NBG4115 over the LAN as if they are
connected directly to your computer.
This allows you to easily share USB-based devices such as
printers (A), faxes (B) and scanners (C), among others, with
people on the network.
For more information about these features, see the User’s
Guide on the included disc.
A
B
C

8

DEUTSCH
9
Anschließen an den NBG4115
Verbinden mit:
http://192.168.1.1
Geben Sie das Standard-
Kennwort “1234” ein, und
ändern Sie es nach
Aufforderung.
Wählen Sie einen Modus:
Wizard (Assistent) oder
Advanced (Erweitert).
1
2
3
DEUTSCH

10
Einrichten der Internetverbindung
Schließen Sie das Gerät an den NBG4115, und wählen Sie
den Modus Wizard (Assistent):
System Name (Systemname):
Geben Sie bis zu 30 Zeichen
als Namen für das Gerät ein.
Domain Name (Domainname):
Lassen Sie dieses Feld frei,
wenn Ihnen der
Internetdienstanbieter keinen
Namen mitgeteilt hat.
Name (SSID): Geben Sie die
bis zu 30 Zeichen des
Netzwerknamens ein, wie er
anderen Drahtlosgeräten
angezeigt wird.
Security (Sicherheit): Wählen
Sie einen Sicherheitstyp. Die
hier gewählt Option muss u.U.
weiter konfiguriert werden.
Connection Type
(Verbindungstyp): Legen Sie
fest, wie die Verbindung zum
Internet hergestellt werden soll.
Diese Information erhalten Sie
von Ihrem
Internetdienstanbieter. Die
angezeigten Optionen hängen
vom gewählten Verbindungstyp
ab.

DEUTSCH
11
Einrichten der 3G-Verbindung
Konfigurieren Sie bei Schritt 3 des Assistenten folgendes:
• Connection Type (Verbindungstyp) - Wählen Sie Mobile 3G.
• PIN Code (PIN-Code) - Geben Sie die 4-stellige PIN-
Nummer (Personal Identification Number) der SIM-Karte
Ihres 3G-Geräts ein.
• APN Code (APN-Code) - Geben Sie den APN-Namen
(Access Point Name) des 3G-Netzwerks ein, zu dem Sie die
Verbindung herstellen möchten.
• Dial Number (Einwahlnummer) - Geben Sie die
Einwahlnummer ein, mit der Sie sich bei Ihrem 3G-Konto
anmelden können.
• User Name (Benutzername) und Password (Kennwort) -
Geben Sie die bis zu 50 alphanumerischen Zeichen für den
Benutzernamen und das Kennwort Ihres 3G-Kontos ein.
Hinweis: Wenn Sie mit dem NB4115 ein USB 3G-Gerät
verwenden, erfolgen alle ein- und abgehenden WAN-
Verbindungen darüber und nicht über den WAN-Port.

12
Einrichten einer WPS-Verbindung
Weitere Informationen zu den in diesem Benutzerhandbuch
beschriebenen Funktionen finden Sie auf der mitgelieferten
CD.
Stellen Sie alle Geräte, die
angeschlossen werden
sollen, nahe beieinander.
Drücken Sie auf die WPS-
Taste des NBG4115.
Die WLAN-LED blinkt.
Drücken Sie innerhalb von
2 Minuten, nachdem Sie
auf die Taste des NBG4115
gedrückt haben, auf die
WPS-Taste eines
kompatiblen Geräts (z.B.
des NWD-270N).
Sobald die Verbindung
besteht, leuchtet die
WLAN-LED des NBG4115
dauerhaft.
1
2
3

DEUTSCH
13
NetUSB
TM
Mit NetUSB können Sie mit USB-Geräten, die über das LAN
direkt an den NBG4115 angeschlossen sind, so arbeiten, als
wären sie direkt an den Computer angeschlossen.
Auf diese Weise können USB-Geräte wie Drucker (A),
Faxgeräte (B) und Scanner (C) von allen Personen
verwendet werden, die über das Netzwerk angeschlossen
sind.
A
B
C

14

ESPAÑOL
15
Acceder al Configurador WEB del
NBG4115
Abra un navegador web
como Internet Explorer.
Escriba "http://
192.168.1.1" como se
indica en la imagen.
Escriba la contraseña
predeterminada “1234”,
luego cámbiela cuando se
le pida.
Seleccione un modo:
Wizard (Asistente) o
Advanced (Avanzado).
1
2
3
ESPAÑOL

16
Configurar su conexión a Internet
Conectar al NBG4115 luego seleccionar el modo Wizard
(Asistente):
System Name (Nombre del
sistema): Escriba hasta 30
caracteres para identificar la
red inalámbrica de su router.
Domain Name (Nombre de
dominio): Deje esto en blanco a
menos que su ISP le haya
facilitado la información.
Name (SSID) (Nombre):
Escriba hasta 30 caracteres
para identificar la red
inalámbrica de su router.
Security (Seguridad):
Seleccione un tipo de
seguridad. La opción
seleccionada puede requerir
configuración adicional.
Connection Type (Tipo de
conexión): Seleccione cómo se
conectará a Internet. Esta
información es facilitada por su
ISP. Las opciones disponibles
aquí varían según el tipo de
conexión seleccionado.

ESPAÑOL
17
Configurar su conexión 3G
En el Paso 3 del Asistente, configure lo siguiente:
• Connection Type (Tipo de conexión) - Seleccione Mobile
3G.
• PIN Code (Código PIN) - Escriba el Número de
Identificación Personal del 4 dígitos (PIN) para la tarjeta SIM
de su dispositivo 3G.
• APN Code (Código APN) - Escriba el Nombre del Punto de
Acceso (APN) de la red 3G a la que se va a conectar.
• Dial Number (Número de marcado) - Escriba el número
usado para iniciar sesión en su cuenta 3G.
• User Name (Nombre de usuario) y Password (Contraseña)
- Escriba hasta 50 caracteres alfanuméricos para su nombre
de usuario y contraseña de la cuenta 3G.
Nota: Si utiliza un dispositivo USB 3G con su NB4115, todas las
conexiones WAN entrantes y salientes se realizarán a través de
él y no en el puerto WAN.

18
Configurar una conexión WPS
Para más información acerca de las características descritas
en este libro, consulte la Guía del usuario incluida en el disco.
Coloque los dispositivos
que desea conectar uno
cerca del otro.
Presione el botón WPS en
el NBG4115.
La luz WLAN parpadeará.
Presione el botón WPS en
un dispositivo compatible
(como el NWD-270N)
dentro del periodo de 2
minutos tras haber
presionar el botón WPS en
el NBG4115.
La luz WLAN del NBG4115
se quedará fija tras
conectarse.
1
2
3

ESPAÑOL
19
NetUSB
TM
NetUSB le permite trabajar con dispositivos USB conectados
directamente al NBG4115 sobre la LAN como si estuviesen
conectados directamente al ordenador.
Esto le permite compartir fácilmente dispositivos basados en
USB como impresoras (A), faxes (B) y escáneres (C), entre
otros, con otros ordenadores de la red.
Para más información acerca de estas características,
consulte la Guía del usuario en el disco incluido.
A
B
C

20
/