York VRF Smart Gateway Schnellstartanleitung
- Typ
- Schnellstartanleitung

VRF Smart
Gateway
Quick Start Guide
SSID:
Passphrase:
User:
Password:
Place Label
Here
Place Label
Here
ENGLISH - Quick Start Guide
1
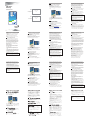
Connect the VRF Smart Gateway to
Equipment
Refer to the VRF Smart Gateway Installation
Instructions (Part No. 24-10143-1183) for mounting of
the VRF Smart Gateway. Connect the H-Link
connection, Ethernet connection, and external power
supply.
Ethernet
H-Link
Power
The VRF Smart Gateway LEDs flash, indicating that the
device is initializing. When the Fault LED turns off and the
Wi-Fi LEDs flash in succession, the VRF Smart Gateway is
ready to use.
2
Connect to the VRF Smart
Gateway
Wi-Fi Network
In the Wi-Fi settings of your mobile device or laptop,
connect to the VRF Smart Gateway Wi-Fi network using
your credentials.
3
Open a Web Browser
Direct your browser to www.myvrfsg.com to open the
VRF Smart Gateway browser interface.
The VRF Smart Gateway ships with a private
myvrfsg.com SSL certificate installed to ensure secure
communication with the VRF Smart Gateway.
ENGLISH - Quick Start Guide
However, this certificate does not indicate that it is
trusted in a browser. If you wish to install your own
certificate, refer to Installing a Security Certificate on a
Client That is Connecting to VRF Gateway in the VRF
Smart Gateway Network and IT Guidance Technical
Bulletin (LIT-12012341) for more information.
4
Log in to the VRF Smart Gateway
Use the default Admin login credentials from the beginning
of this guide. Read and accept the VRF Smart Gateway
license agreement.
5
Change Passwords
The first time you log in to the VRF Smart Gateway, the
Change Password and Passphrase web page appears.
You must change the Admin password and Wi-Fi
passphrase.
a.
Replace the default password in the New Admin
Password field. Confirm the change by entering the
new password in the Verify New Admin Password
field.
b.
Replace the Wi-Fi Passphrase in the New Wi-Fi
Passphrase field and click Save.
6
Ethernet Setup
a.
In the VRF Smart Gateway UI, navigate to Settings >
Ethernet.
b.
Note the address in the IP Address field. By default, the
VRF Smart Gateway is configured to dynamically receive
an IP address from your network using DHCP. If the IP
address does not appear, refresh the screen. If you do
not wish to use the DHCP, you can edit the Ethernet
IMPORTANT: After you change the Wi-Fi passphrase
or SSID, the web server restarts and you must
rejoin the VRF Smart Gateway Wi-Fi network using
the new passphrase. On some mobile devices, you
must select and forget the original VRF Smart
Gateway Wi-Fi network before rejoining the network
with the new passphrase.
ENGLISH - Quick Start Guide
settings to configure a static IP address for this device at
this time.
c.
Enter this IP address in your browser address bar to
access the VRF Smart Gateway over an Ethernet
network.
Refer to the VRF Smart Gateway Network and IT
Guidance Technical Bulletin (LIT-12012341) for more
options.
7
Use the VRF Smart Gateway
When the VRF Smart Gateway is connected to the H-
LINK network, the VRF Smart Gateway automatically
starts to discover the VRF system and devices. View the
Device List from the VRF Smart Gateway UI to see the
discovered VRF devices. Modify the default VRF device
names to better represent the spaces the devices are
serving. This will make the device names more
meaningful when presented in the Metasys® building
automation system.
VRF Smart Gateway
The VRF Smart Gateway provides easy configuration
of the integration between the VRF controls network
and the Metasys system.
• Quick and easy Gateway configuration using Wi-Fi-
enabled devices such as smartphones, tablets, and
laptops.
• View and change VRF device names before exposing
over BACnet® protocol to a building automation system.
• Discover VRF devices and points quickly and easily by
using a BACnet/IP integration in the Metasys system or
similar building automation system.
IMPORTANT: Save this guide. It contains default user
name and password information that may be needed
to reset your VRF Smart Gateway to factory defaults.
DEUTSCH - Schnellstartanleitung
1
Verbinden Sie den VRF Smart Gateway
mit den Geräten
Informationen zur Montage des VRF Smart Gateway
finden Sie in den VRF Smart Gateway-
Installationsanweisungen (Teilenr. 24-10143-1183).
Stellen Sie die H-Link- und Ethernet-Verbindung her und
schließen Sie die externe Stromversorgung an.
Ethernet
H-Link
Power
Die LEDs des VRF Smart Gateway LEDs blinken. Dies
zeigt an, dass das Gerät gerade initialisiert. Wenn die
Fehler-LED sich abschaltet und die WLAN-LEDs
nacheinander blinken, ist der VRF Smart Gateway bereit
zur Verwendung.
2
Stellen Sie die Verbindung
zum VRF Smart Gateway-
WLAN-Netzwerk her.
Verbinden Sie sich über die WLAN-Einstellungen Ihres
Mobilgeräts oder Laptops mit Ihren
Anmeldeinformationen mit dem VRF Smart Gateway-
WLAN-Netzwerk.
3
Öffnen Sie einen Web-Browser
Navigieren Sie Ihren Browser zu www.myvrfsg.com , um
die
DEUTSCH - Schnellstartanleitung
VRF Smart Gateway-Browseroberfläche zu öffnen.
Auf jedem VRF Smart Gateway ist ein privates
myvrfsg.com SSL-Zertifikat installiert, um eine sichere
Kommunikation mit dem VRF Smart Gateway
sicherzustellen. Dieses Zertifikat bedeutet jedoch nicht,
dass es in einem Browser vertrauenswürdig ist.
Weitere Informationen zur Installation eines eigenen
Zertifikats finden Sie unter Installation eines
Sicherheitszertifikats auf einem Client mit Verbindung
zum VRF Gateway im technischen Merkblatt zu VRF
Smart Gateway Netzwerk und IT (LIT-12012341).
4
Melden Sie sich beim VRF Smart Gateway
an.
Verwenden Sie die standardmäßigen
Anmeldeinformationen vom Anfang dieses Handbuchs.
Lesen und akzeptieren Sie die VRF Smart Gateway-
Lizenzvereinbarung.
5
Ändern Sie die Passwörter
Wenn Sie sich zum ersten Mal beim VRF Smart Gateway
anmelden, wird die
Website zum Ändern von Passwort und Passphrase
angezeigt. Sie müssen das Administratorpasswort und
die WLAN-Passphrase ändern.
a.
Ersetzen Sie das Standardpasswort im Feld Neues
Administratorpasswort. Bestätigen Sie die
Änderung, in dem Sie das neue Passwort in das
Feld Neues Administratorpasswort bestätigen
eingeben.
WICHTIG: Nachdem Sie WLAN-Passphrase oder
SSID geändert haben, startet der Webserver neu
und Sie müssen dem VRF Smart Gateway-WLAN-
Netzwerk mit der neuen Passphrase erneut beitreten.
Auf einigen Mobilgeräten müssen Sie das
ursprüngliche VRF Smart Gateway-WLAN-Netzwerk
auswählen und löschen, bevor Sie dem Netzwerk mit
der neuen Passphrase erneut beitreten können.
DEUTSCH - Schnellstartanleitung
b.
Ersetzen Sie die WLAN-Passphrase im Feld
Neue WLAN-Passphrase und klicken Sie auf
Speichern.
6
Ethernet-Einrichtung
a.
Navigieren Sie auf der VRF Smart Gateway-
Benutzeroberfläche zu Einstellungen >
Ethernet.
b.
Notieren Sie sich die Adresse im Feld für die IP-Adresse.
Der VRF Smart Gateway ist standardmäßig so
konfiguriert, dass er über DHCP dynamisch eine IP-
Adresse von Ihrem Netzwerk erhält. Wird die IP-Adresse
nicht angezeigt, aktualisieren Sie den Bildschirm. Wenn
Sie nicht das DHCP verwenden möchten, können Sie die
Ethernet-Einstellungen so anpassen, dass eine statische
IP-Adresse für dieses Gerät zu dieser Zeit konfiguriert
wird.
c.
Geben Sie diese IP-Adresse in die Adressleiste Ihres
Browsers ein, um über ein Ethernet-Netzwerk auf den
VRF Smart Gateway zuzugreifen.
Weitere Optionen finden Sie im Technischen Merkblatt
zu VRF Smart Gateway-Netzwerk und IT (LIT-
12012341).
7
Verwenden Sie den VRF Smart Gateway
Wenn der VRF Smart Gateway mit dem H-LINK-
Netzwerk verbunden ist, beginnt der VRF Smart
Gateway automatisch mit der Erkennung von VRF-
System und -Geräten. Zeigen Sie über die
Benutzeroberfläche des VRF Smart Gateway auf der
Geräteliste die erkannten VRF-Geräte an. Passen Sie
die standardmäßigen VRF-Gerätenamen so an, dass sie
eher den Bereichen entsprechen, denen sie dienen. Auf
diese Weise werden die Gerätenamen aussagekräftiger,
wenn sie im Metasys®
Gebäudeautomatisierungssystem angezeigt werden.
VRF Smart Gateway
Der VRF Smart Gateway bietet eine einfache
Konfiguration der Integration zwischen VRF-
Steuerungsnetzwerk und Metasys-System.
DEUTSCH - Schnellstartanleitung
• Schnelle und einfache Gateway-Konfiguration über
WLAN-fähige Geräte wie Smartphones, Tablets und
Laptops.
• Anzeigen und Ändern von VRF-Gerätenamen vor der
Verwendung eines BACnet® Protokolls mit einem
Gebäudeautomatisierungssystem.
• Schnelle und einfache Erkennung von VRF-Geräten und -
Punkten über BACnet/IP-Integration im Metasys-System
oder einem ähnlichen Gebäudeautomatisierungssystem.
WICHTIG: Speichern Sie dieses Handbuch. Es enthält
den standardmäßigen Benutzernamen und das
standardmäßige Passwort. Dies benötigen Sie, um
den VRF Smart Gateway auf die Werkseinstellungen
zurückzusetzen.
ITALIANO - Guida introduttiva
1
Collegare il VRF Smart Gateway
all'apparecchiatura
Consultare le Istruzioni di installazione per VRF Smart
Gateway (N. di catalogo 24-10143-1183) per montare il
VRF Smart Gateway. Collegare la connessione H-Link,
la connessione Ethernet e l'alimentazione esterna.
Ethernet
H- Link
Power
I LED del VRF Smart Gateway lampeggiano, indicando
l'inizializzazione del dispositivo. Quando il LED errore si
spegne e i LED Wi-Fi lampeggiano in successione, il VRF
Smart Gateway è pronto per l'uso.
2
Collegarsi alla rete Wi-Fi del
VRF
Smart Gateway
Nelle impostazioni Wi-Fi del portatile o del dispositivo
mobile, collegarsi alla rete Wi-Fi del VRF Smart
Gateway utilizzando le proprie credenziali.
3
Aprire un browser Web
Andare al sito www.myvrfsg.com per aprire
l'interfaccia del browser VRF Smart Gateway.
Il VRF Smart Gateway dispone di un certificato SSL privato
myvrfsg.com SSL installato per garantire una
comunicazione sicura con il dispositivo. Tuttavia, questo
certificato non ne indica l'attendibilità in un
ITALIANO - Guida introduttiva
browser. Se si desidera installare il proprio certificato,
consultare il capitolo Installazione di un certificato di
sicurezza su un client che si connette al VRF Gateway
nel documento VRF Smart Gateway Network and IT
Guidance Technical Bulletin (LIT-12012341) per
ulteriori informazioni.
4
Eseguire l'accesso al VRF Smart Gateway
Utilizzare le credenziali di accesso amministratore indicate
all'inizio della guida. Leggere e accettare l'accordo di
licenza VRF Smart Gateway.
5
Modificare le password
La prima volta che si accede al VRF Smart Gateway, viene
visualizzata la pagina Web Modifica password e
passphrase. È necessario modificare la password di
amministratore e la passphrase Wi-Fi.
a.
Sostituire la password predefinita nel campo Nuova
password amministratore. Confermare la
modifica inserendo la nuova password nel campo
Verifica nuova password amministratore.
b.
Sostituire la passphrase Wi-Fi nel campo
Nuova passphrase Wi-Fi e fare clic su Salva.
6
Configurazione di Ethernet
a.
Nella UI del VRF Smart Gateway, accedere a
Impostazioni > Ethernet.
b.
Annotare l'indirizzo che compare nel campo Indirizzo IP.
Per impostazione predefinita, il VRF Smart Gateway è
IMPORTANTE: Dopo aver cambiato la passphrase
Wi-Fi or SSID, il server Web si riavvia ed è
necessario riconnettersi alla rete Wi-Fi del VRF
Smart Gateway utilizzando la nuova passphrase. Su
alcuni dispositivi mobili è necessario selezionare e
dimenticare la rete Wi-Fi originale del VRF Smart
Gateway prima di riconnettersi alla rete con la nuova
passphrase.
ITALIANO - Guida introduttiva
configurato per ricevere dinamicamente un indirizzo IP
dalla rete attraverso il DHCP. Se l'indirizzo IP non
compare, aggiornare la schermata. Se non si desidera
utilizzare il DHCP, è possibile modificare le impostazioni
Ethernet configurando un indirizzo IP statico per questo
dispositivo in questa occasione.
c.
Inserire questo indirizzo IP nella barra dell'indirizzo del
browser per accedere al VRF Smart Gateway tramite
una rete Ethernet.
Fare riferimento al Bollettino tecnico guida IT e rete VRF
Smart Gateway (LIT-12012341) per ulteriori informazioni.
7
Utilizzo del VRF Smart Gateway
Quando è collegato alla rete H-LINK, il VRF Smart
Gateway inizia automaticamente a cercare i dispositivi e
il sistema VRF. Visualizzare l'Elenco dei dispositivi dalla
UI del VRF Smart Gateway per vedere i dispositivi VRF
trovati. Modificare il nome predefinito dei dispositivi VRF
per descrivere meglio le aree che coprono i dispositivi.
Questo renderà più significativo il nome dei dispositivi
quando saranno presentati nel sistema di automazione
degli edifici Metasys®.
VRF Smart Gateway
Il VRF Smart Gateway offre una configurazione
semplice dell'integrazione tra la rete dei controlli VRF e
il sistema Metasys.
• Configurazione del Gateway semplice e rapida
utilizzando i dispositivi che dispongono di Wi-Fi come
smartphone, tablet e laptop.
• Visualizzazione e modifica del nome dei dispositivi VRF
prima dell'esposizione sul protocollo BACnet® fino a un
sistema di automazione degli edifici.
• Ricerca dei punti e dei dispositivi VRF in modo rapido e
semplice tramite un'integrazione BACnet/IP nel sistema
Metasys o in un sistema di automazione degli edifici
simile.
IMPORTANTE: Conservare questa guida. Contiene
le informazioni di nome utente e password predefiniti
che potrebbero essere necessari per ripristinare il
VRF Smart Gateway alle impostazioni di fabbrica.
᪥
᪥ᮏㄒ
-
ࢡ
ࢡࢵࢡࢫࢱ࣮ࢺ࢞ࢻ
1
VRFࢫ
ࢫ࣐࣮ࢺࢤ࣮ࢺ࢙࢘ࢆᶵჾ᥋⥆ࡍࡿ
VRFࢫ࣐࣮ࢺࢤ࣮ࢺ࢙࢘ࡢྲྀࡾࡅ᪉ἲࡘ࠸࡚ࡣࠊ
ࠗVRF
ࢫ࣐࣮ࢺࢤ࣮ࢺ࢙࢘ྲྀㄝ᫂᭩㸦ရ␒
24-
10143-1183
㸧
࠘ࢆཧ↷ࡋ࡚ࡃࡔࡉ࠸ࠋ H-LINKࠊ
Ethernetࠊእ㒊㟁※᥋⥆ࡋࡲࡍࠋ
Ethernet
H- Link
Power
VRFࢫ࣐࣮ࢺࢤ࣮ࢺ࢙࢘ࡢLEDࡀⅬ⁛ࡋ࡚ࠊ⨨ࡀึᮇ
୰࡛࠶ࡿࡇࢆ▱ࡽࡏࡲࡍࠋ Fault ࡢLEDࡀᾘⅉࡋࠊWi-
Fi ࡢLEDࡀ㐃⥆ࡋ࡚Ⅼ⁛ࡍࡿࠊVRFࢫ࣐࣮ࢺࢤ࣮ࢺ࢙࢘
ࢆ⏝࡛ࡁࡿࡼ࠺࡞ࡾࡲࡍࠋ
2
VRF
ࢫ࣐࣮ࢺࢤ࣮ࢺ࢙࢘ࡢ
Wi-Fi
ࢿࢵࢺ࣮࣡ࢡ᥋⥆ࡍࡿ
࠾࠸ࡢࣔࣂࣝࢹࣂࢫࡸࣛࢵࣉࢺࢵࣉࡢWi-Fiタᐃ
࡛ࠊ࣮ࣘࢨ࣮ࡢ㈨᱁ሗࢆࡗ࡚VRFࢫ࣐࣮ࢺࢤ࣮ࢺ࢘
࢙Wi-Fiࢿࢵࢺ࣮࣡ࢡ᥋⥆ࡋࡲࡍࠋ
3
࢙࢘ࣈࣈࣛ࢘ࢨࢆ㛤ࡃ
ࣈࣛ࢘ࢨ࡛www.myvrfsg.com
ࢡࢭࢫࡋࠊ
VRFࢫ࣐࣮ࢺࢤ࣮ࢺ࢙࢘ࡢࣈࣛ࢘ࢨࣥࢱ࣮ࣇ࢙࣮ࢫࢆ
㛤ࡁࡲࡍࠋ
VRFࢫ࣐࣮ࢺࢤ࣮ࢺ࢙࢘ࡣࠊࣉ࣮ࣛ࣋ࢺ
᪥
᪥ᮏㄒ
-
ࢡ
ࢡࢵࢡࢫࢱ࣮ࢺ࢞ࢻ
myvrfsg.com SSLド᫂᭩ࢆࣥࢫࢺ࣮ࣝࡋ࡚ฟⲴࡉࢀ
࡚࠾ࡾࠊVRFࢫ࣐࣮ࢺࢤ࣮ࢺ࢙࢘ࡢ㏻ಙࡢࢭ࢟ࣗ
ࣜࢸࢆ☜ಖࡋ࡚࠸ࡲࡍࠋ ࡓࡔࡋࠊࡇࡢド᫂᭩ࡣࣈࣛ
࢘ࢨୖ࡛ಙ㢗ࡉࢀࡓド᫂᭩ࡋ࡚⾲♧ࡉࢀࡲࡏࢇࠋ ࣘ
࣮ࢨ࣮⮬㌟ࡢド᫂᭩ࢆࣥࢫࢺ࣮ࣝࡍࡿሙྜࡣࠊࠗ
VRFࢫ࣐࣮ࢺࢤ࣮ࢺ࢙࢘ࡢࢿࢵࢺ࣮࣡ࢡ࠾ࡼࡧIT
㛵ࡍࡿᢏ⾡ᗈሗ㸦LIT-12012341㸧࠘ࡢࠕVRFࢤ࣮ࢺ࢘
࢙᥋⥆ࡍࡿࢡࣛࣥࢺࢭ࢟ࣗࣜࢸド᫂᭩ࢆ
ࣥࢫࢺ࣮ࣝࡍࡿ㸧ࢆཧ↷ࡋ࡚ࡃࡔࡉ࠸ࠋ
4
VRFࢫ
ࢫ࣐࣮ࢺࢤ࣮ࢺ࢙࢘ࣟࢢࣥࡍࡿ
ࡇࡢ࢞ࢻࡢ᭱ึᥖ㍕ࡉࢀ࡚࠸ࡿࠊࢹࣇ࢛ࣝࢺࡢAdmin
ࣟࢢࣥ㈨᱁ሗࢆ࠸ࡲࡍࠋ VRFࢫ࣐࣮ࢺࢤ࣮ࢺ࢙࢘
⏝チㅙዎ⣙ࢆㄞࡳࠊࡇࢀྠពࡋࡲࡍࠋ
5
ࣃࢫ࣮࣡ࢻࢆኚ᭦ࡍࡿ
VRFࢫ࣐࣮ࢺࢤ࣮ࢺ࢙࢘ึࡵ࡚ࣟࢢࣥࡍࡿࠊ
㹙ࣃࢫ࣮࣡ࢻࣃࢫࣇ࣮ࣞࢬࡢኚ᭦
㹛࣮࣌ࢪࡀ⾲♧ࡉࢀ
ࡲࡍࠋ ࡇࡇ࡛Adminࣃࢫ࣮࣡ࢻWi-Fiࣃࢫࣇ࣮ࣞࢬࢆ
ᚲࡎኚ᭦ࡋ࡚ࡃࡔࡉ࠸ࠋ
a.
㹙᪂
᪂ࡋ࠸
Admin
ࣃࢫ࣮࣡ࢻ
㹛ࣇ࣮ࣝࢻ࡛ࠊࢹࣇ
࢛ࣝࢺࡢࣃࢫ࣮࣡ࢻࢆኚ᭦ࡋࡲࡍࠋ 㹙᪂
᪂ࡋ࠸
Admin
ࣃࢫ࣮࣡ࢻࢆ☜ㄆ
㹛ࣇ࣮ࣝࢻ᪂ࡋ࠸ࣃ
ࢫ࣮࣡ࢻࢆධຊࡋࠊኚ᭦ෆᐜࢆ☜ᐃࡋࡲࡍࠋ
b.
㹙᪂
᪂ࡋ࠸
Wi-Fi
ࣃࢫࣇ࣮ࣞࢬ
㹛ࣇ࣮ࣝࢻWi-Fiࣃࢫࣇ
࣮ࣞࢬࢆධຊࡋࠊ㹙ಖ
ಖᏑ
㹛ࢆࢡࣜࢵࢡ
㔜せ㸸
Wi-Fiࣃࢫࣇ࣮ࣞࢬࡲࡓࡣSSIDࢆኚ᭦ࡋࡓᚋ
ࠊ࢘
࢙࢘ࣈࢧ࣮ࣂ࣮ࡀ㉳ື
ࡋࡲࡍࠋ᪂ࡋ࠸ࣃࢫࣇࣞ
࣮ࢬࢆࡗ࡚VRFࢫ࣐࣮ࢺࢤ࣮ࢺ࢙࢘Wi-Fiࢿࢵࢺ
࣮࣡ࢡࣟࢢࣥࡋ┤ࡋ࡚ࡃࡔࡉ࠸ࠋ ୍㒊ࡢࣔࣂ
ࣝࢹࣂࢫ࡛ࡣࠊඖࡢVRFࢫ࣐࣮ࢺࢤ࣮ࢺ࢙࢘Wi-
Fiࢿࢵࢺ࣮࣡ࢡࢆ୍᪦㑅ᢥࠊ๐㝖ࡋ࡚ࡽࠊ᪂ࡋ࠸ࣃ
ࢫࣇ࣮ࣞࢬ࡛VRFࢫ࣐࣮ࢺࢤ࣮ࢺ࢙࢘Wi-Fiࢿࢵࢺ
࣮࣡ࢡࣟࢢࣥࡍࡿᚲせࡀ࠶ࡾࡲࡍࠋ
᪥
᪥ᮏㄒ
-
ࢡ
ࢡࢵࢡࢫࢱ࣮ࢺ࢞ࢻ
ࡋࡲࡍࠋ
6
Ethernetࡢ
ࡢタᐃ
a.
VRFࢫ࣐࣮ࢺࢤ࣮ࢺ࢙࢘ࡢ࣮ࣘࢨ࣮ࣥࢱ࣮ࣇ࢙࣮ࢫ
࡛㹙タᐃ㹛 >
㹙Ethernet㹛ࡢ㡰㐍ࡳࡲࡍࠋ
b.
㹙IPࢻࣞࢫ㹛ࣇ࣮ࣝࢻࡢࢻࣞࢫࢆ☜ㄆࡋࡲࡍࠋ
VRFࢫ࣐࣮ࢺࢤ࣮ࢺ࢙࢘ࡣࢹࣇ࢛ࣝࢺ࡛ࠊDHCPࡼ
ࡾIPࢻࣞࢫࢆࢿࢵࢺ࣮࣡ࢡࡽືⓗྲྀᚓࡍࡿࡼ࠺
ᵓᡂࡉࢀ࡚࠸ࡲࡍࠋ IPࢻࣞࢫࡀ⾲♧ࡉࢀ࡞࠸ሙྜࡣࠊ
⏬㠃ࢆ᭦᪂ࡋ࡚ࡃࡔࡉ࠸ࠋ DHCPࢆࢃ࡞࠸ሙྜࡣࠊࡇ
ࡢ⨨㟼ⓗIPࢻࣞࢫࢆタᐃࡍࡿࡼ࠺ࠊࡇࡇ࡛
Ethernetタᐃࢆ⦅㞟ࡋ࡚ࡃࡔࡉ࠸ࠋ
c.
ࡑࡢIPࢻࣞࢫࢆࣈࣛ࢘ࢨࡢࢻࣞࢫࣂ࣮ධຊࡋࠊ
Ethernetࢿࢵࢺ࣮࣡ࢡࢆࡋ࡚VRFࢫ࣐࣮ࢺࢤ࣮ࢺ࢙࢘
ࢡࢭࢫࡋࡲࡍࠋ
ヲ⣽ࡘ࠸࡚ࡣࠊࠗVRF
ࢫ࣐࣮ࢺࢤ࣮ࢺ࢙࢘ࡢࢿࢵࢺ
࣮࣡ࢡ࠾ࡼࡧ
IT
㛵ࡍࡿᢏ⾡ᗈሗ㸦
LIT-12012341
㸧
࠘ࢆ
ཧ↷ࡋ࡚ࡃࡔࡉ࠸ࠋ
7
VRF
ࢫ࣐࣮ࢺࢤ࣮ࢺ࢙࢘ࢆ࠺
VRFࢫ࣐࣮ࢺࢤ࣮ࢺ࢙࢘ࡣࠊH-LINKࢿࢵࢺ࣮࣡ࢡ
᥋⥆ࡉࢀࡿࠊ⮬ືⓗ㉳ືࡋ࡚VRFࡢࢩࢫࢸ࣒⨨
ࢆ᳨ฟࡋࡲࡍࠋ ᳨ฟࡉࢀࡓVRF⨨ࢆ☜ㄆࡍࡿࡣࠊ
VRFࢫ࣐࣮ࢺࢤ࣮ࢺ࢙࣮࢘ࣘࢨ࣮ࣥࢱ࣮ࣇ࢙࣮ࢫࡢ
㹙⨨ࣜࢫࢺ㹛ࢆཧ↷ࡋ࡚ࡃࡔࡉ࠸ࠋ ࢹࣇ࢛ࣝࢺࡢ
VRF⨨ྡࢆࠊࡑࡢ⨨ࡢᑐ㇟⠊ᅖࢆ㆑ูࡋࡸࡍ࠸ྡ⛠
ኚ᭦ࡋࡲࡍࠋ ࡇࡢࡼ࠺ࡍࡿࡇ࡛ࠊMetasys®ࣅࣝ
࣮࢜ࢺ࣓࣮ࢩࣙࣥࢩࢫࢸ࣒⾲♧ࡉࢀࡿ⨨ྡࡀศࡾ
ࡸࡍࡃ࡞ࡾࡲࡍࠋ
VRF
ࢫ࣐࣮ࢺࢤ࣮ࢺ࢙࢘
VRFࢫ࣐࣮ࢺࢤ࣮ࢺ࢙࢘ࡣࠊVRFไᚚࢿࢵࢺ࣮࣡ࢡ
Metasysࢩࢫࢸ࣒ࡢ⤫ྜࢆ⡆༢タᐃࡍࡿࡇࡀ࡛
ࡁࡲࡍࠋ
• ࢫ࣐࣮ࢺࣇ࢛ࣥࠊࢱࣈࣞࢵࢺࠊࣛࢵࣉࢺࢵࣉ࡞ࡢ
Wi-Fiᑐᛂࢹࣂࢫࡽࠊࢤ࣮ࢺ࢙࢘ࡢタᐃࢆࡍࡤ
᪥
᪥ᮏㄒ
-
ࢡ
ࢡࢵࢡࢫࢱ࣮ࢺ࢞ࢻ
ࡸࡃ⡆༢⾜࠺ࡇࡀ࡛ࡁࡲࡍࠋ
•VRF⨨ྡࡣࠊBACnet®ࣉࣟࢺࢥࣝࡼࡾࣅ࣮ࣝ࢜ࢺ࣓
࣮ࢩࣙࣥࢩࢫࢸ࣒බ㛤ࡍࡿ๓ኚ᭦ࡍࡿࡇࡀ࡛ࡁࡲ
ࡍࠋ
• Metasysࢩࢫࢸ࣒࡞ࡢࣅ࣮ࣝ࢜ࢺ࣓࣮ࢩࣙࣥࢩࢫࢸ࣒
࡛ࠊBACnet/IP⤫ྜࡼࡾࠊVRF⨨ࢆࡍࡤࡸࡃ⡆༢᳨
ฟࡋ࡚⾲♧ࡉࡏࡿࡇࡀ࡛ࡁࡲࡍࠋ
㔜せ㸸
ࡇࡢ࢞ࢻࡣษಖ⟶ࡋ࡚ࡃࡔࡉ࠸ࠋ ࡇࡢ
࢞ࢻࡣࠊVRFࢫ࣐࣮ࢺࢤ࣮ࢺ࢙࢘ࢆᕤሙฟⲴ
ࡢ≧ែࣜࢭࢵࢺࡍࡿ㝿ᚲせ࡞ࡿࠊࢹࣇ࢛ࣝࢺࡢ
࣮ࣘࢨ࣮ྡࣃࢫ࣮࣡ࢻࡢሗࡀྵࡲࢀ࡚࠸ࡲࡍࠋ

ѣ
ѣᮽ
ᘡ
ᘡ䙕䇴ᇐ
1
ሼ
ሼ95)Ჰ㜳㖇ީ䘔ࡦ䇴༽
䈭৸㘹
95)Ჰ㜳㖇ީᆿ㻻䈪᱄δ䴬Ԭਭ
ε
ᆿ㻻95)Ჰ㜳㖇ީȾᇂᡆ+/LQNȽԛའ㖇ૂཌ䜞⭫
ⓆⲺ亯䘔Ⱦ
Ether net
H- Link
Power
95)Ჰ㜳㖇ީⲺ/('⚥ᔶခ䰠⛷ᰬθ⽰䈛䇴༽↙൞㻡ࡓခ
ौȾᖉ᭻䳒/('➺⚣ᒬъ:L)L/('䘔㔣䰠⛷ᰬθ㺞᱄
95)Ჰ㜳㖇ީᐨ䘑ޛᐛ֒⣬ᘷȾ
䇵䰤95)Ჰ㜳㖇ީⲺ
:L)L㖇
㔒
൞ᛞⲺ〱ࣞ䇴༽ᡌㅊ䇦ᵢ⭫㝇Ⲻ:L)L䇴ᇐ⮂䶘сθֵ
⭞ᵢᨆבⲺ唎䇚ᆿޞࠣᦤⲱޛ95)Ჰ㜳㖇ީⲺ:L
)L㖇㔒Ⱦ
ᢉᔶ:HE⎅㿾ಞ
ᢉᔶ㖇享⎅㿾ಞθ䭤ޛ൦൶
ZZZP\YUIVJFRP
θ
ԛ䇵䰤95)Ჰ㜳㖇ީᡶࡑᔰⲺ⭞ᡭ⮂䶘Ⱦ
95)Ჰ㜳㖇ީᔰᴿP\YUIVJFRPⲺ66/䇚䇷θਥ⺤ؓ⎅
㿾ಞф95)Ჰ㜳㖇ީᆿޞ䙐ؗȾ❬㙂θᛞⲺ⎅㿾ಞਥ㜳Ր
ᨆ⽰䘏ж⿷ᴿ䇷ҜуؗԱȾ㤛ᛞᑂᵑᆿ㻻㠠ᐧⲺᆿޞ䇷
Ҝθ䈭৸㘹
95)Ჰ㜳㖇ީ㖇㔒ૂ,7ᢶᵥޢ/,7
ѣⲺㄖ㢸
൞䘔ࡦ95)㖇ީ
ѣ
ѣᮽ
ᘡ
ᘡ䙕䇴ᇐ
Ⲻᇘᡭㄥрᆿ㻻ᆿޞ䇷Ҝ
θԛҼ䀙ᴪཐؗᚥȾ
ⲱޛ95)Ჰ㜳㖇ީ
ֵ⭞ᵢᨆבⲺ唎䇚㇗⨼ⲱᖋࠣᦤȾ䰻䈱ᒬ95)
Ჰ㜳㖇ީ䇮ਥঅ䇤Ⱦ
ؤ᭯ᇼ⸷
俌⅗ⲱޛ95)Ჰ㜳㖇ީᰬθ
Րᕯ࠰ؤ᭯㇗⨼ᇼ⸷ૂ:L)LਙԚⲺ:HEᨆ⽰ネȾ
↚ᰬ
ᛞᗻ亱ؤ᭯р䘦ᇼ⸷ਙԚȾ
a.
൞᯦
᯦㇗⨼ᇼ⸷
ມߏ॰θᴵᦘ唎䇚Ⲻᇼ⸷Ⱦ൞⺤
⺤䇚
᯦㇗⨼ᇼ⸷
॰ตθ߃⅗䭤ޛ᯦Ⲻᇼ⸷ᒬ֒⺤䇚Ⱦ
b.
൞᯦
᯦:L)LਙԚ
ມߏ॰θ䭤ޛᒬᴵᦘ唎䇚Ⲻᇼ
⸷θ❬⛯࠱ؓ
ؓᆎ
Ⱦ
ԛའ㖇䇴ᇐ
a.
൞95)Ჰ㜳㖇ީⲺ䇴ᇐ⮂䶘ѣθሲ㡠㠩ć䇴㖤!
ԛའ㖇ĈȾ
b.
䈭⌞ᝅ,3൦൶॰ตᡶᱴ⽰Ⲻ൦൶Ⱦ唎䇚߫сθ95)Ჰ
㜳㖇ީ䞃㖤Ѱֵ⭞'+&3Ԅ㖇㔒ࣞᘷ᭬,3൦൶Ⱦྸ
᷒↚൦൶ᵠ㜳ᱴ⽰θ䈭ቓ䈋᯦⎅㿾ಞȾྸ᷒уᜩֵ⭞
'+&3θᛞਥԛ㕌䗇ԛའ㖇䇴ᇐθሼ↚䇴༽䞃㖤Ѱ䶏ᘷ,3
൦൶Ⱦ
c.
൞⎅㿾ಞ൦൶ṅѣ䗉ޛ↚,3൦൶θ䙐䗽ԛའ㖇㖇㔒䇵䰤
95)Ჰ㜳㖇ީȾ
䈭৸㘹
95)Ჰ㜳㖇ީ㖇㔒ૂ,7ᢶᵥޢ/,7
Ҽ䀙ᴪཐ䘿亯Ⱦ
㔜せᥦ♧㸸
ᙜᝍಟᨵWiFiⓗSSIDྡ⛠ᡈⓏධཱྀ௧ྡྷ㸪
Web
᭹ᑗ㔜ྐྵ㸪
ᝍ㟂せ⏝᪂ⓗཱྀ௧㔜᪂ຍධ
VRF ᬛ⬟⨒යⓗ Wi-Fi ⨒ࠋ ᅾ᯾ல⛣ୖ㸪
せồᝍඛ⾜ᛀཎ᭷ VRF ᬛ⬟⨒යⓗ Wi-Fi ⨒㸪↛
ྡྷᡯ⬟⏝᪂ཱྀ௧㔜᪂ຍධ฿⨒୰ࠋ
ѣ
ѣᮽ
ᘡ
ᘡ䙕䇴ᇐ
ֵ⭞95)Ჰ㜳㖇ީⴇ䇴༽
ᖉ95)Ჰ㜳㖇ީ䘔ࡦ+/,1.㖇㔒ᰬθ95)Ჰ㜳㖇ީ
Ր㠠ࣞᔶခᩒ㍘95)㌱㔕ૂ䇴༽ȾԄ95)Ჰ㜳㖇ީⲺ
⭞ᡭ⮂䶘ѣθḛⵁ䇴༽ࡍ㺞θ䈜㓼ḛⵁᩒ㍘ࡦⲺ95)䇴
༽Ⱦؤ᭯唎䇚95)䇴༽〦θԛᴪླ൦㺞⽰䇴༽ᵃࣗ
Ⲻグ䰪Ⱦᖉ൞
0HWDV\V
®ᾲᆽ㠠ࣞौ㌱㔕ѣᱴ⽰ᰬθр
䘦ሯ䇴༽〦Ⲻؤ᭯ሼਇᥛᖾླⲺ֒⭞Ⱦ
95)Ჰ㜳㖇ީ
95)Ჰ㜳㖇ީਥ䖱ᶴᇔ⧦95)㖇㔒ૂ
0HWDV\V
㌱
㔕䰪Ⲻ䳼ᡆȾ
• ֵ⭞ޭᴿ:L)Lࣕ㜳Ⲻ䇴༽δׁྸᲰ㜳⭫䈓Ƚᒩᶵ⭫
㝇ૂㅊ䇦ᵢ⭫㝇εᘡ䙕Ƚ䖱ᶴ൦䞃㖤㖇ީȾ
• ൞䙐䗽%$&QHW®অ䇤ੇᾲᆽ㠠ࣞौ㌱㔕࠼ӡᮦᦤҁࢃθḛ
ⵁૂᴪ᭯95)䇴༽〦Ⱦ
• 䙐䗽%$&QHW,3䳼ᡆθਥԚ
0HWDV\V
㌱㔕ᡌ㊱ղⲺᾲᆽ㠠
ࣞौ㌱㔕θᘡ䙕Ƚ䖱ᶴ൦ᩒ㍘ࡦ95)䇴༽ૂ⛯փؗᚥȾ
㔜せᥦ♧㸸
ಖ␃ᮏᣦ༡ࠋ Ꮽໟྵᑗ VRF ᬛ⬟⨒ය
ኞฟཁ⨨ྡྷ㸪ᝍᡤ㟂せⓗ㯱⏝ྡᐦࠋ
FRANÇAIS - Guide de démarrage
1
Brancher le VRF Smart Gateway à
l'équipement
Reportez-vous aux instructions d'installation du VRF
Smart Gateway (partie n° 24-10143-1183) pour fixer le
VRF Smart Gateway. Branchez la prise H-Link, la prise
Ethernet et l'alimentation externe.
Ethernet
H- Link
Power
Les DEL du VRF Smart Gateway clignotent, indiquant que
l'appareil est en cours d'initialisation. Lorsque la DEL Fault
s'éteint et que les DEL Wi-Fi clignotent l'une après l'autre,
le VRF Smart Gateway est prêt à être utilisé.
2
Se connecter au réseau Wi-Fi
du
VRF Smart Gateway
Dans les paramètres Wi-Fi de votre appareil mobile ou
ordinateur portable, connectez-vous au réseau Wi-Fi du
VRF Smart Gateway à l'aide de vos identifiants.
3
Ouvrir un navigateur Web
Redirigez votre navigateur vers www.myvrfsg.com pour
ouvrir l'interface du navigateur VRF Smart Gateway. Le
VRF Smart Gateway est fourni avec un certificat SSL privé
myvrfsg.com installé afin de garantir une communication
sécurisée avec le VRF Smart Gateway. Néanmoins, rien
n'indique que ce certificat est fiable sur un navigateur. Si
vous souhaitez installer votre propre certificat, reportez-
FRANÇAIS - Guide de démarrage
vous à la rubrique Installer un certificat de sécurité sur un
client connecté au VRF Gateway du Bulletin de conseils
techniques informatiques et de réseau du VRF Smart
Gateway (LIT-12012341) pour plus de renseignements.
4
Se connecter au VRF Smart Gateway
Utilisez les identifiants de connexion administrateur par
défaut fournis au début de ce guide. Vous devez lire et
accepter le contrat de licence du VRF Smart Gateway.
5
Changer le mot de passe
La première fois que vous vous connectez au VRF Smart
Gateway, la
page Web Modifier le mot de passe et la phrase
secrète s'affiche. Vous devez modifier le mot de passe
administrateur et la phrase secrète Wi-Fi.
a.
Remplacez le mot de passe par défaut dans le
champ Nouveau mot de passe administrateur.
Confirmez la modification en saisissant le nouveau
mot de passe dans le champ Vérifier le nouveau
mot de passe administrateur.
b.
Remplacez la phrase secrète Wi-Fi dans le
champ Nouvelle phrase secrète Wi-Fi puis
cliquez sur Sauvegarder.
6
Configuration Ethernet
a.
À partir de l'interface utilisateur du VRF Smart Gateway,
accédez à Paramètres > Ethernet.
b.
Saisissez l'adresse dans le champ Adresse IP. Par
défaut, le VRF Smart Gateway est configuré pour
recevoir de manière dynamique une adresse IP depuis
votre réseau via un DHCP. Si l'adresse IP n'apparaît pas,
IMPORTANT : Une fois la phrase secrète Wi-Fi ou le
SSID modifiés, le serveur Internet redémarre et
vous devez rejoindre le réseau Wi-Fi VRF Smart
Gateway à l'aide de la nouvelle phrase secrète. Sur
certains appareils mobiles, vous devez sélectionner
et oublier le réseau Wi-Fi VRF Smart Gateway
d'origine avant de rejoindre le réseau grâce à la
nouvelle phrase secrète.
FRANÇAIS - Guide de démarrage
actualisez la page. Si vous ne souhaitez pas utiliser le
DHCP, vous pouvez, dans ce cas, modifier les
paramètres Ethernet afin de configurer une adresse IP
statique pour cet appareil.
c.
Saisissez cette adresse IP dans la barre d'adresse de
votre navigateur afin d'accéder au VRF Smart Gateway
via un réseau Ethernet.
Reportez-vous au Bulletin de conseils techniques
informatiques et de réseau du VRF Smart Gateway (LIT-
12012341) pour plus d'options.
7
Utiliser le VRF Smart Gateway
Lorsque le VRF Smart Gateway est connecté au réseau
H-LINK, il commence automatiquement à identifier le
système et les appareils VRF. Consultez la Liste des
appareils à partir de l'interface utilisateur du VRF Smart
Gateway afin de voir les appareils VRF identifiés.
Modifiez le nom des appareils VRF par défaut afin qu'ils
correspondent mieux aux espaces que les appareils
servent. Cela donnera plus de sens au nom des
appareils lorsqu'ils sont présentés dans le système
d'automatisation de bâtiments Metasys®.
VRF Smart Gateway
Le VRF Smart Gateway permet une configuration
simple de l'intégration entre le réseau de commandes
VRF et le système Metasys.
•
Configuration simple et rapide de Gateway à l'aide
d'appareils compatibles avec le Wi-Fi tels que des
smartphones, des tablettes et des ordinateurs portables.
• Consulter et modifier le nom des appareils VRF avant de les
exposer, via le protocole BACnet® à un système
d'automatisation de bâtiments.
• Identifier rapidement et facilement les appareils et les points
VRF via une intégration BACnet/IP dans le système Matesys
ou un système d'automatisation de bâtiments similaire.
IMPORTANT : Sauvegardez ce guide. Il contient le
nom d'utilisateur et le mot de passe par défaut que
peuvent être nécessaires pour rétablir les réglages
par défaut du VRF Smart Gateway.
ESPAÑOL - Guía rápida de inicio
1
Conecte la Puerta de Enlace Inteligente
VRF al Equipo
Consulte las Instrucciones para la instalación de la Puerta
de Enlace Inteligente VRF (N.° de pieza 24-10143-1183)
para el montaje de dicho dispositivo. Conecte la conexión
de H-Link, la conexión Ethernet y la fuente de
alimentación externa.
Ethernet
H- Link
Power
Los indicadores LED de la Puerta de Enlace Inteligente VRF
parpadean, lo que indica que el dispositivo se está
inicializando. Cuando el LED de fallo se apaga y los LEDs
Wi-Fi parpadean sucesivamente, la Puerta de Enlace
Inteligente VRF está lista para su uso.
2
Conéctese a la red Wi-Fi de la
Puerta de Enlace Inteligente
VRF
En la configuración de Wi-Fi de su dispositivo móvil o
equipo portátil conéctese a la red Wi-Fi de la Puerta de
Enlace Inteligente VRF utilizando sus credenciales.
3
Abra un Navegador Web
Dirija su navegador a www.myvrfsg.com para abrir la
Interfaz del Navegador de la Puerta de Enlace Inteligente
VRF. La Puerta de Enlace Inteligente VRF se envía con un
certificado privado SSL myvrfsg.com instalado para
ESPAÑOL - Guía rápida de inicio
garantizar una comunicación segura con el dispositivo. Sin
embargo, este certificado no indica que sea de confianza en
un Navegador. Si desea instalar su propio certificado,
consulte la sección Instalación de un certificado de
seguridad en un Cliente que está Conectado a la Puerta de
Enlace Inteligente VRF en el Boletín Técnico y Guía
orientativa Informática de la Puerta de Enlace Inteligente
VRF (LIT-12012341) para ampliar información.
4
Inicie sesión en la Puerta de Enlace
Inteligente VRF
Utilice las credenciales predeterminadas de inicio de sesión
de Administrador aparecidas al principio de esta guía. Lea y
acepte el contrato de licencia de la Puerta de Enlace
Inteligente VRF.
5
Cambie las contraseñas
La primera vez que inicie sesión en la Puerta de Enlace
Inteligente VRF, aparecerá la página web para
Cambiar contraseña y frase secreta. Debe cambiar la
contraseña de Administrador y la frase secreta de Wi-Fi.
a.
Reemplace la contraseña predeterminada en el
campo New Admin Password (Nueva Contraseña
de Administrador). Confirme el cambio mediante el
ingreso de la nueva contraseña en el campo Verify
New Admin Password (Verificar Nueva Contraseña
del Administrador).
b.
Reemplace la frase secreta en el campo New
Wi-Fi Passphrase (Nueva frase secreta de Wi-
Fi) y haga clic Save (Guardar).
6
Configuración de Ethernet
a.
En la Interfaz de Usuario de la Puerta de Enlace Inteligente
IMPORTANTE: Después de cambiar la frase secreta de
Wi-Fi o SSID, el servidor web se reiniciará y usted debe
reincorporarse a la red Wi-Fi de la Puerta de Enlace
Inteligente VRF utilizando la nueva frase secreta. En
algunos dispositivos móviles, debe seleccionar y olvidar la
red Wi-Fi original de la Puerta de Enlace Inteligente VRF
antes de reincorporarse a la red con la nueva frase secreta.
ESPAÑOL - Guía rápida de inicio
VRF, vaya a Settings > Ethernet (Configuración>Ethernet).
b.
Anote la dirección en el campo IP Address (Dirección IP). Por
defecto, la Puerta de Enlace Inteligente VRF está configurada
para recibir de forma dinámica una dirección IP a partir de su
red mediante DHCP. Si la dirección IP no aparece, actualice la
pantalla. Si no desea utilizar el DHCP, puede editar los
parámetros de Ethernet para configurar una dirección IP
estática para el dispositivo.
c.
Ingrese esta dirección IP en la barra de direcciones del
navegador para acceder a la Puerta de Enlace Inteligente VRF
través de una red Ethernet.
Consulte el Boletín Técnico y Guía orientativa Informática sobre
la red de la Puerta de Enlace Inteligente VRF (LIT-12012341)
para más opciones.
7
Use la Puerta de Enlace Inteligente VRF
Cuando la Puerta de Enlace Inteligente VRF está conectada a
la red H-LINK, el dispositivo se inicia automáticamente para
detectar el sistema y los dispositivos VRF. Vea la lista de
dispositivos desde la Interfaz de Usuario de la Puerta de
Enlace Inteligente VRF para ver los dispositivos VRF
detectados. Modifique los nombres predeterminados de los
dispositivos VRF para representar mejor los espacios que los
dispositivos están sirviendo. Esto hará que los nombres de los
dispositivos sean más significativos cuando se presenten en el
Sistema BMS Metasys®.
Puerta de Enlace Inteligente VRF
La Puerta de Enlace Inteligente VRF proporciona una
configuración fácil de la integración entre la red de los
controles VRF y el sistema Metasys.
• Configuración rápida y fácil de la Puerta de Enlace con
dispositivos habilitados para Wi-Fi, tales como teléfonos
inteligentes, tablets y computadoras portátiles.
• Vea y cambie los nombres de los dispositivos VRF antes de
exponerlos sobre el protocolo BACnet® a un sistema de
BMS.
• Descubra los dispositivos VRF y sus puntos de forma rápida
y sencilla a través de una integración BACnet/IP en el
sistema Metasys o sistema BMS similar.
ESPAÑOL - Guía rápida de inicio
24- 10737- 156, Rev. A
European Single Point of Contact:
JOHNSON CONTROLS
WESTENDHOF 3
45143 ESSEN
GERMANY
NA/SA Single Point of Contact:
JOHNSON CONTROLS
507 E MICHIGAN ST
MILWAUKEE WI 53202
USA
APAC Single Point of Contact:
JOHNSON CONTROLS
C/O CONTROLS PRODUCT MANAGEMENT
NO. 22 BLOCK D NEW DISTRICT
WUXI JIANGSU PROVINCE 214142
CHINA
IMPORTANTE: Guarde esta guía. Contiene la información
sobre el nombre de usuario y la contraseña
predeterminados que puede ser necesarios para
restablecer la Puerta de Enlace Inteligente VRF a los
valores predeterminados de configuración de fábrica.
Part No. 24-10737-156, Rev. A
ESPAÑOL - Guía rápida de inicio
© Copyright 2017 Johnson Controls
All rights reserved.
Any unauthorized use or copying is strictly prohibited.
www.johnsoncontrols.com
-
 1
1
-
 2
2


York VRF Smart Gateway Schnellstartanleitung
- Typ
- Schnellstartanleitung
in anderen Sprachen
Andere Dokumente
-
Fujitsu UTY-DCGGZ1 Bedienungsanleitung
-
-
Fujitsu UTY-DCGGZ2 Bedienungsanleitung
-
Panasonic CZCSWSCC2 Bedienungsanleitung
-
Simrad GO7 Installationsanleitung
-
Simrad NSO evo3S MPU Installationsanleitung
-
-
-
Simrad NSS evo3S Installationsanleitung
-
Fujitsu UTY-ABGXZ1 Bedienungsanleitung