
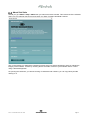
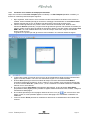
Instructions for Use
Viot™
Suite
Science
made
smarter
D-0118679-D – 2021/05
EN Instructions for Use
SV Bruksanvisning
DA Brugsanvisning
NO Bruksanvisning
DE Gebrauchsanweisung
FR Instructions d’utilisation
IT Istruzioni per l'uso
ES Manual de instrucciones


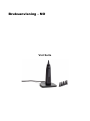
Instructions for Use - EN
Viot™ Suite

Table of contents
1 Introduction ............................................................................................................................................... 1
About this Manual .............................................................................................................................. 1
Intended use ...................................................................................................................................... 1
Intended User Profile ......................................................................................................................... 1
2 System setup ............................................................................................................................................ 2
System requirements ......................................................................................................................... 2
2.1.1 Supported Operating Systems ................................................................................................... 2
2.1.2 PC Security ................................................................................................................................ 2
2.1.3 Supported Noah4 office systems ............................................................................................... 2
Software installation ........................................................................................................................... 3
2.2.1 Software installation Windows®10, Windows®7, Windows®8.1 and Windows®8 ................... 3
3 Using Interacoustics Video Otoscope .................................................................................................... 7
Pre-heating and light source .............................................................................................................. 7
White balance .................................................................................................................................... 7
Capturing pictures/video .................................................................................................................... 7
Hardware Manual .............................................................................................................................. 7
4 Using the Viot™ Suite .............................................................................................................................. 8
Launching from Databases ................................................................................................................ 8
4.1.1 Noah 4 ....................................................................................................................................... 8
4.1.2 Working with OtoAccess® ......................................................................................................... 8
How to configure an alternative data recovery location ..................................................................... 9
General operations within the Viot™Suite ....................................................................................... 10
About Viot Suite ............................................................................................................................... 12
The Print wizard ............................................................................................................................... 13
4.5.1 Designing a customized print template .................................................................................... 15
4.5.2 Design elements ...................................................................................................................... 16
Creating Reports .............................................................................................................................. 21
4.6.1 Operation of the Report Editor ................................................................................................. 21
4.6.2 The Report editor ..................................................................................................................... 22
4.6.3 The Template editor ................................................................................................................. 23

Viot™ - Instructions for Use - EN Page 1
1 Introduction
About this Manual
This manual is valid for the Viot™ Suite. This product is manufactured by:
Interacoustics A/S
Audiometer Allé 1
5500 Middelfart
Denmark
Tel.: +45 6371 3555
Fax: +45 6371 3522
E-mail: info@interacoustics.com
Web: www.interacoustics.com
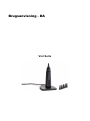
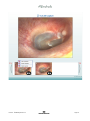
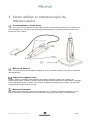
Intended use
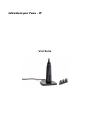
The Viot™ is used for the objective viewing of the external auditory meatus and canal before, during and
after any audiological procedure.
The Viot™ Suite has been created to control the Viot™ hardware allowing viewing, capture and storage of
the images and videos created through use of this product.
Intended User Profile
This product has been designed for use by trained audiological and medical professionals for examination of
the ear and external ear.

Viot™ - Instructions for Use - EN Page 2
2 System setup
System requirements
PC minimum requirements:
• 2 GHz Intel i3 processor
• 4GB Ram
• 2.5 GB available disk space
• 1024x768 resolution (1280x1024 or higher recommended)
• Hardware accelerated DirectX/Direct3D graphics card.
2.1.1 Supported Operating Systems
• Windows® 7 SP1 (x86 and x64)
• Windows® 8 / 8.1 (x64)
• Windows® 10 (x64)
Windows® is a registered trademark of Microsoft Corporation in the United States and other countries.
Important: make sure you have the latest service packs and critical updates installed for the version of
Windows® that you are running.
Should you desire to connect the Viot™ via a USB hub then please ensure that it is a powered hub.
2.1.2 PC Security
We recommend that the user has taken sufficient measures regarding PC security. This may include the
installation and use of a virus scanner, firewall and restricted user access. For further information on this we
recommend the user consults their system administrator.
Using operating systems where Microsoft have discontinued software and security support will increase the
risk for viruses and malware, which may result in breakdowns, data loss and data theft and misuse.
Interacoustics A/S cannot be held liable for your data. Some Interacoustics A/S products support or may
work with operating systems unsupported by Microsoft. Interacoustics A/S recommends you to always use
Microsoft supported operating systems that are kept fully security updated.
2.1.3 Supported Noah4 office systems
We are compatible with all NOAH-integrated office systems which are running on NOAH and NOAH engine.

Viot™ - Instructions for Use - EN Page 3
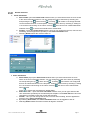
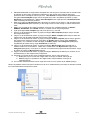
Software installation
Do not connect the Hardware to the computer before the software has been installed!
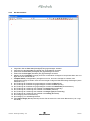
2.2.1 Software installation Windows®10, Windows®7, Windows®8.1 and Windows®8
Insert the installation USB drive and follow the steps below to install the Viot™ Suite software. To find the
installation file; click “Start”, then go to “My Computer” and double click the USB drive to view the contents of
the installation USB. Double click the “setup.exe” file to initiate the installation.

Viot™ - Instructions for Use - EN Page 4
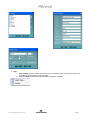
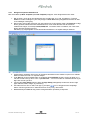
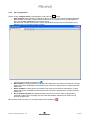
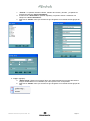
Please ensure that you have checked the box to agree to the license terms and conditions. Once you have
done this it will allow you to proceed as the ’Install’ button will be active.
Clicking ’Options’ will allow you to change the installation path. If you proceed without clicking and changing
this it will go to the default location.
Note: The installation of Interacoustics Universe is included within this step. It is by default checked on; you
can disable this if you wish.
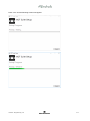
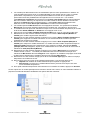
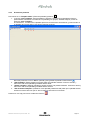
1) Press ”Install” and the following screen appears:
Please click “Yes” to allow the software to make changes and install the required files to your computer.
Press ”Yes” and the following screens will appear:

Viot™ - Instructions for Use - EN Page 5

Viot™ - Instructions for Use - EN Page 6
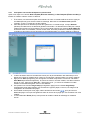
On completion the following screen will appear.

Viot™ - Instructions for Use - EN Page 7
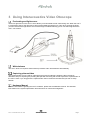
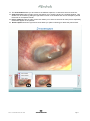
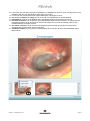
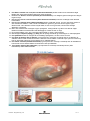
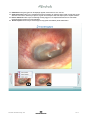
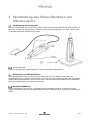
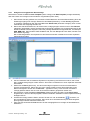
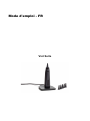
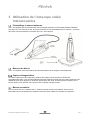
3 Using Interacoustics Video Otoscope
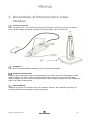
Pre-heating and light source
There is a light source in the Viot™ which allows you to illuminate the ear canal during use. When the Viot™
is connected to the PC the light source will not immediately be switched on. Only when opening the Suite
you will notice that the light source and camera image is enabled allowing you to view the image which the
Viot™ can capture.
White balance
The Viot™ does not require a white-balance procedure and it will handle this automatically.
Capturing pictures/video
The Capture button can be used for capturing pictures and for starting & stopping video recordings.
Alternative ways of capturing are pressing the spacebar and using the mouse to press the capture button in
the Viot™ Suite. If you long-press the capture button then it will inform the suite that you wish to swap
earside.
Hardware Manual
For more information regarding the Viot™ hardware, please see the hardware manual. This includes
information on the system specification and instructions on care and management.

Viot™ - Instructions for Use - EN Page 8
4 Using the Viot™ Suite
NOTICE
Make sure that the video otoscope is properly connected to your PC before starting the Viot™ Suite!
Launching from Databases
4.1.1 Noah 4
If you are using HIMSA’s Noah 4, the Viot™ Suite software will install itself automatically in the menu bar on
the start page, along with all the other software modules.
4.1.2 Working with OtoAccess®
For further instructions about working with OtoAccess®, please see the OtoAccess® operation manual.

Viot™ - Instructions for Use - EN Page 9
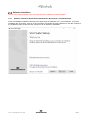
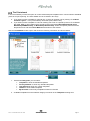
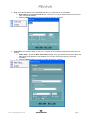
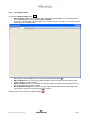
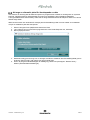
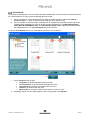
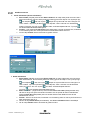
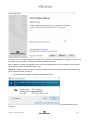
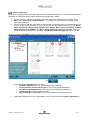
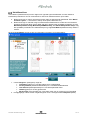
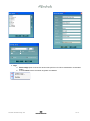
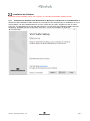
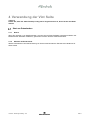
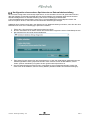
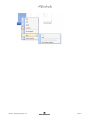
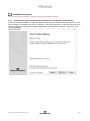
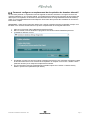
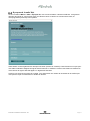
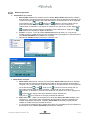
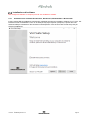
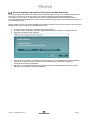
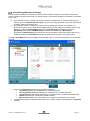
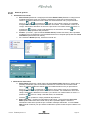
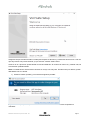
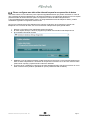
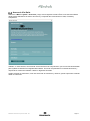
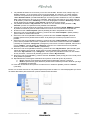
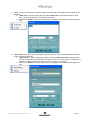
How to configure an alternative data recovery location
The Affinity/Equinox Suite has a backup location for data to be written in the case that the software is
accidentally terminated or the system crashes. The following locations are the default storage folder for
recovery or standalone databasesC:\ProgramData\Interacoustics\Affinity Suite\ or
C:\ProgramData\Interacoustics\Equinox Suite\ but they can be amended via the following instructions.
NOTE: This feature can be used to change the recovery location when you are working through a database
as well as the standalone save location.
1. Go to C:\Program Files (x86)\Interacoustics\Viot™ Suite
2. In this folder find and launch the executable program titled FolderSetupViot™.exe
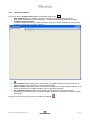
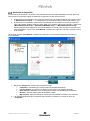
3. The below pop up will appear.
4. Using this tool, you can specify the location you wish to store the standalone database or the
recovery data by clicking on the ‘Select Folder’ button and specifying the desired location.
5. Should you wish to revert the data location to the default then simply click on the ‘Restore factory
default’ button.

Viot™ - Instructions for Use - EN Page 10
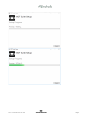
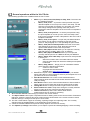
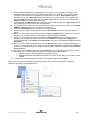
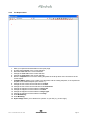
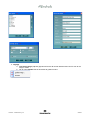
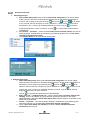
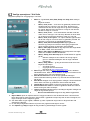
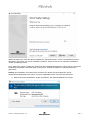
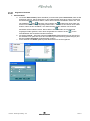
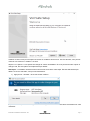
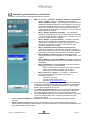
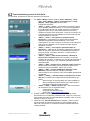
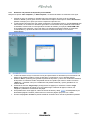
General operations within the Viot™Suite
The following operations are available within the Viot™ Suite:
1. Menu to go to Print, View, Edit, Setup or Help, Print. The menu has
the following structure:
• Menu | Print | Print … to print the current protocol using the
default template as it is set up in the Viot™ 440 setup. You will
enter the print window from where you can select your printer
and change settings before printing. Note that you are
prompted to select a template if in the Viot™440 no template is
selected.
• Menu | Print | Print preview… to see the print preview using
the print template as it is set up in the Viot™440 setup. Note
that you are prompted to select a template if in the Viot™440 no
template is selected
• Menu | Print | Print layout… to open the print wizard window
from where you can select a template to print the current
protocol. See paragraph 5.1 5.1for operating the print wizard.
• Menu | View | Save window position stores the current size
and positioning of the Viot™ Suite. Next time the suite is
opened it will default to saved size and position.
• Menu | Edit | Export to file allows you to export the currently
selected picture to a BMP, JPEG, TIFF or PNG file
• Menu | Edit | Export to MSPaint allows you to export the
currently selected picture as a BMP file directly into MSPaint
• Menu | Setup | Viot™440 setup opens the main setup window
in which you
o define the location where recorded videos are stored
o enter the print setup from which the default print template
is selected
• Menu | Help | About … brings you to an informative window
which shows the following information:
o Version of Viot™ Suite
o Copyright Interacoustics 2009
o Website link to www.interacoustics.com
2. Print button to print current viewed protocol directly to your default
printer. Note that you are prompted to select a print template if it is not
yet defined in the Viot™440 setup.
3. Save & New Session icon to save current measurements to
OtoAccess® or Noah and start a new session with all included tests
ready for testing.
4. Save & Exit button to save current measurements to OtoAccess® or
Noah, close the Viot™ Suite and go back to OtoAccess® or Noah.
5. Change Ear button to change from left to right ear and vice versa.
6. Select camera live view to swap from seeing the currently selected
picture or video to the live view from the video otoscope.
7. Historic session drop down menu where earlier stored
measurements can be chosen for reviewing.
8. Go to current session button brings you back to the current session.
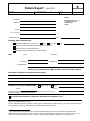
9. The Report editor button opens a separate window for adding notes to the current session. Remember
that when saving the session this report is also saved to OtoAccess®. In the current version it means
that after saving no changes to this report can be made.
10. The Viot™ Suite allows 2 types of recording, capturing images and capturing video. The currently
selected mode is highlighted blue or red, depending on the chosen ear.
11. A white checkmark indicates that (at least some) captures are stored in memory.
12. The Capture (and Stop) button allows you to capture a picture and starting/stopping a video recording.

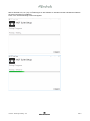
Viot™ - Instructions for Use - EN Page 11
13. The arrow buttons allow you to browse to the different captures, in case there are more than four.
14. View at monitor under the right mouse click allows you to view the picture in a separate window. This
window can be resized by pulling the right bottom corner of the window and can for example be placed
full screen on a separate monitor.
15. Insert comment under the right mouse click allows you to insert a comment for each picture separately.
Comments appear on the printout.
16. Delete capture under the right mouse click allows you (after confirming) to delete the picture/video.

Viot™ - Instructions for Use - EN Page 12
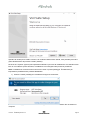
About Viot Suite
Should you go to Menu > Help > About then you will see the below window. This is the area of the software
where you can manage license keys and check your Suite, Firmware and Build Versions.
Also, in this window you will find the Checksum section which is a feature designed to help you identify the
integrity of the software. It works by checking the file and folder content of your software version. This is
using a SHA-256 algorithm.
On opening the checksum, you will see a string of characters and numbers, you can copy this by double
clicking on it.

Viot™ - Instructions for Use - EN Page 13
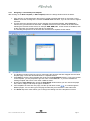
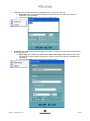
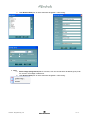
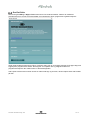
The Print wizard
In the Print Wizard you have the option to create customized print templates which can be linked to individual
protocols for quick printing. The Print Wizard can be accessed in two ways.
a. If you want to make a template for general use, or select an existing one for printing: Go to Menu/
File/Print Layout… in any of the Affinity2 Suite tabs (AUD, REM or HIT)
b. If you want to make a template or select an existing one to link to a specific protocol: Go to Module
tab (AUD, REM, or HIT) relating to the specific protocol and select Menu/Setup/AC440 setup,
Menu/Setup/REM440 setup, or Menu/Setup HIT440 setup. Select the specific protocol from the
drop down menu and select Print Wizard at the bottom of the window.
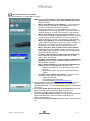
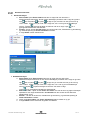
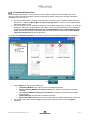
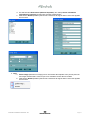
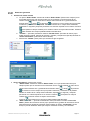
Now the Print Wizard window opens and shows the following information and functionalities:
1. Underneath Categories you can select
• Templates to show all available templates
• Factory defaults to show only standard templates
• User defined to show only custom templates
• Hidden to show hidden templates
• My favorites to show only templates marked as a favorite
2. Available templates from the selected category are shown in the Templates viewing area.
1
2
3
4
5
6
11
12a
13
12b

Viot™ - Instructions for Use - EN Page 14
3. Factory default templates are recognized by the lock icon. They ensure that you always have a
standard template and do not need to create a customized one. However, they cannot be edited
according to personal preferences without resaving with a new name. User defined/created
templates can be set to Read-only (showing the lock icon), by right clicking on the template and
selecting Read-only from the drop down list. Read-only status can also be removed from User
defined templates by following the same steps.
4. Templates added to My favorites are marked with a star. Adding templates to My favorites allows
quick viewing of your most commonly used templates.
5. The template that is attached to the selected protocol when entering the print wizard via the AC440,
REM440 or HIT440 window is recognized by a checkmark.
6. Press the New Template button to open a new empty template.
7. Select one of the existing templates and press the Edit Template button to modify the selected
layout.
8. Select one of the existing templates and press the Delete Template button to delete the selected
template. You will be prompted to confirm that you want to delete the template.
9. Select one of the existing templates and press the Hide Template button to hide the selected
template. The template will now be visible only when Hidden is selected under Categories. To
unhide the template, select Hidden under Categories, right click on the desired template and select
View/Show.
10. Select one of the existing templates and press the My Favorites button to mark the template as a
favorite. The template can now be quickly found when My Favorites is selected under Categories.
To remove a template marked with a star from My Favorites, select the template and press the My
Favorites button.
11. Select one of the templates and press the Preview button to print preview the template on screen.
12. Depending how you reached the Print Wizard, you will have the option to press
a. Print for using the selected template for printing or press
b. Select for dedicating the selected template to the protocol from which you got into the Print
Wizard.
13. To leave the Print Wizard without selecting or changing a template press Cancel.
Right clicking on a specific template provides a drop down menu offering an alternative method for
performing the options as described above:

Viot™ - Instructions for Use - EN Page 15
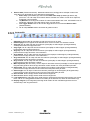
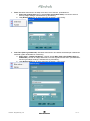
4.5.1 Designing a customized print template
After clicking on the New Template (or Edit Template) button the design window shows as below.
1. Upon opening, a short description about how to create a template will show on the screen. Press
Close to close the message box. Uncheck the Show hints checkbox, if you do not want it to appear
next time.
2. This list shows the elements which can be dragged onto the blank template. When General is
selected, the general elements are listed. Template elements for each module will be listed when
selecting the relevant module name, for example AUD, REM, HIT. If other suites are installed, such
as the Titan suite, the relevant suites will also be displayed.
The handling and options for all elements are discussed in a separate section below.
3. The taskbar includes numerous icons for customizing the elements that are dragged onto the blank
template page. These are described below in a separate section.
4. Press Save to save the print template and go back to the Print Wizard window. If you have created
a new template, you are prompted to give it a name. Press Save As… if you have modified an
existing template and want to save under a different name.
5. Pressing the Page Setup button opens the Page Setup window where you can choose the paper
size, source, margins and setup the paper orientation.
6. If the template has more than one page, use the up and down arrows, , to scroll through the
different pages. You can also type in the page number that you would like to view and/or edit.
7. The Zoom drop down menu allows you to change the viewing size of the template on screen.

Viot™ - Instructions for Use - EN Page 16
4.5.2 Design elements
Template elements are added to the template page using the select, drag and drop function.
Click on the desired element and drag it onto the template page. The element will appear as a small box in
the upper left hand corner. Resize the element to the desired size and drag it to an appropriate location.
The following elements are available for the AUD, REM, HIT and Video Otoscopy modules. The section
below describes the options available within each element once dragged onto the template. Right clicking
on any element will list its options for customization.
Seite laden ...
Seite laden ...
Seite laden ...
Seite laden ...
Seite laden ...
Seite laden ...
Seite laden ...
Seite laden ...
Seite laden ...
Seite laden ...
Seite laden ...
Seite laden ...
Seite laden ...
Seite laden ...
Seite laden ...
Seite laden ...
Seite laden ...
Seite laden ...
Seite laden ...
Seite laden ...
Seite laden ...
Seite laden ...
Seite laden ...
Seite laden ...
Seite laden ...
Seite laden ...
Seite laden ...
Seite laden ...
Seite laden ...
Seite laden ...
Seite laden ...
Seite laden ...
Seite laden ...
Seite laden ...
Seite laden ...
Seite laden ...
Seite laden ...
Seite laden ...
Seite laden ...
Seite laden ...
Seite laden ...
Seite laden ...
Seite laden ...
Seite laden ...
Seite laden ...
Seite laden ...
Seite laden ...
Seite laden ...
Seite laden ...
Seite laden ...
Seite laden ...
Seite laden ...
Seite laden ...
Seite laden ...
Seite laden ...
Seite laden ...
Seite laden ...
Seite laden ...
Seite laden ...
Seite laden ...
Seite laden ...
Seite laden ...
Seite laden ...
Seite laden ...
Seite laden ...
Seite laden ...
Seite laden ...
Seite laden ...
Seite laden ...
Seite laden ...
Seite laden ...
Seite laden ...
Seite laden ...
Seite laden ...
Seite laden ...
Seite laden ...
Seite laden ...
Seite laden ...
Seite laden ...
Seite laden ...
Seite laden ...
Seite laden ...
Seite laden ...
Seite laden ...
Seite laden ...
Seite laden ...
Seite laden ...
Seite laden ...
Seite laden ...
Seite laden ...
Seite laden ...
Seite laden ...
Seite laden ...
Seite laden ...
Seite laden ...
Seite laden ...
Seite laden ...
Seite laden ...
Seite laden ...
Seite laden ...
Seite laden ...
Seite laden ...
Seite laden ...
Seite laden ...
Seite laden ...
Seite laden ...
Seite laden ...
Seite laden ...
Seite laden ...
Seite laden ...
Seite laden ...
Seite laden ...
Seite laden ...
Seite laden ...
Seite laden ...
Seite laden ...
Seite laden ...
Seite laden ...
Seite laden ...
Seite laden ...
Seite laden ...
Seite laden ...
Seite laden ...
Seite laden ...
Seite laden ...
Seite laden ...
Seite laden ...
Seite laden ...
Seite laden ...
Seite laden ...
Seite laden ...
Seite laden ...
Seite laden ...
Seite laden ...
Seite laden ...
Seite laden ...
Seite laden ...
Seite laden ...
Seite laden ...
Seite laden ...
Seite laden ...
Seite laden ...
Seite laden ...
Seite laden ...
Seite laden ...
Seite laden ...
Seite laden ...
Seite laden ...
Seite laden ...
Seite laden ...
Seite laden ...
Seite laden ...
Seite laden ...
Seite laden ...
Seite laden ...
Seite laden ...
Seite laden ...
Seite laden ...
Seite laden ...
Seite laden ...
Seite laden ...
Seite laden ...
Seite laden ...
Seite laden ...
Seite laden ...
Seite laden ...
Seite laden ...
Seite laden ...
Seite laden ...
Seite laden ...
Seite laden ...
Seite laden ...
Seite laden ...
Seite laden ...
Seite laden ...
Seite laden ...
Seite laden ...
Seite laden ...
Seite laden ...
Seite laden ...
Seite laden ...
Seite laden ...
Seite laden ...
Seite laden ...
Seite laden ...
Seite laden ...
Seite laden ...
Seite laden ...
Seite laden ...
Seite laden ...
Seite laden ...
Seite laden ...
Seite laden ...
Seite laden ...
Seite laden ...
-
 1
1
-
 2
2
-
 3
3
-
 4
4
-
 5
5
-
 6
6
-
 7
7
-
 8
8
-
 9
9
-
 10
10
-
 11
11
-
 12
12
-
 13
13
-
 14
14
-
 15
15
-
 16
16
-
 17
17
-
 18
18
-
 19
19
-
 20
20
-
 21
21
-
 22
22
-
 23
23
-
 24
24
-
 25
25
-
 26
26
-
 27
27
-
 28
28
-
 29
29
-
 30
30
-
 31
31
-
 32
32
-
 33
33
-
 34
34
-
 35
35
-
 36
36
-
 37
37
-
 38
38
-
 39
39
-
 40
40
-
 41
41
-
 42
42
-
 43
43
-
 44
44
-
 45
45
-
 46
46
-
 47
47
-
 48
48
-
 49
49
-
 50
50
-
 51
51
-
 52
52
-
 53
53
-
 54
54
-
 55
55
-
 56
56
-
 57
57
-
 58
58
-
 59
59
-
 60
60
-
 61
61
-
 62
62
-
 63
63
-
 64
64
-
 65
65
-
 66
66
-
 67
67
-
 68
68
-
 69
69
-
 70
70
-
 71
71
-
 72
72
-
 73
73
-
 74
74
-
 75
75
-
 76
76
-
 77
77
-
 78
78
-
 79
79
-
 80
80
-
 81
81
-
 82
82
-
 83
83
-
 84
84
-
 85
85
-
 86
86
-
 87
87
-
 88
88
-
 89
89
-
 90
90
-
 91
91
-
 92
92
-
 93
93
-
 94
94
-
 95
95
-
 96
96
-
 97
97
-
 98
98
-
 99
99
-
 100
100
-
 101
101
-
 102
102
-
 103
103
-
 104
104
-
 105
105
-
 106
106
-
 107
107
-
 108
108
-
 109
109
-
 110
110
-
 111
111
-
 112
112
-
 113
113
-
 114
114
-
 115
115
-
 116
116
-
 117
117
-
 118
118
-
 119
119
-
 120
120
-
 121
121
-
 122
122
-
 123
123
-
 124
124
-
 125
125
-
 126
126
-
 127
127
-
 128
128
-
 129
129
-
 130
130
-
 131
131
-
 132
132
-
 133
133
-
 134
134
-
 135
135
-
 136
136
-
 137
137
-
 138
138
-
 139
139
-
 140
140
-
 141
141
-
 142
142
-
 143
143
-
 144
144
-
 145
145
-
 146
146
-
 147
147
-
 148
148
-
 149
149
-
 150
150
-
 151
151
-
 152
152
-
 153
153
-
 154
154
-
 155
155
-
 156
156
-
 157
157
-
 158
158
-
 159
159
-
 160
160
-
 161
161
-
 162
162
-
 163
163
-
 164
164
-
 165
165
-
 166
166
-
 167
167
-
 168
168
-
 169
169
-
 170
170
-
 171
171
-
 172
172
-
 173
173
-
 174
174
-
 175
175
-
 176
176
-
 177
177
-
 178
178
-
 179
179
-
 180
180
-
 181
181
-
 182
182
-
 183
183
-
 184
184
-
 185
185
-
 186
186
-
 187
187
-
 188
188
-
 189
189
-
 190
190
-
 191
191
-
 192
192
-
 193
193
-
 194
194
-
 195
195
-
 196
196
-
 197
197
-
 198
198
-
 199
199
-
 200
200
-
 201
201
-
 202
202
-
 203
203
-
 204
204
-
 205
205
-
 206
206
-
 207
207
-
 208
208
-
 209
209
-
 210
210
-
 211
211
-
 212
212
-
 213
213
-
 214
214
-
 215
215


in anderen Sprachen
Verwandte Papiere
-
 Interacoustics Diagnostic Suite Bedienungsanleitung
-
 Interacoustics Callisto™ Bedienungsanleitung
-
Interacoustics affinity 2.0 Bedienungsanleitung
-
Interacoustics Affinity Compact Bedienungsanleitung
-
-
 Interacoustics Callisto™ Bedienungsanleitung
-
 Interacoustics ASSR Instructions For Use Manual
-
 Interacoustics AT235 Bedienungsanleitung


