
1 / 12
MA251 (de_en) 4866N85000
Bedienungsanleitung
MA251 (de_en)
Operating instructions
Crimpzange PV-CZM Crimping pliers PV-CZM
Inhalt
Hinweis zur Pflege der Crimpzange ���������������������������������������������1
Sicherheitshinweise ���������������������������������������������������������������������2
Zange bestückt für MC4 Steckverbinder �������������������������������������3
Zange bestückt für MC4-EVO 2 Steckverbinder �������������������������6
Crimpeinsatz auswechseln ����������������������������������������������������������8
Crimpen ������������������������������������������������������������������������������������10
Content
Care instructions��������������������������������������������������������������������������1
Safety Instructions �����������������������������������������������������������������������2
Crimping pliers equipped for MC4 connectors �����������������������������3
Crimping pliers equipped for MC4-EVO 2 connectors ������������������6
Exchanging the crimping die ��������������������������������������������������������8
Crimping ������������������������������������������������������������������������������������10
Hinweis zur Pflege der Crimpzange Care instructions
Um eine optimale Crimpausführung und eine lange Lebensdauer
der Zange zu erreichen, ist folgendes zu beachten:
•Das Werkzeug frei von Staub, Feuchtigkeit und anderen Rück-
ständen halten�
•Zange mit einer sauberen, weichen Bürste oder einem fusel-
freien Tuch reinigen� Dabei keine harten oder abrasiven Reini-
gungsmittel verwenden�
•Regelmäßige optische Kontrolle der Crimpeinsätze auf Abnut-
zung oder Beschädigungen durchführen�
•Die Zange an einem sauberen, trockenen und geschlossenen
Ort lagern�
To ensure best crimp performance and crimping pliers service life
the following care instructions shall be met:
•Clean the crimping pliers from dust, moisture and other resi-
dues using a clean, soft brush or lint-free cloth�
•Do not use any harsh or abrasive agents�
•Regular visual inspection of the profile area regarding damage
or wear�
•When crimping pliers are not in use, store them in a clean and
dry place�
2 / 12 MA251
Sicherheitshinweise Safety instructions
Bedeutung der Bedienungsanleitung
Wenn die Bedienungsanleitung und die folgenden Sicherheits-
hinweise NICHT befolgt werden, können Lebensgefahr durch
Stromschlag, Lichtbögen, Brand oder ein Ausfall des Systems
die Folge sein�
•Bedienungsanleitung vollständig befolgen�
Das Produkt nur entsprechend dieser Bedienungsanleitung und
der technischen Daten anschließen und verwenden�
Die digitale Bedienungsanleitung und die technischen Daten sind
unter dem folgenden Link verfügbar:
•www�staubli�com/re-downloads�html
Importance of the instruction manual
NOT following the instruction manual and safety instructions
could result in life-threatening injuries due to electric shock, elec-
tric arcs, fi re, or failure of the system�
•Follow the entire instruction manual�
Use the product only according to this instruction manual and
the technical data�
The digital instruction manual and the technical data are
availableat:
•www�staubli�com/re-downloads�html
Bestimmungsgemäße Verwendung
Die vorliegenden Handwerkzeuge sind für die ordnungsgemäße
Durchführung des Anschlusses von Stäubli PV-Steckverbindern
mit PV-Leitungen im spannungsfreien Zustand vorgesehen�
Das Werkzeug ist NICHT geeignet für Arbeiten unter Spannung
(IEC 60900)�
Intended use
The present hand tools are in place to deliver crimp excellence
for Stäubli PV connectors with cables� Crimpings shall be carried
out only in de-energized state of the cables�
The hand tool is NOT suitable for Live working (IEC 60900)�
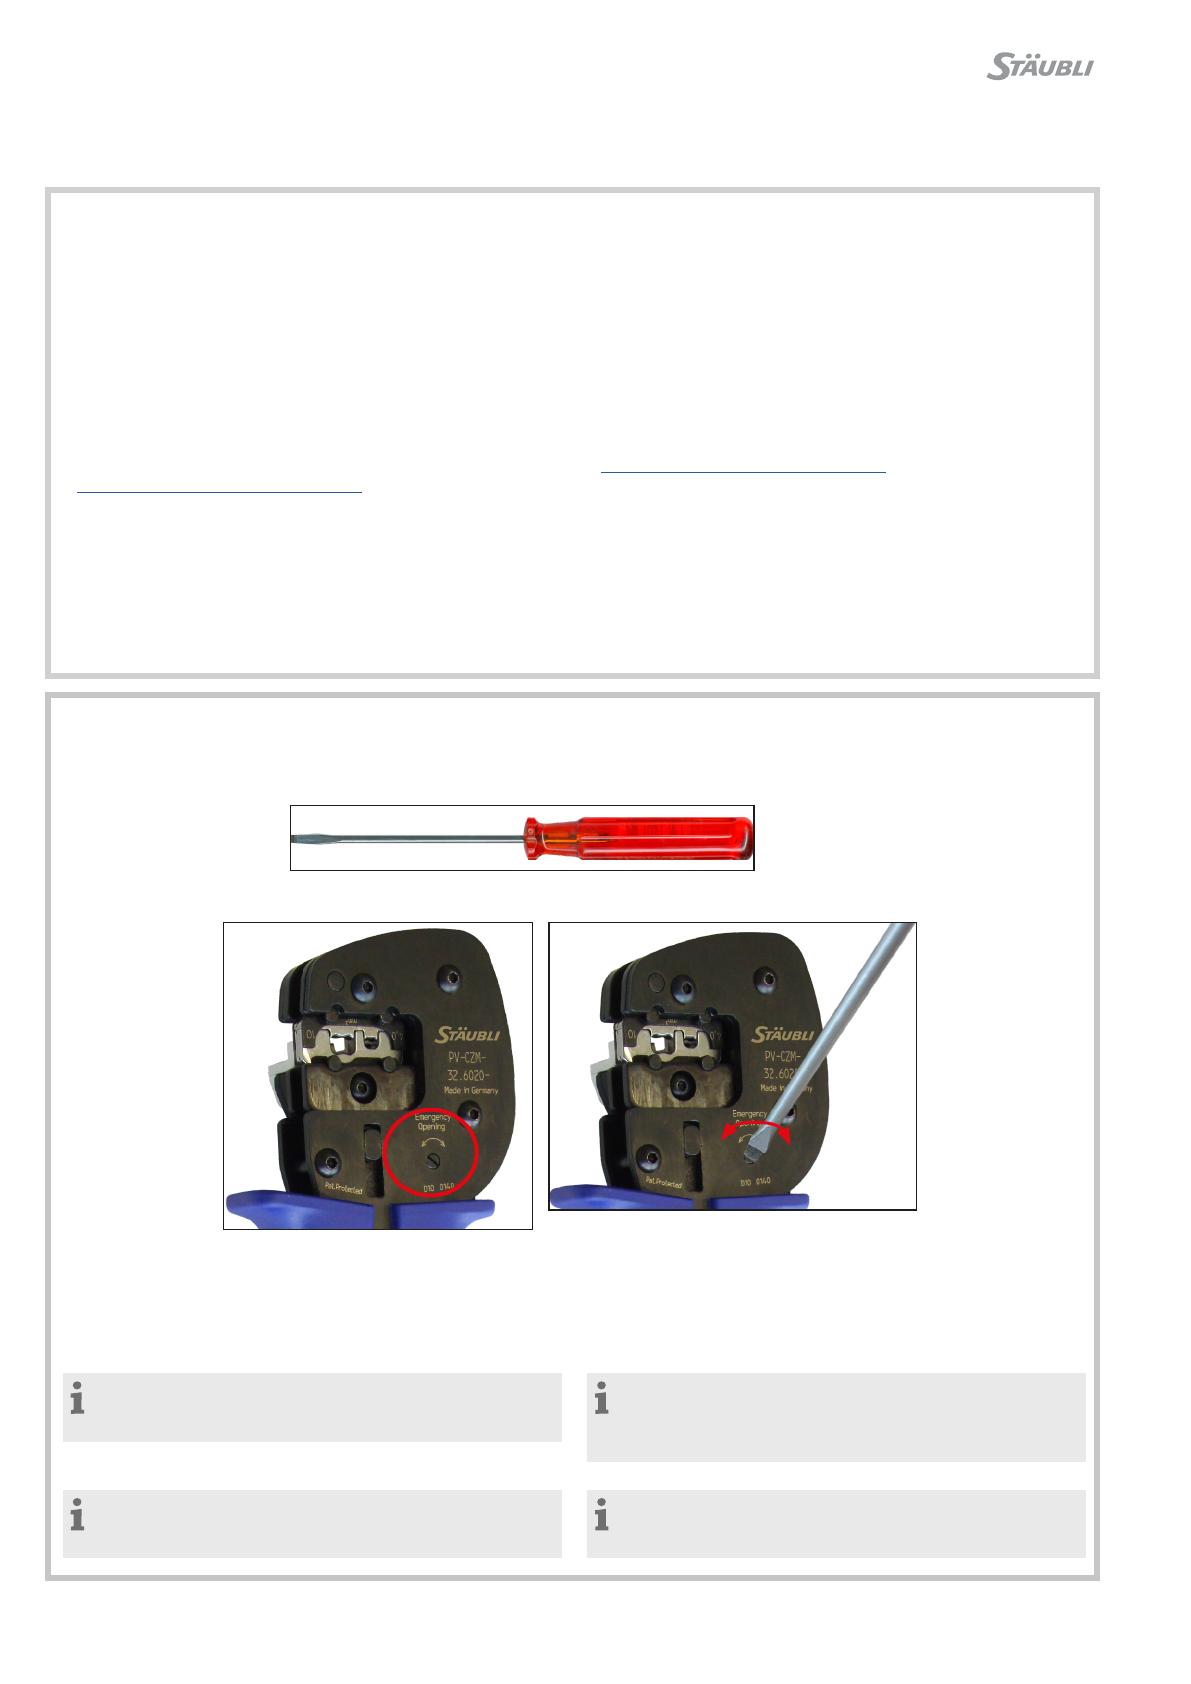
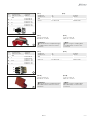
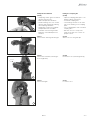
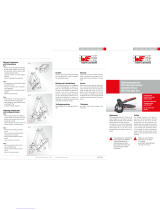
Crimpzange notönen Crimping pliers emergency opening
Benötigtes Werkzeug zur Notönung der Crimpzange:
Schraubendreher mit einer feinen Spitze z�B� 3 × 75 mm
Required tool for emergency opening:
Screwdriver with fine tip e�g� 3 × 75mm
Ziel: Crimpzange notönen. Goal: crimping pliers emergency opening.
Handlungsschritt:
•Schraube mit dem Schraubendreher drehen
(mit/gegen Uhrzeigersinn)�
Resultat:
•Die Verriegelung löst sich�
Action step:
•Turn the screw with the screwdriver
(clockwise/counterclockwise)�
Result:
•The locking mechanism loosens�
Hinweis:
Nach einer Notönung der Crimpzange darf der gerade
bearbeitete Crimp nicht mehr verwendet werden�
Note:
Once the crimping pliers have been opened using the
emergency opening, the metal crimp in process needs to be
discarded�
Hinweis:
Nach einer Notönung kann die Crimpzange unmittelbar für
eine nächste Crimp Herstellung wieder benutzt werden�
Note:
No special action necessary to use the crimping pliers for
any next crimp operation following an emergency opening�

MA251 3 / 12
1
Typ
Type
Leiterquerschnitt
Conductor cross section
Oener Crimpkontact (B-Crimp)
Open crimp contacts (B-Crimp)
Geschlossener Crimpkontakt (O-Crimp)
Closed crimp contacts (O-Crimp)
Crimpzangen
Crimping pliers
Crimpeinsätze
Crimping dies
Lokator
Locator
PV-CZM-18100
32.6020-18100
PV-CZM-19100
32.6020-19100
PV-CZM-22100
32.6020-22100
PV-CZM-23100
32.6020-23100
PV-CZM-20100
32.6020-20100
PV-CZM-21100
32.6020-21100
PV-ES-CZM-18100
32.6021-18100
PV-ES-CZM-19100
32.6021-19100
PV-ES-CZM-22100
32.6021-22100
PV-ES-CZM-23100
32.6021-23100
PV-ES-CZM-20100
32.6021-20100
PV-ES-CZM-21100
32.6021-21100
PV-LOC
32.6040
PV-LOC-B
32.6055
PV-LOC-D
32.6074
PV-KBT4/2,5...-UR,
PV-KST4/2,5...-UR
2.5 mm2• • • • • •
14 AWG • • • • • •
PV-KBT4/6...-UR,
PV-KST4/6...-UR
4 mm2• • • • • • • • • • •
12 AWG • • • • • • • • • • •
6 mm2• • • • • • • • •
10 AWG • • • • • • • • •
PV-KBT4/5...-UR,
PV-KST4/5...-UR
14 AWG • • • •
12 AWG • • • •
10 AWG • • • •
PV-KBT4/8II-UR,
PV-KST4/8II-UR
8 AWG • • • • • • •
PV-KBT/10...,
PV-KST/10...
10 mm2• • • • • •
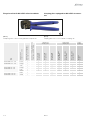
Zange bestückt für MC4 Steckverbinder Crimping pliers equipped for MC4 connectors
(ill. 1)
Crimpzange inkl� Lokator und eingebautem Crimpeinsatz�
(ill. 1)
Crimping pliers incl� locator and built-in crimping die�

4 / 12 MA251
2
3
4
8
7
5
6
1
2
3
4
5
6
10
9
Pos. Leiterquerschnitt
Cable cross section
geeignet für
suitable for
mm² AWG
11.5 14 PV-KST4/2.5-UR
PV-KBT4/2.5-UR
22.5 PV-KST4/2.5-UR
PV-KBT4/2.5-UR
34 12 PV-KST4/6-UR
PV-KBT4/6-UR
Pos. Leiterquerschnitt
Cable cross section
geeignet für
suitable for
mm² AWG
42.5 PV-KST4/2.5...-UR
PV-KBT4/2.5...-UR
54 12 PV-KST4/6...-UR
PV-KBT4/6...-UR
66 10 PV-KST4/6...-UR
PV-KBT4/6...-UR
Pos. Leiterquerschnitt
Cable cross section
geeignet für
suitable for
mm²
74PV-KST4/6...-UR
PV-KBT4/6...-UR
810 PV-KST4/10...-UR
PV-KBT4/10...-UR
Pos. Leiterquerschnitt
Cable cross section
geeignet für
suitable for
mm²
96PV-KST4/6...-UR
PV-KBT4/6...-UR
10 10 PV-KST4/10...-UR
PV-KBT4/10...-UR
Einzelteile Individual parts
(ill. 2 + 3 + 4 + 5 + 6 + 7)
Auswechselbare Crimpeinsätze�
(ill. 2 + 3 + 4 + 5 + 6 + 7)
Interchangeable crimping dies�
(ill. 2) (ill. 2)
Crimpbereich
Crimping range
Typ
Type
Bestell-Nr.
Order No.
mm2AWG
1.5/2.5/4 14/12 PV-ES-CZM-18100 32.6021-18100
(ill. 3) (ill. 3)
Crimpbereich
Crimping range
Typ
Type
Bestell-Nr.
Order No.
mm2AWG
2.5/4/6 12/10 PV-ES-CZM-19100 32.6021-19100
(ill. 4) (ill. 4)
Crimpbereich
Crimping range
Typ
Type
Bestell-Nr.
Order No.
mm2AWG
4/10 PV-ES-CZM-20100 32.6021-20100
(ill. 5) (ill. 5)
Crimpbereich
Crimping range
Typ
Type
Bestell-Nr.
Order No.
mm2
6/10 PV-ES-CZM-21100 32.6021-21100
(ill. 6)
Lokator PV-LOC
Bestell-Nr�: 32�6040
(ill. 6)
Locator PV-LOC
Order No�: 32�6040

MA251 5 / 12
7
8
10
9
11
12
13
16
15
14
(ill. 7) (ill. 7)
Crimpbereich
Crimping range
Typ
Type
Bestell-Nr.
Order No.
AWG
8/12/10 PV-CZM-22100 32.6020-22100
(ill. 8)
Lokator PV-LOC-B
Bestell-Nr�: 32�6055
(ill. 8)
Locator PV-LOC-B
Order No�: 32�6055
Hinweis:
Beim Einsatz des Crimpwerkzeuges
PV-CZM-22100 Lokator PV-LOC-B
benutzen�
Note:
When using the crimping pliers
PV-CZM-22100, use the locator
PV-LOC-B�
(ill. 9) (ill. 9)
Crimpbereich
Crimping range
Typ
Type
Bestell-Nr.
Order No.
AWG
8/10/12/14 PV-CZM-23100 32.6021-23100
(ill. 10)
Lokator PV-LOC-D
Bestell-Nr�: 32�6074
(ill. 10)
Locator PV-LOC-D
Order No�: 32�6074
Hinweis:
Beim Einsatz des Crimpwerkzeuges
PV-CZM-23100 Lokator PV-LOC-D
benutzen�
Note:
When using the crimping pliers
PV-CZM-23100, use the locator
PV-LOC-D�
Pos. Leiterquerschnitt
Cable cross section
geeignet für
suitable for
AWG
11 8PV-KST4/8II-UR
PV-KBT4/8II-UR
12 10 PV-KST4/6...-UR
PV-KBT4/6...-UR
13 12 PV-KST4/6...-UR
PV-KBT4/6...-UR
Pos. Leiterquerschnitt
Cable cross section
geeignet für
suitable for
AWG
14 8PV-KST4/8II-UR
PV-KBT4/8II-UR
15 10/12 PV-KST4/5...-UR
PV-KBT4/5...-UR
16 14 PV-KST4/5...-UR
PV-KBT4/5...-UR

6 / 12 MA251
11
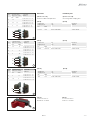
Zange bestückt für MC4-EVO 2 Steckverbinder Crimping pliers equipped for MC4-EVO 2 connec-
tors
(ill. 11)
Crimpzange inkl� Lokator und eingebautem Crimpeinsatz�
(ill. 11)
Crimping pliers incl� locator and built-in crimping die�
Typ
Type
Leiterquerschnitt
Conductor cross section
Oener Crimpkontakt (B-Crimp)
Open crimp contacts (B-Crimp)
Geschlossener Crimpkontakt (O-Crimp)
Closed crimp contacts (O-Crimp)
Crimpzangen
Crimping pliers
Crimpeinsätze
Crimping dies
Lokator
Locator
PV-CZM-40100
32.6020-40100
PV-CZM-41100
32.6020-41100
PV-CZM-42100
32.6020-42100
PV-ES-CZM-40100
32.6021-40100
PV-ES-CZM-41100
32.6021-41100
PV-ES-CZM-42100
32.6021-42100
PV-LOC-C
32.6056
PV-KST-EVO 2/2.5…-UR
PV-KBT-EVO 2/2.5…-UR
2.5 mm2• • • • • •
14 AWG • • • • • •
PV-KST-EVO 2/6...-UR,
PV-KBT-EVO 2/6...-UR
4 mm2• • • • • • • •
12 AWG • • • • • • • •
6 mm2• • • • • •
10 AWG • • • • • •
PV-KST-EVO 2/10...-UR,
PV-KBT-EVO 2/10...-UR
10 mm2• • • •
8 AWG • • • •

MA251 7 / 12
12
13
1
2
3
4
5
6
14
8
7
15
Pos. Leiterquerschnitt
Cable cross section
geeignet für
suitable for
mm2AWG
11.5 PV-KST4-EVO 2/2,5...-UR
PV-KBT4-EVO 2/2,5...-UR
22.5 14 PV-KST4-EVO 2/2,5...-UR
PV-KBT4-EVO 2/2,5...-UR
34 12 PV-KST4-EVO 2/6...-UR
PV-KBT4-EVO 2/6...-UR
Pos. Leiterquerschnitt
Cable cross section
geeignet für
suitable for
mm2AWG
42.5 14 PV-KST4-EVO 2/2,5...-UR
PV-KBT4-EVO 2/2,5...-UR
54 12 PV-KST4-EVO 2/6...-UR
PV-KBT4-EVO 2/6...-UR
66 10 PV-KST4-EVO 2/6...-UR
PV-KBT4-EVO 2/6...-UR
Einzelteile Individual parts
(ill. 12 + 13 + 14)
Auswechselbare Crimpeinsätze�
(ill. 12 + 13 + 14)
Interchangeable crimping dies�
(ill. 12) (ill. 12)
Crimpbereich
Crimping range
Typ
Type
Bestell-Nr.
Order No.
mm2AWG
1.5/2.5/4 14/12 PV-ES-CZM-40100 32.6021-40100
(ill. 13) (ill. 13)
Crimpbereich
Crimping range
Typ
Type
Bestell-Nr.
Order No.
mm2AWG
2.5/4/6 14/12/10 PV-ES-CZM-41100 32.6021-41100
(ill. 14) (ill. 14)
Crimpbereich
Crimping range
Typ
Type
Bestell-Nr.
Order No.
mm2AWG
4/10 12/8 PV-ES-CZM-42100 32.6021-42100
(ill. 15)
Lokator PV-LOC-C
Bestell-Nr�: 32�6056
(ill. 15)
Locator PV-LOC-C
Order no�: 32�6056
Pos. Leiterquerschnitt
Cable cross section
geeignet für
suitable for
mm2AWG
74 12 PV-KST4-EVO 2/6...-UR
PV-KBT4-EVO 2/6...-UR
810 8 PV-KST4-EVO 2/10...-UR
PV-KBT4-EVO 2/10...-UR

8 / 12 MA251
16
17
18
19
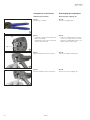
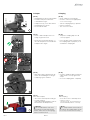
Crimpeinsatz auswechseln Exchanging the crimping die
Crimpeinsatz ausbauen Removing the crimping die
(ill. 16)
Crimpzange schließen�
(ill. 16)
Close the crimping pliers�
(ill. 17)
•Schraube S (lang) und S1 (kurz) kom-
plett herausdrehen�
•Crimpzange önen (ganz zusammen-
drücken und loslassen)�
(ill. 17)
•Remove completely both mounting
screws: the long S and the short S1�
• Open the crimping pliers (press com-
pletely together and release)�
(ill. 18)
Oberen Crimpeinsatz herausnehmen�
(ill. 18)
Remove the upper crimping die�
(ill. 19)
Unteren Crimpeinsatz herausnehmen�
(ill. 19)
Remove the lower crimping die�

MA251 9 / 12
20
21
22
23
Crimpeinsatz einbauen Fitting the crimping die
(ill. 20)
•Crimpzange önen (ganz zusammen-
drücken und loslassen)�
•Beide Crimpeinsätze einführen�
•Die Beschriftung muss sich auf der
gleichen Seite wie die Beschriftung
der Crimpzange befinden�
•Crimpzange schliessen und beide
Crimpeinsätze festschrauben�
•Schraube an ihrer richtigen Stelle
platzieren� Schraubenköpfe nicht
verletzen�
(ill. 20)
•Open the crimping pliers (press com-
pletely together and release)�
•Insert both crimping dies�
•The markings must be on the same
side as the marking on the crimping
pliers�
•Close crimping pliers and screw both
crimping dies�
•But take care not to strip screw
heads and to put each screw in its
proper location�
(ill. 21)
Lokator in den Führungsstift einlegen�
(ill. 21)
Ax locator onto the guide pin�
(ill. 22)
Lokator umschwenken (wird magne-
tisch festgehalten)�
(ill. 22)
Rotate the locator (held magnetically)
(ill. 23)
Lokator verriegeln�
(ill. 23
Lock the locator�

10 / 12 MA251
26
C
24
25
27
Crimpen Crimping
(ill. 24)
•Klemmbügel (K) önen und festhalten�
•Kontakt in den passenden Quer-
schnittsbereich legen�
•Crimplaschen (C) nach oben drehen�
•Klemmbügel (K) loslassen�
•Der Kontakt ist fixiert�
(ill. 24)
•Open clamp (K) and hold tight�
•Insert the contact in the appropriate
cross-section range�
•Turn the crimping flaps (C) upwards�
•Release clamp (K)�
•The contact is locked�
(ill. 25)
•Prüfen, ob die Crimplaschen noch
richtig ausgerichtet sind�
(ill. 25)
•Verify if the crimping flaps are still
correctly aligned�
•Zange leicht zusammendrücken, so
dass die Crimplaschen innerhalb des
Crimpeinsatzes liegen�
•Press the pliers gently together until
the crimping flaps are properly locat-
ed within the crimping die�
(ill. 26)
•Abisolierte Leitung einführen bis die
Litzen am Klemmbügel anschlagen�
•Crimpzange ganz schließen�
(ill. 26)
•Insert the stripped cable end until the
cable strands come up against the
clamp�
•Close the crimping pliers completely�
(ill. 27)
Nach dem Crimpen,
•den Lokator in Ruheposition bringen
•Kontakt entfernen
(siehe Pfeil und Benutzeraktion auf ill� 15
zum Erreichen der Ruheposition)�
(ill. 27)
After crimping,
•move the locator to default position
•remove contact
(see arrow in ill� 15 for interaction to
achieve default position of locator)�
Hinweis:
Die Kontakte dürfen nicht unter
Anwendung von Kraft entnommen
werden� Diese müssen leichtgängig
entfernt werden können�
Note:
The crimp terminals shall not be re-
leased from the crimping pliers under
force� They should come out easily�

MA251 11 / 12
28
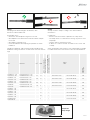
(ill. 28)
Crimpung kontrollieren bezüglich der Kriterien, die in
IEC 60352-2 beschrieben sind�
(ill. 28)
Visually check the crimp according to the criteria written in
IEC 60352-2�
Sicherstellen, dass:
•alle Litzen in der Crimphülse eingeschlossen sind�
•die Crimphülse nicht deformiert ist und kein Teil der Crimpla-
schen fehlt�
•die Crimpung symmetrisch ist�
•auf der Kontaktseite der Crimpung ein „Bündel“ aus Litzen
sichtbar ist�
Confirm that:
•All of the strands have been captured in the crimp sleeve�
•The crimp sleeve is not deformed or missing any portion of the
crimp flaps�
•That the crimp is symmetrical in form�
•A “brush” of conductor strands are visible on the contact side
of crimp�
Crimphöhe verifizieren� Typische Werte für die Crimphöhe der
Stäubli PV Leitung Flex-Sol-Evo TX und Flex-Sol-Evo DX sind wie
folgt:
Verify crimp height� Typical values for the crimp height for Stäubli
PV cable Flex-Sol-Evo TX and Flex-Sol-Evo DX are listed below:
MC4 MC4-Evo 2 mm2AWG
Oener Crimpkontakt (B-Crimp)
Open crimp contacts (B-Crimp)
Geschlossener Crimpkontakt (O-Crimp)
Closed crimp contacts (O-Crimp)
Leitung
Cable
Crimphöhe
Crimp height
PV-KBT4/2,5...-UR
PV-KST4/2,5...-UR
PV-KST4-EVO 2/2.5…-UR
PV-KBT4-EVO 2/2.5…-UR 2.5 14 • Flex-Sol-Evo TX 2,5 Flex-Sol-Evo DX 2,5 1.80
PV-KBT4/6...-UR
PV-KST4/6...-UR
PV-KST4-EVO 2/6...-UR
PV-KBT4-EVO 2/6...-UR 4.0 12 • Flex-Sol-Evo TX 4,0 Flex-Sol-Evo DX 4,0 2.15
PV-KBT4/6...-UR
PV-KST4/6...-UR
PV-KST4-EVO 2/6...-UR
PV-KBT4-EVO 2/6...-UR 6.0 10 • Flex-Sol-Evo TX 6,0 Flex-Sol-Evo DX 6,0 2.40
PV-KBT/10…
PV-KST/10…
PV-KST4-EVO 2/10...-UR
PV-KBT4-EVO 2/10...-UR 10 8 • Flex-Sol-Evo TX 10 Flex-Sol-Evo DX 10 3.02
PV-KBT4/5…-UR
PV-KST4/5…-UR 14 • Flex-Sol-Evo DX 2,5 2.20
PV-KBT4/5…-UR
PV-KST4/5…-UR 12 • Flex-Sol-Evo DX 4,0 2.50
PV-KBT4/5…-UR
PV-KST4/5…-UR 10 • Flex-Sol-Evo DX 6,0 2.50
PV-KBT4/8II-UR
PVKST4/8II-UR 8 • Flex-Sol-Evo DX 10 3.12
Crimphöhe
Crimp height

12 / 12 MA251
Hersteller/Manufacturer:
Stäubli Electrical Connectors AG
Stockbrunnenrain 8
4123 Allschwil/Switzerland
Tel� +41 61 306 55 55
Fax +41 61 306 55 56
mail ec�ch@staubli�com
www�staubli�com/electrical
© by Stäubli Electrical Connectors AG, Switzerland – MA251 – 03.2023, Index e, Marketing Communications – Änderungen vorbehalten/Subject to alterations
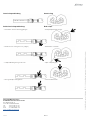
Gute Crimpverbindung Good crimp
Schlechte Crimpverbindung:
•Stanzteile in falsche Richtung gebogen�
Bad crimp:
•Stamped parts bent wrongly�
•Werksto nach unten geflossen („Flügel“)� •Material flow outwards�
•Crimpverbindung nicht geschlossen� •Open crimp wings�
•Nicht gecrimpte Leitungslitzen� •Not included strands�
-
 1
1
-
 2
2
-
 3
3
-
 4
4
-
 5
5
-
 6
6
-
 7
7
-
 8
8
-
 9
9
-
 10
10
-
 11
11
-
 12
12


Verwandte Artikel
Andere Dokumente
-
ST UBLI MA213-01 Benutzerhandbuch
-
 Multi-Contact M-0GP-SW Installationsanleitung
-
Sharp ND-235(R1J) Bedienungsanleitung
-
-
 GLW EC 65 Bedienungsanleitung
-
Harting 09 99 000 0881 Bedienungsanleitung
-
 SolarWorld Sunmodule SW xx mono RHA User Instructions
-
 ODU 080.000.062.000.000 Benutzerhandbuch
-
 Tyco Electronics 0-0654174-2 Operating Instructions Manual
-
 Wurth Elektronik 600 003 Bedienungsanleitung


