
WIRELESS BLUETOOTH CEILING SPEAKER KIT
DRAHTLOSER BLUETOOTH-DECKENLAUTSPRECHERSATZ
CONJUNTO DE ALTAVOCES DE TECHO INALÁMBRICOS CON BLUETOOTH
KIT D’ENCEINTES BLUETOOTH SANS FIL POUR PLAFOND KIT
CASSE ALTOPARLANTI BLUETOOTH WIRELESS DA SOFFITTO
DRAADLOZE PLAFONDLUIDSPREKERSET MET BLUETOOTH
12302R
user guide
www.philex.com/support

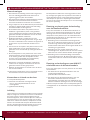
Warnings
1. All mains electrical wiring should be carried out by a
fullyqualiedelectricianandtestedregularly
during installation.
2. All electrical work carried out in England and Wales
must comply with Part P of the Building Regulations.
If you are located elsewhere check local Regulations.
3. Alwaysensureelectricityisswitchedoatthe
consumer unit before any wiring work is started.
4. If the Bluetooth module is installed in a bathroom
ceiling space you must use a suitable ceiling
mounted pull cord switch or a wall mounted ON/OFF
power switch positioned outside the bathroom.
5. The Bluetooth module is designed to be mounted in
theceilingspace,alwaysmakesurethereissucient
space surrounding the unit (a minimum of 15cm) to
allowsucientventilation.
6. Before drilling or cutting into ceiling or walls it is
recommended you use a suitable detector to check
for hidden cables and pipes.
7. If the speakers are to be mounted in a ceiling with a
room(s)above,inmostinstances,eachspeaker
willneedtobettedwitharehood(notsupplied).
Please check local Building Regulations.
8. Do not disassemble or modify the speaker or BT
moduletherearenouserserviceableparts.
9. Do not mount the speakers or module close to any
heat source.
10. Do not mount the speakers in the ceiling of a shower
cubicleorabovebathsorwashbasins.
Features and box contents
2 x 6W Ceiling speakers
1xBluetoothprewiredreceivermodule-
with 2 x 3m speaker cables and 25cm power lead
1 x User guide
Introduction
You can install this kit into your ceiling for easy and safe
music listening in any room you choose. It is simple to
pairwithanyBluetoothenableddevicesuchasasmart-
phone or tablet, and minimises the risk of water damage
toyourexpensiveelectronics.Perfectforkitchens,
bedrooms and bathrooms.
TheprewiredcompactBluetoothmoduleisttedinthe
ceiling space and can be connected to an existing
lighting circuit.
Thespeakersareverylowproleandwhenmountedsit
almostushwiththeceiling.Theyarettedintheceiling
inmuchthesamewayasdownlightsandtintocut
outs the same size as most downlights for a simple and
discrete solution.
Positioning and planning the wiring of the
Bluetooth module
There are three methods for connecting the Bluetooth
module to an existing 6A lighting circuit.
Bear in mind you need to position the module within 3m
of both speakers if you want to use the
prewired speaker cable to reach the speakers in their
mounted position.
1. Wiringtoanexistinglightingroseifthereissucient
terminal space. Please note this method should
only be used if you want the Bluetooth module pow-
ered only when the lighting is switched on.
2. Wiring a new junction box into the lighting circuit.
This method requires running a new cable to an
on/olightswitch.
3. Wiring to an existing Wago type junction box in the
lighting circuit. This method requires running a
newcabletoanon/olightswitch.
Positioning and wiring a power ON/OFF
switch for the Bluetooth module
There are a number of options for positioning an
ON/OFF switch.
1. Running a cable from a ceiling junction box to a new
wall mounted switch or ceiling pull cord switch.
2. Running a cable from a ceiling junction box to an
existing switch position and replacing a single light
switch with a twin lighting switch (or replacing a twin
switch with a triple switch).
N.B.Wehavesuppliedatransparentlabelwitha
speaker symbol to mark the switch used for the speaker.
2 BLUETOOTH CEILING SPEAKER - User Guide www.philex.com/support
EN
EN WIRELESS BUETOOTH CEILING SPEAKER KIT - User Guide

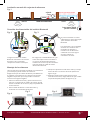
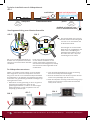
speaker ceiling
240V Lighting circuit
Bluetooth module
up to 3m up to 3m R
L
junction
box BT module switch cable
twin switch for light
and Bluetooth module
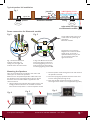
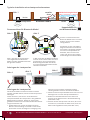
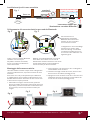
Typical speaker kit installation
Fig. 1
Connections to an existing
Wago box are similar to those
shown in Fig. 3. Consult a
qualiedelectricianifyouare
not sure how to make the
right connections.
Power connection for Bluetooth module
NEUTRAL LOOP LINE
MAINS IN
SWITCH
LIGHT
BT MODULE
EARTH
BT MODULE
MAINS IN
MAINS OUT
SWITCH
Fig. 2 shows the Bluetooth
module connected to a
ceiling rose, the light and
module share the same switch.
In Fig. 3 the Bluetooth module
and a new switch are wired to
anexistinglightingcircuitviaa
new junction box interrupting
an existing lighting mains cable.
A new cable needs to be run to
a new switch for powering on
andothe
Bluetooth module
Fig. 2 Fig. 3
Fig. 4
Fig. 6
Fig. 5
Mounting the Speakers
Onceyouhavewiredyourmoduletothemainsand
switch you can mount the speakers.
Make sure the 3m prewired speaker cables will reach
the speakers in the mounting position chosen. Check
that there are no hidden cables or pipework in the
chosen locations.
1. Using a 74mm hole saw and drill to make holes in the
ceiling(if74mmholesawisnotavailable72-76mm
saws can be used). There is a cutout template on P20.
2. Pull the speaker cable through the hole and attach to
the speaker terminals.
3. Pointthespringclipsupwardsandtthetwoarms
into the ceiling hole (See Fig 4 & 5).
4. Pushthespeakerupwarduntilrmlyinposition,
ensuring that the cable is not trapped (See Fig 5 & 6).
www.philex.com/support BLUETOOTH CEILING SPEAKER - User Guide 3
EN

Pairing your speakers with Bluetooth
enabled mobiles and tablets
Once wiring is completed switch on the module and you
will hear a triple tone to indicate the module is ready to
pair. Select the Bluetooth function on your mobile/de-
viceandsearchforBluetoothdevices.Thespeakerwill
appearas“iStarBTCSK”intheBluetoothdevicelist,se-
lect and pair. Enter the following Pin Code 1122 to pair.
After successful pairing you will hear a double beep. You
cannowplayaudiofromyourmobile/device.
Please Note:Ifthepairingisnotsuccessful,switcho
for 10 seconds, switch back on and try again.Each time
themoduleisswitchedoandthedeviceisdisconnect-
ed it will not reconnect automatically when the module
isswitchedbackon.Thisallowsotherdevicestoconnect
to the module.
Re-connecting to a previously paired
device or pairing a new device
Onceswitchedoleavethemoduleswitchedofor60
seconds before switching on again to pair to a new de-
viceortoconnecttoapreviouslypaireddevice.Ifwhen
you switch on you don’t hear the triple tone indicating
themoduleisreadytoconnect/pairswitchoandwait
a further 60 seconds before switching on again. It may
benecessarytounpairthepreviouslyconnecteddevice
beforeanewdevicecanbeconnected.
Troubleshooting
Q1 The sound is low or completely silent.
A1Makesureyourmobile/deviceischarged.
A2 Make sure your Bluetooth connection is fully
functioning.
A3Checkthevolumeofyourmobile/deviceandthatan
audible audio track is playing.
Q2Mydevicecannotndthemodule.
A1 If when you switch on the module you don’t hear
the triple tone indicating that the module is ready to
co
nnect/pair,switchoandwaitafurther60seconds.
Switch back on and you should hear the triple tone
and “iStar BTCSK” should appear in your Bluetooth
devicelist.
A2Anotherdevicemaystillbeconnectedtothemodule.
Todisconnecttheotherdeviceswitchothemodule
for60secondsasaboveandthenpairyourdevice.
4 BLUETOOTH CEILING SPEAKER - User Guide www.philex.com/support
Declaration of Conformity
Hereby, Philex Electronic Ltd. declares that the radio
equipment: model 12302R Bluetooth Speaker Kit for
radio broadcast reception in domestic premises is in
compliancewiththeRadioEquipmentDirective2014/53/
EU. The full text of the EU declaration of conformity is
availableatthefollowinginternetaddress:
www.philex.com/doc
Technical Support
If you experience problems using your speakers please
visitourtechnicalwebsiteatwww.philex.com/support
tosendusamessageorlivechatduringocehours.
WEEE Disposal/Recycling
Waste electrical and electronic products should
not be disposed of with household waste.
Please recycle where facilities exist. Check with
yourLocalAuthorityforrecyclingadvice.
EN

Warnungen
1. DiegesamteelektrischeVerdrahtungsolltevoneinem
vollqualiziertenElektrikerausgeführtundwährend
derInstallationregelmäßiggetestetwerden.
2. AlledurchgeführtenelektrischenArbeitenmüsenden
einschlägigenBauvorschriftenentsprechen.
BitteüberprüfenSievorderInstallationdieörtlichen
Vorschriften.
3. Stellen Sie immer sicher, dass der Strom an der
Endverbrauchereinheitabgeschaltetwird,bevormit
den Verdrahtungsarbeiten begonnen wird.
4. WenndasBluetooth-ModulanderDeckeeinesBade-
zimmersinstalliertwird,müssenSieeinengeeigneten,
an der Decke montierten Zugtaster oder einen
außerhalbdesBadezimmerspositioniertenEIN/
AUS-SchalteranderWandverwenden.
5. DasBluetooth-ModulistfürdieMontageimDeck-
enbereichvorgesehen.AchtenSieimmerdarauf,dass
umdasGerätherumgenügendPlatzvorhandenist
(mindestens15cm),umeineausreichendeBelüftung
zuermöglichen.
6. BevorSieLöcherinDeckenoderWändebohrenoder
schneiden, wird empfohlen, einen geeigneten
Detektorzuverwenden,umnachverstecktenKabeln
und Rohren zu suchen.
7. Wenn die Lautsprecher in einer Decke mit einem
Raum(Räumen)darübermontiertwerdensollen,muss
indenmeistenFällenjederLautsprechermiteiner
Feuerschutzhaube(nichtmitgeliefert)versehen
werden.BitteprüfenSiedieörtlichenBauvorschriften.
8. LautsprecherundBluetooth-Moduldürfennicht
zerlegtodermodiziertwerden;esgibtkeineTeile,
dievomBenutzergewartetwerdenkönnten.
9. Montieren Sie die Lautsprecher oder das Modul nicht
inderNäheeinerWärmequelle.
10. Montieren Sie die Lautsprecher nicht an der Decke
einerDuschkabineoderüberBadewannenoder
Waschbecken.
Merkmale und Inhalt des Kartons
2 x 6W Deckenlautsprecher
1xvorverdrahtetesBluetooth-Empfängermodul-mit
2 x 3 m Lautsprecherkabel und 25 cm Stromkabel 1 x
Bedienungsanleitung
Einführung
SiekönnendiesenBausatzinIhreDeckeeinbauen,um
in jedem beliebigen Raum einfach und sicher Musik zu
hören.EristeinfachmitjedemBluetooth-fähigenGerät
zu koppeln, wie z.B. einem Smartphone oder Tablet, und
minimiertdasRisikovonWasserschädenanIhrerteuren
Elektronik.PerfektfürKüchen,SchlafzimmerundBade-
zimmer.DasvorverdrahtetekompakteBluetooth-Modul
wird in den Deckenraum eingebaut und kann an einen
bestehenden Beleuchtungskreislauf
angeschlossen werden.
DieLautsprechersindsehrachundnachderMontage
fastbündigmitderDecke.SiewerdenähnlichwieDeck-
enstrahlerindieDeckeeingebautundpassenfüreine
einfacheunddiskreteLösunginAusschnittederselben
GrößewiediemeistenDeckenstrahler.
Positionierung und Planung der
Verkabelung des Bluetooth-Moduls
EsgibtdreiMethoden,dasBluetooth-Modulmiteinem
bestehenden6A-Beleuchtungskreislaufzuverbinden.
DenkenSiedaran,dassSiedasModul3mvonbeiden
Lautsprechernentferntpositionierenmüssen,wenn
SiedasvorverdrahteteLautsprecherkabelverwenden
möchten,umdieLautsprecherinihrermontiertenPosi-
tion zu erreichen.
1. VerkabelunganeinevorhandeneBeleuchtung-
srosette,wenngenügendPlatzfürdieAnschlüsse
vorhandenist.BittebeachtenSie,dassdieseMethode
nurdannverwendetwerdensollte,wenndasBluetooth-
ModulausschließlichbeieingeschalteterBeleuchtung
mitStromversorgtwerdensoll.
2. Verkabelung einer neuen Anschlussdose in den
Beleuchtungskreislauf. Bei dieser Methode muss ein
neuesKabelzueinemEin/Aus-Lichtschalterverlegt
werden.
3. VerkabelunganeinevorhandeneWago-Verteilerdose
im Beleuchtungskreislauf. Bei dieser Methode muss
einneuesKabelzueinemEin/Aus-Lichtschalterverlegt
werden
Positionierung und Verkabelung eines EIN/AUS-
Leistungsschalters für das Bluetooth-Modul
EsgibteineReihevonOptionenfürdiePositionierung
einesEIN/AUS-Schalters.
1.VerlegungeinesKabelsvoneinerDeckenverteilerdose
zu einem neuen Wandschalter oder Deckenzugtaster.
2.VerlegeneinesKabelsvoneinerDeckenverteilerdose
zueinervorhandenenSchalterpositionundErsetzen
eineseinzelnenLichtschaltersdurcheinenDoppel-
beleuchtungsschalter(oderErsetzeneinesDoppels-
chalters durch einen Dreifachschalter).
N.B. Wir haben ein transparentes Etikett mit einem Laut-
sprechersymbolmitgeliefert,umdenfürdenLautspre-
cherverwendetenSchalterzukennzeichnen.
DE DRAHTLOSER BLUETOOTH-DECKENLAUTSPRECHERSATZ - Benutzerhandbuch
www.philex.com/support BLUETOOTH-DECKENLAUTSPRECHERSATZ - Benutzerhandbuch 5
DE

Lautsprecher Decke
240V Beleuchtungskreislauf
Bluetooth-modul
bis 3m bis 3m R
L
verteiler
dose BT-Modul-Schalterkabel
Doppelschalter für
und Bluetooth-Modul
Anschlüsseaneinevorhandene
Wago-Verteilerdosesindähnlich
wie in Abb. 3 dargestellt. Wenden
Siesichaneinenqualizierten
Elektriker, wenn Sie sich nicht
sicher sind, wie Sie die richtigen
Verbindungenherstellenkönnen.
Typische Installation eines Lautsprecherbausatzes
NEUTRAL LOOP LINE
MAINS IN
SWITCH
LIGHT
BT MODULE
EARTH
BT MODULE
MAINS IN
MAINS OUT
SWITCH
Abb. 2 zeigt das an eine Deckenro-
setteangeschlosseneBluetooth-
Modul;LeuchteundModulbenutzen
den gleichen Schalter.
InAbb.3werdendasBluetooth-Modul
undeinneuerSchalterübereineneue
Verteilerdose,dieeinvorhandenes
Beleuchtungsnetzkabel unterbricht,
mit einem bestehenden Beleuchtung-
skreislaufverdrahtet.
ZumEin-undAusschaltendes
Bluetooth-Modulsmusseinneues
Kabel zu einem neuen Schalter
verlegtwerden
Abb. 2 Abb. 3
Abb. 1
Stromanschluss für Bluetooth-Modul
Abb. 4
Abb. 6
Abb. 5
Anbringen der Lautsprecher
6 BLUETOOTH-DECKENLAUTSPRECHERSATZ - Benutzerhandbuch www.philex.com/support
DE
Anbringen der Lautsprecher
Sobald Sie Ihr Modul mit dem Stromnetz und dem
Schalterverkabelthaben,könnenSiedieLautsprecher
anbringen.
StellenSiesicher,dassdie3mvorverdrahteten
LautsprecherkabeldieLautsprecherindergewählten
Einbaupositionerreichen.PrüfenSie,dassanden
gewähltenStellenkeineverstecktenKabeloderRohrlei-
tungenvorhandensind.
1.Verwendungeiner74-mm-Lochsägeundeines
BohrerszurHerstellungvonLöcherninderDecke
(wennkeine74-mm-LochsägezurVerfügungsteht,
können72-76-mm-Sägenverwendetwerden).
UmseitigbendetsicheineAusschnittschablone.
2. Ziehen Sie das Lautsprecherkabel durch das Loch und
befestigen Sie es an den Lautsprecherklemmen.
3. Richten Sie die Federklammern nach oben und
steckenSiediebeidenArmeindieDeckenönung
(siehe Abb. 4 & 5).
4.DrückenSiedenLautsprechernachoben,biserfest
in Position ist, und stellen Sie dabei sicher, dass das
Kabel nicht eingeklemmt wird (siehe Abb. 5 & 6).

Koppeln Ihrer Lautsprecher mit Bluetooth-
fähigen Mobiltelefonen und Tablets
Sobald die Verkabelung abgeschlossen ist, schalten Sie
dasModulein,undSiehöreneinendreifachenTon,der
anzeigt,dassdasModulkopplungsbereitist.WählenSie
dieBluetooth-FunktionaufIhremMobiltelefon/Gerät
undsuchenSienachBluetooth-Geräten.
Der Lautsprecher erscheint als “iStar BTCSK” in der Liste
derBluetooth-Geräte,wählenSieihnausundkoppeln
Sie ihn. Die Kopplung erfolgt normalerweise automa-
tisch, wenn ein Passwort erforderlich ist, geben Sie
(0000)ein.NacherfolgreicherKopplunghörenSieeinen
doppeltenPiepton.SiekönnenjetztAudiovonIhrem
Handy/Gerätabspielen.
Bitte beachten Sie: Wenn die Kopplung nicht erfolgre-
ichist,schaltenSiedasModulfür10Sekundenaus,
schaltenSieeswiedereinundversuchenSieeserneut.
JedesMal,wenndasModulausgeschaltetunddasGerät
abgetrennt wird, wird es nicht automatisch wieder
angeschlossen, wenn das Modul wieder eingeschaltet
wird.DiesermöglichtesanderenGeräten,sichmitdem
Modulzuverbinden.
Erneutes Anschließen an ein zuvor
gekoppeltes Gerät oder Koppeln eines
neuen Geräts
Lassen Sie das Modul nach dem Ausschalten 60
Sekundenlangausgeschaltet,bevorSieeswieder
einschalten,umeinneuesGerätzukoppelnodereine
VerbindungzueinemzuvorgekoppeltenGerätherzus-
tellen.WennSiebeimEinschaltennichtdenDreifach-
Tonhören,deranzeigt,dassdasModulanschluss-/
kopplungbereit ist, schalten Sie es aus und warten Sie
weitere60Sekunden,bevorSieeswiedereinschalten.
Fehlersuche
F1 Der Ton ist leise oder völlig unhörbar.
A1StellenSiesicher,dassIhrMobiltelefon/Gerätaufge
laden ist.
A2StellenSiesicher,dassIhreBluetooth-Verbindung
vollfunktionsfähigist.
A3ÜberprüfenSiedieLautstärkedesHandys/Geräts
unddasseinhörbarerMusiktitelabgespieltwird.
F2MeinGerätkanndasModulnichtnden.
A1WennSiebeimEinschaltennichtdenDreifach-Ton
hören,deranzeigt,dassdasModulanschluss-/
kopplungbereit ist, schalten Sie es aus und warten Sie
weitere60Sekunden,bevorSieeswiedereinschalten.
Schalten Sie wieder ein und Sie sollten den dreifachen
Tonhörenund“iStarBTCSK”sollteinderListeIhrer
Bluetooth-Geräteerscheinen.
A2UnterUmständenkannnocheinanderesGerätan
dasModulangeschlossensein.UmdasandereGerät
zu trennen, schalten Sie das Modul wie oben
beschriebenfür60Sekundenausundkoppelndann
IhrGerät.
Konformitätserklärung
HiermiterklärtPhilexElectronicLtd.,dassdie
Funkausrüstung:Modelle12302RBluetooth
LautsprecherbausatzfürdenRundfunkempfang
inPrivathaushaltenmitderFunkgeräterichtlinie
2014/53/EUkonformist.DervollständigeText
EU-Konformitätserklärungistverfügbarunterder
folgenden Internetadresse: www.philex.com/doc
Technischer Support
WeitereHilfen,Ratschläge,Informationenundeinen
LivechatndenSieaufwww.philex.com/support
Entsorgung / Recycling von Elektro- und
Elektronikaltgeräten
ElektrischeAltgeräteundelektronischeProduktedürfen
nichtimHausmüllentsorgtwerden.GebenSiesiebei
einemWertstohofbzw.einerRecycling-Sammelstelle
ab.BeiFragenzumRecyclingkönnenSiesichanIhre
örtlichenBehördenoderIhrGeschäftvorOrtwenden.
www.philex.com/support BLUETOOTH-DECKENLAUTSPRECHERSATZ - Benutzerhandbuch 7
DE

ES
CONJUNTO DE ALTAVOCES DE TECHO INALÁMBRICOS CON BLUETOOTH - Guía del usuario
Advertencias
1.
Todo el cableado eléctrico de la red debe ser realizado
porunelectricistaplenamentecualicadoydebeser
probado regularmente durante la instalación.
2. Todo el trabajo eléctrico realizado debe cumplir con
lasnormasdeconstrucciónpertinentes.Porfavor,
consulte las regulaciones locales antes de la instalación.
3. Asegúrese siempre de que la electricidad esté
desconectada en la unidad de consumo antes de
iniciar cualquier labor de cableado.
4. Si el módulo Bluetooth se instala en el techo de un
baño, deberá utilizar un interruptor adecuado
montado en el techo con un cordel para tirar o un
interruptor de encendido y apagado montado en la
pared fuera del baño.
5. El módulo Bluetooth está diseñado para montarlo
eneltecho,asegúresesiempredequehaysuciente
espacio en torno a la unidad (un mínimo de 15 cm)
paraquehayasucienteventilación.
6. Antes de perforar o abrir el techo o las paredes se
recomienda utilizar un detector adecuado para
comprobar si hay cables y tuberías ocultos.
7. Silosaltavocessevanamontarenuntechoconuna
ovariashabitacionesencima,enlamayoríadelos
casos,cadaaltavozdeberácontarconunacubierta
contra incendios (no incluida). Compruebe el
reglamento de construcción local.
8. Nodesmontenimodiqueelaltavozoelmódulo
Bluetooth, ya que no tiene piezas que el usuario
pueda reparar.
9. Nomontelosaltavocesoelmódulocercadeninguna
fuente de calor.
10.Nomontelosaltavoceseneltechodeunacabinade
duchaoencimadebañerasolavabos.
Características y contenido de la caja
2 altavocesdetechode6W
1 módulo receptor precableado Bluetooth con 2 cables
paraaltavocesde3mycabledealimentación
de 25 cm
1 guía de usuario
Introducción
Puede instalar este conjunto en el techo para escuchar
música de forma fácil y segura en cualquier habitación
que desee. Es fácil de sincronizar con cualquier dis-
positivoconBluetooth,comounteléfonointeligente
o tablet, y minimiza el riesgo de que el agua dañe sus
costosos aparatos electrónicos. Es perfecto para cocinas,
dormitorios y baños. El módulo compacto de Bluetooth
precableado se instala en el techo y se puede conectar a
un circuito de iluminación existente.
Losaltavocessonmuyestrechosycuandosemontan
quedan casi a ras del techo. Se instalan en el techo de
la misma manera que las luces descendentes y encajan
encavidadesdelmismotamañoquelamayoríadeellas
para que disfrute de una solución sencilla y discreta.
Colocaciónyplanicacióndelcableadodel
módulo Bluetooth
Hay tres métodos para conectar el módulo Bluetooth
a un circuito de iluminación de 6 A existente. Tenga en
cuenta que debe colocar el módulo a 3 m de ambos alta-
vocessideseautilizarelcabledealtavozprecableado
parallegaralosaltavocesensuposicióndemontaje.
1. Cablear a una roseta de iluminación existente si hay
sucienteespacioenlosterminales.Tengaencuenta
que este método solo debe utilizarse si desea que el
módulo Bluetooth se alimente únicamente cuando la
iluminación esté encendida.
2. Cablearunanuevacajadeconexionesenelcircuito
de la iluminación. Este método requiere extender un
nuevocablehastauninterruptordeluzdeencen
dido/apagado.
3. Cablear una caja de conexiones existente de tipo
Wago en el circuito de iluminación. Este método
requiereextenderunnuevocablehastaun
interruptor de luz de encendido/apagado.
Colocación y cableado de un interruptor
de encendido/apagado para el módulo
Bluetooth
Hayvariasopcionesparacolocaruninterruptorde
encendido y apagado.
1. Extender un cable desde una caja de conexiones del
techohastaunnuevointerruptormontadoenla
pared o hasta un interruptor montado en el techo
con un cordel para tirar.
2. Extender un cable desde una caja de conexiones del
techo hasta una posición del interruptor y sustituir un
interruptor de luz simple por un interruptor de luz
doble (o sustituir un interruptor doble por un
interruptor triple).
Nota: hemos incluido una etiqueta transparente con un
símbolodealtavozparaseñalizarelinterruptorquese
utilizaparaelaltavoz.
8
ALTAVOCES DE TECHO CON BLUETOOTH
-
Guía del usuario
www.philex.com/support
ES

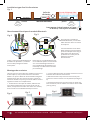
Fig. 4
Fig. 6
Fig. 5
Montaje de los altavoces
Unavezquehayaconectadoelmóduloalaredeléctrica
yelinterruptor,puedemontarlosaltavoces.
Asegúresedequeloscablesdelaltavozprecableadode
3mlleguenalosaltavocesenlaposicióndemontaje
elegida. Compruebe que no haya cables o tuberías
ocultos en los lugares elegidos.
1.Utiliceuntaladrode74mmyperforeoriciosenel
techo (si no dispone de un taladro de 74 mm, puede
utilizaruntaladrode72-76mm).Hayunaplantillade
recorte al dorso.
2.Paseelcabledelaltavozatravésdeloricioy
conécteloalosterminalesdelaltavoz.
3. Coloque las pinzas de muelle hacia arriba y coloque
losdosbrazoseneloriciodeltecho(véanselas
guras4y5).
4.Empujeelaltavozhaciaarribahastaqueesté
colocadormemente,asegurándosedequeelcable
noquedeatrapado(veánselasguras5y6)
altavoz techo
240 V Circuito de iluminación
módulo Bluetooth
hasta 3 m hasta 3 m R
L
caja de
cone
Cable del interruptor del módulo BT
interruptor doble
para el módulo
Las conexiones a una caja Wago
existente son similares a las
mostradasenlagura3.
Consulte con un electricista
cualicadosinoestáseguro
de cómo realizar las
conexiones correctas.
NEUTRAL BUCLE FASE
ENTRADA DE LA RED
INTERRUPTOR
LUZ
MÓDULO BT
TIERRA
MÓDULO BT
ENTRADA DE LA RED
SALIDA DE LA RED
INTERRUPTOR
Lagura2muestraelmódulo
Bluetooth conectado a una roseta
de techo, la luz y el módulo
comparten el mismo interruptor.
Enlagura3,elmóduloBluetoothyun
nuevointerruptorestánconectadosa
un circuito de iluminación existente
medianteunanuevacajadeconexiones
que interrumpe un cable de red de
iluminación existente.
Esprecisoextenderunnuevo
cablehastaunnuevointerruptor
para alimentar el módulo
Bluetooth
Fig. 2 Fig. 3
Fig. 1
Conexión de alimentación del módulo Bluetooth
Instalación normal del conjunto de altavoces
www.philex.com/support
ALTAVOCES DE TECHO CON BLUETOOTH
-
Guía del usuario
9
ES

Sincronizar los altavoces con móviles y
tablets con Bluetooth
Unavezterminadoelcableado,enciendaelmódulo
y escuchará tres tonos para indicar que el módulo
está listo para su sincronización. Seleccione la función
Bluetoothensumóvil/dispositivoybusquedispositivos
Bluetooth.
Elaltavozaparecerácomo«iStarBTCSK»enlalistade
dispositivosBluetooth,seleccioneysincronice.
Normalmente, la sincronización se realizará de forma
automática, pero si se requiere una contraseña
introduzca (0000). Escuchará dos pitidos tras una
sincronización correcta. Ahora puede reproducir el
audiodesumóvilodispositivo.
Nota: Si la sincronización no se realiza correctamente,
apagueeldispositivodurante10segundos,vuelvaa
encenderloeinténtelodenuevo.Cadavezquese
apagueelmóduloysedesconecteeldispositivo,este
nosevolveráaconectarautomáticamentecuandose
vuelvaaencenderelmódulo.Deestaforma,sepueden
conectarotrosdispositivosalmódulo.
Vuelva a conectar a un dispositivo
sincronizado previamente o sincronice
un nuevo dispositivo
Unavezapagado,dejeelmóduloasídurante60
segundosantesdevolveraencenderlopara
sincronizarloconunnuevodispositivoopara
conectarloaundispositivosincronizadopreviamente.
Si cuando lo enciende no escucha los tres tonos que
indican que el módulo está listo para la sincronización o
conexión, apáguelo y espere otros 60 segundos antes de
volveraencenderlo.
Resolución de problemas
P1 El sonido es bajo o inexistente.
R1Asegúresedequesumóvilodispositivoestá
cargado.
R2 Asegúrese de que su conexión Bluetooth funciona
correctamente.
R3Compruebeelvolumendelmóvilodeldispositivo,y
que se esté reproduciendo una pista de música audible.
P2 Mi dispositivo no encuentra el módulo.
R1 Si cuando lo enciende no escucha los tres tonos que
indican que el módulo está listo para la
sincronización o conexión, apáguelo y espere otros
60segundos.Vuelvaaencenderlo.Ahoradebería
escucharlostrestonosyelnombre«iStarBTCSK»
deberíaaparecerensulistadedispositivos
Bluetooth.
R2Puedeserquehayaotrodispositivoquetodavíaesté
conectado con el módulo. Para desconectar el otro
dispositivo,apagueelmódulodurante60segundos
como se indica arriba y luego sincronice su
dispositivo.
Declaración de conformidad
Por el presente, Philex Electronic Ltd. declara que
elequipoderadio:modeloConjuntodealtavoces
Bluetooth 12302R para la recepción de emisiones de
radioenlocalesdomésticoscumpleconlaDirectivade
Equipos de Radio 2014/53/UE. El texto completo de la
declaración de conformidad de la UE está disponible en
la dirección de Internet: www.philex.com/doc
Asistencia técnica
Para obtener más asistencia, asesoramiento,
informaciónoaccederaunchatdeasistenciaenvivo,
visite:www.philex.com/support
Eliminación / Reciclaje de RAEE
No deseche este producto con el resto de desechos
domésticosalnaldesuvidaútil;entrégueloenun
centro de recogida y reciclaje de aparatos eléctricos y
electrónicos.
10
ALTAVOCES DE TECHO CON BLUETOOTH
-
Guía del usuario
www.philex.com/support
ES

FR KIT D’ENCEINTES BLUETOOTH SANS FIL POUR PLAFOND - Guide d’utilisation
Avertissements
1.Touslesbranchementsélectriquesausecteurdoivent
êtreeectuésparunélectricienqualié,ettestés
régulièrement pendant l’installation.
2.Touslestravauxélectriqueseectuésdoiventêtre
conformes aux réglementations de construction
applicables.Veuillezvérierlesréglementations
localesavantl’installation.
3.Veilleztoujoursàcouperl’électricitédepuisvotre
compteuravantdecommencertoustravauxde
câblage électrique.
4. Si le module Bluetooth est installé dans le plafond
d’unesalledebains,vousdevezutiliserun
interrupteur à cordon monté au plafond ou un
interrupteur mural de type ON/OFF, positionné à
l’extérieur de la salle de bains.
5. Le module Bluetooth est conçu pour être monté dans
levideduplafond.Veillezsystématiquementàcequ’il
yaitsusammentd’espaceautourdel’unité(au
moins15cm)pourpermettreunebonneventilation.
6.Avantdeperceroudécouperleplafondoulesmurs,
nousvousrecommandonsd’utiliserundétecteur
appropriépourvérierqu’iln’yaitpasdecâblesou
de tuyaux cachés.
7.S’ilyauneouplusieurspiècesau-dessusduplafond
oùvousprévoyezdemonterlesenceintes,dansla
plupartdescas,chaqueenceintedevraêtreinstallée
avecuneprotectionanti-incendie(nonfournie).
Consultez les réglementations locales de
construction.
8.N’eectuezaucuneopérationdedémontageoude
modicationdesenceintesoudumoduleBluetooth.
Il n’y a aucune pièce réparable par l’utilisateur.
9. Ne montez pas les enceintes ou le module à proximité
d’une source de chaleur.
10.Ne montez pas les enceintes dans le plafond d’une
cabinededouche,ouau-dessusd’unebaignoireou
d’unlavabo.
Accessoires et contenu de l’emballage
2 x Enceintes de plafond 6W
1xmodulederéceptionBluetoothpré-câblé-
avec2xcâblesd’enceintede3metuncâble
d’alimentation de 25cm
1 x Guide d’utilisation
Introduction
Vouspouvezinstallercekitdansvotreplafond,pour
écouter de la musique facilement, en toute sécurité,
dansn’importequellepiècedevotrechoix.Idéalpour
les cuisines, les chambres et les salles de bains. Pour
proterdevoschansonspréférées,ilvoussutde
connectervotresmartphoneouvotretabletteaux
enceintesviaBluetooth.
Plusbesoind’emportervosappareilsélectroniques
partoutavecvous,aurisquedelesendommager,
notammentlorsquevousêtesencontactavecdel’eau.
LemoduleBluetoothcompactpré-câbléestinstallé
danslevideduplafondetpeutêtrebranchéàuncircuit
d’éclairage existant.
Lesenceintessontvraimenttrèsdiscrètesetsefondent
quasiment dans le plafond. Elles s’installent à peu près
de la même façon que des spots de plafond et néces-
sitent des découpes de même taille, pour une solution
simple qui passe inaperçu.
Positionnement et prévision du câblage
du module Bluetooth
Il y a trois méthodes de branchement du module Blue-
tooth à un circuit d’éclairage existant de 6A. Gardez à
l’esprit que le module ne doit pas être situé à plus de 3m
desdeuxenceintes,sivoussouhaitezl’yrelieravecles
câbles fournis.
1. Branchement à un plafonnier existant s’il y a suf-
sammentd’espaceentermesdeterminaux.Notezque
cetteméthodedoitêtreutiliséeseulementsivoussou-
haitez que le module Bluetooth soit alimenté unique-
ment lorsque la lumière est allumée.
2. Branchementd’unenouvelleboîtededérivationdans
le circuit d’éclairage. Cette méthode nécessite de passer
unnouveaucâblepourrelierlaboîteàuninterrupteur
detypeon/o.
3. BranchementàuneboîtededérivationdetypeWago
existante dans le circuit d’éclairage. Cette méthode né-
cessitedepasserunnouveaucâblepourrelierlaboîteà
uninterrupteurdetypeon/o.
Positionnement et câblage d’un
interrupteur de type ON/OFF pour le
module Bluetooth
Plusieursoptionss’orentàvouspourlepositionne-
ment de l’interrupteur de type ON/OFF.
1. Fairepasseruncâblepourrelieruneboîtededériva-
tionsituéedansleplafondàunnouvelinterrupteur
muralouunnouvelinterrupteuràcordonmontéau
plafond.
2. Fairepasseruncâblepourrelieruneboîtededériva-
tion située dans le plafond à un interrupteur existant et
si cet interrupteur a un seul bouton, le remplacer par
un interrupteur à deux boutons (ou si cet interrupteur a
deux boutons, le remplacer par un interrupteur à trois
boutons).
N.B.Nousvousavonsfourniuneétiquettetranspar-
enteavecunsymbolereprésentantuneenceintepour
indiquer l’interrupteur dédié aux enceintes.
www.philex.com/support KIT D’ENCEINTES BLUETOOTH POUR PLAFOND - Guide d’utilisation 11
FR

Fig. 4
Fig. 6
Fig. 5
Montage des enceintes
Unefoisquevousavezreliévotremoduleausecteuret
àl’interrupteur,vouspouvezmonterlesenceintes.
Veillez à ce que les câbles de 3m du module atteignent
l’emplacementquevousavezchoisipourmonterles
enceintes. Veillez à ce qu’il n’y ait aucun câble ni aucune
tuyauterie cachés à cet emplacement.
1.Àl’aided’unescietrépande74mm,eectuezdes
trousdansleplafond(sivousn’avezpasdesciede
74mm,vouspouvezenutiliseruneentre72et76mm).
Voustrouverezunmodèlededécoupeauverso.
2.Tirezlecâbled’enceintedumoduleàtraversletrouet
branchez-leauxbornesdel’enceinte.
3.Rabattezlesdeuxclipsàressortverslehautpour
pouvoirlesrentrerdansletrouduplafond(voirFig4et
5).
4.Poussezl’enceinteverslehautjusqu’àcequ’ellesoit
bienencastrée,toutenveillantànecoinceraucuncâble
(voirFig5et6).
enceint plafon
Circuit d’éclairage 240v
Module Bluetooth
3 m max. 3 m max. D
G
boîte de
dérivation
Câble d’interrupteur du module BT
interrupteur à deux buotons, un pour
la lumière, l’autre pour le module
Lesbranchementsàuneboîte
Wago existante sont les mêmes
que ceux indiqués dans la Fig. 3.
Faites appel à un électricien
qualiésivousn’êtespassûr
d’eectuerlesbons
branchements.
NEUTRE BOUCLE PHASE
ENTRÉE SECTEUR
INTERRUPTEUR
LUMIÈRE
MODULE BT
TERRE
MODULE BT
ENTRÉE SECTEUR
SORTIE SECTEUR
INTERRUPTEUR
La Fig. 2 montre le module Bluetooth
branchéàunplafonnier;lalumière
et le module partagent le même
interrupteur.
Dans la Fig. 3, le module Bluetooth et
unnouvelinterrupteursontbranchés
àuncircuitd’éclairageexistantvia
unenouvelleboîtededérivationqui
interrompt un câble secteur existant
pour l’éclairage.
Pour allumer et éteindre le
moduleBluetooth,unnouveau
câbledoitêtrereliéàunnouvel
interrupteur
Fig. 2 Fig. 3
Fig. 1
Branchement électrique du module Bluetooth
Installation type d’un kit d’enceintes
12 KIT D’ENCEINTES BLUETOOTH POUR PLAFOND - Guide d’utilisation www.philex.com/support
FR

Lesbranchementsàuneboîte
Wago existante sont les mêmes
que ceux indiqués dans la Fig. 3.
Faites appel à un électricien
qualiésivousn’êtespassûr
d’eectuerlesbons
branchements.
Jumelage de votre mobile ou tablette
avec les enceintes via Bluetooth
Une fois les branchements terminés, allumez le module.
Vous entendrez un signal sonore retentir trois fois,
ce qui indique que le module est prêt pour le jumelage.
SélectionnezlafonctionBluetoothsurvotremobile/
appareil, et recherchez les appareils Bluetooth
disponibles.
Sélectionnez«iStarBTCSK»danslalisteetcommencez
lejumelageaveclesenceintes.Normalement,le
jumelage se fait automatiquement. Si un mot de passe
est demandé, tapez 0000. Une fois l’opération réussie,
vousentendrezdeuxbips.Vouspouvezmaintenantlire
ducontenuaudiodepuisvotremobile/appareil.
Attention : Si le jumelage échoue, éteignez le module,
attendez10secondes,puisrallumez-leetréessayez.
Chaque fois que le module est éteint et que l’appareil
s’en déconnecte, la reconnexion ne se fait pas
automatiquement dès que le module est rallumé. Cela
permetauxautresappareilsdepouvoirseconnecter.
Reconnecter un appareil précédemment
jumelé ou connecter un nouvel appareil
Unefoisquevousavezéteintlemodule,attendez60
secondesavantdelerallumerpourconnecterun
nouvelappareilouunappareilprécédemmentjumelé.
Siaumomentdel’allumagevousn’entendezpasle
signal sonore retentir trois fois, indiquant que le module
est prêt pour la connexion/le jumelage, éteignez le
module,etattendezencore60secondesavantdele
rallumer.
Résolution des problèmes
Problème 1 Le son est faible ou complètement inaudible.
Solution1 Veillezàcequevotremobile/appareilsoit
chargé.
Solution2 VériezsivotreconnexionBluetooth
fonctionne correctement.
Solution3 Vériezleniveaudevolumesurvotre
mobile/appareil et si une piste audio
audible est en cours de lecture.
Problème 2 Mon appareil ne trouve pas le module.
Solution 1 Si au moment de l’allumage du module
vousn’entendezpaslesignalsonore
retentir trois fois, indiquant que le module
est prêt pour la connexion/le jumelage,
éteignez le module, et attendez 60
secondes.Quandvouslerallumerez,vous
entendrez normalement retentir le signal
sonoretroisfoiset«iStarBTCSK»devrait
apparaîtredanslalistedesappareilsBluet
tooth disponibles.
Solution2 Unautreappareilestpeut-êtreencore
connecté au module. Pour déconnecter
l’autre appareil, éteignez le module, puis
attendez 60 secondes comme indiqué plus
hautavantdelerallumeretdeconnecter
votreappareil.
Déclaration de conformité
Philex Electronic Ltd. déclare par la présente que
l’équipement radio modèle 12302R, kit d’enceintes
Bluetoothpourdiusionetréceptionradiodansun
cadredomestique,estconformeàladirective2014/53/
UE sur les équipements radio. Le texte complet de la
déclaration européenne de conformité est disponible
à cette adresse : www.philex.com/doc
Assistance technique
Pour tous conseils, aide, informations ou chat en
direct, consultez www.philex.com/support
Élimination / recyclage des DEEE
Àlandeladuréedeviedel’appareil,nepass’en
débarrasseraveclesorduresménagères.Leremettre
à un centre de collecte agréé pour le recyclage des
appareils électriques et électroniques.
www.philex.com/support KIT D’ENCEINTES BLUETOOTH POUR PLAFOND - Guide d’utilisation 13
FR

IT
KIT CASSE ALTOPARLANTI BLUETOOTH WIRELESS DA SOFFITTO - Manuale utente
Avvertenze
1.
Tuttiicollegamentiallareteelettricadevonoessere
eettuatidaunelettricistaqualicatoedevonoessere
testati regolarmente durante l’installazione.
2.Tuttiilavorielettricieseguitidevonoessereconformi
airegolamentiedilizipertinenti.Vericarelenormative
locali prima dell’installazione.
3. Assicurarsi sempre che la tensione di rete sia
scollegataprimadiiniziarequalsiasilavorodicablaggio.
4.SeilmoduloBluetoothvieneinstallatonellospazio
delsottodiunbagno,utilizzareuninterruttorea
cordicelladasottoadattoouninterruttoredi
corrente ON/OFF a parete posizionato all’esterno
della stanza.
5. Il modulo Bluetooth è progettato per l’installazione a
sotto.Siraccomandapertantodivericarechevisia
spaziosucienteintornoall’unità(almeno15cm)per
consentireun’adeguataventilazione.
6.Primadiforareconuntrapanooeettuaretaglisu
sottoopareti,siraccomandadiutilizzareun
rilevatoreadattoperescluderelapresenzadicavi
elettrici o tubi dell’acqua nascosti.
7.Selecasseacustichevengonomontatesuunsotto
che abbia una camera sopra, nella maggior parte dei
casiognicassadovràesseredotatadiprotezione
antincendio (non fornita). Consultare il Regolamento
Edilizio locale.
8.Nondisassemblareomodicarelecasseacustiche
o il modulo Bluetooth in quanto all’interno non sono
presenti parti manutenzionabili dall’utente.
9. Non montare le casse acustiche o il modulo nelle
vicinanzediunasorgentedicalore.
10.Nonmontarelacasseacustichenelsottodiuna
cabinadocciaoaldisopradiunavascadabagnoo
dellavandino.
Dotazioni e contenuto della confezione
2casseacustiche6Wdasotto
1moduloricevitoreBluetoothpre-cablato,con2
cavida3mperilcollegamentodellecasseeuncavo
alimentatore da 25 cm,
1 manuale utente
Introduzione
Ilkitpuòessereinstallatonelsottoperl’ascolto
comodo e sicuro della musica in qualsiasi stanza di pref-
erenza.Èsempliceeettuarel’associazioneaqualsiasi
dispositivoabilitatoperBluetoothcomeuntelefono
cellulare o un tablet, e in questo modo si riduce il rischio
che l’acqua danneggi costosi apparecchi elettronici.
Perfetto per cucine, camere da letto e bagni. Il modulo
Bluetoothcompattopre-cablatosimontanellospazio
delsottoepuòessereconnessoauncircuitodi
illuminazione esistente.
Lecasseacustichehannounbassoproloe,unavolta
montate,rimangonoquasialodelsotto.Simontano
nelsottoinmodopraticamentesimileaifarettiincas-
sati, infatti si possono inserire in alloggiamenti della
stessamisuraprevistiperlamaggiorpartedeifaretti,
orendounasoluzionesempliceediscreta.
Posizionamentoepianicazionedel
cablaggio del modulo Bluetooth
Vi sono tre sistemi per il collegamento del modulo
Bluetooth a un circuito di illuminazione 6A esistente.
Ricordiamocheilmodulodeveessereposizionatonel
raggio di 3 metri da entrambe le casse acustiche se si
intendeutilizzareilcavoperaltoparlantepre-cablato
perraggiungerelecassenellaposizioneincuiverranno
montate.
1. Collegamento a un rosone per lampadario esistente
se lo spazio del terminale lo consente. NB: questo
sistemadovrebbeessereutilizzatounicamentesesi
desideracheilmoduloBluetoothvengaalimentato
solo quando si accende la luce.
2.Collegamentoaunascatoladiderivazionenuova
nel circuito di illuminazione. Questo sistema richiede
l’aggiuntadiuncavonuovoauninterruttoredella
luceon/o.
3.Collegamentoaunascatoladiderivazioneditipo
Wago nel circuito di illuminazione. Questo sistema
richiedel’aggiuntadiuncavonuovoauninterruttore
dellaluceon/o.
Posizionamento e cablaggio di un
interruttore di alimentazione ON/OFF per
il modulo Bluetooth
Esistonodiverseopzioniperilposizionamentodiun
interruttore ON/OFF.
1.Passaggiodiuncavodaunascatoladiderivazionea
sottoauninterruttorenuovomontatoapareteoa
uninterruttoreacordicellamontatosulsottostesso.
2.Passaggiodiuncavodaunascatoladiderivazionea
sottoauninterruttoreesistenteesostituzionediun
interruttore per luce singola con un interruttore per
luce doppio (o sostituzione di un interruttore doppio
con un interruttore triplo).
N.B. Abbiamo incluso un’etichetta trasparente con il
simbolo di un altoparlante per contrassegnare
l’interruttore usato per le casse acustiche
14
ALTOPARLANTI BLUETOOTH DA SOFFITTO - Manuale utente
www.philex.com/support
IT

Fig. 4
Fig. 6
Fig. 5
Montaggio delle casse acustiche
Unavoltacablatoilmoduloedopoaverlocollegatoalla
corrente e all’interruttore, si possono montare le casse
acustiche.
Assicurarsicheicaviperaltoparlantepre-cablatida3
m raggiungano le casse acustiche nella posizione in cui
devonoesseremontate.Vericarechenonvisianocavi
o tubi nascosti nei punti prescelti.
1. Utilizzando una sega a tazza da 74 mm, praticare
deiforinelsotto(selasegaatazzada74mmnonè
disponibile,possonoessereusateinalternativatazze
da72-76mm).Sulretroèpresenteunadimaper
il taglio.
2.Tirarel’appositocavoattraversoilforoecollegarloai
terminali delle casse acustiche.
3.Tenendoifermagliamollaversol’alto,inserireidue
braccinelforosulsotto(vediFigg.4&5).
4.Spingerelecasseacusticheinaltonoachenonsono
saldamente ancorate in posizione, assicurandosi che
ilcavononsiastrozzato(vediFigg.5&6).
casse soffitto
Circuito di illuminazione 240v
modulo Bluetooth
fino a 3m fino a 3m D
S
scatola di
derivazione
Cavo per interruttore modulo BT
interruttore doppio per
illuminazione e modulo Bluetooth
I collegamenti a una scatola Wago
esistente sono simili a quelli
mostrati nella Fig. 3. Consultare
unelettricistaqualicatosenon
sièsicuridicomeeettuareicol-
legamenti giusti.
NEUTRO LOOP FASE
CORRENTE ELETTRICA
IN INGRESSO
INTERRUTTORE
LUCE
MODULO BT
TERRA
MODULO BT
CORRENTE ELETTRICA
IN INGRESSO
CORRENTE ELETTRICA
IN USCITA
INTERRUTTORE
La Fig. 2 mostra il modulo Bluetooth
connesso a un rosone per
lampadarioesistentesulsotto,
laluceeilmodulocondividonolo
stesso interruttore.
NellaFig.3ilmoduloBluetootheunnuovo
interruttore sono cablati a un circuito di
illuminazioneesistenteattraversounanuova
scatoladiderivazione,interrompendoun
cavodicorrenteperlaluceesistente.
Per l’accensione e lo
spegnimento del modulo
Bluetoothdeveesserefatto
passareuncavonuovono
auninterruttorenuovo
Fig. 2 Fig. 3
Fig. 1
Collegamento alla corrente elettrica per modulo Bluetooth
Installazione tipo kit casse acustiche
www.philex.com/support
ALTOPARLANTI BLUETOOTH DA SOFFITTO - Manuale utente
15
IT

16
ALTOPARLANTI BLUETOOTH DA SOFFITTO - Manuale utente
www.philex.com/support
Associazione delle casse acustiche a
telefoni cellulari e tablet con Bluetooth
Unavoltacompletatoilcablaggio,all’accensionedel
modulosidovrebbeudireuntriplicetonoacustico
che indica che il modulo è pronto per l’associazione.
Selezionare la funzione Bluetooth sul proprio telefono/
dispositivoericercareidispositiviBluetooth.
Lecasseacusticheverrannorilevateconilnome“iStar
BTCSK”nell’elencodispositiviBluetooth,selezionarle
eassociarle.L’associazionedisolitoavvieneautomat-
icamente.Laddovesiarichiestaunapassword,digitare
(0000). Al termine dell’associazione, l’apparecchio em-
ette un duplice suono. È ora possibile riprodurre l’audio
daltelefono/dispositivo.
NB: se l’associazione non riesce, spegnere per 10
secondi,quindiriaccendereeriprovare.Ognivoltache
ilmodulovienespentoeildispositivoscollegato,non
si riconnette automaticamente alla riaccensione del
modulo. Ciò consente la connessione al modulo di altri
dispositivi.
Riconnessione a un dispositivo
precedentemente associato o
associazione di un nuovo dispositivo
Unavoltaspento,lasciareilmodulospentoper60
secondiprimadiriaccenderloperassociarloaunnuovo
dispositivoopercollegarloaundispositivoprecedente-
mente associato. Se, quando si accende l’apparecchio,
non si sente il triplice tono che indica che il modulo è
pronto per la connessione/associazione, spegnere e
attendere altri 60 secondi prima di riaccendere.
Risoluzione dei problemi
D1 Il suono è basso o completamente silenzioso.
R1Assicurarsicheiltelefono/dispositivosiacarico.
R2 Assicurarsi che la connessione Bluetooth funzioni
correttamente.
R3Controllareilvolumedeltelefono/dispositivoe
vericarechevisiaunatracciamusicaleudibilein
riproduzione.
D2 Il mio dispositivo non è in grado di trovare il
modulo.
R1 Se, quando si accende il modulo, non si sente il
triplice tono che indica che il modulo è pronto per la
connessione/associazione, spegnere e attendere altri
60secondi.Allariaccensione,sidovrebbeudire
iltriplicetonoe“iStarBTCSK”dovrebbecomparire
nell’elencodeidispositiviBluetooth.
R2Unaltrodispositivopotrebbeessereancoraconnes
soalmodulo.Perscollegarel’altrodispositivo,
spegnere il modulo per 60 secondi come sopra,
quindiassociareilnuovodispositivo.
Dichiarazione di conformità
Con il presente documento Philex Electronic Ltd.
dichiara che l’apparecchiatura radio: Kit casse acustiche
Bluetooth, modelli 12302R per la ricezione di emissioni
diradiodiusioneinlocalidomesticièconformealla
DirettivaApparecchiatureRadio2014/53/UE.Iltesto
completo della dichiarazione di conformità UE è
disponibile al seguente indirizzo internet:
www.philex.com/doc
Assistenza tecnica
Per ulteriori aiuti, consigli, informazioni o per una chat
live,visitare:www.philex.com/support
Smaltimento / riciclaggio RAEE
Nonsmaltireilprodottoconiriutidomesticiallane
dellasuavitautile;consegnarloinveceauncentrodi
raccolta per il riciclaggio degli apparecchi elettrici ed
elettronici.
IT

NL
DRAADLOZE PLAFONDLUIDSPREKERSET MET BLUETOOTH - Gebruikershandleiding
Waarschuwingen
1.Alleelektrischebedradingmoetwordenuitgevoerd
dooreenvollediggekwaliceerdeelektricienen
regelmatig getest tijdens de installatie.
2.Alleuitgevoerdeelektrischewerkzaamhedenmoeten
voldoenaanderelevantebouwvoorschriften.
Controleerdelokalevoorschriftenvoorinstallatie.
3.Zorgeraltijdvoordatdeelektriciteitbijdeverbruiker-
seenheidisuitgeschakeldvoordatmetbedrading-
swerkzaamheden wordt begonnen.
4.Alsdebluetoothmoduleinhetplafondvaneen
badkamer is geïnstalleerd, moet u een geschikte
aan het plafond gemonteerde trekkoordschakelaar
gebruiken of buiten de badkamer een aan de muur
gemonteerdeAAN/UIT-schakelaar.
5. De bluetoothmodule is ontworpen om in de
plafondruimte te worden gemonteerd. Zorg er altijd
voordatervoldoenderuimterondomhetapparaatis
(minimaal15cm)omvoldoendeventilatietoete
laten.
6. Vóor het boren of snijden in het plafond of de muren
wordtaanbevolenomeengeschiktedetectorte
gebruikenomtecontrolerenopverborgenkabelsen
leidingen.
7. Als de luidsprekers in een plafond met een of meer
kamer(s)erbovenmoetenwordengemonteerd,moet
indemeestegevallenelkeluidsprekerworden
voorzienvaneenbrandkap(nietmeegeleverd).
Controleerdelokalebouwvoorschriften.
8.Demonteerofwijzigdeluidsprekerofbluetooth-
module niet. Er zijn geen onderdelen die door de
gebruiker kunnen worden gerepareerd.
9. Monteer de luidsprekers of module niet in de buurt
vaneenwarmtebron.
10.Monteerdeluidsprekersnietinhetplafondvaneen
douchecabineofboveneenbadofwastafel
Kenmerken en inhoud van de doos
2 x 6 W plafondluidsprekers
1xbluetooth-voorbedradeontvangermodule-
met 2 x 3 m luidsprekerkabels en 25 cm
voedingskabel
1 x gebruikershandleiding
Inleiding
U kunt deze kit in uw plafond installeren zodat u gemak-
kelijkenveilignaarmuziekkuntluistereninelkekamer
dieukiest.Dekitiseenvoudigtekoppelenaanelk
bluetoothapparaat, zoals een smartphone of tablet, en
minimaliseert het risico op waterschade aan uw dure
elektronica.Ideaalvoorkeukens,slaapkamersenbad-
kamers.Devoorbedradecompactebluetoothmodule
wordt in de plafondruimte gemonteerd en kan op een
bestaandverlichtingscircuitwordenaangesloten.
Deluidsprekershebbeneenzeerlaagproelenzitten
bij montage bijna gelijk met het plafond. Ze worden op
vrijweldezelfdemanierinhetplafondgemonteerdals
inbouwspotsenpasseninuitsparingenvandezelfde
groottealsdemeesteinbouwspotsvooreeneenvoudige
en discrete oplossing.
Plaatsing en planning van de bedrading
voor de bluetoothmodule
Er zijn drie methoden om de bluetoothmodule aan te
sluitenopeenbestaand6A-verlichtingscircuit.Houder
rekeningmeedatudemodulebinnen3mvanbeide
luidsprekersmoetplaatsenalsudevoorbedradeluid-
sprekerkabel wilt gebruiken om de luidsprekers in hun
gemonteerde positie te bereiken.
1.Bedradingnaareenbestaandeverlichtingscontact
doosalservoldoendeaansluitruimteis.Letop:deze
methode mag enkel worden gebruikt als u wilt dat
de bluetoothmodule alleen wordt ingeschakeld als de
verlichtingisingeschakeld.
2.Bedradingvaneennieuweaansluitdoosinhet
verlichtingscircuit.Bijdezemethodemoeteennieuwe
kabelnaareenaan/uit-lichtschakelaarwordengeleid.
3.BedradingnaareenbestaandeWago-aansluitdoos
inhetverlichtingscircuit.Bijdezemethodemoeteen
nieuwekabelnaareenaan/uit-lichtschakelaarworden
geleid.
Plaatsing en bedrading van een AAN/UIT-
schakelaar voor de bluetoothmodule
ErzijneenaantaloptiesvoorhetplaatsenvaneenAAN/
UIT-schakelaar.
1.Eenkabelvaneenplafondaansluitdoosnaareen
nieuwe wandschakelaar of
plafondtrekkoordschakelaar leiden.
2.Eenkabelvaneenplafondaansluitdoosnaareen
bestaande schakelaar leiden en een enkele
lichtschakelaarvervangendooreendubbele(ofeen
dubbeleschakelaarvervangendooreendrievoudige).
N.B. Een transparant label met een luidsprekersymbool
ismeegeleverdomdeschakelaarvoordeluidsprekerte
markeren.
www.philex.com/support PLAFONDLUIDSPREKERSET MET BLUETOOTH - Gebruikershandleiding 17
NL

Afb. 4
Afb. 6
Afb. 5
De luidsprekers monteren
Nadat u uw module op het lichtnet en de schakelaar
hebt aangesloten, kunt u de luidsprekers monteren.
Zorgervoordatde3mvoorbedradeluidsprekerkabels
de luidsprekers in de gekozen montagepositie bereiken.
Controleerofergeenverborgenkabelsofleidingenzijn
op de gekozen locaties.
1.Gebruikeen74mmgatenzaagen-booromgatenin
het plafond te maken (als er geen 74 mm
gatenzaagbeschikbaaris,kunnen72-76mm-zagen
wordengebruikt).Uvindteensjabloonvoorde
uitsparing op de keerzijde.
2.Trekdeluidsprekerkabeldoorhetgatenbevestig
deze aan de luidsprekeraansluitingen.
3.Richtdeveerklemmennaarbovenenplaatsdetwee
armen in het plafondgat (zie afb. 4 en 5).
4.Duwdeluidsprekeromhoogtotdatdezestevigopzijn
plaatszitenzorgervoordatdekabelnietbekneld
raakt (zie afb. 5 en 6).
luidspreker plafon
240V verlichtingscircuit
bluetoothmodule
tot 3 m tot 3 m R
L
ansluitdoos
BT-module-Schakelaarkabel
dubbele schakelaar voor
licht en bluetoothmodule
Aansluitingen in een bestaande
Wago-dooszijnvergelijkbaarmet
deze in afb. 3. Raadpleeg een
gekwaliceerdeelektricienalsu
niet zeker weet hoe u de juiste
aansluitingen moet maken.
NEUTRAAL LUS LIJN
NETVOE
SHAKELAAR
LICHT
BT-MODULE
AARDI
BT-MODULE
NETVOE
NETVOEDIN
SHAKELAAR
Afb.2toontdebluetoothmodulever-
bonden met een plafondcontactdoos.
Het licht en de module delen dezelfde
schakelaar.
In afb. 3 zijn de bluetoothmodule
eneennieuweschakelaarviaeen
nieuwe aansluitdoos aangesloten op
eenbestaandverlichtingscircuit,waarbij
eenbestaandeverlichtingskabelwordt
onderbroken.
Een nieuwe kabel moet naar een
nieuwe schakelaar worden geleid
voorhetin-enuitschakelenvan
de bluetoothmodule.
Afb. 2 Afb. 3
Afb. 1
Voedingsaansluiting voor bluetoothmodule
Typische installatie van de luidsprekerset
18 PLAFONDLUIDSPREKERSET MET BLUETOOTH - Gebruikershandleiding www.philex.com/support
NL

Aansluitingen in een bestaande
Wago-dooszijnvergelijkbaarmet
deze in afb. 3. Raadpleeg een
gekwaliceerdeelektricienalsu
niet zeker weet hoe u de juiste
aansluitingen moet maken.
Uw luidsprekers koppelen aan mobiele
telefoons en tablets met Bluetooth
Zodradebedradingisvoltooid,schakeltudemodulein
enhoortueendrievoudigetoonomaantegevendat
de module klaar is om te worden gekoppeld. Selecteer
de bluetoothfunctie op uw mobiele telefoon/apparaat
en zoek naar bluetoothapparaten.
Deluidsprekerverschijntals“iStarBTCSK”indelijstmet
bluetoothapparaten, selecteer en koppel. Het koppelen
gaat normaal gesproken automatisch. Als een wacht-
woordvereistis,voerdan(0000)in.Naeensuccesvolle
koppeling hoort u een dubbele pieptoon. U kunt nu
audioafspelenvanafuwmobieletelefoon/apparaat.
Opmerking: Als het koppelen niet lukt, schakel dan 10
seconden uit, schakel weer in en probeer het opnieuw.
Elke keer dat de module wordt uitgeschakeld en het ap-
paraatlosgekoppeld,wordtdeverbindingnietautoma-
tisch hersteld als de module weer wordt ingeschakeld.
Hierdoor kunnen andere apparaten op de module
worden aangesloten.
Opnieuw verbinden met een eerder
gekoppeld apparaat of een nieuw
apparaat koppelen
Laat de module na uitschakeling 60 seconden
uitgeschakeldvoordatuhemweerinschakeltomte
koppelenmeteennieuwapparaatofomverbindingte
maken met een eerder gekoppeld apparaat. Hoort u bij
hetinschakelengeendrievoudigetoondieaangeeftdat
demoduleklaarisomteverbinden/koppelen,schakel
danuitenwachtnogeens60secondenvoordatude
module weer inschakelt.
Problemen oplossen
V1 Het geluid is laag of volledig stil.
A1Zorgervoordatzoweluwmobieletelefoonenhet
apparaat opgeladen zijn.
A2Zorgervoordatueenbluetoothverbindinghebtdie
volledigfunctioneert.
A3Controleerhetvolumevanuwmobieletelefoon/ap-
paraat en of er hoorbare muziek wordt afgespeeld.
V2 Mijn apparaat kan de module niet vinden.
A1Hoortubijhetinschakelengeendrievoudigetoon
dieaangeeftdatdemoduleklaarisomteverbinden/
koppelen, schakel uit en wacht 60 seconden. Schakel
weerin.Uzounudedrievoudigetoonmoetenhorenen
“iStar BTCSK” in uw bluetoothapparatenlijst zien.
A2 Er kan nog een ander apparaat aan de module ge-
koppeld zijn. Om het andere apparaat los te koppelen,
schakeltudemodulezoalshierbovenbeschreven60
secondenuitenkoppeltuvervolgensuwapparaat.
Conformiteitsverklaring
PhilexElectronicLtd.verklaarthierbijdatderadioap-
paratuur:modellen12302RBluetooth-luidsprekerset
voorradio-ontvangstinwoningeninovereenstemming
ismetderichtlijnnr.2014/53/EUvoorradioapparatuur.
DevolledigetekstvandeEU-conformiteitsverklaringis
beschikbaarviahetinternetadres:www.philex.com/doc
Technische ondersteuning
Voorhulp,advies,informatieoflivechat,ganaar
www.philex.com/support
WEEE-verwijdering / recycling
Elektrische en elektronische producten mogen niet
bijhethuishoudelijkafvalwordengedaan.Recycle
wanneerhiervoorvoorzieningenzijn.Neemcontact
opmetdelokaleautoriteitenvooradviesover
recycling.
www.philex.com/support PLAFONDLUIDSPREKERSET MET BLUETOOTH - Gebruikershandleiding 19
NL

20 BLUETOOTH CEILING SPEAKER - User Guide www.philex.com/support
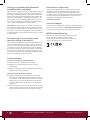
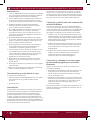
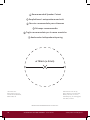
ø 74mm (± 2mm)
EN Recommended Speaker Cutout
DE Empfohlener Lautsprecherausschnitt
ES Recorte recomendado para altavoces
FR Découpe recommandée
IT Taglio raccomandato per le casse acustiche
NL Aanbevolen luidsprekeruitsparing
Made In China © Philex Electronic Ltd. 2021 V1.5
UK Distributor:
Philex Electronic Ltd.,
London Road, Bedford,
MK42 0NX, UK.
Distributed in the EU by:
Philex Electronic Ireland Ltd.,
Robwyn House, Corrintra,
Castleblayney, Co. Monaghan,
A75 YX76, Ireland
-
 1
1
-
 2
2
-
 3
3
-
 4
4
-
 5
5
-
 6
6
-
 7
7
-
 8
8
-
 9
9
-
 10
10
-
 11
11
-
 12
12
-
 13
13
-
 14
14
-
 15
15
-
 16
16
-
 17
17
-
 18
18
-
 19
19
-
 20
20


in anderen Sprachen
- English: i-star 12302R User guide
- français: i-star 12302R Mode d'emploi
- español: i-star 12302R Guía del usuario
- italiano: i-star 12302R Guida utente
- Nederlands: i-star 12302R Gebruikershandleiding
Sonstige Unterlagen
-
i-box i-box Melody DAB DAB+ FM Portable Radio Benutzerhandbuch
-
 LIVARNO LUX 288149 Assembly, Operating And Safety Instructions
-
Turbosound IX15 Schnellstartanleitung
-
Q Acoustics E120 Installationsanleitung
-
iON Solar Stone Glow Benutzerhandbuch
-
Turbosound iP82 Schnellstartanleitung
-
Alesis Transactive 50 Benutzerhandbuch
-
Cooke & Lewis Berrow Benutzerhandbuch
-
EUROCOM P270WM Benutzerhandbuch
-
DoorBird D21x Series IP Video Door Station Benutzerhandbuch
