HP Color LaserJet CM3530 Multifunction Printer series Benutzerhandbuch
- Kategorie
- PC / Workstation Barebones
- Typ
- Benutzerhandbuch

www.hp.com/go/usemyMFP
EN
EN
Getting Started Guide
Read me rst
FR
FR
Guide de mise en route
A lire avant l’utilisation
DE
DE
Erste Schritte
Wichtige Hinweise
IT
IT
Guida introduttiva
Informazioni preliminari
ES
ES
Guía de instalación inicial
Lea esto primero
CA
CA
Guia de primers passos
Llegiu-me primer
NL
NL
Beknopte handleiding
Lees dit eerst
PT
PT
Guia de primeiros passos
Leia-me primeiro
HP Color LaserJet CM3530 MFP Series
MFP HP Color LaserJet série CM3530
Seite wird geladen ...

1
EN
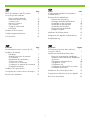
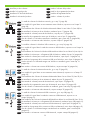
Topic Page
In-box documentation and CD contents 3
Set up the product hardware
Remove packing materials 7
Install control-panel overlay 9
Connect power 10
Network connection 11
Fax connection 12
Congure control panel 13
Load paper 17
Install the product software 19
Congure digital send features 37
Solve problems 53
FR
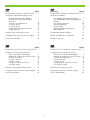
Sommaire Page
Documentation fournie et contenu des CD 3
Installation du matériel
Déballage 7
Installation du cache du panneau
de commande 9
Branchement de l’alimentation 10
Connexion au réseau 11
Connexion pour la télécopie 12
Conguration du panneau de commande 13
Chargement du papier 17
Installation du logiciel produit 19
Conguration des fonctions d’envoi numérique 37
Résolution des problèmes 53
DE
Thema Seite
Im Lieferumfang enthaltene Dokumentation
und Inhalt der CD 3
Einrichten der Produkthardware
Entfernen der Verpackung 7
Anbringen der Bedienfeldschablone 9
Anschließen an das Stromnetz 10
Anschließen an das Netzwerk 11
Anschließen des Faxkabels 12
Kongurieren des Bedienfelds 13
Einlegen von Papier 17
Installieren der Produktsoftware 19
Kongurieren der digitalen Sendefunktionen 37
Problembehebung 53
IT
Argomento Pagina
Documentazione acclusa alla confezione
e contenuto del CD 3
Installazione dell'hardware del prodotto
Rimozione dei materiali di imballaggio 7
Installazione della mascherina del pannello
di controllo 9
Collegamento all'alimentazione 10
Collegamento in rete 11
Collegamento fax 12
Congurazione del pannello di controllo 13
Caricamento della carta 17
Installazione del software del prodotto 19
Congurazione delle funzioni di invio digitale 38
Risoluzione dei problemi 53
Seite wird geladen ...

3
EN
In-box documentation and CD content
Getting Started Guide
HP Support Flyer
Wall poster
CDs
• Installer
• Software drivers
• Wall Poster
• Quick Reference Guide
• User Guide
• Fax Guides
• Embedded Web Server Guide
• Jetdirect Inside Guide
Documentation fournie et contenu des CD
Guide de mise en route
Prospectus d’assistance HP
Afche
CD
• Programme d’installation
• Pilotes de logiciel
• Afche
• Guide de référence rapide
• Guide de l’utilisateur
• Guides du télécopieur
• Guide du serveur Web intégré
• Guide d’utilisation de Jetdirect
FR
DE
Im Lieferumfang enthaltene Dokumentation und
Inhalt der CD
Erste Schritte
Faltblatt zum HP Support
Wandposter
CDs
• Installationsprogramm
• Softwaretreiber
• Wandposter
• Kurzübersicht
• Benutzerhandbuch
• Faxanleitung
• Anleitung für den eingebetteten Webserver
• Detaillierte Anleitung für den Jetdirect
IT
Documentazione acclusa alla confezione e
contenuto del CD
Guida introduttiva
Pieghevole dell’assistenza HP
Poster
CD
• Programma di installazione
• Driver software
• Poster
• Guida di riferimento rapido
• Guida dell’utente
• Guide fax
• Guida del server Web incorporato
• Guida di Jetdirect
ES
Documentación incluida y contenido del CD
Guía de instalación inicial
Folleto de asistencia de HP
Póster de instrucciones
CD
• Instalador
• Controladores de software
• Póster de instrucciones
• Guía de referencia rápida
• Guía del usuario
• Guías de fax
• Guía del servidor Web incorporado
• Guía de Jetdirect
CA
Documentació que hi ha a la caixa i contingut del CD
Guia de primers passos
Prospecte d’ajuda d’HP
Cartell
CD
• Instal·lador
• Controladors de programari
• Cartell
• Guia de referència ràpida
• Guia de l’usuari
• Guies de fax
• Guia del servidor web incrustat
• Guia de Jetdirect per dins
NL
Meegeleverde documentatie en inhoud van de cd
Beknopte handleiding
Ondersteuningsbrochure van HP
Poster
Cd's
• Installatieprogramma
• Softwaredrivers
• Poster
• Naslaghandleiding
• Gebruikershandleiding
• Faxhandleidingen
• Gebruikershandleiding voor de geïntegreerde
webserver
• Jetdirect Inside-handleiding
PT
Conteúdo do CD e documentação contida na caixa
Guia de primeiros passos
Folheto de suporte HP
Pôster
CDs
• Instalador
• Drivers do software
• Pôster
• Guia de referência rápida
• Guia do usuário
• Guias de fax
• Guia do servidor da web incorporado
• Guia do Jetdirect interno

4
1
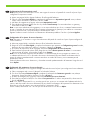
NJ
OE
835 mm
870.5 mm
819 mm
32.2 inch
es
34.3 inches
32.8 inches
10% - 80%
10° - 30°C
(50° - 86°F)
EN
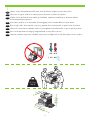
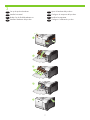
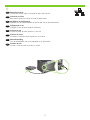
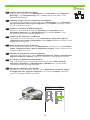
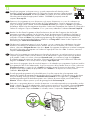
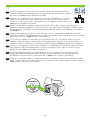
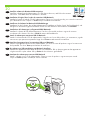
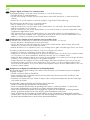
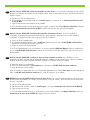
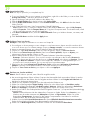
Select a sturdy, well-ventilated, dust-free area, away from direct sunlight to position the product.
FR
Choisissez un support solide et un endroit propre et bien aéré où placer votre produit.
DE
Wählen Sie für das Produkt einen stabilen, gut belüfteten, staubfreien Aufstellungsort, der keiner direkten
Sonneneinstrahlung ausgesetzt ist.
IT
Posizionare il prodotto in un'area stabile, ben arieggiata, pulita e lontana dalla luce solare diretta.
ES
Elija un lugar sólido, bien ventilado, sin polvo y apartado de la luz directa del sol para colocar el producto.
CA
Seleccioneu una zona ben ventilada, sense pols i protegida de la llum directa del sol per situar-hi el producte.
NL
Kies voor het apparaat een veilige, goedgeventileerde, stofvrije plek uit de zon.
PT
Selecione uma área segura, bem ventilada, sem poeira e protegida da luz solar direta para colocar o produto.

5
EN
Product Requirements
• Power outlet
• Active phone line (CM3530fs MFP)
• Active network connection (if connecting to a network)
FR
Exigences du produit
• Prise de courant
• Ligne téléphonique active (MFP CM3530fs)
• Connexion réseau active (dans le cadre d’une utilisation en réseau)
DE
Produktanforderungen
• Netzsteckdose
• Funktionierende Telefonleitung (CM3530fs MFP)
• Funktionierender Netzwerkanschluss (bei Anschluss an ein Netzwerk)
IT
Requisiti del prodotto
• Presa di alimentazione
• Linea telefonica attiva (MFP CM3530fs)
• Collegamento in rete attivo (se si effettua il collegamento a una rete)
ES
Requisitos del producto
• Toma de alimentación
• Línea telefónica activa (CM3530fs MFP)
• Conexión de red activa (si se conecta a una red)
CA
Requisits del producte
• Presa de corrent
• Línia telefònica activa (CM3530fs MFP)
• Connexió de xarxa activa (si es connecta a una xarxa)
NL
Apparaatvereisten
• Stopcontact
• Actieve telefoonlijn (CM3530fs MFP)
• Actieve netwerkverbinding (als u op een netwerk bent aangesloten)
PT
Requisitos do produto
• Saída de alimentação
• Linha telefônica ativa (MFP CM3530fs)
• Conexão de rede ativa (se conectado a uma rede)

2
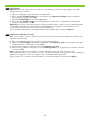
CM3530fs MFP
1 2
3
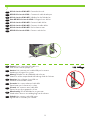
EN
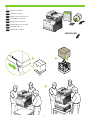
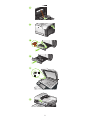
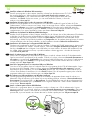
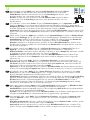
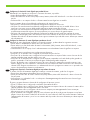
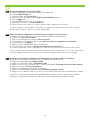
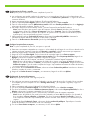
Unpack the product.
FR
Déballez le produit.
DE
Packen Sie das Produkt aus.
IT
Disimballare il prodotto.
ES
Desembale el producto.
CA
Desempaqueteu el producte.
NL
Pak het product uit.
PT
Desembale o produto.

7
3
1
3
2
4
5
EN
Set up the product hardware.
FR
Installez le matériel.
DE
Richten Sie die Produkthardware ein.
IT
Installare l'hardware del prodotto.
ES
Ajuste el hardware del producto.
CA
Congureu el maquinari del producte.
NL
Installeer het apparaat.
PT
Congure o hardware do produto.
Seite wird geladen ...

9
4
12
13
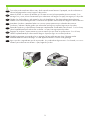
EN
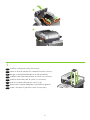
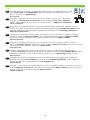
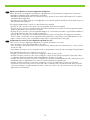
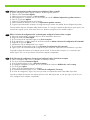
Install the control-panel overlay (if necessary).
FR
Mettez le cache du panneau de commande en place (si besoin).
DE
Bringen Sie die Bedienfeldschablone an (falls erforderlich).
IT
Installare la mascherina del pannello di controllo (se necessario).
ES
Instale la cubierta del panel de control (si es necesario).
CA
Instal·leu la caràtula del tauler de control (si cal).
NL
Plaats indien nodig het afdekplaatje op het bedieningspaneel.
PT
Instale o decalque do painel de controle (se necessário).

10
5
2
1
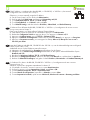
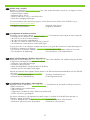
EN
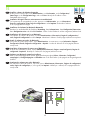
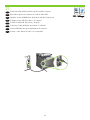
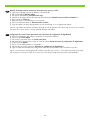
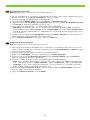
Connect the power.
EN
1) Fax
2) USB
3) Network
FR
Branchez l’imprimante sur une prise d’alimentation.
FR
1) Télécopie
2) USB
3) Réseau
DE
Schließen Sie das Stromkabel an.
DE
1) Fax
2) USB
3) Netzwerk
IT
Collegare l'alimentazione.
IT
1) Fax
2) USB
3) Rete
ES
Conecte la alimentación.
ES
1) Fax
2) USB
3) Red
CA
Endolleu el producte.
CA
1) Fax
2) USB
3) Xarxa
NL
Sluit het netsnoer aan.
NL
1) Fax
2) USB
3) Netwerk
PT
Conecte o cabo de alimentação.
PT
1) Fax
2) USB
3) Rede

11
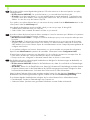
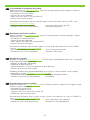
EN
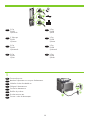
Network connection
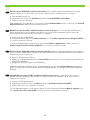
Connect the network cable to the product and to the network.
FR
Connexion au réseau
Raccordez le produit au réseau à l’aide du câble réseau.
DE
Anschließen an das Netzwerk
Schließen Sie das Netzwerkkabel an das Produkt und an das Netzwerk an.
IT
Collegamento in rete
Collegare il cavo di rete al prodotto e alla rete.
ES
Conexión de red
Conecte el cable de red al producto y a la red.
CA
Connexió de xarxa
Connecteu el cable de xarxa al producte i a la xarxa.
NL
Netwerkverbinding
Sluit de netwerkkabel aan op het apparaat en op het netwerk.
PT
Conexão da rede
Conecte o cabo de rede ao produto e à rede.

12
7
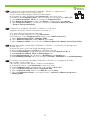
EN
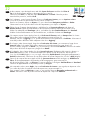
Caution! Do not connect the USB cable now.
Wait until the software prompts you.
EN
HP Color LaserJet 3530fs MFP: Connect the fax cord.
FR
Attention ! Ne connectez pas le câble USB pour le moment.
Attendez que le logiciel vous y invite.
FR
MFP HP Color LaserJet 3530fs : Connectez le câble de télécopie.
DE
Achtung! Schließen Sie das USB-Kabel nicht sofort an.
Warten Sie auf die entsprechende Aufforderung durch die Software.
DE
HP Color LaserJet 3530fs MFP: Schließen Sie das Faxkabel an.
IT
Attenzione. Non collegare il cavo USB ora.
Attendere la richiesta del software.
IT
Unità MFP HP Color LaserJet 3530fs: Collegare il cavo del fax.
ES
Precaución. No conecte todavía el cable USB.
Espere hasta que el software se lo solicite.
ES
HP Color LaserJet 3530fs MFP: Conecte el cable del fax.
CA
Precaució: No connecteu ara el cable USB.
Espereu ns que el programari ho sol·liciti.
CA
HP Color LaserJet 3530fs MFP: Connecteu el cable del fax.
NL
Waarschuwing! Sluit de USB-kabel nu nog niet aan.
Wacht totdat u hiervoor een melding krijgt van de software.
NL
HP Color LaserJet 3530fs MFP: Sluit het faxsnoer aan.
PT
Cuidado! Não conecte o cabo USB agora.
Aguarde até ser solicitado pelo software.
PT
MFP HP Color LaserJet 3530fs: Conecte o cabo de fax.

13
8
EN
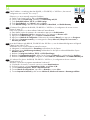
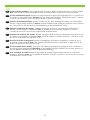
Turn on the product and wait while it starts, which can take several minutes. If prompted, use the touchscreen to
select a language and a country/region for the product.
FR
Mettez le produit sous tension et attendez qu’il se mette en route (cela peut prendre plusieurs minutes). Si un
message vous y invite, utilisez l’écran tactile pour sélectionner une langue et un pays/une région pour le produit.
DE
Schalten Sie das Produkt ein, und warten Sie, bis es hochgefahren ist. Dies kann mehrere Minuten dauern.
Wählen Sie auf Aufforderung über den Touchscreen eine Sprache und ein Land/eine Region für das Produkt aus.
IT
Accendere il prodotto e attendere nché non si avvia; questa operazione può richiedere alcuni minuti.
Se richiesto, utilizzare il display graco per selezionare una lingua e un paese/regione per il prodotto.
ES
Encienda el producto y espere hasta que arranque completamente. Puede tardar varios minutos. Si se le solicita,
utilice la pantalla táctil para seleccionar un idioma o un país/una región para el producto.
CA
Engegueu el producte i espereu mentre es posa en marxa. Això pot durar uns quants minuts. Si es sol·licita,
utilitzeu la pantalla tàctil per seleccionar la llengua i el país/la regió on es troba el producte.
NL
Schakel het apparaat in en wacht tot het is opgestart. Dit kan enkele minuten duren. Selecteer met het
aanraakscherm een taal en land/regio voor het apparaat wanneer u hierom wordt gevraagd.
PT
Ligue o produto e aguarde até que ele seja iniciado. Isso poderá levar alguns minutos. Se solicitado, use o visor
interativo para selecionar um idioma e o país/região do produto.

14
9
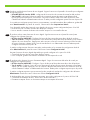
The product includes several digital-sending features. Follow the instuctions on the control panel to set up the
following features:
HP Color LaserJet 3035fs MFP: Set up the fax feature so you can send faxes from the product.
All models: Set up the e-mail feature so you can send documents as e-mail attachments. To perform this step,
you need to know the IP address of the outgoing SMTP e-mail server. Ask your network administrator for this
address. You can also set up this feature in step 30.
If you prefer to set up these features later, you can access the setup wizards from the Administration menu on the
control panel. Select the Initial Setup menu.
More digital sending features are also available, which you can set up in steps 2 through 30:
Send fax driver: Send faxes from your computer.
Send to folder: Save a scanned document in a folder on your network.
•
•
•
•
EN
Le produit est doté de plusieurs fonctions d’envoi numérique. Suivez les instructions qui s’afchent sur le panneau
de commande pour congurer les fonctions suivantes :
MFP HP Color LaserJet 3035fs : Congurez la fonction de télécopie pour pouvoir envoyer des télécopies avec
le produit.
Tous les modèles : Congurez la fonction de messagerie électronique pour pouvoir envoyer des documents
en pièces jointes de courriers électroniques. Pour ce faire, vous devez connaître l’adresse IP du serveur mail
SMTP émetteur. Vous pouvez l’obtenir auprès de votre administrateur réseau. L’étape 30 permet également de
congurer cette fonction.
Si vous préférez congurer ces fonctions ultérieurement, vous pouvez accéder aux assistants de conguration
depuis le menu Administration du panneau de commande. Sélectionnez le menu Conguration initiale.
D’autres fonctions d’envoi numérique sont disponibles. Pour les congurer, reportez-vous aux étapes 2 à 30 :
Pilote d’envoi de télécopie : envoyez des télécopies depuis votre ordinateur.
Envoyer vers dossier : enregistrez un document numérisé dans un dossier sur votre réseau.
•
•
•
•
FR
Das Produkt verfügt über mehrere digitale Sendefunktionen. Befolgen Sie die Anweisungen am Bedienfeld, um
folgende Funktionen einzurichten:
HP Color LaserJet 3035fs MFP: Richten Sie die Faxfunktionen ein, damit Sie vom Produkt aus Faxmitteilungen
senden können.
Alle Modelle: Richten Sie die E-Mail-Funktion ein, damit Sie Dokumente als E-Mail-Anlagen versenden können.
Für diesen Schritt müssen Sie die E-Mail-Adresse des SMTP-Postausgangsservers kennen. Erfragen Sie diese
bei Ihrem Netzwerkadministrator. Sie können diese Funktion auch in Schritt 30 einrichten.
Wenn Sie diese Funktionen lieber später einrichten möchten, können Sie über das Menü Verwaltung auf dem
Bedienfeld auf die Einrichtungsassistenten zugreifen. Wählen Sie das Menü Initialisierungseinrichtung.
Es sind weitere digitale Sendefunktionen verfügbar, die Sie in den Schritten 2 bis 30 einrichten können:
Faxsendetreiber: Senden von Faxmitteilungen vom Computer aus.
Senden an Ordner: Speichern eines gescannten Dokumentes in einem Ordner im Netzwerk.
•
•
•
•
DE
Seite wird geladen ...
Seite wird geladen ...

17
10
1
2
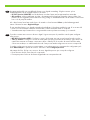
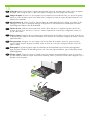
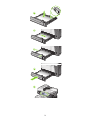
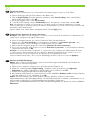
Load paper. Make sure the paper is against the right edge of the tray, and adjust the guides so they are against
the paper. After closing the tray, use the control panel to congure the correct paper size and type.
EN
Chargez du papier. Assurez-vous que le papier est en contact avec le bord droit du bac, puis ajustez les guides
papier pour caler le papier. Après avoir fermé le bac, congurez le format et le type de papier adéquats sur le
panneau de commande.
FR
Legen Sie Papier ein. Stellen Sie sicher, dass das Papier am rechten Rand des Fachs anliegt, und stellen Sie die
Führungen so ein, dass sie am Papier anliegen. Kongurieren Sie das Papierformat und die Papiersorte nach
dem Einlegen des Papiers über das Bedienfeld.
DE
Caricare la carta. Vericare che la carta tocchi il bordo destro del vassoio e regolare le guide in modo che
tocchino la carta. Dopo aver chiuso il vassoio, utilizzare il pannello di controllo per congurare il formato e il
tipo di carta corretti.
IT
Cargue el papel. Asegúrese de que el papel está al borde derecho de la bandeja. Ajuste las guías de modo que
se ajusten al papel. Después de cerrar la bandeja, utilice el panel de control para congurar el tamaño y tipo de
papel adecuados.
ES
Carregueu paper. Assegureu-vos que el paper toca la vora dreta de la safata i ajusteu les guies per tal que
toquin el paper. Després de tancar la safata, utilitzeu el tauler de control per congurar la mida i el tipus de
paper correctes.
CA
Plaats papier. Zorg dat het papier tegen de rechterkant van de papierlade ligt en schuif de papiergeleiders
tegen het papier. Nadat u de lade hebt gesloten, stelt u het juiste papierformaat en -type in met behulp van het
bedieningspaneel.
NL
Coloque o papel. Certique-se de que o papel está junto à margem direita da bandeja e ajuste as guias para
que elas quem próximas ao papel. Após fechar a bandeja, utilize o painel de controle para congurar o tipo e
tamanho correto de papel.
PT
Seite wird geladen ...

19
EN
Install the product software.
EN
To install the software for Windows networks, go to step 11 (page 20).
EN
To install the software for Windows USB connections, go to step 14 (page 24).
EN
To install the software for Macintosh networks, go to step 15 (page 25).
EN
To install the software for Macintosh USB connections, go to step 20 (page 31).
FR
Installez le logiciel produit.
FR
Pour installer le logiciel dans un environnement réseau Windows, reportez-vous à l’étape 11
(page 20).
FR
Pour installer le logiciel dans un environnement réseau Macintosh, reportez-vous à l’étape 15
(page 25).
FR
Pour installer le logiciel dans le cadre de connexions USB Macintosh, reportez-vous à
l’étape 20 (page 31).
FR
Pour installer le logiciel dans le cadre de connexions USB Windows, reportez-vous à l’étape 14
(page 24).
DE
Installieren Sie die Produktsoftware.
DE
Zum Installieren der Software für Windows-Netzwerke fahren Sie mit Schritt 11 (Seite 20) fort.
DE
Zum Installieren der Software für Macintosh-Netzwerke fahren Sie mit Schritt 15 (Seite 25) fort.
DE
Zum Installieren der Software für Macintosh-USB-Anschlüsse fahren Sie mit Schritt 20 (Seite 31) fort.
DE
Zum Installieren der Software für Windows-USB-Anschlüsse fahren Sie mit Schritt 14 (Seite 24) fort.
IT
Installare il software del prodotto.
IT
Per installare il software per le reti Windows, andare al punto 11 (pagina 20).
IT
Per installare il software per le reti Macintosh, andare al punto 15 (pagina 25).
IT
Per installare il software per i collegamenti USB di Macintosh, andare al punto 20 (pagina 31).
IT
Per installare il software per i collegamenti USB di Windows, andare al punto 14 (pagina 24).
ES
Instale el software del producto.
ES
Para instalar el software para redes de Windows, vaya al paso 11 (página 20).
ES
Para instalar el software para redes de Macintosh, vaya al paso 15 (página 25).
ES
Para instalar el software para conexiones USB de Macintosh, vaya al paso 20 (página 31).
ES
Para instalar el software para conexiones USB de Windows, vaya al paso 14 (página 24).
CA
Instal·leu el programari del producte.
CA
Per instal·lar el programari de xarxes per al Windows, aneu al pas 11 (pàgina 20).
CA
Per instal·lar el programari de xarxes per al Macintosh, aneu al pas 15 (pàgina 25).
CA
Per instal·lar el programari de les connexions USB per al Macintosh, aneu al pas 20 (pàgina 31).
CA
Per instal·lar el programari de les connexions USB per al Windows, aneu al pas 14 (pàgina 24).
NL
Installeer de apparaatsoftware.
NL
Om de software voor Windows-netwerken te installeren, gaat u naar stap 11 (pagina 20).
NL
Om de software voor Macintosh-netwerken te installeren, gaat u naar stap 15 (pagina 25).
NL
Om de software voor USB-aansluitingen van Macintosh te installeren, gaat u naar stap 20
(pagina 31).
NL
Om de software voor USB-aansluitingen van Windows te installeren, gaat u naar stap 14
(pagina 24).
PT
Instale o software do produto.
PT
Para instalar o software em redes Windows, vá para a etapa 11 (página 20).
PT
Para instalar o software em redes Macintosh, vá para a etapa 15 (página 25).
PT
Para instalar o software em conexões USB Macintosh, vá para a etapa 20 (página 31).
PT
Para instalar o software em conexões USB Windows, vá para a etapa 14 (página 24).

20
11
(PEHGGHG-HWGLUHFW3DJH +3&RORU/DVHU-HW&00)36HULHV
3DJH
EN
Install the software for Windows networks
At the product control panel, touch Administration, touch Information, touch Conguration/
Status Pages, touch Conguration Page, and touch Print. Identify the IP address on the
Embedded Jetdirect page.
FR
Installation du logiciel dans un environnement réseau Windows
Sur le panneau de commande du produit, appuyez sur Administration, puis sur Informations,
Pages de conguration/d’état, Page de conguration et enn Imprimer. Recherchez l’adresse
IP sur la page Jetdirect intégré.
DE
Installieren der Software für Windows-Netzwerke
Berühren Sie am Bedienfeld des Produktes Verwaltung, dann Informationen, dann
Konguration/Statusseiten, dann Kongurationsseite und schließlich Drucken. Suchen
Sie die IP-Adresse auf der integrierten Jetdirect-Seite.
IT
Installazione del software per le reti Windows
Sul pannello di controllo del prodotto, toccare Amministrazione, Informazioni, Pagine di
congurazione/stato, Pagina di congurazione e inne Stampa. Identicare l'indirizzo IP nella
pagina JetDirect incorporata.
ES
Instale el software para redes de Windows
En el panel de control del producto, toque Administración. A continuación, toque Información,
Páginas Conguración/Estado, Página de conguración e Imprimir. Localice la dirección IP en
la página Jetdirect incorporado.
CA
Instal·lació del programari de xarxes per al Windows
Al tauler de control del producte, toqueu Administració,Informació, Pàgines estat/conguració,
Pàgina de conguració i Imprimeix. Identiqueu l’adreça IP a la pàgina Jetdirect incrustat.
NL
De software voor Windows-netwerken installeren
Raak op het bedieningspaneel van het apparaat achtereenvolgens Beheer, Informatie,
Conguratie-/statuspagina's, Conguratiepagina en Afdrukken aan. Zoek het IP-adres
op de pagina van de geïntegreerde Jetdirect.
PT
Instalação do software pare redes Windows.
No painel do controle do produto, toque nas opções Administração, Informações, Páginas
de conguração/status, Página de conguração e, em seguida, em Imprimir. Identique o
endereço IP na página JetDirect incorporado.

21
12
If the IP address is something other than 0.0.0.0, or 192.0.0.192, or 19.254.x.x, the network
conguration was successful. Go to step 13.
Otherwise, you must manually assign the IP address.
a) On the control panel, scroll to and touch Administration.
b) Scroll to and touch Initial Setup, and then touch Networking and I/O.
c) Touch Embedded JetDirect, TCP/IP, and IPV4 Settings.
d) Touch Cong Method, set to Manual, and touch Save.
e) Touch Manual Settings, and then enter the IP Address, Subnet Mask, and Default Gateway.
EN
Si l’adresse IP est différente de 0.0.0.0, 192.0.0.192 ou 19.254.x.x, la conguration du réseau a réussi.
Vous pouvez passer à l’étape 13.
Dans le cas contraire, vous devez affecter l’adresse IP manuellement.
a) Faites déler le menu du panneau de commande et appuyez sur Administration.
b) Recherchez Conguration initiale et appuyez dessus, puis appuyez sur Réseau et E/S.
c) Appuyez sur JetDirect intégré, puis sur TCP/IP et Paramètres IPV4.
d) Appuyez sur Méthode de conguration. Sélectionnez le paramètre Manuel, puis appuyez sur Enregistrer.
e) Appuyez sur Paramètres manuels, puis renseignez les champs Adresse IP, Masque de sous-réseau et
Passerelle par défaut.
FR
Lautet die IP-Adresse nicht 0.0.0.0, 192.0.0.192 oder 19.254.x.x, war die Netzwerkkonguration erfolgreich.
Fahren Sie mit Schritt 13 fort.
Andernfalls müssen Sie die IP-Adresse manuell zuweisen.
a) Navigieren Sie am Bedienfeld zu Verwaltung und berühren Sie die Option.
b) Navigieren Sie zu Initialisierungseinrichtung und berühren Sie die Option und anschließend die Option
Netzwerk und E/A.
c) Berühren Sie Integrierter JetDirect, TCP/IP und IPV4-Einstellungen.
d) Berühren Sie Kongurationsmethode, stellen Sie die Option auf Manuell ein, und berühren Sie Speichern.
e) Berühren Sie Manuelle Einstellungen, und geben Sie dann IP-Adresse, Subnetzmaske und Standard- Gateway ein.
DE
Se l'indirizzo IP è diverso da 0.0.0.0, 192.0.0.192 o 19.254.x.x, la congurazione di rete è riuscita.
Passare al punto 13.
Altrimenti, è necessario assegnare manualmente l'indirizzo IP.
a) Sul pannello di controllo, scorrere le opzioni e toccare Amministrazione.
b) Scorrere le opzioni e toccare Impostazione iniziale, quindi Rete e I/O.
c) Toccare Jetdirect incorporato, TCP/IP e Impostazioni IPV4.
d) Toccare Metodo di congurazione, impostarlo su Manuale e toccare Salva.
e) Toccare Impostazioni manuali, quindi inserire Indirizzo IP, Maschera di sottorete e Gateway predenito.
IT
Seite wird geladen ...

23
13
EN
Quit all open programs on the print server or on each computer that will share the product.
Install the software from the Administrator CD. Follow the onscreen instructions. When prompted,
select Connected to the Network, and then click Next. The installer shows the available printers.
Select the printer that has the appropriate IP address. Click Finish. If prompted, restart the
computer. Go to step 24.
FR
Quittez tous les programmes en cours d’exécution sur le serveur d’impression ou sur tous les ordinateurs qui
utiliseront le logiciel. Installez le logiciel à l’aide du CD de l’administrateur. Suivez les instructions à l’écran.
Lorsqu’un message d’invite s’afche, sélectionnez Connecté au réseau, puis cliquez sur Suivant. Le programme
d’installation afche la liste des imprimantes disponibles. Sélectionnez l’imprimante dont l’adresse IP correspond à
l’adresse IP congurée. Cliquez sur Terminer. Si vous y êtes invité, redémarrez l’ordinateur. Passez à l’étape 24.
DE
Beenden Sie alle offenen Programme auf dem Druckerserver oder auf allen Computern, die das Produkt
gemeinsam verwenden. Installieren Sie die Software, die auf der Administrator-CD enthalten ist. Befolgen Sie
die Anweisungen auf dem Bildschirm. Wählen Sie auf Aufforderung die Option für die Netzwerkverbindung,
und klicken Sie dann auf Weiter. Das Installationsprogramm zeigt die verfügbaren Drucker an. Wählen Sie
den Drucker mit der entsprechenden IP-Adresse. Klicken Sie auf Fertig stellen. Starten Sie den Computer nach
Aufforderung neu. Fahren Sie mit Schritt 24 fort.
IT
Chiudere tutte le applicazioni aperte sul server di stampa o su tutti i computer che condivideranno il prodotto.
Installare il software dal CD dell'amministratore. Attenersi alle istruzioni visualizzate sullo schermo. Quando
richiesto, selezionare Collegata alla rete e fare clic su Avanti. Il programma di installazione visualizza le stampanti
disponibili. Selezionare una stampante con l'indirizzo IP appropriato. Fare clic su Fine. Se richiesto, riavviare il
computer. Passare al punto 24.
ES
Cierre todos los programas que estén abiertos en el servidor de impresión o en cualquier equipo que vaya a
compartir el producto. Instale el software desde el CD de administrador. Siga las instrucciones que aparecen
en la pantalla. Cuando se le solicite, seleccione Conectado a red y, a continuación, haga clic en Siguiente.
El instalador muestra las impresoras disponibles. Seleccione la impresora que tiene la dirección IP adecuada.
Haga clic en Finalizar. Si se le solicita, reinicie el equipo. Vaya al paso 24.
CA
Sortiu de tots els programes oberts al servidor d’impressió o als ordinadors que compartiran el producte. Instal·leu
el programari des del CD de l’administrador. Seguiu les instruccions de la pantalla. Quan es sol·liciti, seleccioneu
Connectat a la xarxa i, to seguit, feu clic a Següent. L’instal·lador mostra les impressores disponibles. Seleccioneu
la impressora que tingui l’adreça IP apropiada. Feu clic a Finalitza. Si el dispositiu ho sol·licita, reinicieu
l’ordinador. Aneu al pas 24.
NL
Sluit alle geopende programma's af op de afdrukserver of op elke computer die op het apparaat wordt
aangesloten. Installeer de apparaatsoftware vanaf de cd-rom voor beheerders. Volg de instructies op het scherm.
Als er een melding verschijnt, selecteert u Verbonden met het netwerk en vervolgens klikt u op Volgende. Het
installatieprogramma geeft de beschikbare printers weer. Selecteer de printer met het juiste IP-adres. Klik op
Voltooien. Start de computer opnieuw op als dat gevraagd wordt. Ga naar stap 24.
PT
Feche todos os programas abertos no servidor de impressão ou em cada computador que compartilha o produto.
Instale o software com o CD do administrador. Siga as instruções na tela. Ao ser solicitado, selecione Conectado
à rede, e clique em Avançar. O instalador mostra as impressoras disponíveis. Selecione a impressora com o
endereço IP apropriado. Clique em Concluir. Se solicitado, reinicie o computador. Vá para a etapa 24.
Seite wird geladen ...

25
15
(PEHGGHG-HWGLUHFW3DJH +3&RORU/DVHU-HW&00)36HULHV
3DJH
EN
Install the software for Macintosh networks
At the product control panel, touch Administration, touch Information, touch Conguration/
Status Pages, touch Conguration Page, and touch Print. Identify the IP address on the
Embedded Jetdirect page.
FR
Installation du logiciel dans un environnement réseau Macintosh
Sur le panneau de commande du produit, appuyez sur Administration, puis sur Informations,
Pages de conguration/d’état, Page de conguration et enn Imprimer. Recherchez l’adresse
IP sur la page Jetdirect intégré.
DE
Installieren der Software für Macintosh-Netzwerke
Berühren Sie am Bedienfeld des Produktes Verwaltung, dann Informationen, dann Konguration/Statusseiten,
dann Kongurationsseite und schließlich Drucken. Suchen Sie die IP-Adresse auf der integrierten Jetdirect-Seite.
IT
Installazione del software per le reti Macintosh
Sul pannello di controllo del prodotto, toccare Amministrazione, Informazioni, Pagine di congurazione/
stato, Pagina di congurazione e inne Stampa. Identicare l'indirizzo IP nella pagina JetDirect incorporata.
ES
Instale el software para redes de Macintosh
En el panel de control del producto, toque Administración. A continuación, toque Información, Páginas
Conguración/Estado, Página de conguración e Imprimir. Localice la dirección IP en la página Jetdirect
incorporado.
CA
Instal·lació del programari de xarxes per al Macintosh
Al tauler de control del producte, toqueu Administració,Informació, Pàgines estat/conguració, Pàgina de
conguració i Imprimeix. Identiqueu l’adreça IP a la pàgina Jetdirect incrustat.
NL
Software voor Macintosh-netwerken installeren
Raak op het bedieningspaneel van het apparaat achtereenvolgens Beheer, Informatie, Conguratie-/
statuspagina's, Conguratiepagina en Afdrukken aan. Zoek het IP-adres op de pagina van de geïntegreerde
Jetdirect.
PT
Instalação do software para redes Macintosh
No painel de controle do produto, toque nas opções Administração, Informações, Páginas de conguração/
status, Página de conguração, e, em seguida, em Imprimir. Identique o endereço IP na página JetDirect
incorporada.

2
1
If the IP address is something other than 0.0.0.0, or 192.0.0.192, or 19.254.x.x, the network
conguration was successful. Go to step 17.
Otherwise, you must manually assign the IP address.
a) On the control panel, scroll to and touch Administration.
b) Scroll to and touch Initial Setup, and then touch Networking and I/O.
c) Touch Embedded JetDirect, TCP/IP, and IPV4 Settings.
d) Touch Cong Method, set to Manual, and touch Save.
e) Touch Manual Settings, and then enter the IP Address, Subnet Mask, and Default Gateway.
EN
Si l’adresse IP est différente de 0.0.0.0, 192.0.0.192 ou 19.254.x.x, la conguration du réseau a réussi.
Passez à l’étape 17.
Dans le cas contraire, vous devez affecter l’adresse IP manuellement.
a) Faites déler le menu du panneau de commande et appuyez sur Administration.
b) Recherchez Conguration initiale et appuyez dessus, puis appuyez sur Réseau et E/S.
c) Appuyez sur JetDirect intégré, puis sur TCP/IP et Paramètres IPV4.
d) Appuyez sur Méthode de conguration. Sélectionnez le paramètre Manuel, puis appuyez sur Enregistrer.
e) Appuyez sur Paramètres manuels, puis renseignez les champs Adresse IP, Masque de sous-réseau et
Passerelle par défaut.
FR
Lautet die IP-Adresse nicht 0.0.0.0, 192.0.0.192 oder 19.254.x.x, war die Netzwerkkonguration erfolgreich.
Fahren Sie mit Schritt 17 fort.
Andernfalls müssen Sie die IP-Adresse manuell zuweisen.
a) Navigieren Sie am Bedienfeld zu Verwaltung und berühren Sie die Option.
b) Navigieren Sie zu Initialisierungseinrichtung und berühren Sie die Option und anschließend die Option
Netzwerk und E/A.
c) Berühren Sie Integrierter JetDirect, TCP/IP und IPV4-Einstellungen.
d) Berühren Sie Kongurationsmethode, stellen Sie die Option auf Manuell ein, und berühren Sie Speichern.
e) Berühren Sie Manuelle Einstellungen, und geben Sie dann IP-Adresse, Subnetzmaske und Standard- Gateway ein.
DE
Se l'indirizzo IP è diverso da 0.0.0.0, 192.0.0.192 o 19.254.x.x, la congurazione di rete è riuscita.
Passare al punto 17.
Altrimenti, è necessario assegnare manualmente l'indirizzo IP.
a) Sul pannello di controllo, scorrere le opzioni e toccare Amministrazione.
b) Scorrere le opzioni e toccare Impostazione iniziale, quindi Rete e I/O.
c) Toccare Jetdirect incorporato, TCP/IP e Impostazioni IPV4.
d) Toccare Metodo di congurazione, impostarlo su Manuale e toccare Salva.
e) Toccare Impostazioni manuali, quindi inserire Indirizzo IP, Maschera di sottorete e Gateway predenito.
IT
Seite wird geladen ...
Seite wird geladen ...
Seite wird geladen ...
Seite wird geladen ...
Seite wird geladen ...
Seite wird geladen ...
Seite wird geladen ...
Seite wird geladen ...
Seite wird geladen ...
Seite wird geladen ...
Seite wird geladen ...
Seite wird geladen ...
Seite wird geladen ...
Seite wird geladen ...
Seite wird geladen ...
Seite wird geladen ...
Seite wird geladen ...
Seite wird geladen ...
Seite wird geladen ...
Seite wird geladen ...
Seite wird geladen ...
Seite wird geladen ...
Seite wird geladen ...
Seite wird geladen ...
Seite wird geladen ...
Seite wird geladen ...
Seite wird geladen ...
Seite wird geladen ...
Seite wird geladen ...
Seite wird geladen ...
Seite wird geladen ...
Seite wird geladen ...
-
 1
1
-
 2
2
-
 3
3
-
 4
4
-
 5
5
-
 6
6
-
 7
7
-
 8
8
-
 9
9
-
 10
10
-
 11
11
-
 12
12
-
 13
13
-
 14
14
-
 15
15
-
 16
16
-
 17
17
-
 18
18
-
 19
19
-
 20
20
-
 21
21
-
 22
22
-
 23
23
-
 24
24
-
 25
25
-
 26
26
-
 27
27
-
 28
28
-
 29
29
-
 30
30
-
 31
31
-
 32
32
-
 33
33
-
 34
34
-
 35
35
-
 36
36
-
 37
37
-
 38
38
-
 39
39
-
 40
40
-
 41
41
-
 42
42
-
 43
43
-
 44
44
-
 45
45
-
 46
46
-
 47
47
-
 48
48
-
 49
49
-
 50
50
-
 51
51
-
 52
52
-
 53
53
-
 54
54
-
 55
55
-
 56
56
-
 57
57
-
 58
58
-
 59
59
-
 60
60


HP Color LaserJet CM3530 Multifunction Printer series Benutzerhandbuch
- Kategorie
- PC / Workstation Barebones
- Typ
- Benutzerhandbuch
in anderen Sprachen
- English: HP Color LaserJet CM3530 Multifunction Printer series User manual
- français: HP Color LaserJet CM3530 Multifunction Printer series Manuel utilisateur
- español: HP Color LaserJet CM3530 Multifunction Printer series Manual de usuario
- italiano: HP Color LaserJet CM3530 Multifunction Printer series Manuale utente
- Nederlands: HP Color LaserJet CM3530 Multifunction Printer series Handleiding
- português: HP Color LaserJet CM3530 Multifunction Printer series Manual do usuário
Verwandte Artikel
-
HP LaserJet Enterprise P3015 Printer series Benutzerhandbuch
-
HP Color LaserJet CM6049f Multifunction Printer series Installationsanleitung
-
-
HP LaserJet M5035 Multifunction Printer series Schnellstartanleitung
-
HP (Hewlett-Packard) CP3525 Benutzerhandbuch
-
-
HP (Hewlett-Packard) Color LaserJet 3600 Benutzerhandbuch
-
-
-