NASA WSP1300 Weather Station / Bluetooth Speaker Benutzerhandbuch
- Kategorie
- Wecker
- Typ
- Benutzerhandbuch

WEATHER STATION /
BLUETOOTH SPEAKER
WSP1300
Manuel d’utilisation
User manual
Bedienungsanleitung
Manuale d'uso
Manual de usuario disponible en:
Manual do usuário disponível em:
Gebruikershandleiding beschikbaar op:
Instrukcja obsługi dostępna na stronie:
Felhasználói kézikönyv elérhető a:
Uživatelská příručka k dispozici na:
Руководство пользователя доступно по адресу:
Brukerhåndbok tilgjengelig på:
Användarmanual nns på:
Brugervejledning tilgængelig på:
Käyttöopas saatavilla osoitteessa:
Notendahandbók fáanleg á:
https://gtcompany.fr/customer-support/#nasa

AVANT LA PREMIÈRE UTILISATION
- Déballer l’appareil et s’assurer qu’il est en bon état.
- Lire attentivement toutes les instructions de la présente notice, en respectant les consignes
d’utilisation et de sécurité.
- Conserver cette notice et en aviser les utilisateurs potentiels.
EDITION : FR
STATION MÉTÉO /
ENCEINTE BLUETOOTH
REF : WSP1300
CONSIGNES DE SÉCURITÉ
- Cet appareil peut être utilisé par des enfants à partir de 8 ans et
plus ainsi que par des personnes ayant des capacités physiques,
sensorielles ou mentales réduites ou un manque d’expérience
et de connaissances, à condition qu’elles aient reçu une supervision
ou des instructions concernant l’utilisation de l’appareil en toute
sécurité et qu’elles comprennent les dangers encourus.
- Les enfants ne doivent pas jouer avec l’appareil.
- Le nettoyage et l’entretien par l’usager ne doivent pas être eectués
par des enfants, sauf s’ils ont plus de 8 ans et qu’ils sont surveillés.
- Maintenir l’appareil hors de portée des enfants de moins de 8 ans.
- Ne pas utiliser la station météo à l’extérieur.
- Ne pas exposer l’appareil aux rayons du soleil, à des ammes
ou à des températures élevées.
- Ne pas exposer l’appareil à des égouttements d’eau ou à des
éclaboussures.
- Ne pas utiliser l’appareil s’il ne fonctionne pas normalement.
- Ne pas réparer l’appareil soi-même. Ne coner les réparations
qu’à une personne qualiée.
- Cet appareil a été conçu pour un usage domestique uniquement,
toute utilisation professionnelle non appropriée ou non conforme
à la notice, n’engage ni la responsabilité, ni la garantie du fabricant.

INFORMATIONS CONCERNANT LES PILES (NON FOURNIES)
UTILISATION AVEC ADAPTATEUR
- Pour fonctionner correctement, l’appareil doit être équipé des piles prévues
à cet eet.
- Seules les piles du type recommandé doivent être utilisées.
- Les piles doivent être mises en place en respectant le sens de polarité.
- Les bornes des piles ne doivent pas être mises en court-circuit.
- Ne pas mélanger des piles neuves et des piles usagées.
- Ne pas mélanger des piles alcalines, des piles standard (carbone-zinc) et
des batteries rechargeables (nickel-cadmium).
- Ne pas recharger les piles ni tenter de les ouvrir.
- Ne pas jeter les piles au feu.
- Retirez les piles de l’appareil en cas de non-utilisation prolongée.
- Remplacez toutes les piles en même temps par des piles neuves identiques
entre elles.
- Si le liquide qui sort de la pile entre en contact avec les yeux ou la peau, lavez la zone
atteinte immédiatement et minutieusement à l’eau claire et consulter un médecin.
- Ne pas exposer les piles à une chaleur excessive telle que rayon solaire,
feu ou assimilé.
- La station météo est conçue pour fonctionner avec le réseau électrique local.
- Utiliser l’appareil uniquement avec un adaptateur ayant les caractéristiques
précises indiquées.
- Dans le cas où une rallonge est nécessaire, prendre toutes les précautions
nécessaires an d’éviter tout risque de chute.
- Ne pas brancher ou débrancher l’adaptateur avec les mains humides.
- L’adaptateur ne doit pas être bloqué et doit être facilement accessible en
cours d’utilisation.
ATTENTION
RISQUE DE CHOC ELECTRIQUE
NE PAS OUVRIR
ATTENTION : Pour réduire le risque de choc électrique, ne pas ouvrir
l’appareil, il n’y a aucune partie à l’intérieur destinée à l’utilisateur. Conez
toutes les réparations à un personnel qualié.

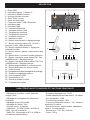
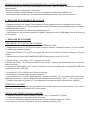
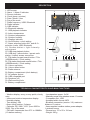
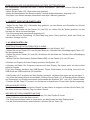
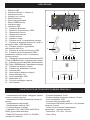
DESCRIPTION
CARACTÉRISTIQUES TECHNIQUES ET FONCTIONS PRINCIPALES
1 : Écran LED
2 : Indicateur Alarme 1 / Alarme 2
3 : Indicateur répétition alarme
4 : Horloge (heures, minutes)
5 : Date / Mois / Année
6 : Jours de la semaine
7 : Fréquence radio / USB / Bluetooth
8 : Indicateur radio
9 : Indicateur USB
10 : Indicateur Bluetooth
11 : Indicateur lecture USB
12 : Température intérieure
13 : Température extérieure
14 : Humidité extérieure
15 : Indicateur météo
16 : Bouton marche/arrêt + réglage horloge
17 : Bouton sélection alarme AL1 et AL2 +
sélection (radio, USB, Bluetooth)
18 : Bouton répétition alarme + réglage de
l’intensité lumière
19 : Bouton lecture / pause / mémorisation des
stations
20 : Bouton arrêt / connexion sonde extérieure
21 : Bouton recherche avant station FM / Titre
(USB/Bluetooth) / Réglage horloge
22 : Bouton recherche arrière station FM / Titre
(USB/Bluetooth) / Réglage horloge
23 : Bouton augmentation du volume sonore
24 : Bouton diminution du volume sonore
25 : Antenne radio
26 : Compartiment à piles (sauvegarde de l’horloge)
27 : Prise pour adaptateur secteur
28 : Port compatible USB
29 : Haut-parleurs (x2)
30 : Orice de xation murale
31 : Compartiment à piles
- Achage de la météo : soleil, éclaircies,
nuages, pluie
- Achage de la température intérieure et
extérieure
- Achage du taux d’humidité
- Achage de l’heure : 24H
- Fonction réveil : 2 alarmes
- Calendrier : JJ / MM / AAAA ( de 2000 à
2099), Jour de la semaine
- Radio FM : fréquences de 87.5 à 108MHz
(10 stations mémorisables)
- Puissance haut-parleurs : 2x1W
- Portée maximale de la sonde sans l : 10 mètres
- Port compatible : USB
- Format audio accepté : MP3
- Connexion Bluetooth (version : 3.0) : distance
maximale 10 mètres
- Eléments fournis : station météo, adaptateur
secteur, 1 sonde sans l
- Dimensions : 170 x 50 x 124 mm
- Poids : 390 g
15 1
1
2 3
4
5
6
30
31
29
16 17
18 20 22 24
25 26 27 28
19 21 23
71098111314
12

1 - UTILISATION DE LA STATION MÉTÉO
STATION MÉTÉO
Posez la station météo sur une surface plane horizontale.
SONDE
La sonde peut être installée :
- soit au mur à l’aide d’une vis (non fournie). Accrochez la sonde par l’orice (30) situé au dos.
- soit horizontalement
Pour de meilleurs résultats :
- N’exposez pas la sonde en plein soleil ou à l’humidité.
- Ne mettez pas la sonde à plus de 10 mètres de la station météo.
- Minimisez les obstacles (portes, murs et meubles) entre la sonde et le radio réveil.
- Eloignez la sonde des objets métalliques ou électroniques.
TEMPÉRATURES ET HUMIDITÉ
La station météo ache les informations suivantes :
- Température intérieure (12) relevée par la station météo
- Température (13) et humidité extérieures provenant de la sonde
REMARQUE : la sonde thermique intérieure étant située au dos de l’appareil, veillez à ne pas obstruer
cette partie sous peine d’altérer la prise de température.
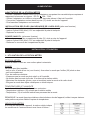
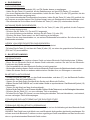
INDICATEUR MÉTÉO
À la mise en marche de l’appareil, la station météo indique
les conditions de l’environnement sous forme d’icônes :
ALIMENTATION
ADAPTATEUR DE LA STATION MÉTÉO
- Utilisez l’adaptateur secteur fourni ou un adaptateur comportant les caractéristiques requises et
respectant les normes en vigueur : DC 5V 1.5A ; 7.5W.
- Utilisez l’adaptateur en intérieur uniquement, dans des pièces à l’abri de l’humidité.
- Connectez l’adaptateur secteur dans la prise (27) située au dos de l’appareil.
- Puis branchez l’adaptateur sur le secteur.
INSTALLATION DES PILES (SAUVEGARDE DE L’HORLOGE) (piles non fournies)
- Retirez le couvercle du compartiment à piles (26).
- Insérez 2 piles LR03 (AAA) 1.5V en respectant la polarité indiquée.
- Replacez le couvercle.
SONDE SANS FIL (piles non fournies)
- Ouvrez le couvercle du compartiment à piles (31) situé au dos de l’appareil.
- Insérez 2 piles LR03 (AAA) 1.5V en respectant la polarité indiquée.
- Refermez le couvercle du compartiment à piles.
INSTALLATION / UTILISATION

CONNEXION DE LA SONDE EXTÉRIEURE AVEC LA STATION MÉTÉO
La sonde extérieure se connecte automatiquement après 1 minute. Sinon, connectez les appareils
manuellement :
- Pressez le bouton (20) durant 3 secondes.
- Lorsque la station météo détecte la sonde, la température extérieure s’ache (13).
- Les données de la sonde sont envoyées automatiquement toutes les 2 minutes environ.
2 - RÉGLAGE DE L’HEURE ET DE LA DATE
- Pressez le bouton (16) durant 3 secondes pour entrer dans le mode de réglage heure & date.
- Utilisez les boutons (21) et (22) pour ajuster les valeurs. Maintenez les boutons appuyés pour accélérer
le délement des valeurs.
- Le jour de la semaine est aché automatiquement (6).
- Sans action sur les boutons pendant le réglage, l’appareil revient à l’achage normal au bout de
15 secondes.
3 - RÉGLAGE DE L’ALARME
RÉGLAGE ET ACTIVATION DE L’ALARME
- Pressez le bouton (17). Le symbole « AL1 » s’ache à l’écran.
- Utilisez les boutons (21) et (22) pour régler l’heure de l’alarme. Pressez le bouton (17) pour valider.
Le chire des minutes clignote.
- Utilisez les boutons (21) et (22) pour régler les minutes de l’alarme. Pressez le bouton (17) pour
valider.
- Sélectionnez le mode réveil (Bip/Radio/USB) à l’aide des boutons (21) et (22)
● Réveil par Bip : le symbole « bP » apparait sur l’écran.
● Réveil par Radio : la fréquence s’ache sur l’écran. L’alarme se déclenchera sur la dernière
station écoutée.
● Le symbole USB s’ache sur l’écran. Ce mode de réveil n’est valide que si un dispositif USB a été
inséré dans le port USB (28).
- Le symbole « AL2 » s’ache sur l’écran et clignote.
- Procédez de la même façon que pour l’alarme 1.
- Pour sélectionner l’une des deux alarmes, pressez le bouton (17) en mode veille (écran avec
achage de l’heure). L’écran achera consécutivement les symboles « AL1 », « AL2 » puis les 2.
- Pressez à nouveau le bouton (17) pour désactiver les alarmes (aucun symbole ne s’ache).
ARRÊT DE L’ALARME
L’alarme se déclenche à l’heure programmée. Pour arrêter l’alarme, pressez le bouton (16), celle-ci
retentira à nouveau le lendemain à la même heure.
RÉVEIL AVEC RÉPÉTITION DE L’ALARME
- Lorsque la sonnerie retentit, pressez le bouton (18) : le symbole ZZ clignote.
- La sonnerie retentira à nouveau après 9 minutes.
- La fonction Répétition d’alarme est active tant que le symbole clignote à l’écran.
- Pour annuler la fonction Répétition d’alarme, pressez le bouton (18).

4 - RÉGLAGE DE LA RADIO
SÉLECTION DES STATIONS
- Déployez le l de l’antenne (25) pour une meilleure réception des stations FM.
- Pressez le bouton (16) jusqu’à ce que la fréquence radio s’ache sur l’écran LED (7).
- Pour sélectionner manuellement une station radio, appuyez sur le bouton (21) ou (22) jusqu’à
acher la fréquence de la station.
- Pour lancer une recherche automatique des stations, pressez longuement le bouton (21) ou (22)
jusqu’à ce que la fréquence commence à déler. La recherche s’arrête lorsqu’une station radio est
correctement captée.
- La recherche automatique peut-être interrompue en pressant le bouton (21) ou (22).
MÉMORISATION DES STATIONS
- Pour sélectionner une station radio, appuyez sur le bouton (21) ou (22) jusqu’à acher la fréquence de la station.
- Maintenez appuyé le bouton (19). P01 s’ache et clignote.
- Pour sélectionner un enregistrement, appuyez sur le bouton (21) ou (22).
- Ré-appuyez sur le bouton (19) pour conrmer le réglage, le numéro de la mémoire cesse de clignoter.
- Procédez comme ci-dessus pour régler d’autres stations de radios. Vous pouvez régler jusqu’à 10
stations de radios.
ÉCOUTER DES STATIONS MÉMORISÉES
- Appuyez sur le bouton (13), la dernière fréquence radio apparait.
- Appuyez sur le bouton (6) puis sur le bouton (9) ou (10) pour sélectionner la mémoire (P01 à P10).
5 - MODE BLUETOOTH
INFORMATIONS
- La portée opérationnelle entre cet appareil et un périphérique Bluetooth est d’environ 10 mètres.
- Avant de connecter un périphérique Bluetooth à cet appareil, familiarisez-vous avec les fonctionnalités
Bluetooth de ce périphérique.
- La compatibilité avec tous les périphériques Bluetooth n’est pas garantie.
- Tout obstacle présent entre cet appareil et un périphérique Bluetooth peut réduire la portée opérationnelle.
- Maintenez cet appareil éloigné des autres appareils électroniques pour éviter les interférences.
ACTIVATION DU BLUETOOTH
- Pressez successivement le bouton (16) pour mettre l’appareil en marche et (17) pour sélectionner la
fonction Bluetooth, le symbole (bt) clignote (10).
- Lancez la recherche des prols Bluetooth depuis le périphérique audio source.
- Sélectionnez le prol SWB254 pour synchroniser les deux appareils (le symbole Bluetooth (10) se ge).
- Lancez la musique depuis le périphérique audio source.
- Pressez le bouton (20) pour mettre en pause. Pressez à nouveau pour reprendre la lecture.
- Pressez le bouton (21) pour passer à la piste suivante.
- Pressez le bouton (22) une fois pour revenir au début de la piste courante, deux fois pour revenir à
la piste précédente.
RÉGLER LE VOLUME SONORE À UN NIVEAU D’ÉCOUTE CORRECT
- Par la suite, ajustez le volume sonore avec les boutons + / - (23 et 24).
DÉCONNEXION DU BLUETOOTH
- Pressez le bouton (16) pour arrêter l’appareil et pour déconnecter le périphérique Bluetooth.
REMARQUE : L’appareil ne peut pas recevoir de la musique provenant simultanément de deux
périphériques audio Bluetooth. Il faut déconnecter au préalable la fonction Bluetooth du périphérique
associé puis faire une nouvelle recherche du périphérique Bluetooth à synchroniser.

7 - UTILISATION AVANCÉE
FONCTION SOMMEIL
- Appuyez sur le bouton (16) pour sélectionner une station de radio ou un périphérique Bluetooth.
- Appuyez sur le bouton (18) durant 3 secondes pour activer la fonction sommeil « SLEEP ».
- Appuyez successivement sur le bouton (18) pour sélectionner un délai de mise en veille automatique
10min 20min 30min 40min 50min 60min 70min 80min
90min 100min 110min 120min.
- Pour annuler la mise en veille automatique et éteindre la radio/périphérique BT, appuyez sur le
bouton (16), le voyant « SLEEP » disparait.
RÉGLAGE INTENSITÉ LUMINEUSE DE L’ÉCRAN
- Par défaut, la station météo est réglée sur un achage intensif de l’écran.
- Pour diminuer l’intensité lumineuse, appuyez sur le bouton (18).
- Appuyez une seconde fois pour retourner à un achage plus lumineux.
8 - ENTRETIEN ET NETTOYAGE
- Retirez les piles en cas de non-utilisation prolongée.
- Débranchez l’appareil avant de le nettoyer.
- Nettoyez si nécessaire l’extérieur de l’appareil avec un chion doux.
- Ne pas utiliser de produit d’entretien agressif ni d’éponge abrasive.
- Ne jamais utiliser d’alcool pour nettoyer l’appareil.
ATTENTION : Ne jamais plonger l’appareil dans l’eau ou dans un quelconque liquide.
6 - MODE USB
LECTURE D’UN PÉRIPHÉRIQUE USB
Cet appareil peut être connecté à une source audio externe grâce à la connexion USB (uniquement
clé USB).
- Pressez le bouton (16) puis le bouton (17) jusqu’à ce que s’ache sur l’écran : USB (9).
- Connectez un périphérique USB (clé USB) sur le port USB (28).
- La lecture démarre automatiquement, le voyant (11) s’allume.
- Pressez le bouton (20) pour mettre en pause. Pressez à nouveau pour reprendre la lecture.
- Pressez le bouton (21) pour passer à la piste suivante.
- Pressez le bouton (22) une fois pour revenir au début de la piste courante, deux fois pour revenir
à la piste précédente.
- Pour arrêter la lecture, pressez le bouton (19).
CHARGER UN APPAREIL MOBILE AVEC LA CONNEXION USB
An optimiser la charge, n’éteignez pas la station multifonction.
- Branchez le connecteur câble d’origine de l’appareil mobile sur le port USB (28).
- Branchez le connecteur câble d’origine sur votre appareil mobile.
- La charge de votre appareil mobile débute instantanément.
- Une fois la charge de votre appareil mobile atteint 100%, débranchez alors votre appareil.

BEFORE THE FIRST USE
- Unpack the unit and check that it is in good condition.
- Please read all the directions in this manual carefully and follow the operating and safety
instructions. Keep this manual and show it to potential users.
VERSION : EN
WEATHER STATION /
BLUETOOTH SPEAKER
REF : WSP1300
SAFETY INSTRUCTIONS
- This unit may be used by children aged 8 years and over and by
anyone with reduced physical, sensory or mental capabilities or a
lack of experience and knowledge, provided that they have been
given supervision or instructions about how to use the unit safely
and that they understand the hazards involved.
- Children should not be allowed to play with the device.
- Cleaning and maintenance must not be carried out by children
unless they are over 8 years of age and supervised.
- Keep the device out of the reach of children under 8 years of age.
- Do not use the weather station outdoors.
- Do not expose the unit to direct sunlight, ames or high
temperatures.
- Do not expose the unit to dripping water or splashes.
- This unit has been designed for domestic use only. The
manufacturer cannot be held responsible, and the guarantee
will not apply, for any professional use that is not appropriate or
does not comply with the instructions.

BATTERY INFORMATION (BATTERIES NOT SUPPLIED)
USE WITH ADAPTER
- To function properly, the sensor must have the appropriate batteries inserted.
- Only the recommended type of batteries should be used.
- The batteries must be inserted the right way round.
- The battery terminals must not be short-circuited.
- Do not mix new and used batteries.
- Do not mix alkaline, standard (carbon-zinc) and rechargeable (nickel - cadmium)
batteries.
- Do not recharge the batteries or attempt to open them.
- Do not dispose of batteries in re.
- Replace all batteries at the same time with new, identical batteries.
- If the liquid from a battery comes into contact with your eyes or skin, wash
the aected area immediately and thoroughly with clean water and seek medical
attention.
- Do not expose batteries to excessive heat such as sunlight, re or similar.
- The weather station is designed to work with the local power supply.
- Use the unit only with an adapter that has the dened specications.
- If an extension cord is required, take all necessary precautions to avoid the
risk of a fall.
- Do not connect or disconnect the adapter with wet hands.
- The adapter must not be blocked and must be easily accessible during use.
CAUTION:
RISK OF ELECTRIC SHOCK
DO NOT OPEN
CAUTION: To reduce the risk of electric shock, do not open the unit, there
are no user-serviceable parts inside. All repairs should be carried out by a
qualied person.

DESCRIPTION
TECHNICAL CHARACTERISTICS AND MAIN FUNCTIONS
1: LED screen
2: Alarm 1 / Alarm 2 indicator
3: Snooze indicator
4: Clock (hours, minutes)
5: Date / Month / Year
6: Day of the week
7: Radio frequency / USB / Bluetooth
8: Radio indicator
9: USB indicator
10: Bluetooth indicator
11: USB playback indicator
12: Indoor temperature
13: Outdoor temperature
14: Outdoor humidity
15: Weather indicator
16: On/O button + clock setting
17: Alarm selection button AL1 and AL2 +
selection (radio, USB, Bluetooth)
18: Snooze button + light intensity
adjustment
19: USB stop playback button
20: USB play / pause button / preset radio
station / outdoor sensor connection
21: FM station forward search button / Title
(USB/Bluetooth) / Clock setting
22: FM station backward search button / Title
(USB/Bluetooth) / Clock setting
23: Volume up button
24: Volume down button
25: Radio antenna
26: Battery compartment (clock backup)
27: AC adapter socket
28: USB compatible port
29: Speakers (x2)
30: Wall mounting hole
31: Battery compartment
- Weather display: sunny, sunny spells, cloudy,
rainy
- Indoor and outdoor temperature display
- Humidity display
- Time display: 24H
- Alarm clock function: 2 alarms
- Calendar: DD / MM / YYYY (from 2000 to
2099), Day of the week
- FM radio: frequencies from 87.5 to 108MHz
(10 station memory)
- Loudspeakers power: 2x1W
- Maximum range of the wireless sensor: 10 metres
- Compatible port: USB
- Accepted audio format: MP3
- Bluetooth connection (version: 3.0): maximum
distance 10 metres
- Items supplied: weather station, power adapter,
1 wireless sensor
- Dimensions: 170 x 50 x 124 mm
- Weight: 390 g
15 1
1
2 3
4
5
6
30
31
29
16 17
18 20 22 24
25 26 27 28
19 21 23
71098111314
12

1 - USE OF THE WHEATHER STATION
WEATHER STATION
Place the weather station on a at horizontal surface.
SENSOR
The sensor can be installed:
- either on the wall using a screw (not included). Hang the sensor through the hole (30) on the back.
- or horizontally
For best results:
- Do not expose the sensor to direct sunlight or moisture.
- Do not place the sensor more than 10 metres away from the weather station.
- Minimise obstacles (doors, walls and furniture) between the sensor and the weather station.
- Keep the sensor away from metal or electronic objects.
TEMPERATURES AND HUMIDITY
The weather station displays the following information:
- Indoor temperature (12) measured by the weather station
- Outdoor temperature (13) and humidity (14) from the sensor
NOTE: The indoor temperature sensor is located on the back of the unit, so please do not obstruct
this area as this may aect the temperature reading.
WEATHER INDICATOR
When the unit is turned on, the weather station will show
the weather conditions in the form of icons:
POWER SUPPLY
AC ADAPTOR OF THE WHEATHER STATION
- Use the supplied AC adapter or an adapter with the required characteristics respecting the
current regulations: DC 5V 1.5A ; 7.5W.
- Use the adapter indoors only, in rooms protected from moisture.
- Connect the AC adapter to the AC adapter terminal (27) on the back of the unit.
- Then connect the adapter to the mains.
INSTALLING THE BATTERIES (CLOCK BACKUP) (batteries not included)
- Remove the batteries compartment cover (26).
- Insert 2 x 1,5V LR03 (AAA) batteries, respecting the polarity indicated.
- Replace the cover.
WIRELESS SENSOR (batteries not included)
- Open the batteries compartment cover (31) on the back of the unit.
- Insert 2 x 1,5V LR03 (AAA) batteries, respecting the polarity indicated.
- Close the cover.
INSTALLATION / USE
Sunny
DESCRIPTIONICON
Sunny spells
Cloudy
Rainy

CONNECTION OF THE OUTDOOR SENSOR WITH THE WEATHER STATION
The outdoor sensor connects automatically after 1 minute. Otherwise, you can connect the devices
manually:
- Press button (20) for 3 seconds.
- When the weather station detects the sensor, the outdoor temperature will be displayed (13).
- The sensor data is sent automatically about every 3 minutes.
2 - SETTING THE TIME AND DATE
- Press button (16) for 3 seconds to enter the time and date setting mode.
- Use buttons (21) and (22) to adjust the values. Hold the buttons down to speed up scrolling.
- The day of the week is displayed automatically (6).
- If the buttons are not pressed, the unit returns to the normal display after 15 seconds.
3 - SETTING THE ALARM
SETTING AND ACTIVATING THE ALARM
- Press button (17). The symbol «AL1» appears on the screen.
- Use buttons (21) and (22) to set the alarm hour. Press button (17) to conrm. The minute digit
ashes.
- Use buttons (21) and (22) to set the alarm minutes. Press button (17) to conrm.
- Select the alarm mode (Beep/Radio/USB) using buttons (21) and (22)
● Beep alarm: the symbol «bP» appears on the screen.
● Radio alarm: the frequency is displayed on the screen. The alarm will activate the last station
listened to.
● The USB symbol appears on the screen. This wake-up mode is only valid if a USB device has
been inserted into the USB port (28).
- The «AL2» symbol appears on the screen and ashes.
- Proceed in the same way as for alarm 1.
- To select one of the two alarms, press button (17) in standby mode (screen with time display). The
screen will display consecutively the symbols «AL1», «AL2» then the 2.
- Press button (17) again to deactivate the alarms (no symbol is displayed).
SWITCHING OFF THE ALARM
The alarm will go o at the programmed time. To stop the alarm, press button (16). It will sound again
the next day at the same time.
SNOOZE FUNCTION
- When the alarm sounds, press button (18): the symbol ZZ ashes.
- The alarm will sound again after 9 minutes.
- The snooze function is active as long as the symbol ashes on the display.
- To cancel the snooze function, press button (18).

4 - RADIO MODE
STATIONS SELECTION
- Extend the antenna wire (25) for better reception of FM stations.
- Press button (16) until the radio frequency is displayed on the LED screen (7).
- To manually select a radio station, press button (21) or (22) until the station’s frequency is displayed.
- To initiate an automatic station search, press and hold button (21) or (22) until the frequency starts to
scroll. The search stops when a radio station is found.
- The automatic search can be interrupted by pressing button (21) or (22).
STATION SAVING
- To select a radio station, press button (21) or (22) until the station frequency is displayed.
- Press button (19). P01 will be displayed.
- To select a saved station, press button (21) or (22).
- Press button (19) again to conrm the setting, the saving number stops ashing.
- Proceed as above to save other radio stations. You can set up to 10 radio stations.
LISTENING TO A SAVED STATION
- Press button (13), the last radio frequency appears.
- Press button (6) and then button (9) or (10) to select a saving (P01 to P10)
5 - BLUETOOTH MODE
INFORMATIONS
- The operational range between this device and a Bluetooth device is approximately 10 metres.
- Before connecting a Bluetooth device to this unit, familiarise yourself with the Bluetooth features of
that device.
- Compatibility with all Bluetooth devices is not guaranteed.
- Any obstruction between this device and a Bluetooth device may reduce the operational range.
- Keep this device away from other electronic devices to avoid interference.
BLUETOOTH ACTIVATION
- Press button (16) successively to switch on the device and (17) select the Bluetooth function, the (bt)
symbol will ash (10).
- Start the Bluetooth prole search from the source audio device.
- Select the SWB254 prole to synchronise the two devices (the Bluetooth symbol (10) no longer ashes).
- Playback music from the source audio device.
- Press button (20) to pause. Press again to resume playback.
- Press button (21) to move to the next track.
- Press button (22) once to return to the beginning of the current track, twice to return to the previous
track.
ADJUST THE VOLUME TO THE CORRECT LISTENING LEVEL
Then adjust the volume with the + / - buttons (23 and 24).
DISCONNECTING THE BLUETOOTH
Press button (16) to turn o the unit and disconnect the Bluetooth device.
NOTE: The device cannot receive music from two Bluetooth audio devices simultaneously. You must
rst disconnect the Bluetooth function from the associated device and then search again for the Bluetooth
device to be synchronised.

7 - ADVANCED USE
SLEEP FUNCTION
- Press button (16) to select a radio station or a Bluetooth peripheral.
- Press button (18) for 3 seconds to activate the sleep function.
- Successively press button (18) to select an automatic sleep time
10min 20min 30min 40min 50min 60min 70min 80min
90min 100min 110min 120min.
- To cancel the automatic sleep and turn o the radio/BT peripheral, press button (16), and the sleep
indicator (3) disappears.
LIGHT INTENSITY ADJUSTMENT
- By default, the intensity of the weather station display is set to high.
- To decrease the light intensity, press button (18).
- Press a second time to return to a high intensity.
8 - MAINTENANCE AND CLEANING
- Remove the batteries when left unused for a long period.
- Unplug the unit before cleaning.
- If necessary, clean the exterior of the unit with a soft cloth.
- Do not use harsh cleaning agents or abrasive sponges.
- Never use alcohol to clean the unit.
CAUTION: Never immerse the unit in water or any other liquid.
6 - USB MODE
PLAYBACK FROM USB CONNECTION
This unit can be connected to an external audio source using the USB connection (USB stick only).
- Press button (16) and then button (17) until the screen shows: USB (9).
- Connect a USB device (USB stick) to the USB port (28). Playback starts automatically, indicator
(11) lights up.
- Press button (20) to pause. Press again to resume playback.
- Press button (21) to move to the next track.
- Press button (22) once to return to the beginning of the current track, twice to return to the previous
track.
- To stop playback, press button (19).
CHARGING A MOBILE DEVICE WITH THE USB CONNECTION
In order to optimise charging, do not switch o the weather station.
- Connect the original cable for the mobile device to the USB port (28).
- Connect the original cable to your mobile device.
- Your mobile device starts charging immediately.
- Unplug your mobile device once it is fully charged.

VOR DER ERSTEN BENUTZUNG
- Packen Sie das Gerät aus und prüfen Sie, ob es in unbeschädigtem Zustand ist.
- Lesen Sie sorgfältig alle Anweisungen in dieser Bedienungsanleitung und beachten Sie
die Bedienungs- und Sicherheitshinweise. Bewahren Sie diese Bedienungsanleitung auf und
weisen Sie die möglichen Benutzer darauf hin.
VERSION : DE
WETTERSTATION /
BLUETOOTH-LAUTSPRECHER
REF : WSP1300
SICHERHEITSHINWEISE
- Dieses Gerät kann von Kindern ab 8 Jahren sowie von Personen
mit eingeschränkten körperlichen, sensorischen oder mentalen
Fähigkeiten oder mangelnder Erfahrung bzw. fehlendem Wissen
benutzt werden, sofern sie beaufsichtigt werden oder bezüglich
des sicheren Gebrauchs des Geräts unterwiesen wurden und über
die Gefahren informiert sind.
- Kinder dürfen nicht mit dem Gerät spielen.
- Die Reinigung und Wartung darf nicht von Kindern durchgeführt
werden, es sei denn, sie sind älter als 8 Jahre und unter Aufsicht.
- Bewahren Sie das Gerät außerhalb der Reichweite von Kindern
unter 8 Jahren auf.
- Verwenden Sie die Wetterstation nicht im Freien.
- Setzen Sie das Gerät nicht direkter Sonneneinstrahlung,
Flammen oder hohen Temperaturen aus.
- Setzen Sie das Gerät Wassertropfen und -spritzern aus.
- Nehmen Sie das Gerät nicht in Betrieb, wenn es nicht einwandfrei
funktioniert.
- Reparieren Sie das Gerät nicht selbst. Lassen Sie Reparaturen
nur von einer qualizierten Person durchfhren.
- Dieses Gerät wurde nur für den Hausgebrauch entwickelt. Für
eine professionelle Nutzung, die ungeeignet ist oder nicht der
Bedienungsanleitung entspricht, übernimmt der Hersteller weder
Haftung noch Garantie.

INFORMATIONEN ZU DEN BATTERIEN (NICHT IM LIEFERUMFANG ENTHALTEN)
NETZBETRIEB
- Damit der Sensor korrekt funktioniert, muss er mit den passenden Batterien
ausgestattet sein.
- Es sollten nur die empfohlenen Batterietypen verwendet werden.
- Die Batterien müssen mit der richtigen Polarität eingelegt werden.
- Die Batterieklemmen dürfen nicht kurzgeschlossen werden.
- Mischen Sie keine neuen und gebrauchten Batterien.
- Mischen Sie keine Alkali-, Standard- (Kohle-Zink) und wiederauadbaren
(Nickel-Cadmium) Batterien.
- Laden Sie die Batterien nicht auf und versuchen Sie nicht, sie zu önen.
- Werfen Sie die Batterien nicht ins Feuer.
- Ersetzen Sie alle Batterien gleichzeitig durch identische neue Batterien.
- Sollte die Flüssigkeit aus der Batterie mit Ihren Augen oder Ihrer Haut in
Berhrung kommt, waschen Sie den betroenen Bereich sofort grndlich mit
sauberem Wasser und suchen Sie einen Arzt auf.
- Setzen Sie die Batterien nicht starker Hitze wie Sonnenlicht, Feuer o. Ä.
aus.
- Die Wetterstation ist für den Betrieb mit dem lokalen Stromnetz ausgelegt.
- Verwenden Sie das Gerät nur mit einem Netzteil, das die angegebenen
Eigenschaften hat.
- Falls ein Verlängerungskabel erforderlich ist, treen Sie alle nötigen
Vorkehrungen, damit das Gerät nicht herunterfällt.
- Das Netzteil nicht mit nassen Händen anschließen oder abziehen.
- Das Netzteil darf nicht blockiert werden und muss während des Betriebs
leicht zugänglich sein.
ACHTUNG!
STROMSCHLAGGEFAHR!
NICHT ÖFFNEN
ACHTUNG : Um die Stromschlaggefahr zu mindern, önen Sie das
Gerät nicht. Im Inneren benden sich keine Teile, die fr die Bedienung
durch den Nutzer bestimmt wären. Überlassen Sie sämtliche Reparaturen
einer qualizierten Fachkraft.

BESCHREIBUNG
TECHNISCHE EIGENSCHAFTEN UND HAUPTFUNKTIONEN
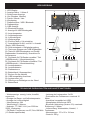
1: LED-Display
2: Anzeige Alarm 1 / Alarm 2
3: Schlummern-Anzeige
4: Uhr (Stunden, Minuten)
5: Datum / Monat / Jahr
6: Wochentag
7: Radiofrequenz / USB / Bluetooth
8: Radioanzeige
9: USB-Anzeige
10: Bluetooth-Anzeige
11: Anzeige für USB-Wiedergabe
12: Innentemperatur
13: Außentemperatur
14: Luftfeuchtigkeit
15: Wetteranzeige
16: Ein/Aus-Taste + Uhr einstellen
17: Auswahltaste für AL1 und AL2 + Auswahl
(Radio, USB, Bluetooth)
18: Schlummertaste + Helligkeitsregelung
19: Taste zum Stoppen der USB-Wiedergabe
20: Taste für USB-Wiedergabe und Pause /
Radiosender-Voreinstellung / Anschluss für
Außensensor
21: Suchtaste für FM-Sender vorwärts / Titel
(USB/Bluetooth) / Uhrzeiteinstellung
22: Suchtaste für FM-Sender rückwärts / Titel
(USB/Bluetooth) / Uhrzeiteinstellung
23: Lautstärketaste +
24: Lautstärketaste -
25: Radioantenne
26: Batteriefach (Uhrenspeicher)
27: Buchse für das Netzteil
28: USB-kompatibler Anschluss
29: Lautsprecher (x2)
30: Önung zum Befestigen an der Wand
31: Batteriefach
- Wetteranzeige: sonnig, heiter, bewölkt,
regnerisch
- Anzeige der Raum- und Außentemperatur
- Anzeige der Luftfeuchtigkeit
- Uhrzeitanzeige: 24H
- Weckfunktion: 2 Alarme
- Kalender: TT / MM / JJJJ (von 2000 bis
2099), Wochentag
- FM-Radio: Frequenzen von 87,5 bis 108 MHz
(10 Sender speicherbar)
- Leistung der Lautsprecher: 2x1W
- Reichweite des Funksensors: maximal 10
Meter
- Anschluss kompatibel mit USB
- Akzeptiertes Audioformat: MP3
- Bluetooth-Verbindung (Version 3.0): maximale
Entfernung 10 Meter
- Lieferumfang: Wetterstation, Netzteil, 1
Funksensor
- Abmessungen: 170 x 50 x 124 mm
- Gewicht: 390 g
15 1
1
2 3
4
5
6
30
31
29
16 17
18 20 22 24
25 26 27 28
19 21 23
71098111314
12

1 - VERWENDUNG DER WETTERSTATION
WETTERSTATION
Stellen Sie die Wetterstation auf eine ebene, waagerechte Fläche.
SENSOR
Der Sensor kann folgendermaßen installiert werden:
- mit einer Schraube (nicht im Lieferumfang enthalten) an der Wand Befestigen Sie den Sensor
mithilfe der Önung (30) auf der Rckseite des Geräts.
- oder waagerecht.
So erzielen Sie die bestmöglichen Ergebnisse:
- Setzen Sie den Sensor keinem direkten Sonnenlicht und keiner Feuchtigkeit aus.
- Platzieren Sie den Sensor nicht weiter als 10 Meter von der Wetterstation entfernt.
- Achten Sie darauf, dass zwischen Sensor und Wetterstation möglichst wenig Hindernisse (Türen,
Wände und Möbel) liegen.
- Halten Sie den Sensor von Metallgegenständen und elektronischen Geräten fern.
TEMPERATUREN UND LUFTFEUCHTIGKEIT
Die Wetterstation zeigt die folgenden Informationen an:
- Innentemperatur (12), von der Wetterstation gemessen
- Außentemperatur (13) und Luftfeuchtigkeit (14) vom Sensor
HINWEIS: Der Sensor fr die Innentemperatur bendet sich an der Rckseite des Geräts. Achten Sie
darauf, dass die Rückseite nicht blockiert ist, denn dies kann die Temperaturmessung beeinträchtigen.
WETTERANZEIGE
Nach dem Einschalten des Geräts zeigt die Wetterstation
die Bedingungen in der Umgebung in Form von Symbolen
an:
STROMVERSORGUNG
NETZTEIL DER WETTERSTATION
- Verwenden Sie das mitgelieferte Netzteil oder ein Netzteil mit den erforderlichen Eigenschaften
und beachten Sie die Normen: DC 5V 1.5A ; 7.5W.
- Verwenden Sie das Netzteil nur in Räumen, wo es vor Feuchtigkeit geschützt ist.
- Schließen Sie das Netzteil an die Buchse (27) auf der Rückseite des Geräts an.
- Schließen Sie dann das Netzteil an den Strom an.
EINSETZEN DER BATTERIEN (UHRENSPEICHER) (Batterien nicht im Lieferumfang enthalten)
- Nehmen Sie den Deckel des Batterienfachs ab (26).
- Legen Sie 2 x 1,5V LR03 (AAA) Batterien ein. Achten Sie auf die angegebene Polarität.
- Setzen Sie den Deckel wieder ein.
FUNKSENSOR (Batterien nicht im Lieferumfang enthalten)
- Önen Sie den Deckel des Batterienfachs (31) auf der Rckseite des Geräts.
- Legen Sie 2 x 1,5V LR03 (AAA) Batterien ein. Achten Sie auf die angegebene Polarität.
- Schließen Sie den Deckel des Batterienfachs wieder.
INSTALLATION / VERWENDUNG
Sonnig
BESCHREIBUNGSYMBOL
Heiter
Bewölkt
Regnerisch

VERBINDUNG DES AUSSENSENSORS MIT DER WETTERSTATION
Der Außensensor verbindet sich nach 1 Minute automatisch. Falls nicht, können Sie die Geräte
manuell koppeln:
- Halten Sie die Taste (20) 3 Sekunden lang gedrückt.
- Wenn die Wetterstation den Sensor erkennt, wird die Außentemperatur angezeigt (13).
- Die Daten vom Sensor werden automatisch etwa alle 2 Minuten gesendet.
2 - UHRZEIT UND DATUM EINSTELLEN
- Halten Sie die Taste (16) 3 Sekunden lang gedrückt, um den Modus zum Einstellen von Uhrzeit
und Datum aufzurufen.
- Stellen Sie die Werte mit den Tasten (21) und (22) ein. Halten Sie die Tasten gedrückt, um das
Scrollen der Werte zu beschleunigen.
- Der Wochentag wird automatisch angezeigt (6).
- Wird während der Einstellung 15 Sekunden lang keine Taste gedrückt, kehrt das Gerät zur
normalen Anzeige zurück.
3 - ALARM EINSTELLEN
EINSTELLEN UND AKTIVIEREN DES ALARMS
- Drücken Sie die Taste (17). Auf dem Display erscheint das Symbol „AL1”.
- Stellen Sie mit den Tasten (21) und (22) den Alarm ein. Drücken Sie zur Bestätigung die Taste (17).
Die Minutenzahl blinkt.
- Stellen Sie mit den Tasten (21) und (22) die Minuten für den Alarm ein. Drücken Sie zur Bestätigung
die Taste (17).
- Wählen Sie den Weckmodus (Piepton/Radio/USB) mit den Tasten (21) und (22) aus.
● Wecken mit Piepton: Auf dem Display erscheint das Symbol „bP”.
● Wecken mit Radio: Die Frequenz erscheint auf dem Display. Der Alarm ertönt mit dem zuletzt
gehörten Sender.
● Auf dem Display erscheint das USB-Symbol. Dieser Weckmodus ist nur gltig, wenn sich ein
USB-Gerät am USB-Anschluss (28) bendet.
- Das Symbol „AL2” erscheint auf dem Display und blinkt. Verfahren Sie genau so wie bei Alarm 1.
- Um einen der beiden Alarme auszuwählen, drücken Sie die Taste (17) im Standby-Modus (Display
mit Zeitanzeige). Im Display erscheinen nacheinander die Symbole „AL1” und „AL2”, danach beide.
- Drücken Sie die Taste (17) erneut, um die Alarme zu deaktivieren. Es wird kein Symbol angezeigt.
DEN ALARM STOPPEN
Der Alarm ertönt zur programmierten Uhrzeit. Um den Alarm zu stoppen, drücken Sie die Taste (16).
Der Alarm ertönt am nächsten Tag zur selben Uhrzeit.
WECKEN MIT SCHLUMMERFUNKTION
- Wenn der Alarm ertönt, drücken Sie die Taste (18): Das Symbol ZZ blinkt.
- Nach 9 Minuten ertönt der Alarm erneut.
- Die Schlummerfunktion bleibt so lange aktiv, wie das Symbol auf dem Display blinkt.
- Um die Schlummerfunktion auszuschalten, drücken Sie die Taste (18).
Seite wird geladen ...
Seite wird geladen ...
Seite wird geladen ...
Seite wird geladen ...
Seite wird geladen ...
Seite wird geladen ...
Seite wird geladen ...
Seite wird geladen ...
Seite wird geladen ...
Seite wird geladen ...
Seite wird geladen ...
-
 1
1
-
 2
2
-
 3
3
-
 4
4
-
 5
5
-
 6
6
-
 7
7
-
 8
8
-
 9
9
-
 10
10
-
 11
11
-
 12
12
-
 13
13
-
 14
14
-
 15
15
-
 16
16
-
 17
17
-
 18
18
-
 19
19
-
 20
20
-
 21
21
-
 22
22
-
 23
23
-
 24
24
-
 25
25
-
 26
26
-
 27
27
-
 28
28
-
 29
29
-
 30
30
-
 31
31


NASA WSP1300 Weather Station / Bluetooth Speaker Benutzerhandbuch
- Kategorie
- Wecker
- Typ
- Benutzerhandbuch
in anderen Sprachen
Verwandte Artikel


Andere Dokumente
-
Bresser VA colour RC Weather Station Bedienungsanleitung
-
Tokai TC-139 Benutzerhandbuch
-
Bresser BF-PRO RC Weather Station Bedienungsanleitung
-
Albrecht DR 884 Hybridradio Internet/DAB+/UKW Bedienungsanleitung
-
Irox EBR707C Bedienungsanleitung
-
Auriol 4-LD4868 Usage And Safety Instructions
-
-
-
iLuv TimeShaker Super Schnellstartanleitung