La Marzocco VULCANO Benutzerhandbuch
- Kategorie
- Kaffeemühlen
- Typ
- Benutzerhandbuch


instruction manual
Contents
1. Foreword page 2
2. Dimensions page 2
3. Packaging page 2
4. Disposal page 2
5. General description page 3
6. Use page 4
7. Installation and wiring page 4
8. Operation of the appliance page 5
9. Warnings regarding operation page 8
10. Safety devices page 8
11. Warnings regarding safety page 9
12. Noise levels page 10
13. Maintenance page 10
14. Cleaning the appliance page 11
1
EN
vulcano
La Marzocco S.r.l.
Via La Torre 14/H
Località La Torre
50038 Scarperia e San Piero
(Firenze) – ITALIA
www.lamarzocco.com
info@lamarzocco.com
T: +39 055 849 191
F: +39 055 849 1990

1. Foreword
Read this manual from cover to cover
before using the appliance as it contains
important instructions for the safety, oper-
ation and maintenance of the appliance.
Look after this manual and keep it in a
safe place.
The manufacturer reserves the right to
make changes to the product and to the
manual.
2. Dimensions
3. Packaging
On opening the packaging, check care-
fully to make sure the appliance is
intact and that there are no signs of
damage. If in any doubt, do not use the
unit and contact personnel with the
appropriate professional skills.
The packaging materials must be kept
out of the reach of children as they
represent a potential source of danger.
Keep the packaging until the warranty
has expired.
4. Disposal
Do not litter: dispose of the packaging
materials according to the laws in force.
Should you decide not to use the appli-
ance any more, remember to unplug it
so that it cannot be used, and then cut
the cable in the point where it comes
out of the appliance.
Contact specialized firms for information
on the disposal of the components of
the appliance.
2
EN
VULCANO AUTOMATIC VULCANO ON DEMAND
GRINDER-DOSER GRINDER-DOSER

INFORMATION FOR USERS RESIDING
IN THE EUROPEAN UNION
Pursuant to art. 26 of Legislative Decree
of March 14, 2014, no. 49: "Imple-
mentation of Directive 2012/19/EU on
Waste Electrical and Electronic Equip-
ment (WEEE)."
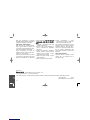
The crossed bin symbol shown
here and on the equipment or its
box indicates that, at the end of
its useful life, the product (EEE)
must be collected separately from other
waste, with prohibition of disposal with
mixed waste.
For more information, contact
La
Marzocco s.r.l.
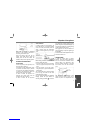
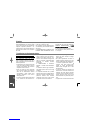
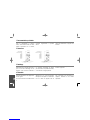
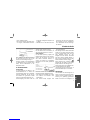
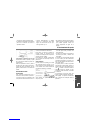
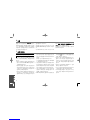
5. General description
HOPPER COVER
HOPPER
(coffee bean container)
LOCKING SLIDE
HOPPER FIXING PINS PUSH BUTTON PANEL
DOSER COVER GRINDING ADJUSTMENT LEVEL FUNNEL
DOSER
COUNTER
FILTER HOLDER FORK DOSING LEVEL SERIAL NUMBER LABEL
SWITCH
DRIP TRAY
3
EN

6. Use
This appliance has been designed
SOLELY for grinding coffee beans. Any
other use is understood to be improper,
and consequently hazardous. The manu-
facturer cannot be held responsible for
any damage as a result of improper or
incorrect use.
Do not use the appliance for grinding
other types of food, or anything else.
Do not use the doser (Vulcano Auto-
matic) to store foods or measure them.
THE GRINDER-DOSERS MANUFAC-
TURED BY OUR COMPANY ARE
INTENDED FOR SKILLED PERSONNEL
ONLY FOR PROFESSIONAL USE AND
NOT FOR HOUSEHOLD USE. The user
must be an adult.
Do not allow children or incapable
persons to use the appliance.
7. Installation and wiring
The appliance must be installed by
skilled technical personnel in conformity
with the safety rules in force. Incorrect
installation may result in injury of
persons or animals, or damage to prop-
erty, for which the manufacturer cannot
be held responsible.
•
The appliance must be placed on a
stable, flat surface (we recommend to
install the appliance at an height
between 80 and 100 cm from the floor).
•Before plugging in the appliance, make
sure the voltage and frequency values
of the supply mains correspond to the
ratings indicated on the label featuring
the appliance’s technical data.
•The wall socket must be fitted with an
efficient earth contact. Consequently,
it is essential to make sure the earth
system is efficient and in conformity
with current safety rules. If in any
doubt, have the system thoroughly
checked by personnel with the appro-
priate professional skills.
IT IS COMPULSORY TO EARTH THE
APPLIANCE.
The manufacturer cannot be held
responsible in the event this regulation
is not complied with.
•
It is essential to make sure the ratings of
the system are suitable for the power
absorbed by the appliance - as indicated
on the label featuring the technical data
- and that the wall socket is protected
against overcurrents.
•Do not use extension cables, plug
adapters for multiple sockets or make-
shift connections.
•In EEC member countries, the regula-
tion in force calls for the external equi-
potential terminal on the outer part
of the appliance’s base plate to be
connected to a equipotential node if
the installation is to be correct.
•The motor must rotate clockwise. If the
rotation of three-phase motors is to be
inverted, by inverting the two power
supply wires inside the plug, this must
be carried out by skilled personnel.
•The appliance is suitable for indoor use
only. Do not use the appliance outdoor.
•Thoroughly clean the appliance at the
first installation; follow the instructions
in chapter 9 and 14.
•Do not install the appliance near to
water dispenser or similar product that
could throw water jet on the appliance.
4
EN

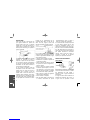
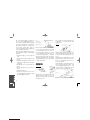
8. Operation of the appliance
PRELIMINARIES
HOPPER
HOPPER
FIXING PIN
OPEN
Make sure the hopper is positioned
correctly on the appliance and fixed to
the casing with relevant pins.
Close the locking slide and fill the
hopper with coffee beans. Open the
locking slide so that the beans are
allowed to drop into the grinding system.
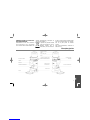
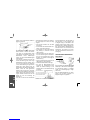
SWITCHING THE APPLIANCE ON AND OFF
Vulcano Automatic
In order to power up the appliance, turn
the on-off switch knob to I.
The appliance starts automatically every
12 portions of coffee (every 6 portions
in the version with shorter doser group).
It switches off automatically when the
doser is filled with ground coffee.
In order to switch the appliance on
manually, the switch knob must be
turned all the way (to START).
In order to switch off the appliance
manually, set the on-off switch knob to O.
Vulcano on Demand
In order to power up the appliance, set
the on-off knob to I. The display located
on the lid of the push button panel will
show a counter with the incremental
number of doses ground by the appli-
ance.
DISPLAY
MENU BUTTON
PUSH BUTTON
FOR MANUAL GRINDING
SINGLE DOSE BUTTON
DOUBLE DOSE BUTTON
After having placed the filter holder on
the filter holder fork push:
•the push button on the left (indicating
one cup) to grind and dispense a single
dose;
•the push button on the right (indic-
ating two cups) to grind and dispense a
double dose.
The counter adds one for each single dose
(one cup sign) and adds two for each
double dose (two cup sign).
One can manually activate the appliance
keeping pushed the push button for
manual grinding (indicating ) located in
the centre of push-panel. Hold down the
push button for manual grinding and the
grinder will grind until you lift the finger. By
using the push button for manual grinding
no dose is added in the counter.
We suggest to use the push button for
manual grinding to adjust the grinding of
the appliance.
In order to switch off the appliance turn the
knob of the switch to O.
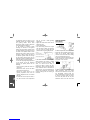
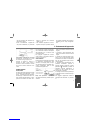
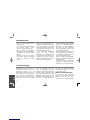
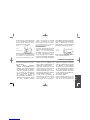
ADJUSTING GRINDING
In order to achieve finer or coarser
grinding, move the grinding adjustment
level. To increase the coarseness of the
ground coffee, the adjustment level
must be rotated clockwise; to increase
the fineness, turn the level anticlock-
wise.
FINER
GRINDING
COARSER
GRINDING
The adjustment level remains in the
chosen position without having to be
locked in place. The adjustment must
5
EN

be performed with the motor on, and
preferably without any coffee between
the grinding blades. Grind small
amounts of coffee in order to determine
the optimal degree of fineness.
In the Vulcano on Demand, before
checking the fineness of the ground
coffee, grind some doses of coffee to fill
the duct between the grinding area and
the outlet. This operation must be done
whenever the grinding setting has been
changed in order to empty the duct of
the previous ground coffee. The change
of the grinding setting might vary the
weight of the doses. Therefore adjust the
doses only after the grinding setting.
In case the range of grinding adjustment
is not enough, to get the requested
grinding set, please proceed as the
following:
•close the locking slide and switch the
grinder off;
•unscrew the check pins of the coffee
bean hopper and remove it;
•remove the screws which fix the
grinding adjustment level into the
grinding adjustment disk and remove
the level;
•fit back the level and put the holes in
line with the ones of the adjustment
disk so to allow a wider grinding
adjustment;
•tighten the screws of the level into the
adjustment disk;
•put the hopper back;
•only after having secured the hopper
into the grinder cabinet by tightening
the pins, open the locking slide and
proceed with the grinding adjustment.
HOPPER
LEVEL FIXING SCREW
GRINDING ADJUSTMENT LEVEL
GRINDING ADJUSTMENT DISK
If the coffee comes out of the espresso
coffee machine very quickly, it means
the coffee is ground too coarse. Vice
versa, if it comes out too slowly, it
means the coffee is ground too fine.
Nonetheless, bear in mind that there are
many conditions liable to influence the
correct supply, such as the weight of the
portions, the compacting, the espresso
machine settings, and the cleaning of
the filters.
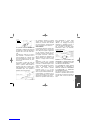
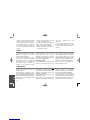
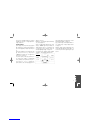
COFFEE DOSE ADJUSTMENT
Vulcano Automatic
COFFEE DOSE ADJUSTMENT
REDUCE
THE DOSE
INCREASE
THE DOSE
In order to adjust the size of the portion
dispensed, the small knob located in the
centre of the ground coffee storage
container must be turned while holding
still the star shaped dosing unit.
By turning the small knob clockwise, the
portion is reduced. Turning it anticlock-
wise results in an increase.
COLLECTING
THE DOSE
In order to collect the portions of ground
coffee dispensed, insert the coffee
machine’s filter holder all the way onto
the fork-shaped support under the
ground coffee outlet. In order to release
a portion of ground coffee, the doser
level must be pulled all the way and
allowed to return on its own. Pull twice
6
EN

in a row for a double portion.
To centre the coffee drop into the filter
holder, it is possible to carry out a side-
ways adjustment of the support fork
located under the dispenser, by slightly
loosening the fixing screws and then
tightening them again after having
moved the fork into the new position.
FORK THICKNESS
If necessary, use shims (included in the
package) to back the position of the
fork. After finding the best position, fix
the fork with the appropriate screws.
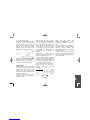
Vulcano on Demand
In order to adjust the size of the portion
dispensed, use the push button controls
located on the lid of the funnel. After
having set the optimal degree of fine-
ness, check the weight of the dose with
a digital precision scale.
In order to adjust the dose press the
push button “MENU” for 3 seconds; the
display will blink.
Select the dose you wish to adjust :
either the single dose (indicating one
cup) or the double dose (indicating two
cups). The display will show the grinding
time (in seconds) of the selected dose.
By pressing the push buttons “+” and
“-“ the grinding time can be increased
or decreased and consequently the
selected dose can be increased or
decreased.
Approximately, a change of 0.10
seconds is equivalent to a change of
dose of 0.3 grams (0.01 ounces).
To set the desired amount of grinding
time press the push button “MENU” for
3 seconds. A blinking of the display will
confirm the data have been saved and
the exit from the adjusting program.
Use a digital precision scale to check
again the weight of the dose and, if
necessary, repeat above mentioned
operation.
PUSH BUTTON PANEL
GRINDING TIME
ADJUSTMENT
MENU BUTTON BUTTON
PUSH BUTTON FOR
DISPLAY MANUAL GRINDING
SINGLE DOUBLE
DOSE BUTTON DOSE BUTTON
WHEN YOU ARE INSIDE THE
ADJUSTING PROGRAM IT IS NOT
POSSIBLE TO OPERATE THE APPLI-
ANCE.
IF THE APPLIANCE GETS SWITCHED
OFF (SWITCH IN THE POSITION O)
BEFORE EXITING FROM THE
ADJUSTING PROGRAM THE CHANGES
ARE NOT SAVED.
In order to collect the portions of ground
coffee, insert the filter holder all the way
onto the fork-shaped support under the
ground coffee outlet.
7
EN

9. Warnings regarding operation
•Do not leave the appliances turned ON
without coffee in the hopper.
•In the Vulcano Automatic, avoid
pulling the dosing level partially,
always pull it all the way.
•Do not insert, when filling the hopper
with coffee beans, foreign objects.
Handle with clean hands.
•After any hopper filling and in normal
use of the appliance, the hopper lid
must be positioned correctly.
•FIRST INSTALLATION
For the correct use of the grinding
blades, at the first installation or
whenever the grinding blades have
been replaced, grind some doses of
coffee. Do not use those first doses.
In the Vulcano on Demand, for the
appliance to function at its best, on its
first installation and every time the
hopper is cleaned, after having ground
a few coffee doses, clean the inner
surface of the funnel with a dry brush.
•OPERATING RANGE OF THE MOTOR
IN THE VERSIONS WITH SINGLE-
PHASE MOTORS, OBSERVE THE
DUTY CYCLE STATED IN THE LABEL
LOCATED ON THE SIDE OF THE AP-
PLIANCE.
E. g. : a data on the label 35s ON /
45s OFF points out an allowed duty
cycle of 35 seconds switched on and
45 seconds switched off.
APPLIANCES WITH THREE-PHASE
MOTORS ARE ALLOWED FOR CON-
TINUOUS WORKING.
In order to achieve good grinding, it is
nonetheless recommended to operate
the appliance at intervals, allowing it to
operate for no more than 10-15
minutes at a time.
10. Safety devices
THERMAL OVERLOAD PROTECTION
The appliance’s motor is protected
against overheating resulting from over-
currents by a thermal overload protec-
tion which, when tripped, cuts off the
power supply to the motor. Should the
protection trip as a result of anomalous
operation, such as the grinding blades
jamming, the appliance must be turned
off using the on-off switch,
UN-
PLUGGED FROM THE MAINS, AND
SKILLED TECHNICAL PERSONNEL
CONTACTED. NEVER PERFORM ANY
WORK ON THE APPLIANCE WHILE IT IS
ATTACHED TO THE MAINS, TO AVOID
THE RISK THAT MOTOR TURNS ON
SUDDENLY.
If the appliance overheats
as a result of the motor stopping, allow
the appliance to cool down before per-
forming any repair work.
MOTOR LOCKING MICROSWITCH
The system that protects against acci-
dental contact with the rotating parts of
the grinding system consists of a
8
EN

microswitch, situated under the body of
the appliance, that cuts the electricity to
the motor.
HOPPER
TONGUE
MICROSWITCH
The push button that controls this
device is operated by a tongue in the
collar of the hopper. If the hopper is
removed or not properly in place, the
microswitch prevents the appliance from
working. To ensure the hopper is posi-
tioned correctly it must be fixed to the
casing using the relevant pins.
COFFEE OUTLET GUARD
The coffee outlet guard must always be
fixed to the doser (Vulcano Automatic),
or to the funnel (Vulcano on Demand),
using the relevant screws, which must
never be removed by the user. THE
REMOVAL OF THE COFFEE OUTLET
GUARD CAN BE DONE BY SKILLED
TECHNICAL PERSONNEL ONLY AFTER
DISCONNECTING THE APPLIANCE
FROM THE POWER SUPPLY BY
UNPLUGGING.
COFFEE
OUTLET GUARD
Before reconnecting the appliance to
the power supply, fix the safety device to
the doser, or to the funnel, by relevant
screws.
11. Warnings regarding safety
This electrical appliance must be used
in conformity with the rules in force
governing safe operation.
•WHEN OPERATING THE APPLIANCE,
BEWARE OF THE MOVING MECHAN-
ICAL PARTS’ IN THE AREA OF THE
GRINDING BLADES AND OF THE
GROUND COFFEE OUTLET. BEFORE
REMOVING THE HOPPER FROM THE
GRINDING SYSTEM, DISCONNECT
THE POWER SUPPLY. AVOID
REMOVING FOREIGN BODIES FROM
THE GRINDING SYSTEM OR HOPPER
WITHOUT FIRST UNPLUGGING THE
APPLIANCE FROM THE MAINS.
•Take care, as the grinding blades may
continue rotating for a short while even
after the appliance is switched off.
•THE USER IS NOT AUTHORIZED TO
REMOVE SCREWS OR ANY PARTS
SCREWED ONTO THE APPLIANCE.
•In the event the appliance is not
working properly or is faulty, contact
skilled technical personnel, and do not
attempt to make repairs yourself.
•BEFORE PERFORMING ANY WORK
ON THE APPLIANCE, INCLUDING
CLEANING AND/OR MAINTENANCE,
DISCONNECT IT FROM THE POWER
SUPPLY BY UNPLUGGING. TURNING
OFF THE APPLIANCE USING ITS
MASTER SWITCH DOES NOT
ASSURE THE SAME CONDITIONS OF
SAFETY.
•Do not tamper with the appliance.
•When the appliance is left unattended,
the appliance’s power supply must be
disconnected using its master switch
(for example, at night, during work
breaks, midweek closing or holidays).
•Do not let liquids of any kind come
into contact with the internal or
9
EN

external parts of the appliance.
•Never put ground coffee in the hopper
intended only for coffee beans.
•DO NOT TUG ON THE SUPPLY
CABLE TO UNPLUG THE APPLIANCE
FROM THE MAINS.
•Do not touch the appliance with damp
or wet hands or feet.
•Do not use the appliance barefoot.
The manufacturer cannot be held
responsible for bodily injury or damage
to property if these regulations are not
complied with.
12. Noise level
EEC Countries:
The maximal noise emission of our
appliances (valued as acoustic power) is
81 dB(A).
The daily personal noise exposure of a
worker, due ONLY to an appliance’s
limit operation of 240 minutes per eight
hours, is 78 dB(A), according to
European Directive 86/188/EEC and
European Directive 2003/10/EC.
Therefore during he appliance’s normal
operation, no provisions are to be taken
in order to prevent such risks arising or
likely to arise from noise exposure at
work (articles 3-8 of European Directive
2003/10/EC).
USA & Canada:
The noise level of our appliances is
included within the limits stated in U.
S. regulation 29 CFR 1910. 95 (‘
Occu-
pational Health and Environment
Control - Occupational noise exposure
’)
for eight hours continuously in a day (in
reference to a noise exposure due solely
to appliance operation).
Said noise level has been determined on
identical news appliances.
13. Maintenance
It is essential to check the state of the
supply cable and plug periodically.
IN THE EVENT THE SUPPLY CABLE
OR PLUG ARE DAMAGED, CALL IN
SKILLED TECHNICAL PERSONNEL TO
REPLACE THEM, THIS TO PREVENT
ANY RISK.
IN -CERTIFIED APPLIANCES, A
SPECIAL TOOL IS REQUIRED TO
OPEN THE BASE PLATE TO GET AT
THE CABLE.
It is recommended to use original spare
parts only.
In order to assure the lasting efficiency
of the appliance, skilled technical
personnel must be called in to perform
periodical maintenance, including
detailed checks of the state of those
components subject to wear.
The state of the grinding blades must be
checked periodically. Keeping the
grinding blades in an excellent state
assures high-quality grinding, resulting
in greater productivity and limited over-
heating.
10
EN

14. Cleaning the appliance
DISCONNECT THE APPLIANCE’S
POWER SUPPLY BY UNPLUGGING IT
BEFORE CLEANING. THE APPLIANCE
MUST NOT BE CLEANED USING
WATER JETS.
Do not install the appliance in rooms
where water jets are used for cleaning.
THE APPLIANCE MUST BE CLEANED
PERIODICALLY BY SKILLED TECH-
NICAL PERSONNEL ONLY.
Use perfectly clean, disinfected cloths
or brushes for cleaning.
Do not use abrasive products as these
are liable to take the sheen off shiny
parts.
Hopper
LOCKING SLIDE HUB
HOPPER
Wash the hopper once it has been
removed from the appliance, using
neutral soap and water, rinse abundantly
with lukewarm and dry thoroughly.
To clean the internal surfaces it is
necessary to remove the hopper, slip off
the locking slide by pushing down the
click. Then turn the hub clockwise and
lift to remove it (see picture).
It is advisable to clean the hopper peri-
odically.
To reassemble completely the hopper
please proceed in the reverse order with
previous instructions.
Once the hopper has been cleaned it
must be put back on the appliance
properly fixing it with the relevant pins.
Grinding system
As explained in the paragraph "
ADJUSTING
GRINDING
" remove the hopper and the
adjustment level.
Unscrew the adjustment disk by turning
it clockwise. After having removed the
upper blade holder, clean the grinding
blades, threads and the entire system
thoroughly using a clean brush or cloth.
To clean the threads of the grinder
please use a small wire brush.
We recommend to check that the
threads of the grinder and of the
grinding adjustment disk are clean: to
do so screw the adjustment disk anti-
clockwise
without the upper blade holder until the
end. If the grinding adjustment disk
can not turn easily, than it is necessary
to clean again. If the cleaning opera-
tions are not done as above the risk is to
damage the threads.
GRINDING
ADJUSTMENT DISK
UPPER GRINDING
BLADE HOLDER
GRINDING
ADJUSTMENT SPRINGS
Please check that the grinding adjust-
ment springs are on their place. Having
refitted the upper grinding blade holder
in the relevant slot, please lubricate,
with grease suitable for food contact,
the threads of the grinding adjustment
disk and its underneath surface which
touches the upper grinding blade
holder.
Screw the adjustment disk by turning it
anticlockwise, place the adjustment
level and fix it on adjustment disk with
the relevant screws
After having refitted the hopper properly
adjust grinding as required.
11
EN

Doser (Vulcano Automatic)
Having discharged the ground coffee,
clean the doser’s star unit with a clean
brush, expelling the material removed by
pulling the doser level.
Use a dry cloth to thoroughly clean the
outlet of the ground coffee on the
bottom of the doser.
When a more thorough cleaning is
required, the operation must be
performed only by skilled technical
personnel, after disconnecting the appli-
ance from the power supply, according
to the following instructions:
1.Remove the coffee outlet guard
unscrewing the relevant screws;
2.Unscrew the hexagonal-head screw
that fix the coffee dose adjustment
knob;
3.Unscrew (anticlockwise) the coffee
dose adjustment knob holding the
doser’s stars unit (female dosing star
and the upper dosing star) pushed
down;
4.Remove the doser’s stars unit;
5.Remove the central spring;
6.Clean thoroughly the bottom of the
doser, especially the sharp edges on
sight and the outlet of the ground
coffee.
In order to reassemble the doser, follow
the previous instructions in inverted
order; pay attention that the feather of
the coffee-outlet covering section plate
is correctly set in the proper slide on the
side of the basin.
Funnel (Vulcano on Demand)
After having removed the lid with the
operating switches, clean the funnel and
its lid with a dry and disinfected brush.
12
EN
Produced by:
Mazzer Luigi srl
Via Moglianese,113 – 30030 Gardigiano di Scorzè (Venezia) - Italy
E-mail:mazzer@mazzer.com - http://www.mazzer.com
All right reserved. It is prohibited to reproduce, adapt or translate this document without prior written authorization.
First Edition: 2010
Last Revised: VL04 02/2015

manuale d'istruzione
Indice
1. Prefazione pag 2
2. Dimensioni pag 2
3. Imballo pag 2
4. Smaltimento pag 2
5. Descrizione generale pag 3
6. Impiego pag 4
7. Installazione ed allacciamento elettrico pag 4
8. Funzionamento dell’apparecchio pag 5
9. Avvertenze per l’uso pag 8
10. Protezioni pag 8
11. Avvertenze per la sicurezza pag 9
12. Rumore pag 10
13. Manutenzione pag 10
14. Pulizia dell’apparecchio pag 11
1
IT
vulcano
La Marzocco S.r.l.
Via La Torre 14/H
Località La Torre
50038 Scarperia e San Piero
(Firenze) – ITALIA
www.lamarzocco.com
info@lamarzocco.com
T: +39 055 849 191
F: +39 055 849 1990

1. Prefazione
Prima di utilizzare l’apparecchio leggere
attentamente il presente manuale in
ogni sua parte in quanto fornisce impor-
tanti indicazioni sulla sicurezza, l’uso e
la manutenzione dell’apparecchio.
Conservare con cura il presente
manuale.
Il fabbricante si riserva il diritto di modi-
ficare il prodotto ed il manuale.
2. Dimensioni
MACINADOSATORE MACINADOSATORE
VULCANO AUTOMATIC VULCANO ON DEMAND
3. Imballo
Appena aperto l’imballo, controllare con
cura che l’apparecchio sia integro e che
non siano presenti danneggiamenti. In
caso di dubbio non utilizzarlo e rivolgersi
a personale professionalmente qualifi-
cato.
Le parti dell’imballaggio non devono
essere lasciate alla portata dei bambini
in quanto fonte di potenziale pericolo.
Conservare l’imballo fino a garanzia
scaduta.
4. Smaltimento
Evitare di disperdere nell’ambiente gli
elementi dell’imballo attenendosi alle
leggi vigenti. In caso si decidesse di non
utilizzare più l’apparecchio si racco-
manda di renderlo inoperativo staccando
la spina dell’alimentazione elettrica
dalla presa di corrente e successiva-
mente tagliando il cavo nel punto di
uscita dall’apparecchio.
Per lo smaltimento dei componenti
dell’apparecchio rivolgersi a società
specializzate.
2
IT

INFORMAZIONE AGLI UTENTI RESIDENTI
NELL'UNIONE EUROPEA
Ai sensi dell’art. 26 del Decreto
Legislativo 14 Marzo 2014, n. 49:
“Attuazione della direttiva 2012/19/UE
sui rifiuti di apparecchiature elettriche
ed elettroniche (RAEE)” .
Il simbolo del cassonetto
barrato qui riportato e presente
sull'apparecchiatura o sulla sua
confezione indica che il
prodotto (AEE), alla fine della propria
vita utile deve essere raccolto
separatamente dagli altri rifiuti, con
divieto di smaltimento tra i rifiuti urbani
misti.
Per maggiori informazioni contattare
La
Marzocco s.r.l.
5. Descrizione generale
COPERCHIO CAMPANA
CAMPANA
(contenitore caffè in grani)
SERRANDA
PERNI FISSAGGIO CAMPANA COPERCHIO-TASTIERA
COPERCHIO DOSATORE LEVA REGOLAZIONE MACINATURA IMBUTO
GRUPPO DOSATORE
CONTACOLPI
LEVA DOSATORE
FORCHETTA PORTAFILTRO PER PRELIEVO CAFFÈ MACINATO ETICHETTA MATRICOLA
INTERRUTTORE
PIATTINO
3
IT

6. Impiego
Questo apparecchio è stato concepito
ESCLUSIVAMENTE per macinare caffè
in grani. Ogni altro uso è da considerarsi
improprio e pertanto pericoloso. Il co-
struttore declina ogni responsabilità per
eventuali danni dovuti ad uso improprio
od errato.
Non utilizzare l’apparecchio per macina-
re altri tipi di alimenti o altro.
Non utilizzare il gruppo dosatore (Vulca-
no Automatic) per conservare alimenti o
per dosarli.
I MACINADOSATORI DI NOSTRA PRO-
DUZIONE SONO APPARECCHI DESTI-
NATI A PERSONALE TECNICO QUALI-
FICATO PER UN UTILIZZO ESCLUSI-
VAMENTE PROFESSIONALE E NON
PER UN USO DOMESTICO. L’utilizzato-
re deve essere una persona adulta.
Non permettere l’uso da parte di bambi-
ni o incapaci.
7. Installazione ed allacciamento elettrico
L’installazione deve essere effettuata da
personale tecnico qualificato in confor-
mità alle normative di sicurezza vigenti.
Una installazione errata può causare
danni a persone, animali o cose, per i
quali il costruttore non può essere consi-
derato responsabile.
•L’apparecchio deve essere posizionato
su di una superficie stabile e piana (si
consiglia una distanza dal pavimento
compresa tra 80 e 100 cm).
•Prima di inserire la spina controllare
che i valori di tensione e di frequenza
della rete di alimentazione elettrica
corrispondano a quelli indicati sulla
etichetta contenente i dati tecnici
dell’apparecchio.
•La presa di corrente deve essere fornita
di un contatto di terra efficiente. E’
importante quindi verificare che l’im-
pianto di messa a terra sia efficace e
conforme alle attuali norme di sicu-
rezza. In caso di dubbio far eseguire da
parte di personale professionalmente
qualificato un accurato controllo
all’impianto.
E’ OBBLIGATORIO IL COLLEGA-
MENTO A TERRA DELL’APPAREC-
CHIO.
Il costruttore declina ogni responsabi-
lità qualora questa norma non venga
rispettata.
•E’ importante verificare che la portata
elettrica dell’impianto sia adeguata alla
potenza e/o corrente assorbite dall’ap-
parecchio indicate sulla etichetta
contenente i dati tecnici e che la presa
sia protetta contro le sovracorrenti.
•Non utilizzare prolunghe, adattatori
elettrici per prese multiple o collega-
menti volanti.
•Nei paesi appartenenti alla CEE la
normativa vigente prevede che per una
corretta installazione dell’apparecchio,
il morsetto equipotenziale esterno
presente sulla parte esterna della
piastra di fondo dell’apparecchio,
debba essere collegato ad un nodo
equipotenziale.
•Il senso di rotazione del motore deve
essere orario. L’eventuale inversione di
rotazione dei motori trifase, mediante
inversione di due conduttori di alimen-
tazione all’interno della spina, deve
essere effettuata da personale qualifi-
cato.
•L'apparecchio è adatto esclusivamente
4
IT

per uso all'interno. Non utilizzare l'ap-
parecchio all’aperto.
•Pulire accuratamente l'apparecchio
alla prima installazione; in particolare
seguire le istruzione dei successivi
capitoli 9 e 14.
•Non installare l'apparecchio vicino a
dispenser di acqua o a prodotti similari
che possono proiettare anche acciden-
talmente getti di acqua sull'apparec-
chio.
8. Funzionamento dell'apparecchio
PREPARAZIONE
CAMPANA
PERNO
FISSAGGIO CAMPANA
APERTO
Verificare che la campana sia posizionata
correttamente sull’apparecchio e fissata
alla carenatura con gli appositi perni.
Chiudere la serranda e riempire la
campana con caffè in grani. Aprire la
serranda in modo da consentire l’entrata
dei chicchi di caffè nel sistema di maci-
natura.
AVVIAMENTO ED ARRESTO
Vulcano Automatic
Per dare corrente all’apparecchio ruotare
la manopolina dell’interruttore in posi-
zione I. L’avviamento avviene automati-
camente ogni 12 dosature di caffè. L’ar-
resto avviene automaticamente al riem-
pimento del dosatore del caffè maci-
nato.
Per l’avviamento manuale dell’apparec-
chio è necessario ruotare la manopolina
dell’interruttore fino a termine corsa
(posizione START).
Per spegnere l’apparecchio manual-
mente ruotare la manopolina dell’inter-
ruttore in posizione O.
Vulcano on Demand
Per dare corrente all’apparecchio ruotare
la manopolina dell’interruttore nella
posizione I. Sul display posto sul coper-
chio tastiera apparirà un contatore con il
numero incrementale totale di dosi
macinate dall’apparecchio.
DISPLAY
PULSANTE MENU
PULSANTE
MACINATURA MANUALE
PULSANTE DOSE SINGOLA
PULSANTE DOSE DOPPIA
Dopo aver posizionato il portafiltro
nell’apposita forchetta, premere rispetti-
vamente:
•il pulsante a sinistra (indicazione una
tazza) per macinare e dosare una dose
singola;
•il pulsante a destra (indicazione due
tazze) per macinare e dosare una dose
doppia.
Il contatore sul coperchio-tastiera incre-
menta di uno per ogni dosatura singola
(indicazione una tazza) e incrementa di
due per ogni dosatura doppia (indica-
zione due tazze).
E’ possibile avviare manualmente l’ap-
parecchio mantenendo premuto il
pulsante centrale sul coperchio - tastiera
(indicazione ). Rilasciando il pulsante di
macinatura manuale l’apparecchio si
arresta. Con tale pulsante non viene
incrementato il contatore.
Si consiglia l’utilizzo di tale pulsante per
la regolazione della macinatura dell’ap-
parecchio.
Per spegnere l’apparecchio ruotare la
manopola dell’interruttore in posizione
O.
5
IT

REGOLAZIONE DELLA MACINATURA
Per macinare il caffè più o meno fine si
deve agire sulla leva di regolazione
macinatura. Per aumentare la grossezza
del macinato è necessario ruotare la leva
in senso orario; per diminuirla è neces-
sario ruotare la leva in senso antiorario.
MACINATURA
PIÙ FINE
MACINATURA
PIÙ GROSSA
La leva rimane nella posizione fissata
senza necessità di alcun arresto. La
regolazione va effettuata con motore
avviato e possibilmente senza caffè tra
le macine. Macinare piccoli quantitativi
di caffè per la ricerca della granulosità
ottimale.
Nel Vulcano on Demand, prima di verifi-
care la finezza del macinato macinare
qualche dose di caffè per riempire il
condotto tra la zona di macinatura e la
bocchetta di uscita del macinato. Tale
operazione va eseguita ogni qual volta
viene variata la macinatura, per svuotare
il condotto dal macinato precedente. La
variazione della granulometria del maci-
nato potrebbe variare il peso delle dosi.
Regolare quindi la dose solo successiva-
mente alla regolazione della macinatura.
CAMPANA
VITI FISSAGGIO LEVA
LEVA
REGOLAZIONE MACINATURA
GHIERA
REGOLAZIONE MACINATURA
Nel caso in cui non fosse possibile, a
causa del limitato angolo di azione della
leva, raggiungere il livello di granulosità
desiderato, procedere nel seguente
modo:
•chiudere la serranda e spegnere l'appa-
recchio;
•svitare i perni di fissaggio della
campana e rimuovere la stessa;
•svitare le viti che fissano la leva di
regolazione alla ghiera e rimuovere la
leva;
•riposizionare la leva allineando i fori
per il fissaggio, ai fori presenti sulla
ghiera che permettono la più ampia ed
opportuna regolazione della macina-
tura;
•fissare la leva alla ghiera con le appo-
site viti;
•riposizionare la campana;
•solo dopo aver fissato la campana alla
carenatura, avvitando gli appositi
perni, aprire la serranda e procedere
con la regolazione della macinatura.
Se l’erogazione della macchina per
espresso è molto rapida significa che il
caffè è macinato troppo grosso. Se vice-
versa l’erogazione è molto lenta significa
che il caffè è macinato troppo fine. Deve
comunque essere considerato che sono
molteplici le condizioni che possono
influenzare la corretta erogazione, quali
la grammatura della dose, la pressatura,
la regolazione della macchina espresso e
la pulizia dei filtri.
REGOLAZIONE DELLA DOSE DEL CAFFÈ MACINATO
Vulcano Automatic
REGOLAZIONE DELLA DOSE
RIDUZIONE
DELLA DOSE
AUMENTO
DELLA DOSE
Per la regolazione della dosatura si deve
agire sulla manopolina posta al centro
del dosatore del caffè macinato tenendo
fermo il gruppo stelle di dosatura.
Ruotando la manopolina in senso orario
si ottiene una riduzione della dose, in
senso antiorario si ottiene un aumento
della stessa.
6
IT

PRELIEVO
DELLA DOSE
Per prelevare le dosi di caffè macinato
posizionare il portafiltro della macchina
per caffè fino in fondo alla forchetta di
supporto sotto l’uscita del caffè maci-
nato.
Per ottenere la caduta di una dose di
caffè macinato è necessario tirare la
leva del dosatore fino a termine corsa
senza accompagnarla nel ritorno. Tirare
due volte consecutivamente per prele-
vare due dosi.
Per centrare la caduta del caffè nel
portafiltro è possibile regolare lateral-
mente la posizione della forchetta di
supporto posta sotto il dosatore allen-
tando leggermente le viti di fissaggio e
riavvitandole dopo aver spostato la
forchetta nella nuova posizione.
SPESSORE FORCHETTA
Se necessario, utilizzare gli appositi
spessori (inseriti nella confezione) per
arretrare la posizione della forchetta.
Una volta trovata la posizione ottimale
fissare la forchetta con le relative viti.
Vulcano on Demand
La regolazione della dose avviene utiliz-
zando i comandi posti sul coperchio-ta-
stiera. Dopo aver regolato la granulome-
tria del macinato, verificare con una
bilancia di precisione il peso della dose.
Per regolare la dosatura si deve acce-
dere al programma di regolazione: per
entrare premere per tre secondi il tasto
“MENU”; il display inizierà a lampeg-
giare.
Selezionare la dose che si desidera
variare: la dosatura singola (indicazione
una tazza) o la dosatura doppia (indica-
zione due tazze). Apparirà sul display il
tempo di macinatura attuale (in
secondi) della dosatura prescelta.
Premendo i tasti “+” e ”–“ si incre-
menta o si diminuisce il tempo di maci-
natura e quindi la dosatura selezionata.
Indicativamente, una variazione di 0.1
secondi corrisponde ad una variazione
della dose di 0.3 grammi (0.01 once).
Quando si è impostato il valore voluto, si
deve memorizzare il nuovo valore
premendo per tre secondi il tasto
“MENU”. Un lampeggio del display
confermerà il salvataggio dei dati e
l’uscita dal programma di regolazione.
Con la bilancia di precisione pesare
nuovamente la dose e, se necessario,
ripetere l’operazione.
COPERCHIO TASTIERA
PULSANTI PER
VARIAZIONE TEMPO
PULSANTE MENU DI MACINATURA
PULSANTE
DISPLAY MACINATURA MANUALE
PULSANTE PULSANTE
DOSE SINGOLA DOSE DOPPIA
QUANDO SI E’ ALL’INTERNO DEL
PROGRAMMA DI REGOLAZIONE NON
E’ POSSIBILE COMANDARE LA MACI-
NATURA DELL’APPARECCHIO.
SE L’APPARECCHIO VIENE SPENTO
(INTERRUTTORE IN POSIZIONE O)
PRIMA DI USCIRE DAL PROGRAMMA
DI REGOLAZIONE, LE MODIFICHE
NON VENGONO SALVATE.
Per prelevare le dosi di caffè macinato
posizionare il portafiltro della macchina
per caffè fino in fondo alla forchetta di
supporto sotto l’uscita del caffè maci-
nato.
7
IT
Seite wird geladen ...
Seite wird geladen ...
Seite wird geladen ...
Seite wird geladen ...
Seite wird geladen ...
Seite wird geladen ...
Seite wird geladen ...
Seite wird geladen ...
Seite wird geladen ...
Seite wird geladen ...
Seite wird geladen ...
Seite wird geladen ...
Seite wird geladen ...
Seite wird geladen ...
Seite wird geladen ...
Seite wird geladen ...
Seite wird geladen ...
Seite wird geladen ...
Seite wird geladen ...
Seite wird geladen ...
Seite wird geladen ...
Seite wird geladen ...
Seite wird geladen ...
Seite wird geladen ...
Seite wird geladen ...
Seite wird geladen ...
Seite wird geladen ...
Seite wird geladen ...
Seite wird geladen ...
Seite wird geladen ...
Seite wird geladen ...
Seite wird geladen ...
Seite wird geladen ...
Seite wird geladen ...
Seite wird geladen ...
Seite wird geladen ...
Seite wird geladen ...
Seite wird geladen ...
Seite wird geladen ...
Seite wird geladen ...
Seite wird geladen ...
Seite wird geladen ...
Seite wird geladen ...
Seite wird geladen ...
Seite wird geladen ...
Seite wird geladen ...
Seite wird geladen ...
Seite wird geladen ...
Seite wird geladen ...
Seite wird geladen ...
Seite wird geladen ...
Seite wird geladen ...
Seite wird geladen ...
Seite wird geladen ...
-
 1
1
-
 2
2
-
 3
3
-
 4
4
-
 5
5
-
 6
6
-
 7
7
-
 8
8
-
 9
9
-
 10
10
-
 11
11
-
 12
12
-
 13
13
-
 14
14
-
 15
15
-
 16
16
-
 17
17
-
 18
18
-
 19
19
-
 20
20
-
 21
21
-
 22
22
-
 23
23
-
 24
24
-
 25
25
-
 26
26
-
 27
27
-
 28
28
-
 29
29
-
 30
30
-
 31
31
-
 32
32
-
 33
33
-
 34
34
-
 35
35
-
 36
36
-
 37
37
-
 38
38
-
 39
39
-
 40
40
-
 41
41
-
 42
42
-
 43
43
-
 44
44
-
 45
45
-
 46
46
-
 47
47
-
 48
48
-
 49
49
-
 50
50
-
 51
51
-
 52
52
-
 53
53
-
 54
54
-
 55
55
-
 56
56
-
 57
57
-
 58
58
-
 59
59
-
 60
60
-
 61
61
-
 62
62
-
 63
63
-
 64
64
-
 65
65
-
 66
66
-
 67
67
-
 68
68
-
 69
69
-
 70
70
-
 71
71
-
 72
72
-
 73
73
-
 74
74


La Marzocco VULCANO Benutzerhandbuch
- Kategorie
- Kaffeemühlen
- Typ
- Benutzerhandbuch
in anderen Sprachen
- English: La Marzocco VULCANO User manual
- français: La Marzocco VULCANO Manuel utilisateur
- español: La Marzocco VULCANO Manual de usuario
- italiano: La Marzocco VULCANO Manuale utente
Andere Dokumente
-
Rancilio KRYO 65 OD Benutzerhandbuch
-
Crem Coffee Pulse Bedienungsanleitung
-
Rancilio MD80 Use And Maintenance
-
Rancilio KRYO 65/ST Benutzerhandbuch
-
-
Mahlkonig Pro M Bedienungsanleitung
-
-
Rancilio ROCKY-SD Benutzerhandbuch
-
ECM S-Automatik 64 Edition No. 1 Benutzerhandbuch
-
Expobar New Elegance Benutzerhandbuch