Yamaha DM2000 Bedienungsanleitung
- Kategorie
- Musikinstrumente
- Typ
- Bedienungsanleitung

E
STUDIO MANAGER
STUDIO MANAGER
for
for
Owner’s Manual
Owner’s Manual
Keep This Manual For Future Reference.
Keep This Manual For Future Reference.

i
Important Information
Studio Manager—Owner’s Manual
Important Information
Studio Manager Exclusion of Certain Liability
Manufacturer, importer, or dealer shall not be liable for any incidental damages including
personal injury or any other damages caused by improper use or operation of Studio Man-
ager.
Trademarks
Apple and Macintosh are registered trademarks of Apple Computer, Inc. PowerPC is a reg-
istered trademark of International Business Machines Corporation. Pentium and Celeron
are registered trademarks of Intel Corporation. Microsoft and Windows are registered
trademarks of Microsoft Corporation. OMS is a registered trademark of Opcode Systems,
Inc. Adobe and Acrobat are registered trademarks of Adobe Systems Incorporated. Smart-
Media is a trademark of Toshiba America, Inc. All other trademarks are the property of their
respective holders and are hereby acknowledged.
Copyright
No part of the Studio Manager software or this
Owner’s Manual
may be reproduced or dis-
tributed in any form or by any means without the prior written authorization of Yamaha
Corporation.
© 2002 Yamaha Corporation. All rights reserved.
Yamaha Web Site
Information about Studio Manager, related products, and other Yamaha professional audio
equipment is available on the Yamaha Professional Audio Web site at:
<http://www.yamaha.co.jp/product/proaudio/homeenglish/navi/index.htm>.
SPECIAL NOTICES
• Use of the software and this guide is governed by the SOFTWARE LICENSING AGREE-
MENT which the purchaser fully agrees to upon breaking the seal of the software packaging.
(Please read carefully the AGREEMENT at the end of this guide before installing the appli-
cation.)
• Copying of the software or reproduction of this guide in whole or in part by any means is
expressly forbidden without the written consent of the manufacturer.
• Yamaha makes no representations or warranties with regard to the use of the software and
documentation and cannot be held responsible for the results of the use of this guide and
the software.
Specifications and external appearance subject to change without notice.

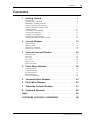
Contents
ii
Studio Manager—Owner’s Manual
Contents
1 Getting Started . . . . . . . . . . . . . . . . . . . . . . . . . . . . 1
Introduction . . . . . . . . . . . . . . . . . . . . . . . . . . . . . . . . . . . . . . . . . . . . . . . . . . . . . . . . 1
Contents of the CD-ROM . . . . . . . . . . . . . . . . . . . . . . . . . . . . . . . . . . . . . . . . . . . . . 1
Minimum System Requirements . . . . . . . . . . . . . . . . . . . . . . . . . . . . . . . . . . . . . . . . 2
Software Installation for Windows . . . . . . . . . . . . . . . . . . . . . . . . . . . . . . . . . . . . . . 3
Software Installation for Macintosh . . . . . . . . . . . . . . . . . . . . . . . . . . . . . . . . . . . . . 8
Setting up OMS . . . . . . . . . . . . . . . . . . . . . . . . . . . . . . . . . . . . . . . . . . . . . . . . . . . . . 11
Connecting to the DM2000 . . . . . . . . . . . . . . . . . . . . . . . . . . . . . . . . . . . . . . . . . . . 12
Starting Studio Manager . . . . . . . . . . . . . . . . . . . . . . . . . . . . . . . . . . . . . . . . . . . . . . 13
Quitting Studio Manager . . . . . . . . . . . . . . . . . . . . . . . . . . . . . . . . . . . . . . . . . . . . . 13
Configuring Studio Manager . . . . . . . . . . . . . . . . . . . . . . . . . . . . . . . . . . . . . . . . . . 13
Using Studio Manager Online & Offline . . . . . . . . . . . . . . . . . . . . . . . . . . . . . . . . . 14
2 Console Window . . . . . . . . . . . . . . . . . . . . . . . . . . 15
Input Channels . . . . . . . . . . . . . . . . . . . . . . . . . . . . . . . . . . . . . . . . . . . . . . . . . . . . . 16
Master Section . . . . . . . . . . . . . . . . . . . . . . . . . . . . . . . . . . . . . . . . . . . . . . . . . . . . . . 18
Master Layer Channels . . . . . . . . . . . . . . . . . . . . . . . . . . . . . . . . . . . . . . . . . . . . . . . 20
Remote Layer Channels . . . . . . . . . . . . . . . . . . . . . . . . . . . . . . . . . . . . . . . . . . . . . . 21
3 Selected Channel Window . . . . . . . . . . . . . . . . . . 22
Input Channels . . . . . . . . . . . . . . . . . . . . . . . . . . . . . . . . . . . . . . . . . . . . . . . . . . . . . 22
Bus Outs . . . . . . . . . . . . . . . . . . . . . . . . . . . . . . . . . . . . . . . . . . . . . . . . . . . . . . . . . . . 24
Aux Sends . . . . . . . . . . . . . . . . . . . . . . . . . . . . . . . . . . . . . . . . . . . . . . . . . . . . . . . . . . 25
Stereo Out . . . . . . . . . . . . . . . . . . . . . . . . . . . . . . . . . . . . . . . . . . . . . . . . . . . . . . . . . 27
Matrix Sends . . . . . . . . . . . . . . . . . . . . . . . . . . . . . . . . . . . . . . . . . . . . . . . . . . . . . . . 28
Remote Channels . . . . . . . . . . . . . . . . . . . . . . . . . . . . . . . . . . . . . . . . . . . . . . . . . . . 29
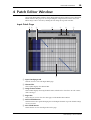
4 Patch Editor Window . . . . . . . . . . . . . . . . . . . . . . 30
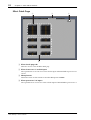
Input Patch Page . . . . . . . . . . . . . . . . . . . . . . . . . . . . . . . . . . . . . . . . . . . . . . . . . . . . 30
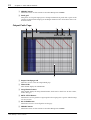
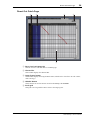
Output Patch Page . . . . . . . . . . . . . . . . . . . . . . . . . . . . . . . . . . . . . . . . . . . . . . . . . . 31
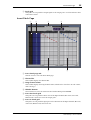
Insert Patch Page . . . . . . . . . . . . . . . . . . . . . . . . . . . . . . . . . . . . . . . . . . . . . . . . . . . . 32
Effect Patch Page . . . . . . . . . . . . . . . . . . . . . . . . . . . . . . . . . . . . . . . . . . . . . . . . . . . . 33
Direct Out Patch Page . . . . . . . . . . . . . . . . . . . . . . . . . . . . . . . . . . . . . . . . . . . . . . . . 34
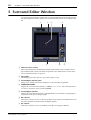
5 Surround Editor Window . . . . . . . . . . . . . . . . . . . 35
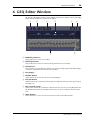
6 GEQ Editor Window . . . . . . . . . . . . . . . . . . . . . . . 36
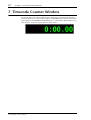
7 Timecode Counter Window . . . . . . . . . . . . . . . . . 37
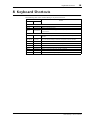
8 Keyboard Shortcuts . . . . . . . . . . . . . . . . . . . . . . . . 38
Index . . . . . . . . . . . . . . . . . . . . . . . . . . . . . . . . . . . . . . 39
SOFTWARE LICENSING AGREEMENT . . . . . . . . . . . . . 40

1
Chapter 1—Getting Started
Studio Manager—Owner’s Manual
1 Getting Started
Introduction
The Yamaha Studio Manager for DM2000 allows you to control and display DM2000
parameters on your computer.
This
Owner’s Manual
contains information about installing and operating Studio Manager
for DM2000. Please refer to the DM2000
Owner’s Manual
for detailed information on oper-
ating the DM2000.
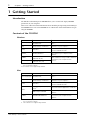
Contents of the CD-ROM
Windows
Mac
Folder name Software Comments
Acroread_
\
English
Acrobat Reader
1,
2
1. An electronic (PDF) manual is included with this software. Refer to the electronic manual for informa-
tion on using the software.
2. This software is not supported by Yamaha.
Allows you to read the PDF format documen-
tation
SM_
Studio Manager for DM2000
1
Allows you to control and display DM2000
parameters on your computer
Card_
Card Filer
1
You can transfer and manage DM2000 data
stored on SmartMedia cards.
Mididrv_ Yamaha CBX Driver
Driver software necessary for serial communi-
cation between your computer and the
DM2000.
USBdrv_
Yamaha USB MIDI Driver
(Windows 98, Me)
Driver software necessary for USB communica-
tion between your computer and the
DM2000.
USBdrv2k_
Yamaha USB MIDI Driver
(Windows 2000, XP)
Folder name Software Comments
Acroread_
\
English
Acrobat Reader
1,
2
1. An electronic (PDF) manual is included with this software. Refer to the electronic manual for informa-
tion on using the software.
2. This software is not supported by Yamaha.
Allows you to read the PDF format documen-
tation
SM_
Studio Manager for DM2000
1
Allows you to control and display DM2000
parameters on your computer
Card_
Card Filer
1
You can transfer and manage DM2000 data
stored on SmartMedia cards.
OMS_
Open Music System (OMS)
2.3.8
1, 2
Lets you use musical applications on Mac OS.
OMS Setup for YAMAHA
Contains sample OMS setup files for the
DM2000.
USBdrv_ YAMAHA USB MIDI Driver
Driver software necessary for USB communica-
tion between your computer and the
DM2000.

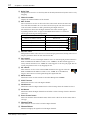
Minimum System Requirements
2
Studio Manager—Owner’s Manual
Minimum System Requirements
For Windows
Listed below are the minimum system requirements for a PC to run each item of software
supplied on the CD-ROM.
Studio Manager for DM2000
• A 433 MHz or faster Intel Pentium or Celeron processor
• At least 128 MB of RAM
• At least 20 MB of hard disk space
• A VGA or better display with 1024 x 768 pixels, 256 colors (1280 x 1024, High Color 16-bit
recommended)
• Microsoft Windows 98SE, Me, 2000, XP Home Edition, XP Professional Edition
Note that if you are using 1024 x 768 display resolution, select the Auto-hide option for the
Task Bar.
Card Filer
• A 100 MHz or faster Intel Pentium or Celeron processor
• At least 8 MB of RAM
• At least 2 MB of hard disk space
• A VGA or better display with 800 x 600 pixels, 256 colors
• Microsoft Windows 95, 98, 98SE, Me, NT4.0, 2000, XP Home Edition, XP Professional Edi-
tion
Yamaha USB MIDI Driver
• At least 32 MB of RAM
• At least 2 MB of hard disk space
• Microsoft Windows 98, 98SE, Me, NT4.0, 2000, XP Home Edition, XP Professional Edition
Yamaha CBX Driver
• Microsoft Windows 95, 98, 98SE, Me, NT4.0, 2000, XP Home Edition, XP Professional Edi-
tion
For Mac
Listed below are the minimum system requirements for a Mac to run each item of software
supplied on the CD-ROM.
Studio Manager for DM2000
• A 233MHz PowerPC 604 processor or better (recommended: G3/300 MHz or better
equipped with USB)
• At least 50 MB of RAM (virtual memory must be turned off)
• At least 7MB of free hard disk space
Note: Your operating system may have system requirements other than those specified for the
software.
Note: Your operating system may have system requirements other than those specified for the
software.

3
Chapter 1—Getting Started
Studio Manager—Owner’s Manual
• Display resolution of 1024 x 768 pixels, 256 colors (1280 x 1024 pixels, 32,000 colors recom-
mended)
• Mac OS 8.6 to 9.2.2 (Mac OS X not supported)
• OMS 2.3.3 or later
Note that in OMS MIDI Setup, “Run in Background” must be turned on.
Card Filer
• A PowerPC processor or better
• At least 6 MB of RAM
• Display resolution of 800 x 600 pixels, 256 colors
• Mac OS 8.6 to 9.2.2 (Mac OS X not supported)
Yamaha USB MIDI Driver
• A PowerPC processor or better
• At least 64 MB of RAM (128 MB recommended)
• At least 2 MB of hard disk space
• USB port
• Mac OS 8.6 to 9.2.2 (Mac OS X not supported)
Software Installation for Windows
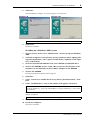
Acrobat Reader
In order to view the electronic (PDF) manuals included with the software, you’ll need to
install Acrobat Reader.
1
Double-click the “Acroread_” folder.
The folder opens and four different language folders are displayed.
2
Double-click the folder of the language you want to use.
The folder opens and for the English vesion, the “ar500enu.exe” file is displayed.
3
Double-click “ar500enu.exe.”
The Acrobat Reader setup dialog appears.
4
Follow the on-screen directions to install the software.
After installation is complete, an Acrobat folder is created in C:\ Program Files. (The default
location.)
For information on using the Acrobat Reader, refer to the Reader Guide in the Help menu.
Note:
If you are using a PowerBook and it is on battery power, go to “Power conservation set-
tings” and deselect “Allow processor cycling.”
Note: If an older version of Acrobat Reader is installed on your PC, you’ll need to uninstall it
before proceeding.

Software Installation for Windows
4
Studio Manager—Owner’s Manual
USB MIDI Driver
To operate the DM2000 from your computer via USB, you’ll need to install the USB MIDI
driver. This software transfers MIDI data back and forth between Studio Manager and the
DM2000 via USB.
For Windows 98/Me, see the next section.
For Windows 2000, see page 6.
For Windows XP, see page 7.
Installing on a Windows 98/Me system
1
Turn on your PC and start Windows.
2
Insert the included CD-ROM disc into your CD-ROM or DVD-ROM drive.
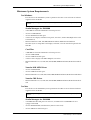
3
Turn off the DM2000 and use a USB cable to connect the USB port of the
computer (or the USB hub) to the TO HOST USB port of the DM2000.
4
Turn on the DM2000.
The Add New Hardware Wizard window appears. If it does not appear, click Add New
Hardware in the Control Panel.
Note: For Windows Me, select “Automatic search for a better driver (Recommended)” and click
Next. When the driver is located and installed, proceed to Step 9. If the driver cannot be located,
select “Specify the location of the driver (Advanced)” and specify the CD-ROM drive’s root
directory (e.g., D:\) to install the driver.
DM2000
Computer
USB cable
Driver
Sequence
Software
Windows 98 Windows Me

5
Chapter 1—Getting Started
Studio Manager—Owner’s Manual
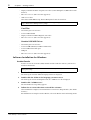
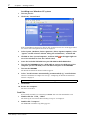
5
Click Next.
The window appears as shown below.
6
Select “Search for the best driver for your device. (Recommended).” Click
Next.
The window appears, as shown below.
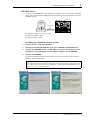
7
Select “CD-ROM drive” only, as shown. Click Next.
When the driver is found, “YAMAHA USB MIDI Driver” is displayed in the window as
shown below.
Note: You may be asked to insert your Windows CD-ROM so that the driver can be located.
Specify the USBdrv_ folder of the CD-ROM (such as D:\USBdrv_\) and continue the instal-
lation.

Software Installation for Windows
6
Studio Manager—Owner’s Manual
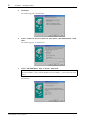
8
Click Next.
After installation is complete, the window appears as shown below.
9
Click Finish.
The driver is installed.
Installing on a Windows 2000 system
1
Turn on your PC and use the “Administrator” account to log into Windows
2000.
2
Select My Computer, Control Panel, System, Hardware, Driver Signing, File
Signature Verification, select “Ignore -Install all files, regardless of file signa-
ture,” and click OK.
3
Insert the included CD-ROM disc into your CD-ROM or DVD-ROM drive.
4
Turn off the DM2000 and use a USB cable to connect the USB port of the
computer (or the USB hub) to the TO HOST USB port of the DM2000.
5
Turn on the DM2000.
The Add New Hardware Wizard window appears.
6
Click Next.
7
Select “Search for a suitable driver for my device. (Recommended).” Click
Next.
8
Select “CD-ROM drives” only, in the window that appears. Click Next.
When the installation is complete the message, “Completing the Found New Hardware
Wizard” is displayed.
9
Click Finish.
10
Restart the computer.
The driver is installed.
Note: It may take up to ten seconds for this window to appear.
Note: You may be asked to insert your Windows CD-ROM so that the driver can be located.
Specify the “USBdrv2k_” folder of the CD-ROM drive (such as D:\USBdrv2k_\) and continue
the installation.
Note: It may take up to ten seconds for this window to appear.
Windows 98 Windows Me

7
Chapter 1—Getting Started
Studio Manager—Owner’s Manual
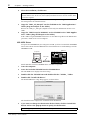
Installing on a Windows XP system
1
Turn on your PC.
2
Click Start, Control Panel.
If the Control Panel is displayed as shown, click “Switch to classic view” in the upper left of
the window. All control panels and icons are displayed.
3
Select System, Hardware, Driver signatures, Driver signature options, select
“Ignore—Install software without asking for confirmation,” and click OK.
4
Click OK to close System Properties, and then click in the upper right cor-
ner of the window to close the Control Panel.
5
Insert the included CD-ROM into your CD-ROM or DVD-ROM drive.
6
Turn off the DM2000 and use a USB cable to connect the USB port of the
computer (or the USB hub) to the TO HOST USB port of the DM2000.
7
Turn on the DM2000.
The Found New Hardware Wizard window appears.
8
Select “Install software automatically (recommended) (I),” and click Next.
When the installation is complete the message, “Completing the Found New Hardware
Wizard” is displayed.
9
Click Finish.
10
Restart the computer.
The driver is installed.
Card Filer
If you install Card Filer, you can manage DM2000 data stored on SmartMedia cards.
1 Double-click the “Card_” folder.
The folder opens and various files including “Setup.exe” are displayed.
2 Double-click “Setup.exe.”
The YAMAHA Card Filer setup dialog appears.
Note: It may take up to ten seconds for this window to appear.

Software Installation for Macintosh 8
Studio Manager—Owner’s Manual
3 Follow the on-screen directions to install the software.
A YAMAHA folder is created in C:\Program Files (the default location). The files for Card
Filer are created inside that folder. Refer to “Card Filer Manual.pdf” for information on
using Card Filer.
CBX Driver
1 Double-click the “Mididrv_” folder.
The folder opens and various files including “Setup.exe” are displayed.
2 Double-click “Setup.exe.”
The YAMAHA CBX Driver setup dialog appears.
3 Follow the on-screen directions to install the software.
Studio Manager for DM2000
1 Double-click the “SM_” folder.
The folder opens and various files including “Setup.exe” are displayed.
2 Double-click “Setup.exe.”
The Studio Manager for DM2000 setup dialog appears.
3 Follow the on-screen directions to install the software.
Software Installation for Macintosh
Acrobat Reader
In order to view the electronic (PDF) manuals included with the software, you’ll need to
install Acrobat Reader.
1 Double-click the “Acrobat_” folder.
The folder opens and four language folders are displayed: English, French, German, and
Japanese.
2 Double-click the folder of the language you want to use.
The folder opens and the “Reader Installer” file is displayed.
The Installer name may differ depending on the language you select.
3 Double-click “Reader Installer.”
Acrobat Reader setup dialog appears.
4 Follow the on-screen directions to install the software.
After installation is complete, an Acrobat folder is created on your Mac’s startup disk (the
default location).
For information on using the Acrobat Reader, refer to the Reader Guide in the Help menu.
Open Music System (OMS) 2.3.8
OMS allows you to use several MIDI applications on the Mac OS at the same time.
1 Double-click the “OMS_” folder (English version only).
The folder opens and the “Install OMS 2.3.8” file is displayed.
2 Double-click “Install OMS 2.3.8.”
The OMS setup dialog appears.
3 Follow the on-screen directions to install the software.

9
Chapter 1—Getting Started
Studio Manager—Owner’s Manual
4
After the installation, click Restart.
After restarting, the Opcode folder is created containing the OMS Applications folder (on
the startup disk as the default location).
5
Copy the “OMS_2.3_Mac.pdf” on the CD-ROM to the “OMS Applications”
folder (drag-and-drop it to the folder).
Refer to the “OMS_2.3_Mac.pdf” (English version only) for information on how to use
OMS.
6
Copy the “OMS Setup for YAMAHA” on the CD-ROM to the “OMS Applica-
tions” folder (drag-and-drop it to the folder).
In the “OMS Setup for YAMAHA” folder there are the OMS Setup files for the Yamaha tone
generators, which can be used as templates.
USB MIDI Driver
To operate the DM2000 from your computer via USB, you’ll need to install the USB MIDI
driver. This software transfers MIDI data back and forth between Studio Manager and the
DM2000 via USB.
Install OMS first, then the USB MIDI driver, and then set up OMS.
1
Start the computer.
2
Insert the included CD-ROM into the CD-ROM drive.
The CD-ROM icon is displayed on the desktop.
3
Double-click the CD-ROM icon and double-click the “USBdrv_” folder.
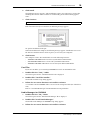
4
Double-click “Install USB Driver.”
The Install USB Driver setup dialog appears, as shown below.
The “Install Location” displays the destination of the installation.
5
If you want to change the destination disk or folder, click the Switch Disk
button and use the pop-up menu to specify the destination.
Note: After the installation is complete, you may encounter an error message warning that the
installer did not close. In this case, choose Quit from the File menu to close the installer. Then
restart the computer.
Note: This pop-up menu usually displays the startup disk as the destination.
DM2000
OMS
Computer
USB cable
Driver
Sequence
Software

Software Installation for Macintosh
10
Studio Manager—Owner’s Manual
6
Click Install.
The following message appears: “This installation requires your computer to restart after
installing this software. Click Continue to automatically quit all other running applica-
tions.”
7
Click Continue.
The installation starts.
If the driver has already been installed, the following message appears.
To quit the installation, click Quit.
When the installation is complete, the following message appears: “Installation was success-
ful. You have installed software which requires you to restart your computer.”
8
Click Restart.
The computer restarts. The installed files are in the following locations:
• YAMAHA USB MIDI Patch is located in System Folder\Control Panels
• USB YAMAHA MIDI Driver is located in System Folder\Extensions
• YAMAHA USB MIDI OMS Driver is located in System Folder\OMS Folder
Card Filer
If you inst Card Filer, you can manage DM2000 data stored on SmartMedia cards.
1
Double-click the “Card_” folder.
The folder opens and the “Card Filer Installer” file is displayed.
2
Double-click “Card Filer installer.”
The Install Card Filer setup dialog appears.
3
Follow the on-screen directions to install the software.
A “Card Filer 1.0.3 for DM2000” folder is created on the startup hard disk (the default loca-
tion).
Refer to “Card Filer Manual.pdf” for information on using Card Filer.
Studio Manager for DM2000
1
Double-click the “SM_” folder.
The folder opens and the “Install Studio Manager” file is displayed.
2
Double-click “Install Studio Manager.”
The Install Studio Manager for DM2000 setup dialog appears.
3
Follow the on-screen directions to install the software.
Note: To cancel the installation, click Cancel.

11 Chapter 1—Getting Started
Studio Manager—Owner’s Manual
Setting up OMS
OMS Studio Setup files for the DM2000 are supplied on the included CD-ROM. The setup
files are used for setting up OMS when using the serial or USB ports.
1 Turn off the DM2000 and use a USB cable to connect the USB port of the
computer (or the USB hub) to the TO HOST USB port of the DM2000.
2 Turn on the DM2000 and start the computer.
3 Insert the included CD-ROM into the CD-ROM drive of your Mac.
The CD-ROM icon appears on the desktop.
4 Double-click the CD-ROM icon, “OMS_”, and “OMS Setup for YAMAHA.”
Three files “DM2000-Modem,” “DM2000-Printer,” and “DM2000-USB” appear. Copy
these to the hard disk on your computer.
5 Double-click one of “DM2000-Modem” or “DM2000-Printer” or
“DM2000-USB” to start OMS Setup.
The setup files are used as follows.
DM2000-Modem: Used when connecting the modem port of your Mac to the DM2000.
DM2000-Printer: Used when connecting the printer port of your Mac to the DM2000.
DM2000-USB: Used when connecting the USB port of your Mac to the DM2000.
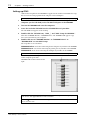
After starting the OMS Setup, the selected
Studio Setup file opens. The
DM2000-USB version is shown on the
right.
Note: When using USB, OMS and the USB MIDI driver should be installed before proceeding.
Note: A USB hub is necessary when several DM2000s are connected to the computer.
Note: When using either of the serial ports (modem or printer), go to OMS Setup Preferences
and deselect “Use Apple DMA driver when available.”
Note: If “ ” is not indicated next to the setup file name, choose Make Current from the File
menu, and then Save.
Indicates this setup is available

Connecting to the DM2000 12
Studio Manager—Owner’s Manual
The OMS studio setup is complete.
1 Start OMS Setup and choose “New Setup” from the File menu.
The OMS Driver Search dialog appears.
2 Deselect “Modem” and “Printer,” and click Search.
If successful, the USB-MIDI device is displayed in the OMS driver setting dialog.
3 Click OK to search for ports.
Port 1, Port 2... appears in the dialog.
4 Select the appropriate ports and click OK to store the setting.
Refer to “OMS_2.3_Mac.pdf” supplied with OMS for more information.
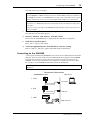
Connecting to the DM2000
Select the port and ID on the DM2000 that you want to use for communication with Studio
Manager. To select a port and ID, locate the MIDI/TO HOST Setup page of the DM2000
and make the selections as required. If you are using the serial port to connect to the
DM2000, select the type that matches your computer’s serial port. You can select either
PC-2 or Mac. See the DM2000 documentation for more information.
Note: After the OMS Studio Setup above has been completed, your computer will recognize
only the DM2000 as a MIDI instrument. If you use another MIDI instrument in addition to
the DM2000,or you add a second DM2000 to the existing system, you should create an original
Studio Setup file. Refer to the on-line manual supplied with OMS for more information.
Note: Depending on your Mac and Mac OS version, the included OMS Studio Setup file may
not function (i.e., MIDI data cannot be transmitted/received even though the settings have
been made.)
In this case, connect your Mac to the DM2000 via USB and follow the procedure below to rec-
reate the setup file.
Note: Turn off the DM2000 and shut down the computer if you connecting using the serial or
MIDI ports
USB cable
USB port
Serial cable
Serial port
DM2000 Rear Panel
Connection Alternatives
Mac or PC
Serial1.
USB
MIDI
MIDI Interface
MIDI cables
2.
3.

13 Chapter 1—Getting Started
Studio Manager—Owner’s Manual
Starting Studio Manager
For Windows, click the “Start” button and select Programs, YAMAHA Studio Manager,
DM2000, Studio Manager for DM2000.
For Mac, open the Studio Manager folder and double-click “YAMAHA Studio Manager for
DM2000.”
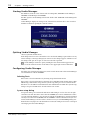
Studio Manager displays its startup screen, shown below, and then takes a few seconds to
initialize itself before opening the Console window.
Quitting Studio Manager
Choose Quit from the File menu.
If all changes have been saved, all windows close and Studio Manager quits. If there are any
unsaved changes, a message asking if you want to save the changes appears. Click Yes to save
the changes and quit, No to quit, or Cancel to cancel the operation.
Studio Manager can also be quit by clicking the Close button in the upper-left cor-
ner of the Console window on the Mac, or the upper-right corner in Windows.
Configuring Studio Manager
You must select an input and output port, and a Console Device ID so that Studio Manager
can communicate with the DM2000.
Selecting Ports
Ports can be selected in Windows by choosing Setup from the File menu.
Ports can be selected on the Mac by choosing Select OMS Ports from the File menu. OMS
MIDI Setup, OMS Studio Setup, and the System setup dialog are also accessible from the
File menu. See the OMS documentation for more information on OMS. The System setup
dialog is not part of OMS and is described in the next section.
System setup dialog
To open the dialog, select it from the File menu. This dialog is used to select one of eight
Console Device IDs. You must ensure that the DM2000 you want to communicate with is
set to the same ID. From here, you can turn on and off Studio Manager’s control of channel
and Layer selection on the DM2000, and the DM2000’s control of channel and Layer selec-
tion in Studio Manager, and also choose whether or not you want DM2000 patching con-
firmed before carrying it out. On the Windows version, the dialog is also used to select input
and output ports for Studio Manager.

Using Studio Manager Online & Offline 14
Studio Manager—Owner’s Manual
Shown below left is the Mac version of the dialog, and below right is the Windows version.
Using Studio Manager Online & Offline
When Studio Manager is started, it opens a new Session using its default settings and checks
whether an active DM2000 is connected, active meaning connected and turned on. If an
active DM2000 is detected, a message appears asking whether or not you want to transfer
the settings of the Studio Manager Session to the DM2000 (PC –>Console), or transfer the
settings of the DM2000 to the Studio Manager Session (Console–>PC), or neither (CAN-
CEL). After you have selected your option, the ONLINE/OFFLINE status indicator of the
Console window displays whether Studio Manager is online or offline accordingly.
If no active DM2000 is detected, no messages appear and a new Session opens using the
default settings. If an active DM2000 is detected after Studio Manager was started, the same
message appears as described previously.
If you want to change to online or offline at any time later, choose Re-synchronize... from
the Studio Manager Synchronization menu, and the same message appears as described
previously.
Only one Studio Manager Session can be open at a time. If a Session is open, and you want
to open another, either a previously saved Session or a new one, a message appears warning
that the current Session will be overwritten if you continue. If Studio Manager is offline and
you continue, the Session is loaded. If Studio Manager is online and you continue, the Ses-
sion is loaded and the same message appears as described previously, asking if you want to
transfer the settings of the Session to the DM2000, or transfer the settings from the DM2000
(which can be used as an Undo function), or neither.
Note that there is an All Lib option in the message window described above. This is used to
select whether or not the contents of the libraries are transferred.
Note: Do not operate the DM2000 while Studio Manager is synchronizing. Wait until the
ONLINE/OFFLINE status indicator shows “ONLINE.” This ensures that the settings on the
DM2000 and in Studio Manager are the same.
Note: In Version 1.0 of Studio Manager for DM2000, the settings of a Session can include
library information, however you cannot edit the contents of the libraries as there is no Library
window.
Note: When you execute a Library Sort operation on the DM2000, you must synchronize Stu-
dio Manager after wards. To do this choose Re-synchronize from the Synchronization menu
and ensure that the All Lib option just described is selected before synchronizing.

15 Chapter 2—Console Window
Studio Manager—Owner’s Manual
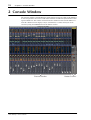
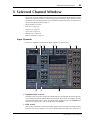
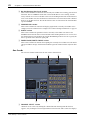
2 Console Window
The Console window is Studio Manager’s main window and opens when Studio Manager
is started. It provides an overview of the mixer channels, and most major functions can be
operated from here. The window is divided into the Channel Section and the Master Sec-
tion. The Channel Section displays a Layer (24 channels) at a time, and Layers can be
selected by using the LAYER buttons in the Master Section.
Channel Section Master Section

Input Channels 16
Studio Manager—Owner’s Manual
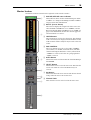
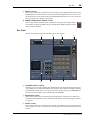
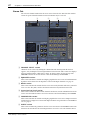
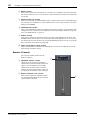
Input Channels
An Input Channel from the Console window is shown below.
A SOURCE parameter
This parameter is used to select an Input source. To select an
Input source, click the parameter and choose from the list that
appears.
B Bus Out routing buttons
These buttons are used to route the Input Channel’s signal to
one or more of the Bus Outs.
C STEREO button
This button is used to route the Input Channel’s signal to the
Stereo Out.
D DIRECT button
This button turns on and off the Input Channel’s routing to its
Direct Out.
E Direct Out destination
This parameter is used to select a Direct Out destination. To
select a destination, click the parameter and choose from the list
that appears.
F PHASE button
This button is used to reverse the signal phase of the channel.
G INSERT button
This button is used to turn on and off the Input Channel’s Insert.
H GATE button
This button is used to turn on and off the Input Channel’s Gate.
I Gate open & closed indicators
These indicators display whether the Gate is open (green) or
closed (red), when the Gate is turned on.
J Gate Threshold display
This display shows the Threshold setting of the Gate. The value
can be set by dragging.
K COMP button
This button is used to turn on and off the Input Channel’s Com-
pressor.
L Compressor curve display
This display shows the Compressor’s curve.
M EQ button
This button is used to turn on and off the Input Channel’s
4-band Parametric Equalizer.
N EQ curve display
This display shows the Equalizer’s curve, which
can be set by dragging.
O DELAY button
This button is used to turn on and off the Input Channel’s Delay
function.
B
C
D
6
7
9
K
J
L
M
N
O
P
Q
R
W
X
Y
Z
8
5
a
b
1
T
V
U
S

17 Chapter 2—Console Window
Studio Manager—Owner’s Manual
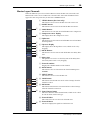
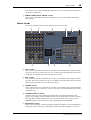
P Delay Time
This parameter is used to set the delay time of the Delay function. Delay times can be set by
dragging.
Q Channel number
Displays the Channel number of the channel.
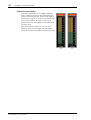
R AUX section
These controls are used to set the levels of the 12 Aux Sends. To turn an Aux Send
on or off, click its number. To set an Aux Send level, drag the end of the bar next
to the Aux Send’s number or click a point along the length of the bar.
The table below shows how the Input Channel’s Aux Send controls appear
depending on their status. See page 23 for information on how to switch Aux
Sends to pre-fader or post-fader positions.
S Pan/Aux Send
This parameter shows either the stereo or surround pan position and, during Aux Send set-
ting, the parameter shows the Aux Send level in dB.
T Pan control
This control is used to set the Input Channel’s stereo or surround pan position. When the
PAN CONTROL in the Master Section is set to “STEREO,” the Pan control appears as a
rotary control, and when set to “SURR,” the control appears as dot on a pan graph. The sur-
round pan position can be set by dragging the dot.
U LFE control
This control is used to set the surround LFE Channel level. It appears when the
PAN CONTROL in the Master Section is set to “SURR.” To set the LFE level,
drag the end of its bar or click a point along the length of the bar.
V AUTO button
This button is not used in Version 1.0 of Studio Manager for DM2000.
W SELECT button
This button is used to select the Input Channel.
X SOLO button
This button solos the Input Channel and is colored orange when the channel is soloed.
Y ON button
This button turns the Input Channel on and off. It is colored orange when the channel is
turned on.
Z Short Channel name
This is the channel’s Short Channel name, which can be edited. To edit the name, click it
and type.
a Channel Fader
This control is used to set the level of the Input Channel.
b Channel Meter
This meter displays the signal level of the Input Channel.
Aux Send status Bar appearance on Input Channel
Either on or off but no level set Dark blue bar
Off, pre-fader Green bar outline displays level
On, pre-fader Green bar displays level
Off, post-fader Orange bar outline displays level
On, post-fader Orange bar displays level
Seite wird geladen ...
Seite wird geladen ...
Seite wird geladen ...
Seite wird geladen ...
Seite wird geladen ...
Seite wird geladen ...
Seite wird geladen ...
Seite wird geladen ...
Seite wird geladen ...
Seite wird geladen ...
Seite wird geladen ...
Seite wird geladen ...
Seite wird geladen ...
Seite wird geladen ...
Seite wird geladen ...
Seite wird geladen ...
Seite wird geladen ...
Seite wird geladen ...
Seite wird geladen ...
Seite wird geladen ...
Seite wird geladen ...
Seite wird geladen ...
Seite wird geladen ...
Seite wird geladen ...
-
 1
1
-
 2
2
-
 3
3
-
 4
4
-
 5
5
-
 6
6
-
 7
7
-
 8
8
-
 9
9
-
 10
10
-
 11
11
-
 12
12
-
 13
13
-
 14
14
-
 15
15
-
 16
16
-
 17
17
-
 18
18
-
 19
19
-
 20
20
-
 21
21
-
 22
22
-
 23
23
-
 24
24
-
 25
25
-
 26
26
-
 27
27
-
 28
28
-
 29
29
-
 30
30
-
 31
31
-
 32
32
-
 33
33
-
 34
34
-
 35
35
-
 36
36
-
 37
37
-
 38
38
-
 39
39
-
 40
40
-
 41
41
-
 42
42
-
 43
43
-
 44
44


Yamaha DM2000 Bedienungsanleitung
- Kategorie
- Musikinstrumente
- Typ
- Bedienungsanleitung
in anderen Sprachen
- English: Yamaha DM2000 Owner's manual
- français: Yamaha DM2000 Le manuel du propriétaire
- español: Yamaha DM2000 El manual del propietario
- italiano: Yamaha DM2000 Manuale del proprietario
- русский: Yamaha DM2000 Инструкция по применению
- Nederlands: Yamaha DM2000 de handleiding
- português: Yamaha DM2000 Manual do proprietário
- dansk: Yamaha DM2000 Brugervejledning
- polski: Yamaha DM2000 Instrukcja obsługi
- čeština: Yamaha DM2000 Návod k obsluze
- svenska: Yamaha DM2000 Bruksanvisning
- Türkçe: Yamaha DM2000 El kitabı
- română: Yamaha DM2000 Manualul proprietarului
Verwandte Artikel
-
Yamaha 02R96 Installationsanleitung
-
-
-
-
-
Yamaha R96 Bedienungsanleitung
-
-
-
-