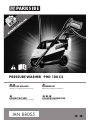
Parkside PHD 100 C2 Translation Of Original Operation Manual
- Typ
- Translation Of Original Operation Manual

IAN 88055
PRESSURE WASHER PHD 100 C2
HOCHDRUCKREINIGER
Originalbetriebsanleitung
PRESSURE WASHER
Translation of original operation manual
HÖGTRYCKSTVÄTT
Översättning av bruksanvisning i original
PAINEPESURI
Alkuperäisen käyttöohjeen käännös

GB / IE Translation of original operation manual Page
FI Alkuperäisen käyttöohjeen käännös Sivu
SE Översättning av bruksanvisning i original Sidan
DE / AT / CH Originalbetriebsanleitung Seite
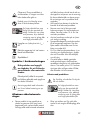
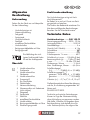
Before reading, unfold the page containing the illustrations and familiarise yourself with all functions
of the device.
Käännä ennen lukemista kuvallinen sivu esiin ja tutustu seuraavaksi laitteen kaikkiin toimintoihin.
Vik ut bildsidan och ha den till hands när du läser igenom anvisningarna och gör dig bekant med
apparatens / maskinens funktioner.
Klappen Sie vor dem Lesen die Seite mit den Abbildungen aus und machen Sie sich anschließend
mit allen Funktionen des Gerätes vertraut.
4
15
25
36

B
A
11
7621
10
8
4 5
9
3
12
13
14
15
1 2
310
11
10
12
13
14

4
GB IE
Introduction
Congratulations on the purchase of your
new device. With it, you have chosen a
high quality product.
The operating instructions constitute part of
this product. They contain important infor-
mation on safety, use and disposal.
Before using the product, familiarise your-
self with all of the operating and safety
instructions. Use the product only as de-
Keep this manual safely and in the event
that the product is passed on, hand over
all documents to the third party.
Intendend purpose
Only use the pressure washer in the follow-
ing private home areas:
• To clean machines, vehicles, buildings,
work tools, facades, terraces, garden-
ing tools, etc. with a high-pressure
water jet.
• Only use with original accessories and
spares.
• Observe the manufacturer’s instructions
for the device that is to be cleaned.
General Description
Extent of the Delivery
Unpack the pressure washer and verify the
contents:
- Pressure washer
- Chassis
- Gun
- High-pressure hose
- Jet lance
- High-pressure nozzle
Content
Introduction .................................4
Intended purpose
......................... 4
General description
......................4
Extent of the delivery
.......................4
Overview
.......................................5
Functional description
...................... 5
Technical data
..............................5
Notes on Safety
...........................5
Explanation of symbols
....................6
Symbols in the manual
.....................6
General notes on safety
...................6
Start-up
.......................................8
Setting up
......................................9
Mains connection
............................9
Operation
......................................9
Interrupting operation
....................10
Ending operation
..........................10
Using detergents
...........................10
Fixing the Wheels ......................11
Removing the Chassis ...................11
Cleaning and Maintenance
.........11
Cleaning
......................................11
Maintenance
................................11
Storage
...................................... 11
Waste Disposal and Environmental
Protection
...................................12
Guarantee
.................................12
Repair Service
............................13
Service-Center
............................13
Service Branch
...........................13
Trouble shooting
........................14
Spare parts order
......................14
Translation of the original
EC declaration of conformity
......49
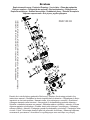
Exploded Drawing
.....................53

5
IEGB
Technical data
Pressure Washer .........PHD 100 C2
Mains connection
.............. 230V~, 50 Hz
Power consumption
....................1450 W
Mains cable
.....................................5 m
Weight (incl. all parts)
...................6,1 kg
Safety class
......................................
II
Degree of protection
.........................IPX5
................40°C
.... 0,8 MPa (8 bar)
Operating pressure p
........ 7 MPa (70 bar)
Max. permissible pressure p.
...................
.................................. 10 MPa (100 bar)
Pumping rate, water
................... 5 l/min
Max. pumping rate, water ........ 6,6 l/min
Acoustic pressure level
(L
pA) ................78 dB(A); KpA=3,0 dB(A)
Sound power level (L
WA)
measured
..... 88,8 dB(A); KWA=3,0 dB(A)
guaranteed
........................... 95 dB (A)
Vibration (an) ....... 0,7 m/s
2
; K=0,15 m/s
2
The operating conditions during measuring
and the procedures used for measuring in
accordance with
EN 60335-2-79:2009.
Technical and optical changes can be car-
ried out in the course of further development
without notice. All dimensions, references
and information of this instruction manual are
therefore without guarantee. Legal claims,
which are made on the basis of the instruc-
tion manual, cannot thus be considered as
valid.
Notes on Safety
This Section is concerned with the basic
safety rules when working with the pres-
sure washer.
- Cleaning agent container with nozzle
- Nozzle cleaning pin
The diagram of the most im-
portant functional elements
can be found on the foldout
side.
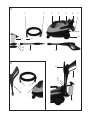
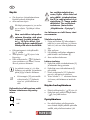
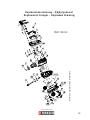
Overview
A
1 High-pressure connection on the
gun side
2 High-pressure connection on the
washer side
3 High-pressure connection
4 Carrying handle
5 ON / OFF switch
6 Accessories holder
7 Power supply cable
8 Water connection with sieve in-
sert (not visible)
9 Chassis
10 Gun
11 Jet lance
13 High-pressure nozzle
14 Cleaning agent container with
nozzle
15 Nozzle cleaning pin
Functional description
The pressure washer is to be used for
washing with a high-pressure water jet. A
detergent can be added if this is required.
For the functions of the operating elements
please refer to the subsequent description.
Ensure that the safety instructions are al-
ways observed!

6
GB IE
Explanation of symbols
Attention!
Before beginning work, familiarise
yourself thoroughly with all the op-
erating elements, particularly with
how they function and operate. Ask
a specialist if necessary.
Attention: Remove the plug from the
socket as soon as the power lead is
damaged or cut.
The pressure washer is not suitable
for direct connection to the drinking
water supply system.
CAUTION. pressure wash-
ers can be dangerous if
they are not operated cor-
rectly! The jet must never
be directed at people,
animals, electric equipment
connected to the power
supply or against the actual
pressure washer.
95
Information of the acoustic power
level L
WA
in dB.
Electric appliances should not be dis-
posed of in the domestic garbage.
Safety class II
Symbols in the manual
Warning symbols (the danger
can be explained at the place
of the exclamation mark)
with information on damage
and injury prevention.
Instruction symbols (the instruction
can be explained at the place of
the exclamation mark) with informa-
tion on preventing damage.
Help symbols with information on
improving tool handling.
General notes on safety
• This appliance is not intended for use
by persons (including children) with
reduced physical, sensory or mental
capabilities, or lack of experience and
knowledge, unless they have been giv-
en supervision or instruction concern-
ing use of the appliance by a person
responsible for their safety.
• Children should be supervised to en-
sure that they do not play with the ap-
pliance.
• People who are unfamiliar with the
operating instructions are not permitted
to use the equipment. The operation
of the equipment is not authorised for
people under the age of 15.
• High pressure cleaners shall not be
used by children or untrained person-
nel.
•
-
ble surface.
• The transport handle is exclusively for
transporting the equipment. The equip-
ment is portable but not to be carried
during operation.
•
For your safety, it is recommended that
you wear safety glasses, safety boots
and gloves and, if necessary, ear pro-
tection.
• The device content a pressure switch
and a thermal circuit breaker. If the tem-
peratur limit is overstepping the device
switch off for reasons of safety.

7
IEGB
• In the event of a fault or defect dur-
ing operation, immediately switch off
and unplug the equipment. Then read
page 14 of the operating instructions
for possible fault causes or contact our
service centre.
Working with the equipment
Caution: to avoid accidents and
injuries:
CAUTION. pressure wash-
ers can be dangerous if
they are not operated cor-
rectly! The jet must never
be directed at people,
animals, electric equipment
connected to the power
supply or against the actual
pressure washer.
• Do not direct the jet at yourself or oth-
ers in order to clean clothes and shoes.
• Do not operate the pressure washer
when other people are in the immedi-
ate vicinity, other than they are also
wearing protective clothes.
• Always use the spray gun with both
hands. This will enable you to safely
counter the recoil force from the emerg-
ing water jet.
• Take appropriate measures to keep
children away from the equipment
whilst it is running.
• Dispose of the packaging material cor-
rectly.
• Do not use the equipment in the vicinity
or explosion.
• Do not spray combustible liquids. Risk
of explosion.
• Store the equipment in a dry place and
out of reach of children.
• Children must be supervised in order
to ensure that they do not play with the
equipment.
• Ensure that no exhaust emissions occur
within the vicinity of air inlets.
Caution! To avoid damage to the
equipment and any possible
person injury resulting from this:
• Do not work with damaged or incom-
plete equipment, or with equipment
that has been converted without the
approval of the manufacturer. Before
initial operation, have a specialist
check that the required electrical pro-
tection measures are in place.
• Never operate the pressure washer if
the power supply cable or other impor-
tant parts, such as the high-pressure
hose or the gun, are damaged.
• Protect the pressure washer from frost
and dry running.
• Use only original accessories and do
not carry out conversion work on the
equipment.
• Please read the notes in the operating
instructions on the topic of “mainte-
nance and cleaning”. Any measures
above and beyond these, particularly
opening the equipment, are to be car-
ried out by an electrician. In the case
of repairs, always contact our service
centre.
• The washer was designed for opera-
tion with a neutral detergent based on
a biologically decomposable anionic
tenside. Other detergents or chemical
substances could impair the safety of
the washer and damage it.
• If you come into contact with cleaning
agents, rinse with plenty of clean wa-
ter.

8
GB IE
• If the power cable for this equipment is
damaged, it must be replaced by the
manufacturer, a customer service agent
-
son in order to prevent hazards.
• Do not pull the plug from the socket by
the cable. Protect the cable from heat,
oil and sharp edges.
the cable.
• Use only extension cables that are pro-
tected from spray water and designed
for outdoor use. Always fully unroll a
cable drum before use. Check the ca-
ble for damage.
• Before any work on the equipment,
during work breaks and in the case
of non-use, remove the plug from the
socket.
• The machine shall be disconnected
from its power source during cleaning
or maintenance and replacing parts or
conerting the machine to another func-
tion.
• The cross-section of the power supply
cable must not be less than 2 x 2,5
mm².
• Wear sturdy footwear to protect
against electric shock.
Start-up
In keeping with current regulations
a pressure washer must never be
operated off the drinking water
mains supply without a controlla-
with EN 12729 type BA must be
used.
• Water that has passed through a back-
-
able.
couplings are important for machine
safety. Use only high-pressure hoses,
the manufacturer.
• To ensure machine safety, use only
original replacement parts from the
manufacturer or replacement parts au-
thorised by the manufacturer.
Electrical safety:
Caution: to avoid accidents and
injuries from electric shocks:
• The plug and socket of an extension
cable must be water-tight!
Unsuitable extension cables can
be dangerous as people can be
harmed by an electric shock!
• Protect the electric plug connections
against moisture.
plug connections in an area that is safe
• Ensure that the mains voltage matches
• The electrical installation shall be ac-
cording to national wiring rules.
• Connection to the mains must be car-
ried out by an experienced electrician
and meet the requirements of IEC
60364-1.
• The device must only be connected to
a mains socket via a residual-current
circuit breaker (RCD) with a rated leak-
Fuse: at least 13 ampere.
• Before each use, check the equipment,
cable and plug for damage.

9
IEGB
from specialist retailers.
• Employ an ordinary garden hose for
length.
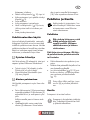
Setting up
B
• Screw the equipment side of the
high-pressure hose connection
(2) to the high-pressure hose con-
nection (3) on the equipment.
• Screw the gun side of the high-
pressure hose connection (1) to
the spray gun (10)
• Establish the water supply by
connecting the rapid-action wa-
ter supply connector to the water
connection with sieve insert (8).
C
• Connect to the spray gun (10)
by inserting and screwing in the
jet tube (11).
in with the jet pipe (11) to con-
nect either the adjustable fan
nozzle (12) or the high pressure
nozzle (13).
Screw in to connect the deter-
gent container with nozzle (14)
directly to the spray gun (10).
With using the cleaning agent
container with the nozzle (
A
14), pour only cleaning agent
into the container. It is sucked in
automatically.
The width of the jet can be increased by
turning the end of the nozzle to the left. To
reduce the width of the jet, turn the end of
the nozzle to the right.
Mains connection
The pressure washer you have acquired is
-
sure washer must only be connected to an
earthed socket 230 V ~ 50Hz.
Only operate the pressure washer
after all the above points have been
observed.
• Ensure that the pressure washer is
turned off by its ON / OFF switch (
A
5).
• Insert the mains plug into the mains
socket
Operation
• Connect the equipment to the water
tap. Observe the regulations for the
use of a system separator.
• Turn on the water tap entirely.
Never operate the pressure washer
with a closed water tap. Dry run-
ning will damage the washer!
Be prepared for the recoil
force of the emitted wa-
ter jet! Ensure that you are
are holding the gun (
A
5)
securely, otherwise you could
injure yourself or other peo-
ple.
• Switch on the pressure washer with the
ON / OFF switch (
A
5).
• Pull the lever of the gun (
A
10) to turn
on the washer.
• Hold the switch-on lever of the gun
(
A
10) until there is no more air in the
pressure washer.

10
GB IE
Releasing the lever will switch
off the washer, but the pressure
within the system is retained.
D
• Lock / unlock the switch-on lever
of the gun (10) by depressing
the locking button (17).
Lock the switch-on lever to prevent
the pressure washer from being in-
advertently / accidentally started.
Locked
Open
In case of leaks in the water
system, immediately switch
off the equipment at the on/
off switch (5) and disconnect
the mains cable (7) of the
equipment from the mains.
There is a risk of electric
shock. Start restoring the wa-
ter connections (see “Initial
Operation – Setup”).
If there is still air in the equipment,
please proceed as follows:
Bleed the supply hose:
1. Remove the quick connection for the
garden hose adapter on the water
connection (8) and open the water tap
until water with no bubbles emerges.
2. Close the water tap.
3. Connect the supply hose to the equip-
ment with the aid of the quick connec-
tion for the garden hose adapter (8).
4. Fully open the water tap.
Bleed the equipment:
5. Switch on the equipment at the on/off
switch (5) until the pressure has built
up.
6. Switch off the equipment at the on/off
switch (5).
7. Depress the start lever on the spray
gun (10) until the pressure is released.
8. Please repeat steps 5. to 7. several
times until there is no further air in the
equipment.
Interrupting operation
• Release the lever of the gun (
A
10).
• During prolonged work intervals turn
off the washer by its ON / OFF switch
(
A
5).
Ending operation
• After working with cleaning agents,
run the equipment with clean water to
completely rinse the cleaning agent
from the pipes.
• Release the lever of the gun (
A
10).
• Turn off the pressure by its ON / OFF
switch (
A
5).
• Turn off the water tap.
• Disconnect the pressure washer from
the water mains.
• Pull the lever of the gun (
A
10) to vent
the pressure existing within the system.
• Disconnect the mains plug.
Using detergents
The washer was designed for operation
with a neutral detergent based on a bio-
logically decomposable anionic tenside.
Other detergents or chemical substances
could impair the safety of the washer and
damage it.

11
IEGB
E
Fixing the Wheels
The back wheels on the chassis (9) can be
-
er against undesired rolling away.
• To do this push the two bolts (16) out-
wards and downwards.
The wheels are now no longer able to
turn.
two bolts (16) upwards.
F
Removing the Chassis
The pressure washer can also be used
without the chassis (9).
• Press the release button (18) on the
front locking point. Hold the chassis (9)
securely in the front area and pull the
pressure washer upwards.
At the same time, tilt the pressure
washer slightly to the rear.
• To reinstate, insert the device into the
rear area of the chassis (9). Push down
on the device down and press the re-
lease button (18) at the same time. The
device clicks into the chassis.
Cleaning and Mainte-
nance
Pull out the power plug before
every maintenance operation. There
is a risk of electrocution or of injury
from moving parts.
Cleaning
Never direct the water jet
against the washer, nor clean
water. This could give rise to
the danger of electric shock
and damage the washer! .
Always keep the washer clean. Do
not use any detergents or solvents.
• Always keep the ventilation slots clean
and free.
• Only clean the pressure washer with a
soft brush or a slightly moist cloth.
• In case a nozzle of the jet tube
(12/13) is clogged up, use the nozzle
cleaning pin (15) to remove the object
from the nozzle.
G
If necessary, take off the water con-
Maintenance
The pressure washer is maintenance free.
Ask our service centre to carry out
any work that is not described in
these instructions. Use only original
parts.
Storage
• Drain all the water from the pressure
washer. Disconnect the unit from the
water supply. Press the On/Off switch
(
A
5) to turn on the pressure washer
for no longer than 1 minute until no
more water escapes from the high-
pressure connection (
A
5). Turn off the
unit.

12
GB IE
• Protect the pressure washer and its ac-
cessories from frost when they have not
been completely drained of all water.
• Store the pressure washer and its ac-
cessories in a frost-free room.
•
To transport or put away the equip-
ment, use only the carrying handle.
•
Store the equipment only in a horizon-
tal position in order to protect it from
any damage.
Waste Disposal and En-
vironmental Protection
Be environmentally friendly. Return the
tool, accessories and packaging to a recy-
them.
Electric appliances should not be dis-
posed of in the domestic garbage.
Hand the tool in at a recycling centre. The
plastics and metal parts can be separated
and recycled. Ask your Service Center about
this.
We can carry out a waste disposal of your
device free of charge.
Guarantee
Dear Customer,
This equipment is provided with a 3-year
guarantee from the date of purchase.
In case of defects, you have statutory rights
against the seller of the product. These
statutory rights are not restricted by our
guarantee presented below.
Terms of Guarantee
The term of the guarantee begins on the
date of purchase. Please retain the original
receipt. This document is required as proof
of purchase.
If a material or manufacturing defect
occurs within three years of the date of
purchase of this product, we will repair or
replace – at our choice – the product for
you free of charge. This guarantee requires
the defective equipment and proof of pur-
chase to be presented within the three-year
period with a brief written description of
what constitutes the defect and when it oc-
curred.
If the defect is covered by our guarantee,
you will receive either the repaired product
or a new product. No new guarantee pe-
riod begins on repair or replacement of the
product.
Guarantee Period and Statutory
Claims for Defects
The guarantee period is not extended by
the guarantee service. This also applies for
replaced or repaired parts. Any damages
and defects already present at the time of
purchase must be reported immediately af-
ter unpacking. Repairs arising after expiry
of the guarantee period are chargeable.
Guarantee Cover
The equipment has been carefully pro-
duced in accordance with strict quality
guidelines and conscientiously checked
prior to delivery.
The guarantee applies for all material and
manufacturing defects. This guarantee
does not extend to cover product parts that
are subject to normal wear and may there-
fore be considered as wearing parts (e.g.
to breakable parts (e.g. switches, batteries,
or parts made of glass).
This guarantee shall be invalid if the prod-
uct has been damaged, used incorrectly or
not maintained. Precise adherence to all of

13
IEGB
manual is required for proper use of the
product. Intended uses and actions against
which the operating manual advises or
warns must be categorically avoided.
The product is designed only for private
and not commercial use. The guarantee
will be invalidated in case of misuse or
improper handling, use of force, or inter-
ventions not undertaken by our authorised
service branch.
Processing in Case of Guarantee
To ensure quick handling of you issue,
please follow the following directions:
• Please have the receipt and item
number (e.g. IAN 12345) ready as
proof of purchase for all enquiries.
rating plate, an engraved plate on the
front page of your manual (bottom left)
or as a sticker on the back or bottom.
• Should functional errors or other de-
fects occur, please initially contact the
by telephone or by e-mail. You will
then receive further information on the
processing of your complaint.
• After consultation with our customer
service, a product recorded as defec-
tive can be sent postage paid to the
service address communicated to you,
with the proof of purchase (receipt)
the defect and when it occurred. In or-
der to avoid acceptance problems and
additional costs, please be sure to use
only the address communicated to you.
Ensure that the consignment is not sent
carriage forward or by bulky goods,
express or other special freight. Please
send the equipment inc. all accessories
supplied at the time of purchase and
ensure adequate, safe transport pack-
aging.
Repair Service
For a charge, repairs not covered by the
guarantee can be carried out by our serv-
ice branch, which will be happy to issue a
cost estimate for you.
We can handle only equipment that has
been sent with adequate packaging and
postage.
Attention: Please send your equipment to
our service branch in clean condition and
with an indication of the defect.
Equipment sent carriage forward or by
bulky goods, express or other special
freight will not be accepted.
We will dispose of your defective devices
free of charge when you send them to us.
Service-Center
Service Great Britain
Tel.: 0871 5000 720
(£ 0.10/Min.)
E-Mail: [email protected]
IAN 88055
Service Ireland
Tel.: 1890 930 034
(0,08 EUR/Min., (peak))
(0,06 EUR/Min., (off peak))
E-Mail: [email protected]
IAN 88055
Service Branch
Please note that the following address is
not a service address. Please initially con-
DES UK Ltd.
Unit B7
Oxford Street Industrial Park
Vulcan Road
Bilston, West Midlands WV14 7LF
IE
GB
IEGB

14
GB IE
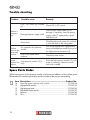
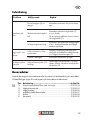
Trouble shooting
Problem Possible cause Remedy
Washer is
not opera-
ting
ON / OFF switch (5) is turned
off
Check ON / OFF switch
Damaged power supply cable
Check power supply cable (7) for
damage. If necessary have the power
supply cable (7) replaced by a quali-
Mains fault
Check the electrical system for conformi-
ty with the data on the rating plate.
Washer
does not ge-
nerate any
pressure
Air trapped in the pressure
washer
Turn on the washer with high-pressure
the high-pressure connection (3).
Drop in the water mains
pressure
Check the water mains.
Severe
-
tuations
High-pressure nozzle (13) is
dirty
Rinse the high-pressure nozzle (13) with
water. If necessary clean the nozzle
hole with a needle.
Spare Parts Order
When buying parts for the pressure washer, use the service address or fax number given.
Please enter your machine type and the product number of the part you are ordering.
Item Description .......................................................... Product No.
14 Cleaning agent container with nozzle ...................................91096764
13 High-pressure nozzle ...........................................................91096765
1-2 High-pressure hose ..............................................................91096766
......................................................91096767
11
Jet lance ............................................................................ 91096768
10 Gun ..................................................................................91096769

15
FI
Alkusanat
Onnittelumme uuden laitteen ostollesi.
Olet valinnut laadukkaan tuotteen. Käyt-
töohje on tuotteeseen kuuluva osa. Se
sisältää tärkeitä turvallisuuteen, käyttöön
ja laitteen hävittämiseen liittyviä ohjeita.
Tutustu käyttö- ja turvallisuusohjeisiin ennen
tuotteen käyttöönottoa. Käytä tuotetta vain
ohjeiden mukaisesti ja vain sille tarkoitet-
tuun käyttöön.
Pidä käyttöohje tallessa ja luovuta kaikki
asiakirjat laitteen mukana seuraavalle käyt-
täjälle.
Käyttö
Tämä painepesuri on tarkoitettu vain yksi-
tyiseen käyttöön:
• koneiden, ajoneuvojen, rakennelmien,
työkalujen, julkisivujen, terassien, puutar-
hatyökalujen ym. puhdistukseen
• alkuperäisillä tarvikkeilla ja varaosilla
• puhdistettavan välineen valmistajan anta-
mien ohjeiden mukaan
Yleinen kuvaus
Toimituksen laajuus
Poista laite pakkauksesta ja tarkista
toimituksen sisältö.
- Painepesuri ja sähköjohdot
- Alusta
- Ruiskutuspistooli
- Paineletku
- Teräsputki
- Säädettävä laakasädesuutin
- Painesuutin
- Puhdistusaineastia ja suutin
- Suuttimen puhdistusneula
Sisältö
Alkusanat ..................................15
Käyttö
.......................................15
Yleinen kuvaus
..........................15
Toimituksen laajuus
.........................15
Yleistiedot
.....................................16
Toiminta
........................................16
Tekniset tiedot
...........................16
Tur vallisuusohjeet
......................16
Symbolien ja turvallisuusohjeiden
selitys
..........................................16
Ohjeessa olevat symbolit
............... 17
Yleiset turvallisuusmääräykset
.........17
Asennusohje
..............................19
Kokoaminen.................................19
Sähköliitäntä
................................19
Käyttö
.........................................20
Käytön keskeyttäminen
.................. 20
Pysäyttäminen
..............................20
Puhdistusaineiden käyttö................21
Pyörien kiinnitys
...........................21
Alustan poistaminen ...................21
Puhdistus ja Huolto ....................21
Puhdistus
.....................................21
Huolto
.........................................21
Häiriöt - Syyt - Apu
....................22
Varaosatilaus
.............................22
Säilytys
......................................23
Jätehuolto ja ympäristösuoja
.....23
Takuu
........................................23
Korjaus-huolto
...........................24
Service-Center
............................24
Asiakaspalvelu
..........................24
Alkuperäisen CE yhdenmu-
kaisuustodistuksen käännös
......51
Räjäytyskuvat
............................ 53

16
FI
Maks. sallittu paine p ..10 MPa (100 bar)
Syöttömäärä, vesi
...................... 5 l/min
Max. syöttömäärä, vesi ............ 6,6 l/min
Äänen painetaso
(L
pA) ...............78 dB(A); KpA=3,0 dB(A)
Äänitehotaso (L
WA)
mitattu
.......... 88,8 dB(A); KWA=3,0 dB(A)
taattu
....................................... 95 dB (A)
Värinä (an) ..........0,7 m/s
2
; K=0,15 m/s
2
Käyttöolosuhteet mittauksen aikana ja mittauk-
sessa käytetyt menettelyt
EN 60335-2-79:2009.
Teknisiä ja ulkonäköä koskevia muutoksia
laitteen kehityksen suhteen voidaan tehdä
ilmoittamatta niistä etukäteen. Kaikki tässä
käyttöohjeessa annetut mitat, viitteet ja
tiedot ovat ilman takuuta. Käyttöohjeesta
poikkeavia muutosvaatimuksia ei voida
hakea oikeusteitse.
Turvallisuusohjeet
Tämä luku käsittelee olennaisia turvallisuus-
ohjeita painepesurilla työskennellessä.
Symbolien ja turvallisuusoh-
jeiden selitys
Huomio!
Ennen kuin teet töitä uppopumpulla,
ota ensin selvää sen kaikista osista,
erikoisesti sen toiminnoista ja vaiku-
tuksista. Tarvittaessa hae apua am-
mattimieheltä.Lue käyttöohje ja ota
huomioon siinä olevat viitteet!
Huomio! Vedä pistoke pistorasiasta
heti, jos voimakaapeli on vioittunut
tai mennyt poikki.
Tärkeimpien osien kuvat ovat
takasivulla.
Yleistiedot
A
1 Paineliitäntä, pistoolin puolinen
2 Paineliitäntä, laitteen puolinen
3 Paineliitäntä
4 Kantokahva
5 Virtakytkin
6 Tarvikkeiden pidike
7 Sähköjohto
8 Vesiliitäntä ja sihti ( ei näkyvissä)
9 Alusta
10 Ruiskutuspistooli
11 Teräsputki
12 Säädettävä laakasädesuutin
13 Painesuutin
14 Puhdistusaineastia ja suutin
15 Suuttimen puhdistusneula
Toiminta
Painepesurilla puhdistaessa ruiskutetaan
vettä paineella.
Tarpeen vaatiessa voidaan siihen lisätä
myös puhdistuaineita.
Käyttöoelementtien toiminta esitetään seu-
raavissa kuvauksissa. Noudata turvallisuus-
ohjeita.
Tekniset tiedot
Painepesuri ................ PHD 100 C2
Tulojännite
........................230V~, 50 Hz
Virransaanti
.............................. 1450 W
Yläkahva......................................... 5 m
Paino (sis. kaikki osat)................... 6,1 kg
Suojaluokka
....................................
II
Kotelointiluokka
...............................IPX5
Tulolämpötila T maks.
.................... 40°C
Tulopaine p maks.
...........0,8 MPa (8 bar)
Työpaine p
......................7 MPa (70 bar)

17
FI
Laite ei sovellu liitettäväksi juomave-
siverkkoon.
Painepesurit voivat olla vaa-
rallisia jos niitä käytetään
asiattomasti. Vesisuihkua ei
saa suunnata ihmisiin, eläi-
miin eikä aktiivisiin sähkölait-
teisiin tai laitteeseen itse.
95
Äänitehotasolukema L
WA
dB:nä
Sähkölaitteet eivät kuulu talousjättei-
siin.
Suojaluokka II
Ohjeessa olevat symbolit
Vaaraan viittaavat merkit
henkilö- ja ainevahinkojen
välttämiseksi.
Kieltomerkit (huutomerkin asemasta
kielto selitetään) ja tiedot vahinkojen
estämiseksi.
Viitemerkit laitteen käytön helpotta-
miseksi.
Yleiset turvallisuusmääräyk-
set
• Tätä laitetta ei ole tarkoitettu sellaisten
henkilöiden (lapset mukaan luettuina)
käytettäväksi, joilla on rajoittuneet fyy-
siset, sensoriset tai henkiset valmiudet
tai joilta puuttuu kokemus ja tieto lait-
teen käytöstä, paitsi jos heitä valvoo
heidän turvallisuudestaan vastuussa
oleva henkilö tai jos he saavat opastus-
ta laitteen käytössä.
• Lapsia tulee valvoa sen varmistamisek-
si, etteivät he leiki tällä laitteella.
• Henkilöt, jotka eivät ole tutustuneet
käyttöohjeeseen, eivät saa käyttää lai-
tetta. Laitteen käyttö alle 15-vuotiaille
henkilöille on kielletty.
• Käytä painepesuria ainoastaan tasai-
sella ja kestävällä alustalla.
• Kuljetuskahva on tarkoitettu ainoastaan
laitteen kuljettamiseen. Laitetta voi siir-
tää paikasta toiseen, mutta sitä ei saa
kantaa käytön aikana.
• Turvallisuutesi vuoksi on suositeltavaa
käyttää suojalaseja, turvakenkiä ja kä-
sineitä sekä tarvittaessa kuulosuojia.
• Mikäli laitteessa esiintyy käytön aikana
häiriö tai vika, täytyy laite kytkeä välit-
tömästi pois päältä ja irrottaa pistoke
pistorasiasta. Etsi sitten käyttöohjeen
sivulta 22 häiriön mahdollinen syy tai
ota yhteyttä Service-keskukseemme.
Laitteella työskentely
Varo: Vältyt tapaturmilta ja louk-
kaantumisilta:
Painepesurit voivat olla vaa-
rallisia jos niitä käytetään
asiattomasti. Vesisuihkua ei
saa suunnata ihmisiin, eläi-
miin eikä aktiivisiin sähkölait-
teisiin tai laitteeseen itse.
• Älä koskaan suuntaa vesisuihkua it-
seesi tai muihin henkilöihin esimrkiksi
puhdistamaan vaatteita tai kenkiä.
• Älä käytä laitetta, jos lähettyvillä on
henkilöitä, paitsi jos heillä on suojava-
rusteet päällä.
• Käytä ruiskupistoolia aina molemmin
käsin. Siten hallitset voimakkaasta ve-
sisuihkusta ulostulevan suihkun voiman.

18
FI
• Suorita erityiset toimenpiteet pitämään
laite lapsilta ulottumattomissa.
• Jätehuolla pakkausmateriaali asianmu-
kaisesti.
• Älä käytä laitetta syttyvien nesteiden
tai kaasujen lähettyvillä. Noudattamat-
tomuus aiheuttaa palo- ja räjähdysvaa-
ran.
•
Älä sumuta syttyviä nesteitä. Räjähdys-
vaara
• Säilytä laite kuivassa paikassa ja lap-
silta ulottumattomissa.
• Lapsia täytyy valvoa ja varmistaa, ett-
eivät he leiki laitteella.
• Tarkista, ettei aukkojen kohdalla synny
kaasumaisia päästöjä.
Varo! Näin vältät laitteen vahin-
goittumisen ja mahdollisesti siitä
seuraavat henkilövahingot:
• Älä työskentele viallisella, epätäydelli-
sellä tai ilman valmistajan erityistä lu-
paa muutetulla laitteella. Anna ennen
käyttöä ammattimiehen tarkistaa, että
kaikki vaaditut sähköä koskevat turva-
toimenpiteet ovat käytettävissä.
• Älä ota laitetta käyttöön, jos laitteen säh-
köjohto tai jokin muu tärkeä johdon tai
letkun osa on viallinen.
• Suojaa laite pakkaselta ja tyhjäkäynnil-
tä.
• Käytä vain alkuperäisiä varaosia, älä
tee laitteeseen mitään muutoksia.
• Lue käyttöohjeen kappale „Huolto ja
puhdistus“ ja noudata siinä annettuja
ohjeita. Kaikki muuta toimenpiteet,
erityisesti laitteen avaamisen saa suo-
rittaa vain sähköalan ammattimies.
Käänny korjaustapauksissa huoltokes-
kuksemme puoleen.
• Laite on kehitetty käytettäväksi neut-
raalin, biologisesti häviävän anioniisia
tensiidejä sisältävän puhdistusaineen
kanssa. Muiden puhdistusaineiden tai
kemiallisten aineiden käyttö voi vaikut-
taa negatiivisesti laitteen toimintaan ja
aiheuttaa vikoja siihen.
• Jos joudut kosketuksiin puhdistusainei-
den kanssa, niin huuhtele aine pois juok-
sevan veden alla.
• Erottimen läpi virtaava vesi katsotaan
sopimattomaksi juomavedeksi.
• Korkeapaineletkut, armatuurit ja kytki-
met ovat tärkeitä koneen turvallisuuden
kannalta. Käytä ainoastaan valmistajan
hyväksymiä letkuja, armatuureja ja kytki-
miä.
• Käytä koneen turvallisuuden vuoksi vain
valmistajan omia tai valmistajan hyväk-
symiä alkuperäisiä varaosia.
Sähköä koskeva turvallisuus:
Varo: Näin vältyt sähköiskusta ai-
heutuvilta tapaturmilta ja loukkaan-
tumisilta:
• Jos käytät jatkokaapelia, täytyy pistok-
keen ja kytkimen olla roiskesuojatut.
Sopimattomat jatkokaapelit voivat
olla vaarallisia. Uhkaava tapatur-
ma- ja sähköiskuvaara.
• Suojaa pistokkeet kosteudelta.
• Tulva-alueilla tulee liitokset asentaa
tulvalta varmaan paikkaan.
• Tarkista, että virtajännite vastaa tyyppi-
kilvessä annettua arvoa.
• Verkkoliitännän saa suorittaa pätevyyden
omaava sähköasentaja, IEC 60364-1
vaatimukset tulee täyttää.
• Kytke laite ainoastaan vikavirtasuojat-
tuun pistorasiaan, jonka nimellisvuoto-
virta ei saa olla ylittää 30 mA. Sulak-
keet vähintään 6 amperia.

19
FI
• Ruuvaa pistoolin puoleinen (1)
korkeapaineliitos ruiskupistooliin
(10)
• Liitä vesiverkon pikaliitin laitteen
vedensaannin sihdilliseen liitoskoh-
taan (8).
C
• Liitä teräsputki (11) pistooliin (10)
napsauttamalla ja kiertämällä se
paikalleen
• Kun suihkuputki (11) on asennettu
paikalleen, kierrä joko säädettävä
laakasuihkusuutin (12) tai korkea-
painesuihku (13) kiinni suihkuput-
keen (11).
Puhdistusainesäiliö suuttimineen (
A
14) liitetään suoraan pistooliin
(10).
Jos otat käyttöön puhdistusaine-
astian ja suuttimen täytyy astia
täyttää pesuaineella. Pesuaine
imetään automaattisesti.
Kiertämällä suuttimen kärkeä vasemmalle
voit suurentaa ruiskun leveyttä. Kiertämällä
suuttimen kärkeä oikealle, se kapenee.
Sähköliitäntä
Ostamaasi painepesuriin on asennettu pis-
toke. Painepesuri on tarkoitettu liitettäväksi
230 V ~ 50Hz suko-pistorasiaan.
Ota laite käyttöön vasta sen jälkeen
kun kaikki edellä mainitut pisteet on
otettu huomioon.
• Tarkista, että painepesuri on kytketty
virtakytkimestä (
A
5) päältä pois.
• Pistä pistoke pistorasiaan.
• Jos tämän laitteen liitäntäjohto vioittuu,
valmistaja tai asiakaspalvelu tai muu
ammattitaitoinen henkilö korvaa sen
erityisellä liitäntäjohdolla, jotta ei syn-
ny vaaratilanteita.
• Älä vedä kaapelista, kun aiot irrottaa
pistokkeen pistorasiasta. Suojaa kaa-
peli kuumuudelta, öljyltä ja teräviltä
reunoilta.
• Älä kanna laitetta kaapelista tai ripusta
sitä kaapeliin.
• Käytä vain roiskesuojattua ja ulkotiloi-
hin hyväksyttyä lisäkaapelia. Kelaa
kaapeli kaapelirummusta kokonaan
ulos. Tarkista kaapelin kunto.
• Irrota pistoke pistorasiasta aina, kun
pidät tauon tai et käytä laitetta.
• Sähköjohtojen poikkileikkauksien täytyy
olla 2 x 2,5 mm².
• Käytä tukevia kenkiä sähköiskun estämi-
seksi.
Asennusohje
Voimassa olevien määräysten mu-
kaan painepesuria ei koskaan saa
liittää tavalliseen vesijohtoon ilman
järjestelmän erotinlaitetta. Käytä
EN 12729 tyypiltään BA mukaista
erotinlaitetta.
Erottimen läpi virtaava vesi katsotaan sopi-
mattomaksi juomavedeksi.
Järjestelmäerottimen voi hankkia rau-
takaupasta.
Käytä tavanomaista ja sopivan pituista puu-
tarhatarvikkieista saatavaa vesiletkua.
Kokoaminen
B
• Ruuvaa laitteen puoleinen kor-
keapaineliitos (2) laitteen liitäntä-
kohtaan (3).

20
FI
Käyttö
• Ota huomioon järjestelmäerottimen
käyttöä koskevat määräykset.
• Avaa vesihana täysin
Älä käytä painepesuria, jos vesiha-
na on suljettu. Tyhjäkäynti rikkoo
laitteen.
Varo vesisuihkun takapotku-
voimaa. Varmista, että seisot
tukevasti ja pidät pistoolis-
ta (
A
10) hyvin kiinni. Voit
muuten loukata mahdollisesti
lähettyvillä olevia henkilöitä.
• Kytke painepesuri virtakytkkimellä
(
A
5) päälle.
• Vedä pistoolin (
A
10) vipua. Laite
käynnistyy.
• Pidä ruiskupistoolin (
A
10) kytkentä-
vipua painettuna niin kauan, kunnes
ilma on poistunut laitteesta.
Jos päästät vivusta irti, niin laite
kytkeytyy pois päältä. Järjestelmän
paine pysyy kuitenkin laitteessa.
D
• Lukitusnappia (10) painamalla
ruiskupistoolin (17) kytkentä-
vipua voi pitää lukittuna tai
auki.
Kytkentävivun lukitseminen estää
laitteen tahattoman käynnisty-
misen.
lukittu
auki
Jos vesijärjestelmässä on
vuoto, kytke silloin laite heti
pois päältä virtakoskettime-
sta (5) ja vedä pistoke irti pi-
storasiasta (7). Vaara saada
sähköisku! Tee vesiliitokset
uudestaan. (katso kohta
„Käyttöönotto – Pystytys“)
Jos laitteessa on vielä ilmaa, toimi
seuraavasta:
Tuloletkun tuuletus:
1. Poista vesiliitoksen (8) letkuadapterin
pikaliitin ja avaa vesihana, ja juoksuta
vettä niin, että vesi tulee kuplattomana
ulos.
2. Sulje vesihana.
3. Liitä tuloletku vesiliitoksen adapeterin
pikaliittimellä vesiliitokseen (8).
4. Avaa vesihana kokonaan.
Laitteen tuuletus:
5. Kytke laite päälle virtakoskettimesta (5),
ja laitteeseen kertyy painetta.
6. Kytke laite taas virtakoskettimesta (5)
pois päältä.
7. Paina ruiskupistoolin (10) kytkentävi-
pua niin, että paine on poistunut.
8. Toista kohdat 5. - 7. muutaman kerran
niin kauan, että laitteessa ei enää ole
ilmaa.
Käytön keskeyttäminen
• Päästä suihkupistoolin (
A
10) vipu irti.
• Kytke laite pois päältä virtakytkimestä
(
A
5), kun pidät taukoa.
Pysäyttäminen
• Kun olet käyttänyt puhdistusaineita,
anna laitteen käydä pelkällä puhtaalla
vedellä, että puhdistusainetta ei jää
Seite wird geladen ...
Seite wird geladen ...
Seite wird geladen ...
Seite wird geladen ...
Seite wird geladen ...
Seite wird geladen ...
Seite wird geladen ...
Seite wird geladen ...
Seite wird geladen ...
Seite wird geladen ...
Seite wird geladen ...
Seite wird geladen ...
Seite wird geladen ...
Seite wird geladen ...
Seite wird geladen ...
Seite wird geladen ...
Seite wird geladen ...
Seite wird geladen ...
Seite wird geladen ...
Seite wird geladen ...
Seite wird geladen ...
Seite wird geladen ...
Seite wird geladen ...
Seite wird geladen ...
Seite wird geladen ...
Seite wird geladen ...
Seite wird geladen ...
Seite wird geladen ...
Seite wird geladen ...
Seite wird geladen ...
Seite wird geladen ...
Seite wird geladen ...
Seite wird geladen ...
Seite wird geladen ...
Seite wird geladen ...
Seite wird geladen ...
Seite wird geladen ...
-
 1
1
-
 2
2
-
 3
3
-
 4
4
-
 5
5
-
 6
6
-
 7
7
-
 8
8
-
 9
9
-
 10
10
-
 11
11
-
 12
12
-
 13
13
-
 14
14
-
 15
15
-
 16
16
-
 17
17
-
 18
18
-
 19
19
-
 20
20
-
 21
21
-
 22
22
-
 23
23
-
 24
24
-
 25
25
-
 26
26
-
 27
27
-
 28
28
-
 29
29
-
 30
30
-
 31
31
-
 32
32
-
 33
33
-
 34
34
-
 35
35
-
 36
36
-
 37
37
-
 38
38
-
 39
39
-
 40
40
-
 41
41
-
 42
42
-
 43
43
-
 44
44
-
 45
45
-
 46
46
-
 47
47
-
 48
48
-
 49
49
-
 50
50
-
 51
51
-
 52
52
-
 53
53
-
 54
54
-
 55
55
-
 56
56
-
 57
57


Parkside PHD 100 C2 Translation Of Original Operation Manual
- Typ
- Translation Of Original Operation Manual
in anderen Sprachen
- English: Parkside PHD 100 C2
- svenska: Parkside PHD 100 C2
- suomi: Parkside PHD 100 C2
Verwandte Artikel
-
Parkside PHD 100 C2 Translation Of Original Operation Manual
-
-
Parkside PHD 100 B2 Translation Of Original Operation Manual
-
-
-
Parkside PHD 150 A1 Bedienungsanleitung
-
Parkside PHD 100 A1 Bedienungsanleitung
-
Parkside PHD 150 G4 Translation Of The Original Instructions
-
-
Parkside PHD 100 D2 - IAN 63638 Bedienungsanleitung