Zanussi ZTB276 Benutzerhandbuch
- Kategorie
- Wäschetrockner
- Typ
- Benutzerhandbuch

User manual
Exhaust Dryer
Benutzer-
information
Ablufttrockner
ZTB 276

Contents
Important safety information _ _ _ _ _ _ _ _ _ _ _ _ 2
Product description _ _ _ _ _ _ _ _ _ _ _ _ _ _ _ _ 4
Control panel _ _ _ _ _ _ _ _ _ _ _ _ _ _ _ _ _ _ _ _ 4
Before first use _ _ _ _ _ _ _ _ _ _ _ _ _ _ _ _ _ _ _ 5
Sorting and preparing laundry _ _ _ _ _ _ _ _ _ _ _ 5
Programme chart _ _ _ _ _ _ _ _ _ _ _ _ _ _ _ _ _ 6
Daily use _ _ _ _ _ _ _ _ _ _ _ _ _ _ _ _ _ _ _ _ _ _ 8
Care and cleaning _ _ _ _ _ _ _ _ _ _ _ _ _ _ _ _ 10
What to do if ... _ _ _ _ _ _ _ _ _ _ _ _ _ _ _ _ _ _ 11
Machine settings _ _ _ _ _ _ _ _ _ _ _ _ _ _ _ _ _ 12
Technical data _ _ _ _ _ _ _ _ _ _ _ _ _ _ _ _ _ _ 13
Installation _ _ _ _ _ _ _ _ _ _ _ _ _ _ _ _ _ _ _ _ 13
Environment _ _ _ _ _ _ _ _ _ _ _ _ _ _ _ _ _ _ _ 15
Service _ _ _ _ _ _ _ _ _ _ _ _ _ _ _ _ _ _ _ _ _ _ 16
Subject to change without notice
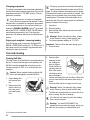
Important safety information
Important! In the interest of your safety and to
ensure the correct use, before installing and first
using the appliance, read this user manual
carefully, including its hints and warnings. To
avoid unnecessary mistakes and accidents, it is
important to ensure that all people using the
appliance are thoroughly familiar with its operation
and safety features. Save these instructions and
make sure that they remain with the appliance if it
is moved or sold, so that everyone using it through
its life will be properly informed on appliance use
and safety.
General safety
• It is dangerous to alter the specifications or attempt
to modify this product in any way.
• This appliance is not intended for use by persons
(including children) with reduced physical, sensory
or lack of experience and knowledge, unless they
have been given supervision or instruction concern-
ing use of the appliance by a person responsible for
their safety.
• Make sure that small pets do not climb into the drum.
To avoid this, please check into the drum before us-
ing.
• Any objects such as coins, safety pins, nails, screws,
stones or any other hard, sharp material can cause
extensive damage and must not be placed into the
machine.
• In order to avoid danger of fires caused by excessive
drying, do not use appliance to dry the following
items: Cushions, quilts and the like (these items ac-
cumulate heat).
• Items such as foam rubber (latex foam), shower
caps, waterproof textiles, rubber backed articles and
clothes or pillows fitted with foam rubber pads should
not be dried in the tumble dryer.
• Always unplug the appliance after use, clean and
maintenance.
• Under no circumstances should you attempt to re-
pair the machine yourself. Repairs carried out by
inexperienced persons may cause injury or serious
malfunctioning. Contact your local Service Centre.
Always insist on genuine spare parts.
• Items that have been soiled with substances such
as cooking oil acetone, petrol, kerosene, spot re-
movers, turpentine, waxes and wax removers
should be washed in hot water with an extra amount
of detergent before being dried in the tumble dryer.
•
Danger of explosion: Never tumble dry items that
have been in contact with inflammable solvents (pet-
rol, methylated spirits, dry cleaning fluid and the
like). As these substance are volatile, they could
cause an explosion. Only tumble dry items washed
with water.
•
Risk of fire: items that have been spotted or soaked
with vegetable or cooking oil constitute a fire hazard
and should not be placed in the tumble dryer.
• If you have washed your laundry with stain remover
you must execute an extra rinse cycle before loading
your tumble dryer.
• Please make sure that no gas lighters or matches
have accidentally been left in pockets of garments
to be loaded into appliance
Warning! Never stop a tumble dry before the
end of the drying cycle unless all items are
quickly removed and spread out so that the heat is
dissipated. Risk of fire!
2

•
Risk of electric shock! Do not spray down the ap-
pliance with jets of water.
• The final part of a tumble dryer cycle occurs without
heat (cool down cycle) to ensure that the items are
left at a temperature that ensures that items will not
be damaged.
• Ensure you have adequate ventilation in the instal-
lation room to avoid the back flow of gases into the
room from appliances burning other fuels, including
open fires.
Installation
• This appliance is heavy. Care should be taken when
moving it.
• When unpacking the appliance, check that it is not
damaged. If in doubt, do not use it and contact the
Service Centre.
• All packing and transit bolts must be removed before
use. Serious damage can occur to the product and
to property if this is not adhered to. See relevant
section in the user manual.
• Any electrical work required to install this appliance
should be carried out by a qualified electrician or
competent person.
• Care must be taken to ensure that the appliance
does not stand on the electrical supply cable.
• If the machine is situated on a carpeted floor, please
adjust the feet in order to allow air to circulate freely.
• After having installed the appliance, check that it is
not pressing or standing on its electrical supply cable
or/and inlet hose.
• If the tumble dryer is placed on top of a washing
machine, it is compulsory to use the stacking kit
(optional accessory).
Use
• This appliance is designed for domestic use. It must
not be used for purposes other than those for which
it was designed.
• Only wash fabrics which are designed to be machine
dried. Follow the instructions on each garment label.
• Do not dry unwashed items in the tumble dryer.
• Do not overload the appliance. See the relevant
section in the user manual.
• Clothes which are dripping wet should not be placed
in the dryer.
• Garments which have been in contact with volatile
petroleum products should not be machine dried. If
volatile cleaning fluids are used, care should be tak-
en to ensure that the fluid is removed from the gar-
ment before placing in the machine.
• Never pull the power supply cable to remove the plug
from the socket; always take hold of the plug itself.
• Never use the tumble dryer if the power supply ca-
ble, the control panel, the working surface or the
base are damaged so that the inside of the tumble
dryer is accessible.
• Fabric softeners, or similar products should be used
as specified by the fabric softener instructions.
•
Caution - hot surface : Do not touch the door light
cover surface when the light is switched on.
1)
•
Hot surface: Do not touch the back of the ap-
pliance while it is operating!
Child safety
• This machine is not intended for use by young chil-
dren or infirm persons without supervision.
• Children should be supervised to ensure that they
do not play with the appliance.
• The packaging components (e.g. plastic film, poly-
styrene) can be dangerous to children - danger of
suffocation! Keep them out of children’s reach.
• Keep all detergents in a safe place out of children’s
reach.
• Make sure that children or pets do not climb into the
drum.
1) Only dryers equipped with internal drum light.
3

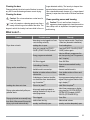
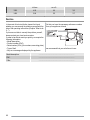
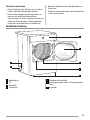
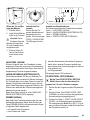
Product description
1
3
4
2
5
6
7
1 Control panel
2 Door
3 Fluff filter
4 Rating plate
5 Adjustable feet
6 Sideways vent outlets / back vent outlet
7 Ring nut
Control panel
1 2 3
45
1 Programme knob and "O" (off) switch
2 Function buttons
3 START / PAUZE (START PAUSE) button
4 STARTUITSTEL (DELAY START )button
4

5 Function status led
- delay time lights
- DROGEN (DRYING) light
- ANTI-KREUK / EINDE (END) light
- FILTER light
Before first use
In order to remove any residues which may have been
produced during production, wipe the dryer drum with
a damp cloth or carry out a brief drying cycle (ca. 30
min.) with damp cloths in the machine.
Sorting and preparing laundry
Sorting laundry
• Sort by fabric type:
–
Cotton/linen for programmes in COTTON
pro-
gramme group.
– Mixtures and synthetics for programmes in SYN-
THETICS
programme group.
• Sorting by care label. The care labels mean:
Drying in
the tumble
dryer pos-
sible in
principle
Dry at nor-
mal tem-
perature
Dry at re-
duced
tempera-
ture
(press
LAGE
TEMP.
(DELI-
CATE )
button!)
Drying in
the tumble
dryer not
possible
Important! Do not place in the appliance any wet
laundry which is not specified on the care label as being
suitable for tumble-drying.
This appliance can be used for all wet laundry items
which are labelled as suitable for tumble-drying.
• Do not dry new, coloured textiles together with light-
coloured laundry items. Textile colours may bleed.
• Do not dry cotton jersey and knitwear with the EX-
TRA programme. Items may shrink!
Preparing laundry
• To avoid laundry becoming tangled: close zips, but-
ton up duvet covers and tie loose ties or ribbons (e.g.
of aprons).
• Empty pockets. Remove metal items (paper clips,
safety pins, etc).
• Turn items with double-layered fabrics inside out
(e.g. with cotton-lined anoraks, the cotton layer
should be outermost). These fabrics will then dry
better.
Important! Do not overload the appliance. Observe
max. loading volume of 7 kg.
Laundry weights
Type of laundry Weight
Bathrobe 1200 g
Napkin 100 g
Quilt cover 700 g
Sheet 500 g
Pillow case 200 g
Tablecloth 250 g
Towelling towel 200 g
Tea cloth 100 g
Night dress 200 g
Ladies' briefs 100 g
Man's work shirt 600 g
Man's work shirt 200 g
Man's pyjamas 500 g
Blouse 100 g
Men's underpants 100 g
5

Programme chart
Programmes
max. load (weight when dry)
Additional functions/options Application/properties
Care mark
KATOEN (COTTON)
EXTRA DROOG
(EXTRA DRY)
7 kg
LAGE TEMP. (DELICATE ), AN-
TI-KREUK / EINDE (LONG AN-
TICREASE ) , ZOEMER (BUZ-
ZER), STARTUITSTEL (DELAY
START)
Thorough drying of thick or mul-
ti- layered fabrics, e.g. terry tow-
elling items, bathrobes.
KATOEN (COTTON)
STERKDROOG
(STRONG DRY)
7 kg
LAGE TEMP. (DELICATE ), AN-
TI-KREUK / EINDE (LONG AN-
TICREASE ) , ZOEMER (BUZ-
ZER), STARTUITSTEL (DELAY
START)
Thorough drying of thick or mul-
ti- layered fabrics, e.g. terry tow-
elling items, bathrobes.
KATOEN (COTTON)
KASTDROOG
(STORAGE DRY)
1)
7 kg
LAGE TEMP. (DELICATE ), AN-
TI-KREUK / EINDE (LONG AN-
TICREASE ) , ZOEMER (BUZ-
ZER), STARTUITSTEL (DELAY
START)
Thorough drying of fabrics of
even thicknesses, e.g. terry tow-
elling items, knitwear, towels.
KATOEN (COTTON)
STRIJKDROOG +
(DAMP)
1)
7 kg
LAGE TEMP. (DELICATE ), AN-
TI-KREUK / EINDE (LONG AN-
TICREASE ) , ZOEMER (BUZ-
ZER), STARTUITSTEL (DELAY
START)
For thin textiles which are still to
be ironed, e.g. knitted items, cot-
ton shirts.
KATOEN (COTTON)
STRIJKDROOG
(IRON DRY)
1)
7 kg
LAGE TEMP. (DELICATE ), AN-
TI-KREUK / EINDE (LONG AN-
TICREASE ) , ZOEMER (BUZ-
ZER), STARTUITSTEL (DELAY
START)
For thin fabrics which are also to
be ironed, e.g. knitwear, cotton
shirts.
SYNTHETICA (SYN-
THETICS) EXTRA
DROOG (EXTRA
DRY)
3 kg
LAGE TEMP. (DELICATE ), AN-
TI-KREUK / EINDE (LONG AN-
TICREASE ) , ZOEMER (BUZ-
ZER), STARTUITSTEL (DELAY
START)
Thorough drying of thick or mul-
ti-layered fabrics, e.g. pullovers,
bedding, table linen.
2)
6

Programmes
max. load (weight when dry)
Additional functions/options Application/properties
Care mark
SYNTHETICA (SYN-
THETICS) KAST-
DROOG (STORAGE
DRY)
1)
3 kg
LAGE TEMP. (DELICATE ), AN-
TI-KREUK / EINDE (LONG AN-
TICREASE ) , ZOEMER (BUZ-
ZER), STARTUITSTEL (DELAY
START)
For thin fabrics which are not ir-
oned, e.g. easy care shirts, table
linen, baby clothes, socks, lin-
gerie with bones or wires.
2)
SYNTHETICA (SYN-
THETICS) STRIJK-
DROOG (IRON
DRY)
3 kg
LAGE TEMP. (DELICATE ), AN-
TI-KREUK / EINDE (LONG AN-
TICREASE ) , ZOEMER (BUZ-
ZER), STARTUITSTEL (DELAY
START)
For thin fabrics which are also to
be ironed, e.g. knitwear, cotton
shirts.
2)
30' 1kg
LAGE TEMP. (DELICATE ), AN-
TI-KREUK / EINDE (LONG AN-
TICREASE ) , ZOEMER (BUZ-
ZER), STARTUITSTEL (DELAY
START)
For further drying of individual
items of laundry or for small vol-
umes of less than 1 kg.
STRIJKVRIJ +
(EASY IRON PLUS)
3)
1 kg (or
5
shirts)
DELICATE
3)
, ANTI-KREUK /
EINDE (LONG ANTICREASE ) ,
ZOEMER (BUZZER), STAR-
TUITSTEL (DELAY START)
Special programme with anti-
crease mechanism for easy
care textiles such shirts and
blouses; for minimum ironing ef-
fort. The result depends on the
type and quality of textiles. (The
loading volume corresponds to
approx. 5 to 7 shirts.) Recom-
mendation: Place textiles in the
dryer straight after spinning.
Once dried, immediately re-
move textiles and place on
clothes hanger.
MIX (MIXED) 3 kg
DELICATE
3)
, ANTI-KREUK /
EINDE (LONG ANTICREASE ) ,
ZOEMER (BUZZER), STAR-
TUITSTEL (DELAY START)
For drying cotton and synthetic
fabrics, uses low temperature.
7

Programmes
max. load (weight when dry)
Additional functions/options Application/properties
Care mark
BABY 2 kg
LAGE TEMP. (DELICATE ), AN-
TI-KREUK / EINDE (LONG AN-
TICREASE ) , ZOEMER (BUZ-
ZER), STARTUITSTEL (DELAY
START)
Baby cycle is a special pro-
gramme for jumpers to be dried
“ready to wear”.
JEANS 7 kg
LAGE TEMP. (DELICATE ), AN-
TI-KREUK / EINDE (LONG AN-
TICREASE ) , ZOEMER (BUZ-
ZER), STARTUITSTEL (DELAY
START)
For leisure clothing, such as
jeans, sweat-shirts, etc., of dif-
ferent material thicknesses (e.g.
at the neck, cuffs and seams).
LUCHTEN (COOL-
ING)
7 kg ZOEMER (BUZZER)
Special programme, lasting
around 10 minutes, for refresh-
ing or gently cleaning textiles
with commercially available dry
cleaning sets. (Only use those
products which are declared as
suitable for the drier by the man-
ufacturer; please observe the
manufacturer’s instructions for
use.)
1) In accordance with IEC61121
2) Select LAGE TEMP. (DELICATE )button
3) Automatic
Daily use
Switching machine on
Turn the programme selector to any programme. The
machine has been switched on.
8

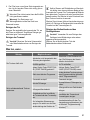
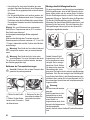
41 2 3
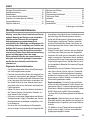
1011 987 56
Door opening and laun-
dry loading
1. Open the door.
2. Load your laundry (do
not force it in).
Caution! Do not jam
laundry in between
the loading door and rub-
ber seal.
3. Close loading door se-
curely. Lock must au-
dibly lock.
Selecting the pro-
gramme
Turn the programme se-
lector dial to the required
programme. The light
START / PAUZE (START
PAUSE)starts to flash.
Selecting additional functions
You can choose from the additional functions:
button 1 -LAGE TEMP. (DELICATE)
button 2 -ANTI-KREUK / EINDE (LONG ANTI-
CREASE )
button 3 -ZOEMER (BUZZER)
button 5 -STARTUITSTEL (DELAY START)
LAGE TEMP. (DELICATE)
Pressing this button allows drying to be performed at a
lower temperature, for delicate items. The correspond-
ing pilot light comes on. This option can also be used
for time controlled drying.
ANTI-KREUK / EINDE (LONG ANTICREASE )
A long anti-crease phase lengthen the anti-crease
phase (30 min.) at the end of the drying additionally by
60 minutes. The drum rotates at intervals during this
phase. This keeps the laundry loose and free of crea-
ses. Phase lasts in total 90 minutes. The laundry can
be removed at any time during the anti-crease phase.
When the option is active, the ANTI-KREUK / EINDE
(LONG ANTICREASE ) light is on.
ZOEMER (BUZZER)
When the drying cycle has finished, an intermittent au-
dible signal will sound. By depressing button ZOEMER
(BUZZER) the acoustic signal is switched off in the fol-
lowing cases:
• when selecting the programme
• when depressing the buttons
• when the programme selector dial is turned to an-
other position during the programme or when you
depress an option button during the cycle
• at the end of the programme.
The corresponding light comes on.
STARTUITSTEL (DELAY START)
With the STARTUITSTEL (DELAY START) but-
ton, you can delay the start of a programme
by 3, 6 or 9 hours.
1. Select the programme and additional functions.
2. Press the STARTUITSTEL (DELAY START) but-
ton as many times as necessary (the lights show
which delay time have been chosen).
3. To activate the delay timer, press button 4 -
START / PAUZE (START PAUSE). The lights 9h
6h 3h (lights 7, 8, 9) change on every three hours
until the time is getting on for start cycle.
Starting the programme
Press the START / PAUZE (START PAUSE) button.
The programme is started.
The programme phase is shown by appropriate lights;
light 10 - DROGEN (DRYING) , light 11 - ANTI-KREUK /
EINDE (END) .
9

Changing programme
To change a programme which has been selected by
mistake once the programme has started, first turn the
programme selector to "O" -OFF position. The pro-
gramme is cancelled.
The programme can no longer be changed di-
rectly once the programme has started. If never-
theless there is an attempt to change the programme
on the programme knob or if an function button (ex-
cluding the ZOEMER (BUZZER) button
2)
) is pressed,
led on the START / PAUZE (START PAUSE) button
starts flashing temporarily in red. The drying pro-
gramme is not however affected by this (laundry pro-
tection).
Drying cycle complete / removing laundry
Once the drying cycle is complete, the lights ANTI-
KREUK / EINDE (END) and light 6 - FILTER are on. If
the buzzer is active, an acoustic signal sounds inter-
mittently for about one minute.
The drying cycles are automatically followed by
an anti-crease phase which lasts around 30 mi-
nutes. The drum rotates at intervals during this phase.
This keeps the laundry loose and free of creases. The
laundry can be removed at any time during the anti-
crease phase. (The laundry should be taken out to-
wards the end of the anti-crease phase at the latest to
prevent creases from forming.)
1. Open door.
2. Remove laundry.
3. Remove filter after clothes has been removed.
Clean the filter.
Warning! Before You place the filter , please
check it there is nothing inside the filter seat.
4. Turn the programme selector to "O" (OFF).
Important! Clean the filter after each drying cycle.
5. Close the door.
Care and cleaning
Cleaning fluff filter
The filter collect all the fluff which accumulates during
drying. To ensure that the dryer works perfectly, the
fluff filter must be cleaned after every drying cycle.
The warning light FILTER , is on to remind you this
operation.
Caution! Never operate the dryer without fluff
filter or with damaged or blocked fluff filter.
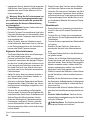
1. Open loading door
and remove laun-
dry.
2. Remove the filter
which is built into
the lower part of
the loading aper-
ture.
3. Open the filter
pressing the but-
ton, among two
slots on fingers.
Clean the filter us-
ing dump hand or
cloth. After a peri-
od of time, a patina
due to detergent
residue on laundry forms on the filters. When this
occurs, clean the filter with warm water using a
brush.
Close the filter and do not forget to put it back.
Warning! Before You place the filter, please
check it there is nothing inside the filter seat.
4. The filter can be positioned only to one side. If po-
sition is wrong, the filter overhangs.
If the filter will not snap into place, the loading
door cannot be closed.
Warning! You must DISCONNECT the
appliance from the electricity supply, before you
can carry out any cleaning or maintenance work.
2) Only dryers with buzzer button
10

Cleaning the door
Clean periodically the interior part of the door to remove
any fluff. Accurate cleaning ensures correct drying.
Cleaning the drum
Caution! Do not use abrasives or steel wool to
clean the drum.
Lime in the water or cleaning agents may form a
barely visible lining on the inside of the drum. The
degree to which the laundry has been dried is then no
longer detected reliably. The laundry is damper than
expected when removed from the dryer.
Use a standard domestic cleaner (e.g. vinegar-based
cleaner) to wipe down the inside of the drum and drum
ribs.
Clean operating screen and housing
Caution! Do not use furniture cleaners or
aggressive cleaning agents to clean the machine.
Use a damp cloth to wipe down the operating screen
and housing.
What to do if ...
Problem Possible cause Remedy
Dryer does not work.
Mains plug is not plugged in or fuse
is not working correctly.
Plug in at mains socket. Check fuse
in fuse box (domestic installation).
Loading door is open. Close loading door.
Have you pressed the START /
PAUZE (START PAUSE) button?
Press the START / PAUZE (START
PAUSE) button again.
Drying results unsatisfactory.
Wrong programme selected.
Select a different programme the
next time you dry (see “Programme
chart” chapter).
Fluff filter clogged. Clean fluff filter.
Overloading of laundry.
Observe recommended loading
volumes.
Ventilation slots covered up. Uncover ventilation slots.
Residue on inside surface of drum
or drum ribs.
Clean inside surface of drum and
drum ribs.
Conductance of water at installa-
tion site differs from standard set-
ting of machine.
1)
Re-programme standard setting for
degree of drying (see ‘Machine set-
tings’ chapter)
1)
.
Loading door does not close.
Filter not in place
2)
. Install filter into place
2)
.
Drying cycle ends shortly after pro-
gramme starts.
Not enough washing loaded or
washing loaded is too dry for se-
lected programme.
Select time programme or higher
drying level (e.g. EXTRA DROOG
(EXTRA DRY) instead of KAST-
DROOG (STORAGE DRY)).
Drying cycle lasts an unusually long
time. Note: After around 5 hours the
drying cycle ends automatically.
Filter clogged. Clean filter.
Load volume too big. Reduce load volume.
Laundry insufficiently spun. Laundry must be adequately spun.
11

Problem Possible cause Remedy
Particularly high room temperature.
Temporary switching off of the com-
pressor to avoid overload.
Automatic process, there is no fault
with the appliance. If possible, low-
er the room temperature.
1) Only dryers with conductance programming
2) Only dryers with removable filter
Machine settings
Setting Implementation
Buzzer permanent off
1. Turn the programme selector to any programme.
2.
Press simultaneously the LAGE TEMP. (DELICATE ) and ANTI-
KREUK / EINDE (LONG ANTICREASE ) buttons and hold down for
approx. 5 seconds.
3. The buzzer is by default always off.
Water hardness
Water contains, a variable quan-
tity of limestone and mineral salts
of which quantities vary accord-
ing to geographical locations
thus varying its conductivity val-
ues.
Relevant variations of the con-
ductivity of the water compared
to those prefixed by the factory
could slightly influence the resid-
ual humidity of the laundry at the
end of the cycle. Your dryer al-
lows you to regulate the sensitiv-
ity of the drying sensor based on
conductivity values of the water.
1. Turn the programme selector to any programme.
2.
Press simultaneously the ANTI-KREUK / EINDE (LONG ANTI-
CREASE ) and START / PAUZE (START PAUSE) buttons and hold
down for approx. 5 seconds. Lights show the current setting:
– ANTI-KREUK / EINDE (END) - low conductivity <300 micro S/cm
– DROGEN (DRYING) - medium conductivity 300-600 micro S/cm
– DROGEN (DRYING) and ANTI-KREUK / EINDE (END) - high con-
ductivity >600 micro S/cm
3.
Press the START / PAUZE (START PAUSE) button sequentially until
you set desired level.
4.
To memorize setting press simultaneously the the ANTI-KREUK /
EINDE (LONG ANTICREASE ) and START / PAUZE (START PAUSE)
buttons or turn knob to "O" off position
12

Technical data
Height x width x depth 85 x 60 x 58 cm
Drum volume 108 l
Depth with loading door open 109 cm
Height can be adjusted by 1.5 cm
Weight when empty approx. 32.5kg
Loading volume (depends on programme)
1)
max. 7 kg
Voltage 230 V
Required fuse 16 A
Total power 2600 W
Energy efficiency class
C
Energy consumption (7 kg of cotton, pre-drained at
1000 rpm)
2)
3.9 kWh
Average annual energy consumption 263.1 kWh
Use Domestic
Permissible ambient temperature + 5°C to + 35°C
Consumption values
The consumption values have been established under standard conditions. They may deviate when the machine
is operated in domestic circumstances.
Programme
Energy consumption in kWh / average drying time
in min.
KATOEN (COTTON) KASTDROOG (STORAGE
DRY)
2)
3.9 / 95 (7 kg load pre-drained at 1000 rpm)
KATOEN (COTTON) STRIJKDROOG (IRON DRY)
2)
3.05 / 75 (7 kg load pre-drained at 1000 rpm)
SYNTHETICA (SYNTHETICS) KASTDROOG
(STORAGE DRY)
2)
1.15 / 30 (3 kg load pre-drained at 1200 rpm)
1) Different loading volume data may be needed in some countries as a result of different measuring methods.
2) in accordance with EN 61121
Installation
Appliance positioning
• It is recommended that, for your convenience, the
machine is positioned close to your washing ma-
chine.
• The tumble dryer must be installed in a clean place,
where dirt does not build up.
• Air must be able to circulate freely all round the ap-
pliance. Do not obstruct the front ventilation grille or
the air intake grilles at the back of the machine.
• To keep vibration and noise to a minimum when the
dryer is in use, it should be placed on a firm, level
surface.
13

• Once in its permanent operating position, check that
the dryer is absolutely level with the aid of a spirit
level. If it is not, raise or lower the feet until it is.
• The feet must never be removed. Do not restrict the
floor clearance through deeppile carpets, strips of
wood or similar. This might cause heat built-up which
would interfere with the operation of the appliance.
Important! The hot air emitted by the tumble dryer can
reach temperatures of up to 60°C. The appliance must
therefore not be installed on floors which are not
resistant to high temperatures.
When operating the tumble dryer, the room
temperature must not be lower than +5°C and higher
than +35°C, as it may affect the performance of the
appliance.
Warning! Should the appliance be moved, it
must be transported vertically.
Warning! The appliance must not be installed
behind the lockable door, a sliding door or a door
with a hinge on the opposite side to that of the
appliance.
Removing transport safety packaging
Caution! Before use all parts of the transport
packaging must be removed.
1. Open loading door.
2. Pull off adhesive strips
from inside machine on
top of drum.
3. Remove foil hose and
polystyrene padding
from the machine.
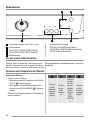
Fitting the vent hose
To simplify the installation, there is a choice of vent
outlets: one at the back, the others in the left and right-
hand side. Connect the hose to whichever is the more
convenient by pulling the ring nut (A) from the vent out-
let at the back, screwing it on to the hose and pushing
it firmly back into place. The unused vents should now
be sealed with the special snap covers provided.
A
A
Once connected to the dry-
er, run the vent hose to the
desired outlet point, ensur-
ing that the run’s overall
length is less than 2 m, and
that it contains no more
than two bends. As to the
outlet itself, if you have decided on a fixed wall/window
grille, a good local builder’s merchant should be able
to supply you with the necessary fittings and installation
advice.
Warning!
It is important not to
connect the vent hose to,
for example, a cooker
hood, or a chimney or flue
pipe designed to carry the
exhaust from a fuel burning
appliance.
Note that to avoid conden-
sation problems, it is essential that the dryer be fitted
with the flexible hose to carry its “exhaust” at least be-
yond the kitchen units; preferable outside the kitchen.
In order to prevent the appliance from overheating, it is
important that the steam exhaust is unobstructed.
Therefore, in case of a permanent hose fitted to an
exterior wall or ceiling, it must be ensured an exhaust
capacity of at least 150 m3/h. If the dryer is fitted next
to kitchen units, make sure that the vent hose is not
squashed. If the hose is partially squashed, drying ef-
ficiency will be reduced, resulting in longer drying times
and higher energy consumption. If the hose is com-
pletely squashed, the safety cut-outs with which the
machine is fitted may operate. When operating the
B
14

tumble dryer, the room temperature must not be lower
than +5°C and higher than +35°C, as it may affect the
performance of the appliance.
Electrical connection
Details on mains voltage, type of current and the fuses
required should be taken from the type plate. The type
plate is fitted near the loading aperture (see “Product
description” chapter).
Connect the machine to an earthed socket, in ac-
cordance with current wiring regulations.
Warning! The manufacturer declines any
responsibility for damage or injury through
failure to comply with the above safety
precautions.
Should the appliance power supply cable need to
be replaced, this must be carried out by our Service
Center.
Warning! The plug must be accessible after
installing the machine.
Door reversal
To make it easier to load or unload the laundry, the door
can be reversed. The door must only be reversed by
an authorised service engineer. Please contact your
local Service Force Centre. The engineer will carry out
the door reversal at your cost.
Special accessories
Stacking kit
A special stacking kit is
available through your
dealer, to enable the
mounting of the dyer on top
of a front loading washing
machine with cover’s depth
between 48 and 60 cm.
Read carefully the instruc-
tions supplied with the kit.
Environment
The symbol on the product or on its packaging
indicates that this product may not be treated as
household waste. Instead it should be taken to the
appropriate collection point for the recycling of
electrical and electronic equipment. By ensuring this
product is disposed of correctly, you will help prevent
potential negative consequences for the environment
and human health, which could otherwise be caused
by inappropriate waste handling of this product. For
more detailed information about recycling of this
product, please contact your local council, your
household waste disposal service or the shop where
you purchased the product.
Packaging material
The packaging materials are environmentally friendly
and can be recycled. The plastic components are iden-
tified by markings, e.g. >PE<, >PS<, etc. Please dis-
pose of the packaging materials in the appropriate con-
tainer at the community waste disposal facilities.
Warning! When disposing of old appliances,
remove the mains cable and dispose of together with
the plug. Remove the door hook and ensure it is no
longer lockable to prevent young children being
trapped inside.
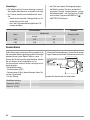
Environmental tips
• In the dryer, laundry becomes fluffy and soft. Fabric
softeners are not therefore needed when washing.
• Your dryer will function most economically if you:
– always keep the ventilation slots on the base of
the dryer unobstructed;
– use the loading volumes specified in the pro-
gramme overview;
– clean the filter after each drying cycle;
– spin the laundry well before drying. Example:
Consumption data – depending on spinning
speed – for 7 kg of laundry, dried using the COT-
TON
KASTDROOG (STORAGE DRY) pro-
gramme.
Pre-draining Drying cycle
Revolutions per minute
Residual dampness
Energy in kWh
15

in litres as a %
1000 4.20 60 3,9
1400 3.64 52 3.7
Service
In the event of technical faults, please first check
whether you can remedy the problem yourself with the
help of the operating instructions (Chapter “What to do
if…”).
If you were not able to remedy the problem yourself,
please contact your local service centre.
In order to be able to assist you quickly, we require the
following information:
– Model description
– Product number (PNC)
– Serial number (S No.) (for numbers, see rating plate)
– Type of fault
– Any error messages displayed by the appliance
So that you have the necessary reference numbers
from your appliance at hand,
we recommend that you write them in here:
Model description: .................................................................................
PNC: .................................................................................
S No.: .................................................................................
16

Inhalt
Wichtige Sicherheitshinweise _ _ _ _ _ _ _ _ _ _ 17
Gerätebeschreibung _ _ _ _ _ _ _ _ _ _ _ _ _ _ _ 19
Bedienblende _ _ _ _ _ _ _ _ _ _ _ _ _ _ _ _ _ _ _ 20
Vor der ersten Inbetriebnahme _ _ _ _ _ _ _ _ _ _ 20
Sortieren und Vorbereiten der Wäsche _ _ _ _ _ _ 20
Programmübersicht _ _ _ _ _ _ _ _ _ _ _ _ _ _ _ _ 21
Täglicher Gebrauch _ _ _ _ _ _ _ _ _ _ _ _ _ _ _ 24
Reinigung und Pflege _ _ _ _ _ _ _ _ _ _ _ _ _ _ _ 26
Was tun, wenn... _ _ _ _ _ _ _ _ _ _ _ _ _ _ _ _ _ 27
Programmiermöglichkeiten _ _ _ _ _ _ _ _ _ _ _ _ 28
Technische Daten _ _ _ _ _ _ _ _ _ _ _ _ _ _ _ _ 29
Aufstellen _ _ _ _ _ _ _ _ _ _ _ _ _ _ _ _ _ _ _ _ _ 29
Entsorgung _ _ _ _ _ _ _ _ _ _ _ _ _ _ _ _ _ _ _ _ 31
Kundendienst _ _ _ _ _ _ _ _ _ _ _ _ _ _ _ _ _ _ _ 32
Änderungen vorbehalten
Wichtige Sicherheitshinweise
Wichtig! Lesen Sie zu Ihrer Sicherheit und für eine
optimale Nutzung des Geräts vor der Installation
und dem ersten Gebrauch die vorliegende
Gebrauchsanweisung aufmerksam durch,
einschließlich der Ratschläge und Warnungen. Es
ist wichtig, dass zur Vermeidung von Fehlern und
Unfällen alle Personen, die das Gerät benutzen, mit
der Bedienung und den Sicherheitsvorschriften
vertraut sind. Heben Sie die Gebrauchsanweisung
gut auf und übergeben Sie sie bei einem
Weiterverkauf des Geräts dem neuen Besitzer, so
dass jeder während der gesamten Lebensdauer
des Geräts über Gebrauch und Sicherheit
informiert ist.
Allgemeine Sicherheitshinweise
• Aus Sicherheitsgründen dürfen keine Änderungen
am Gerät vorgenommen werden.
• Personen (einschließlich Kinder), die aufgrund ihrer
physischen, sensorischen oder geistigen Fähigkei-
ten oder ihrer Unerfahrenheit oder Unkenntnis nicht
in der Lage sind, das Gerät sicher zu benutzen, dür-
fen dieses Gerät nicht ohne Aufsicht oder Anwei-
sung durch eine für ihre Sicherheit verantwortliche
Person benutzen.
• Stellen Sie sicher, dass keine kleinen Haustiere in
die Trommel klettern. Kontrollieren Sie daher vor
dem Gebrauch die Trommel.
• Alle harten und scharfen Gegenstände wie Münzen,
Sicherheitsnadeln, Nägel, Schrauben usw. können
das Gerät schwer beschädigen und gehören nicht
in die Maschine.
• Trocknen Sie zur Vermeidung von Brandgefahr
durch zu langes Trocknen keine der folgenden Wä-
schestücke in dem Gerät: Kissen, Schlafdecken und
ähnliche Dinge (die Wärme speichern können).
• Artikel wie Schaumgummi (Latexschaumgummi),
Duschhauben, imprägnierte Textilien, gummibe-
schichte Wäschestücke, Kleider oder Kissen mit
Schaumgummipolster dürfen in dem Gerät nicht ge-
trocknet werden.
• Ziehen Sie nach dem Trocknen und zum Reinigen
und Warten des Gerätes immer den Netzstecker.
• Versuchen Sie unter keinen Umständen, das Gerät
selbst zu reparieren. Reparaturen durch unerfahre-
ne Personen können zu Verletzungen und schweren
Funktionsstörungen führen. Wenden Sie sich an Ih-
ren Kundendienst. Bestehen Sie immer auf Original-
Ersatzteilen.
• Wäschestücke, die mit Speiseöl verschmutzt sind
oder die mit Aceton, Benzin, Kerosin, Fleckentfer-
nern, Terpentin und Wachsentfernern behandelt
worden sind, müssen vor dem Trocknen in dem Wä-
schetrockner in heißem Wasser und zusätzlichem
Waschmittel gewaschen werden.
•
Explosionsgefahr: Trocknen Sie keine Wäsche-
stücke, die mit entflammbaren Stoffen (Benzin, de-
naturiertem Alkohol, Trockenreinigungsmittel oder
Ähnlichem) in Berührung gekommen sind. Da diese
Stoffe flüchtig sind, besteht Explosionsgefahr.
Trocknen Sie nur mit Wasser gewaschene Wäsche-
stücke.
• Brandgefahr: Wäschestücke, die mit Speise- oder
Pflanzenöl befleckt oder getränkt sind, stellen eine
Brandgefahr dar und gehören nicht in den Wäsche-
trockner.
• Für Wäsche, die mit Fleckenentferner behandelt
wurde, muss vor dem Trocknen ein zusätzlicher
Spülgang durchgeführt werden.
17

• Vergewissern Sie sich, dass keine Feuerzeuge oder
Streichhölzer in den Taschen von Wäschestücken
geblieben sind, bevor Sie die Wäsche in die Tro-
ckentrommmel legen
Warnung! Wenn Sie die Trockentrommel vor
dem Ende des Trockengangs anhalten müs-
sen, entnehmen Sie bitte sofort die gesamte Wä-
sche und breiten Sie diese zur Wärmeableitung
aus. Brandgefahr!
• Stromschlaggefahr! Spritzen Sie das Gerät nicht
mit einem Wasserstrahl ab.
• Der letzte Teil eines Trocknerzyklusses findet ohne
Hitze statt (Abkühlzyklus), um sicherzustellen, dass
die Wäsche auf einer Temperatur bleibt, bei der sie
nicht beschädigt wird.
• Stellen Sie sicher, dass der Aufstellraum ausrei-
chend belüftet wird, damit keine Gase von Geräten
in den Raum gelangen können, die Treibstoffe ver-
brennen oder offene Flammen erzeugen.
Allgemeine Sicherheitshinweise
• Aus Sicherheitsgründen dürfen keine Änderungen
am Gerät vorgenommen werden.
• Personen (einschließlich Kinder), die aufgrund ihrer
physischen, sensorischen oder geistigen Fähigkei-
ten oder ihrer Unerfahrenheit oder Unkenntnis nicht
in der Lage sind, das Gerät sicher zu benutzen, dür-
fen dieses Gerät nicht ohne Aufsicht oder Anwei-
sung durch eine für ihre Sicherheit verantwortliche
Person benutzen.
• Stellen Sie sicher, dass keine kleinen Haustiere in
die Trommel klettern. Kontrollieren Sie daher vor
dem Gebrauch die Trommel.
• Alle harten und scharfen Gegenstände wie Münzen,
Sicherheitsnadeln, Nägel, Schrauben usw. können
das Gerät schwer beschädigen und gehören nicht
in die Maschine.
• Trocknen Sie zur Vermeidung von Brandgefahr
durch zu langes Trocknen keine der folgenden Wä-
schestücke in dem Gerät: Kissen, Schlafdecken und
ähnliche Dinge (die Wärme speichern können).
• Artikel wie Schaumgummi (Latexschaumgummi),
Duschhauben, imprägnierte Textilien, gummibe-
schichte Wäschestücke, Kleider oder Kissen mit
Schaumgummipolster dürfen in dem Gerät nicht ge-
trocknet werden.
• Ziehen Sie nach dem Trocknen und zum Reinigen
und Warten des Gerätes immer den Netzstecker.
• Versuchen Sie unter keinen Umständen, das Gerät
selbst zu reparieren. Reparaturen durch unerfahre-
ne Personen können zu Verletzungen und schweren
Funktionsstörungen führen. Wenden Sie sich an Ih-
ren Kundendienst. Bestehen Sie immer auf Original-
Ersatzteilen.
Einsatzbereich
• Dieses Gerät ist zur Verwendung im Haushalt be-
stimmt. Es darf nicht für andere Zwecke benutzt
werden.
• Trocknen Sie nur Textilien, die trocknergeeignet
sind. Beachten Sie die Pflegekennzeichen auf den
Textiletiketten.
• Trocknen Sie keine ungewaschenen Wäschestücke
im Trockner.
• Überfüllen Sie das Gerät nicht. Siehe den ent-
sprechenden Abschnitt in der Gebrauchsanwei-
sung.
• Tropfnasse Kleidung darf nicht in den Wäschetrock-
ner geladen werden.
• Textilien, die mit flüchtigen Erdölerzeugnissen in
Kontakt gekommen sind, dürfen nicht in dem Gerät
getrocknet werden. Wenn flüchtige Reinigungsflüs-
sigkeiten verwendet wurden, müssen diese Flüs-
sigkeiten ausgewaschen werden, bevor das Klei-
dungsstück in das Gerät gegeben wird.
• Ziehen Sie niemals am Netzkabel, um den Stecker
aus der Steckdose zu ziehen; sondern immer am
Stecker.
• Benutzen Sie den Wäschetrockner niemals, wenn
das Stromkabel, die Bedienblende, die Arbeitsplatte
oder der Sockel beschädigt ist, so dass das Gerä-
teinnere frei liegt.
• Weichspüler oder ähnliche Produkte dürfen nur ent-
sprechend den Herstelleranweisungen benutzt wer-
den.
•
Vorsicht - Heiße Oberfläche : Berühren Sie bei
eingeschalteter Innenbeleuchtung nicht die Abde-
ckung der Glühlampe.
3)
•
Heiße Oberfläche: Die Rückseite des Gerätes
während des Betriebs nicht berühren!
3) Nur Trockner mit Innenbeleuchtung.
18

Sicherheit von Kindern
• Dieses Gerät darf ohne Aufsicht nicht von kleinen
Kindern oder Behinderten bedient werden.
• Kinder sollten sorgsam beaufsichtigt werden, so
dass sie nicht dem Gerät spielen können.
• Verpackungen (z.B. Folien, Polystyrol) können eine
Gefahr für Kinder darstellen - Erstickungsgefahr!
Halten Sie solche Materialien von Kindern fern.
• Bewahren Sie Waschmittel außer Reichweite von
Kindern auf.
• Stellen Sie sicher, dass Kinder oder Kleintiere nicht
in die Trommel klettern.
Gerätebeschreibung
1
3
4
2
5
6
7
1 Bedienblende
2 Tür
3 Flusenfilter
4 Typenschild
5 Einstellbare Schraubfüße
6 Entlüftungsauslässe seitlich / Entlüftungsauslass
hinten
7 Ringmutter
19

Bedienblende
1 2 3
45
1 Programmwahlschalter und Taste "O" aus
2 Funktionstasten
3 Taste START / PAUZE (START PAUSE)
4 Taste STARTUITSTEL (ZEITVORWAHL)
5 Betriebsanzeige
- Kontrolllampe Zeitvorwahl
- DROGEN (TROCKEN) Kontrolllampe
- ANTI-KREUK / EINDE (ENDE) Kontrolllampe
- FILTER (SIEB) Kontrolllampe
Vor der ersten Inbetriebnahme
Reinigen Sie die Trommel des Trockners mit einem
feuchten Tuch oder führen Sie ein kurzes Trockenpro-
gramm (ca. 30 Min.) mit feuchter Wäsche aus, um alle
fertigungsbedingten Rückstände aus der Trommel zu
entfernen.
Sortieren und Vorbereiten der Wäsche
Sortieren der Wäsche
• Sortieren nach Gewebeart:
– Baumwolle/Leinen für Programme in der BAUM-
WOLLE
Programmgruppe.
– Mischgewebe und synthetische Stoffe für Pro-
gramme in der MISCHGEWEBE
Programm-
gruppe.
• Sortieren nach Pflegekennzeichen. Die Pflegekenn-
zeichen bedeuten:
Trocknen
im Wä-
schetrock-
ner grund-
sätzlich
möglich
Trocknen
mit nor-
maler
Tempera-
tur
Trocknen
mit niedri-
ger Tem-
peratur
(drücken
Sie die
Taste LA-
GE
TEMP.
(SCHON)
!)
Trocknen
im Wä-
schetrock-
ner nicht
möglich
20
Seite wird geladen ...
Seite wird geladen ...
Seite wird geladen ...
Seite wird geladen ...
Seite wird geladen ...
Seite wird geladen ...
Seite wird geladen ...
Seite wird geladen ...
Seite wird geladen ...
Seite wird geladen ...
Seite wird geladen ...
Seite wird geladen ...
Seite wird geladen ...
Seite wird geladen ...
Seite wird geladen ...
Seite wird geladen ...
-
 1
1
-
 2
2
-
 3
3
-
 4
4
-
 5
5
-
 6
6
-
 7
7
-
 8
8
-
 9
9
-
 10
10
-
 11
11
-
 12
12
-
 13
13
-
 14
14
-
 15
15
-
 16
16
-
 17
17
-
 18
18
-
 19
19
-
 20
20
-
 21
21
-
 22
22
-
 23
23
-
 24
24
-
 25
25
-
 26
26
-
 27
27
-
 28
28
-
 29
29
-
 30
30
-
 31
31
-
 32
32
-
 33
33
-
 34
34
-
 35
35
-
 36
36


Zanussi ZTB276 Benutzerhandbuch
- Kategorie
- Wäschetrockner
- Typ
- Benutzerhandbuch
in anderen Sprachen
- English: Zanussi ZTB276 User manual
Verwandte Artikel
-
Zanussi ZTB271 Benutzerhandbuch
-
-
-
-
-
-
-
-
-