Parkside PSZ 250 A1 Original Instructions Manual
- Typ
- Original Instructions Manual

145 mm 138 mm
ELECTRIC ROPE HOIST PSZ 250 A1
ELECTRIC ROPE HOIST
Operation and safety notes
Translation of the original instructions
ELEKTROMOS CSÖRLŐ
Kezelési és biztonsági utalások
Eredeti használati utasítás fordítása
ELEKTRIČNO DVIGALO Z
ŽIČNO VRVJO
Navodila za upravljanje in varnostna opozorila
Prevod izvirnih navodil
LANOVÝ NAVIJÁK
Pokyny pro obsluhu a bezpečnostní pokyny
Překlad původního návodu k používání
LANOVÝ NAVIJAK
Pokyny pre obsluhu a bezpečnostné pokyny
Preklad pôvodného návodu na použitie
SEILHEBEZUG
Bedienungs- und Sicherheitshinweise
Originalbetriebsanleitung
IAN 320662_1904

138 mm
GB Operation and safety notes Page 5
HU Kezelési és biztonsági utalások Oldal 15
SI Navodila za upravljanje in varnostna opozorila Stran 25
CZ Pokyny pro obsluhu a bezpečnostní pokyny Strana 35
SK Pokyny pre obsluhu a bezpečnostné pokyny Strana 45
DE/AT/CH Bedienungs- und Sicherheitshinweise Seite 55

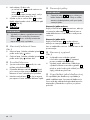
A
CB
1615
1
3
6
4
5
7
8
11
14
10
2
9
13
12
15
16
17
18
11
10
12
138 mm

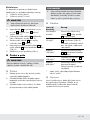
D E
F G
H I
J K
138 mm

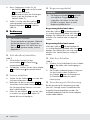
5 GB
Warnings and symbols used .......................................... Page 6
Introduction............................................................ Page 6
Intended use............................................................ Page 6
Scope of delivery........................................................ Page 7
Description of parts ...................................................... Page 7
Technical data .......................................................... Page 7
Safety information .................................................... Page 8
Assembly .............................................................. Page 9
Before first use......................................................... Page 9
Operation.............................................................. Page 10
Winding/unwinding the cable.............................................. Page 10
Lifting loads ............................................................ Page 10
Maximum/minimum length levers ........................................... Page 10
Emergency off switch ..................................................... Page 10
Set-up as block and tackle................................................. Page 10
Cleaning and care ..................................................... Page 11
Cleaning............................................................... Page 11
Maintenance ........................................................... Page 11
Repairs ................................................................ Page 11
Storage ............................................................... Page 12
Disposal................................................................ Page 12
Warranty .............................................................. Page 12
EC Declaration of conformity.......................................... Page 14

6 GB
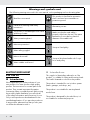
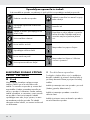
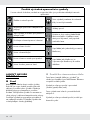
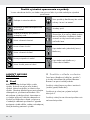
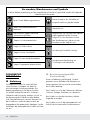
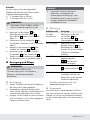
Warnings and symbols used
The following warnings are used in this user manual, on the packaging and on the rating plate:
Read the user manual.
This product is classified as protection
class I and must be connected to a
protective ground.
Observe all warnings and safety
instructions!
Alternating current
IP54
The product is shielded against dust and
splashing of water.
Make sure that the steel cable is
properly rolled onto the reel. The space
between coils must be less than the
diameter of the cable itself.
Wear protective gloves!
Wear ear protection!
Set-up as fixed pulley.
Wear safety goggles!
Wear a dust mask!
Set-up as block and tackle with 2 rope
hoists and pulley.
Wear suitable work boots!
ELECTRIC ROPE HOIST
PSZ 250 A1
Introduction
We congratulate you on the purchase of your
new product. You have chosen a high quality
product. The instructions for use are part of the
product. They contain important information
concerning safety, use and disposal. Before using
the product, please familiarise yourself with all
of the safety information and instructions for use.
Only use the product as described and for the
specified applications. If you pass the product on
to anyone else, please ensure that you also pass
on all the documentation with it.
Intended use
This rope hoist (hereinafter referred to as “the
product”) is suitable for lifting and lowering loads.
The load is fastened to a hook on the product.
The product is intended for use in indoor spaces
(barns, garages, workshops, etc.).
The product is not suitable for exerting lateral
tensile force.
The product is designed for household use; it is
not suitable for commercial purposes.

7 GB
Other uses or modifications to the product are
considered improper use and may result in risks
such as mortal danger, injury or damages. The
manufacturer assumes no liability for damages
arising from improper use. The product is not
suitable for commercial use or other applications.
Scope of delivery
m
WARNING!
u The product and the packaging materials
are not toys! Children shall not play with
plastic bags, films and small parts! There is
a risk of choking and suffocation!
1 x Electric rope hoist
1 x Extra hook with pulley
2 x Mounting brackets
4 x Mounting screws (with non-removable spring
washer and removable washer)
1 x Instruction manual
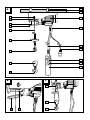
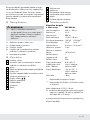
Description of parts
1
Mounting bracket
2
Mounting screws (with non-removable spring
washer and removable washer)
3
Motor
4
Remote control suspension cable
5
Control cable
6
Power cord with power plug
7
Emergency off switch
8
Control switch ( / )
9
Remote control
10
Extra hook
11
Pulley
12
Hook
13
Shut-off weight
14
Steel cable
15
Minimum cable length lever
16
Maximum cable length lever
17
Drum
18
Mounting opening for hook
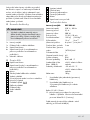
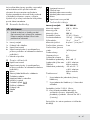
Technical data
Rope hoist PSZ 250 A1
Nominal voltage: 230 V
~
, 50 Hz
Nominal current: 2.2 A
Rated power: 500 W
Duty type: S3 20 % 10 min:
Permissible load: 125 kg* | 250 kg**
Lifting height: 12 m* | 6 m**
Nominal speed: 8 m/min* | 4 m/min**
Steel cable diameter: 3 mm
Steel cable tensile
strength: 1870 N/mm²
Protection class: I
Drive group: M1
Degree of protection: IP54
Operating conditions
(Height above sea level:
Max. 1000 m):
0 to +40 °C
< 80 % relative
humidity
Storage conditions: –25 to +55 °C
< 80 relative humidity
Net weight: 10 kg
* Set-up as fixed pulley
** Set-up as block and tackle with 2 rope hoists
and pulley
Duty type S3 20 % 10 min:
S3= Intermittent duty without influence of the
start-up process. Within a given 10 minute
period, the maximum operating time is 20 %
(2 minutes).
The A-rated noise emissions at the operator’s
location is less than 86 dB(A).

8 GB
Safety information
m
WARNING!
u Read all safety information,
instructions, diagrams and
technical specifications applied to
the product. Failure to follow the safety
information and the below instructions may
result in electric shock, fire and/or serious
injury.
Keep all the safety information and
instructions in a safe place for future
reference.
¾ Keep children and other unauthorized
persons away from the product.
m
DANGER!
u Risk of electric shock! Never attempt
to repair the product yourself. In case of
malfunction, repairs are to be conducted
by qualified personnel only.
m
DANGER!
u Risk of electric shock! Turn off the
product and disconnect it from the power
supply before cleaning and when the
product is not in use.
m
DANGER!
u Risk of injury! Improper use may result
in personal injury. Use the product only
as described in the user manual. Never
attempt to alter the product in any way.
m
DANGER!
u Risk of injury! Never use a damaged
product. Disconnect the product from the
power supply and contact your retailer if
the product is damaged.
¾ Make sure that the nominal voltage on the
rating plate complies with the supply voltage.
¾ If possible, only operate the product on an
electrical circuit protected by a fault current
switch and a fuse of at least 10 A.
¾ The use of extension cords is not
recommended. If the use of an extension
cord is necessary, it must be designed for a
current flow of at least 10 A.
¾ Shield the product, power cord and power
plug from dust, direct sunlight, dripping and
splashing water.
¾ Protect the power cord from damage. Do
not allow the power cord to hang over sharp
corners; do not crush or bend it. Keep the
power cord away from any hot surfaces and
open flames.

9 GB
¾ Do not operate the product if the power
cord or power plug are damaged, nor if the
product does not work or is damaged in any
way.
¾ If the power cord is damaged, it must be
replaced by the manufacturer, its service
agent or similarly qualified persons in order
to avoid a hazard.
¾ Do not disconnect the power plug from the
socket outlet by pulling on the power cord.
Special safety information for rope
hoists
¾ Persons who intend to use the product
must first receive appropriate training or
instructions.
¾ It is prohibited to move persons with the
product.
¾ It is prohibited to lift loads in excess of the
nominal load.
¾ Do not attempt to lift stuck or jammed loads.
¾ The steel cable must be taut when lifting the
load.
¾ Do not pull the loads in horizontal direction.
¾ Avoid switching the product on and off
rapidly (inching operation).
¾ Always be attentive when operating the
product.
¾ Do not leave hanging loads unattended
without taking appropriate safety measures.
¾ Do not stand or work underneath raised
loads.
¾ The product has not been outfitted with a
rated power limit. Do not attempt to lift the
load further when the overheat protection
limits operation. In this case, the load has
exceeded the product’s nominal power.
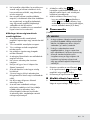
¾ Do not use the maximum/minimum length
levers
15
16
routinely as a stop mechanism.
These levers serve as a stop mechanism only
in emergencies.
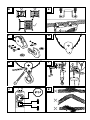
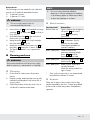
¾ Before you begin: Check whether
– the steel cable
14
is wound properly
around the drum
17
and whether
– the space between coils is less than the
diameter of the cable itself (Fig. D).
Assembly
(Fig. E)
m
DANGER!
u The square tube must be able to bear
a minimum load of 500 kg at the
points where the product is fastened. If
you are unsure, consult a professional
(e.g. a structural engineer).
u Seek advice from a qualified technician to
ensure all screws are tightened fully and
correctly.
u A qualified technician or a properly
trained person should check the anchoring
of the square tube before the product is
started.
¾ Fasten the product with the mounting
brackets
1
and the mounting screws
2
to
a suitable square tube.
¾ Tighten the mounting screws
2
.
Before first use
¾ Remove the transport lock from the steel
cable
14
. Cut the rubber band and remove
it.

10 GB
¾ Before you begin: Check whether
– the steel cable
14
is wound properly
around the drum
17
and whether
– the space between coils is less than the
diameter of the cable itself (Fig. D).
¾ Make sure the steel cable
14
passes the
maximum/minimum length levers
15
16
properly and without touching them (Fig. B).
Operation
NOTE
u The product has been outfitted with a
thermostat switch. During operation, it may
stop the motor
3
. The motor can be only
started again once it has cooled down.
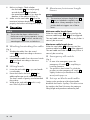
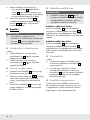
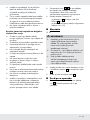
Winding/unwinding the cable
(Fig. J)
¾ Winding the cable: Press the control
switch
8
upwards according to the arrow
indication
.
¾ Unwinding the cable: Press the control switch
8
downwards according to the arrow
indication
.
Lifting loads
¾ Lower the steel cable
14
so you can handle
it comfortably.
¾ Fasten the load to the hook
10
12
. Use
additional bungee cords where necessary.
The load’s centre of gravity must be beneath
the product.
¾ Wind up the steel cable
14
until it is only
taut. Then fully lift the load.
Maximum/minimum length
levers
NOTE
u The maximum/minimum length levers
15
16
are not intended to regularly stop
the product. Always attempt to stop the
product before it triggers one of these
levers.
Minimum cable length lever
When the steel cable
14
is fully wound up, the
minimum cable length lever
15
will be triggered.
The steel cable cannot be wound up any further. It
can only be unwound.
Maximum cable length lever
When the steel cable
14
is fully unwound, the
maximum cable length lever
16
will be triggered.
The steel cable cannot be unwound any further. It
can only be wound up.
Emergency off switch
(Fig. J)
¾ In case of an emergency, press the
emergency off switch
7
to stop lifting or
lowering operation.
¾ The product is then locked. To unlock the
product, turn the emergency off switch
7
slightly clockwise (in the direction of the
arrow) until it pops out.
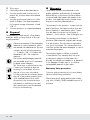
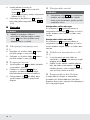
Set-up as block and tackle
Setting up the product as a block and tackle
distributes the load to 2 pulleys. This allows twice
the weight to be lifted. However, the maximum
lifting height and speed are reduced by half.

11 GB
Accessories
The following tools are needed for the safe and
proper use of the block and tackle function:
¾ 2 spanners (8 mm)
¾ 2 spanners (13 mm)
m
WARNING
u Do not use any accessories not
recommended by Parkside.
¾ Fasten the hook
12
to the intended mounting
opening
18
. The steel cable
14
now forms a
loop (Fig. C).
¾ Dismantle the pulley
11
of the extra hook:
Remove the 3 screws (Fig. F).
¾ Hang the pulley
11
in the loop formed by
the steel cable
14
(Fig. G).
¾ Attach the screws and the extra hook
10
to
the pulley
11
. Fasten the 3 screws (Fig. H).
¾ The block and tackle is now operational
(Fig. I).
Cleaning and care
m
WARNING!
Disconnect the device from the power supply
before inspections, maintenance or cleaning!
Cleaning
¾ Ensure that no water enters the product
interior.
¾ Regular, proper cleaning helps ensure safe
operation and lengthens the service life of
your product.
¾ Clean the product with a dry cloth. Use a
soft brush for hard-to-reach areas.
NOTE
u Do not use any chemical, alkaline,
abrasive or otherwise aggressive cleaning
or disinfecting agents to clean the product
as they may damage its surfaces.
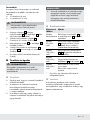
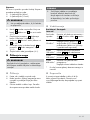
Maintenance
Test interval Procedure
Before each use Check whether the emergency
off switch
7
and control
switch
8
are properly
functioning.
Every 30 cycles* Check the entire steel cable
14
for damages (Fig. K).
Replace the steel cable
if damaged (available at
specialist retailers).
Every 100 cycles* Check to ensure the
maximum/minimum length
levers
15
16
are fully
functional without load.
Every 200 cycles*
Lubricate the steel cable
14
and the pulley
11
.
Every 800 cycles* Make sure all screws are
securely fastened.
Check the entire product for
signs of wear.
* One cycle corresponds to one upward and
downward movement of a load.
Repairs
There are no parts in the product interior that
can be repaired by the user. Contact a qualified
professional to have the product checked and
repaired.

12 GB
Storage
¾ Clean the product as described above.
¾ Store the product and its accessories in
a dark, dry, frost-free and well-ventilated
location.
¾ Store the product at a location out of the
reach of children. The ideal temperature
for long-term storage is between +5 and
+30 °C.
¾ Store the product in its original packaging.
Disposal
The packaging is made entirely of recyclable
materials, which you may dispose of at local
recycling facilities.
Observe the marking of the packaging
materials for waste separation, which
are marked with abbreviations (a) and
numbers (b) with following meaning:
1 – 7: plastics / 20 – 22: paper and
fibreboard / 80 – 98: composite
materials.
The product and packaging materials
are recyclable, dispose of it separately
for better waste treatment.
The Triman logo is valid in France only.
Contact your local refuse disposal
authority for more details of how to
dispose of your worn-out product.
To help protect the environment, please
dispose of the product properly when
it has reached the end of its useful
life and not in the household waste.
Information on collection points and
their opening hours can be obtained
from your local authority.
Warranty
The product has been manufactured to strict
quality guidelines and meticulously examined
before delivery. In the event of product defects
you have legal rights against the retailer of this
product. Your legal rights are not limited in any
way by our warranty detailed below.
The warranty for this product is 3 years from the
date of purchase. Should this product show any
fault in materials or manufacture within 3 years
from the date of purchase, we will repair or
replace it – at our choice – free of charge to you.
The warranty period begins on the date of
purchase. Please keep the original sales receipt
in a safe location. This document is required as
your proof of purchase. This warranty becomes
void if the product has been damaged, or used or
maintained improperly.
The warranty applies to defects in material
or manufacture. This warranty does not cover
product parts subject to normal wear, thus
possibly considered consumables (e. g. batteries)
or for damage to fragile parts, e. g. switches,
rechargeable batteries or glass parts.
Warranty claim procedure
To ensure quick processing of your case, please
observe the following instructions:
Please have the till receipt and the item number
(e.g. IAN 123456_7890) available as proof of
purchase.

13 GB
You will find the item number on the type plate,
an engraving on the front page of the instructions
(bottom left), or as a sticker on the rear or bottom
of the appliance.
If functional or other defects occur, please contact
the service department listed either by telephone
or by e-mail.
You can return a defective product to us free
of charge to the service address that will be
provided to you. Ensure that you enclose the proof
of purchase (till receipt) and information about
what the defect is and when it occurred.
Service
Service Great Britain
Tel.: 0800 404 7657
E-Mail: o[email protected]

14 GB
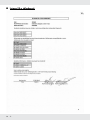
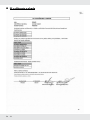
EC Declaration of conformity

15 HU
Felhasznált figyelmeztető jelzések és szimbólumok .................Oldal 16
Bevezető ...............................................................Oldal 16
Rendeltetésszerű használat ................................................Oldal 16
A csomagolás tartalma ...................................................Oldal 17
A részegységek leírása ...................................................Oldal 17
Műszaki adatok .........................................................Oldal 17
Biztonsági utasítások..................................................Oldal 18
Összeszerelés..........................................................Oldal 19
Mielőtt először használná.............................................Oldal 19
Kezelés.................................................................Oldal 20
A kábel fel- és letekerése ..................................................Oldal 20
Terhek megemelése ......................................................Oldal 20
Kábelhosszállító kar......................................................Oldal 20
Vészleállító .............................................................Oldal 20
Beállítás csigasorként.....................................................Oldal 20
Tisztítás és ápolás .....................................................Oldal 21
Tisztítás................................................................Oldal 21
Karbantartás ...........................................................Oldal 21
Javítás.................................................................Oldal 21
Tárolás . . . . . . . . . . . . . . . . . . . . . . . . . . . . . . . . . . . . . . . . . . . . . . . . . . . . . . . . . . . . . . . . Oldal 22
Mentesítés .............................................................Oldal 22
Garancia ...............................................................Oldal 22
EK-megfelelőségi nyilatkozat .........................................Oldal 24

16 HU
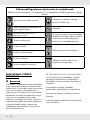
Felhasznált figyelmeztető jelzések és szimbólumok
Ebben a kezelési útmutatóban, a csomagoláson és az adattáblán az alábbi figyelmeztető jelzések
láthatók:
Olvassa el a használati útmutatót.
A termék az I. védelmi osztályba
tartozik, és földelni kell.
Vegye figyelembe a figyelmeztető- és
biztonsági jelzéseket!
Váltóáram
IP54
A termék védett a portól és a
ráfröccsenő víztől.
Gondoskodjon arról, hogy az acélkábel
megfelelően fel legyen tekerve a dobra.
A tekercsek közötti távolság legyen
kisebb, mint az acélkábel átmérője.
Viseljen védőkesztyűt!
Viseljen fülvédőt!
Beállítás egyszerű emelőcsigaként.
Viseljen védőszemüveget!
Viseljen porálarcot!
Beállítás 2 emelőcsigából és egy
görgőből álló csigasorként.
Viseljen megfelelő védőcipőt!
ELEKTROMOS CSÖRLŐ
PSZ 250 A1
Bevezető
Gratulálunk új termékének vásárlása alkalmából.
Ezzel a döntésével vállalatunk értékes terméke
mellett döntött. A használati utasítás ezen termék
része. A biztonságra, a használatára és a
megsemmisítésre vonatkozó fontos tudnivalókat
tartalmazza. A termék használata előtt ismerje
meg az összes használati és biztonsági
tudnivalót. A terméket csak a leírtak szerint és a
megadott felhasználási területeken alkalmazza.
A termék harmadik személy számára való
továbbadása esetén kézbesítse vele annak a
teljes dokumentációját is.
Rendeltetésszerű használat
Ez az emelőcsiga (a továbbiakban „termék”)
rakományok felemelésére és leengedésére
használható. A teher a terméken egy kampóra
rögzíthető.
A termék belső terekben (pajtákban,
garázsokban, műhelyekben stb.) használható.
A termék nem alkalmas oldalirányú húzóerő
kifejtésére.
A termék háztartási célra készült, üzleti célokra
nem használható.

17 HU
A termék más használati módjai, módosításai nem
rendeltetésszerűnek minősülnek és életveszély,
sérülések és károk kockázatával járnak. A gyártó
nem vállal felelősséget a nem rendeltetésszerű
használatból eredő károkét. A terméket nem
üzleti felhasználásra, vagy egyéb alkalmazásra
szánták.
A csomagolás tartalma
m
FIGYELMEZTETÉS!
u A termék és a csomagolóanyagok nem
játékszerek! Gyermekek nem játszhatnak
a műanyag zacskókkal, fóliákkal és az
apró alkatrészekkel! Lenyelés és fulladás
veszélye!
1 x Elektromos csör lő
1 x Pótkampó csigával
2 x Szerelőkeretek
4 x Rögzítőcsavar (nem levehető rugós alátéttel
és levehető alátéttel)
1 x Kezelési útmutató
A részegységek leírása
1
Szerelőkeret
2
Rögzítőcsavarok (nem levehető rugós
alátéttel és levehető alátéttel)
3
Motor
4
A távszabályzó akasztókábele
5
Irányítókábel
6
Elektromos vezeték csatlakozóval
7
Vészleállító
8
Vezérlőkapcsoló ( / )
9
Távszabályzó
10
Pótkampó
11
Csiga
12
Kampó
13
Zárósúly
14
Acélkábel
15
Kábelhosszállító kar felfelé
16
Kábelhosszállító kar lefelé
17
Dob
18
Rögzítőfurat a kampóhoz
Műszaki adatok
Elektromos csörlő PSZ 250 A1
Névleges feszültség: 230 V∼, 50 Hz
Névleges áramerősség: 2,2 A
Névleges teljesítmény: 500 W
Működési típus: S3 20 % 10 perc:
Engedélyezett terhelés: 125 kg* | 250 kg**
Emelési magasság: 12 m* | 6 m**
Névleges sebesség: 8 m/min* | 4 m/min**
Az acélkábel átmérője: 3 mm
Az acélkábel
szakítószilárdsága: 1870 N/mm²
Védelmi osztály: I
Meghajtótípus: M1
Védelmi besorolás: IP54
Működési feltételek
(tengerszint
feletti magasság:
max. 1000 m):
0 és +40 °C között
< 80 % relatív
páratartalom
Tárolási feltételek: –25 és +55 °C között
< 80 % relatív
páratartalom
Nettó súly: 10 kg
* Beállítás egyszerű emelőcsigaként
** Beállítás 2 emelőcsigából és egy görgőből
álló csigasorként
Működési típus S3 20 % 10 perc:
S3 = Időszakos működés az indítási folyamat
hatása nélkül. Egy adott 10 perces
időintervallumon belül a maximális működési
idő ennek a 20 %-a (2 perc).
Az A-besorolású zajkibocsájtás a kezelő
személyénél alacsonyabb, mint 86 dB(A).

18 HU
Biztonsági utasítások
m
FIGYELMEZTETÉS!
u Olvasson el minden, ehhez a
termékhez mellékelt biztonsági
utasítást, figyelmeztetést, ábrát
és műszaki adatot. A biztonsági
utasítások és az alábbi figyelmeztetések
figyelmen kívül hagyása áramütéshez,
tűzesethez és/vagy súlyos sérülésekhez
vezethet.
Őrizzen meg minden biztonsági
utasítást és figyelmeztetést biztonságos
helyen későbbi használatra.
¾ A gyermekeket és más nem jogosult
személyeket tartsa a terméktől távol.
m
VESZÉLY!
u Áramütésveszély! Ne próbálja meg
saját kezűleg megjavítani a készüléket.
Hibás működés esetén a termék javítási
munkáit bízza képzett szakemberre.
m
VESZÉLY!
u Áramütésveszély! Tisztítás előtt, vagy
ha a terméket nem használja, kapcsolja
ki a terméket és szüntesse meg az
áramellátását.
m
VESZÉLY!
u Sérülésveszély! A szakszerűtlen
kezelés sérülésekhez vezethet. A terméket
kizárólag ezen használati útmutatónak
megfelelően használja. Ne próbálja meg
a terméket bármilyen módon módosítani.
m
VESZÉLY!
u Sérülésveszély! Ne használja a
terméket, ha sérült. Ha a termék megsérült,
válassza le a hálózati áramról és forduljon
az eladójához.
¾ Ügyeljen arra, hogy a hálózati feszültség
adatai megfeleljenek az adattáblán
feltüntetett névleges feszültség adatainak.
¾ Ha lehetséges, a terméket csak olyan
áramkörön üzemeltesse, mely egy
maradékáram-megszakítóval van ellátva,
mely egy legalább 10 A értékű biztosítékkal
rendelkezik.
¾ Hosszabbító használata nem ajánlott.
Amennyiben mégis szükség van
hosszabbítókábelre, annak alkalmasnak kell
lennie legalább 10 A áram vezetésére.
¾ A terméket, az elektromos vezetéket és
a csatlakozót óvja a portól, a közvetlen
napfénytől, a rácseppenő vagy ráfröccsenő
víztől.
¾ Óvja az elektromos vezetéket a sérülésektől.
Ne hagyja, hogy azt éles sarkokon
átlógni, becsípődni, és ne hajlítsa meg. Az
elektromos vezetéket tartsa forró felületektől
és nyílt lángoktól távol.

19 HU
¾ Ne használja a készüléket, ha az elektromos
vezeték vagy a hálózati csatlakozó sérült,
ha a termék nem működik, vagy bármilyen
módon megsérült.
¾ Ha a termék hálózati csatlakozókábele
megsérül, a kockázatok elkerülése érdekében
azt a gyártónak, az ügyfélszolgálatának,
vagy egy annak megfelelő képzettségű
szakembernek kell kicserélnie.
¾ Az elektromos csatlakozót ne a vezetéknél
fogva húzza ki a konnektorból.
Különleges biztonsági utasítások
emelőcsigákhoz
¾ A terméket használó személyeknek
megfelelő képzettséget vagy utasításokat kell
kapnia.
¾ Tilos a termékkel személyeket mozgatni.
¾ Tilos a névleges terhelést meghaladó
terheket emelni.
¾ Ne próbáljon rögzített vagy leragadt
terheket felemelni.
¾ A rakomány felemelésekor az acélkábelnek
meg kell feszülnie.
¾ Ne húzzon rakományokat vízszintes
irányban.
¾ Kerülje a túl gyors be- és kikapcsolást
(léptető üzemmód).
¾ A termék kezelése során legyen mindig
körültekintő.
¾ Soha ne hagyjon lelógó rakományokat
felügyeleten kívül biztonsági óvintézkedések
nélkül.
¾ Ne álljon vagy dolgozzon felemelt
rakományok alatt.
¾ A termék nem rendelkezik névleges
teljesítmény-szabályozóval. Ne próbálja
tovább emelni a rakományt, ha a
túlhevülésgátló korlátozza a működést.
A rakomány ekkor meghaladja a termék
névleges teljesítményét.
¾ A kábelhosszállító kart
15
16
ne
használja normál leállítószerkezetként. A
kábelhosszállító karok csak vészhelyzeti
leállításra használhatóak.
¾ Mielőtt nekilátna: Ellenőrizze, hogy
– hogy az acélkábel
14
megfelelően a
dobra
17
van-e tekerve, valamint, hogy
– a tekercsek közötti távolság kisebb legyen,
mint az acélkábel átmérője (D ábra).
Összeszerelés
(E ábra)
m
VESZÉLY!
u A négyszögletes rúdnak a termék rögzítési
pontjánál legalább 500 kg terhelést kell
elbírnia. Ha ebben nem biztos, kérje ki
szakember (pl. statikus) tanácsát.
u Forduljon szakemberhez annak
megállapításához, hogy a csavarokat
teljes mértékben és helyesen húzta-e meg.
u A termék üzembe helyezése előtt
vizsgáltassa meg a négyszögletes rúd
rögzítését egy képzett műszerésszel
vagy egy annak megfelelő képzettségű
személlyel.
¾ Rögzítse a terméket a szerelőkeretek
1
és a rögzítőcsavarok
2
segítségével egy
megfelelő négyszögletes rúdhoz.
¾ Húzza meg a rögzítőcsavarokat
2
erősen.
Mielőtt először használná
¾ Távolítsa el az acélkábel
14
szállítóreteszét.
Vágja át a gumiszalagot, majd vegye le.

20 HU
¾ Mielőtt nekilátna: Ellenőrizze, hogy
– hogy az acélkábel
14
megfelelően a
dobra
17
van-e tekerve, valamint, hogy
– a tekercsek közötti távolság kisebb legyen,
mint az acélkábel átmérője (D ábra).
¾ Ellenőrizze, hogy az acélkábel
14
megfelelően áthalad-e a kábelhosszállító
karokon
15
16
anélkül, hogy azokhoz
hozzáérne (B ábra).
Kezelés
MEGJEGYZÉS
u A termék termosztátkapcsolóval
rendelkezik. A működés alatt ez leállíthatja
a motort
3
. A motort csak akkor lehet
újraindítani, ha az már lehűlt.
A kábel fel- és letekerése
(J ábra)
¾ A kábel feltekerése: Nyomja meg a
vezérlőkapcsolót
8
a nyíl irányának
megfelelően felfelé.
¾ A kábel letekerése: Nyomja meg a
vezérlőkapcsolót
8
a nyíl irányának
megfelelően lelfelé.
Terhek megemelése
¾ Engedje le az acélkábelt
14
annyira, hogy
azt kényelmesen kezelni tudja.
¾ Rögzítse a terhet a kampóra
10
12
. Szükség
szerint több rögzítőszíjat is használhat.
A teher súlypontjának a termék alján kell
lennie.
¾ Húzza fel az acélkábelt
14
annyira, hogy
az épp megfeszüljön. Ezt követően kezdje
felemelni a terhet.
Kábelhosszállító kar
MEGJEGYZÉS
u A kábelhosszállító kar
15
16
nem a
termék normál leállítására szolgál. Mindig
próbálja leállítani a terméket, mielőtt az
egy kábelhosszállító kart aktiválna.
Kábelhosszállító kar felfelé
Amikor az acélkábel
14
teljes mértékben fel
van tekerve, a kábelhosszállító kar felfelé
15
működésbe lép. Az acélkábelt nem lehet tovább
felfelé húzni. Az acélkábelt ekkor csak lefelé lehet
engedni.
Kábelhosszállító kar lefelé
Amikor az acélkábel
14
teljes mértékben fel
van tekerve, a kábelhosszállító kar lefelé
16
működésbe lép. Az acélkábelt nem lehet tovább
lefelé engedni. Az acélkábelt ekkor csak felfelé
lehet húzni.
Vészleállító
(J ábra)
¾ Vészhelyzet esetén az emelkedést vagy
a leeresztést leállíthatja a vészleállító
7
megnyomásával.
¾ A termék ekkor zárolódik. A termék
zárolásának feloldásához fordítsa el a
vészleállítót
7
kissé az óramutató járásával
megegyező irányban (a nyíl irányában),
amíg az ki nem ugrik.
Beállítás csigasorként
Csigasorként történő beállítás esetén a teher
két csigára fog eloszlani. Így kétszer annyi súly
is megemelhető. Emellett a maximális emelési
magasság és a sebesség megfeleződik.
Seite wird geladen ...
Seite wird geladen ...
Seite wird geladen ...
Seite wird geladen ...
Seite wird geladen ...
Seite wird geladen ...
Seite wird geladen ...
Seite wird geladen ...
Seite wird geladen ...
Seite wird geladen ...
Seite wird geladen ...
Seite wird geladen ...
Seite wird geladen ...
Seite wird geladen ...
Seite wird geladen ...
Seite wird geladen ...
Seite wird geladen ...
Seite wird geladen ...
Seite wird geladen ...
Seite wird geladen ...
Seite wird geladen ...
Seite wird geladen ...
Seite wird geladen ...
Seite wird geladen ...
Seite wird geladen ...
Seite wird geladen ...
Seite wird geladen ...
Seite wird geladen ...
Seite wird geladen ...
Seite wird geladen ...
Seite wird geladen ...
Seite wird geladen ...
Seite wird geladen ...
Seite wird geladen ...
Seite wird geladen ...
Seite wird geladen ...
Seite wird geladen ...
Seite wird geladen ...
Seite wird geladen ...
Seite wird geladen ...
Seite wird geladen ...
Seite wird geladen ...
Seite wird geladen ...
Seite wird geladen ...
Seite wird geladen ...
-
 1
1
-
 2
2
-
 3
3
-
 4
4
-
 5
5
-
 6
6
-
 7
7
-
 8
8
-
 9
9
-
 10
10
-
 11
11
-
 12
12
-
 13
13
-
 14
14
-
 15
15
-
 16
16
-
 17
17
-
 18
18
-
 19
19
-
 20
20
-
 21
21
-
 22
22
-
 23
23
-
 24
24
-
 25
25
-
 26
26
-
 27
27
-
 28
28
-
 29
29
-
 30
30
-
 31
31
-
 32
32
-
 33
33
-
 34
34
-
 35
35
-
 36
36
-
 37
37
-
 38
38
-
 39
39
-
 40
40
-
 41
41
-
 42
42
-
 43
43
-
 44
44
-
 45
45
-
 46
46
-
 47
47
-
 48
48
-
 49
49
-
 50
50
-
 51
51
-
 52
52
-
 53
53
-
 54
54
-
 55
55
-
 56
56
-
 57
57
-
 58
58
-
 59
59
-
 60
60
-
 61
61
-
 62
62
-
 63
63
-
 64
64
-
 65
65


Parkside PSZ 250 A1 Original Instructions Manual
- Typ
- Original Instructions Manual
in anderen Sprachen
- slovenčina: Parkside PSZ 250 A1
Verwandte Artikel
-
Parkside PSZ 250 A1 Operation And Safety Notes Translation Of The Original Instructions
-
Parkside PMBS 105 A1 Operation and Safety Notes
-
-
-
-
-
-
Andere Dokumente
-
EINHELL BT-EH 1000 Benutzerhandbuch
-
Einhell Blue BT-EH 500 Bedienungsanleitung
-
Güde GSZ 600 Translation Of Original Operating Instructions
-
Husqvarna Friction Saver Rope Climbing Gear Benutzerhandbuch
-
Westfalia WS18SH200 Li-Ion Cable Hoist Benutzerhandbuch
-
Powerplus POWX900 Bedienungsanleitung
-
-
GYS POWER PULLER 4T Bedienungsanleitung
-
Silvercrest 284982 Operation and Safety Notes
-
Powerplus POWX902 Bedienungsanleitung