
Designed in The Netherlands
GEBRUIKSAANWIJZING JOOLZ GEO
INSTRUCTION MANUAL JOOLZ GEO
GEBRAUCHSANWEISUNG JOOLZ GEO
ISTRUZIONI PER L'USO JOOLZ GEO
WAARSCHUWING ! Garantie pagina 59 Geen registratie = geen service !
WARNING ! Warranty page 64 No registration = no service !
WARNUNG ! Garantie Seite 68 Keine Registrierung = Kein Service !
IMPORTANTE ! Garanzia pagina 72 Nessun registro = nessun servizio !

instruction manual
3
Hello there!
Let me introduce myself. I am the Joolz Geo, the best companion for every
family adventure. For all the exciting things happening right now and for those
yet to come. Whether you decide to explore new destinations, new possibilities,
or new experiences, my performance will enrich every journey.
Following is a step-by-step guide to understanding me, so I can be of service to
you in the best possible way.
Please read this manual carefully and with a smile.
Wishing you a great journey!
Please remember to ll in the warranty card on the Joolz website. Collect your
personal birth tree when you register!
IMPORTANT: Please read these instructions carefully before usage and keep
them for future reference.
HELLO
HELLO
HELLO
HELLO
HALLO
HALLO
HALLO
GUTEN TAG
GUTEN TAG
GUTEN TAG
CIAO
CIAO
CIAO
CIAO
INTRODUCTION
JOOLZ
Nieuwe Herengracht 51-53
1011 RN Amsterdam
e Netherlands
T +31(0) 206 304 887

instruction manual
4
instruction manual
5
INDEX
Unwrap me ....................................................................................................................... 7
Congurations .............................................................................................................. 14
Get me up and running ................................................................................................ 18
Get me ready for duo .................................................................................................... 40
Storage ........................................................................................................................... 54
Nederlands ..................................................................................................................... 58
English ...........................................................................................................................62
Deutsch ........................................................................................................................... 66
Italiano ............................................................................................................................ 70


instruction manual
8
instruction manual
9
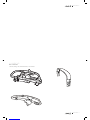
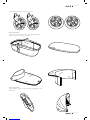
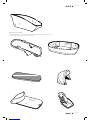
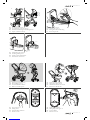
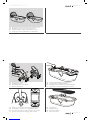
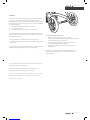
2 front wheels (swivel wheels), 2 rear wheels (air tires)
Box 2: Upper cot box
1 upper cot/ seat frame, 1 upper cot fabric, 1 hypoallergenic breathable
mattress, 1 upper cot cover, 1 upper cot cushion
Box 3: Upper seat box
1 upper seat fabric, 1 upper cot/ seat sun hood frame including fabric, 1 XL
basket fabric


instruction manual
14
instruction manual
15
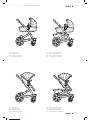
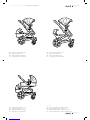
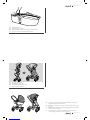
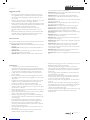
2. CONFIGURATIONS - 2.1 Standard/mono congurations
NL
EN
DE
IT
Bovenste wieg
Single upper cot
Einzelne obere Wanne
Culla singola superiore
NL
EN
DE
IT
Bovenste wieg en XL mand
Upper cot and XL basket
Obere Wanne und XL Korb
Culla superiore e cestello XL
NL
EN
DE
IT
Bovenste stoel
Single upper seat
Einzelner oberer Sitz
Seduta singola superiore
NL
EN
DE
IT
Bovenste stoel en XL mand
Upper seat and XL basket
Oberer Sitz und XL Korb
Seduta superiore e cestello XL

instruction manual
16
instruction manual
17
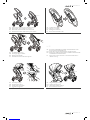
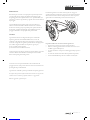
2. CONFIGURATIONS - 2.2 Optional duo congurations
NL
EN
DE
IT
Bovenste stoel en onderste wieg
Upper seat and lower cot
Oberer Sitz und untere Wanne
Seduta superiore e culla inferiore
NL
EN
DE
IT
Bovenste stoel en onderste stoel
Upper seat and lower seat
Oberer Sitz und unterer Sitz
Seduta superiore e seduta inferiore
NL
EN
DE
IT
Bovenste wieg en onderste wieg
Upper cot and lower cot
Obere Wanne und untere Wanne
Culla superiore e culla inferiore
NL
EN
DE
IT
Bovenste wieg frame = bovenste stoel frame
Upper cot frame = upper seat frame
Oberer Wannenrahmen = Oberer Sitzrahmen
Telaietto culla superiore = Telaietto seduta superiore
NOTE

instruction manual
18
instruction manual
19
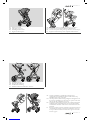
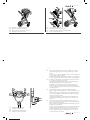
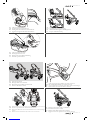
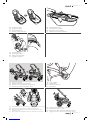
3. GET ME UP AND RUNNING
NL
EN
DE
IT
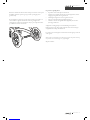
Monteren van het onderstel
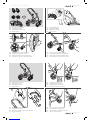
Assembling the chassis
Zusammenbauen des Gestells
Montare il telaio
NL
EN
DE
IT
Onderstel uitklappen
Unfolding the chassis
Entfalten des Gestells
Aprire il telaio
click!
click!
1 2
click!
1 2
NL
EN
DE
IT
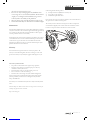
Achterwielen (luchtbanden) bevestigen
Attaching the rear wheels (air tires)
Anbringen der Hinterräder (Lubereifung)
Inserire le ruote posteriori (pneumatici ad aria)
NL
EN
DE
IT
Voorwielen (zwenkwielen) bevestigen
Attaching the front wheels (swivel wheels)
Anbringen der Vorderräder (Schwenkräder)
Inserire le ruote anteriori (ruote piroettanti)
NL
EN
DE
IT
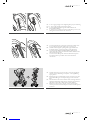
Gebruik van het onderstel
Adjusting the chassis
Einstellung des Gestells
Regolare il telaio
NL
EN
DE
IT
Vergrendel beide voorwielen
Locking both the front wheels
Verriegeln beider Schwenkräder
Bloccare entrambi le ruote anteriori
NL
EN
DE
IT
Duwbeugel in hoogte verstellen
Adjusting the handlebar
Verstellen der Schiebestange in die korrekte Höhe
Regolare il manubrio
NL
EN
DE
IT
Rem vergrendelen en ontgrendelen
Activating and releasing the brake
Aktivieren und Lösen der Feststellbremse
Azionare e rilasciare il freno

instruction manual
20
instruction manual
21
NL
EN
DE
IT
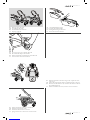
Demonteren van het onderstel
Disssembling the chassis
Auseinanderbauen des Gestells
Rimuovere il telaio
NL
EN
DE
IT
Achterwielen verwijderen
Removing the rear wheels
Entfernen der Hinterräder
Rimuovere le ruote posteriori
1
2
1
2
1
2
NL
EN
DE
IT
Voorwielen verwijderen
Removing the front wheels
Entfernen der Vorderräder
Rimuovere le ruote anteriori
NL
EN
DE
IT
Onderstel inklappen
Folding the chassis
Zusammenfalten des Gestells
Chiudere il telaio
NL
EN
DE
IT
(1) Vergrendel eerst de rem, (2) ontgrendel de duwbeugel door de
klipjes opwaarts te trekken, (3) trek de duwbeugel iets naar je toe, en
klap de kinderwagen in
(1) First apply the brake, (2) unlock the handlebar by pulling the
oblong buttons upwards simultaneously, (3) pull the handle bar
upwards, and fold the pushchair
(1) Um das Gestell zusammenzufalten, ziehen Sie zunächst die Bremse
an , (2) lösen Sie dann den Sicherheitsbügel, indem Sie die
Sicherheitsklinken gleichzeitig nach oben drücken, (3) Schieben Sie
den Sicherheitsbügel nach oben und falten Sie den Kinderwagen
zusammen
(1) Per chiudere il telaio azionare per prima cosa il freno, (2) sbloccare
il manubrio premendo i pulsanti verso l’alto contemporanemente da
ambo i lati, (3) tirare il manubrio verso l’alto e piegare il passeggino
3
4click!
NOTE

instruction manual
22
instruction manual
23
1
2
3
5
6
4
NL
EN
DE
IT
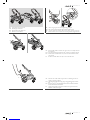
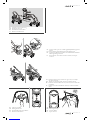
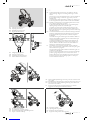
Monteren van de bovenste wieg
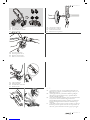
Assembling upper cot
Zusammenbauen der oberen Wanne
Montare la culla superiore
NL
EN
DE
IT
Duwbeugel verstellen in hoogste positie
Adjusting the handlebar to its highest position
Verstellen der Schiebestange in die höchste Position
Regolare il manubrio all’altezza massima
click!
click!
NL
EN
DE
IT
Wieg op het onderstel plaatsen
Placing the cot on the chassis
Platzieren der Wanne auf dem Gestell
Inserire la culla superiore al telaio
NL
EN
DE
IT
Klap de wieg uit en span deze door middel van de wiegbeugels
To unfold the cot or tighten the cot simply pull the clamps
Auseinanderfalten und Spannen der Wanne durch Benutzung der Haken
Apertura ed estenzione della culla agganciando i morsetti
1
2
NL
EN
DE
IT
Wiegkussen plaatsen door middel van de rits en de drukknopen
Attach the cot cushion by using the zipper and push buttons
Befestigen des Wannenkissens mithilfe des Reisverschlusses und der Druckknöpfe
Inserimento del cuscino della culla utilizzando la cerniera ed i bottoni a pressione
NL
EN
DE
IT
Matras plaatsen
Placing the mattress
Platzieren der Matratze
Inserire il materassino
12
NL
EN
DE
IT
Zonnekap bevestigen
Attaching the sun hood
Befestigen des Sonnendachs
Agganciare la cappottina
NL
EN
DE
IT
Vind de zonnekap in doos 3: Bovenste stoel
Gebruik de bovenste wieg altijd in combinatie met het wiegkussen
Find the sun hood within Box 3: Upper seat box
Use the upper cot always in combination with the cot cushion
Das Sonnendach nden Sie in der Box 3: Oberer Sitz
Benutzen Sie die obere Wanne immer in Kombination mit dem
dazugehörigen Wannenkissen
La cappottina si trova all’interno della confezione 3: Seduta superiore
Utilizzare la culla superiore sempre insieme al cuscino della culla.
NOTE

instruction manual
24
instruction manual
25
1
2
NL
EN
DE
IT
Air-Top openen en sluiten
Uncovering and covering the Air-Top
Abnehmen und Befestigen des Belüungsfensters
Scoprire e richiudere l’Air-Top
NL
EN
DE
IT
Wiegdekje bevestigen
Fastening the cot cover
Befestigen der Wannenabdeckung
Inserire il copri culla
click! click!
click!
click!
NL
EN
DE
IT
Veiligheidsbeugel bevestigen
Attaching the bumper bar
Anbringen des Sicherheitsbügels
Inserire la barra di sicurezza
6
5
4
2
1
3
NL
EN
DE
IT
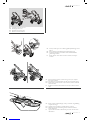
Demontage van bovenste wieg
Disassembling upper cot
Auseinanderbauen der Wanne
Rimuovere la culla superiore
NL
EN
DE
IT
Til de wieg van het onderstel
Taking the cot o the chassis
Abnehmen der Wanne vom Gestell
Rimuovere la culla dal telaio
2
1
90°
NL
EN
DE
IT
Vouw de wieg in
Folding the cot
Zusammenfalten der Wanne
Chiudere la culla
NL
EN
DE
IT
Spanbeugels verwijderen
Taking clamps of the upper cot
Lösen der Haken
Rilasciare i morsetti

instruction manual
26
instruction manual
27
NL
EN
DE
IT
Bekleding losritsen
Unzip the upper cot fabric
Önen des Reißverschlusses des Bezugs der oberen Wanne
Aprire la cerniera del tessuto della culla superiore
1
24
3
NL
EN
DE
IT
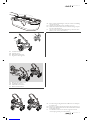
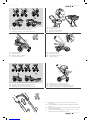
Monteren van de stoel
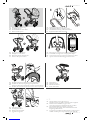
Assembling the upper seat
Zusammenbauen des oberen Sitzes
Montare la seduta superiore
=
NL
EN
DE
IT
De bovenste wieg maakt gebruik van hetzelfde frame, zonnekap en
veiligheidsbeugel als de bovenste stoel
e upper cot employs the same frame, sun hood and safety bar as the
upper seat
Rahmen, Sonnendach und Sicherheitsbügel sind für die obere Wanne
und oberen Sitz verwendbar
La culla superiore monta lo stesso telaietto, cappottina e barra di
sicurezza impiegati anche per la seduta superiore

instruction manual
28
instruction manual
29
click!
click!
NL
EN
DE
IT
Frame van bovenste stoel op het onderstel bevestigen
Positioning the upper seat frame on the chassis
Platzieren des oberen Sitzrahmens auf dem Gestell
Inserimento del telaietto della seduta superiore sul telaio
NL
EN
DE
IT
Stoelkussen bevestigen
Fixing the seat cushion
Befestigen des Sitzkissens
Inserire il cuscinetto della seduta
1
2
NL
EN
DE
IT
Stoelbekleding bevestigen
Fastening the upper seat fabric
Befestigen des Sitzstos
Inserimento del tessuto della seduta superiore
NL
EN
DE
IT
Zonnekap bevestigen
Attaching the sun hood
Anbringen des Sonnendachs
Agganciare la cappottina
click!
click!
NL
EN
DE
IT
Veiligheidsbeugel bevestigen
Attaching the bumper bar
Anbringen des Sicherheitsbügels
Inserire la barra di sicurezza
NL
EN
DE
IT
Bevestig de stoelbekleding met behulp van het klittenband aan het
frame en rits daarna de bekleding vast
Fix the Velcro straps in the frame and the seat fabric and zip it
Befestigen Sie die Klettverschlussstreifen am Rahmen und am Sitzsto
und schließen Sie den Reißverschluss
Fissare i lacci in velcro sul telaietto e sul rivestimento della seduta e
chiuderli con la zip
NOTE

instruction manual
30
instruction manual
31
NL
EN
DE
IT
Gebruik van de stoel
Adjusting the upper seat
Einstellung des oberen Sitzes
Regolare la seduta superiore
NL
EN
DE
IT
Stoel positie verstellen door gelijktijdig de ronde knoppen in te drukken
To adjust the seat position push the buttons simultaneously
Verändern der Sitzposition durch gleichzeitiges Drücken der Sicherheitsknöpfe
Regolare la seduta facendo pressione sui pulsanti simultaneamente
c
b
a
2
1
NL
EN
DE
IT
Stoel richting wijzigen
Changing the seat direction
Verändern der Sitzrichtung
Cambiare l’orientamento della seduta - direzione
1
2
3
NL
EN
DE
IT
Verander de richting door tegelijkertijd op de langwerpige
ontkoppelknoppen te drukken en til dan één kant van de stoel op.
Herhaal deze actie met de andere kant
Alter the position by simultaneously pushing in the oblong buttons on
the connector and liing up one side of the seat, repeat the same action
with the other side and turn the seat around
Verändern Sie die Sitzrichtung, indem Sie den rechteckigen Knopf am
Verbindungsstück eindrücken und eine Seite des Sitzes hoch heben,
wiederholen Sie die Schritte auf der anderen Seite und drehen Sie den
Sitz herum
Invertite la posizione premendo sui pulsanti rettangolari del connettore
e simultaneamente tirando verso l’alto un lato della seduta, ripetere lo
stesso procedimennto sull’altro lato della seduta e girare la stessa nella
direzione opposta

instruction manual
32
instruction manual
33
click!
1
2
NL
EN
DE
IT
Klik de stoel terug op het onderstel
Click the seat back onto the chassis
Drücken Sie ihn herunter bis er einrastet
Riposizionare la seduta sul telaio
NL
EN
DE
IT
Air-Top openen en sluiten
Uncovering and covering the Air-Top
Abnehmen und Befestigen des Belüungsfensters
Scoprire e richiudere l’Air-Top
1. Haal de kruisgordel tussen de benen van je kind door. Door de
zitplaat omhoog te klappen, kan de kruisgordel in lengte versteld
worden
2. Pas de lengte van de schouderbanden aan door deze met behulp van
de gespen korter of langer te maken
3. Neem de kruisgordel in het midden en schuif de twee slotdelen van
de schoudergordel aan de zijkanten in elkaar totdat deze vastklikken
1. Pull the crotch belt between your child’s legs, raise the base of the
seat to adjust the length of the crotch belt
2. Adjust the length of the shoulder straps to your child’s height by
adjusting the loops beneath the two shoulder pads
3. Hold the crotch strap in the middle and insert the clips on the
shoulder straps into the slots on the sides until they click into place,
release the restraint system by pushing the clips on the shoulder straps
and pulling them out
1. Ziehen Sie den Kreuzgurt zwischen den Beinen des Kindes
hindurch, klappen Sie die Sitzplatte hoch, um die Gurtlänge anzupas-
sen
2. Passen Sie die Länge des Schultergurtes der Größe Ihres Kindes an,
indem Sie ihn mithilfe der Schnallen unter den beiden Schulterpols-
tern kürzer oder länger machen
3. Halten Sie den Kreuzgurt in der Mitte fest und schieben Sie die
Steckschnallen des Schultergurtes an den Seiten ineinander, bis sie
einrasten
1. Posizionare e tirare la cintura spartigambe in mezzo al linguine
destro e sinstro del bambino, sollevate la base della seduta per regolare
l’altezza della cintura spartigambe
2. Regolate l’altezza degli spallacci all’altezza del bambino agendo sui
passanti sotto le imbottiture
3. Tenere la cintura spartigambe nel mezzo e inserire gli attacchi degli
spallacci negli appositi spazi a destra ed a sinsitra sino a che non
risultino chiusi insieme da un click, sbloccare le cinture di sicurezza
facendo una pressione sugli attacchi degli spallacci e contempora-
neamente tirandoli verso l’esterno
NL
EN
DE
IT
Veiligheidsgordel gebruiken
Using the restraint system
Verwendung des Sicherheitsgurtes
Utilizzare la cintura di sicurezza
NL
EN
DE
IT
NOTE

instruction manual
34
instruction manual
35
1
2
NL
EN
DE
IT
4. Om toegang te krijgen tot de veiligheidsgordel open je de ritssluiting
4. To access the restraint system unzip the pocket
4. Um Zugri zum Sicherheitsgurt zu erhalten önen Sie die
Reissverschluss-Önung
4. Aprire la tasca a cerniera posta sul retro della seduta per avere accesso
alla regolazione d’altezza alle cincture di sicurezza
NL
EN
DE
IT
5. Trek de gordel door de opening in de stof aan de bovenkant van de
stoel en controleer of de riem op juiste wijze soepel meegee
5. Pull the belts through the openings of the upper seat fabric and
check if the straps are correclty engaged by a gentle pull motion
5. Ziehen Sie die Schlaufen durch die Önungen des Bezugs des
oberen Sitzes und versichern Sie sich durch ein kurzes Ziehen, dass die
Gurte korrekt befestigt sind
5. Tirate le cinture dalle aperture del tessuto della seduta superiore e
tirate moderatamente per vericare che le cinture siano ssate
correttamente
4
3
2
1
NL
EN
DE
IT
Verwijder de bovenste stoel. Voer de eerdere acties uit in omgekeerde
volgorde om de stoelbekleding te verwijderen, en de wiegbekleding
erop te plaatsen
Releasing the upper seat. Perform the previous actions in reverse order
to disassemble the upper seat and place the upper cot back onto the
frame
Herausnehmen des oberen Sitzes. Führen Sie die vorherigen Schritte in
umgekehrter Reihenfolge durch, um den oberen Sitz ab zu montieren
und platzieren Sie die obere Wanne wieder auf dem Rahmen
Rimuovere la seduta superiore. Eseguire le stesse azioni in ordine
contrario per rimuovere la seduta superiore ed inserire la culla superiore
nel telaietto

instruction manual
36
instruction manual
37
NL
EN
DE
IT
Kantel de XL mand in een hoek van ongeveer 45º en plaats deze in de
connectoren
Turn the XL basket upwards about 45 ‘ and slide it into the connectors
Drehen Sie den XL Korb um ca 45° nach oben und schieben Sie ihn auf
die Verbindungselemente
Inclinare il cestello XL di circa 45° e fatelo scorrere nei connettori
NL
EN
DE
IT
Monteren van de XL mand
Assembling the XL basket
Zusammenbauen des XL Korbes
Inserire il cestello XL
1
2
NL
EN
DE
IT
XL mandbekleding bevestigen
Fastening the XL basket fabric
Befestigen des Bezugs des XL Korbes
Inserire il tessuto del cestello XL
1
NL
EN
DE
IT
Zet de wagen op de rem en plaats de XL mand
Put on the brake and place the XL basket
Ziehen Sie die Bremse an und platzieren Sie den XL-Korb
Azionare il freno ed inserire il cestello XL
click!
NL
EN
DE
IT
Duw de mand naar beneden tot je een klik hoort
Push down until you hear a click
Drücken Sie ihn herunter bis er einrastet
Spingere in basso sino a che non viene avvertito un click

instruction manual
38
instruction manual
39
NL
EN
DE
IT
Verwijderen van de XL mand
Releasing the XL basket
Herausnehmen des XL Korbes
Rimuovere il cestello XL
1
2
NL
EN
DE
IT
Kantel de XL mand in een hoek van ongeveer 45º en verwijder deze uit
het onderstel
Turn the XL basket upwards about 45 ° and remove it from the chassis
Drehen Sie den XL Korb um ca 45° nach oben und entfernen Sie ihn
vom Gestell
Inclinare il cestello XL di circa 45% e rimovetelo dal telaio
1
2
click!
b
a
NL
EN
DE
IT
Scharnier van de XL mand aanpassen door voorzichting met de voet
omhoog of omlaag te duwen
Adjusting shopping basket hinge by pressing/pulling gently with the
feet
Passen Sie die Lage des Einkaufskorbs auf dem Gestell durch leichtes
Ziehen/Drücken mit dem Fuß an
Aggiustamento della cerniera del cestello tramite pressione/rilascio
moderato utilizzando il piede
NL
EN
DE
IT
Zet de wagen op de rem en druk gelijktijdig de clips in
Put on the brake and pull the clips inwards simultaneously
Ziehen Sie die Bremse an und die Sicherheitsverschlüsse gleichzeitig nach innen
Inserire il freno, tirare verso l’interno contemporaneamente gli attacchi
Seite wird geladen ...
Seite wird geladen ...
Seite wird geladen ...
Seite wird geladen ...
Seite wird geladen ...
Seite wird geladen ...
Seite wird geladen ...
Seite wird geladen ...
Seite wird geladen ...
Seite wird geladen ...
Seite wird geladen ...
Seite wird geladen ...
Seite wird geladen ...
Seite wird geladen ...
Seite wird geladen ...
Seite wird geladen ...
Seite wird geladen ...
Seite wird geladen ...
Seite wird geladen ...
-
 1
1
-
 2
2
-
 3
3
-
 4
4
-
 5
5
-
 6
6
-
 7
7
-
 8
8
-
 9
9
-
 10
10
-
 11
11
-
 12
12
-
 13
13
-
 14
14
-
 15
15
-
 16
16
-
 17
17
-
 18
18
-
 19
19
-
 20
20
-
 21
21
-
 22
22
-
 23
23
-
 24
24
-
 25
25
-
 26
26
-
 27
27
-
 28
28
-
 29
29
-
 30
30
-
 31
31
-
 32
32
-
 33
33
-
 34
34
-
 35
35
-
 36
36
-
 37
37
-
 38
38
-
 39
39


in anderen Sprachen
- English: Joolz Geo Owner's manual
- italiano: Joolz Geo Manuale del proprietario
Andere Dokumente
-
Nuna Triv Benutzerhandbuch
-
mothercare chrome™ Bedienungsanleitung
-
iCandy Peach 2 Benutzerhandbuch
-
VERTBAUDET 70303-0032 Benutzerhandbuch
-
ABC Design Turbo S 4F Bedienungsanleitung
-
kiddy Evostar Light 1 Benutzerhandbuch
-
 ickle bubba 10-005-101-014 Benutzerhandbuch
-
Britax affinity Benutzerhandbuch
-
Mamas & Papas armadillo city Benutzerhandbuch
-
