SICK KTS/KTX Prime Quickstart
- Kategorie
- Komfortbeleuchtung
- Typ
- Quickstart

SICK AG
Erwin-Sick-Straße 1
D-79183 Waldkirch
www.sick.com
8020411.ZW66 /06. 07.2018
Quickstart
KTS / KTX Prime
en
These instructions are only valid in connection with the (8020695, 8020708)
operating instructions. You can nd the operating instructions under www.sick.
com.
a The KTS / KTX- sensor is equipped with LEDs. The sensor meets the criteria of risk group 1
according to IEC 62471:2006. No special measures are required (e.g. eye protection).
de
Diese Anleitung ist ausschließlich in Verbindung mit der Betriebsanleitung
(8020694, 8020707) gültig. Die Betriebsanleitung nden Sie unter www.sick.
com.
a Der KTS / KTX-Sensor ist mit LEDs ausgestattet. Der Sensor entspricht der Risikogruppe 1
gemäß IEC 62471:2006. Es müssen keine besonderen Maßnahmen (z. B. zum Schutz der
Augen) vorgenommen werden.
it
Le presenti istruzioni sono valide solo in abbinamento alle istruzioni per l‘uso
(8020695, 8020708). Le istruzioni per l‘uso sono a disposizione su www.sick.
com.
a Il sensore KTS / KTX- è dotato di LED. Il sensore corrisponde al gruppo di rischio 1 secondo
IEC 62471:2006. Non devono essere adottate misure speciali (ad es. per protezione degli
occhi).
fr
Cette notice n‘est valable qu‘avec la notice d‘instruction (8020695, 8020708).
Elle est disponible sur le site Internet www.sick.com.
a Le capteur KTS / KTX- est doté de LED. Il correspond au groupe à risque 1 selon la norme
CEI 62471:2006. Aucune mesure particulière (comme la protection des yeux) ne doit être
prise.
es
Estas instrucciones solo son válidas junto con las instrucciones de uso
(8020695, 8020708). Puede encontrar las instrucciones de uso en www.mysick.
com.
a El sensor KTS / KTX- está equipado con indicadores LED. Este sensor se incluye en el
grupo de riesgo 1 según IEC 62471:2006. No es necesario adoptar ningún tipo de medida
especial (p. ej., para proteger los ojos).
zh
本说明书仅在结合使用 (8020695, 8020708) 操作指南情况下有效。查看操作
指南可访问 www.sick.com 网页。
a
KTS / KTX- 传感器配有 LED。此传感器符合风险组 1(依据 IEC
62471:2006)。不必采取特别措施(例如为保护眼睛)。
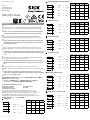
1 Electrical connection (A - G)
Elektrischer Anschluss Conexión eléctrica
Collegamento elettrico
电气连接
Raccordement électrique
The sensors must be connected in a voltage-free state (VS = 0 V).
Der Anschluss der Sensoren muss spannungsfrei (UV = 0 V) erfolgen.
Il collegamento dei sensori deve avvenire in assenza di tensione (UV = 0 V).
Le raccordement des capteurs doit s‘eectuer hors tension (UV = 0 V).
Il collegamento dei sensori deve avvenire in assenza di tensione (UV = 0 V).
必须在无电压状态 (UV = 0 V) 连接传感器。
A Standard 4-Pin
brown
1
-
L+
white
2
-
Q/IN
3
blue
-M
4
-Q
black
2-P 1-P dyn. AUTO
L+ L+ L+ L+
nF F / C L / D F / C
M M M M
Q Q Q Q
1
2
3
4
brn
wht
blu
blk
B Standard 5-Pin, High Precision, High Sensitivity
2-P 1-P dyn. AUTO
L+ L+ L+ L+
nF F / C L / D F / C
M M M M
Q Q Q Q
ET ET ET L / D
1
2
3
4
brn
wht
blu
blk
5
gra
brown
1
-
L+
whit
e
2
-
Q/IN1
blue
3
-M
black
4
-Q
5
- IN2
gray
C Analog Output I (4-Pin)
2-P 1-P dyn. AUTO
L+ L+ L+ L+
Q
A
I Q
A
I Q
A
I Q
A
I
M M M M
Q Q Q Q
1
2
3
4
brn
wht
blu
blk
brown
-L+
1
whit
e
-
2
Q
A
l
blue
- M
3
black
4
- Q
D Analog Output U (4-Pin)
2-P 1-P dyn. AUTO
L+ L+ L+ L+
Q
A
U Q
A
U Q
A
U Q
A
U
M M M M
Q Q Q Q
1
2
3
4
brn
wht
blu
blk
brown
L+-
1
blue
- M
3
black
4
-Q
whit
e
-
2
Q
A
U
E Analog Output U (5-Pin)
2-P 1-P dyn. AUTO
L+ L+ L+ L+
Q
A
U Q
A
U Q
A
U Q
A
U
M M M M
Q Q Q Q
ET ET ET L / D
1
2
3
4
brn
wht
blu
blk
5
gra
F Analog Input and Output (5-Pin)
2-P 1-P dyn. AUTO
L+ L+ L+ L+
Q
A
U Q
A
U Q
A
U Q
A
U
M M M M
Q Q Q Q
IN
A
U IN
A
U IN
A
U IN
A
U
1
2
3
4
brn
wht
blu
blk
5
gra
-
L+
brown
1
-M
blue
3
-Q
4
black
-
5
gray
IN
A
U
-
white
2
Q
A
U
G IO-Link (Version 1.1), High Sensitivity
2-P 1-P dyn. AUTO
L+ L+ L+ L+
Q Q Q Q
M M M M
Q / C Q / C Q / C Q / C
ET ET ET L / D
1
2
3
4
brn
wht
blu
blk
5
gra
brown
1
-L+
whit
e
2
-
Q/IN1
blue
3
-M
black
4
-
Q/C
gray
5
- IN2
8020411.ZW66 /06.07.2018
-L+
brown
1
-M
blue
3
-Q
4
black
-IN
5
gray
-
whit
e
2
Q
A
U

KTS/KTX Prime | SICK
Process data structure (Process data length: 2 Byte)
No. Description Datatype
Bit 0 Switching Signal Q Boolean
Bit 1 Empty
Bit 2 Quality of Run Alarm Boolean
Bit 3 - 5 Emission Color Unsigned Integer (red = 0; green = 1;
blue = 2)
Bit 6 - 15 Measurement Value Emission Color Unsigned Integer
PWR
Q
PWR
Q
PWR
Q
Q
push-pull
(≤ 100 mA)
+ (L+)
Q
‒ (M)
+ (L+)
Q
‒ (M)
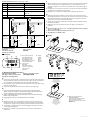
2 Control panel (H)
Bedienfeld Panel de control
Pannello di comando
操作面板
Panneau de commande
H Control panel
1 LEDs (status ind icators)
LEDs (Statusanzeigen)
LED (indicatori di stato)
LED (achages d‘état)
LED (indicadores de estado)
LEDs (Statusanzeigen)
2 Display
Display
Display
Écran
Pantalla
Display
3 Control panel
Bedienfeld
Pannello di comando
Panneau de commande
Panel de control
Bedienfeld
THR
ESC
PRO
TCH
PWR
Q
121
3
3 Mounting and alignment aid (I)
Montage und Ausrichthilfe Montaje y ayuda de alineación
Montaggio e ausilio di allineamento
安装和辅助校准装置
Montage et outil d‘alignement
en
1 Install sensor and xing hole so that the light spot enters the mark horizontally
and horizontal and vertical movements of the test object can be compensated
for to the highest possible degree. Note sensing range while doing so.
2 Compensate for the vertical and horizontal movements of the test object using
marks of suitable lengths.
3 Ensure that any sensor movement does not aect the sensing range.
de
1 Sensor über Befestigungsbohrung so einbauen, dass Lichteck längs in
Markierung eintritt und Seiten- und Höhenbewegungen des Prüfobjekts best-
möglich ausgeglichen werden. Dabei Tastweite beachten.
2 Seiten- und Höhenbewegungen des Prüfobjektes durch entsprechend lange
Markierungen ausgleichen.
3 Bewegung des Sensors mit Tastweiteneinuss ausschließen.
it
1 Montare il sensore nel foro di ssaggio in modo che il punto luminoso longi-
tudinalmente entri nella marcatura e che i movimenti laterali e verticali siano
compensati nel migliore modo possibile. Attenersi alla distanza di rilevamento.
2 Compensare i movimenti laterali e verticali dell‘oggetto di verica con marca-
ture di lunghezza adeguata.
3 Escludere un possibile movimento del sensore con eetto sulla distanza di
rilevamento.
fr
1 Monter le capteur sur le trou de xation de sorte que le spot lumineux pénètre
dans le repère dans le sens longitudinal et que la compensation des mou-
vements en longueur et en hauteur soit optimale. Tenir compte de la plage de
balayage.
2 Compenser les mouvements en hauteur et en longueur de l‘objet de détection
en procédant aux repérages correspondants.
3 Empêcher tout mouvement du capteur avec le régulateur de détection.
es
1 Sirviéndose del oricio de jación, monte el sensor de tal modo que el spot
incida longitudinalmente en la marca y así compensar de la forma más optima
los movimientos laterales y verticales del objeto de comprobación. Para ello,
debe tenerse en cuenta el alcance de detección.
2 Compense los movimientos laterales y verticales del objeto mediante marcas
de longitud apropiada.
3 Asegúrese de que el movimiento del sensor no inuye en el alcance de
detección.
zh
1 通过安装孔安装传感器,使光点顺沿进入标记,并且检查物体在侧向和高度方向的移动尽可能最佳地
获得补偿。在此注意检测距离。
2 通过适当长度的标记对检查物体在侧向和高度方向的移动进行补偿。
3 确保传感器的移动不会对检测距离产生影响。
I Mounting
1
THR
PRO
TCH
PWR
Q
1 Material processing direction
Laufrichtung Material
Direzione di avanzamento materiale
Sens de marche du matériel
Dirección de movimiento del material
物料运行方向

8020411.ZW66 / 06.07.2018
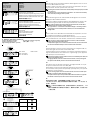
en
Other settings such as the switching threshold, PIN conguration tool, etc. can be
set on the THR and PRO menu level.
2P teach is preset at the factory. Other teach options are described in the opera-
ting instructions: 1P teach, dynamic teach, auto mode.
Ifnosettingsaremadeonthesensorfor5minutes,Standbymode(displayo)isactivated
to save electricity.
Thesettingsmade-andnotconrmedviatheSETbutton-arenotsaved.Toendstandby
mode, one of the operating keys must be pushed.
de
Weitere Einstellungen wie z. B. Schaltschwelle, PIN-Konguration etc. sind über
Menüebene THR und PRO einzustellen.
2P-Teach ist ab Werk voreingestellt. Weitere Teach-Mögklichkeiten werden in der
Betriebsanleitung beschrieben: 1P-Teach, Dynamischer Teach, Auto-Modus.
Wenn am Sensor 5 Minuten lang keine Einstellungen gemacht werden, wird der Stand-
by-Modus (Display aus) aktiviert, um Strom zu sparen.
Die vorgenommenen – und nicht über die SET-Taste bestätigten – Einstellungen werden
nicht gespeichert. Um den Standby-Modus zu beenden, muss eine der Bedientasten
betätigt werden.
it
Tramite il livello menu THR e PRO sono selezionabili altre impostazioni, come ad
es. la soglia di commutazione, la congurazione PIN, ecc.
2P-Teach è preimpostato dalla fabbrica. Nelle istruzioni per l‘uso sono descritte
altre possibilità di teach, come 1P-Teach, teach dinamico, modalità automatica.
Se per 5 minuti non vengono eseguite impostazioni nel sensore, si attiva la modalità
standby(displayo)perrisparmiarecorrente.
Le impostazioni eseguite, ma non confermate tramite il tasto SET, non sono memorizzate.
Per uscire dalla modalità standby deve essere azionato un tasto di comando.
fr
D‘autres paramètres, tels que le seuil de commutation, la conguration PIN, etc.,
doivent être réglés via les niveaux de menu THR et PRO.
L‘apprentissage 2 points est préréglé en usine. D‘autres possibilités d‘apprentis-
sage sont décrites dans la notice d‘instruction : apprentissage 1 point, apprentis-
sage dynamique, mode automatique.
En l‘absence de réglage du capteur pendant 5 minutes, le mode Standby (écran éteint) est
activé pour économiser du courant.
Lesréglageseectués,maisnonconrmésaveclatoucheSET,nesontpasenregistrés.
Pour quitter le mode Standby, actionner l‘une des touches de commande.
es
Otros ajustes como el umbral de conmutación, la conguración PIN, etc. se pue-
den ajustar a través del nivel de menú THR y PRO.
El aprendizaje de 2 puntos está preajustado de fábrica. En las instrucciones de
uso se describen otras opciones de aprendizaje: aprendizaje de 1 punto, aprendi-
zaje dinámico y modo automático.
Si no se hace ningún ajuste en el sensor durante 5 minutos, se activa el modo de espera
(standby) y la pantalla se apaga para ahorrar energía.
LosajustesrealizadosquenosehayanconrmadomediantelateclaSETnoseguardan.
Paranalizarelmododeespera,debeaccionarseunadelasteclasdemando.
zh
其他设置如开关阈值、引脚配置等通过菜单层 THR 和 PRO 调整。
2 点示教为出厂预设。其他示教选项在操作指南中有所描述:如 1 点示教、动
态示教、自动模式。
如果 5 分钟未对传感器进行设置,则会激活待机模式(显示器关闭),以节
省用电。
未通过设置键确认的所做设置不会被保存。要结束待机模式,必须按下其中
一个操作按键。
Display values
Anzeigewerte
Valore visualizzato
Valeursd›achage
Valores indicados
显示值
Meaning
Bedeutung
Signicato
Signication
Signicado
含义
THR
PRO
TCH
PWR
Q
Sensing range set too close / too far away
Tastweite zu nah / weit eingestellt
Distanza di rilevamento impostata troppo vicina / lontana
Réglage trop proche / éloigné de la distance de détection
Alcance de detección ajustado demasiado cerca / lejos
检测距离设置得过近 / 远
THR
PRO
TCH
PWR
Q
Sensing range moderatev
Tastweite mittelmäßig eingestellt
Distanza di rilevamento impostata a livello medio
Réglage médiocre de la distance de détection
Alcance de detección ajustado en un nivel normal
检测距离设置得中等
THR
PRO
TCH
PWR
Q
Nominal sensing range
Nenntastweite
Distanza di rilevamento nominale
Distance nominale de détection
Alcance nominal de detección
标称检测距离
4 Teach-in (standard: 2-point) (J)
Teach-In (Standard: 2-Punkt) Aprendizaje (estándar: 2 puntos)
Teach-in (standard: 2 punti)
示教(默认:2 点)
Apprentissage (standard : 2 points)
J
TCH = Teach
THR = Threshold
PRO = Pro Menue
PWR = Power
61 - 100
31 - 60
1 - 30
Quality of Teach*
THR
PRO
TCH
PWR
Q
THR
PRO
TCH
PWR
Q
SET
THR
PRO
TCH
PWR
Q
SET
THR
PRO
TCH
PWR
Q
THR
PRO
TCH
PWR
Q
THR
PRO
TCH
PWR
Q
THR
PRO
TCH
PWR
Q
THR
PRO
TCH
PWR
Q
SET
SET
SET
Quality of Teach*
Run
3 s

KTS/KTX Prime | SICK
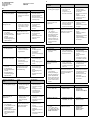
5 Fault diagnosis
Fehlerdiagnose Diagnóstico de fallos
Diagnostica errori
故障诊断
Diagnostic
en
Display, error situation Cause Measure
– “Err” ashes
– Q-LED (yellow) ashes
– Short-circuit message /
Overcurrent message
– Sensor is not connected
properly
– Disconnect sensor from
the power network
– Check pin assignment
– Reconnect sensor
– Check the current at the
switching output
No change to the display for
the alignment aid.
– Distance between the
sensor and the reector
is too large or too small
– Light emission (optics)
is dirty
– Clean sensor
– Check application
conditions
– Restart adjustment
process
After the teach process:
– “Err” ashes
– Q-LED (yellow) and
TCH-LED (yellow) ash
(quickly)
– No signal change at
the switching output for
object detection
Programmed contrast or
contrast dierence is not
sucient for stable contrast
detection
– Clean sensor
– Readjust sensor
– Check application
conditions
– Restart teach process
– Increase contrast
dierence
de
Anzeige, Fehlerbild Ursache Maßnahme
– „Err“ blinkt
– Q-LED (gelb) blinkt
– Kurzschlussmeldung /
Überstrommeldung
– Sensor ist nicht korrekt
angeschlossen
– Sensor vom Stromnetz
trennen
– Pin-Belegung prüfen
– Sensor erneut
anschließen
– Strom an Schaltausgang
prüfen
Keine Veränderung des Dis-
plays bei der Ausrichthilfe.
– Abstand zwischen
Sensor und Objekt ist zu
groß oder klein
– Lichtaustritt (Optik) ist
verschmutzt
– Sensor reinigen
– Einsatzbedingungen
prüfen
– Justage-Vorgang erneut
starten
Nach dem Teachvorgang:
– „Err“ blinkt
– Q-LED (gelb) und
TCH-LED (gelb) blinken
(schnell)
– kein Signalwechsel
am Schaltausgang bei
Objektdetektion
Eingelernter Kontrast bzw.
Kontrastunterschied reicht
nicht aus für eine stabile
Kontrasterkennung
– Sensor reinigen
– Sensor neu justieren
– Einsatzbedingungen
prüfen
– Teach-Vorgang erneut
starten
– Konstrastunterschied
erhöhen
it
Indicatore, schermata di
errore
Causa Provvedimento
– “Err” lampeggia
– Q-LED (giallo) lampeggia
– Messaggio di corto
circuito / messaggio di
sovraccarico
– Sensore non corretta-
mente collegato
– Scollegare il sensore
dalla rete elettrica
– Controllare l‘occupazi-
one pin
– Ricollegare il sensore
– Controllare la cor-
rente nell’uscita di
commutazione
Nessuna variazione del
display nell‘ausilio di
allineamento.
– Distanza tra sensore e
oggetto troppo piccola
o troppo grande
– Uscita luce (ottica)
sporca
– Pulire il sensore
– Controllare le condizioni
d‘impiego
– Riavviare il processo di
regolazione
Dopo il processo di teach:
– “Err” lampeggia
– Q-LED (giallo) e TCH-LED
(giallo) lampeggiano
(rapidamente)
– Nessun cambio di segnale
nell‘uscita di commuta-
zione al rilevamento di
oggetti
Contrasto appreso o dif-
ferenza di contrasto insuf-
ciente per rilevamento
stabile del contrasto
– Pulire il sensore
– Regolare di nuovo il
sensore
– Controllare le condizioni
d‘impiego
– Riavviare il processo di
teach
– Aumentare la dierenza
di contrasto
fr
Achage,représentation
de l›erreur
Cause Mesure
– « Err » clignote
– La LED Q (jaune) clignote
– Message relatif à un
court-circuit / une
surintensité
– Le capteur n‘est pas
raccordé correctement
– Isoler le capteur du
réseau électrique
– Contrôler l‘aectation
des broches
– Raccorder de nouveau le
capteur
– Vérier le courant au
niveau de la sortie de
commutation
Aucune modication
de l‘écran lors de l’outil
d’alignement.
– La distance entre le
capteur et l‘objet est trop
petite ou trop grande
– La sortie de lumière
(optique) est encrassée
– Nettoyer le capteur
– Vérier les conditions
d‘utilisation
– Redémarrer la procédure
de réglage
Après la procédure
d‘apprentissage
– « Err » clignote
– La LED Q (jaune) et la
LED TCH (jaune) cligno-
tent (rapidement)
– Aucun changement de
signal au niveau de la
sortie de commutation
lors de la détection
d‘objets
Le contraste appris ou la
diérence de contraste sont
insusants pour permettre
une détection stable
– Nettoyer le capteur
– Calibrer de nouveau le
capteur
– Vérier les conditions
d‘utilisation
– Redémarrer la procédure
d‘apprentissage
– Augmenter la diérence
de contraste
es
Indicador, imagen de error Causa Acción
– „Err“ ashes
– El LED Q (amarillo)
parpadea
– Indicación de cortocir-
cuito / sobrecorriente
– El sensor no está correc-
tamente conectado
– Desconectar el sensor
de la red eléctrica
– Comprobar la asignación
de pines
– Volver a conectar el
sensor
– Comprobar la corriente
en la salida conmutada
No hay cambios de la
pantalla en la ayuda de
alineación.
– La distancia entre el
sensor y el objeto es
insuciente o excesiva
– La salida de luz (óptica)
está sucia
– Limpiar el sensor
– Comprobar las condicio-
nes de aplicación
– Reiniciar el proceso de
ajuste
Después del proceso de
aprendizaje:
– “Err” parpadea
– El LED Q (amarillo) y el
LED TCH (amarillo) par-
padean (rápidamente)
– No hay cambio de señal
en la salida conmutada
durante la detección de
objetos
El contraste aprendido o la
diferencia de contraste no
es suciente para garantizar
la detección estable de
contraste
– Limpiar el sensor
– Volver a ajustar el sensor
– Comprobar las condicio-
nes de aplicación
– Reiniciar el proceso de
aprendizaje
– Aumentar la diferencia
de contraste
zh
指示灯,故障图 原因 措施
– “Err”闪烁
– Q-LED(黄色)闪烁
– 短路消息 / 过电流消息
– 传感器未正确连接
– 切断传感器电源
– 检查引脚分配
– 重新连接传感器
– 检查输出信号切换装置电流
校准辅助时显示器没有变化。 – 传感器和物体之间的距离过
大或过小
– 光射出装置(光学)脏污
– 清洁传感器
– 检查使用条件
– 重新启动调节流程
完成示教流程后:
– “Err”闪烁
– Q-LED(黄色)和TCH-
LED(黄色)闪烁(快速)
– 进行物体检测时输出信号切
换装置上没有信号切换
示教的对比度或对比度差不足以
实现稳定的对比度检测
– 清洁传感器
– 重新调节传感器
– 检查使用条件
– 重新启动示教流程
– 提高对比度差
-
 1
1
-
 2
2
-
 3
3
-
 4
4


SICK KTS/KTX Prime Quickstart
- Kategorie
- Komfortbeleuchtung
- Typ
- Quickstart
in anderen Sprachen
- français: SICK KTS/KTX Prime
- español: SICK KTS/KTX Prime
- italiano: SICK KTS/KTX Prime
Verwandte Papiere
-
SICK KTS/KTX Prime 1x PNP, 1x NPN Quickstart
-
-
-
-
-
-
-
-
-