Whirlpool MBI 640 S Bedienungsanleitung

Kategorie
Mikrowellen
Typ
Bedienungsanleitung

Dieses Handbuch ist auch geeignet für

1
MBI 600 MBI 610 MBI 640
MBI S00 MBI S10 MBI S40
2
INSTALLATION
PRIOR TO CONNECTING
Check that the voltage on the rating plate
corresponds to the voltage in your home.
AFTER CONNECTING
The oven can be operated only if the oven
door is fi rmly closed.
Do not remove the microwave inlet
protection plates located on the side of the
oven cavity wall. They prevent grease & food
particles from entering the microwave inlet
channels.
Ensure that the appliance is not damaged.
Check that the oven door closes fi rmly against
the door support and that the internal door
seal is not damaged. Empty the oven and clean
the interior with a soft, damp cloth.
Important!
A permanent connection requires the
installation of a separating device. The
separating device must have an omnipolar
contact opening of more than 3 mm including
LS switches, safety valves and relays. The
separating device must be connected directly
to the terminal.
The manufacturers are not liable for any
problems caused by the user’s failure to
observe these instructions.
In the case of a permanent connection, the
appliance should be installed by a qualifi ed
technician.
Ensure the oven cavity is empty before
mounting.
Do not operate this appliance if it has
a damaged mains cord or plug, if it is not
working properly, or if it has been damaged
or dropped. Do not immerse the mains cord
or plug in water. Keep the cord away from hot
surfaces. Electrical shock, fi re or other hazards
may result.
Follow the supplied separate mounting instructions
when installing the appliance.
The earthing of this appliance is compulsory.
The manufacturer will accept no responsibility
for injury to persons, animals or damage to
objects arising from the non-observance of this
requirement.
This product should not be mounted at a
height lower than 850 mm above fl oor level.
3
WARNING!
Only allow children to use the
oven with adult supervision after
adequate instructions have been
given so that the child is able to
use the oven in a safe way and
understands the hazards of improper use.
The appliance is not intended for use by young
children or infi rm persons without supervision.
Young children should be supervised to ensure
that they do not play with the appliance.
If your oven have a combination mode, children
should only use the oven under adult supervision
due to the temperatures generated.
IMPORTANT SAFETY INSTRUCTIONS
READ CAREFULLY AND KEEP FOR FUTURE REFERENCE
Do not heat, or use fl ammable materials
in or near the oven. Fumes can create a fi re
hazard or explosion.
Do not use corrosive chemicals or vapors in
this appliance. This type of oven is specifi cally
designed to heat or cook food. It is not
designed for industrial or laboratory use.
Do not use your microwave oven for drying
textiles, paper, spices, herbs, wood, fl owers,
fruit or other combustible materials. Fire could
result.
If material inside / outside the oven should
ignite, keep oven door closed and turn the
oven off . Disconnect the power cord or shut off
power at the fuse or circuit breaker panel.
Do not over-cook food. Fire could result.
Do not leave the oven unattended, especially
when using paper, plastic or other combustible
materials in the cooking process. Paper can
char or burn and some plastics can melt if used
when heating foods.
WARNING!
Do not use your microwave oven for heating
anything in airtight sealed
containers. The pressure increases
and may cause damage when
opening or may explode.
WARNING!
The door seals and the door seal areas must
be regularly inspected for damage. If these
areas are damaged the appliance should not be
operated until it has been repaired by a trained
service technician.
EGGS
Do not use your microwave
oven for cooking or reheating
whole eggs with or without
shell since they may explode
even after microwave heating has ended.
4
Remove wire twist-ties from paper or
plastic bags before placing bag in the
oven.
PRECAUTIONS
GENERAL
This appliance is designed for domestic use
only!
LIQUIDS
E.g. beverages or water in your
microwave oven, overheating
the liquid beyond boiling point
can occur without evidence
of bubbling. This could result in a sudden boil
over of the hot liquid.
To prevent this possibility the following steps
should be taken:
1. Avoid using straight-sided containers with
narrow necks.
2. Stir the liquid before placing the container
in the oven and let the teaspoon remain
in the container.
3. After heating, allow standing for a short
time, stirring again before carefully
removing the container from the oven.
The appliance should not be operated without
food in the oven when using microwaves.
Operation in this manner is likely to damage the
appliance.
If you practice operating the oven, put a
glass of water inside. The water will absorb the
microwave energy and the oven will not be
damaged.
DEEP-FRYING
Do not use your microwave
oven for deep-frying, because
the oil temperature cannot be
controlled.
Use hot pads or oven mitts to prevent burns,
when touching containers, oven parts, and pan
after cooking.
CAREFUL
Always refer to a microwave cookbook (not
included) for details. Especially, if cooking or
reheating food that contains alcohol.
After heating baby food or
liquids in a baby bottle or in
a baby food jar, always stir
and check the temperature
before serving. This will ensure that the heat
is evenly distributed and the risk of scalding
or burns can be avoided.
Ensure the Lid and the Teat is removed
before heating!
Do not use the cavity for any storage
purposes.
Do not remove the microwave inlet
protection plates located on the side of the
oven cavity wall. They prevent grease & food
particles from entering the microwave inlet
channels.
5
Do not place any utensils on the
Crisp-plate since it will quickly
become very hot and is likely to
cause damage to the utensil.
The Crisp-plate may be preheated
before use (max. 3 min). Always use the Crisp
function when preheating the crisp-plate.
COVER
The Cover is used to cover food during
cooking and reheating with
microwaves only and helps to
reduce spattering, retain food
moisture as well as reducing the
time needed.
Use the cover for two level reheating
Do not use together with the Grill or Crisp. Its
made of plastic and will melt.
GLASS TURNTABLE
Use the Glass turntable with
all cooking methods. It collects
the dripping juices and food
particles that otherwise would
stain and soil the interior of the oven.
* Place the Glass turntable on the turntable
support.
ACCESSORIES
GENERAL
There are a number of accessories available
on the market. Before you buy, ensure they are
suitable for microwave use.
When you put food and accessories in the
microwave oven, ensure that they do not come
in contact with the interior of the oven. This is
especially important with accessories made
of metal or metal parts.
If accessories containing metal comes in
contact with the oven interior, while the oven
is in operation, sparking can occur and the
oven could be damaged.
Always ensure that the turntable is able to
turn freely before starting the oven.
Ensure that the utensils you use are oven
proof and allow microwaves to pass through
them before cooking.
TURNTABLE SUPPORT
Use the turntable support under
the Glass turntable. Never put any
other utensils on the turntable
support.
* Fit the turntable support in the oven.
CRISP HANDLE
Use the supplied special Crisp
handle to remove the hot Crisp
plate from the oven.
Ensure that the utensils you use are oven
proof and allow microwaves to pass through
them before cooking.
WIRE RACK
Use the Wire rack to put food on to allow the
air to circulate properly around the food during
cooking. Cooking large dishes with
microwaves only gives best result
if dish is placed on the wire rack
(high position).
CRISP-PLATE
Place the food directly on the
Crisp-plate. Always use the Glass
turntable as support when using
the Crisp-plate.
BABY BOTTLE HOLDER
Use the Baby bottle Holder when heating
baby food in bottles that are too
tall to stand-alone in the oven.
Please see also, the chapter
”Precautions, for more
information about heating
baby food.
6
CLOCK
1. Press the Stop button (3 seconds) until the left-hand digit (hours) fl icker.
2. Press the +/- buttons to set the hours.
3. Press the Start button again. (The two right hand digits (minutes) fl icker).
4. Press the +/- buttons to set the minutes.
5. Press the Start button again.
The clock is set and in operation.
Note: When the appliance is fi rst plugged in or after a power failure, the display is blank. If the
clock is not set, the display will remain blank until the cooking time is set.
1
3
5
24
This automatic safety function is activated
one minute after the oven has returned to
stand by mode“.
PAUSE OR STOP COOKING
To pause cooking:
The cooking can be paused to check, turn or
stir the food by opening the door. The setting
will be maintained for 10 minutes.
To continue cooking:
Close the door and press the Start
button ONCE. The cooking is resumed
from where it was paused.
Pressing the Start button TWICE will increase
the time by 30 seconds.
If you don’t want to continue
cooking:
Remove the food, close the door and
press the STOP button
A beep will signal once a minute
for 10 minutes when the cooking is
nished. Press the STOP button or open the
door to cancel the signal.
Note: The oven will only hold the settings for
60 seconds if the door is opened and then
closed after the cooking is fi nished.
The door must be opened and closed e.g.
putting food into it, before the safety lock is
released. Else the display will show door“.
Keep the door open while setting
the Clock. This gives you 10 minutes
to complete the setting of the
Clock. Otherwise, each step must be
accomplished within 60 seconds.
START PROTECTION / CHILD LOCK
7
1. Press the +/- buttons to set the desired length of the timer.
2. Press the power button repeatedly to set the power to 0 W.
3. Press the Start button.
TIMER
Use this function when you need a
kitchen timer to measure exact time for
various purposes such as cooking eggs,
pasta or letting the dough rise before
baking etc.
An acoustic signal will be heard when the timer has fi nished to count down.
1. Press the +/- buttons to set the time.
2. Press the power button repeatedly to set the power.
3. Press the Start button.
COOK & REHEAT WITH MICROWAVES
Use this function for normal cooking
and reheating, such as vegetables, fi sh,
potatoes and meat.
Once the cooking process has been started:
The time can easily be increased in 30-second steps by pressing the Start button. Each press
increases the time with 30 seconds. You may also alter the time by pressing the +/- buttons to
increase or decrease the time.
Pressing the power button may also change the power level. The fi rst press will show you the
current power level. Press the power button repeatedly to change power level.
1
23
1
23
8
JET DEFROST
Use this function for defrosting Meat,
Fish & Poultry ONLY. For other foods
such as Bread & Fruit you should
follow the procedure for ”How to cook
and reheat with microwaves” and
choose 160 W when defrosting.
Jet Defrost should only be used if the
net weight is between 100 - 2000g.
1. Press the Jet Defrost button.
2. Press the + / - buttons to set the weight of
the food.
3. Press the Start button.
If the weight is lesser or greater than
recommended weight:
Follow the procedure for ”How to cook and
reheat with microwaves” and choose 160 W
when defrosting.
JET START
This function is used for quick
reheating of foods with a high water
content such as; clear soups, coff ee
or tea.
Press to automatically start with full microwave power level and the cooking time set to 30
seconds. Each additional press increases the time with 30 seconds. You may also alter the time by
pressing the +/- buttons to increase or decrease the time after the function has started.
Midway through the defrosting process the
oven stops and prompts you to TURN” food.
— Open the door.
Turn the food.
— Close the door and restart by pressing the
Jet Start button.
If the food is warmer than deep-freeze
temperature (-18°C), choose lower weight of
the food.
If the food is colder than deep-freeze
temperature (-18°C), choose higher weight of
the food.
Note: the oven continues automatically after
2 min if the food hasn’t been turned. The
defrosting time will be longer in this case.
1
2
3
9
GRILL
Use this function to quickly give a
pleasant brown surface to the food.
1. Press the Grill button.
2. Press the +/- buttons to set the time.
3. Press the Start button.
Do not leave the oven door open for long periods when the Grill is in operation, as this will cause
a drop in temperature.
Note:
Pressing the Grill button during cooking switches the Grill element on and off . The timer will
continue to count down when the Grill element is turned off .
IMPORTANT!
Ensure that the utensils used are heat resistant and ovenproof before grilling with them.
Do not use plastic utensils when grilling. They will melt. Items of wood or paper are not suitable either.
GRILL & MICROWAVES
1. Press the Grill button.
2. Press the Power button to set the microwave power.
3. Press the +/- buttons to set the time.
4. Press the Start button.
During operation you can switch the Grill element on/off by pressing the Grill button. The Max.
possible microwave power level when using the Grill is limited to a factory-preset level.
It is possible to switch the microwaves off by reducing the microwave power level to 0 W.
When 0 W is reached, the oven switches to Grill only mode.
Use this function to cook such foods
as Gratins, Lasagne, Poultry and Baked
potatoes.
1
23
1
2
34
10
CRISP
Use this function to reheat and cook
pizzas and other dough based foods. It
is also good for frying bacon and eggs,
sausages, hamburgers etc.
1. Press the Crisp button.
2. Press the +/- buttons to set the time.
3. Press the Start button.
The oven automatically works with Microwaves and Grill in order to heat the Crisp-plate. This way
the Crisp-plate will rapidly reach its working temperature and begin to brown and crisp the food.
It is not possible to change or switch, the Power level or Grill, on/off , when using the Crisp
function.
IMPORTANT!
Ensure that the Crisp-plate is correctly placed in the middle of the Glass turntable.
The oven and the crisp-plate become very hot when using this function.
Do not place the hot crisp-plate on any surface susceptible to heat.
Be careful, not to touch the ceiling beneath the Grill element.
Use oven mittens or the special Crisp handle supplied when removing the hot Crisp-plate.
Only use the supplied Crisp plate with this function. Other available Crisp plate on the market will
not give the correct result when using this function.
1
23
11
Do not use metal scouring pads
on the inside of the oven cavity.
They will scratch the surface.
Baby Bottle Holder
Cover
Crisp handle.
Wire rack.
CAREFUL CLEANING:
MAINTENANCE & CLEANING
Cleaning is the only maintenance normally
required. It must be carried out with the
microwave oven disconnected.
At regular intervals, especially if spillovers
have occurred, remove the turntable, the
turntable support and wipe the base of the
oven clean.
This oven is designed to operate with the
turntable in place.
Do not operate the microwave oven when the
turntable has been removed for cleaning.
Use a mild detergent, water and a soft cloth
to clean the interior surfaces, front and rear of
the door and the door opening.
Do not allow grease or food particles to build
up around the door.
For stubborn stains, boil a cup of water in the
oven for 2 or 3 minutes. Steam will soften the
marks.
Adding some lemon juice to a cup of water,
placing this on the turntable and boiling for
a few minutes can eliminate odors inside
the oven.
Abrasive cleansers, steel-wool pads, gritty
wash cloths, etc. can damage the control panel,
and the interior and exterior oven surfaces.
Use a sponge with a mild detergent or a paper
towel with spray glass cleaner. Apply spray glass
cleaner to a paper towel.
Do not spray directly on the oven.
The Crisp-plate should be cleaned in mild,
detergent water. Heavily soiled
areas can be cleaned with a
scouring sponge and a mild
cleanser.
Always let the crisp-plate cool off before
cleaning.
Do not immerse or rinse with water while the
crisp-plate is hot. Quick cooling may damage it.
Do not use steel-wool pads. This will scratch
the surface.
Failure to maintain the oven in a clean
condition could lead to deterioration of
the surface that could adversely aff ect the
life of the appliance and possibly result in a
hazardous situation.
DISHWASHER SAFE:
Turntable support.
Glass turntable.
12
Important:
If the mains cord needs replacing it should
be replaced by the original mains cord, which
is available via our service organization. The
mains cord may only be replaced by a trained
service technician.
TROUBLE SHOOTING GUIDE
If the oven does not work, do not make a
service call until you have made the following
checks:
* The Turntable and turntable support is in
place.
* The Plug is properly inserted in the wall
socket.
* The Door is properly closed.
* Check your Fuses and ensure that there is
power available.
* Check that the oven has ample ventilation.
* Wait for ten minutes and then try to operate
the oven once more.
* Open and then close the door before you try
again.
This is to avoid unnecessary calls for which
you will be charged.
When calling for Service, please give the serial
number and type number of the oven (see
Service label). Consult your warranty booklet
for further advice.
WARNING!
Service only to be carried out by a trained
service technician. It is hazardous
for anyone other than a trained
person to carry out any service or
repair operation, which involves
the removal of any cover, which
gives protection against exposure
to microwave energy.
Do not remove any cover.
ENVIRONMENTAL HINTS
The packing box may be fully recycled as
confi rmed by the recycling symbol. Follow
local disposal regulations. Keep
potentially hazardous packaging
(plastic bags, polystyrene etc.) out
of the reach of children.
This appliance is marked according to the
European directive 2002/96/EC on Waste
Electrical and Electronic Equipment (WEEE). By
ensuring this product is disposed of correctly,
you will help prevent potential negative
consequences for the environment and human
health, which could otherwise be caused by
inappropriate waste handling of this product.
The symbol on the product,
or on the documents
accompanying the product,
indicates that this appliance
may not be treated as household
waste. Instead it shall be
handed over to the applicable
collection point for the
recycling of electrical and
electronic equipment.
Disposal must be carried
out in accordance with local environmental
regulations for waste disposal.
For more detailed information about
treatment, recovery and recycling of this
product, please contact your local city offi ce,
your household waste disposal service or the
shop where you purchased the product.
Before scrapping, cut off the mains cord so
that the appliance cannot be connected to the
mains.
13
Level To be used for:
750 W Reheating of beverages, water, clear soups, coff ee, tea or other food with a high
water content. If the food contains egg or cream choose a lower power. Cooking
of vegetables, fi sh, meat etc.
500 W More careful cooking e.g. high protein sauces, cheese and egg dishes and to
nish cooking casseroles.
350 W Simmering stews.
160 W Defrosting. Softening butter, cheeses and ice cream.
0 W When using the Timer only.
CHOOSING POWER LEVEL
SPECIAL NOTE (Cooling)
When a function is fi nished, the oven carries
out a cooling procedure. During this time the
fan, turntable and light operate. This is normal.
After this procedure the oven switches off
automatically. The cooling procedure can be
interrupted without any harm to the oven by
opening the door.
TECHNICAL DATA
DATA FOR TEST AND HEATING PERFORMANCE
In accordance with IEC 60705.
The International Electrotechnical Commission, has developed a standard for comparative testing
of heating performance of diff erent microwave ovens. We recommend the following for this oven:
Test Amount Approx. time Power level Container
12.3.1 750 g 10 min 750 W Pyrex 3.227
12.3.2 475 g 5 ½ min 750 W Pyrex 3.827
12.3.3 900 g 15 min 750 W Pyrex 3.838
13.3 500 g 2 min 40 sec Jet Defrost
SUPPLY VOLTAGE 230 V/50 HZ
RATED POWER INPUT 1900 W
F
USE 10 A (UK 13 A)
MW
OUTPUT POWER 750 W
O
UTER DIMENSIONS (HXWXD) 348 X 595 X 300
I
NNER DIMENSIONS (HXWXD) 187 X 370 X 290
14
AUFSTELLUNG
VOR DEM ANSCHLIESSEN
Die Spannung auf dem Typenschild muss
der Spannungsversorgung in Ihrem Haus
entsprechen.
Nicht die Platten zum Schutz der Mikro-
wellenluftkanäle an der Seite der Wand-
vertiefung des Gerätes herausnehmen. Sie
verhindern, dass Fett und Speiseteilchen in die
Luftkanäle der Mikrowelle gelangen.
Vor der Montage muss der Garraum des
Geräts leer sein.
Das Gerät darf nicht beschädigt sein. Die
Gerätetür muss richtig schließen. Die Dichtung
an der Innenseite der Tür darf nicht beschädigt
sein. Alle Gegenstände aus dem Gerät entfer-
nen und die Innenfl ächen mit einem weichen,
feuchten Tuch reinigen.
Das Gerät nicht in Betrieb nehmen, wenn das
Stromkabel oder der Stecker beschädigt ist,
das Gerät nicht einwandfrei funktioniert oder
in irgendeiner Weise beschädigt wurde. Das
Stromkabel oder den Stecker nicht in Wasser
tauchen. Das Kabel von heißen Flächen fern
halten. Sonst können Stromschlag, Brand oder
sonstige Risiken die Folge sein.
Das Gerät muss in einer Höhe von minde-
stens 850 mm über dem Fußboden montiert
werden.
Die mitgelieferte separate Einbauanleitung
zum Aufbau des Geräts befolgen.
NACH DEM ANSCHLIESSEN
Das Gerät kann nur in Betrieb genommen
werden, wenn die Tür richtig (fest anliegend)
geschlossen ist.
Die Erdung dieses Geräts ist gesetzlich vorge-
schrieben. Der Hersteller übernimmt keinerlei
Haftung für Personen- oder Sachschäden, die
aus einer Nichteinhaltung dieser Vorschrift
resultieren.
Bei einem festen Anschluss sollte das Gerät
von einem qualifi zierten Techniker installiert
werden.
Wichtig!
Ein fester Anschluss erfordert den Einbau
eines Trennschalters. Der Trennschalter muss
über eine zweipolige Kontaktöff nung von
mindestens 3 mm verfügen und auch alle
LS-Schalter, Sicherheitsventile und Relais vom
Netz trennen. Der Trennschalter muss direkt an
das Endgerät angeschlossen werden.
Der Hersteller ist für Probleme, die sich aus
der Nichtbeachtung dieser Anweisungen
durch den Nutzer ergeben, nicht verant-
wortlich.
15
Das Gerät nicht unbeaufsichtigt lassen,
insbesondere dann, wenn beim Garen Papier,
Kunststoff oder andere brennbare Materialien
verwendet werden. Papier kann verkohlen
oder Feuer fangen. Einige Kunststoff e können
schmelzen, wenn sie zusammen mit den Spei-
sen erhitzt werden.
VORSICHT!
Speisen oder Flüssigkeiten im Mikrowellen-
gerät nicht in luftdicht verschlosse-
nen Behältern erhitzen. Der Druck
im Behälter nimmt zu. Das kann
beim Öff nen des Behälters zu
Verletzungen oder einer Explo-
sion führen.
VORSICHT!
Die Türdichtung und die schließenden Berei-
che müssen regelmäßig auf Beschädigungen
kontrolliert werden. Bei einer Beschädigung das
Gerät erst wieder in Betrieb nehmen, nachdem es
von einem qualifi zierten Kundendiensttechniker
repariert wurde.
VORSICHT!
Kinder dürfen das Mikrowellengerät nur unter
Aufsicht benutzen, und nur dann, wenn sie
ausreichend eingewiesen wurden und sich der
Gefahren eines unsachgemäßen
Gebrauchs bewusst sind.
Ohne zusätzliche Aufsicht darf
das Gerät nicht von kleinen
Kindern oder gebrechlichen
Personen benutzt werden. Es ist sicherzustellen,
dass Kinder bei Verwendung dieses Mikrowellen-
gerätes nicht mit dem Gerät spielen.
Wenn das Gerät einen Kombinationsmodus besitzt,
dürfen Kinder das Gerät wegen der entstehenden
hohen Temperaturen nur unter Aufsicht Erwachse-
ner benutzen.
WICHTIGE SICHERHEITSHINWEISE
DIE BEDIENUNGSANLEITUNG GRÜNDLICH DURCHLESEN UND ZUM SPÄTEREN NACHSCHLAGEN
AUFBEWAHREN.
Keine brennbaren Materialien im Gerät selbst
oder in seiner Nähe erhitzen oder verwenden.
Rauchentwicklung kann zu Brand oder Explo-
sion führen.
Keine ätzenden Chemikalien oder Dämpfe
in diesem Gerät verwenden. Dieser Gerätetyp
wurde speziell zum Aufwärmen oder Garen
von Speisen entwickelt. Er eignet sich nicht für
industrielle oder Laborzwecke.
Das Mikrowellengerät nicht zum Trocknen
von Textilien, Papier, Gewürzen, Kräutern, Holz,
Blumen, Früchten oder anderen brennbaren
Materialien verwenden. Es besteht Brandge-
fahr.
Wenn Material innerhalb oder außerhalb des
Garraums zu brennen anfängt, die Gerätetür
geschlossen halten und das Gerät ausschalten.
Den Netzstecker ziehen oder die Sicherung im
Schaltkasten herausdrehen.
Die Speisen nicht länger als nötig garen. Es
besteht Brandgefahr.
EIER
Das Mikrowellengerät nicht
zum Garen oder Aufwärmen
ganzer Eier mit oder ohne
Schale benutzen, da diese auch
nach Beenden des Gar- oder Aufwärmvorgangs
explodieren können.
16
VORSICHTSMASSNAHMEN
ALLGEMEINES
Das Gerät ist ausschließlich für die Verwendung
im Haushalt bestimmt!
Bei Nutzung der Mikrowellenfunktionen darf
das Gerät nur eingeschalten werden, wenn sich
Speisen im Garraum befi nden. Andernfalls kann
es zu Schäden am Gerät kommen.
Zum Vertrautmachen mit dem Gerät ein Glas
Wasser in den Garraum stellen. Das Wasser
absorbiert die Energie der Mikrowellen, sodass
das Gerät nicht beschädigt wird.
Den Garraum nicht als Ablage verwenden.
Nicht die Platten zum Schutz der Mikrowel-
lenluftkanäle an der Seite der Wandvertiefung
des Gerätes herausnehmen. Diese verhindern,
dass Fett und Speiseteilchen in die Luftkanäle
der Mikrowelle gelangen.
Alle Metallteile (z. B. Verschlüsse) von
Papier- oder Plastiktüten entfernen,
bevor die Tüten in den Garraum
gelegt werden.
FRITTIEREN
Das Mikrowellengerät darf
nicht zum Frittieren verwen-
det werden, da die Temperatur
des Frittieröls nicht reguliert werden kann.
Immer Topfl appen oder Ofenhandschuhe
verwenden, wenn nach dem Garen Behälter,
Geräteteile und Schalen angefasst werden. Es
besteht Verbrennungsgefahr.
FLÜSSIGKEITEN
Getränke oder Wasser bei-
spielsweise können in der
Mikrowelle über den Siede-
punkt hinaus erhitzt werden,
ohne dass es zu einer sichtbaren Blasenbildung
kommt. Die heiße Flüssigkeit kann plötzlich
überkochen.
Um dies zu vermeiden, folgende Vorsichtsmaß-
nahmen ergreifen:
1. Keine Gefäße mit geraden Seitenwänden
und engem Hals verwenden.
2. Bevor das Gefäß in den Garraum gestellt
wird, die Flüssigkeit umrühren und den
Teelöff el im Gefäß lassen.
3. Nach dem Erhitzen die Flüssigkeit kurz
stehen lassen, nochmals umrühren und
das Gefäß vorsichtig entnehmen.
ACHTUNG
Weitere Informationen nden Sie im Mikro-
wellenkochbuch (nicht im Lieferumfang ent-
halten). Dies gilt besonders für das Garen oder
Erhitzen von alkoholhaltigen Speisen.
Babynahrung in Gläsern oder
Getränke in Babyfl aschen
müssen nach dem Erwärmen
immer umgerührt und auf
die richtige Temperatur überprüft werden.
Dadurch wird eine gleichmäßige Wärmever-
teilung sichergestellt und das Risiko eines
Verbrühens oder Verbrennens vermieden.
Den Deckel bzw. Sauger unbedingt vor dem
Erwärmen abnehmen!
17
ZUBEHÖR
ALLGEMEINES
Eine Reihe von Zubehörteilen kann käufl ich
erworben werden. Vor dem Kauf prüfen, ob sie
für das Mikrowellengerät geeignet sind.
Nur hitzebeständiges und mikrowellengeeigne-
tes Kochgeschirr verwenden.
Speisen und Zubehör nur dann in das Mi-
krowellengerät stellen, wenn diese nicht mit
dessen Innenwänden in Berührung kommen.
Dies gilt vor allem für Zubehör aus Metall
oder mit Metallteilen.
Wenn solche Teile mit den Innenwänden des
Garraums in Berührung kommen, während
die Mikrowelle in Betrieb ist, können Funken
entstehen und das Gerät beschädigen.
Der Drehteller muss sich stets ungehindert
drehen können, bevor das Gerät eingeschaltet
wird.
Nur hitzebeständiges und mikrowellengeeig-
netes Kochgeschirr verwenden.
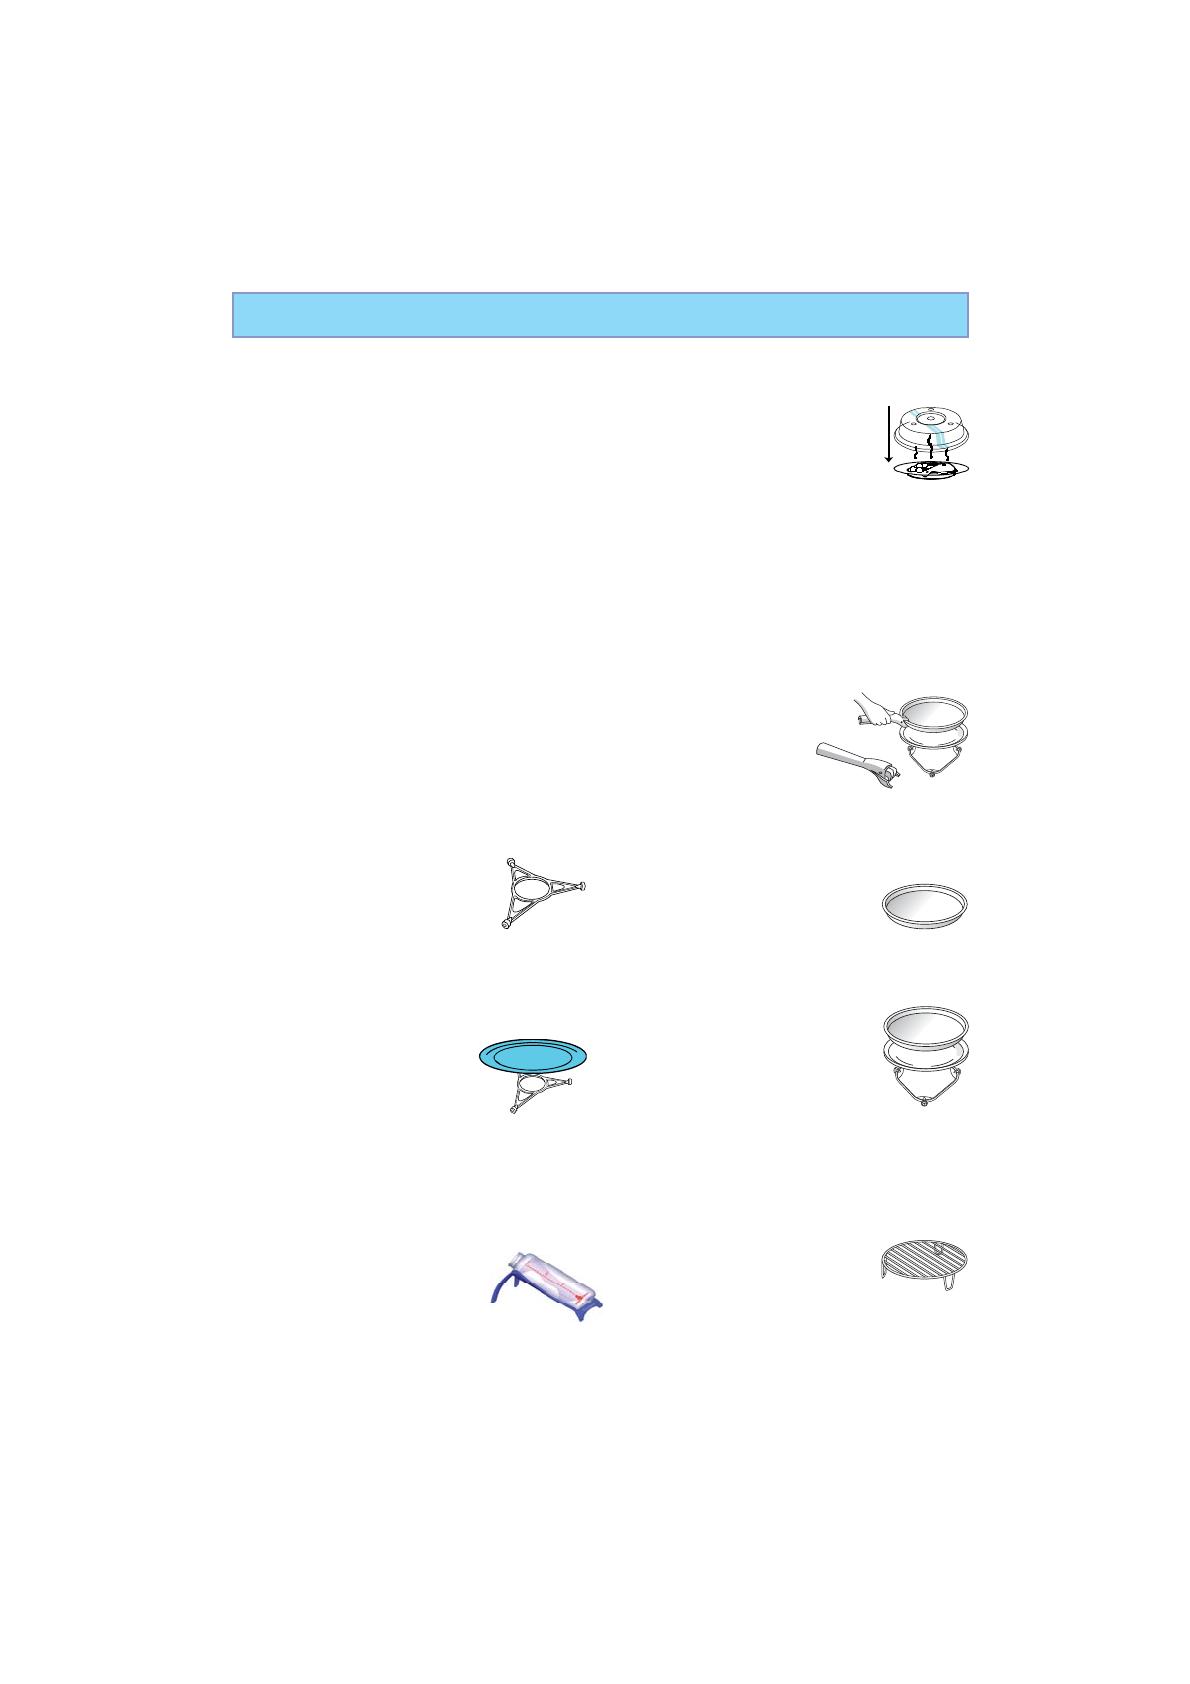
DREHTELLERAUFLAGE
Die Drehtelleraufl age muss
immer unter dem Glasdrehteller
eingesetzt werden. Keine anderen
Gegenstände auf die Drehtellerauf-
lage legen.
* Die Drehtelleraufl age in das Gerät einsetzen.
GLASDREHTELLER
Den Glasdrehteller bei allen Zubereitungs-
arten verwenden. Er fängt her-
untertropfende Flüssigkeit und
Speiseteilchen auf, sodass eine
unnötige Verschmutzung des
Innenraums vermieden wird.
* Den Glasdrehteller auf die Drehtelleraufl age
setzen.
FLÄSCHCHENHALTER
Der Fläschchenhalter dient zum Erwärmen
von Babynahrung in hohen
Flaschen, die nicht allein in der
Mikrowelle stehen bleiben. Im
Kapitel „Vorsichtsmaßnahmen“
nden Sie weitere Informationen zum Erwär-
men von Babynahrung.
ABDECKHAUBE
Die Abdeckhaube dient dazu, die Speisen
beim Garen und Aufwärmen
mit der Mikrowelle abzudecken,
vermindert Verschmutzungen des
Garraums sowie das Austrock-
nen der Speisen und verkürzt die
Garzeit.
Sie kann außerdem zum Aufwärmen auf zwei
Ebenen verwendet werden.
Die Abdeckhaube nicht zusammen mit dem
Grill oder der Crisp-Platte verwenden. Sie
besteht aus Kunststoff und kann schmelzen.
CRISP-GRIFF
Die heiße Crisp-Platte mit
dem speziellen Crisp-
Griff aus dem Gerät neh-
men. Dieser Griff gehört
zum Lieferumfang.
CRISP-PLATTE
Die Speisen direkt auf die Crisp-Platte legen.
Beim Gebrauch der Crisp-Platte stets den Glas-
drehteller als Untersatz benutzen.
Die Crisp-Platte darf nicht als
Unterlage für anderes Geschirr
oder andere Behälter verwendet werden, da sie
sehr schnell heiß wird und das Geschirr beschä-
digen könnte.
Die Crisp-Platte kann vor der
Verwendung vorgewärmt werden
(max. 3 Minuten). Zum Vorwärmen
der Platte immer die Crisp-Funktion
verwenden.
GRILLROST
Die Speisen auf den Grillrost legen, damit
die Luft beim Garen ungehindert um die
Speisen zirkulieren kann. Bei der
Zubereitung von großen Mengen
mit der Mikrowelle erhält man das
beste Ergebnis, wenn die Speise
auf den Grillrost (oben) gestellt wird.
18
1
3
5
24
STARTSCHUTZ/KINDERSICHERUNG
Diese automatische Sicherheitsfunktion
wird eine Minute nach der Rückkehr des Ge-
räts in den „Bereitschaftsmodus“ aktiviert.
Die Sicherheitsverriegelung wird erst dann
freigegeben, wenn die Tür geöff net und wieder
geschlossen wird, z. B. wenn Speisen in die
Mikrowelle gestellt werden. In anderen Fällen
zeigt das Display die Meldung „door“ (Tür).
UNTERBRECHUNG ODER ABBRUCH DES GARVORGANGS
Garvorgang unterbrechen:
Der Garvorgang kann durch Öff nen der Gerä-
tetür unterbrochen werden, um die Speisen
zu kontrollieren, zu wenden oder umzurühren.
Die Einstellungen werden 10 Minuten lang
beibehalten.
Garvorgang fortsetzen:
Die Tür schließen und die Starttaste
EINMAL drücken. Der Garvorgang wird
an der Stelle fortgesetzt, an der er
unterbrochen wurde.
Durch ZWEIMALIGES Drücken der Starttaste
wird die Garzeit um weitere 30 Sekunden
verlängert.
Garvorgang abbrechen:
Das Gericht herausnehmen, die Ge-
rätetür schließen und die Stopptaste
drücken.
Ein Piepton signalisiert, dass der
Garvorgang beendet ist. Er ertönt
nach Ablauf der Garzeit 10 Minuten lang
einmal pro Minute. Um den Piepton abzuschal-
ten, die Stopptaste drücken oder die Gerätetür
öff nen.
Hinweis: Wenn nach Ende des Garvorgangs
die Tür geöff net und wieder geschlossen wird,
behält das Gerät die Einstellungen nur 60
Sekunden lang bei.
UHR
Die Gerätetür beim Einstellen der
Uhr geöff net lassen. Dann bleiben 10
Minuten Zeit, um die Uhr einzustellen.
Andernfalls muss jeder Schritt innerhalb
von 60 Sekunden ausgeführt werden.
1. Die Stopptaste 3 Sekunden lang drücken, bis die linke Ziff er (für die Stunden) blinkt.
2. Mit den Tasten +/- die Stunden einstellen.
3. Die Starttaste erneut drücken (die beiden linken Ziff ern für die Minuten blinken).
4. Mit den Tasten +/- die Minuten einstellen.
5. Die Starttaste erneut drücken.
Die Uhr ist nun eingestellt und betriebsbereit.
Hinweis: Wenn das Gerät zum ersten Mal an das Stromnetz angeschlossen oder nach einem
Stromausfall eingeschaltet wird, bleibt das digitale Anzeigefeld dunkel. Wenn die Uhr nicht einge-
stellt wird, bleibt das digitale Anzeigefeld dunkel, bis die Zubereitungszeit eingestellt ist.
19
1
23
1
23
ZEITSCHALTUHR
Mit der Zeitschaltuhr kann z. B. die
genaue Zeit zum Kochen von Eiern
oder Nudeln oder zum Gehenlassen
von Teig eingestellt werden.
1. Mit den Tasten +/- die gewünschte Zubereitungszeit einstellen.
2. Die Leistungstaste (Power) mehrmals drücken, bis die Leistungsstufe 0 W eingestellt ist.
3. Die Starttaste drücken.
Nach Ablauf der eingestellten Zeit ertönt ein Signalton.
GAREN UND AUFWÄRMEN MIT DER MIKROWELLE
Diese Funktion dient zur normalen
Zubereitung und zum Aufwärmen von
Speisen wie Gemüse, Fisch, Kartoff eln
und Fleisch.
1. Mit den Tasten +/- die Garzeit einstellen.
2. Mehrmals die Leistungstaste drücken, um die Leistungsstufe einzustellen.
3. Die Starttaste drücken.
Während des Garvorgangs:
Die Garzeit kann einfach durch Drücken der Starttaste in 30-Sekunden-Schritten verlängert
werden. Mit jedem Tastendruck wird die Garzeit um 30 Sekunden verlängert. Die Garzeit lässt sich
auch durch durch Drücken der Tasten +/- verlängern oder verkürzen.
Mit der Leistungstaste kann auch die Leistungsstufe geändert werden. Bei der ersten Betätigung
wird die aktuelle Leistungsstufe angezeigt. Mehrmals die Leistungstaste drücken, um eine andere
Leistungsstufe zu wählen.
20
In der Mitte des Auftauvorgangshält das
Gerät an, und es erscheint die Meldung TURN
FOOD“ (Speise wenden).
– Tür öff nen.
– Speise wenden.
Tür schließen und Gerät durch Drücken der
Schnellstarttaste wieder in Betrieb nehmen.
1
2
3
JET DEFROST (SCHNELLAUFTAUEN)
Diese Funktion dient NUR zum Auftau-
en von Fleisch, Fisch und Gefl ügel. Für
andere Nahrungsmittel wie etwa Brot
und Obst entsprechend dem Kapitel
„Garen und Aufwärmen mit der Mikro-
welle“ verfahren und zum Auftauen die
Leistungsstufe 160 W wählen.
Die Schnellauftaufunktion ist nur für
Speisen mit einem Nettogewicht von
100 bis 2000 g vorgesehen.
1. Die Schnellauftautaste (Jet Defrost) drücken.
2. Mit den Tasten +/- das Nahrungsmittelge-
wicht einstellen.
3. Die Starttaste drücken.
Hinweis: Wenn die Speise nicht gewendet
wurde, setzt das Gerät nach 2 Minuten den
Auftauvorgang automatisch fort. Das Auftauen
dauert in diesem Fall länger.
Wenn das Gewicht nicht dem empfohlenen
Wert entspricht:
Zum Auftauen entsprechend dem Kapitel „Ga-
ren und Aufwärmen mit der Mikrowelle“ ver-
fahren und die Leistungsstufe 160 W wählen.
Wenn die Speisen wärmer als die Tiefkühl-
temperatur (-18 °C) sind, ein niedrigeres
Gewicht wählen.
Wenn die Speisen kälter als die Tiefkühl-
temperatur (-18 °C) sind, ein höheres Gewicht
wählen.
JET START (SCHNELLSTART)
Diese Funktion dient zum schnellen
Aufwärmen von Speisen mit einem
hohen Wassergehalt, z. B. klare Suppen,
Kaff ee oder Tee.
Die Starttaste drücken, um automatisch mit der vollen Mikrowellenleistung und einer Garzeit von
30 Sekunden zu beginnen. Mit jedem weiteren Drücken der Taste wird die Zeit um 30 Sekunden
verlängert. Die Garzeit lässt sich auch durch Drücken der Tasten +/- verlängern bzw. verkürzen,
wenn das Gerät bereits in Betrieb ist.
  • Page 1 1
  • Page 2 2
  • Page 3 3
  • Page 4 4
  • Page 5 5
  • Page 6 6
  • Page 7 7
  • Page 8 8
  • Page 9 9
  • Page 10 10
  • Page 11 11
  • Page 12 12
  • Page 13 13
  • Page 14 14
  • Page 15 15
  • Page 16 16
  • Page 17 17
  • Page 18 18
  • Page 19 19
  • Page 20 20
  • Page 21 21
  • Page 22 22
  • Page 23 23
  • Page 24 24
  • Page 25 25
  • Page 26 26
  • Page 27 27
  • Page 28 28
  • Page 29 29
  • Page 30 30
  • Page 31 31
  • Page 32 32
  • Page 33 33
  • Page 34 34
  • Page 35 35
  • Page 36 36
  • Page 37 37
  • Page 38 38
  • Page 39 39
  • Page 40 40
  • Page 41 41
  • Page 42 42
  • Page 43 43
  • Page 44 44
  • Page 45 45
  • Page 46 46
  • Page 47 47
  • Page 48 48
  • Page 49 49
  • Page 50 50
  • Page 51 51
  • Page 52 52

Whirlpool MBI 640 S Bedienungsanleitung

Kategorie
Mikrowellen
Typ
Bedienungsanleitung
Dieses Handbuch ist auch geeignet für